This article is more than one year old. Older articles may contain outdated content. Check that the information in the page has not become incorrect since its publication.
Developing on Kubernetes
How do you develop a Kubernetes app? That is, how do you write and test an app that is supposed to run on Kubernetes? This article focuses on the challenges, tools and methods you might want to be aware of to successfully write Kubernetes apps alone or in a team setting.
We’re assuming you are a developer, you have a favorite programming language, editor/IDE, and a testing framework available. The overarching goal is to introduce minimal changes to your current workflow when developing the app for Kubernetes. For example, if you’re a Node.js developer and are used to a hot-reload setup—that is, on save in your editor the running app gets automagically updated—then dealing with containers and container images, with container registries, Kubernetes deployments, triggers, and more can not only be overwhelming but really take all the fun out if it.
In the following, we’ll first discuss the overall development setup, then review tools of the trade, and last but not least do a hands-on walkthrough of three exemplary tools that allow for iterative, local app development against Kubernetes.
Where to run your cluster?
As a developer you want to think about where the Kubernetes cluster you’re developing against runs as well as where the development environment sits. Conceptually there are four development modes:
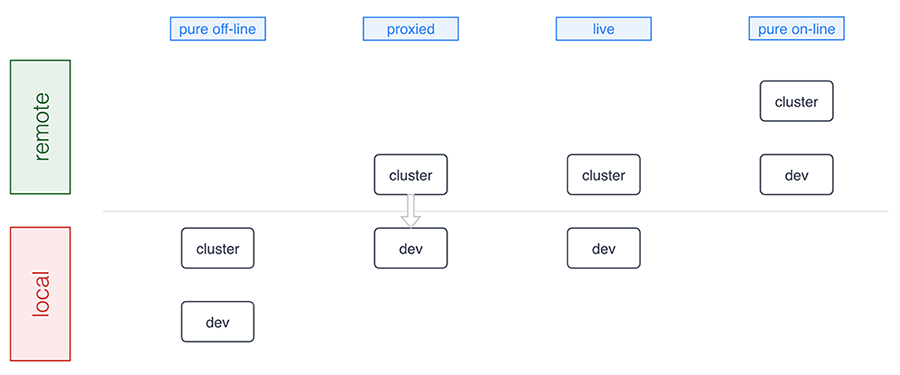
A number of tools support pure offline development including Minikube, Docker for Mac/Windows, Minishift, and the ones we discuss in detail below. Sometimes, for example, in a microservices setup where certain microservices already run in the cluster, a proxied setup (forwarding traffic into and from the cluster) is preferable and Telepresence is an example tool in this category. The live mode essentially means you’re building and/or deploying against a remote cluster and, finally, the pure online mode means both your development environment and the cluster are remote, as this is the case with, for example, Eclipse Che or Cloud 9. Let’s now have a closer look at the basics of offline development: running Kubernetes locally.
Minikube is a popular choice for those who prefer to run Kubernetes in a local VM. More recently Docker for Mac and Windows started shipping Kubernetes as an experimental package (in the “edge” channel). Some reasons why you may want to prefer using Minikube over the Docker desktop option are:
- You already have Minikube installed and running
- You prefer to wait until Docker ships a stable package
- You’re a Linux desktop user
- You are a Windows user who doesn’t have Windows 10 Pro with Hyper-V
Running a local cluster allows folks to work offline and that you don’t have to pay for using cloud resources. Cloud provider costs are often rather affordable and free tiers exists, however some folks prefer to avoid having to approve those costs with their manager as well as potentially incur unexpected costs, for example, when leaving cluster running over the weekend.
Some developers prefer to use a remote Kubernetes cluster, and this is usually to allow for larger compute and storage capacity and also enable collaborative workflows more easily. This means it’s easier for you to pull in a colleague to help with debugging or share access to an app in the team. Additionally, for some developers it can be critical to mirror production environment as closely as possible, especially when it comes down to external cloud services, say, proprietary databases, object stores, message queues, external load balancer, or mail delivery systems.
In summary, there are good reasons for you to develop against a local cluster as well as a remote one. It very much depends on in which phase you are: from early prototyping and/or developing alone to integrating a set of more stable microservices.
Now that you have a basic idea of the options around the runtime environment, let’s move on to how to iteratively develop and deploy your app.
The tools of the trade
We are now going to review tooling allowing you to develop apps on Kubernetes with the focus on having minimal impact on your existing workflow. We strive to provide an unbiased description including implications of using each of the tools in general terms.
Note that this is a tricky area since even for established technologies such as, for example, JSON vs YAML vs XML or REST vs gRPC vs SOAP a lot depends on your background, your preferences and organizational settings. It’s even harder to compare tooling in the Kubernetes ecosystem as things evolve very rapidly and new tools are announced almost on a weekly basis; during the preparation of this post alone, for example, Gitkube and Watchpod came out. To cover these new tools as well as related, existing tooling such as Weave Flux and OpenShift’s S2I we are planning a follow-up blog post to the one you’re reading.
Draft
Draft aims to help you get started deploying any app to Kubernetes. It is capable of applying heuristics as to what programming language your app is written in and generates a Dockerfile along with a Helm chart. It then runs the build for you and deploys resulting image to the target cluster via the Helm chart. It also allows user to setup port forwarding to localhost very easily.
Implications:
- User can customise the chart and Dockerfile templates however they like, or even create a custom pack (with Dockerfile, the chart and more) for future use
- It’s not very simple to guess how just any app is supposed to be built, in some cases user may need to tweak Dockerfile and the Helm chart that Draft generates
- With Draft version 0.12.0 or older, every time user wants to test a change, they need to wait for Draft to copy the code to the cluster, then run the build, push the image and release updated chart; this can timely, but it results in an image being for every single change made by the user (whether it was committed to git or not)
- As of Draft version 0.12.0, builds are executed locally
- User doesn’t have an option to choose something other than Helm for deployment
- It can watch local changes and trigger deployments, but this feature is not enabled by default
- It allows developer to use either local or remote Kubernetes cluster
- Deploying to production is up to the user, Draft authors recommend their other project – Brigade
- Can be used instead of Skaffold, and along the side of Squash
More info:
Skaffold
Skaffold is a tool that aims to provide portability for CI integrations with different build system, image registry and deployment tools. It is different from Draft, yet somewhat comparable. It has a basic capability for generating manifests, but it’s not a prominent feature. Skaffold is extendible and lets user pick tools for use in each of the steps in building and deploying their app.
Implications:
- Modular by design
- Works independently of CI vendor, user doesn’t need Docker or Kubernetes plugin
- Works without CI as such, i.e. from the developer’s laptop
- It can watch local changes and trigger deployments
- It allows developer to use either local or remote Kubernetes cluster
- It can be used to deploy to production, user can configure how exactly they prefer to do it and provide different kind of pipeline for each target environment
- Can be used instead of Draft, and along the side with most other tools
More info:
Squash
Squash consists of a debug server that is fully integrated with Kubernetes, and a IDE plugin. It allows you to insert breakpoints and do all the fun stuff you are used to doing when debugging an application using an IDE. It bridges IDE debugging experience with your Kubernetes cluster by allowing you to attach the debugger to a pod running in your Kubernetes cluster.
Implications:
- Can be used independently of other tools you chose
- Requires a privileged DaemonSet
- Integrates with popular IDEs
- Supports Go, Python, Node.js, Java and gdb
- User must ensure application binaries inside the container image are compiled with debug symbols
- Can be used in combination with any other tools described here
- It can be used with either local or remote Kubernetes cluster
More info:
Telepresence
Telepresence connects containers running on developer’s workstation with a remote Kubernetes cluster using a two-way proxy and emulates in-cluster environment as well as provides access to config maps and secrets. It aims to improve iteration time for container app development by eliminating the need for deploying app to the cluster and leverages local container to abstract network and filesystem interface in order to make it appear as if the app was running in the cluster.
Implications:
- It can be used independently of other tools you chose
- Using together with Squash is possible, although Squash would have to be used for pods in the cluster, while conventional/local debugger would need to be used for debugging local container that’s connected to the cluster via Telepresence
- Telepresence imposes some network latency
- It provides connectivity via a side-car process - sshuttle, which is based on SSH
- More intrusive dependency injection mode with LD_PRELOAD/DYLD_INSERT_LIBRARIES is also available
- It is most commonly used with a remote Kubernetes cluster, but can be used with a local one also
More info:
- Telepresence: fast, realistic local development for Kubernetes microservices
- Getting Started Guide
- How It Works
Ksync
Ksync synchronizes application code (and configuration) between your local machine and the container running in Kubernetes, akin to what oc rsync does in OpenShift. It aims to improve iteration time for app development by eliminating build and deployment steps.
Implications:
- It bypasses container image build and revision control
- Compiled language users have to run builds inside the pod (TBC)
- Two-way sync – remote files are copied to local directory
- Container is restarted each time remote filesystem is updated
- No security features – development only
- Utilizes Syncthing, a Go library for peer-to-peer sync
- Requires a privileged DaemonSet running in the cluster
- Node has to use Docker with overlayfs2 – no other CRI implementations are supported at the time of writing
More info:
- Getting Started Guide
- How It Works
- Katacoda scenario to try out ksync in your browser
- Syncthing Specification
Hands-on walkthroughs
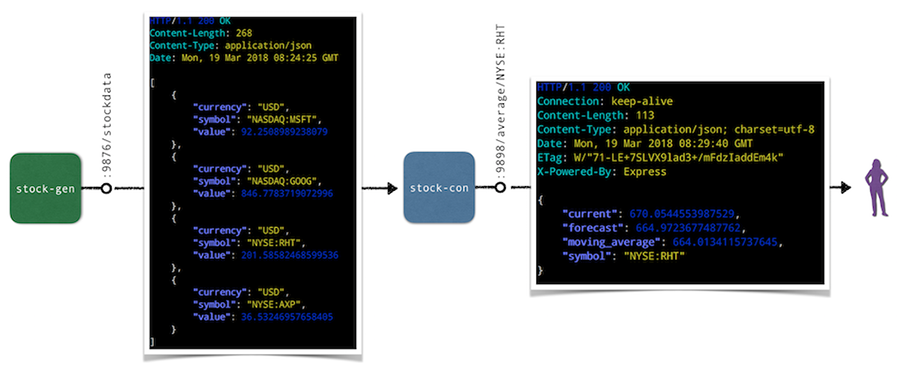
The app we will be using for the hands-on walkthroughs of the tools in the following is a simple stock market simulator, consisting of two microservices:
- The
stock-genmicroservice is written in Go and generates stock data randomly and exposes it via HTTP endpoint/stockdata. * A second microservice,stock-conis a Node.js app that consumes the stream of stock data fromstock-genand provides an aggregation in form of a moving average via the HTTP endpoint/average/$SYMBOLas well as a health-check endpoint at/healthz.
Overall, the default setup of the app looks as follows:
In the following we’ll do a hands-on walkthrough for a representative selection of tools discussed above: ksync, Minikube with local build, as well as Skaffold. For each of the tools we do the following:
- Set up the respective tool incl. preparations for the deployment and local consumption of the
stock-conmicroservice. - Perform a code update, that is, change the source code of the
/healthzendpoint in thestock-conmicroservice and observe the updates.
Note that for the target Kubernetes cluster we’ve been using Minikube locally, but you can also a remote cluster for ksync and Skaffold if you want to follow along.
Walkthrough: ksync
As a preparation, install ksync and then carry out the following steps to prepare the development setup:
$ mkdir -p $(pwd)/ksync
$ kubectl create namespace dok
$ ksync init -n dok
With the basic setup completed we're ready to tell ksync’s local client to watch a certain Kubernetes namespace and then we create a spec to define what we want to sync (the directory $(pwd)/ksync locally with /app in the container). Note that target pod is specified via the selector parameter:
$ ksync watch -n dok
$ ksync create -n dok --selector=app=stock-con $(pwd)/ksync /app
$ ksync get -n dok
Now we deploy the stock generator and the stock consumer microservice:
$ kubectl -n=dok apply \
      -f https://raw.githubusercontent.com/kubernauts/dok-example-us/master/stock-gen/app.yaml
$ kubectl -n=dok apply \
      -f https://raw.githubusercontent.com/kubernauts/dok-example-us/master/stock-con/app.yaml
Once both deployments are created and the pods are running, we forward the stock-con service for local consumption (in a separate terminal session):
$ kubectl get -n dok po --selector=app=stock-con  \
                     -o=custom-columns=:metadata.name --no-headers |  \
                     xargs -IPOD kubectl -n dok port-forward POD 9898:9898
With that we should be able to consume the stock-con service from our local machine; we do this by regularly checking the response of the healthz endpoint like so (in a separate terminal session):
$ watch curl localhost:9898/healthz
Now change the code in the ksync/stock-condirectory, for example update the /healthz endpoint code in service.js by adding a field to the JSON response and observe how the pod gets updated and the response of the curl localhost:9898/healthz command changes. Overall you should have something like the following in the end:

Walkthrough: Minikube with local build
For the following you will need to have Minikube up and running and we will leverage the Minikube-internal Docker daemon for building images, locally. As a preparation, do the following
$ git clone https://github.com/kubernauts/dok-example-us.git && cd dok-example-us
$ eval $(minikube docker-env)
$ kubectl create namespace dok
Now we deploy the stock generator and the stock consumer microservice:
$ kubectl -n=dok apply -f stock-gen/app.yaml
$ kubectl -n=dok apply -f stock-con/app.yaml
Once both deployments are created and the pods are running, we forward the stock-con service for local consumption (in a separate terminal session) and check the response of the healthz endpoint:
$ kubectl get -n dok po --selector=app=stock-con  \
                     -o=custom-columns=:metadata.name --no-headers |  \
                     xargs -IPOD kubectl -n dok port-forward POD 9898:9898 &
$ watch curl localhost:9898/healthz
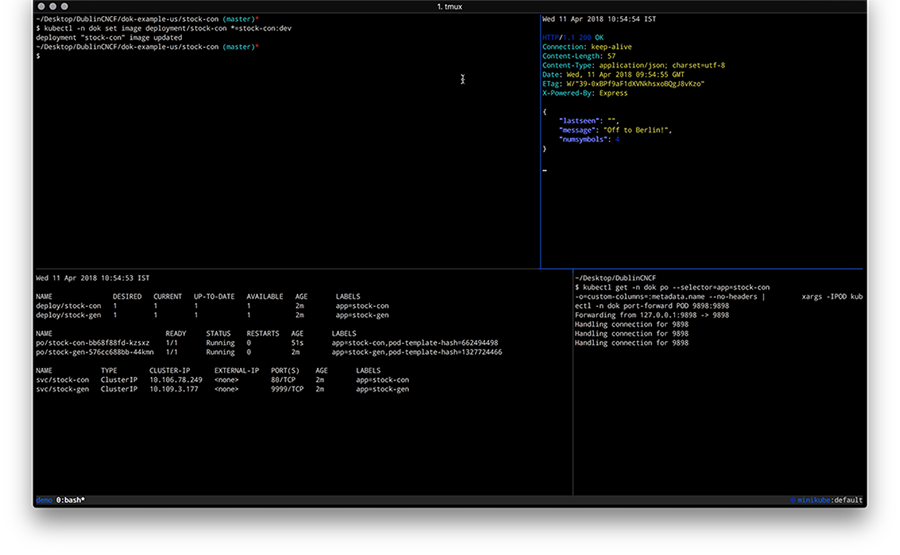
Now change the code in the stock-condirectory, for example, update the /healthz endpoint code in service.js by adding a field to the JSON response. Once you’re done with your code update, the last step is to build a new container image and kick off a new deployment like shown below:
$ docker build -t stock-con:dev -f Dockerfile .
$ kubectl -n dok set image deployment/stock-con *=stock-con:dev
Overall you should have something like the following in the end:
Walkthrough: Skaffold
To perform this walkthrough you first need to install Skaffold. Once that is done, you can do the following steps to prepare the development setup:
$ git clone https://github.com/kubernauts/dok-example-us.git && cd dok-example-us
$ kubectl create namespace dok
Now we deploy the stock generator (but not the stock consumer microservice, that is done via Skaffold):
$ kubectl -n=dok apply -f stock-gen/app.yaml
Note that initially we experienced an authentication error when doing skaffold dev and needed to apply a fix as described in Issue 322. Essentially it means changing the content of ~/.docker/config.json to:
{
   "auths": {}
}
Next, we had to patch stock-con/app.yaml slightly to make it work with Skaffold:
Add a namespace field to both the stock-con deployment and the service with the value of dok.
Change the image field of the container spec to quay.io/mhausenblas/stock-con since Skaffold manages the container image tag on the fly.
The resulting app.yaml file stock-con looks as follows:
apiVersion: apps/v1beta1
kind: Deployment
metadata:
  labels:
    app: stock-con
  name: stock-con
  namespace: dok
spec:
  replicas: 1
  template:
    metadata:
      labels:
        app: stock-con
    spec:
      containers:
      - name: stock-con
        image: quay.io/mhausenblas/stock-con
        env:
        - name: DOK_STOCKGEN_HOSTNAME
          value: stock-gen
        - name: DOK_STOCKGEN_PORT
          value: "9999"
        ports:
        - containerPort: 9898
          protocol: TCP
        livenessProbe:
          initialDelaySeconds: 2
          periodSeconds: 5
          httpGet:
            path: /healthz
            port: 9898
        readinessProbe:
          initialDelaySeconds: 2
          periodSeconds: 5
          httpGet:
            path: /healthz
            port: 9898
---
apiVersion: v1
kind: Service
metadata:
  labels:
    app: stock-con
  name: stock-con
  namespace: dok
spec:
  type: ClusterIP
  ports:
  - name: http
    port: 80
    protocol: TCP
    targetPort: 9898
  selector:
    app: stock-con
The final step before we can start development is to configure Skaffold. So, create a file skaffold.yaml in the stock-con/ directory with the following content:
apiVersion: skaffold/v1alpha2
kind: Config
build:
  artifacts:
  - imageName: quay.io/mhausenblas/stock-con
    workspace: .
    docker: {}
  local: {}
deploy:
  kubectl:
    manifests:
      - app.yaml
Now we’re ready to kick off the development. For that execute the following in the stock-con/ directory:
$ skaffold dev
Above command triggers a build of the stock-con image and then a deployment. Once the pod of the stock-con deployment is running, we again forward the stock-con service for local consumption (in a separate terminal session) and check the response of the healthz endpoint:
$ kubectl get -n dok po --selector=app=stock-con  \
                     -o=custom-columns=:metadata.name --no-headers |  \
                     xargs -IPOD kubectl -n dok port-forward POD 9898:9898 &
$ watch curl localhost:9898/healthz
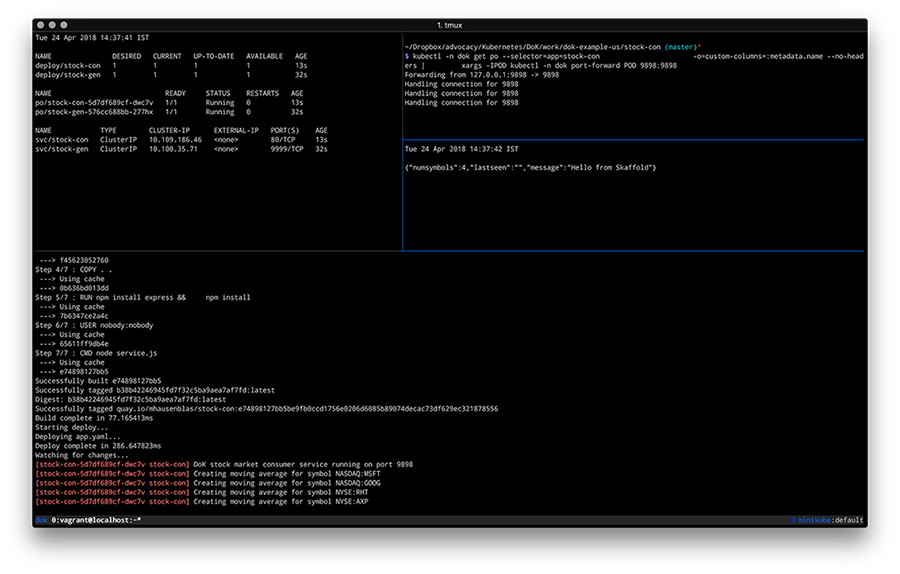
If you now change the code in the stock-condirectory, for example, by updating the /healthz endpoint code in service.js by adding a field to the JSON response, you should see Skaffold noticing the change and create a new image as well as deploy it. The resulting screen would look something like this:
By now you should have a feeling how different tools enable you to develop apps on Kubernetes and if you’re interested to learn more about tools and or methods, check out the following resources:
- Blog post by Shahidh K Muhammed on Draft vs Gitkube vs Helm vs Ksonnet vs Metaparticle vs Skaffold (03/2018)
- Blog post by Gergely Nemeth on Using Kubernetes for Local Development, with a focus on Skaffold (03/2018)
- Blog post by Richard Li on Locally developing Kubernetes services (without waiting for a deploy), with a focus on Telepresence
- Blog post by Abhishek Tiwari on Local Development Environment for Kubernetes using Minikube (09/2017)
- Blog post by Aymen El Amri on Using Kubernetes for Local Development — Minikube (08/2017)
- Blog post by Alexis Richardson on GitOps - Operations by Pull Request (08/2017)
- Slide deck GitOps: Drive operations through git, with a focus on Gitkube by Tirumarai Selvan (03/2018)
- Slide deck Developing apps on Kubernetes, a talk Michael Hausenblas gave at a CNCF Paris meetup (04/2018)
- YouTube videos:
- Raw responses to the Kubernetes Application Survey 2018 by SIG Apps
With that we wrap up this post on how to go about developing apps on Kubernetes, we hope you learned something and if you have feedback and/or want to point out a tool that you found useful, please let us know via Twitter: Ilya and Michael.