This article is more than one year old. Older articles may contain outdated content. Check that the information in the page has not become incorrect since its publication.
11 Ways (Not) to Get Hacked
Kubernetes security has come a long way since the project's inception, but still contains some gotchas. Starting with the control plane, building up through workload and network security, and finishing with a projection into the future of security, here is a list of handy tips to help harden your clusters and increase their resilience if compromised.
Part One: The Control Plane
The control plane is Kubernetes' brain. It has an overall view of every container and pod running on the cluster, can schedule new pods (which can include containers with root access to their parent node), and can read all the secrets stored in the cluster. This valuable cargo needs protecting from accidental leakage and malicious intent: when it's accessed, when it's at rest, and when it's being transported across the network.
1. TLS Everywhere
TLS should be enabled for every component that supports it to prevent traffic sniffing, verify the identity of the server, and (for mutual TLS) verify the identity of the client.
Note that some components and installation methods may enable local ports over HTTP and administrators should familiarize themselves with the settings of each component to identify potentially unsecured traffic.
This network diagram by Lucas Käldström demonstrates some of the places TLS should ideally be applied: between every component on the master, and between the Kubelet and API server. Kelsey Hightower's canonical Kubernetes The Hard Way provides detailed manual instructions, as does etcd's security model documentation.
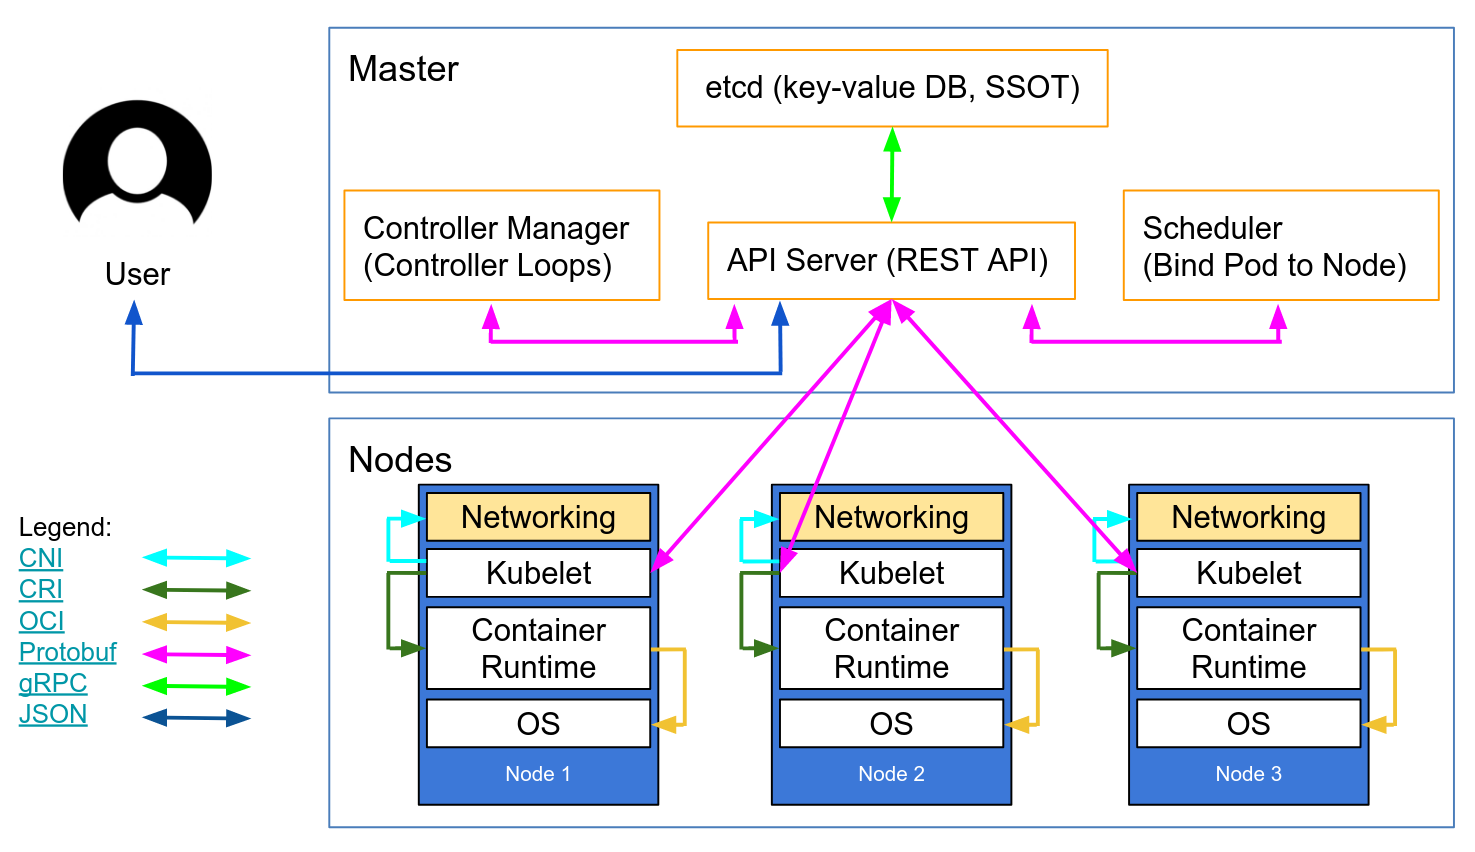
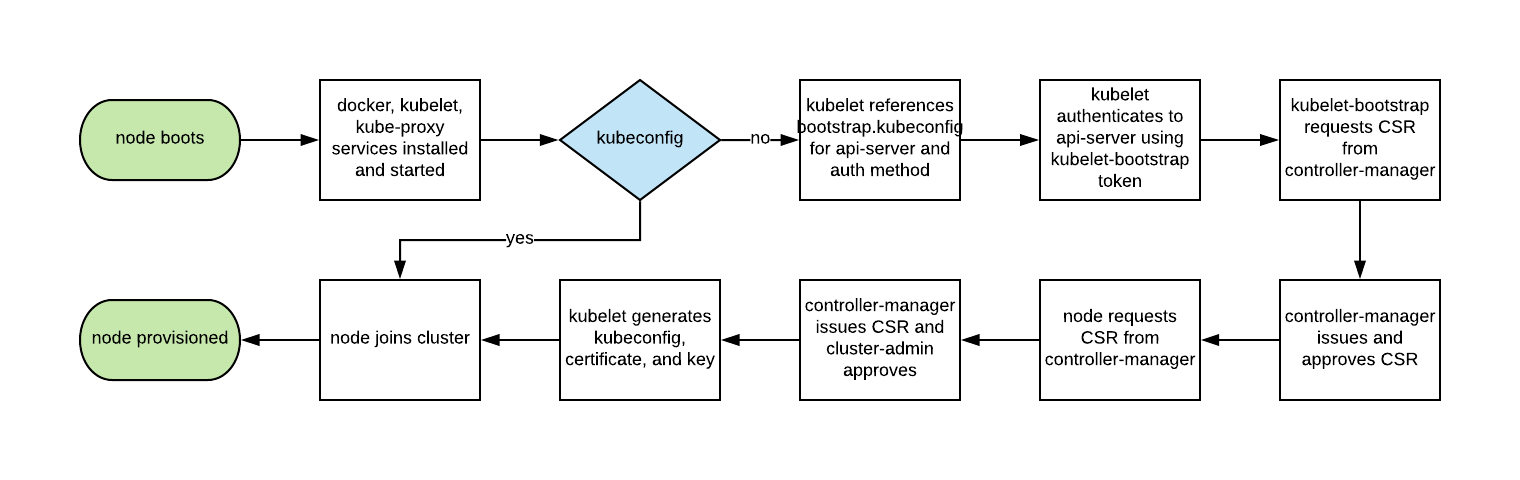
Autoscaling Kubernetes nodes was historically difficult, as each node requires a TLS key to connect to the master, and baking secrets into base images is not good practice. Kubelet TLS bootstrapping provides the ability for a new kubelet to create a certificate signing request so that certificates are generated at boot time.
2. Enable RBAC with Least Privilege, Disable ABAC, and Monitor Logs
Role-based access control provides fine-grained policy management for user access to resources, such as access to namespaces.
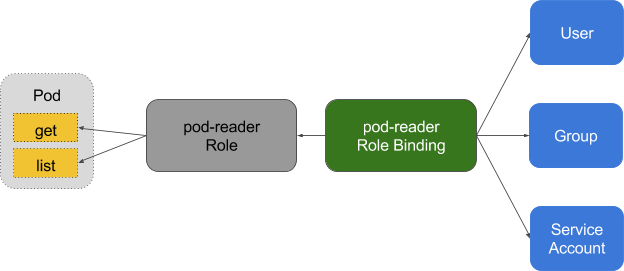
Kubernetes' ABAC (Attribute Based Access Control) has been superseded by RBAC since release 1.6, and should not be enabled on the API server. Use RBAC instead:
--authorization-mode=RBAC
Or use this flag to disable it in GKE:
--no-enable-legacy-authorization
There are plenty of good examples of RBAC policies for cluster services, as well as the docs. And it doesn't have to stop there - fine-grained RBAC policies can be extracted from audit logs with audit2rbac.
Incorrect or excessively permissive RBAC policies are a security threat in case of a compromised pod. Maintaining least privilege, and continuously reviewing and improving RBAC rules, should be considered part of the "technical debt hygiene" that teams build into their development lifecycle.
Audit Logging (beta in 1.10) provides customisable API logging at the payload (e.g. request and response), and also metadata levels. Log levels can be tuned to your organisation's security policy - GKE provides sane defaults to get you started.
For read requests such as get, list, and watch, only the request object is saved in the audit logs; the response object is not. For requests involving sensitive data such as Secret and ConfigMap, only the metadata is exported. For all other requests, both request and response objects are saved in audit logs.
Don't forget: keeping these logs inside the cluster is a security threat in case of compromise. These, like all other security-sensitive logs, should be transported outside the cluster to prevent tampering in the event of a breach.
3. Use Third Party Auth for API Server
Centralising authentication and authorisation across an organisation (aka Single Sign On) helps onboarding, offboarding, and consistent permissions for users.
Integrating Kubernetes with third party auth providers (like Google or GitHub) uses the remote platform's identity guarantees (backed up by things like 2FA) and prevents administrators having to reconfigure the Kubernetes API server to add or remove users.
Dex is an OpenID Connect Identity (OIDC) and OAuth 2.0 provider with pluggable connectors. Pusher takes this a stage further with some custom tooling, and there are some other helpers available with slightly different use cases.
4. Separate and Firewall your etcd Cluster
etcd stores information on state and secrets, and is a critical Kubernetes component - it should be protected differently from the rest of your cluster.
Write access to the API server's etcd is equivalent to gaining root on the entire cluster, and even read access can be used to escalate privileges fairly easily.
The Kubernetes scheduler will search etcd for pod definitions that do not have a node. It then sends the pods it finds to an available kubelet for scheduling. Validation for submitted pods is performed by the API server before it writes them to etcd, so malicious users writing directly to etcd can bypass many security mechanisms - e.g. PodSecurityPolicies.
etcd should be configured with peer and client TLS certificates, and deployed on dedicated nodes. To mitigate against private keys being stolen and used from worker nodes, the cluster can also be firewalled to the API server.
5. Rotate Encryption Keys
A security best practice is to regularly rotate encryption keys and certificates, in order to limit the "blast radius" of a key compromise.
Kubernetes will rotate some certificates automatically (notably, the kubelet client and server certs) by creating new CSRs as its existing credentials expire.
However, the symmetric encryption keys that the API server uses to encrypt etcd values are not automatically rotated - they must be rotated manually. Master access is required to do this, so managed services (such as GKE or AKS) abstract this problem from an operator.
Part Two: Workloads
With minimum viable security on the control plane the cluster is able to operate securely. But, like a ship carrying potentially dangerous cargo, the ship's containers must be protected to contain that cargo in the event of an unexpected accident or breach. The same is true for Kubernetes workloads (pods, deployments, jobs, sets, etc.) - they may be trusted at deployment time, but if they're internet-facing there's always a risk of later exploitation. Running workloads with minimal privileges and hardening their runtime configuration can help to mitigate this risk.
6. Use Linux Security Features and PodSecurityPolicies
The Linux kernel has a number of overlapping security extensions (capabilities, SELinux, AppArmor, seccomp-bpf) that can be configured to provide least privilege to applications.
Tools like bane can help to generate AppArmor profiles, and docker-slim for seccomp profiles, but beware - a comprehensive test suite it required to exercise all code paths in your application when verifying the side effects of applying these policies.
PodSecurityPolicies can be used to mandate the use of security extensions and other Kubernetes security directives. They provide a minimum contract that a pod must fulfil to be submitted to the API server - including security profiles, the privileged flag, and the sharing of host network, process, or IPC namespaces.
These directives are important, as they help to prevent containerised processes from escaping their isolation boundaries, and Tim Allclair's example PodSecurityPolicy is a comprehensive resource that you can customise to your use case.
7. Statically Analyse YAML
Where PodSecurityPolicies deny access to the API server, static analysis can also be used in the development workflow to model an organisation's compliance requirements or risk appetite.
Sensitive information should not be stored in pod-type YAML resource (deployments, pods, sets, etc.), and sensitive configmaps and secrets should be encrypted with tools such as vault (with CoreOS's operator), git-crypt, sealed secrets, or cloud provider KMS.
Static analysis of YAML configuration can be used to establish a baseline for runtime security. kubesec generates risk scores for resources:
{
  "score": -30,
  "scoring": {
    "critical": [{
      "selector": "containers[] .securityContext .privileged == true",
      "reason": "Privileged containers can allow almost completely unrestricted host access"
    }],
    "advise": [{
      "selector": "containers[] .securityContext .runAsNonRoot == true",
      "reason": "Force the running image to run as a non-root user to ensure least privilege"
    }, {
      "selector": "containers[] .securityContext .capabilities .drop",
      "reason": "Reducing kernel capabilities available to a container limits its attack surface",
      "href": "/docs/tasks/configure-pod-container/security-context/"
    }]
  }
}
And kubetest is a unit test framework for Kubernetes configurations:
#// vim: set ft=python:
def test_for_team_label():
    if spec["kind"] == "Deployment":
        labels = spec["spec"]["template"]["metadata"]["labels"]
        assert_contains(labels, "team", "should indicate which team owns the deployment")

test_for_team_label()
These tools "shift left" (moving checks and verification earlier in the development cycle). Security testing in the development phase gives users fast feedback about code and configuration that may be rejected by a later manual or automated check, and can reduce the friction of introducing more secure practices.
8. Run Containers as a Non-Root User
Containers that run as root frequently have far more permissions than their workload requires which, in case of compromise, could help an attacker further their attack.
Containers still rely on the traditional Unix security model (called discretionary access control or DAC) - everything is a file, and permissions are granted to users and groups.
User namespaces are not enabled in Kubernetes. This means that a container's user ID table maps to the host's user table, and running a process as the root user inside a container runs it as root on the host. Although we have layered security mechanisms to prevent container breakouts, running as root inside the container is still not recommended.
Many container images use the root user to run PID 1 - if that process is compromised, the attacker has root in the container, and any mis-configurations become much easier to exploit.
Bitnami has done a lot of work moving their container images to non-root users (especially as OpenShift requires this by default), which may ease a migration to non-root container images.
This PodSecurityPolicy snippet prevents running processes as root inside a container, and also escalation to root:
# Required to prevent escalations to root.
allowPrivilegeEscalation: false
runAsUser:
  # Require the container to run without root privileges.
  rule: 'MustRunAsNonRoot'
Non-root containers cannot bind to the privileged ports under 1024 (this is gated by the CAP_NET_BIND_SERVICE kernel capability), but services can be used to disguise this fact. In this example the fictional MyApp application is bound to port 8443 in its container, but the service exposes it on 443 by proxying the request to the targetPort:
kind: Service
apiVersion: v1
metadata:
  name: my-service
spec:
  selector:
    app: MyApp
  ports:
  - protocol: TCP
    port: 443
    targetPort: 8443
Having to run workloads as a non-root user is not going to change until user namespaces are usable, or the ongoing work to run containers without root lands in container runtimes.
9. Use Network Policies
By default, Kubernetes networking allows all pod to pod traffic; this can be restricted using a Network Policy .

Traditional services are restricted with firewalls, which use static IP and port ranges for each service. As these IPs very rarely change they have historically been used as a form of identity. Containers rarely have static IPs - they are built to fail fast, be rescheduled quickly, and use service discovery instead of static IP addresses. These properties mean that firewalls become much more difficult to configure and review.
As Kubernetes stores all its system state in etcd it can configure dynamic firewalling - if it is supported by the CNI networking plugin. Calico, Cilium, kube-router, Romana, and Weave Net all support network policy.
It should be noted that these policies fail-closed, so the absence of a podSelector here defaults to a wildcard:
apiVersion: networking.k8s.io/v1
kind: NetworkPolicy
metadata:
  name: default-deny
spec:
  podSelector:
Here's an example NetworkPolicy that denies all egress except UDP 53 (DNS), which also prevents inbound connections to your application. NetworkPolicies are stateful, so the replies to outbound requests still reach the application.
apiVersion: networking.k8s.io/v1
kind: NetworkPolicy
metadata:
  name: myapp-deny-external-egress
spec:
  podSelector:
    matchLabels:
      app: myapp
  policyTypes:
  - Egress
  egress:
  - ports:
    - port: 53
      protocol: UDP
  - to:
    - namespaceSelector: {}
Kubernetes network policies can not be applied to DNS names. This is because DNS can resolve round-robin to many IPs, or dynamically based on the calling IP, so network policies can be applied to a fixed IP or podSelector (for dynamic Kubernetes IPs) only.
Best practice is to start by denying all traffic for a namespace and incrementally add routes to allow an application to pass its acceptance test suite. This can become complex, so ControlPlane hacked together netassert - network security testing for DevSecOps workflows with highly parallelised nmap:
k8s: # used for Kubernetes pods
  deployment: # only deployments currently supported
    test-frontend: # pod name, defaults to `default` namespace
      test-microservice: 80  # `test-microservice` is the DNS name of the target service
      test-database: -80     # `test-frontend` should not be able to access test-database’s port 80
      169.254.169.254: -80, -443           # AWS metadata API
      metadata.google.internal: -80, -443  # GCP metadata API

    new-namespace:test-microservice:  # `new-namespace` is the namespace name
      test-database.new-namespace: 80 # longer DNS names can be used for other namespaces
      test-frontend.default: 80
      169.254.169.254: -80, -443           # AWS metadata API
      metadata.google.internal: -80, -443  # GCP metadata API
Cloud provider metadata APIs are a constant source of escalation (as the recent Shopify bug bounty demonstrates), so specific tests to confirm that the APIs are blocked on the container network helps to guard against accidental misconfiguration.
10. Scan Images and Run IDS
Web servers present an attack surface to the network they're attached to: scanning an image's installed files ensures the absence of known vulnerabilities that an attacker could exploit to gain remote access to the container. An IDS (Intrusion Detection System) detects them if they do.
Kubernetes permits pods into the cluster through a series of admission controller gates, which are applied to pods and other resources like deployments. These gates can validate each pod for admission or change its contents, and they now support backend webhooks.
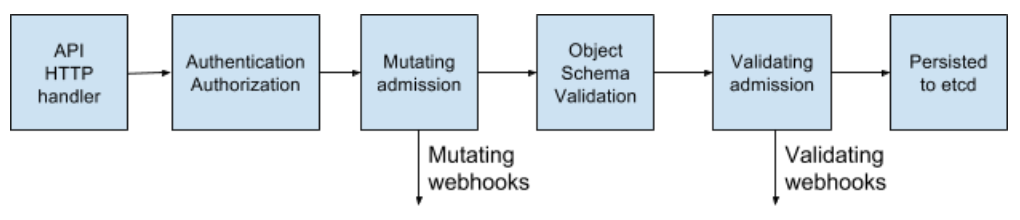
These webhooks can be used by container image scanning tools to validate images before they are deployed to the cluster. Images that have failed checks can be refused admission.
Scanning container images for known vulnerabilities can reduce the window of time that an attacker can exploit a disclosed CVE. Free tools such as CoreOS's Clair and Aqua's Micro Scanner should be used in a deployment pipeline to prevent the deployment of images with critical, exploitable vulnerabilities.
Tools such as Grafeas can store image metadata for constant compliance and vulnerability checks against a container's unique signature (a content addressable hash). This means that scanning a container image with that hash is the same as scanning the images deployed in production, and can be done continually without requiring access to production environments.
Unknown Zero Day vulnerabilities will always exist, and so intrusion detection tools such as Twistlock, Aqua, and Sysdig Secure should be deployed in Kubernetes. IDS detects unusual behaviours in a container and pauses or kills it - Sysdig's Falco is a an Open Source rules engine, and an entrypoint to this ecosystem.
Part Three: The Future
The next stage of security's "cloud native evolution" looks to be the service mesh, although adoption may take time - migration involves shifting complexity from applications to the mesh infrastructure, and organisations will be keen to understand best-practice.

11. Run a Service Mesh
A service mesh is a web of encrypted persistent connections, made between high performance "sidecar" proxy servers like Envoy and Linkerd. It adds traffic management, monitoring, and policy - all without microservice changes.
Offloading microservice security and networking code to a shared, battle tested set of libraries was already possible with Linkerd, and the introduction of Istio by Google, IBM, and Lyft, has added an alternative in this space. With the addition of SPIFFE for per-pod cryptographic identity and a plethora of other features, Istio could simplify the deployment of the next generation of network security.
In "Zero Trust" networks there may be no need for traditional firewalling or Kubernetes network policy, as every interaction occurs over mTLS (mutual TLS), ensuring that both parties are not only communicating securely, but that the identity of both services is known.
This shift from traditional networking to Cloud Native security principles is not one we expect to be easy for those with a traditional security mindset, and the Zero Trust Networking book from SPIFFE's Evan Gilman is a highly recommended introduction to this brave new world.
Istio 0.8 LTS is out, and the project is rapidly approaching a 1.0 release. Its stability versioning is the same as the Kubernetes model: a stable core, with individual APIs identifying themselves under their own alpha/beta stability namespace. Expect to see an uptick in Istio adoption over the coming months.
Conclusion
Cloud Native applications have a more fine-grained set of lightweight security primitives to lock down workloads and infrastructure. The power and flexibility of these tools is both a blessing and curse - with insufficient automation it has become easier to expose insecure workloads which permit breakouts from the container or its isolation model.
There are more defensive tools available than ever, but caution must be taken to reduce attack surfaces and the potential for misconfiguration.
However if security slows down an organisation's pace of feature delivery it will never be a first-class citizen. Applying Continuous Delivery principles to the software supply chain allows an organisation to achieve compliance, continuous audit, and enforced governance without impacting the business's bottom line.
Iteratating quickly on security is easiest when supported by a comprehensive test suite. This is achieved with Continuous Security - an alternative to point-in-time penetration tests, with constant pipeline validation ensuring an organisation's attack surface is known, and the risk constantly understood and managed.
This is ControlPlane's modus operandi: if we can help kickstart a Continuous Security discipline, deliver Kubernetes security and operations training, or co-implement a secure cloud native evolution for you, please get in touch.
Andrew Martin is a co-founder at @controlplaneio and tweets about cloud native security at @sublimino