This article is more than one year old. Older articles may contain outdated content. Check that the information in the page has not become incorrect since its publication.
A Guide to Kubernetes Admission Controllers
Kubernetes has greatly improved the speed and manageability of backend clusters in production today. Kubernetes has emerged as the de facto standard in container orchestrators thanks to its flexibility, scalability, and ease of use. Kubernetes also provides a range of features that secure production workloads. A more recent introduction in security features is a set of plugins called “admission controllers.” Admission controllers must be enabled to use some of the more advanced security features of Kubernetes, such as pod security policies that enforce a security configuration baseline across an entire namespace. The following must-know tips and tricks will help you leverage admission controllers to make the most of these security capabilities in Kubernetes.
What are Kubernetes admission controllers?
In a nutshell, Kubernetes admission controllers are plugins that govern and enforce how the cluster is used. They can be thought of as a gatekeeper that intercept (authenticated) API requests and may change the request object or deny the request altogether. The admission control process has two phases: the mutating phase is executed first, followed by the validating phase. Consequently, admission controllers can act as mutating or validating controllers or as a combination of both. For example, the LimitRanger admission controller can augment pods with default resource requests and limits (mutating phase), as well as verify that pods with explicitly set resource requirements do not exceed the per-namespace limits specified in the LimitRange object (validating phase).
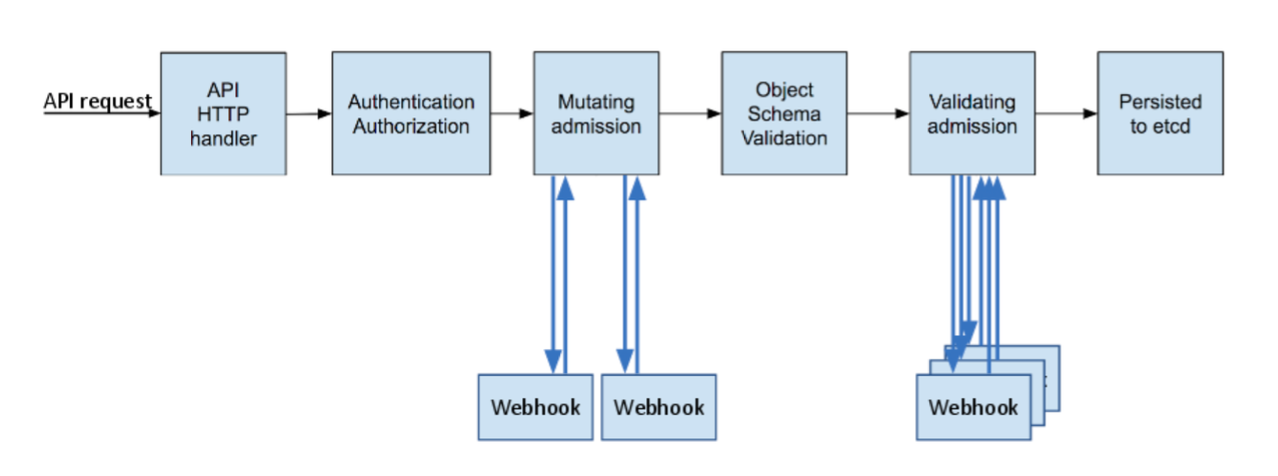
Admission Controller Phases
It is worth noting that some aspects of Kubernetes’ operation that many users would consider built-in are in fact governed by admission controllers. For example, when a namespace is deleted and subsequently enters the Terminating state, the NamespaceLifecycle admission controller is what prevents any new objects from being created in this namespace.
Among the more than 30 admission controllers shipped with Kubernetes, two take a special role because of their nearly limitless flexibility - ValidatingAdmissionWebhooks and MutatingAdmissionWebhooks, both of which are in beta status as of Kubernetes 1.13. We will examine these two admission controllers closely, as they do not implement any policy decision logic themselves. Instead, the respective action is obtained from a REST endpoint (a webhook) of a service running inside the cluster. This approach decouples the admission controller logic from the Kubernetes API server, thus allowing users to implement custom logic to be executed whenever resources are created, updated, or deleted in a Kubernetes cluster.
The difference between the two kinds of admission controller webhooks is pretty much self-explanatory: mutating admission webhooks may mutate the objects, while validating admission webhooks may not. However, even a mutating admission webhook can reject requests and thus act in a validating fashion. Validating admission webhooks have two main advantages over mutating ones: first, for security reasons it might be desirable to disable the MutatingAdmissionWebhook admission controller (or apply stricter RBAC restrictions as to who may create MutatingWebhookConfiguration objects) because of its potentially confusing or even dangerous side effects. Second, as shown in the previous diagram, validating admission controllers (and thus webhooks) are run after any mutating ones. As a result, whatever request object a validating webhook sees is the final version that would be persisted to etcd.
The set of enabled admission controllers is configured by passing a flag to the Kubernetes API server. Note that the old --admission-control flag was deprecated in 1.10 and replaced with --enable-admission-plugins.
--enable-admission-plugins=ValidatingAdmissionWebhook,MutatingAdmissionWebhook
Kubernetes recommends the following admission controllers to be enabled by default.
--enable-admission-plugins=NamespaceLifecycle,LimitRanger,ServiceAccount,DefaultStorageClass,DefaultTolerationSeconds,MutatingAdmissionWebhook,ValidatingAdmissionWebhook,Priority,ResourceQuota,PodSecurityPolicy
The complete list of admission controllers with their descriptions can be found in the official Kubernetes reference. This discussion will focus only on the webhook-based admission controllers.
Why do I need admission controllers?
Admission controllers serve multiple purposes in Kubernetes, mainly around Security, Governance, and Configuration management.
Security
Admission controllers can increase security by mandating a reasonable security baseline across an entire namespace or cluster. The built-in PodSecurityPolicy admission controller is perhaps the most prominent example; it can be used for disallowing containers from running as root or making sure the container’s root filesystem is always mounted read-only, for example. Further use cases that can be realized by custom, webhook-based admission controllers include:
- Allow pulling images only from specific registries known to the enterprise, while denying unknown image registries.
- Reject deployments that do not meet security standards. For example, containers using the
privilegedflag can circumvent a lot of security checks. This risk could be mitigated by a webhook-based admission controller that either rejects such deployments (validating) or overrides theprivilegedflag, setting it tofalse.
Governance
Admission controllers allow you to enforce the adherence to certain practices such as having good labels, annotations, resource limits, or other settings. Some of the common scenarios include:
- Enforce label validation on different objects to ensure proper labels are being used for various objects, such as every object being assigned to a team or project, or every deployment specifying an app label.
- Automatically add annotations to objects, such as attributing the correct cost center for a “dev” deployment resource.
Configuration Management
Admission controllers allow you to validate the configuration of the objects running in the cluster and prevent any obvious misconfigurations from hitting your cluster. Admission controllers can be useful in detecting and fixing images deployed without semantic tags, such as by:
- automatically adding resource limits or validating resource limits,
- ensuring reasonable labels are added to pods, or
- ensuring image references used in production deployments are not using the
latesttags, or tags with a-devsuffix.
In this way, admission controllers and policy management help make sure that applications stay in compliance within an ever-changing landscape of controls.
Example: Writing and Deploying an Admission Controller Webhook
To illustrate how admission controller webhooks can be leveraged to establish custom security policies, let’s consider an example that addresses one of the shortcomings of Kubernetes: a lot of its defaults are optimized for ease of use and reducing friction, sometimes at the expense of security. One of these settings is that containers are by default allowed to run as root (and, without further configuration and no USER directive in the Dockerfile, will also do so). Even though containers are isolated from the underlying host to a certain extent, running containers as root does increase the risk profile of your deployment— and should be avoided as one of many security best practices. The recently exposed runC vulnerability (CVE-2019-5736), for example, could be exploited only if the container ran as root.
You can use a custom mutating admission controller webhook to apply more secure defaults: unless explicitly requested, our webhook will ensure that pods run as a non-root user (we assign the user ID 1234 if no explicit assignment has been made). Note that this setup does not prevent you from deploying any workloads in your cluster, including those that legitimately require running as root. It only requires you to explicitly enable this riskier mode of operation in the deployment configuration, while defaulting to non-root mode for all other workloads.
The full code along with deployment instructions can be found in our accompanying GitHub repository. Here, we will highlight a few of the more subtle aspects about how webhooks work.
Mutating Webhook Configuration
A mutating admission controller webhook is defined by creating a MutatingWebhookConfiguration object in Kubernetes. In our example, we use the following configuration:
apiVersion: admissionregistration.k8s.io/v1beta1
kind: MutatingWebhookConfiguration
metadata:
  name: demo-webhook
webhooks:
  - name: webhook-server.webhook-demo.svc
    clientConfig:
      service:
        name: webhook-server
        namespace: webhook-demo
        path: "/mutate"
      caBundle: ${CA_PEM_B64}
    rules:
      - operations: [ "CREATE" ]
        apiGroups: [""]
        apiVersions: ["v1"]
        resources: ["pods"]
This configuration defines a webhook webhook-server.webhook-demo.svc, and instructs the Kubernetes API server to consult the service webhook-server in namespace webhook-demo whenever a pod is created by making a HTTP POST request to the /mutate URL. For this configuration to work, several prerequisites have to be met.
Webhook REST API
The Kubernetes API server makes an HTTPS POST request to the given service and URL path, with a JSON-encoded AdmissionReview (with the Request field set) in the request body. The response should in turn be a JSON-encoded AdmissionReview, this time with the Response field set.
Our demo repository contains a function that takes care of the serialization/deserialization boilerplate code and allows you to focus on implementing the logic operating on Kubernetes API objects. In our example, the function implementing the admission controller logic is called applySecurityDefaults, and an HTTPS server serving this function under the /mutate URL can be set up as follows:
mux := http.NewServeMux()
mux.Handle("/mutate", admitFuncHandler(applySecurityDefaults))
server := &http.Server{
  Addr:    ":8443",
  Handler: mux,
}
log.Fatal(server.ListenAndServeTLS(certPath, keyPath))
Note that for the server to run without elevated privileges, we have the HTTP server listen on port 8443. Kubernetes does not allow specifying a port in the webhook configuration; it always assumes the HTTPS port 443. However, since a service object is required anyway, we can easily map port 443 of the service to port 8443 on the container:
apiVersion: v1
kind: Service
metadata:
  name: webhook-server
  namespace: webhook-demo
spec:
  selector:
    app: webhook-server  # specified by the deployment/pod
  ports:
    - port: 443
      targetPort: webhook-api  # name of port 8443 of the container
Object Modification Logic
In a mutating admission controller webhook, mutations are performed via JSON patches. While the JSON patch standard includes a lot of intricacies that go well beyond the scope of this discussion, the Go data structure in our example as well as its usage should give the user a good initial overview of how JSON patches work:
type patchOperation struct {
  Op    string      `json:"op"`
  Path  string      `json:"path"`
  Value interface{} `json:"value,omitempty"`
}
For setting the field .spec.securityContext.runAsNonRoot of a pod to true, we construct the following patchOperation object:
patches = append(patches, patchOperation{
  Op:    "add",
  Path:  "/spec/securityContext/runAsNonRoot",
  Value: true,
})
TLS Certificates
Since a webhook must be served via HTTPS, we need proper certificates for the server. These certificates can be self-signed (rather: signed by a self-signed CA), but we need Kubernetes to instruct the respective CA certificate when talking to the webhook server. In addition, the common name (CN) of the certificate must match the server name used by the Kubernetes API server, which for internal services is <service-name>.<namespace>.svc, i.e., webhook-server.webhook-demo.svc in our case. Since the generation of self-signed TLS certificates is well documented across the Internet, we simply refer to the respective shell script in our example.
The webhook configuration shown previously contains a placeholder ${CA_PEM_B64}. Before we can create this configuration, we need to replace this portion with the Base64-encoded PEM certificate of the CA. The openssl base64 -A command can be used for this purpose.
Testing the Webhook
After deploying the webhook server and configuring it, which can be done by invoking the ./deploy.sh script from the repository, it is time to test and verify that the webhook indeed does its job. The repository contains three examples:
- A pod that does not specify a security context (
pod-with-defaults). We expect this pod to be run as non-root with user id 1234. - A pod that does specify a security context, explicitly allowing it to run as root (
pod-with-override). - A pod with a conflicting configuration, specifying it must run as non-root but with a user id of 0 (
pod-with-conflict). To showcase the rejection of object creation requests, we have augmented our admission controller logic to reject such obvious misconfigurations.
Create one of these pods by running kubectl create -f examples/<name>.yaml. In the first two examples, you can verify the user id under which the pod ran by inspecting the logs, for example:
$ kubectl create -f examples/pod-with-defaults.yaml
$ kubectl logs pod-with-defaults
I am running as user 1234
In the third example, the object creation should be rejected with an appropriate error message:
$ kubectl create -f examples/pod-with-conflict.yaml
Error from server (InternalError): error when creating "examples/pod-with-conflict.yaml": Internal error occurred: admission webhook "webhook-server.webhook-demo.svc" denied the request: runAsNonRoot specified, but runAsUser set to 0 (the root user)
Feel free to test this with your own workloads as well. Of course, you can also experiment a little bit further by changing the logic of the webhook and see how the changes affect object creation. More information on how to do experiment with such changes can be found in the repository’s readme.
Summary
Kubernetes admission controllers offer significant advantages for security. Digging into two powerful examples, with accompanying available code, will help you get started on leveraging these powerful capabilities.
References:
- https://kubernetes.io/docs/reference/access-authn-authz/admission-controllers/
- https://docs.okd.io/latest/architecture/additional_concepts/dynamic_admission_controllers.html
- https://kubernetes.io/blog/2018/01/extensible-admission-is-beta/
- https://medium.com/ibm-cloud/diving-into-kubernetes-mutatingadmissionwebhook-6ef3c5695f74
- https://github.com/kubernetes/kubernetes/blob/v1.10.0-beta.1/test/images/webhook/main.go
- https://github.com/istio/istio
- https://www.stackrox.com/post/2019/02/the-runc-vulnerability-a-deep-dive-on-protecting-yourself/