The Concepts section helps you learn about the parts of the Kubernetes system and the abstractions Kubernetes uses to represent your cluster, and helps you obtain a deeper understanding of how Kubernetes works.
This is the multi-page printable view of this section. Click here to print.
Concepts
- 1: Overview
- 1.1: Kubernetes Components
- 1.2: Objects In Kubernetes
- 1.2.1: Kubernetes Object Management
- 1.2.2: Object Names and IDs
- 1.2.3: Labels and Selectors
- 1.2.4: Namespaces
- 1.2.5: Annotations
- 1.2.6: Field Selectors
- 1.2.7: Finalizers
- 1.2.8: Owners and Dependents
- 1.2.9: Recommended Labels
- 1.2.10: Storage Versions
- 1.3: The Kubernetes API
- 1.4: The kubectl command-line tool
- 2: Cluster Architecture
- 2.1: Nodes
- 2.2: Communication between Nodes and the Control Plane
- 2.3: Controllers
- 2.4: Leases
- 2.5: Cloud Controller Manager
- 2.6: About cgroup v2
- 2.7: Kubernetes Self-Healing
- 2.8: Garbage Collection
- 2.9: Mixed Version Proxy
- 3: Containers
- 3.1: Images
- 3.2: Container Environment
- 3.3: Runtime Class
- 3.4: Container Lifecycle Hooks
- 3.5: Container Runtime Interface (CRI)
- 4: Workloads
- 4.1: Pods
- 4.1.1: Pod Lifecycle
- 4.1.2: Pod Conditions
- 4.1.3: Init Containers
- 4.1.4: Sidecar Containers
- 4.1.5: Ephemeral Containers
- 4.1.6: Liveness, Readiness, and Startup Probes
- 4.1.7: Disruptions
- 4.1.8: Pod Hostname
- 4.1.9: Pod Quality of Service Classes
- 4.1.10: Scheduling Group
- 4.1.11: Static Pods
- 4.1.12: User Namespaces
- 4.1.13: Downward API
- 4.1.14: Advanced Pod Configuration
- 4.2: Workload API
- 4.2.1: Pod Group Disruption and Priority
- 4.2.2: PodGroup Scheduling Policies
- 4.2.3: Topology-Aware Workload Scheduling
- 4.3: Workload Management
- 4.3.1: Deployments
- 4.3.2: ReplicaSet
- 4.3.3: StatefulSets
- 4.3.4: DaemonSet
- 4.3.5: Jobs
- 4.3.6: Automatic Cleanup for Finished Jobs
- 4.3.7: CronJob
- 4.3.8: ReplicationController
- 4.4: PodGroup API
- 4.4.1: PodGroup Lifecycle
- 4.5: Managing Workloads
- 4.6: Autoscaling Workloads
- 4.7: Horizontal Pod Autoscaling
- 4.8: Resource managers
- 4.9: Vertical Pod Autoscaling
- 5: Services, Load Balancing, and Networking
- 5.1: Service
- 5.2: Ingress
- 5.3: Ingress Controllers
- 5.4: Gateway API
- 5.5: EndpointSlices
- 5.6: Network Policies
- 5.7: DNS for Services and Pods
- 5.8: IPv4/IPv6 dual-stack
- 5.9: Topology Aware Routing
- 5.10: Networking on Windows
- 5.11: Service ClusterIP allocation
- 5.12: Service Internal Traffic Policy
- 6: Storage
- 6.1: Volumes
- 6.2: Persistent Volumes
- 6.3: Projected Volumes
- 6.4: Ephemeral Volumes
- 6.5: Storage Classes
- 6.6: Volume Attributes Classes
- 6.7: Dynamic Volume Provisioning
- 6.8: Volume Snapshots
- 6.9: Volume Snapshot Classes
- 6.10: CSI Volume Cloning
- 6.11: Volume Populators and Data Sources
- 6.12: Storage Capacity
- 6.13: Node-specific Volume Limits
- 6.14: Local ephemeral storage
- 6.15: Volume Health Monitoring
- 6.16: Windows Storage
- 7: Configuration
- 7.1: ConfigMaps
- 7.2: Secrets
- 7.3: Resource Management for Pods and Containers
- 7.4: Organizing Cluster Access Using kubeconfig Files
- 7.5: Resource Management for Windows nodes
- 8: Security
- 8.1: Cloud Native Security and Kubernetes
- 8.2: Pod Security Standards
- 8.3: Pod Security Admission
- 8.4: Service Accounts
- 8.5: Pod Security Policies
- 8.6: Security For Linux Nodes
- 8.7: Security For Windows Nodes
- 8.8: Controlling Access to the Kubernetes API
- 8.9: Role Based Access Control Good Practices
- 8.10: Good practices for Kubernetes Secrets
- 8.11: Multi-tenancy
- 8.12: Hardening Guide - Authentication Mechanisms
- 8.13: Hardening Guide - Dynamic Resource Allocation
- 8.14: Hardening Guide - Scheduler Configuration
- 8.15: Kubernetes API Server Bypass Risks
- 8.16: Linux kernel security constraints for Pods and containers
- 8.17: Security Checklist
- 8.18: Application Security Checklist
- 9: Policies
- 10: Scheduling, Preemption and Eviction
- 10.1: Kubernetes Scheduler
- 10.2: Topology-Aware Workload Scheduling
- 10.3: Assigning Pods to Nodes
- 10.4: Pod Overhead
- 10.5: Pod Scheduling Readiness
- 10.6: Pod Topology Spread Constraints
- 10.7: Taints and Tolerations
- 10.8: Scheduling Framework
- 10.9: Dynamic Resource Allocation
- 10.10: Gang Scheduling
- 10.11: Scheduler Performance Tuning
- 10.12: PodGroup Scheduling
- 10.13: Resource Bin Packing
- 10.14: Workload-Aware Preemption
- 10.15: Pod Priority and Preemption
- 10.16: Node-pressure Eviction
- 10.17: API-initiated Eviction
- 10.18: Node Declared Features
- 11: Cluster Administration
- 11.1: Node Shutdowns
- 11.2: Swap memory management
- 11.3: Node Autoscaling
- 11.4: Certificates
- 11.5: Cluster Networking
- 11.6: Observability
- 11.7: Admission Webhook Good Practices
- 11.8: Good practices for Dynamic Resource Allocation as a Cluster Admin
- 11.9: Logging Architecture
- 11.10: Compatibility Version For Kubernetes Control Plane Components
- 11.11: Metrics For Kubernetes System Components
- 11.12: Metrics for Kubernetes Object States
- 11.13: System Logs
- 11.14: Traces For Kubernetes System Components
- 11.15: Proxies in Kubernetes
- 11.16: API Priority and Fairness
- 11.17: Installing Addons
- 11.18: Coordinated Leader Election
- 12: Windows in Kubernetes
- 13: Extending Kubernetes
- 13.1: Compute, Storage, and Networking Extensions
- 13.1.1: Network Plugins
- 13.1.2: Device Plugins
- 13.2: Extending the Kubernetes API
- 13.2.1: Custom Resources
- 13.2.2: Kubernetes API Aggregation Layer
- 13.3: Operator pattern
1 - Overview
Kubernetes is a portable, extensible, open source platform for managing containerized workloads and services that facilitate both declarative configuration and automation. It has a large, rapidly growing ecosystem. Kubernetes services, support, and tools are widely available.
This page is an overview of Kubernetes.
The name Kubernetes originates from Greek, meaning helmsman or pilot. K8s as an abbreviation results from counting the eight letters between the "K" and the "s". Google open sourced the Kubernetes project in 2014. Kubernetes combines over 15 years of Google's experience running production workloads at scale with best-of-breed ideas and practices from the community.
Why you need Kubernetes and what it can do
Containers are a good way to bundle and run your applications. In a production environment, you need to manage the containers that run the applications and ensure that there is no downtime. For example, if a container goes down, another container needs to start. Wouldn't it be easier if this behavior was handled by a system?
That's how Kubernetes comes to the rescue! Kubernetes provides you with a framework to run distributed systems resiliently. It takes care of scaling and failover for your application, provides deployment patterns, and more. For example: Kubernetes can easily manage a canary deployment for your system.
Kubernetes provides you with:
- Service discovery and load balancing Kubernetes can expose a container using a DNS name or its own IP address. If traffic to a container is high, Kubernetes is able to load balance and distribute the network traffic so that the deployment is stable.
- Storage orchestration Kubernetes allows you to automatically mount a storage system of your choice, such as local storage, public cloud providers, and more.
- Automated rollouts and rollbacks You can describe the desired state for your deployed containers using Kubernetes, and it can change the actual state to the desired state at a controlled rate. For example, you can automate Kubernetes to create new containers for your deployment, remove existing containers and adopt all their resources to the new container.
- Automatic bin packing You provide Kubernetes with a cluster of nodes that it can use to run containerized tasks. You tell Kubernetes how much CPU and memory (RAM) each container needs. Kubernetes can fit containers onto your nodes to make the best use of your resources.
- Self-healing Kubernetes restarts containers that fail, replaces containers, kills containers that don't respond to your user-defined health check, and doesn't advertise them to clients until they are ready to serve.
- Secret and configuration management Kubernetes lets you store and manage sensitive information, such as passwords, OAuth tokens, and SSH keys. You can deploy and update secrets and application configuration without rebuilding your container images, and without exposing secrets in your stack configuration.
- Batch execution In addition to services, Kubernetes can manage your batch and CI workloads, replacing containers that fail, if desired.
- Horizontal scaling Scale your application up and down with a simple command, with a UI, or automatically based on CPU usage.
- IPv4/IPv6 dual-stack Allocation of IPv4 and IPv6 addresses to Pods and Services.
- Designed for extensibility Add features to your Kubernetes cluster without changing upstream source code.
What Kubernetes is not
Kubernetes is not a traditional, all-inclusive PaaS (Platform as a Service) system. Since Kubernetes operates at the container level rather than at the hardware level, it provides some generally applicable features common to PaaS offerings, such as deployment, scaling, load balancing, and lets users integrate their logging, monitoring, and alerting solutions. However, Kubernetes is not monolithic, and these default solutions are optional and pluggable. Kubernetes provides the building blocks for building developer platforms, but preserves user choice and flexibility where it is important.
Kubernetes:
- Does not limit the types of applications supported. Kubernetes aims to support an extremely diverse variety of workloads, including stateless, stateful, and data-processing workloads. If an application can run in a container, it should run great on Kubernetes.
- Does not deploy source code and does not build your application. Continuous Integration, Delivery, and Deployment (CI/CD) workflows are determined by organization cultures and preferences as well as technical requirements.
- Does not provide application-level services, such as middleware (for example, message buses), data-processing frameworks (for example, Spark), databases (for example, MySQL), caches, nor cluster storage systems (for example, Ceph) as built-in services. Such components can run on Kubernetes, and/or can be accessed by applications running on Kubernetes through portable mechanisms, such as the Open Service Broker.
- Does not dictate logging, monitoring, or alerting solutions. It provides some integrations as proof of concept, and mechanisms to collect and export metrics.
- Does not provide nor mandate a configuration language/system (for example, Jsonnet). It provides a declarative API that may be targeted by arbitrary forms of declarative specifications.
- Does not provide nor adopt any comprehensive machine configuration, maintenance, management, or self-healing systems.
- Additionally, Kubernetes is not a mere orchestration system. In fact, it eliminates the need for orchestration. The technical definition of orchestration is execution of a defined workflow: first do A, then B, then C. In contrast, Kubernetes comprises a set of independent, composable control processes that continuously drive the current state towards the provided desired state. It shouldn't matter how you get from A to C. Centralized control is also not required. This results in a system that is easier to use and more powerful, robust, resilient, and extensible.
Historical context for Kubernetes
Let's take a look at why Kubernetes is so useful by going back in time.

Traditional deployment era:
Early on, organizations ran applications on physical servers. There was no way to define resource boundaries for applications in a physical server, and this caused resource allocation issues. For example, if multiple applications run on a physical server, there can be instances where one application would take up most of the resources, and as a result, the other applications would underperform. A solution for this would be to run each application on a different physical server. But this did not scale as resources were underutilized, and it was expensive for organizations to maintain many physical servers.
Virtualized deployment era:
As a solution, virtualization was introduced. It allows you to run multiple Virtual Machines (VMs) on a single physical server's CPU. Virtualization allows applications to be isolated between VMs and provides a level of security as the information of one application cannot be freely accessed by another application.
Virtualization allows better utilization of resources in a physical server and allows better scalability because an application can be added or updated easily, reduces hardware costs, and much more. With virtualization you can present a set of physical resources as a cluster of disposable virtual machines.
Each VM is a full machine running all the components, including its own operating system, on top of the virtualized hardware.
Container deployment era:
Containers are similar to VMs, but they have relaxed isolation properties to share the Operating System (OS) among the applications. Therefore, containers are considered lightweight. Similar to a VM, a container has its own filesystem, share of CPU, memory, process space, and more. As they are decoupled from the underlying infrastructure, they are portable across clouds and OS distributions.
Containers have become popular because they provide extra benefits, such as:
- Agile application creation and deployment: increased ease and efficiency of container image creation compared to VM image use.
- Continuous development, integration, and deployment: provides reliable and frequent container image build and deployment with quick and efficient rollbacks (due to image immutability).
- Dev and Ops separation of concerns: create application container images at build/release time rather than deployment time, thereby decoupling applications from infrastructure.
- Observability: not only surfaces OS-level information and metrics, but also application health and other signals.
- Environmental consistency across development, testing, and production: runs the same on a laptop as it does in the cloud.
- Cloud and OS distribution portability: runs on Ubuntu, RHEL, CoreOS, on-premises, on major public clouds, and anywhere else.
- Application-centric management: raises the level of abstraction from running an OS on virtual hardware to running an application on an OS using logical resources.
- Loosely coupled, distributed, elastic, liberated micro-services: applications are broken into smaller, independent pieces and can be deployed and managed dynamically – not a monolithic stack running on one big single-purpose machine.
- Resource isolation: predictable application performance.
- Resource utilization: high efficiency and density.
What's next
- Take a look at the Kubernetes Components
- Take a look at the Kubernetes API
- Take a look at kubectl: the primary CLI for Kubernetes
- Take a look at the Cluster Architecture
- Ready to Get Started?
1.1 - Kubernetes Components
An overview of the key components that make up a Kubernetes cluster.
This page provides a high-level overview of the essential components that make up a Kubernetes cluster.

The components of a Kubernetes cluster
Core Components
A Kubernetes cluster consists of a control plane and one or more worker nodes. Here's a brief overview of the main components:
Control Plane Components
Manage the overall state of the cluster:
- kube-apiserver
- The core component server that exposes the Kubernetes HTTP API.
- etcd
- Consistent and highly-available key value store for all API server data.
- kube-scheduler
- Looks for Pods not yet bound to a node, and assigns each Pod to a suitable node.
- kube-controller-manager
- Runs controllers to implement Kubernetes API behavior.
- cloud-controller-manager (optional)
- Integrates with underlying cloud provider(s).
Node Components
Run on every node, maintaining running pods and providing the Kubernetes runtime environment:
- kubelet
- Ensures that Pods are running, including their containers.
- kube-proxy (optional)
- Maintains network rules on nodes to implement Services.
- Container runtime
- Software responsible for running containers. Read Container Runtimes to learn more.
🛇 This item links to a third party project or product that is not part of Kubernetes itself. More information
Your cluster may require additional software on each node; for example, you might also run systemd on a Linux node to supervise local components.
Addons
Addons extend the functionality of Kubernetes. A few important examples include:
- DNS
- For cluster-wide DNS resolution.
- Web UI (Dashboard)
- For cluster management via a web interface.
- Container Resource Monitoring
- For collecting and storing container metrics.
- Cluster-level Logging
- For saving container logs to a central log store.
Flexibility in Architecture
Kubernetes allows for flexibility in how these components are deployed and managed. The architecture can be adapted to various needs, from small development environments to large-scale production deployments.
For more detailed information about each component and various ways to configure your cluster architecture, see the Cluster Architecture page.
1.2 - Objects In Kubernetes
Kubernetes objects are persistent entities in the Kubernetes system. Kubernetes uses these entities to represent the state of your cluster. Learn about the Kubernetes object model and how to work with these objects.
This page explains how Kubernetes objects are represented in the Kubernetes API, and how you can
express them in .yaml format.
Understanding Kubernetes objects
Kubernetes objects are persistent entities in the Kubernetes system. Kubernetes uses these entities to represent the state of your cluster. Specifically, they can describe:
- What containerized applications are running (and on which nodes)
- The resources available to those applications
- The policies around how those applications behave, such as restart policies, upgrades, and fault-tolerance
A Kubernetes object is a "record of intent"--once you create the object, the Kubernetes system will constantly work to ensure that the object exists. By creating an object, you're effectively telling the Kubernetes system what you want your cluster's workload to look like; this is your cluster's desired state.
To work with Kubernetes objects—whether to create, modify, or delete them—you'll need to use the
Kubernetes API. When you use the kubectl command-line
interface, for example, the CLI makes the necessary Kubernetes API calls for you. You can also use
the Kubernetes API directly in your own programs using one of the
Client Libraries.
Object spec and status
Almost every Kubernetes object includes two nested object fields that govern
the object's configuration: the object spec and the object status.
For objects that have a spec, you have to set this when you create the object,
providing a description of the characteristics you want the resource to have:
its desired state.
The status describes the current state of the object, supplied and updated
by the Kubernetes system and its components. The Kubernetes
control plane continually
and actively manages every object's actual state to match the desired state you
supplied.
For example: in Kubernetes, a Deployment is an object that can represent an
application running on your cluster. When you create the Deployment, you
might set the Deployment spec to specify that you want three replicas of
the application to be running. The Kubernetes system reads the Deployment
spec and starts three instances of your desired application--updating
the status to match your spec. If any of those instances should fail
(a status change), the Kubernetes system responds to the difference
between spec and status by making a correction--in this case, starting
a replacement instance.
For more information on the object spec, status, and metadata, see the Kubernetes API Conventions.
Describing a Kubernetes object
When you create an object in Kubernetes, you must provide the object spec that describes its
desired state, as well as some basic information about the object (such as a name). When you use
the Kubernetes API to create the object (either directly or via kubectl), that API request must
include that information as JSON in the request body.
Most often, you provide the information to kubectl in a file known as a manifest.
By convention, manifests are YAML (you could also use JSON format).
Tools such as kubectl convert the information from a manifest into JSON or another supported
serialization format when making the API request over HTTP.
Here's an example manifest that shows the required fields and object spec for a Kubernetes Deployment:
apiVersion: apps/v1
kind: Deployment
metadata:
  name: nginx-deployment
spec:
  selector:
    matchLabels:
      app: nginx
  replicas: 2 # tells deployment to run 2 pods matching the template
  template:
    metadata:
      labels:
        app: nginx
    spec:
      containers:
      - name: nginx
        image: nginx:1.14.2
        ports:
        - containerPort: 80
One way to create a Deployment using a manifest file like the one above is to use the
kubectl apply command
in the kubectl command-line interface, passing the .yaml file as an argument. Here's an example:
kubectl apply -f https://k8s.io/examples/application/deployment.yaml
The output is similar to this:
deployment.apps/nginx-deployment created
Required fields
In the manifest (YAML or JSON file) for the Kubernetes object you want to create, you'll need to set values for the following fields:
apiVersion- Which version of the Kubernetes API you're using to create this objectkind- What kind of object you want to createmetadata- Data that helps uniquely identify the object, including anamestring,UID, and optionalnamespacespec- What state you desire for the object
The precise format of the object spec is different for every Kubernetes object, and contains
nested fields specific to that object. The Kubernetes API Reference
can help you find the spec format for all of the objects you can create using Kubernetes.
For example, see the spec field
for the Pod API reference.
For each Pod, the .spec field specifies the pod and its desired state (such as the container image name for
each container within that pod).
Another example of an object specification is the
spec field
for the StatefulSet API. For StatefulSet, the .spec field specifies the StatefulSet and
its desired state.
Within the .spec of a StatefulSet is a template
for Pod objects. That template describes Pods that the StatefulSet controller will create in order to
satisfy the StatefulSet specification.
Different kinds of objects can also have different .status; again, the API reference pages
detail the structure of that .status field, and its content for each different type of object.
See Kubernetes Configuration Best Practices for additional information on writing YAML configuration files.
Server side field validation
Starting with Kubernetes v1.25, the API server offers server side
field validation
that detects unrecognized or duplicate fields in an object. It provides all the functionality
of kubectl --validate on the server side.
The kubectl tool uses the --validate flag to set the level of field validation. It accepts the
values ignore, warn, and strict while also accepting the values true (equivalent to strict)
and false (equivalent to ignore). The default validation setting for kubectl is --validate=true.
Strict- Strict field validation, errors on validation failure
Warn- Field validation is performed, but errors are exposed as warnings rather than failing the request
Ignore- No server side field validation is performed
When kubectl cannot connect to an API server that supports field validation it will fall back
to using client-side validation. Kubernetes 1.27 and later versions always offer field validation;
older Kubernetes releases might not. If your cluster is older than v1.27, check the documentation
for your version of Kubernetes.
What's next
If you're new to Kubernetes, read more about the following:
- Pods which are the most important basic Kubernetes objects.
- Deployment objects.
- Controllers in Kubernetes.
- kubectl and kubectl commands.
Kubernetes Object Management
explains how to use kubectl to manage objects.
You might need to install kubectl if you don't already have it available.
To learn about the Kubernetes API in general, visit:
To learn about objects in Kubernetes in more depth, read other pages in this section:
1.2.1 - Kubernetes Object Management
The kubectl command-line tool supports several different ways to create and manage
Kubernetes objects. This document provides an overview of the different
approaches. Read the Kubectl book for
details of managing objects by Kubectl.
Management techniques
Warning:
A Kubernetes object should be managed using only one technique. Mixing and matching techniques for the same object results in undefined behavior.| Management technique | Operates on | Recommended environment | Supported writers | Learning curve |
|---|---|---|---|---|
| Imperative commands | Live objects | Development projects | 1+ | Lowest |
| Imperative object configuration | Individual files | Production projects | 1 | Moderate |
| Declarative object configuration | Directories of files | Production projects | 1+ | Highest |
Imperative commands
When using imperative commands, a user operates directly on live objects
in a cluster. The user provides operations to
the kubectl command as arguments or flags.
This is the recommended way to get started or to run a one-off task in a cluster. Because this technique operates directly on live objects, it provides no history of previous configurations.
Examples
Run an instance of the nginx container by creating a Deployment object:
kubectl create deployment nginx --image nginx
Trade-offs
Advantages compared to object configuration:
- Commands are expressed as a single action word.
- Commands require only a single step to make changes to the cluster.
Disadvantages compared to object configuration:
- Commands do not integrate with change review processes.
- Commands do not provide an audit trail associated with changes.
- Commands do not provide a source of records except for what is live.
- Commands do not provide a template for creating new objects.
Imperative object configuration
In imperative object configuration, the kubectl command specifies the operation (create, replace, etc.), optional flags and at least one file name. The file specified must contain a full definition of the object in YAML or JSON format.
See the API reference for more details on object definitions.
Warning:
The imperativereplace command replaces the existing
spec with the newly provided one, dropping all changes to the object missing from
the configuration file. This approach should not be used with resource
types whose specs are updated independently of the configuration file.
Services of type LoadBalancer, for example, have their externalIPs field updated
independently from the configuration by the cluster.Examples
Create the objects defined in a configuration file:
kubectl create -f nginx.yaml
Delete the objects defined in two configuration files:
kubectl delete -f nginx.yaml -f redis.yaml
Update the objects defined in a configuration file by overwriting the live configuration:
kubectl replace -f nginx.yaml
Trade-offs
Advantages compared to imperative commands:
- Object configuration can be stored in a source control system such as Git.
- Object configuration can integrate with processes such as reviewing changes before push and audit trails.
- Object configuration provides a template for creating new objects.
Disadvantages compared to imperative commands:
- Object configuration requires basic understanding of the object schema.
- Object configuration requires the additional step of writing a YAML file.
Advantages compared to declarative object configuration:
- Imperative object configuration behavior is simpler and easier to understand.
- As of Kubernetes version 1.5, imperative object configuration is more mature.
Disadvantages compared to declarative object configuration:
- Imperative object configuration works best on files, not directories.
- Updates to live objects must be reflected in configuration files, or they will be lost during the next replacement.
Declarative object configuration
When using declarative object configuration, a user operates on object
configuration files stored locally, however the user does not define the
operations to be taken on the files. Create, update, and delete operations
are automatically detected per-object by kubectl. This enables working on
directories, where different operations might be needed for different objects.
Note:
Declarative object configuration retains changes made by other writers, even if the changes are not merged back to the object configuration file. This is possible by using thepatch API operation to write only
observed differences, instead of using the replace
API operation to replace the entire object configuration.Examples
Process all object configuration files in the configs directory, and create or
patch the live objects. You can first diff to see what changes are going to be
made, and then apply:
kubectl diff -f configs/
kubectl apply -f configs/
Recursively process directories:
kubectl diff -R -f configs/
kubectl apply -R -f configs/
Trade-offs
Advantages compared to imperative object configuration:
- Changes made directly to live objects are retained, even if they are not merged back into the configuration files.
- Declarative object configuration has better support for operating on directories and automatically detecting operation types (create, patch, delete) per-object.
Disadvantages compared to imperative object configuration:
- Declarative object configuration is harder to debug and understand results when they are unexpected.
- Partial updates using diffs create complex merge and patch operations.
What's next
- Managing Kubernetes Objects Using Imperative Commands
- Imperative Management of Kubernetes Objects Using Configuration Files
- Declarative Management of Kubernetes Objects Using Configuration Files
- Declarative Management of Kubernetes Objects Using Kustomize
- Kubectl Command Reference
- Kubectl Book
- Kubernetes API Reference
1.2.2 - Object Names and IDs
Each object in your cluster has a Name that is unique for that type of resource. Every Kubernetes object also has a UID that is unique across your whole cluster.
For example, you can only have one Pod named myapp-1234 within the same namespace, but you can have one Pod and one Deployment that are each named myapp-1234.
For non-unique user-provided attributes, Kubernetes provides labels and annotations.
Names
A client-provided string that refers to an object in a resource
URL, such as /api/v1/pods/some-name.
Only one object of a given kind can have a given name at a time. However, if you delete the object, you can make a new object with the same name.
Names must be unique across all API versions of the same resource.
Kubernetes uniquely identifies objects using a combination of four attributes:
- API group (e.g.,
apps) - Resource type (e.g.,
deployments) - Namespace (for namespaced resources)
- Name
While you can access a resource through different API versions (such as v1 or v1beta1), the version is simply a different representation of the same underlying object. Because the version is not part of the unique identification, you cannot create two objects with the same name and resource type in the same namespace by using different API versions.
Note:
In cases when objects represent a physical entity, like a Node representing a physical host, when the host is re-created under the same name without deleting and re-creating the Node, Kubernetes treats the new host as the old one, which may lead to inconsistencies.The server may generate a name when generateName is provided instead of name in a resource create request.
When generateName is used, the provided value is used as a name prefix, which server appends a generated suffix
to. Even though the name is generated, it may conflict with existing names resulting in an HTTP 409 response. This
became far less likely to happen in Kubernetes v1.31 and later, since the server will make up to 8 attempts to generate a
unique name before returning an HTTP 409 response.
Below are four types of commonly used name constraints for resources.
DNS Subdomain Names
Most resource types require a name that can be used as a DNS subdomain name as defined in RFC 1123. This means the name must:
- contain no more than 253 characters
- contain only lowercase alphanumeric characters, '-' or '.'
- start with an alphanumeric character
- end with an alphanumeric character
RFC 1123 Label Names
Some resource types require their names to follow the DNS label standard as defined in RFC 1123. This means the name must:
- contain at most 63 characters
- contain only lowercase alphanumeric characters or '-'
- start with an alphabetic character
- end with an alphanumeric character
Note:
When theRelaxedServiceNameValidation feature gate is enabled,
Service object names are allowed to start with a digit.RFC 1035 Label Names
Some resource types require their names to follow the DNS label standard as defined in RFC 1035. This means the name must:
- contain at most 63 characters
- contain only lowercase alphanumeric characters or '-'
- start with an alphabetic character
- end with an alphanumeric character
Note:
While RFC 1123 technically allows labels to start with digits, the current Kubernetes implementation requires both RFC 1035 and RFC 1123 labels to start with an alphabetic character. The exception is when theRelaxedServiceNameValidation
feature gate is enabled for Service objects, which allows Service names to start with digits.Path Segment Names
Some resource types require their names to be able to be safely encoded as a path segment. In other words, the name may not be "." or ".." and the name may not contain "/" or "%".
Here's an example manifest for a Pod named nginx-demo.
apiVersion: v1
kind: Pod
metadata:
  name: nginx-demo
spec:
  containers:
  - name: nginx
    image: nginx:1.14.2
    ports:
    - containerPort: 80
Note:
Some resource types have additional restrictions on their names.UIDs
A Kubernetes systems-generated string to uniquely identify objects.
Every object created over the whole lifetime of a Kubernetes cluster has a distinct UID. It is intended to distinguish between historical occurrences of similar entities.
Kubernetes UIDs are universally unique identifiers (also known as UUIDs). UUIDs are standardized as ISO/IEC 9834-8 and as ITU-T X.667.
What's next
- Read about labels and annotations in Kubernetes.
- See the Identifiers and Names in Kubernetes design document.
1.2.3 - Labels and Selectors
Labels are key/value pairs that are attached to objects such as Pods. Labels are intended to be used to specify identifying attributes of objects that are meaningful and relevant to users, but do not directly imply semantics to the core system. Labels can be used to organize and to select subsets of objects. Labels can be attached to objects at creation time and subsequently added and modified at any time. Each object can have a set of key/value labels defined. Each Key must be unique for a given object.
"metadata": {
  "labels": {
    "key1" : "value1",
    "key2" : "value2"
  }
}
Labels allow for efficient queries and watches and are ideal for use in UIs and CLIs. Non-identifying information should be recorded using annotations.
Motivation
Labels enable users to map their own organizational structures onto system objects in a loosely coupled fashion, without requiring clients to store these mappings.
Service deployments and batch processing pipelines are often multi-dimensional entities (e.g., multiple partitions or deployments, multiple release tracks, multiple tiers, multiple micro-services per tier). Management often requires cross-cutting operations, which breaks encapsulation of strictly hierarchical representations, especially rigid hierarchies determined by the infrastructure rather than by users.
Example labels:
"release" : "stable","release" : "canary""environment" : "dev","environment" : "qa","environment" : "production""tier" : "frontend","tier" : "backend","tier" : "cache""partition" : "customerA","partition" : "customerB""track" : "daily","track" : "weekly"
These are examples of commonly used labels; you are free to develop your own conventions. Keep in mind that label Key must be unique for a given object.
Syntax and character set
Labels are key/value pairs. Valid label keys have two segments: an optional
prefix and name, separated by a slash (/). The name segment is required and
must be 63 characters or less, beginning and ending with an alphanumeric
character ([a-z0-9A-Z]) with dashes (-), underscores (_), dots (.),
and alphanumerics between. The prefix is optional. If specified, the prefix
must be a DNS subdomain: a series of DNS labels separated by dots (.),
not longer than 253 characters in total, followed by a slash (/).
If the prefix is omitted, the label Key is presumed to be private to the user.
Automated system components (e.g. kube-scheduler, kube-controller-manager,
kube-apiserver, kubectl, or other third-party automation) which add labels
to end-user objects must specify a prefix.
The kubernetes.io/ and k8s.io/ prefixes are
reserved for Kubernetes core components.
Valid label value:
- must be 63 characters or less (can be empty),
- unless empty, must begin and end with an alphanumeric character (
[a-z0-9A-Z]), - could contain dashes (
-), underscores (_), dots (.), and alphanumerics between.
For example, here's a manifest for a Pod that has two labels
environment: production and app: nginx:
apiVersion: v1
kind: Pod
metadata:
  name: label-demo
  labels:
    environment: production
    app: nginx
spec:
  containers:
  - name: nginx
    image: nginx:1.14.2
    ports:
    - containerPort: 80
Label selectors
Unlike names and UIDs, labels do not provide uniqueness. In general, we expect many objects to carry the same label(s).
Via a label selector, the client/user can identify a set of objects. The label selector is the core grouping primitive in Kubernetes.
The API currently supports two types of selectors: equality-based and set-based.
A label selector can be made of multiple requirements which are comma-separated.
In the case of multiple requirements, all must be satisfied so the comma separator
acts as a logical AND (&&) operator.
The semantics of empty or non-specified selectors are dependent on the context, and API types that use selectors should document the validity and meaning of them.
Note:
For some API types, such as ReplicaSets, the label selectors of two instances must not overlap within a namespace, or the controller can see that as conflicting instructions and fail to determine how many replicas should be present.Caution:
For both equality-based and set-based conditions there is no logical OR (||) operator.
Ensure your filter statements are structured accordingly.Equality-based requirement
Equality- or inequality-based requirements allow filtering by label keys and values.
Matching objects must satisfy all of the specified label constraints, though they may
have additional labels as well. Three kinds of operators are admitted =,==,!=.
The first two represent equality (and are synonyms), while the latter represents inequality.
For example:
environment = production
tier != frontend
The former selects all resources with key equal to environment and value equal to production.
The latter selects all resources with key equal to tier and value distinct from frontend,
and all resources with no labels with the tier key. One could filter for resources in production
excluding frontend using the comma operator: environment=production,tier!=frontend
One usage scenario for equality-based label requirement is for Pods to specify
node selection criteria. For example, the sample Pod below selects nodes where
the accelerator label exists and is set to nvidia-tesla-p100.
apiVersion: v1
kind: Pod
metadata:
  name: cuda-test
spec:
  containers:
    - name: cuda-test
      image: "registry.k8s.io/cuda-vector-add:v0.1"
      resources:
        limits:
          nvidia.com/gpu: 1
  nodeSelector:
    accelerator: nvidia-tesla-p100
Set-based requirement
Set-based label requirements allow filtering keys according to a set of values.
Three kinds of operators are supported: in,notin and exists (only the key identifier).
For example:
environment in (production, qa)
tier notin (frontend, backend)
partition
!partition
- The first example selects all resources with key equal to
environmentand value equal toproductionorqa. - The second example selects all resources with key equal to
tierand values other thanfrontendandbackend, and all resources with no labels with thetierkey. - The third example selects all resources including a label with key
partition; no values are checked. - The fourth example selects all resources without a label with key
partition; no values are checked.
Similarly the comma separator acts as an AND operator. So filtering resources
with a partition key (no matter the value) and with environment different
than qa can be achieved using partition,environment notin (qa).
The set-based label selector is a general form of equality since
environment=production is equivalent to environment in (production);
similarly for != and notin.
Set-based requirements can be mixed with equality-based requirements.
For example: partition in (customerA, customerB),environment!=qa.
API
LIST and WATCH filtering
For list and watch operations, you can specify label selectors to filter the sets of objects returned; you specify the filter using a query parameter. (To learn in detail about watches in Kubernetes, read efficient detection of changes). Both requirements are permitted (presented here as they would appear in a URL query string):
- equality-based requirements:
?labelSelector=environment%3Dproduction,tier%3Dfrontend - set-based requirements:
?labelSelector=environment+in+%28production%2Cqa%29%2Ctier+in+%28frontend%29
Both label selector styles can be used to list or watch resources via a REST client.
For example, targeting apiserver with kubectl and using equality-based one may write:
kubectl get pods -l environment=production,tier=frontend
or using set-based requirements:
kubectl get pods -l 'environment in (production),tier in (frontend)'
As already mentioned set-based requirements are more expressive. For instance, they can implement the OR operator on values:
kubectl get pods -l 'environment in (production, qa)'
or restricting negative matching via notin operator:
kubectl get pods -l 'environment,environment notin (frontend)'
Set references in API objects
Some Kubernetes objects, such as services
and replicationcontrollers,
also use label selectors to specify sets of other resources, such as
pods.
Service and ReplicationController
The set of pods that a service targets is defined with a label selector.
Similarly, the population of pods that a replicationcontroller should
manage is also defined with a label selector.
Label selectors for both objects are defined in json or yaml files using maps,
and only equality-based requirement selectors are supported:
"selector": {
    "component" : "redis",
}
or
selector:
  component: redis
This selector (respectively in json or yaml format) is equivalent to
component=redis or component in (redis).
Resources that support set-based requirements
Newer resources, such as Job,
Deployment,
ReplicaSet, and
DaemonSet,
support set-based requirements as well.
selector:
  matchLabels:
    component: redis
  matchExpressions:
    - { key: tier, operator: In, values: [cache] }
    - { key: environment, operator: NotIn, values: [dev] }
matchLabels is a map of {key,value} pairs. A single {key,value} in the
matchLabels map is equivalent to an element of matchExpressions, whose key
field is "key", the operator is "In", and the values array contains only "value".
matchExpressions is a list of pod selector requirements. Valid operators include
In, NotIn, Exists, and DoesNotExist. The values set must be non-empty in the case of
In and NotIn. All of the requirements, from both matchLabels and matchExpressions
are ANDed together -- they must all be satisfied in order to match.
Selecting sets of nodes
One use case for selecting over labels is to constrain the set of nodes onto which a pod can schedule. See the documentation on node selection for more information.
Using labels effectively
You can apply a single label to any resources, but this is not always the best practice. There are many scenarios where multiple labels should be used to distinguish resource sets from one another.
For instance, different applications would use different values for the app label, but a
multi-tier application, such as the guestbook example,
would additionally need to distinguish each tier.
In the following examples, the app label is included for convenience in manual queries
and simple CLI usage. The app.kubernetes.io/name label follows the recommended Kubernetes
labeling conventions and is better suited for tooling and automation.
The frontend could carry the following labels:
labels:
  app: guestbook
  app.kubernetes.io/name: guestbook
  tier: frontend
while the Redis master and replica would have different tier labels, and perhaps even an
additional role label:
labels:
  app: guestbook
  app.kubernetes.io/name: guestbook
  tier: backend
  role: master
and
labels:
  app: guestbook
  app.kubernetes.io/name: guestbook
  tier: backend
  role: replica
The labels allow for slicing and dicing the resources along any dimension specified by a label:
kubectl apply -f examples/guestbook/all-in-one/guestbook-all-in-one.yaml
kubectl get pods -Lapp -Ltier -Lrole
NAME                           READY  STATUS    RESTARTS   AGE   APP         TIER       ROLE
guestbook-fe-4nlpb             1/1    Running   0          1m    guestbook   frontend   <none>
guestbook-fe-ght6d             1/1    Running   0          1m    guestbook   frontend   <none>
guestbook-fe-jpy62             1/1    Running   0          1m    guestbook   frontend   <none>
guestbook-redis-master-5pg3b   1/1    Running   0          1m    guestbook   backend    master
guestbook-redis-replica-2q2yf  1/1    Running   0          1m    guestbook   backend    replica
guestbook-redis-replica-qgazl  1/1    Running   0          1m    guestbook   backend    replica
my-nginx-divi2                 1/1    Running   0          29m   nginx       <none>     <none>
my-nginx-o0ef1                 1/1    Running   0          29m   nginx       <none>     <none>
kubectl get pods -lapp=guestbook,role=replica
NAME                           READY  STATUS   RESTARTS  AGE
guestbook-redis-replica-2q2yf  1/1    Running  0         3m
guestbook-redis-replica-qgazl  1/1    Running  0         3m
Updating labels
Sometimes you may want to relabel existing pods and other resources before creating
new resources. This can be done with kubectl label.
For example, if you want to label all your NGINX Pods as frontend tier, run:
kubectl label pods -l app=nginx tier=fe
pod/my-nginx-2035384211-j5fhi labeled
pod/my-nginx-2035384211-u2c7e labeled
pod/my-nginx-2035384211-u3t6x labeled
This first filters all pods with the label "app=nginx", and then labels them with the "tier=fe". To see the pods you labeled, run:
kubectl get pods -l app=nginx -L tier
NAME                        READY     STATUS    RESTARTS   AGE       TIER
my-nginx-2035384211-j5fhi   1/1       Running   0          23m       fe
my-nginx-2035384211-u2c7e   1/1       Running   0          23m       fe
my-nginx-2035384211-u3t6x   1/1       Running   0          23m       fe
This outputs all "app=nginx" pods, with an additional label column of pods' tier
(specified with -L or --label-columns).
For more information, please see kubectl label.
What's next
1.2.4 - Namespaces
In Kubernetes, namespaces provide a mechanism for isolating groups of resources within a single cluster. Names of resources need to be unique within a namespace, but not across namespaces. Namespace-based scoping is applicable only for namespaced objects (e.g. Deployments, Services, etc.) and not for cluster-wide objects (e.g. StorageClass, Nodes, PersistentVolumes, etc.).
When to Use Multiple Namespaces
Namespaces are intended for use in environments with many users spread across multiple teams, or projects. For clusters with a few to tens of users, you should not need to create or think about namespaces at all. Start using namespaces when you need the features they provide.
Namespaces provide a scope for names. Names of resources need to be unique within a namespace, but not across namespaces. Namespaces cannot be nested inside one another and each Kubernetes resource can only be in one namespace.
Namespaces are a way to divide cluster resources between multiple users (via resource quota).
It is not necessary to use multiple namespaces to separate slightly different resources, such as different versions of the same software: use labels to distinguish resources within the same namespace.
Note:
For a production cluster, consider not using thedefault namespace. Instead, make other namespaces and use those.Initial namespaces
Kubernetes starts with four initial namespaces:
default- Kubernetes includes this namespace so that you can start using your new cluster without first creating a namespace.
kube-node-lease- This namespace holds Lease objects associated with each node. Node leases allow the kubelet to send heartbeats so that the control plane can detect node failure.
kube-public- This namespace is readable by all clients (including those not authenticated). This namespace is mostly reserved for cluster usage, in case that some resources should be visible and readable publicly throughout the whole cluster. The public aspect of this namespace is only a convention, not a requirement.
kube-system- The namespace for objects created by the Kubernetes system.
Working with Namespaces
Creation and deletion of namespaces are described in the Admin Guide documentation for namespaces.
Note:
Avoid creating namespaces with the prefixkube-, since it is reserved for Kubernetes system namespaces.Viewing namespaces
You can list the current namespaces in a cluster using:
kubectl get namespace
NAME              STATUS   AGE
default           Active   1d
kube-node-lease   Active   1d
kube-public       Active   1d
kube-system       Active   1d
Setting the namespace for a request
To set the namespace for a current request, use the --namespace flag.
For example:
kubectl run nginx --image=nginx --namespace=<insert-namespace-name-here>
kubectl get pods --namespace=<insert-namespace-name-here>
Setting the namespace preference
You can permanently save the namespace for all subsequent kubectl commands in that context.
kubectl config set-context --current --namespace=<insert-namespace-name-here>
# Validate it
kubectl config view --minify | grep namespace:
Namespaces and DNS
When you create a Service,
it creates a corresponding DNS entry.
This entry is of the form <service-name>.<namespace-name>.svc.cluster.local, which means
that if a container only uses <service-name>, it will resolve to the service which
is local to a namespace. This is useful for using the same configuration across
multiple namespaces such as Development, Staging and Production. If you want to reach
across namespaces, you need to use the fully qualified domain name (FQDN).
As a result, all namespace names must be valid RFC 1123 DNS labels.
Warning:
By creating namespaces with the same name as public top-level domains, Services in these namespaces can have short DNS names that overlap with public DNS records. Workloads from any namespace performing a DNS lookup without a trailing dot will be redirected to those services, taking precedence over public DNS.
To mitigate this, limit privileges for creating namespaces to trusted users. If required, you could additionally configure third-party security controls, such as admission webhooks, to block creating any namespace with the name of public TLDs.
Not all objects are in a namespace
Most Kubernetes resources (e.g. Pods, Services, Deployments, and others) are in some namespaces. However namespace resources are not themselves in a namespace. And low-level resources, such as Nodes and PersistentVolumes, are not in any namespace.
To see which Kubernetes resources are and aren't in a namespace:
# In a namespace
kubectl api-resources --namespaced=true

# Not in a namespace
kubectl api-resources --namespaced=false
Automatic labelling
FEATURE STATE:
Kubernetes 1.22 [stable]The Kubernetes control plane sets an immutable label
kubernetes.io/metadata.name on all namespaces.
The value of the label is the namespace name.
What's next
- Learn more about creating a new namespace.
- Learn more about deleting a namespace.
1.2.5 - Annotations
You can use Kubernetes annotations to attach arbitrary non-identifying metadata to objects. Clients such as tools and libraries can retrieve this metadata.
Attaching metadata to objects
You can use either labels or annotations to attach metadata to Kubernetes objects. Labels can be used to select objects and to find collections of objects that satisfy certain conditions. In contrast, annotations are not used to identify and select objects. The metadata in an annotation can be small or large, structured or unstructured, and can include characters not permitted by labels. It is possible to use labels as well as annotations in the metadata of the same object.
Annotations, like labels, are key/value maps:
"metadata": {
  "annotations": {
    "key1" : "value1",
    "key2" : "value2"
  }
}
Note:
The keys and the values in the map must be strings. In other words, you cannot use numeric, boolean, list or other types for either the keys or the values.Here are some examples of information that could be recorded in annotations:
Fields managed by a declarative configuration layer. Attaching these fields as annotations distinguishes them from default values set by clients or servers, and from auto-generated fields and fields set by auto-sizing or auto-scaling systems.
Build, release, or image information like timestamps, release IDs, git branch, PR numbers, image hashes, and registry address.
Pointers to logging, monitoring, analytics, or audit repositories.
Client library or tool information that can be used for debugging purposes: for example, name, version, and build information.
User or tool/system provenance information, such as URLs of related objects from other ecosystem components.
Lightweight rollout tool metadata: for example, config or checkpoints.
Phone or pager numbers of persons responsible, or directory entries that specify where that information can be found, such as a team web site.
Directives from the end-user to the implementations to modify behavior or engage non-standard features.
Instead of using annotations, you could store this type of information in an external database or directory, but that would make it much harder to produce shared client libraries and tools for deployment, management, introspection, and the like.
Syntax and character set
Annotations are key/value pairs. Valid annotation keys have two segments: an optional prefix and name, separated by a slash (/). The name segment is required and must be 63 characters or less, beginning and ending with an alphanumeric character ([a-z0-9A-Z]) with dashes (-), underscores (_), dots (.), and alphanumerics between. The prefix is optional. If specified, the prefix must be a DNS subdomain: a series of DNS labels separated by dots (.), not longer than 253 characters in total, followed by a slash (/).
If the prefix is omitted, the annotation Key is presumed to be private to the user. Automated system components (e.g. kube-scheduler, kube-controller-manager, kube-apiserver, kubectl, or other third-party automation) which add annotations to end-user objects must specify a prefix.
The kubernetes.io/ and k8s.io/ prefixes are reserved for Kubernetes core components.
Valid annotation values have no character set restrictions — unlike label values, annotation values may contain any string, including special characters, whitespace, and structured data such as JSON or YAML. If you plan to store binary data (such as CBOR), the Kubernetes project recommends that you base64 encode it. However, the total size of all annotations on a single object (keys and values combined) must not exceed 256 KiB.
For example, here's a manifest for a Pod that has the annotation imageregistry: https://hub.docker.com/ :
apiVersion: v1
kind: Pod
metadata:
  name: annotations-demo
  annotations:
    imageregistry: "https://hub.docker.com/"
spec:
  containers:
  - name: nginx
    image: nginx:1.14.2
    ports:
    - containerPort: 80
What's next
- Learn more about Labels and Selectors.
- Find Well-known labels, Annotations and Taints
1.2.6 - Field Selectors
Field selectors let you select Kubernetes objects based on the value of one or more resource fields. Here are some examples of field selector queries:
metadata.name=my-servicemetadata.namespace!=defaultstatus.phase=Pending
This kubectl command selects all Pods for which the value of the status.phase field is Running:
kubectl get pods --field-selector status.phase=Running
Note:
Field selectors are essentially resource filters. By default, no selectors/filters are applied, meaning that all resources of the specified type are selected. This makes thekubectl queries kubectl get pods and kubectl get pods --field-selector "" equivalent.Supported fields
Supported field selectors vary by Kubernetes resource type. All resource types support the metadata.name and metadata.namespace fields. Using unsupported field selectors produces an error. For example:
kubectl get ingress --field-selector foo.bar=baz
Error from server (BadRequest): Unable to find "ingresses" that match label selector "", field selector "foo.bar=baz": "foo.bar" is not a known field selector: only "metadata.name", "metadata.namespace"
List of supported fields
| Kind | Fields |
|---|---|
| Pod | spec.nodeNamespec.restartPolicyspec.schedulerNamespec.serviceAccountNamespec.hostNetworkstatus.phasestatus.podIPstatus.podIPsstatus.nominatedNodeName |
| Event | involvedObject.kindinvolvedObject.namespaceinvolvedObject.nameinvolvedObject.uidinvolvedObject.apiVersioninvolvedObject.resourceVersioninvolvedObject.fieldPathreasonreportingComponentsourcetype |
| Secret | type |
| Service | spec.clusterIPspec.type |
| Namespace | status.phase |
| ReplicaSet | status.replicas |
| ReplicationController | status.replicas |
| Job | status.successful |
| Node | spec.unschedulable |
| CertificateSigningRequest | spec.signerName |
Custom resources fields
All custom resource types support the metadata.name and metadata.namespace fields.
Additionally, the spec.versions[*].selectableFields field of a CustomResourceDefinition
declares which other fields in a custom resource may be used in field selectors. See selectable fields for custom resources
for more information about how to use field selectors with CustomResourceDefinitions.
Supported operators
You can use the =, ==, and != operators with field selectors (= and == mean the same thing). This kubectl command, for example, selects all Kubernetes Services that aren't in the default namespace:
kubectl get services --all-namespaces --field-selector metadata.namespace!=default
Chained selectors
As with label and other selectors, field selectors can be chained together as a comma-separated list. This kubectl command selects all Pods for which the status.phase does not equal Running and the spec.restartPolicy field equals Always:
kubectl get pods --field-selector=status.phase!=Running,spec.restartPolicy=Always
Multiple resource types
You can use field selectors across multiple resource types. This kubectl command selects all Statefulsets and Services that are not in the default namespace:
kubectl get statefulsets,services --all-namespaces --field-selector metadata.namespace!=default
1.2.7 - Finalizers
Finalizers are namespaced keys that tell Kubernetes to wait until specific conditions are met before it fully deletes resources that are marked for deletion. Finalizers alert controllers to clean up resources the deleted object owned.
When you tell Kubernetes to delete an object that has finalizers specified for
it, the Kubernetes API marks the object for deletion by populating .metadata.deletionTimestamp,
and returns a 202 status code (HTTP "Accepted"). The target object remains in a terminating state while the
control plane, or other components, take the actions defined by the finalizers.
After these actions are complete, the controller removes the relevant finalizers
from the target object. When the metadata.finalizers field is empty,
Kubernetes considers the deletion complete and deletes the object.
You can use finalizers to control garbage collection of resources. For example, you can define a finalizer to clean up related API resources or infrastructure before the controller deletes the object being finalized.
You can use finalizers to control garbage collection of objects by alerting controllers to perform specific cleanup tasks before deleting the target resource.
Finalizers don't usually specify the code to execute. Instead, they are typically lists of keys on a specific resource similar to annotations. Kubernetes specifies some finalizers automatically, but you can also specify your own.
How finalizers work
When you create a resource using a manifest file, you can specify finalizers in
the metadata.finalizers field. When you attempt to delete the resource, the
API server handling the delete request notices the values in the finalizers field
and does the following:
- Modifies the object to add a
metadata.deletionTimestampfield with the time you started the deletion. - Prevents the object from being removed until all items are removed from its
metadata.finalizersfield - Returns a
202status code (HTTP "Accepted")
The controller managing that finalizer notices the update to the object setting the
metadata.deletionTimestamp, indicating deletion of the object has been requested.
The controller then attempts to satisfy the requirements of the finalizers
specified for that resource. Each time a finalizer condition is satisfied, the
controller removes that key from the resource's finalizers field. When the
finalizers field is emptied, an object with a deletionTimestamp field set
is automatically deleted. You can also use finalizers to prevent deletion of unmanaged resources.
A common example of a finalizer is kubernetes.io/pv-protection, which prevents
accidental deletion of PersistentVolume objects. When a PersistentVolume
object is in use by a Pod, Kubernetes adds the pv-protection finalizer. If you
try to delete the PersistentVolume, it enters a Terminating status, but the
controller can't delete it because the finalizer exists. When the Pod stops
using the PersistentVolume, Kubernetes clears the pv-protection finalizer,
and the controller deletes the volume.
Note:
When you
DELETEan object, Kubernetes adds the deletion timestamp for that object and then immediately starts to restrict changes to the.metadata.finalizersfield for the object that is now pending deletion. You can remove existing finalizers (deleting an entry from thefinalizerslist) but you cannot add a new finalizer. You also cannot modify thedeletionTimestampfor an object once it is set.After the deletion is requested, you can not resurrect this object. The only way is to delete it and make a new similar object.
Note:
Custom finalizer names must be publicly qualified finalizer names, such asexample.com/finalizer-name.
Kubernetes enforces this format; the API server rejects writes to objects where the change does not use qualified finalizer names for any custom finalizer.Owner references, labels, and finalizers
Like labels, owner references describe the relationships between objects in Kubernetes, but are used for a different purpose. When a controller manages objects like Pods, it uses labels to track changes to groups of related objects. For example, when a Job creates one or more Pods, the Job controller applies labels to those pods and tracks changes to any Pods in the cluster with the same label.
The Job controller also adds owner references to those Pods, pointing at the Job that created the Pods. If you delete the Job while these Pods are running, Kubernetes uses the owner references (not labels) to determine which Pods in the cluster need cleanup.
Kubernetes also processes finalizers when it identifies owner references on a resource targeted for deletion.
In some situations, finalizers can block the deletion of dependent objects, which can cause the targeted owner object to remain for longer than expected without being fully deleted. In these situations, you should check finalizers and owner references on the target owner and dependent objects to troubleshoot the cause.
Note:
In cases where objects are stuck in a deleting state, avoid manually removing finalizers to allow deletion to continue. Finalizers are usually added to resources for a reason, so forcefully removing them can lead to issues in your cluster. This should only be done when the purpose of the finalizer is understood and is accomplished in another way (for example, manually cleaning up some dependent object).What's next
- Read Using Finalizers to Control Deletion on the Kubernetes blog.
1.2.8 - Owners and Dependents
In Kubernetes, some objects are owners of other objects. For example, a ReplicaSet is the owner of a set of Pods. These owned objects are dependents of their owner.
Ownership is different from the labels and selectors
mechanism that some resources also use. For example, consider a Service that
creates EndpointSlice objects. The Service uses labels to allow the control plane to
determine which EndpointSlice objects are used for that Service. In addition
to the labels, each EndpointSlice that is managed on behalf of a Service has
an owner reference. Owner references help different parts of Kubernetes avoid
interfering with objects they don’t control.
Owner references in object specifications
Dependent objects have a metadata.ownerReferences field that references their
owner object. A valid owner reference consists of the object name and a UID
within the same namespace as the dependent object. Kubernetes sets the value of
this field automatically for objects that are dependents of other objects like
ReplicaSets, DaemonSets, Deployments, Jobs and CronJobs, and ReplicationControllers.
You can also configure these relationships manually by changing the value of
this field. However, you usually don't need to and can allow Kubernetes to
automatically manage the relationships.
Dependent objects also have an ownerReferences.blockOwnerDeletion field that
takes a boolean value and controls whether specific dependents can block garbage
collection from deleting their owner object. Kubernetes automatically sets this
field to true if a controller
(for example, the Deployment controller) sets the value of the
metadata.ownerReferences field. You can also set the value of the
blockOwnerDeletion field manually to control which dependents block garbage
collection.
A Kubernetes admission controller controls user access to change this field for dependent resources, based on the delete permissions of the owner. This control prevents unauthorized users from delaying owner object deletion.
Note:
Cross-namespace owner references are disallowed by design. Namespaced dependents can specify cluster-scoped or namespaced owners. A namespaced owner must exist in the same namespace as the dependent. If it does not, the owner reference is treated as absent, and the dependent is subject to deletion once all owners are verified absent.
Cluster-scoped dependents can only specify cluster-scoped owners. In v1.20+, if a cluster-scoped dependent specifies a namespaced kind as an owner, it is treated as having an unresolvable owner reference, and is not able to be garbage collected.
In v1.20+, if the garbage collector detects an invalid cross-namespace ownerReference,
or a cluster-scoped dependent with an ownerReference referencing a namespaced kind, a warning Event
with a reason of OwnerRefInvalidNamespace and an involvedObject of the invalid dependent is reported.
You can check for that kind of Event by running
kubectl get events -A --field-selector=reason=OwnerRefInvalidNamespace.
Ownership and finalizers
When you tell Kubernetes to delete a resource, the API server allows the
managing controller to process any finalizer rules
for the resource. Finalizers
prevent accidental deletion of resources your cluster may still need to function
correctly. For example, if you try to delete a PersistentVolume that is still
in use by a Pod, the deletion does not happen immediately because the
PersistentVolume has the kubernetes.io/pv-protection finalizer on it.
Instead, the volume remains in the Terminating status until Kubernetes clears
the finalizer, which only happens after the PersistentVolume is no longer
bound to a Pod.
Kubernetes also adds finalizers to an owner resource when you use either
foreground or orphan cascading deletion.
In foreground deletion, it adds the foreground finalizer so that the
controller must delete dependent resources that also have
ownerReferences.blockOwnerDeletion=true before it deletes the owner. If you
specify an orphan deletion policy, Kubernetes adds the orphan finalizer so
that the controller ignores dependent resources after it deletes the owner
object.
What's next
- Learn more about Kubernetes finalizers.
- Learn about garbage collection.
- Read the API reference for object metadata.
1.2.9 - Recommended Labels
You can visualize and manage Kubernetes objects with more tools than kubectl and the dashboard. A common set of labels allows tools to work interoperably, describing objects in a common manner that all tools can understand.
In addition to supporting tooling, the recommended labels describe applications in a way that can be queried.
The metadata is organized around the concept of an application. Kubernetes is not a platform as a service (PaaS) and doesn't have or enforce a formal notion of an application. Instead, applications are informal and described with metadata. The definition of what an application contains is loose.
Note:
These are recommended labels. They make it easier to manage applications but aren't required for any core tooling.Shared labels and annotations share a common prefix: app.kubernetes.io. Labels
without a prefix are private to users. The shared prefix ensures that shared labels
do not interfere with custom user labels.
Labels
In order to take full advantage of using these labels, they should be applied on every resource object.
| Key | Description | Example | Type |
|---|---|---|---|
app.kubernetes.io/name | The name of the application | mysql | string |
app.kubernetes.io/instance | A unique name identifying the instance of an application | mysql-abcxyz | string |
app.kubernetes.io/version | The current version of the application (e.g., a SemVer 1.0, revision hash, etc.) | 5.7.21 | string |
app.kubernetes.io/component | The component within the architecture | database | string |
app.kubernetes.io/part-of | The name of a higher level application this one is part of | wordpress | string |
app.kubernetes.io/managed-by | The tool being used to manage the operation of an application | Helm | string |
To illustrate these labels in action, consider the following StatefulSet object:
# This is an excerpt
apiVersion: apps/v1
kind: StatefulSet
metadata:
  labels:
    app.kubernetes.io/name: mysql
    app.kubernetes.io/instance: mysql-abcxyz
    app.kubernetes.io/version: "5.7.21"
    app.kubernetes.io/component: database
    app.kubernetes.io/part-of: wordpress
    app.kubernetes.io/managed-by: Helm
Applications And Instances Of Applications
An application can be installed one or more times into a Kubernetes cluster and, in some cases, the same namespace. For example, WordPress can be installed more than once where different websites are different installations of WordPress.
The name of an application and the instance name are recorded separately. For
example, WordPress has a app.kubernetes.io/name of wordpress while it has
an instance name, represented as app.kubernetes.io/instance with a value of
wordpress-abcxyz. This enables the application and instance of the application
to be identifiable. Every instance of an application must have a unique name.
Examples
To illustrate different ways to use these labels the following examples have varying complexity.
A Simple Stateless Service
Consider the case for a simple stateless service deployed using Deployment and Service objects. The following two snippets represent how the labels could be used in their simplest form.
The Deployment is used to oversee the pods running the application itself.
apiVersion: apps/v1
kind: Deployment
metadata:
  labels:
    app.kubernetes.io/name: myservice
    app.kubernetes.io/instance: myservice-abcxyz
...
The Service is used to expose the application.
apiVersion: v1
kind: Service
metadata:
  labels:
    app.kubernetes.io/name: myservice
    app.kubernetes.io/instance: myservice-abcxyz
...
Web Application With A Database
Consider a slightly more complicated application: a web application (WordPress) using a database (MySQL), installed using Helm. The following snippets illustrate the start of objects used to deploy this application.
The start to the following Deployment is used for WordPress:
apiVersion: apps/v1
kind: Deployment
metadata:
  labels:
    app.kubernetes.io/name: wordpress
    app.kubernetes.io/instance: wordpress-abcxyz
    app.kubernetes.io/version: "4.9.4"
    app.kubernetes.io/managed-by: Helm
    app.kubernetes.io/component: server
    app.kubernetes.io/part-of: wordpress
...
The Service is used to expose WordPress:
apiVersion: v1
kind: Service
metadata:
  labels:
    app.kubernetes.io/name: wordpress
    app.kubernetes.io/instance: wordpress-abcxyz
    app.kubernetes.io/version: "4.9.4"
    app.kubernetes.io/managed-by: Helm
    app.kubernetes.io/component: server
    app.kubernetes.io/part-of: wordpress
...
MySQL is exposed as a StatefulSet with metadata for both it and the larger application it belongs to:
apiVersion: apps/v1
kind: StatefulSet
metadata:
  labels:
    app.kubernetes.io/name: mysql
    app.kubernetes.io/instance: mysql-abcxyz
    app.kubernetes.io/version: "5.7.21"
    app.kubernetes.io/managed-by: Helm
    app.kubernetes.io/component: database
    app.kubernetes.io/part-of: wordpress
...
The Service is used to expose MySQL as part of WordPress:
apiVersion: v1
kind: Service
metadata:
  labels:
    app.kubernetes.io/name: mysql
    app.kubernetes.io/instance: mysql-abcxyz
    app.kubernetes.io/version: "5.7.21"
    app.kubernetes.io/managed-by: Helm
    app.kubernetes.io/component: database
    app.kubernetes.io/part-of: wordpress
...
With the MySQL StatefulSet and Service you'll notice information about both MySQL and WordPress, the broader application, are included.
1.2.10 - Storage Versions
The Kubernetes API server stores objects, relying on an etcd-compatible backing store (often, the backing storage is etcd itself). Each object is serialized using a particular version of that API type; for example, the v1 representation of a ConfigMap. Kubernetes uses the term storage version to describe how an object is stored in your cluster.
The Kubernetes API also relies on automatic conversion; for example, if you have a HorizontalPodAutoscaler, then you can interact with that HorizontalPodAutoscaler using any mix of the v1 and v2 versions of the HorizontalPodAutoscaler API. Kubernetes is responsible for converting each API call so that clients do not see what version is actually serialized.
For cluster administrators, object storage version is an important concept to understand since it is what links the API representation of the object to the actual encoding in the storage backend. This can be important for when the underlying binary encodings of the object matter, such as for encryption at rest, or API deprecation.
The same API may have multiple storage versions that the API Server can then convert to an object schema. A single object that is part of that resource must only have one storage version at any time. This means that the API Server is aware of the binary encodings of the objects and is able to convert between all the stored versions to the API Representation of the object dynamically.
The version of an object is separate from the storage version entirely. For
example, a v1alpha1 and v1beta1 API Object for the same Resource will be
encoded the same in storage as long as the storage version has not been updated
between the two objects.
Storage version to resource mapping
Every resource will have 1 active storage version at any point in time, meaning that any write to an object will store the object at that storage version. The storage version can be updated however, making it so that objects can be stored at differing versions. One object will only be stored at one storage version at any time.
Reads from the API Server will convert the stored data to the API representation of the object. This makes it so that old storage versions can sit indefinitely as long as no updates occur to the object. Writes, on the other hand, will convert the stored object to the new representation upon update.
Storage versions for custom resources
Custom resources are defined dynamically, and as such differ from built in Kubernetes types with their storage version. Builtin objects generally have their storage encoding defined separately from their API types, where the stored object acts as a hub and the specific version of the resource does not matter apart from being a field in the object schema.
However, for custom resources, a certain version of the resource must be set as the storage version. The schema defined by that specific version of the custom resource will be used as the encoding of the resource in the storage layer. See the advanced CRD featureset for more detailed information on the API setup and versioning.
For example see this CustomResourceDefinition for crontabs:
apiVersion: apiextensions.k8s.io/v1
kind: CustomResourceDefinition
metadata:
  name: crontabs.example.com
spec:
  group: example.com
  # list of versions supported by this CustomResourceDefinition
  versions:
  - name: v1beta1
    # Each version can be enabled/disabled by Served flag.
    served: true
    # One and only one version must be marked as the storage version.
    storage: true
    schema:
      openAPIV3Schema:
        type: object
        properties:
          host:
            type: string
          port:
            type: string
  - name: v1
    served: true
    storage: false
    schema:
      openAPIV3Schema:
        type: object
        properties:
          host:
            type: string
          port:
            type: string
          time:
            type: string
  conversion:
    strategy: None
  scope: Namespaced
  names:
    plural: crontabs
    singular: crontab
    kind: CronTab
    shortNames:
    - ct
The v1beta1 API definition is used as the storage version, meaning that any
updates or creation of crontabs will be stored with the object schema of the
v1beta1 api. In this case it actually would mean that the v1 API object
would never be able to store the time field since it is not part of the
storage definition. This schema is used in the storage layer as the binary
encoding of the object itself. Trying to set two versions as the stored version
at the same time is considered invalid, since that would mean that two data
schemes would be considered valid ways to store the objects at the same time.
Upon modification of the version that is used for storage, that version of the API will be used to store any new or update CRs. Watching or getting the object will have the object be in use but will just convert the object from the old storage version and not affect the object. Only updating or creating will have an effect and use the newly defined storage version.
How storage versions are relevant to encryption at rest
There are tools to encrypt the at rest storage of a cluster, especially for cluster secrets. This adds an additional layer of protection for data exfiltration since the actual stored data in the cluster is encrypted. This means that the API Server is actually decrypting the data as it retrieves them from storage. The APIServer must have the key for that storage version in order to decode the object properly.
The storage version in this case is more than just the binary encoding of the object. As long as what is stored can be somehow converted into the API object, it can be used as a storage version.
Migrating to a different storage version
Multiple storage versions for a single resource can pose problems for cluster administrators. A cluster administrator may not remove old versions of an API for CRDs which may be unsupported until they are sure that all objects are no longer using the storage version associated with it. With a large number of objects and an opaque view into which ones are new and which ones still are backed by old storage versions, it makes it difficult to tell when a version can be safely removed. If a version is removed prematurely, it can mean being unable to read the object entirely.
Another important issue is the use of encryption keys as defined in the section above. Since a resource must be actively in use to update the storage version, when a key rotation is done, both the old encryption key and the new encryption key must remain in use until the administrator is sure all objects have been written to at least once. This poses both security risks and usability issues, since a key cannot be fully removed from use until then.
See storage version migration on examples of how to run a migration to ensure that all objects are using a newer storage version without manual intervention.
1.3 - The Kubernetes API
The Kubernetes API lets you query and manipulate the state of objects in Kubernetes. The core of Kubernetes' control plane is the API server and the HTTP API that it exposes. Users, the different parts of your cluster, and external components all communicate with one another through the API server.
The core of Kubernetes' control plane is the API server. The API server exposes an HTTP API that lets end users, different parts of your cluster, and external components communicate with one another.
The Kubernetes API lets you query and manipulate the state of API objects in Kubernetes (for example: Pods, Namespaces, ConfigMaps, and Events).
Most operations can be performed through the kubectl command-line interface or other command-line tools, such as kubeadm, which in turn use the API. However, you can also access the API directly using REST calls. Kubernetes provides a set of client libraries for those looking to write applications using the Kubernetes API.
Each Kubernetes cluster publishes the specification of the APIs that the cluster serves.
There are two mechanisms that Kubernetes uses to publish these API specifications; both are useful
to enable automatic interoperability. For example, the kubectl tool fetches and caches the API
specification for enabling command-line completion and other features.
The two supported mechanisms are as follows:
The Discovery API provides information about the Kubernetes APIs: API names, resources, versions, and supported operations. This is a Kubernetes specific term as it is a separate API from the Kubernetes OpenAPI. It is intended to be a brief summary of the available resources and it does not detail specific schema for the resources. For reference about resource schemas, please refer to the OpenAPI document.
The Kubernetes OpenAPI Document provides (full) OpenAPI v2.0 and 3.0 schemas for all Kubernetes API endpoints. The OpenAPI v3 is the preferred method for accessing OpenAPI as it provides a more comprehensive and accurate view of the API. It includes all the available API paths, as well as all resources consumed and produced for every operations on every endpoints. It also includes any extensibility components that a cluster supports. The data is a complete specification and is significantly larger than that from the Discovery API.
Discovery API
Kubernetes publishes a list of all group versions and resources supported via the Discovery API. This includes the following for each resource:
- Name
- Cluster or namespaced scope
- Endpoint URL and supported verbs
- Alternative names
- Group, version, kind
The API is available in both aggregated and unaggregated form. The aggregated discovery serves two endpoints, while the unaggregated discovery serves a separate endpoint for each group version.
Aggregated discovery
FEATURE STATE:
Kubernetes v1.30 [stable](enabled by default)Kubernetes offers stable support for aggregated discovery, publishing
all resources supported by a cluster through two endpoints (/api and
/apis). Requesting this
endpoint drastically reduces the number of requests sent to fetch the
discovery data from the cluster. You can access the data by
requesting the respective endpoints with an Accept header indicating
the aggregated discovery resource:
Accept: application/json;v=v2;g=apidiscovery.k8s.io;as=APIGroupDiscoveryList.
Without indicating the resource type using the Accept header, the default
response for the /api and /apis endpoint is an unaggregated discovery
document.
The discovery document for the built-in resources can be found in the Kubernetes GitHub repository. This Github document can be used as a reference of the base set of the available resources if a Kubernetes cluster is not available to query.
The endpoint also supports ETag and protobuf encoding.
Unaggregated discovery
Without discovery aggregation, discovery is published in levels, with the root endpoints publishing discovery information for downstream documents.
A list of all group versions supported by a cluster is published at
the /api and /apis endpoints. Example:
{
  "kind": "APIGroupList",
  "apiVersion": "v1",
  "groups": [
    {
      "name": "apiregistration.k8s.io",
      "versions": [
        {
          "groupVersion": "apiregistration.k8s.io/v1",
          "version": "v1"
        }
      ],
      "preferredVersion": {
        "groupVersion": "apiregistration.k8s.io/v1",
        "version": "v1"
      }
    },
    {
      "name": "apps",
      "versions": [
        {
          "groupVersion": "apps/v1",
          "version": "v1"
        }
      ],
      "preferredVersion": {
        "groupVersion": "apps/v1",
        "version": "v1"
      }
    },
    ...
}
Additional requests are needed to obtain the discovery document for each group version at
/apis/<group>/<version> (for example:
/apis/rbac.authorization.k8s.io/v1alpha1), which advertises the list of
resources served under a particular group version. These endpoints are used by
kubectl to fetch the list of resources supported by a cluster.
OpenAPI interface definition
For details about the OpenAPI specifications, see the OpenAPI documentation.
Kubernetes serves both OpenAPI v2.0 and OpenAPI v3.0. OpenAPI v3 is the
preferred method of accessing the OpenAPI because it offers a more comprehensive
(lossless) representation of Kubernetes resources. Due to limitations of OpenAPI
version 2, certain fields are dropped from the published OpenAPI including but not
limited to default, nullable, oneOf.
OpenAPI V2
The Kubernetes API server serves an aggregated OpenAPI v2 spec via the
/openapi/v2 endpoint. You can request the response format using
request headers as follows:
| Header | Possible values | Notes |
|---|---|---|
Accept-Encoding | gzip | not supplying this header is also acceptable |
Accept | application/com.github.proto-openapi.spec.v2@v1.0+protobuf | mainly for intra-cluster use |
application/json | default | |
* | serves application/json |
Warning:
The validation rules published as part of OpenAPI schemas may not be complete, and usually aren't. Additional validation occurs within the API server. If you want precise and complete verification, akubectl apply --dry-run=server runs all the applicable validation (and also activates admission-time
checks).OpenAPI V3
FEATURE STATE:
Kubernetes v1.27 [stable](enabled by default)Kubernetes supports publishing a description of its APIs as OpenAPI v3.
A discovery endpoint /openapi/v3 is provided to see a list of all
group/versions available. This endpoint only returns JSON. These
group/versions are provided in the following format:
{
    "paths": {
        ...,
        "api/v1": {
            "serverRelativeURL": "/openapi/v3/api/v1?hash=CC0E9BFD992D8C59AEC98A1E2336F899E8318D3CF4C68944C3DEC640AF5AB52D864AC50DAA8D145B3494F75FA3CFF939FCBDDA431DAD3CA79738B297795818CF"
        },
        "apis/admissionregistration.k8s.io/v1": {
            "serverRelativeURL": "/openapi/v3/apis/admissionregistration.k8s.io/v1?hash=E19CC93A116982CE5422FC42B590A8AFAD92CDE9AE4D59B5CAAD568F083AD07946E6CB5817531680BCE6E215C16973CD39003B0425F3477CFD854E89A9DB6597"
        },
        ....
    }
}
The relative URLs are pointing to immutable OpenAPI descriptions, in
order to improve client-side caching. The proper HTTP caching headers
are also set by the API server for that purpose (Expires to 1 year in
the future, and Cache-Control to immutable). When an obsolete URL is
used, the API server returns a redirect to the newest URL.
The Kubernetes API server publishes an OpenAPI v3 spec per Kubernetes
group version at the /openapi/v3/apis/<group>/<version>?hash=<hash>
endpoint.
Refer to the table below for accepted request headers.
| Header | Possible values | Notes |
|---|---|---|
Accept-Encoding | gzip | not supplying this header is also acceptable |
Accept | application/com.github.proto-openapi.spec.v3@v1.0+protobuf | mainly for intra-cluster use |
application/json | default | |
* | serves application/json |
A Golang implementation to fetch the OpenAPI V3 is provided in the package
k8s.io/client-go/openapi3.
Kubernetes 1.36 publishes OpenAPI v2.0 and v3.0; there are no plans to support 3.1 in the near future.
Protobuf serialization
Kubernetes implements an alternative Protobuf based serialization format that is primarily intended for intra-cluster communication. For more information about this format, see the Kubernetes Protobuf serialization design proposal and the Interface Definition Language (IDL) files for each schema located in the Go packages that define the API objects.
Persistence
Kubernetes stores the serialized state of objects by writing them into etcd.
API groups and versioning
To make it easier to eliminate fields or restructure resource representations,
Kubernetes supports multiple API versions, each at a different API path, such
as /api/v1 or /apis/rbac.authorization.k8s.io/v1alpha1.
Versioning is done at the API level rather than at the resource or field level to ensure that the API presents a clear, consistent view of system resources and behavior, and to enable controlling access to end-of-life and/or experimental APIs.
To make it easier to evolve and to extend its API, Kubernetes implements API groups that can be enabled or disabled.
API resources are distinguished by their API group, resource type, namespace (for namespaced resources), and name. The API server handles the conversion between API versions transparently: all the different versions are actually representations of the same persisted data. The API server may serve the same underlying data through multiple API versions.
For example, suppose there are two API versions, v1 and v1beta1, for the same
resource. If you originally created an object using the v1beta1 version of its
API, you can later read, update, or delete that object using either the v1beta1
or the v1 API version, until the v1beta1 version is deprecated and removed.
At that point you can continue accessing and modifying the object using the v1 API.
API changes
Any system that is successful needs to grow and change as new use cases emerge or existing ones change. Therefore, Kubernetes has designed the Kubernetes API to continuously change and grow. The Kubernetes project aims to not break compatibility with existing clients, and to maintain that compatibility for a length of time so that other projects have an opportunity to adapt.
In general, new API resources and new resource fields can be added often and frequently. Elimination of resources or fields requires following the API deprecation policy.
Kubernetes makes a strong commitment to maintain compatibility for official Kubernetes APIs
once they reach general availability (GA), typically at API version v1. Additionally,
Kubernetes maintains compatibility with data persisted via beta API versions of official Kubernetes APIs,
and ensures that data can be converted and accessed via GA API versions when the feature goes stable.
If you adopt a beta API version, you will need to transition to a subsequent beta or stable API version once the API graduates. The best time to do this is while the beta API is in its deprecation period, since objects are simultaneously accessible via both API versions. Once the beta API completes its deprecation period and is no longer served, the replacement API version must be used.
Note:
Although Kubernetes also aims to maintain compatibility for alpha APIs versions, in some circumstances this is not possible. If you use any alpha API versions, check the release notes for Kubernetes when upgrading your cluster, in case the API did change in incompatible ways that require deleting all existing alpha objects prior to upgrade.Refer to API versions reference for more details on the API version level definitions.
API Extension
The Kubernetes API can be extended in one of two ways:
- Custom resources let you declaratively define how the API server should provide your chosen resource API.
- You can also extend the Kubernetes API by implementing an aggregation layer.
What's next
- Learn how to extend the Kubernetes API by adding your own CustomResourceDefinition.
- Controlling Access To The Kubernetes API describes how the cluster manages authentication and authorization for API access.
- Learn about API endpoints, resource types and samples by reading API Reference.
- Learn about what constitutes a compatible change, and how to change the API, from API changes.
1.4 - The kubectl command-line tool
kubectl is the primary command-line tool for communicating with a Kubernetes cluster. This page provides an overview of kubectl and its role in the Kubernetes ecosystem.
Kubernetes provides a command line tool for communicating with a Kubernetes cluster's control plane, using the Kubernetes API.
The kubectl tool communicates with your cluster through the Kubernetes API.
For configuration, kubectl looks for a file named config in the $HOME/.kube directory.
You can specify other kubeconfig
files by setting the KUBECONFIG environment variable or by setting the
--kubeconfig flag.
Role of kubectl
The kubectl tool is the primary interface for creating, inspecting, updating, and deleting Kubernetes objects.
It complements the Kubernetes Components that run inside your cluster
and the Kubernetes API that those components implement.
Whether you run kubectl from your laptop or from a Pod inside the cluster, it sends requests to the API server.
Other clients, such as client libraries and web dashboards
like Headlamp, also communicate through the same API.
How kubectl works
The kubectl tool connects to the API server and authenticates using the cluster, user, and context defined in your
kubeconfig file.
When you run kubectl from outside a cluster, it uses the kubeconfig file to find the API server address and credentials.
When kubectl runs inside a Pod (for example, in a CI/CD pipeline), it can use in-cluster authentication
based on the ServiceAccount token mounted in the Pod.
When you run a command, kubectl translates your intent into one or more HTTP requests to the
Kubernetes API. The API server validates each request,
applies it to the cluster state stored in etcd, and
returns the result. This means every kubectl action, whether creating a Deployment or reading logs,
follows the same API-driven path.
Because your kubeconfig can define multiple clusters, users, and contexts, you can use kubectl to
switch between clusters without reconfiguring your environment. Run kubectl config use-context to
change the active context.
What you can do with kubectl
The kubectl tool supports many operations, which fall into these broad categories:
- Manage resources – Create, update, and delete objects such as Pods, Deployments, and Services.
Use
kubectl applyfor declarative management from configuration files. - Inspect cluster state – List and describe objects, view events, and check resource usage.
- Debug – View logs from containers, execute commands inside a running container, or port-forward to a Pod.
- Cluster operations – Drain nodes for maintenance, cordon nodes to prevent new workloads, and manage cluster configuration.
- Script and automate – Format output as JSON, YAML, or custom columns using JSONPath for use in scripts and pipelines.
For syntax, command reference, and examples, see the kubectl reference documentation.
Declarative vs imperative
For production workloads, prefer declarative object management
using kubectl apply with version-controlled configuration files.
Declarative management helps you track changes, collaborate, and integrate with GitOps workflows.
Imperative commands (such as kubectl create or kubectl run) are useful for development and experimentation,
but are harder to reproduce and audit.
Extending kubectl with plugins
You can extend kubectl with plugins that add new
sub-commands. Plugins are standalone binaries that follow the kubectl-<plugin-name> naming convention.
The Kubernetes community maintains many plugins, and you can manage them with the
Krew plugin manager.
Version compatibility
The kubectl tool supports a version skew of plus-or-minus one minor version relative to the cluster's
control plane. For example, kubectl v1.32 works with control planes at v1.31, v1.32, and v1.33.
Using a compatible version avoids unexpected behavior. See the
version skew policy for details.
What's next
- Read the kubectl reference for syntax and command details.
- Install kubectl on your machine.
- Learn about The Kubernetes API that
kubectluses. - Review Kubernetes Components that make up a cluster.
- Explore Object Management and declarative configuration.
- Check the version skew policy for supported version combinations.
2 - Cluster Architecture
The architectural concepts behind Kubernetes.
A Kubernetes cluster consists of a control plane plus a set of worker machines, called nodes, that run containerized applications. Every cluster needs at least one worker node in order to run Pods.
The worker node(s) host the Pods that are the components of the application workload. The control plane manages the worker nodes and the Pods in the cluster. In production environments, the control plane usually runs across multiple computers and a cluster usually runs multiple nodes, providing fault-tolerance and high availability.
This document outlines the various components you need to have for a complete and working Kubernetes cluster.

Figure 1. Kubernetes cluster components.
About this architecture
The diagram in Figure 1 presents an example reference architecture for a Kubernetes cluster. The actual distribution of components can vary based on specific cluster setups and requirements.
In the diagram, each node runs the kube-proxy component. You need a
network proxy component on each node to ensure that the
Service API and associated behaviors
are available on your cluster network. However, some network plugins provide their own,
third party implementation of proxying. When you use that kind of network plugin,
the node does not need to run kube-proxy.
Control plane components
The control plane's components make global decisions about the cluster (for example, scheduling),
as well as detecting and responding to cluster events (for example, starting up a new
pod when a Deployment's
replicas field is unsatisfied).
Control plane components can be run on any machine in the cluster. However, for simplicity, setup scripts typically start all control plane components on the same machine, and do not run user containers on this machine. See Creating Highly Available clusters with kubeadm for an example control plane setup that runs across multiple machines.
kube-apiserver
The API server is a component of the Kubernetes control plane that exposes the Kubernetes API. The API server is the front end for the Kubernetes control plane.
The main implementation of a Kubernetes API server is kube-apiserver. kube-apiserver is designed to scale horizontally—that is, it scales by deploying more instances. You can run several instances of kube-apiserver and balance traffic between those instances.
etcd
Consistent and highly-available key value store used as Kubernetes' backing store for all cluster data.
If your Kubernetes cluster uses etcd as its backing store, make sure you have a back up plan for the data.
You can find in-depth information about etcd in the official documentation.
kube-scheduler
Control plane component that watches for newly created Pods with no assigned node, and selects a node for them to run on.
Factors taken into account for scheduling decisions include: individual and collective resource requirements, hardware/software/policy constraints, affinity and anti-affinity specifications, data locality, inter-workload interference, and deadlines.
kube-controller-manager
Control plane component that runs controller processes.
Logically, each controller is a separate process, but to reduce complexity, they are all compiled into a single binary and run in a single process.
There are many different types of controllers. Some examples of them are:
- Node controller: Responsible for noticing and responding when nodes go down.
- Job controller: Watches for Job objects that represent one-off tasks, then creates Pods to run those tasks to completion.
- EndpointSlice controller: Populates EndpointSlice objects (to provide a link between Services and Pods).
- ServiceAccount controller: Create default ServiceAccounts for new namespaces.
The above is not an exhaustive list.
cloud-controller-manager
A Kubernetes control plane component that embeds cloud-specific control logic. The cloud controller manager lets you link your cluster into your cloud provider's API, and separates out the components that interact with that cloud platform from components that only interact with your cluster.The cloud-controller-manager only runs controllers that are specific to your cloud provider. If you are running Kubernetes on your own premises, or in a learning environment inside your own PC, the cluster does not have a cloud controller manager.
As with the kube-controller-manager, the cloud-controller-manager combines several logically independent control loops into a single binary that you run as a single process. You can scale horizontally (run more than one copy) to improve performance or to help tolerate failures.
The following controllers can have cloud provider dependencies:
- Node controller: For checking the cloud provider to determine if a node has been deleted in the cloud after it stops responding
- Route controller: For setting up routes in the underlying cloud infrastructure
- Service controller: For creating, updating and deleting cloud provider load balancers
Node components
Node components run on every node, maintaining running pods and providing the Kubernetes runtime environment.
kubelet
An agent that runs on each node in the cluster. It makes sure that containers are running in a Pod.
The kubelet takes a set of PodSpecs that are provided through various mechanisms and ensures that the containers described in those PodSpecs are running and healthy. The kubelet doesn't manage containers which were not created by Kubernetes.
kube-proxy (optional)
kube-proxy is a network proxy that runs on each node in your cluster, implementing part of the Kubernetes Service concept.
kube-proxy maintains network rules on nodes. These network rules allow network communication to your Pods from network sessions inside or outside of your cluster.
kube-proxy uses the operating system packet filtering layer if there is one and it's available. Otherwise, kube-proxy forwards the traffic itself.
If you use a network plugin that implements packet forwarding for Services by itself, and providing equivalent behavior to kube-proxy, then you do not need to run kube-proxy on the nodes in your cluster.Container runtime
A fundamental component that empowers Kubernetes to run containers effectively. It is responsible for managing the execution and lifecycle of containers within the Kubernetes environment.
Kubernetes supports container runtimes such as containerd, CRI-O, and any other implementation of the Kubernetes CRI (Container Runtime Interface).
Addons
Addons use Kubernetes resources (DaemonSet,
Deployment, etc) to implement cluster features.
Because these are providing cluster-level features, namespaced resources for
addons belong within the kube-system namespace.
Selected addons are described below; for an extended list of available addons, please see Addons.
DNS
While the other addons are not strictly required, all Kubernetes clusters should have cluster DNS, as many examples rely on it.
Cluster DNS is a DNS server, in addition to the other DNS server(s) in your environment, which serves DNS records for Kubernetes services.
Containers started by Kubernetes automatically include this DNS server in their DNS searches.
Web UI (Dashboard)
Dashboard is a general purpose, web-based UI for Kubernetes clusters. It allows users to manage and troubleshoot applications running in the cluster, as well as the cluster itself.
Container resource monitoring
Container Resource Monitoring records generic time-series metrics about containers in a central database, and provides a UI for browsing that data.
Cluster-level Logging
A cluster-level logging mechanism is responsible for saving container logs to a central log store with a search/browsing interface.
Network plugins
Network plugins are software components that implement the container network interface (CNI) specification. They are responsible for allocating IP addresses to pods and enabling them to communicate with each other within the cluster.
Architecture variations
While the core components of Kubernetes remain consistent, the way they are deployed and managed can vary. Understanding these variations is crucial for designing and maintaining Kubernetes clusters that meet specific operational needs.
Control plane deployment options
The control plane components can be deployed in several ways:
- Traditional deployment
- Control plane components run directly on dedicated machines or VMs, often managed as systemd services.
- Static Pods
- Control plane components are deployed as static Pods, managed by the kubelet on specific nodes. This is a common approach used by tools like kubeadm.
- Self-hosted
- The control plane runs as Pods within the Kubernetes cluster itself, managed by Deployments and StatefulSets or other Kubernetes primitives.
- Managed Kubernetes services
- Cloud providers often abstract away the control plane, managing its components as part of their service offering.
Workload placement considerations
The placement of workloads, including the control plane components, can vary based on cluster size, performance requirements, and operational policies:
- In smaller or development clusters, control plane components and user workloads might run on the same nodes.
- Larger production clusters often dedicate specific nodes to control plane components, separating them from user workloads.
- Some organizations run critical add-ons or monitoring tools on control plane nodes.
Cluster management tools
Tools like kubeadm, kops, and Kubespray offer different approaches to deploying and managing clusters, each with its own method of component layout and management.
Customization and extensibility
Kubernetes architecture allows for significant customization:
- Custom schedulers can be deployed to work alongside the default Kubernetes scheduler or to replace it entirely.
- API servers can be extended with CustomResourceDefinitions and API Aggregation.
- Cloud providers can integrate deeply with Kubernetes using the cloud-controller-manager.
The flexibility of Kubernetes architecture allows organizations to tailor their clusters to specific needs, balancing factors such as operational complexity, performance, and management overhead.
What's next
Learn more about the following:
- Nodes and their communication with the control plane.
- Kubernetes controllers.
- Garbage collection of cluster objects.
- kube-scheduler which is the default scheduler for Kubernetes.
- Etcd's official documentation.
- Several container runtimes in Kubernetes.
- Integrating with cloud providers using cloud-controller-manager.
- kubectl commands.
2.1 - Nodes
Kubernetes runs your workload by placing containers into Pods to run on Nodes. A node may be a virtual or physical machine, depending on the cluster. Each node is managed by the control plane and contains the services necessary to run Pods.
Typically you have several nodes in a cluster; in a learning or resource-limited environment, you might have only one node.
The components on a node include the kubelet, a container runtime, and the kube-proxy.
Management
There are two main ways to have Nodes added to the API server:
- The kubelet on a node self-registers to the control plane
- You (or another human user) manually add a Node object
After you create a Node object, or the kubelet on a node self-registers, the control plane checks whether the new Node object is valid. For example, if you try to create a Node from the following JSON manifest:
{
  "kind": "Node",
  "apiVersion": "v1",
  "metadata": {
    "name": "10.240.79.157",
    "labels": {
      "name": "my-first-k8s-node"
    }
  }
}
Kubernetes creates a Node object internally (the representation). Kubernetes checks
that a kubelet has registered to the API server that matches the metadata.name
field of the Node. If the node is healthy (i.e. all necessary services are running),
then it is eligible to run a Pod. Otherwise, that node is ignored for any cluster activity
until it becomes healthy.
Note:
Kubernetes keeps the object for the invalid Node and continues checking to see whether it becomes healthy.
You, or a controller, must explicitly delete the Node object to stop that health checking.
The name of a Node object must be a valid DNS subdomain name.
Node name uniqueness
The name identifies a Node. Two Nodes cannot have the same name at the same time. Kubernetes also assumes that a resource with the same name is the same object. In the case of a Node, it is implicitly assumed that an instance using the same name will have the same state (e.g. network settings, root disk contents) and attributes like node labels. This may lead to inconsistencies if an instance was modified without changing its name. If the Node needs to be replaced or updated significantly, the existing Node object needs to be removed from API server first and re-added after the update.
Self-registration of Nodes
When the kubelet flag --register-node is true (the default), the kubelet will attempt to
register itself with the API server. This is the preferred pattern, used by most distros.
For self-registration, the kubelet is started with the following options:
--kubeconfig- Path to credentials to authenticate itself to the API server.--cloud-provider- How to talk to a cloud provider to read metadata about itself.--register-node- Automatically register with the API server.--register-with-taints- Register the node with the given list of taints (comma separated<key>=<value>:<effect>).No-op if
register-nodeis false.--node-ip- Optional comma-separated list of the IP addresses for the node. You can only specify a single address for each address family. For example, in a single-stack IPv4 cluster, you set this value to be the IPv4 address that the kubelet should use for the node. See configure IPv4/IPv6 dual stack for details of running a dual-stack cluster.If you don't provide this argument, the kubelet uses the node's default IPv4 address, if any; if the node has no IPv4 addresses then the kubelet uses the node's default IPv6 address.
--node-labels- Labels to add when registering the node in the cluster (see label restrictions enforced by the NodeRestriction admission plugin).--node-status-update-frequency- Specifies how often kubelet posts its node status to the API server.
When the Node authorization mode and NodeRestriction admission plugin are enabled, kubelets are only authorized to create/modify their own Node resource.
Note:
As mentioned in the Node name uniqueness section,
when Node configuration needs to be updated, it is a good practice to re-register
the node with the API server. For example, if the kubelet is being restarted with
a new set of --node-labels, but the same Node name is used, the change will
not take effect, as labels are only set (or modified) upon Node registration with the API server.
Pods already scheduled on the Node may misbehave or cause issues if the Node configuration will be changed on kubelet restart. For example, an already running Pod may be tainted against the new labels assigned to the Node, while other Pods, that are incompatible with that Pod will be scheduled based on this new label. Node re-registration ensures all Pods will be drained and properly re-scheduled.
Manual Node administration
You can create and modify Node objects using kubectl.
When you want to create Node objects manually, set the kubelet flag --register-node=false.
You can modify Node objects regardless of the setting of --register-node.
For example, you can set labels on an existing Node or mark it unschedulable.
You can set optional node role(s) for nodes by adding one or more node-role.kubernetes.io/<role>: <role> labels to the node where characters of <role>
are limited by the syntax rules for labels.
Kubernetes ignores the label value for node roles; by convention, you can set it to the same string you used for the node role in the label key.
You can use labels on Nodes in conjunction with node selectors on Pods to control scheduling. For example, you can constrain a Pod to only be eligible to run on a subset of the available nodes.
Marking a node as unschedulable prevents the scheduler from placing new pods onto that Node but does not affect existing Pods on the Node. This is useful as a preparatory step before a node reboot or other maintenance.
To mark a Node unschedulable, run:
kubectl cordon $NODENAME
See Safely Drain a Node for more details.
Note:
Pods that are part of a DaemonSet tolerate being run on an unschedulable Node. DaemonSets typically provide node-local services that should run on the Node even if it is being drained of workload applications.Node status
A Node's status contains the following information:
You can use kubectl to view a Node's status and other details:
kubectl describe node <insert-node-name-here>
See Node Status for more details.
Node heartbeats
Heartbeats, sent by Kubernetes nodes, help your cluster determine the availability of each node, and to take action when failures are detected.
For nodes there are two forms of heartbeats:
- Updates to the
.statusof a Node. - Lease objects
within the
kube-node-leasenamespace. Each Node has an associated Lease object.
Node controller
The node controller is a Kubernetes control plane component that manages various aspects of nodes.
The node controller has multiple roles in a node's life. The first is assigning a CIDR block to the node when it is registered (if CIDR assignment is turned on).
The second is keeping the node controller's internal list of nodes up to date with the cloud provider's list of available machines. When running in a cloud environment and whenever a node is unhealthy, the node controller asks the cloud provider if the VM for that node is still available. If not, the node controller deletes the node from its list of nodes.
The third is monitoring the nodes' health. The node controller is responsible for:
- In the case that a node becomes unreachable, updating the
Readycondition in the Node's.statusfield. In this case the node controller sets theReadycondition toUnknown. - If a node remains unreachable: triggering
API-initiated eviction
for all of the Pods on the unreachable node. By default, the node controller
waits 5 minutes between marking the node as
Unknownand submitting the first eviction request.
By default, the node controller checks the state of each node every 5 seconds.
This period can be configured using the --node-monitor-period flag on the
kube-controller-manager component.
Rate limits on eviction
In most cases, the node controller limits the eviction rate to
--node-eviction-rate (default 0.1) per second, meaning it won't evict pods
from more than 1 node per 10 seconds.
The node eviction behavior changes when a node in a given availability zone
becomes unhealthy. The node controller checks what percentage of nodes in the zone
are unhealthy (the Ready condition is Unknown or False) at the same time:
- If the fraction of unhealthy nodes is at least
--unhealthy-zone-threshold(default 0.55), then the eviction rate is reduced. - If the cluster is small (i.e. has less than or equal to
--large-cluster-size-thresholdnodes - default 50), then evictions are stopped. - Otherwise, the eviction rate is reduced to
--secondary-node-eviction-rate(default 0.01) per second.
The reason these policies are implemented per availability zone is because one availability zone might become partitioned from the control plane while the others remain connected. If your cluster does not span multiple cloud provider availability zones, then the eviction mechanism does not take per-zone unavailability into account.
A key reason for spreading your nodes across availability zones is so that the
workload can be shifted to healthy zones when one entire zone goes down.
Therefore, if all nodes in a zone are unhealthy, then the node controller evicts at
the normal rate of --node-eviction-rate. The corner case is when all zones are
completely unhealthy (none of the nodes in the cluster are healthy). In such a
case, the node controller assumes that there is some problem with connectivity
between the control plane and the nodes, and doesn't perform any evictions.
(If there has been an outage and some nodes reappear, the node controller does
evict pods from the remaining nodes that are unhealthy or unreachable).
The node controller is also responsible for evicting pods running on nodes with
NoExecute taints, unless those pods tolerate that taint.
The node controller also adds taints
corresponding to node problems like node unreachable or not ready. This means
that the scheduler won't place Pods onto unhealthy nodes.
Resource capacity tracking
Node objects track information about the Node's resource capacity: for example, the amount of memory available and the number of CPUs. Nodes that self register report their capacity during registration. If you manually add a Node, then you need to set the node's capacity information when you add it.
The Kubernetes scheduler ensures that there are enough resources for all the Pods on a Node. The scheduler checks that the sum of the requests of containers on the node is no greater than the node's capacity. That sum of requests includes all containers managed by the kubelet, but excludes any containers started directly by the container runtime, and also excludes any processes running outside of the kubelet's control.
Note:
If you want to explicitly reserve resources for non-Pod processes, see reserve resources for system daemons.Node topology
FEATURE STATE:
Kubernetes v1.27 [stable](enabled by default)If you have enabled the TopologyManager
feature gate, then
the kubelet can use topology hints when making resource assignment decisions.
See Control Topology Management Policies on a Node
for more information.
What's next
Learn more about the following:
- Components that make up a node.
- API definition for Node.
- Node section of the architecture design document.
- Graceful/non-graceful node shutdown.
- Node autoscaling to manage the number and size of nodes in your cluster.
- Taints and Tolerations.
- Node Resource Managers.
- Resource Management for Windows nodes.
2.2 - Communication between Nodes and the Control Plane
This document catalogs the communication paths between the API server and the Kubernetes cluster. The intent is to allow users to customize their installation to harden the network configuration such that the cluster can be run on an untrusted network (or on fully public IPs on a cloud provider).
Node to Control Plane
Kubernetes has a "hub-and-spoke" API pattern. All API usage from nodes (or the pods they run) terminates at the API server. None of the other control plane components are designed to expose remote services. The API server is configured to listen for remote connections on a secure HTTPS port (typically 443) with one or more forms of client authentication enabled. One or more forms of authorization should be enabled, especially if anonymous requests or service account tokens are allowed.
Nodes should be provisioned with the public root certificate for the cluster such that they can connect securely to the API server along with valid client credentials. A good approach is that the client credentials provided to the kubelet are in the form of a client certificate. See kubelet TLS bootstrapping for automated provisioning of kubelet client certificates.
Pods that wish to connect to the API server can do so securely by leveraging a service account so
that Kubernetes will automatically inject the public root certificate and a valid bearer token
into the pod when it is instantiated.
The kubernetes service (in default namespace) is configured with a virtual IP address that is
redirected (via kube-proxy) to the HTTPS endpoint on the API server.
The control plane components also communicate with the API server over the secure port.
As a result, the default operating mode for connections from the nodes and pod running on the nodes to the control plane is secured by default and can run over untrusted and/or public networks.
Control plane to node
There are two primary communication paths from the control plane (the API server) to the nodes. The first is from the API server to the kubelet process which runs on each node in the cluster. The second is from the API server to any node, pod, or service through the API server's proxy functionality.
API server to kubelet
The connections from the API server to the kubelet are used for:
- Fetching logs for pods.
- Attaching (usually through
kubectl) to running pods. - Providing the kubelet's port-forwarding functionality.
These connections terminate at the kubelet's HTTPS endpoint. By default, the API server does not verify the kubelet's serving certificate, which makes the connection subject to man-in-the-middle attacks and unsafe to run over untrusted and/or public networks.
To verify this connection, use the --kubelet-certificate-authority flag to provide the API
server with a root certificate bundle to use to verify the kubelet's serving certificate.
If that is not possible, use SSH tunneling between the API server and kubelet if required to avoid connecting over an untrusted or public network.
Finally, Kubelet authentication and/or authorization should be enabled to secure the kubelet API.
API server to nodes, pods, and services
The connections from the API server to a node, pod, or service default to plain HTTP connections
and are therefore neither authenticated nor encrypted. They can be run over a secure HTTPS
connection by prefixing https: to the node, pod, or service name in the API URL, but they will
not validate the certificate provided by the HTTPS endpoint nor provide client credentials. So
while the connection will be encrypted, it will not provide any guarantees of integrity. These
connections are not currently safe to run over untrusted or public networks.
SSH tunnels
Kubernetes supports SSH tunnels to protect the control plane to nodes communication paths. In this configuration, the API server initiates an SSH tunnel to each node in the cluster (connecting to the SSH server listening on port 22) and passes all traffic destined for a kubelet, node, pod, or service through the tunnel. This tunnel ensures that the traffic is not exposed outside of the network in which the nodes are running.
Note:
SSH tunnels are currently deprecated, so you shouldn't opt to use them unless you know what you are doing. The Konnectivity service is a replacement for this communication channel.Konnectivity service
FEATURE STATE:
Kubernetes v1.18 [beta]As a replacement to the SSH tunnels, the Konnectivity service provides TCP level proxy for the control plane to cluster communication. The Konnectivity service consists of two parts: the Konnectivity server in the control plane network and the Konnectivity agents in the nodes network. The Konnectivity agents initiate connections to the Konnectivity server and maintain the network connections. After enabling the Konnectivity service, all control plane to nodes traffic goes through these connections.
Follow the Konnectivity service task to set up the Konnectivity service in your cluster.
What's next
- Read about the Kubernetes control plane components
- Learn more about Hubs and Spoke model
- Learn how to Secure a Cluster
- Learn more about the Kubernetes API
- Set up Konnectivity service
- Use Port Forwarding to Access Applications in a Cluster
- Learn how to Fetch logs for Pods, use kubectl port-forward
2.3 - Controllers
In robotics and automation, a control loop is a non-terminating loop that regulates the state of a system.
Here is one example of a control loop: a thermostat in a room.
When you set the temperature, that's telling the thermostat about your desired state. The actual room temperature is the current state. The thermostat acts to bring the current state closer to the desired state, by turning equipment on or off.
In Kubernetes, controllers are control loops that watch the state of your cluster, then make or request changes where needed. Each controller tries to move the current cluster state closer to the desired state.Controller pattern
A controller tracks at least one Kubernetes resource type. These objects have a spec field that represents the desired state. The controller(s) for that resource are responsible for making the current state come closer to that desired state.
The controller might carry the action out itself; more commonly, in Kubernetes, a controller will send messages to the API server that have useful side effects. You'll see examples of this below.
Control via API server
The Job controller is an example of a Kubernetes built-in controller. Built-in controllers manage state by interacting with the cluster API server.
Job is a Kubernetes resource that runs a Pod, or perhaps several Pods, to carry out a task and then stop.
(Once scheduled, Pod objects become part of the desired state for a kubelet).
When the Job controller sees a new task it makes sure that, somewhere in your cluster, the kubelets on a set of Nodes are running the right number of Pods to get the work done. The Job controller does not run any Pods or containers itself. Instead, the Job controller tells the API server to create or remove Pods. Other components in the control plane act on the new information (there are new Pods to schedule and run), and eventually the work is done.
After you create a new Job, the desired state is for that Job to be completed. The Job controller makes the current state for that Job be nearer to your desired state: creating Pods that do the work you wanted for that Job, so that the Job is closer to completion.
Controllers also update the objects that configure them.
For example: once the work is done for a Job, the Job controller
updates that Job object to mark it Finished.
(This is a bit like how some thermostats turn a light off to indicate that your room is now at the temperature you set).
Direct control
In contrast with Job, some controllers need to make changes to things outside of your cluster.
For example, if you use a control loop to make sure there are enough Nodes in your cluster, then that controller needs something outside the current cluster to set up new Nodes when needed.
Controllers that interact with external state find their desired state from the API server, then communicate directly with an external system to bring the current state closer in line.
(There actually is a controller that horizontally scales the nodes in your cluster.)
The important point here is that the controller makes some changes to bring about your desired state, and then reports the current state back to your cluster's API server. Other control loops can observe that reported data and take their own actions.
In the thermostat example, if the room is very cold then a different controller might also turn on a frost protection heater. With Kubernetes clusters, the control plane indirectly works with IP address management tools, storage services, cloud provider APIs, and other services by extending Kubernetes to implement that.
Desired versus current state
Kubernetes takes a cloud-native view of systems, and is able to handle constant change.
Your cluster could be changing at any point as work happens and control loops automatically fix failures. This means that, potentially, your cluster never reaches a stable state.
As long as the controllers for your cluster are running and able to make useful changes, it doesn't matter if the overall state is stable or not.
Design
As a tenet of its design, Kubernetes uses lots of controllers that each manage a particular aspect of cluster state. Most commonly, a particular control loop (controller) uses one kind of resource as its desired state, and has a different kind of resource that it manages to make that desired state happen. For example, a controller for Jobs tracks Job objects (to discover new work) and Pod objects (to run the Jobs, and then to see when the work is finished). In this case something else creates the Jobs, whereas the Job controller creates Pods.
It's useful to have simple controllers rather than one, monolithic set of control loops that are interlinked. Controllers can fail, so Kubernetes is designed to allow for that.
Note:
There can be several controllers that create or update the same kind of object. Behind the scenes, Kubernetes controllers make sure that they only pay attention to the resources linked to their controlling resource.
For example, you can have Deployments and Jobs; these both create Pods. The Job controller does not delete the Pods that your Deployment created, because there is information (labels) the controllers can use to tell those Pods apart.
Ways of running controllers
Kubernetes comes with a set of built-in controllers that run inside the kube-controller-manager. These built-in controllers provide important core behaviors.
The Deployment controller and Job controller are examples of controllers that come as part of Kubernetes itself ("built-in" controllers). Kubernetes lets you run a resilient control plane, so that if any of the built-in controllers were to fail, another part of the control plane will take over the work.
You can find controllers that run outside the control plane, to extend Kubernetes. Or, if you want, you can write a new controller yourself. You can run your own controller as a set of Pods, or externally to Kubernetes. What fits best will depend on what that particular controller does.
What's next
- Read about the Kubernetes control plane
- Discover some of the basic Kubernetes objects
- Learn more about the Kubernetes API
- If you want to write your own controller, see Kubernetes extension patterns and the sample-controller repository.
2.4 - Leases
Distributed systems often have a need for leases, which provide a mechanism to lock shared resources
and coordinate activity between members of a set.
In Kubernetes, the lease concept is represented by Lease
objects in the coordination.k8s.io API Group,
which are used for system-critical capabilities such as node heartbeats and component-level leader election.
Node heartbeats
Kubernetes uses the Lease API to communicate kubelet node heartbeats to the Kubernetes API server.
For every Node , there is a Lease object with a matching name in the kube-node-lease
namespace. Under the hood, every kubelet heartbeat is an update request to this Lease object, updating
the spec.renewTime field for the Lease. The Kubernetes control plane uses the time stamp of this field
to determine the availability of this Node.
See Node Lease objects for more details.
Leader election
Kubernetes also uses Leases to ensure only one instance of a component is running at any given time.
This is used by control plane components like kube-controller-manager and kube-scheduler in
HA configurations, where only one instance of the component should be actively running while the other
instances are on stand-by.
Read coordinated leader election to learn about how Kubernetes builds on the Lease API to select which component instance acts as leader.
Kube controller manager lock release on exit
FEATURE STATE:
Kubernetes v1.36 [alpha](disabled by default)When the ControllerManagerReleaseLeaderElectionLockOnExit feature gate is enabled,
the kube-controller-manager actively releases its leader election lock during
leader transitions, rather than waiting for the lock's TTL to expire. This allows
a new leader to be elected more quickly, reducing leader transition latency.
API server identity
FEATURE STATE:
Kubernetes v1.26 [beta](enabled by default)Starting in Kubernetes v1.26, each kube-apiserver uses the Lease API to publish its identity to the
rest of the system. While not particularly useful on its own, this provides a mechanism for clients to
discover how many instances of kube-apiserver are operating the Kubernetes control plane.
Existence of kube-apiserver leases enables future capabilities that may require coordination between
each kube-apiserver.
You can inspect Leases owned by each kube-apiserver by checking for lease objects in the kube-system namespace
with the name apiserver-<sha256-hash>. Alternatively you can use the label selector apiserver.kubernetes.io/identity=kube-apiserver:
kubectl -n kube-system get lease -l apiserver.kubernetes.io/identity=kube-apiserver
NAME                                        HOLDER                                                                           AGE
apiserver-07a5ea9b9b072c4a5f3d1c3702        apiserver-07a5ea9b9b072c4a5f3d1c3702_0c8914f7-0f35-440e-8676-7844977d3a05        5m33s
apiserver-7be9e061c59d368b3ddaf1376e        apiserver-7be9e061c59d368b3ddaf1376e_84f2a85d-37c1-4b14-b6b9-603e62e4896f        4m23s
apiserver-1dfef752bcb36637d2763d1868        apiserver-1dfef752bcb36637d2763d1868_c5ffa286-8a9a-45d4-91e7-61118ed58d2e        4m43s
The SHA256 hash used in the lease name is based on the OS hostname as seen by that API server. Each kube-apiserver should be
configured to use a hostname that is unique within the cluster. New instances of kube-apiserver that use the same hostname
will take over existing Leases using a new holder identity, as opposed to instantiating new Lease objects. You can check the
hostname used by kube-apiserver by checking the value of the kubernetes.io/hostname label:
kubectl -n kube-system get lease apiserver-07a5ea9b9b072c4a5f3d1c3702 -o yaml
apiVersion: coordination.k8s.io/v1
kind: Lease
metadata:
  creationTimestamp: "2023-07-02T13:16:48Z"
  labels:
    apiserver.kubernetes.io/identity: kube-apiserver
    kubernetes.io/hostname: master-1
  name: apiserver-07a5ea9b9b072c4a5f3d1c3702
  namespace: kube-system
  resourceVersion: "334899"
  uid: 90870ab5-1ba9-4523-b215-e4d4e662acb1
spec:
  holderIdentity: apiserver-07a5ea9b9b072c4a5f3d1c3702_0c8914f7-0f35-440e-8676-7844977d3a05
  leaseDurationSeconds: 3600
  renewTime: "2023-07-04T21:58:48.065888Z"
Expired leases from kube-apiservers that no longer exist are garbage collected by new kube-apiservers after 1 hour.
You can disable API server identity leases by disabling the APIServerIdentity
feature gate.
Workloads
Your own workload can define its own use of Leases. For example, you might run a custom
controller where a primary or leader member
performs operations that its peers do not. You define a Lease so that the controller replicas can select
or elect a leader, using the Kubernetes API for coordination.
If you do use a Lease, it's a good practice to define a name for the Lease that is obviously linked to
the product or component. For example, if you have a component named Example Foo, use a Lease named
example-foo.
If a cluster operator or another end user could deploy multiple instances of a component, select a name prefix and pick a mechanism (such as hash of the name of the Deployment) to avoid name collisions for the Leases.
You can use another approach so long as it achieves the same outcome: different software products do not conflict with one another.
2.5 - Cloud Controller Manager
FEATURE STATE:
Kubernetes v1.11 [beta]Cloud infrastructure technologies let you run Kubernetes on public, private, and hybrid clouds. Kubernetes believes in automated, API-driven infrastructure without tight coupling between components.
The cloud-controller-manager is a Kubernetes control plane component that embeds cloud-specific control logic. The cloud controller manager lets you link your cluster into your cloud provider's API, and separates out the components that interact with that cloud platform from components that only interact with your cluster.
By decoupling the interoperability logic between Kubernetes and the underlying cloud infrastructure, the cloud-controller-manager component enables cloud providers to release features at a different pace compared to the main Kubernetes project.
The cloud-controller-manager is structured using a plugin mechanism that allows different cloud providers to integrate their platforms with Kubernetes.
Design
The cloud controller manager runs in the control plane as a replicated set of processes (usually, these are containers in Pods). Each cloud-controller-manager implements multiple controllers in a single process.
Note:
You can also run the cloud controller manager as a Kubernetes addon rather than as part of the control plane.Cloud controller manager functions
The controllers inside the cloud controller manager include:
Node controller
The node controller is responsible for updating Node objects when new servers are created in your cloud infrastructure. The node controller obtains information about the hosts running inside your tenancy with the cloud provider. The node controller performs the following functions:
- Update a Node object with the corresponding server's unique identifier obtained from the cloud provider API.
- Annotating and labelling the Node object with cloud-specific information, such as the region the node is deployed into and the resources (CPU, memory, etc) that it has available.
- Obtain the node's hostname and network addresses.
- Verifying the node's health. In case a node becomes unresponsive, this controller checks with your cloud provider's API to see if the server has been deactivated / deleted / terminated. If the node has been deleted from the cloud, the controller deletes the Node object from your Kubernetes cluster.
Some cloud provider implementations split this into a node controller and a separate node lifecycle controller.
Route controller
The route controller is responsible for configuring routes in the cloud appropriately so that containers on different nodes in your Kubernetes cluster can communicate with each other.
Depending on the cloud provider, the route controller might also allocate blocks of IP addresses for the Pod network.
Service controller
Services integrate with cloud infrastructure components such as managed load balancers, IP addresses, network packet filtering, and target health checking. The service controller interacts with your cloud provider's APIs to set up load balancers and other infrastructure components when you declare a Service resource that requires them.
Authorization
This section breaks down the access that the cloud controller manager requires on various API objects, in order to perform its operations.
Node controller
The Node controller only works with Node objects. It requires full access to read and modify Node objects.
v1/Node:
- get
- list
- create
- update
- patch
- watch
- delete
Route controller
The route controller listens to Node object creation and configures routes appropriately. It requires Get access to Node objects.
v1/Node:
- get
Service controller
The service controller watches for Service object create, update and delete events and then configures load balancers for those Services appropriately.
To access Services, it requires list, and watch access. To update Services, it requires
patch and update access to the status subresource.
v1/Service:
- list
- get
- watch
- patch
- update
Others
The implementation of the core of the cloud controller manager requires access to create Event objects, and to ensure secure operation, it requires access to create ServiceAccounts.
v1/Event:
- create
- patch
- update
v1/ServiceAccount:
- create
The RBAC ClusterRole for the cloud controller manager looks like:
apiVersion: rbac.authorization.k8s.io/v1
kind: ClusterRole
metadata:
  name: cloud-controller-manager
rules:
- apiGroups:
  - ""
  resources:
  - events
  verbs:
  - create
  - patch
  - update
- apiGroups:
  - ""
  resources:
  - nodes
  verbs:
  - '*'
- apiGroups:
  - ""
  resources:
  - nodes/status
  verbs:
  - patch
- apiGroups:
  - ""
  resources:
  - services
  verbs:
  - list
  - watch
- apiGroups:
  - ""
  resources:
  - services/status
  verbs:
  - patch
  - update
- apiGroups:
  - ""
  resources:
  - serviceaccounts
  verbs:
  - create
- apiGroups:
  - ""
  resources:
  - persistentvolumes
  verbs:
  - get
  - list
  - update
  - watch
What's next
Cloud Controller Manager Administration has instructions on running and managing the cloud controller manager.
To upgrade a HA control plane to use the cloud controller manager, see Migrate Replicated Control Plane To Use Cloud Controller Manager.
Want to know how to implement your own cloud controller manager, or extend an existing project?
- The cloud controller manager uses Go interfaces, specifically,
CloudProviderinterface defined incloud.gofrom kubernetes/cloud-provider to allow implementations from any cloud to be plugged in. - The implementation of the shared controllers highlighted in this document (Node, Route, and Service),
and some scaffolding along with the shared cloudprovider interface, is part of the Kubernetes core.
Implementations specific to cloud providers are outside the core of Kubernetes and implement
the
CloudProviderinterface. - For more information about developing plugins, see Developing Cloud Controller Manager.
- The cloud controller manager uses Go interfaces, specifically,
2.6 - About cgroup v2
On Linux, control groups constrain resources that are allocated to processes.
The kubelet and the underlying container runtime need to interface with cgroups to enforce resource management for pods and containers which includes cpu/memory requests and limits for containerized workloads.
There are two versions of cgroups in Linux: cgroup v1 and cgroup v2. cgroup v2 is
the new generation of the cgroup API.
What is cgroup v2?
FEATURE STATE:
Kubernetes v1.25 [stable]cgroup v2 is the next version of the Linux cgroup API. cgroup v2 provides a
unified control system with enhanced resource management
capabilities.
cgroup v2 offers several improvements over cgroup v1, such as the following:
- Single unified hierarchy design in API
- Safer sub-tree delegation to containers
- Newer features like Pressure Stall Information
- Enhanced resource allocation management and isolation across multiple resources
- Unified accounting for different types of memory allocations (network memory, kernel memory, etc)
- Accounting for non-immediate resource changes such as page cache write backs
Some Kubernetes features exclusively use cgroup v2 for enhanced resource management and isolation. For example, the MemoryQoS feature improves memory QoS and relies on cgroup v2 primitives.
Using cgroup v2
The recommended way to use cgroup v2 is to use a Linux distribution that enables and uses cgroup v2 by default.
To check if your distribution uses cgroup v2, refer to Identify cgroup version on Linux nodes.
Requirements
cgroup v2 has the following requirements:
- OS distribution enables cgroup v2
- Linux Kernel version is 5.8 or later
- Container runtime supports cgroup v2. For example:
- containerd v1.4 and later
- cri-o v1.20 and later
- The kubelet and the container runtime are configured to use the systemd cgroup driver
Linux Distribution cgroup v2 support
For a list of Linux distributions that use cgroup v2, refer to the cgroup v2 documentation
- Container Optimized OS (since M97)
- Ubuntu (since 21.10, 22.04+ recommended)
- Debian GNU/Linux (since Debian 11 bullseye)
- Fedora (since 31)
- Arch Linux (since April 2021)
- RHEL and RHEL-like distributions (since 9)
To check if your distribution is using cgroup v2, refer to your distribution's documentation or follow the instructions in Identify the cgroup version on Linux nodes.
You can also enable cgroup v2 manually on your Linux distribution by modifying
the kernel cmdline boot arguments. If your distribution uses GRUB,
systemd.unified_cgroup_hierarchy=1 should be added in GRUB_CMDLINE_LINUX
under /etc/default/grub, followed by sudo update-grub. However, the
recommended approach is to use a distribution that already enables cgroup v2 by
default.
Migrating to cgroup v2
To migrate to cgroup v2, ensure that you meet the requirements, then upgrade to a kernel version that enables cgroup v2 by default.
The kubelet automatically detects that the OS is running on cgroup v2 and performs accordingly with no additional configuration required.
There should not be any noticeable difference in the user experience when switching to cgroup v2, unless users are accessing the cgroup file system directly, either on the node or from within the containers.
cgroup v2 uses a different API than cgroup v1, so if there are any applications that directly access the cgroup file system, they need to be updated to newer versions that support cgroup v2. For example:
- Some third-party monitoring and security agents may depend on the cgroup filesystem. Update these agents to versions that support cgroup v2.
- If you run cAdvisor as a stand-alone DaemonSet for monitoring pods and containers, update it to v0.43.0 or later.
- If you deploy Java applications, prefer to use versions which fully support cgroup v2:
- OpenJDK / HotSpot: jdk8u372, 11.0.16, 15 and later
- IBM Semeru Runtimes: 8.0.382.0, 11.0.20.0, 17.0.8.0, and later
- IBM Java: 8.0.8.6 and later
- If you are using the uber-go/automaxprocs package, make sure the version you use is v1.5.1 or higher.
- If you deploy Node.js applications, prefer to use versions that detect cgroup v2
memory limits. Node.js reads cgroup v2 memory limits (through libuv)
starting with Node.js v20.3.0. The v18 release line does not reliably detect cgroup v2 memory limits.
Versions without this support may read the host's total memory instead of the
limit applied to the pod, which can lead to an incorrectly sized heap and out-of-memory (OOM)
terminations. On affected versions, set the heap size explicitly, for example with the
--max-old-space-sizeflag.
Identify the cgroup version on Linux Nodes
The cgroup version depends on the Linux distribution being used and the
default cgroup version configured on the OS. To check which cgroup version your
distribution uses, run the stat -fc %T /sys/fs/cgroup/ command on
the node:
stat -fc %T /sys/fs/cgroup/
For cgroup v2, the output is cgroup2fs.
For cgroup v1, the output is tmpfs.
Deprecation of cgroup v1
FEATURE STATE:
Kubernetes v1.35 [deprecated]Kubernetes has deprecated cgroup v1. Removal will follow Kubernetes deprecation policy.
Kubelet will no longer start on a cgroup v1 node by default.
To disable this setting a cluster admin should set failCgroupV1 to false in the kubelet configuration file.
What's next
- Learn more about cgroups
- Learn more about container runtime
- Learn more about cgroup drivers
2.7 - Kubernetes Self-Healing
Kubernetes is designed with self-healing capabilities that help maintain the health and availability of workloads. It automatically replaces failed containers, reschedules workloads when nodes become unavailable, and ensures that the desired state of the system is maintained.
Self-Healing capabilities
Container-level restarts: If a container inside a Pod fails, Kubernetes restarts it based on the
restartPolicy.Replica replacement: If a Pod in a Deployment or StatefulSet fails, Kubernetes creates a replacement Pod to maintain the specified number of replicas. If a Pod that is part of a DaemonSet fails, the control plane creates a replacement Pod to run on the same node.
Persistent storage recovery: If a node is running a Pod with a PersistentVolume (PV) attached, and the node fails, Kubernetes can reattach the volume to a new Pod on a different node.
Load balancing for Services: If a Pod behind a Service fails, Kubernetes automatically removes it from the Service's endpoints to route traffic only to healthy Pods.
Here are some of the key components that provide Kubernetes self-healing:
kubelet: Ensures that containers are running, and restarts those that fail.
Deployment (via ReplicaSet), ReplicaSet, StatefulSet and DaemonSet controllers: Maintain the desired number of Pod replicas.
PersistentVolume controller: Manages volume attachment and detachment for stateful workloads.
Considerations
Storage Failures: If a persistent volume becomes unavailable, recovery steps may be required.
Application Errors: Kubernetes can restart containers, but underlying application issues must be addressed separately.
What's next
- Read more about Pods
- Learn about Kubernetes Controllers
- Explore PersistentVolumes
- Read about node autoscaling. Node autoscaling also provides automatic healing if or when nodes fail in your cluster.
2.8 - Garbage Collection
Garbage collection is a collective term for the various mechanisms Kubernetes uses to clean up cluster resources. This allows the clean up of resources like the following:
- Terminated pods
- Completed Jobs
- Objects without owner references
- Unused containers and container images
- Dynamically provisioned PersistentVolumes with a StorageClass reclaim policy of Delete
- Stale or expired CertificateSigningRequests (CSRs)
- Nodes deleted in the following scenarios:
- On a cloud when the cluster uses a cloud controller manager
- On-premises when the cluster uses an addon similar to a cloud controller manager
- Node Lease objects
Owners and dependents
Many objects in Kubernetes link to each other through owner references. Owner references tell the control plane which objects are dependent on others. Kubernetes uses owner references to give the control plane, and other API clients, the opportunity to clean up related resources before deleting an object. In most cases, Kubernetes manages owner references automatically.
Ownership is different from the labels and selectors
mechanism that some resources also use. For example, consider a
Service that creates
EndpointSlice objects. The Service uses labels to allow the control plane to
determine which EndpointSlice objects are used for that Service. In addition
to the labels, each EndpointSlice that is managed on behalf of a Service has
an owner reference. Owner references help different parts of Kubernetes avoid
interfering with objects they don’t control.
Note:
Cross-namespace owner references are disallowed by design. Namespaced dependents can specify cluster-scoped or namespaced owners. A namespaced owner must exist in the same namespace as the dependent. If it does not, the owner reference is treated as absent, and the dependent is subject to deletion once all owners are verified absent.
Cluster-scoped dependents can only specify cluster-scoped owners. In v1.20+, if a cluster-scoped dependent specifies a namespaced kind as an owner, it is treated as having an unresolvable owner reference, and is not able to be garbage collected.
In v1.20+, if the garbage collector detects an invalid cross-namespace ownerReference,
or a cluster-scoped dependent with an ownerReference referencing a namespaced kind, a warning Event
with a reason of OwnerRefInvalidNamespace and an involvedObject of the invalid dependent is reported.
You can check for that kind of Event by running
kubectl get events -A --field-selector=reason=OwnerRefInvalidNamespace.
Cascading deletion
Kubernetes checks for and deletes objects that no longer have owner references, like the pods left behind when you delete a ReplicaSet. When you delete an object, you can control whether Kubernetes deletes the object's dependents automatically, in a process called cascading deletion. There are two types of cascading deletion, as follows:
- Foreground cascading deletion
- Background cascading deletion
You can also control how and when garbage collection deletes resources that have owner references using Kubernetes finalizers.
Foreground cascading deletion
In foreground cascading deletion, the owner object you're deleting first enters a deletion in progress state. In this state, the following happens to the owner object:
- The Kubernetes API server sets the object's
metadata.deletionTimestampfield to the time the object was marked for deletion. - The Kubernetes API server also sets the
metadata.finalizersfield toforegroundDeletion. - The object remains visible through the Kubernetes API until the deletion process is complete.
After the owner object enters the deletion in progress state, the controller deletes dependents it knows about. After deleting all the dependent objects it knows about, the controller deletes the owner object. At this point, the object is no longer visible in the Kubernetes API.
During foreground cascading deletion, the only dependents that block owner
deletion are those that have the ownerReference.blockOwnerDeletion=true field
and are in the garbage collection controller cache. The garbage collection controller
cache may not contain objects whose resource type cannot be listed / watched successfully,
or objects that are created concurrent with deletion of an owner object.
See Use foreground cascading deletion
to learn more.
Background cascading deletion
In background cascading deletion, the Kubernetes API server deletes the owner object immediately and the garbage collector controller (custom or default) cleans up the dependent objects in the background. If a finalizer exists, it ensures that objects are not deleted until all necessary clean-up tasks are completed. By default, Kubernetes uses background cascading deletion unless you manually use foreground deletion or choose to orphan the dependent objects.
See Use background cascading deletion to learn more.
Orphaned dependents
When Kubernetes deletes an owner object, the dependents left behind are called orphan objects. By default, Kubernetes deletes dependent objects. To learn how to override this behaviour, see Delete owner objects and orphan dependents.
Garbage collection of unused containers and images
The kubelet performs garbage collection on unused images every five minutes and on unused containers every minute. You should avoid using external garbage collection tools, as these can break the kubelet behavior and remove containers that should exist.
To configure options for unused container and image garbage collection, tune the
kubelet using a configuration file
and change the parameters related to garbage collection using the
KubeletConfiguration
resource type.
Container image lifecycle
Kubernetes manages the lifecycle of all images through its image manager, which is part of the kubelet, with the cooperation of cadvisor. The kubelet considers the following disk usage limits when making garbage collection decisions:
HighThresholdPercentLowThresholdPercent
Disk usage above the configured HighThresholdPercent value triggers garbage
collection, which deletes images in order based on the last time they were used,
starting with the oldest first. The kubelet deletes images
until disk usage reaches the LowThresholdPercent value.
Garbage collection for unused container images
You can specify the maximum time a local image can be unused for, regardless of disk usage. This is a kubelet setting that you configure for each node.
To configure the setting, you need to set a value for the imageMaximumGCAge
field in the kubelet configuration file.
The value is specified as a Kubernetes duration. See duration in the glossary for more details.
For example, you can set the configuration field to 12h45m,
which means 12 hours and 45 minutes.
Note:
This feature does not track image usage across kubelet restarts. If the kubelet is restarted, the tracked image age is reset, causing the kubelet to wait the fullimageMaximumGCAge duration before qualifying images for garbage collection
based on image age.Container garbage collection
The kubelet garbage collects unused containers based on the following variables, which you can define:
MinAge: the minimum age at which the kubelet can garbage collect a container. Disable by setting to0.MaxPerPodContainer: the maximum number of dead containers each Pod can have. Disable by setting to less than0.MaxContainers: the maximum number of dead containers the cluster can have. Disable by setting to less than0.
In addition to these variables, the kubelet garbage collects unidentified and deleted containers, typically starting with the oldest first.
MaxPerPodContainer and MaxContainers may potentially conflict with each other
in situations where retaining the maximum number of containers per Pod
(MaxPerPodContainer) would go outside the allowable total of global dead
containers (MaxContainers). In this situation, the kubelet adjusts
MaxPerPodContainer to address the conflict. A worst-case scenario would be to
downgrade MaxPerPodContainer to 1 and evict the oldest containers.
Additionally, containers owned by pods that have been deleted are removed once
they are older than MinAge.
Note:
The kubelet only garbage collects the containers it manages.Configuring garbage collection
You can tune garbage collection of resources by configuring options specific to the controllers managing those resources. The following pages show you how to configure garbage collection:
What's next
- Learn more about ownership of Kubernetes objects.
- Learn more about Kubernetes finalizers.
- Learn about the TTL controller that cleans up finished Jobs.
2.9 - Mixed Version Proxy
FEATURE STATE:
Kubernetes v1.36 [beta](enabled by default)Kubernetes 1.36 includes a beta feature that lets an API Server proxy resource requests to other peer API servers. It also lets clients get a holistic view of resources served across the entire cluster through discovery. This is useful when there are multiple API servers running different versions of Kubernetes in one cluster (for example, during a long-lived rollout to a new release of Kubernetes).
This enables cluster administrators to configure highly available clusters that can be upgraded more safely, by :
- ensuring that controllers relying on discovery to show a comprehensive list of resources for important tasks always get the complete view of all resources. We call this complete cluster-wide discovery Peer-aggregated discovery.
- directing resource requests (made during the upgrade) to the correct kube-apiserver. This proxying prevents users from seeing unexpected 404 Not Found errors that stem from the upgrade process. This mechanism is called the Mixed Version Proxy.
Enabling Peer-aggregated Discovery and Mixed Version Proxy
Ensure that UnknownVersionInteroperabilityProxy feature gate
is enabled when you start the API Server:
kube-apiserver \
--feature-gates=UnknownVersionInteroperabilityProxy=true \
# required command line arguments for this feature
--peer-ca-file=<path to kube-apiserver CA cert>
--proxy-client-cert-file=<path to aggregator proxy cert>,
--proxy-client-key-file=<path to aggregator proxy key>,
--requestheader-client-ca-file=<path to aggregator CA cert>,
# requestheader-allowed-names can be set to blank to allow any Common Name
--requestheader-allowed-names=<valid Common Names to verify proxy client cert against>,

# optional flags for this feature
--peer-advertise-ip=`IP of this kube-apiserver that should be used by peers to proxy requests`
--peer-advertise-port=`port of this kube-apiserver that should be used by peers to proxy requests`

# …and other flags as usual
Proxy transport and authentication between API servers
The source kube-apiserver reuses the existing APIserver client authentication flags
--proxy-client-cert-fileand--proxy-client-key-fileto present its identity that will be verified by its peer (the destination kube-apiserver). The destination API server verifies that peer connection based on the configuration you specify using the--requestheader-client-ca-filecommand line argument.To authenticate the destination server's serving certs, you must configure a certificate authority bundle by specifying the
--peer-ca-filecommand line argument to the source API server.
Configuration for peer API server connectivity
To set the network location of a kube-apiserver that peers will use to proxy requests, use the
--peer-advertise-ip and --peer-advertise-port command line arguments to kube-apiserver or specify
these fields in the API server configuration file.
If these flags are unspecified, peers will use the value from either --advertise-address or
--bind-address command line argument to the kube-apiserver.
If those too, are unset, the host's default interface is used.
Peer-aggregated discovery
When you enable the feature, discovery requests are automatically enabled to serve a comprehensive discovery document (listing all resources served by any apiserver in the cluster) by default.
If you would like to request a non peer-aggregated discovery document, you can indicate so by adding the following Accept header to the discovery request:
application/json;g=apidiscovery.k8s.io;v=v2;as=APIGroupDiscoveryList;profile=nopeer
Note:
Peer-aggregated discovery is only supported for Aggregated Discovery requests to the/apis endpoint and not for Unaggregated (Legacy) Discovery requests.Mixed version proxying
When you enable mixed version proxying, the aggregation layer loads a special filter that does the following:
- When a resource request reaches an API server that cannot serve that API (either because it is at a version pre-dating the introduction of the API or the API is turned off on the API server) the API server attempts to send the request to a peer API server that can serve the requested API. It does so by identifying API groups / versions / resources that the local server doesn't recognise, and tries to proxy those requests to a peer API server that is capable of handling the request.
- If the peer API server fails to respond, the source API server responds with 503 ("Service Unavailable") error.
How it works under the hood
When an API Server receives a resource request, it first checks which API servers can serve the requested resource. This check happens using the non peer-aggregated discovery document.
If the resource is listed in the non peer-aggregated discovery document retrieved from the API server that received the request(for example,
GET /api/v1/pods/some-pod), the request is handled locally.If the resource in a request (for example,
GET /apis/resource.k8s.io/v1beta1/resourceclaims) is not found in the non peer-aggregated discovery document retrieved from the API server trying to handle the request (the handling API server), likely because theresource.k8s.io/v1beta1API was introduced in a newer Kubernetes version and the handling API server is running an older version that does not support it, then the handling API server fetches the peer API servers that do serve the relevant API group / version / resource (resource.k8s.io/v1beta1/resourceclaimsin this case) by checking the non peer-aggregated discovery documents from all peer API servers. The handling API server then proxies the request to one of the matching peer kube-apiservers that are aware of the requested resource.If there is no peer known for that API group / version / resource, the handling API server passes the request to its own handler chain which should eventually return a 404 ("Not Found") response.
If the handling API server has identified and selected a peer API server, but that peer fails to respond (for reasons such as network connectivity issues, or a data race between the request being received and a controller registering the peer's info into the control plane), then the handling API server responds with a 503 ("Service Unavailable") error.
3 - Containers
Technology for packaging an application along with its runtime dependencies.
This page will discuss containers and container images, as well as their use in operations and solution development.
The word container is an overloaded term. Whenever you use the word, check whether your audience uses the same definition.
Each container that you run is repeatable; the standardization from having dependencies included means that you get the same behavior wherever you run it.
Containers decouple applications from the underlying host infrastructure. This makes deployment easier in different cloud or OS environments.
Each node in a Kubernetes cluster runs the containers that form the Pods assigned to that node. Containers in a Pod are co-located and co-scheduled to run on the same node.
Container images
A container image is a ready-to-run software package containing everything needed to run an application: the code and any runtime it requires, application and system libraries, and default values for any essential settings.
Containers are intended to be stateless and immutable: you should not change the code of a container that is already running. If you have a containerized application and want to make changes, the correct process is to build a new image that includes the change, then recreate the container to start from the updated image.
Container runtimes
A fundamental component that empowers Kubernetes to run containers effectively. It is responsible for managing the execution and lifecycle of containers within the Kubernetes environment.
Kubernetes supports container runtimes such as containerd, CRI-O, and any other implementation of the Kubernetes CRI (Container Runtime Interface).
Usually, you can allow your cluster to pick the default container runtime for a Pod. If you need to use more than one container runtime in your cluster, you can specify the RuntimeClass for a Pod to make sure that Kubernetes runs those containers using a particular container runtime.
You can also use RuntimeClass to run different Pods with the same container runtime but with different settings.
3.1 - Images
A container image represents binary data that encapsulates an application and all its software dependencies. Container images are executable software bundles that can run standalone and that make very well-defined assumptions about their runtime environment.
You typically create a container image of your application and push it to a registry before referring to it in a Pod.
This page provides an outline of the container image concept.
Note:
If you are looking for the container images for a Kubernetes release (such as v1.36, the latest minor release), visit Download Kubernetes.Image names
Container images are usually given a name such as pause, example/mycontainer, or kube-apiserver.
Images can also include a registry hostname; for example: fictional.registry.example/imagename,
and possibly a port number as well; for example: fictional.registry.example:10443/imagename.
If you don't specify a registry hostname, Kubernetes assumes that you mean the Docker public registry. You can change this behavior by setting a default image registry in the container runtime configuration.
After the image name part you can add a tag or digest (in the same way you would when using with commands
like docker or podman). Tags let you identify different versions of the same series of images.
Digests are a unique identifier for a specific version of an image. Digests are hashes of the image's content,
and are immutable. Tags can be moved to point to different images, but digests are fixed.
Image tags consist of lowercase and uppercase letters, digits, underscores (_),
periods (.), and dashes (-). A tag can be up to 128 characters long, and must
conform to the following regex pattern: [a-zA-Z0-9_][a-zA-Z0-9._-]{0,127}.
You can read more about it and find the validation regex in the
OCI Distribution Specification.
If you don't specify a tag, Kubernetes assumes you mean the tag latest.
Image digests consists of a hash algorithm (such as sha256) and a hash value. For example:
sha256:1ff6c18fbef2045af6b9c16bf034cc421a29027b800e4f9b68ae9b1cb3e9ae07.
You can find more information about the digest format in the
OCI Image Specification.
Some image name examples that Kubernetes can use are:
busybox— Image name only, no tag or digest. Kubernetes will use the Docker public registry and latest tag. Equivalent todocker.io/library/busybox:latest.busybox:1.32.0— Image name with tag. Kubernetes will use the Docker public registry. Equivalent todocker.io/library/busybox:1.32.0.registry.k8s.io/pause:latest— Image name with a custom registry and latest tag.registry.k8s.io/pause:3.5— Image name with a custom registry and non-latest tag.registry.k8s.io/pause@sha256:1ff6c18fbef2045af6b9c16bf034cc421a29027b800e4f9b68ae9b1cb3e9ae07— Image name with digest.registry.k8s.io/pause:3.5@sha256:1ff6c18fbef2045af6b9c16bf034cc421a29027b800e4f9b68ae9b1cb3e9ae07— Image name with tag and digest. Only the digest will be used for pulling.
Updating images
When you first create a Deployment,
StatefulSet, Pod, or other
object that includes a PodTemplate, and a pull policy was not explicitly specified,
then by default the pull policy of all containers in that Pod will be set to
IfNotPresent. This policy causes the
kubelet to skip pulling an
image if it already exists.
Image pull policy
The imagePullPolicy for a container and the tag of the image both affect when the
kubelet attempts to pull
(download) the specified image.
Here's a list of the values you can set for imagePullPolicy and the effects
these values have:
IfNotPresent- the image is pulled only if it is not already present locally.
Always- every time the kubelet launches a container, the kubelet requests the container runtime to pull the image. The container runtime contacts the registry, resolves the image tag or name to a digest, and downloads any layers that are not already cached locally. If all layers are already present, the container runtime uses the cached image without downloading it again. The kubelet itself does not check whether the image is cached locally; it always delegates to the container runtime.
Never- the kubelet does not try fetching the image. If the image is somehow already present locally, the kubelet attempts to start the container; otherwise, startup fails. See pre-pulled images for more details.
The caching semantics of the container runtime make even
imagePullPolicy: Always efficient, as long as the registry is reliably accessible.
The container runtime can notice that the image layers already exist on the node
so that they don't need to be downloaded again.
Note:
You should avoid using the :latest tag when deploying containers in production as
it is harder to track which version of the image is running and more difficult to
roll back properly.
Instead, specify a meaningful tag such as v1.42.0 and/or a digest.
To make sure the Pod always uses the same version of a container image, you can specify
the image's digest;
replace <image-name>:<tag> with <image-name>@<digest>
(for example, image@sha256:45b23dee08af5e43a7fea6c4cf9c25ccf269ee113168c19722f87876677c5cb2).
When using image tags, if the image registry were to change the code that the tag on that image represents, you might end up with a mix of Pods running the old and new code. An image digest uniquely identifies a specific version of the image, so Kubernetes runs the same code every time it starts a container with that image name and digest specified. Specifying an image by digest pins the code that you run so that a change at the registry cannot lead to that mix of versions.
There are third-party admission controllers that mutate Pods (and PodTemplates) when they are created, so that the running workload is defined based on an image digest rather than a tag. That might be useful if you want to make sure that your entire workload is running the same code no matter what tag changes happen at the registry.
Default image pull policy
When you (or a controller) submit a new Pod to the API server, your cluster sets the
imagePullPolicy field when specific conditions are met:
- if you omit the
imagePullPolicyfield, and you specify the digest for the container image, theimagePullPolicyis automatically set toIfNotPresent. - if you omit the
imagePullPolicyfield, and the tag for the container image is:latest,imagePullPolicyis automatically set toAlways. - if you omit the
imagePullPolicyfield, and you don't specify the tag for the container image,imagePullPolicyis automatically set toAlways. - if you omit the
imagePullPolicyfield, and you specify a tag for the container image that isn't:latest, theimagePullPolicyis automatically set toIfNotPresent.
Note:
The value of imagePullPolicy of the container is always set when the object is
first created, and is not updated if the image's tag or digest later changes.
For example, if you create a Deployment with an image whose tag is not
:latest, and later update that Deployment's image to a :latest tag, the
imagePullPolicy field will not change to Always. You must manually change
the pull policy of any object after its initial creation.
Required image pull
If you would like to always force a pull, you can do one of the following:
- Set the
imagePullPolicyof the container toAlways. - Omit the
imagePullPolicyand use:latestas the tag for the image to use; Kubernetes will set the policy toAlwayswhen you submit the Pod. - Omit the
imagePullPolicyand the tag for the image to use; Kubernetes will set the policy toAlwayswhen you submit the Pod. - Enable the AlwaysPullImages admission controller.
ImagePullBackOff
When a kubelet starts creating containers for a Pod using a container runtime,
it might be possible the container is in Waiting
state because of ImagePullBackOff.
The status ImagePullBackOff means that a container could not start because Kubernetes
could not pull a container image (for reasons such as invalid image name, or pulling
from a private registry without imagePullSecret). The BackOff part indicates
that Kubernetes will keep trying to pull the image, with an increasing back-off delay.
Kubernetes raises the delay between each attempt until it reaches a compiled-in limit, which is 300 seconds (5 minutes).
Image pull per runtime class
FEATURE STATE:
Kubernetes includes alpha support for performing image pulls based on the RuntimeClass of a Pod.Kubernetes v1.29 [alpha](disabled by default)If you enable the RuntimeClassInImageCriApi feature gate,
the kubelet references container images by a tuple of image name and runtime handler
rather than just the image name or digest. Your
container runtime
may adapt its behavior based on the selected runtime handler.
Pulling images based on runtime class is useful for VM-based containers, such as
Windows Hyper-V containers.
Serial and parallel image pulls
By default, the kubelet pulls images serially. In other words, the kubelet sends only one image pull request to the image service at a time. Other image pull requests have to wait until the one being processed is complete.
Nodes make image pull decisions in isolation. Even when you use serialized image pulls, two different nodes can pull the same image in parallel.
If you would like to enable parallel image pulls, you can set the field
serializeImagePulls to false in the kubelet configuration.
With serializeImagePulls set to false, image pull requests will be sent to the image service immediately,
and multiple images will be pulled at the same time.
When enabling parallel image pulls, ensure that the image service of your container runtime can handle parallel image pulls.
The kubelet never pulls multiple images in parallel on behalf of one Pod. For example, if you have a Pod that has an init container and an application container, the image pulls for the two containers will not be parallelized. However, if you have two Pods that use different images, and the parallel image pull feature is enabled, the kubelet will pull the images in parallel on behalf of the two different Pods.
Maximum parallel image pulls
FEATURE STATE:
Kubernetes v1.35 [stable]When serializeImagePulls is set to false, the kubelet defaults to no limit on
the maximum number of images being pulled at the same time. If you would like to
limit the number of parallel image pulls, you can set the field maxParallelImagePulls
in the kubelet configuration. With maxParallelImagePulls set to n, only n
images can be pulled at the same time, and any image pull beyond n will have to
wait until at least one ongoing image pull is complete.
Limiting the number of parallel image pulls prevents image pulling from consuming too much network bandwidth or disk I/O, when parallel image pulling is enabled.
You can set maxParallelImagePulls to a positive number that is greater than or
equal to 1. If you set maxParallelImagePulls to be greater than or equal to 2,
you must set serializeImagePulls to false. The kubelet will fail to start
with an invalid maxParallelImagePulls setting.
Multi-architecture images with image indexes
As well as providing binary images, a container registry can also serve a
container image index.
An image index can point to multiple image manifests
for architecture-specific versions of a container. The idea is that you can have
a name for an image (for example: pause, example/mycontainer, kube-apiserver)
and allow different systems to fetch the right binary image for the machine
architecture they are using.
The Kubernetes project typically creates container images for its releases with
names that include the suffix -$(ARCH). For backward compatibility, generate
older images with suffixes. For instance, an image named as pause would be a
multi-architecture image containing manifests for all supported architectures,
while pause-amd64 would be a backward-compatible version for older configurations,
or for YAML files with hardcoded image names containing suffixes.
Using a private registry
Private registries may require authentication to be able to discover and/or pull images from them. Credentials can be provided in several ways:
Specifying
imagePullSecretswhen you define a PodOnly Pods which provide their own keys can access the private registry.
Configuring Nodes to Authenticate to a Private Registry
- All Pods can read any configured private registries.
- Requires node configuration by cluster administrator.
Using a kubelet credential provider plugin to dynamically fetch credentials for private registries
The kubelet can be configured to use credential provider exec plugin for the respective private registry.
- All Pods can use any images cached on a node.
- Requires root access to all nodes to set up.
Vendor-specific or local extensions
If you're using a custom node configuration, you (or your cloud provider) can implement your mechanism for authenticating the node to the container registry.
These options are explained in more detail below.
Specifying imagePullSecrets on a Pod
Note:
This is the recommended approach to run containers based on images in private registries.Kubernetes supports specifying container image registry keys on a Pod.
All imagePullSecrets must be Secrets that exist in the same
Namespace as the
Pod. These Secrets must be of type kubernetes.io/dockercfg or kubernetes.io/dockerconfigjson.
Configuring nodes to authenticate to a private registry
Specific instructions for setting credentials depends on the container runtime and registry you chose to use. You should refer to your solution's documentation for the most accurate information.
For an example of configuring a private container image registry, see the Pull an Image from a Private Registry task. That example uses a private registry in Docker Hub.
Kubelet credential provider for authenticated image pulls
You can configure the kubelet to invoke a plugin binary to dynamically fetch registry credentials for a container image. This is the most robust and versatile way to fetch credentials for private registries, but also requires kubelet-level configuration to enable.
This technique can be especially useful for running static Pods that require container images hosted in a private registry. Using a ServiceAccount or a Secret to provide private registry credentials is not possible in the specification of a static Pod, because it cannot have references to other API resources in its specification.
See Configure a kubelet image credential provider for more details.
Interpretation of config.json
The interpretation of config.json varies between the original Docker
implementation and the Kubernetes interpretation. In Docker, the auths keys
can only specify root URLs, whereas Kubernetes allows glob URLs as well as
prefix-matched paths. The only limitation is that glob patterns (*) have to
include the dot (.) for each subdomain. The amount of matched subdomains has
to be equal to the amount of glob patterns (*.), for example:
*.kubernetes.iowill not matchkubernetes.io, but will matchabc.kubernetes.io.*.*.kubernetes.iowill not matchabc.kubernetes.io, but will matchabc.def.kubernetes.io.prefix.*.iowill matchprefix.kubernetes.io.*-good.kubernetes.iowill matchprefix-good.kubernetes.io.
This means that a config.json like this is valid:
{
    "auths": {
        "my-registry.example/images": { "auth": "…" },
        "*.my-registry.example/images": { "auth": "…" }
    }
}
Image pull operations pass the credentials to the CRI container runtime for every valid pattern. For example, the following container image names would match successfully:
my-registry.example/imagesmy-registry.example/images/my-imagemy-registry.example/images/another-imagesub.my-registry.example/images/my-image
However, these container image names would not match:
a.sub.my-registry.example/images/my-imagea.b.sub.my-registry.example/images/my-image
The kubelet performs image pulls sequentially for every found credential. This
means that multiple entries in config.json for different paths are possible, too:
{
    "auths": {
        "my-registry.example/images": {
            "auth": "…"
        },
        "my-registry.example/images/subpath": {
            "auth": "…"
        }
    }
}
If now a container specifies an image my-registry.example/images/subpath/my-image
to be pulled, then the kubelet will try to download it using both authentication
sources if one of them fails.
Pre-pulled images
Note:
This approach is suitable if you can control node configuration. It will not work reliably if your cloud provider manages nodes and replaces them automatically.By default, the kubelet tries to pull each image from the specified registry.
However, if the imagePullPolicy property of the container is set to IfNotPresent or Never,
then a local image is used (preferentially or exclusively, respectively).
If you want to rely on pre-pulled images as a substitute for registry authentication, you must ensure all nodes in the cluster have the same pre-pulled images.
This can be used to preload certain images for speed or as an alternative to authenticating to a private registry.
Similar to the usage of the kubelet credential provider, pre-pulled images are also suitable for launching static Pods that depend on images hosted in a private registry.
Note:
FEATURE STATE:
Kubernetes v1.35 [beta](enabled by default)Access to pre-pulled images may be authorized according to image pull credential verification.
Ensure image pull credential verification
FEATURE STATE:
Kubernetes v1.35 [beta](enabled by default)If the KubeletEnsureSecretPulledImages feature gate is enabled for your cluster,
Kubernetes will validate image credentials for every image that requires credentials
to be pulled, even if that image is already present on the node. This validation
ensures that images in a Pod request which have not been successfully pulled
with the provided credentials must re-pull the images from the registry.
Additionally, image pulls that re-use the same credentials
which previously resulted in a successful image pull will not need to re-pull from
the registry and are instead validated locally without accessing the registry
(provided the image is available locally).
This is controlled by theimagePullCredentialsVerificationPolicy field in the
Kubelet configuration.
This configuration controls when image pull credentials must be verified if the image is already present on the node:
NeverVerify: Mimics the behavior of having this feature gate disabled. If the image is present locally, image pull credentials are not verified.NeverVerifyPreloadedImages: Images pulled outside the kubelet are not verified, but all other images will have their credentials verified. This is the default behavior.NeverVerifyAllowListedImages: Images pulled outside the kubelet and mentioned within thepreloadedImagesVerificationAllowlistspecified in the kubelet config are not verified.AlwaysVerify: All images will have their credentials verified before they can be used.
This verification applies to pre-pulled images, images pulled using node-wide secrets, and images pulled using Pod-level secrets.
Note:
In the case of credential rotation, the credentials previously used to pull the image will continue to verify without the need to access the registry. New or rotated credentials will require the image to be re-pulled from the registry.Enabling KubeletEnsureSecretPulledImages for the first time
When the KubeletEnsureSecretPulledImages gets enabled for the first time, either
by a kubelet upgrade or by explicitly enabling the feature, if a kubelet is able to
access any images at that time, these will all be considered pre-pulled. This happens
because in this case the kubelet has no records about the images being pulled.
The kubelet will only be able to start making image pull records as any image gets
pulled for the first time.
If this is a concern, it is advised to clean up nodes of all images that should not be considered pre-pulled before enabling the feature.
Note that removing the directory holding the image pulled records will have the same effect on kubelet restart, particularly the images currently cached in the nodes by the container runtime will all be considered pre-pulled.
Creating a Secret with a Docker config
You need to know the username, registry password and client email address for authenticating to the registry, as well as its hostname. Run the following command, substituting placeholders with the appropriate values:
kubectl create secret docker-registry <name> \
  --docker-server=<docker-registry-server> \
  --docker-username=<docker-user> \
  --docker-password=<docker-password> \
  --docker-email=<docker-email>
If you already have a Docker credentials file then, rather than using the above command, you can import the credentials file as a Kubernetes Secret. Create a Secret based on existing Docker credentials explains how to set this up.
This is particularly useful if you are using multiple private container
registries, as kubectl create secret docker-registry creates a Secret that
only works with a single private registry.
Note:
Pods can only reference image pull secrets in their own namespace, so this process needs to be done one time per namespace.Referring to imagePullSecrets on a Pod
Now, you can create pods which reference that secret by adding the imagePullSecrets
section to a Pod definition. Each item in the imagePullSecrets array can only
reference one Secret in the same namespace.
For example:
cat <<EOF > pod.yaml
apiVersion: v1
kind: Pod
metadata:
  name: foo
  namespace: awesomeapps
spec:
  containers:
    - name: foo
      image: janedoe/awesomeapp:v1
  imagePullSecrets:
    - name: myregistrykey
EOF

cat <<EOF >> ./kustomization.yaml
resources:
- pod.yaml
EOF
This needs to be done for each Pod that is using a private registry.
However, you can automate this process by specifying the imagePullSecrets section
in a ServiceAccount
resource. See Add ImagePullSecrets to a Service Account
for detailed instructions.
You can use this in conjunction with a per-node .docker/config.json. The credentials
will be merged.
Use cases
There are a number of solutions for configuring private registries. Here are some common use cases and suggested solutions.
- Cluster running only non-proprietary (e.g. open-source) images. No need to hide images.
- Use public images from a public registry
- No configuration required.
- Some cloud providers automatically cache or mirror public images, which improves availability and reduces the time to pull images.
- Use public images from a public registry
- Cluster running some proprietary images which should be hidden to those outside the company, but
visible to all cluster users.
- Use a hosted private registry
- Manual configuration may be required on the nodes that need to access to private registry.
- Or, run an internal private registry behind your firewall with open read access.
- No Kubernetes configuration is required.
- Use a hosted container image registry service that controls image access
- It will work better with Node autoscaling than manual node configuration.
- Or, on a cluster where changing the node configuration is inconvenient, use
imagePullSecrets.
- Use a hosted private registry
- Cluster with proprietary images, a few of which require stricter access control.
- Ensure AlwaysPullImages admission controller is active. Otherwise, all Pods potentially have access to all images.
- Move sensitive data into a Secret resource, instead of packaging it in an image.
- A multi-tenant cluster where each tenant needs own private registry.
- Ensure AlwaysPullImages admission controller is active. Otherwise, all Pods of all tenants potentially have access to all images.
- Run a private registry with authorization required.
- Generate registry credentials for each tenant, store into a Secret, and propagate the Secret to every tenant namespace.
- The tenant then adds that Secret to
imagePullSecretsof each namespace.
If you need access to multiple registries, you can create one Secret per registry.
Legacy built-in kubelet credential provider
In older versions of Kubernetes, the kubelet had a direct integration with cloud provider credentials. This provided the ability to dynamically fetch credentials for image registries.
There were three built-in implementations of the kubelet credential provider integration: ACR (Azure Container Registry), ECR (Elastic Container Registry), and GCR (Google Container Registry).
Starting with version 1.26 of Kubernetes, the legacy mechanism has been removed, so you would need to either:
- configure a kubelet image credential provider on each node; or
- specify image pull credentials using
imagePullSecretsand at least one Secret.
What's next
- Read the OCI Image Manifest Specification.
- Learn about container image garbage collection.
- Learn more about pulling an Image from a Private Registry.
3.2 - Container Environment
This page describes the resources available to Containers in the Container environment.
Container environment
The Kubernetes Container environment provides several important resources to Containers:
- A filesystem, which is a combination of an image and one or more volumes.
- Information about the Container itself.
- Information about other objects in the cluster.
Container information
The hostname of a Container is the name of the Pod in which the Container is running.
It is available through the hostname command or the
gethostname
function call in libc.
The Pod name and namespace are available as environment variables through the downward API.
User-defined environment variables from the Pod definition are also available to the Container, as are any environment variables specified statically in the container image.
Cluster information
A list of all services that were running when a Container was created is available to that Container as environment variables. This list is limited to services within the same namespace as the new Container's Pod and Kubernetes control plane services.
For a service named foo that exposes a set of Pods, each running a container named bar, the following variables are defined:
FOO_SERVICE_HOST=<the host the service is running on>
FOO_SERVICE_PORT=<the port the service is running on>
Services have dedicated IP addresses and are available to the Container via DNS, if DNS addon is enabled.
What's next
- Learn more about Container lifecycle hooks.
- Get hands-on experience attaching handlers to Container lifecycle events.
3.3 - Runtime Class
FEATURE STATE:
Kubernetes v1.20 [stable]This page describes the RuntimeClass resource and runtime selection mechanism.
RuntimeClass is a feature for selecting the container runtime configuration. The container runtime configuration is used to run a Pod's containers.
Motivation
You can set a different RuntimeClass between different Pods to provide a balance of performance versus security. For example, if part of your workload deserves a high level of information security assurance, you might choose to schedule those Pods so that they run in a container runtime that uses hardware virtualization. You'd then benefit from the extra isolation of the alternative runtime, at the expense of some additional overhead.
You can also use RuntimeClass to run different Pods with the same container runtime but with different settings.
Setup
- Configure the CRI implementation on nodes (runtime dependent)
- Create the corresponding RuntimeClass resources
1. Configure the CRI implementation on nodes
The configurations available through RuntimeClass are Container Runtime Interface (CRI) implementation dependent. See the corresponding documentation (below) for your CRI implementation for how to configure.
Note:
RuntimeClass assumes a homogeneous node configuration across the cluster by default (which means that all nodes are configured the same way with respect to container runtimes). To support heterogeneous node configurations, see Scheduling below.The configurations have a corresponding handler name, referenced by the RuntimeClass. The
handler must be a valid DNS label name.
2. Create the corresponding RuntimeClass resources
The configurations setup in step 1 should each have an associated handler name, which identifies
the configuration. For each handler, create a corresponding RuntimeClass object.
The RuntimeClass resource currently only has 2 significant fields: the RuntimeClass name
(metadata.name) and the handler (handler). The object definition looks like this:
# RuntimeClass is defined in the node.k8s.io API group
apiVersion: node.k8s.io/v1
kind: RuntimeClass
metadata:
  # The name the RuntimeClass will be referenced by.
  # RuntimeClass is a non-namespaced resource.
  name: myclass
# The name of the corresponding CRI configuration
handler: myconfiguration
The name of a RuntimeClass object must be a valid DNS subdomain name.
Note:
It is recommended that RuntimeClass write operations (create/update/patch/delete) be restricted to the cluster administrator. This is typically the default. See Authorization Overview for more details.Usage
Once RuntimeClasses are configured for the cluster, you can specify a
runtimeClassName in the Pod spec to use it. For example:
apiVersion: v1
kind: Pod
metadata:
  name: mypod
spec:
  runtimeClassName: myclass
  # ...
This will instruct the kubelet to use the named RuntimeClass to run this pod. If the named
RuntimeClass does not exist, or the CRI cannot run the corresponding handler, the pod will enter the
Failed terminal phase. Look for a
corresponding event for an
error message.
If no runtimeClassName is specified, the default RuntimeHandler will be used, which is equivalent
to the behavior when the RuntimeClass feature is disabled.
CRI Configuration
For more details on setting up CRI runtimes, see CRI installation.
containerd
Runtime handlers are configured through containerd's configuration at
/etc/containerd/config.toml. Valid handlers are configured under the runtimes section:
[plugins."io.containerd.grpc.v1.cri".containerd.runtimes.${HANDLER_NAME}]
See containerd's config documentation for more details:
CRI-O
Runtime handlers are configured through CRI-O's configuration at /etc/crio/crio.conf. Valid
handlers are configured under the
crio.runtime table:
[crio.runtime.runtimes.${HANDLER_NAME}]
  runtime_path = "${PATH_TO_BINARY}"
See CRI-O's config documentation for more details.
Scheduling
FEATURE STATE:
Kubernetes v1.16 [beta]By specifying the scheduling field for a RuntimeClass, you can set constraints to
ensure that Pods running with this RuntimeClass are scheduled to nodes that support it.
If scheduling is not set, this RuntimeClass is assumed to be supported by all nodes.
To ensure pods land on nodes supporting a specific RuntimeClass, that set of nodes should have a
common label which is then selected by the runtimeclass.scheduling.nodeSelector field. The
RuntimeClass's nodeSelector is merged with the pod's nodeSelector in admission, effectively taking
the intersection of the set of nodes selected by each. If there is a conflict, the pod will be
rejected.
If the supported nodes are tainted to prevent other RuntimeClass pods from running on the node, you
can add tolerations to the RuntimeClass. As with the nodeSelector, the tolerations are merged
with the pod's tolerations in admission, effectively taking the union of the set of nodes tolerated
by each.
To learn more about configuring the node selector and tolerations, see Assigning Pods to Nodes.
Pod Overhead
FEATURE STATE:
Kubernetes v1.24 [stable]You can specify overhead resources that are associated with running a Pod. Declaring overhead allows the cluster (including the scheduler) to account for it when making decisions about Pods and resources.
Pod overhead is defined in RuntimeClass through the overhead field. Through the use of this field,
you can specify the overhead of running pods utilizing this RuntimeClass and ensure these overheads
are accounted for in Kubernetes.
What's next
3.4 - Container Lifecycle Hooks
This page describes how kubelet managed Containers can use the Container lifecycle hook framework to run code triggered by events during their management lifecycle.
Overview
Analogous to many programming language frameworks that have component lifecycle hooks, such as Angular, Kubernetes provides Containers with lifecycle hooks. The hooks enable Containers to be aware of events in their management lifecycle and run code implemented in a handler when the corresponding lifecycle hook is executed.
Container hooks
There are two hooks that are exposed to Containers:
PostStart
This hook is executed immediately after a container is created.
It runs concurrently with the container's ENTRYPOINT (main process),
meaning the hook may run before, during, or after the main process starts.
No parameters are passed to the handler.
Note:
While the hook runs concurrently with the container process, it can delay container status updates; the container may not transition toRunning until the hook completes.PreStop
This hook is called immediately before a container is terminated due to an API request or management
event such as a liveness/startup probe failure, preemption, resource contention and others. A call
to the PreStop hook fails if the container is already in a terminated or completed state and the
hook must complete before the TERM signal to stop the container can be sent. The Pod's termination
grace period countdown begins before the PreStop hook is executed, so regardless of the outcome of
the handler, the container will eventually terminate within the Pod's termination grace period. No
parameters are passed to the handler.
A more detailed description of the termination behavior can be found in Termination of Pods.
StopSignal
The StopSignal lifecycle can be used to define a stop signal which would be sent to the container when it is
stopped. If you set this, it overrides any STOPSIGNAL instruction defined within the container image.
A more detailed description of termination behaviour with custom stop signals can be found in Stop Signals.
Hook handler implementations
Containers can access a hook by implementing and registering a handler for that hook. There are three types of hook handlers that can be implemented for Containers:
- Exec - Executes a specific command, such as
pre-stop.sh, inside the cgroups and namespaces of the Container. Resources consumed by the command are counted against the Container. - HTTP - Executes an HTTP request against a specific endpoint on the Container.
- Sleep - Pauses the container for a specified duration.
Hook handler execution
When a Container lifecycle management hook is called,
the Kubernetes management system executes the handler according to the hook action,
httpGet, tcpSocket (deprecated)
and sleep are executed by the kubelet process, and exec is executed in the container.
The PostStart hook handler call is initiated when a container is created,
meaning the container ENTRYPOINT and the PostStart hook are triggered simultaneously.
(This means it generally doesn't make sense to use an HTTP hook for PostStart, since
there is no guarantee that the container's process will have fully started up when the
hook runs.)
If the PostStart hook takes too long to execute or if it hangs,
it can prevent the container from transitioning to a running state.
PreStop hooks are not executed asynchronously from the signal to stop the Container; the hook must
complete its execution before the TERM signal can be sent. If a PreStop hook hangs during
execution, the Pod's phase will be Terminating and remain there until the Pod is killed after its
terminationGracePeriodSeconds expires. This grace period applies to the total time it takes for
both the PreStop hook to execute and for the Container to stop normally. If, for example,
terminationGracePeriodSeconds is 60, and the hook takes 55 seconds to complete, and the Container
takes 10 seconds to stop normally after receiving the signal, then the Container will be killed
before it can stop normally, since terminationGracePeriodSeconds is less than the total time
(55+10) it takes for these two things to happen.
If either a PostStart or PreStop hook fails,
it kills the Container.
Users should make their hook handlers as lightweight as possible. There are cases, however, when long running commands make sense, such as when saving state prior to stopping a Container.
Hook delivery guarantees
Hook delivery is intended to be at least once,
which means that a hook may be called multiple times for any given event,
such as for PostStart or PreStop.
It is up to the hook implementation to handle this correctly.
Generally, only single deliveries are made. If, for example, an HTTP hook receiver is down and is unable to take traffic, there is no attempt to resend. In some rare cases, however, double delivery may occur. For instance, if a kubelet restarts in the middle of sending a hook, the hook might be resent after the kubelet comes back up.
Debugging Hook handlers
The logs for a Hook handler are not exposed in Pod events.
If a handler fails for some reason, it broadcasts an event.
For PostStart, this is the FailedPostStartHook event,
and for PreStop, this is the FailedPreStopHook event.
To generate a failed FailedPostStartHook event yourself, modify the
lifecycle-events.yaml
file to change the postStart command to "badcommand" and apply it.
Here is some example output of the resulting events you see from running kubectl describe pod lifecycle-demo:
Events:
  Type     Reason               Age              From               Message
  ----     ------               ----             ----               -------
  Normal   Scheduled            7s               default-scheduler  Successfully assigned default/lifecycle-demo to ip-XXX-XXX-XX-XX.us-east-2...
  Normal   Pulled               6s               kubelet            Successfully pulled image "nginx" in 229.604315ms
  Normal   Pulling              4s (x2 over 6s)  kubelet            Pulling image "nginx"
  Normal   Created              4s (x2 over 5s)  kubelet            Created container lifecycle-demo-container
  Normal   Started              4s (x2 over 5s)  kubelet            Started container lifecycle-demo-container
  Warning  FailedPostStartHook  4s (x2 over 5s)  kubelet            Exec lifecycle hook ([badcommand]) for Container "lifecycle-demo-container" in Pod "lifecycle-demo_default(30229739-9651-4e5a-9a32-a8f1688862db)" failed - error: command 'badcommand' exited with 126: , message: "OCI runtime exec failed: exec failed: container_linux.go:380: starting container process caused: exec: \"badcommand\": executable file not found in $PATH: unknown\r\n"
  Normal   Killing              4s (x2 over 5s)  kubelet            FailedPostStartHook
  Normal   Pulled               4s               kubelet            Successfully pulled image "nginx" in 215.66395ms
  Warning  BackOff              2s (x2 over 3s)  kubelet            Back-off restarting failed container
What's next
- Learn more about the Container environment.
- Get hands-on experience attaching handlers to Container lifecycle events.
3.5 - Container Runtime Interface (CRI)
The CRI is a plugin interface which enables the kubelet to use a wide variety of container runtimes, without having a need to recompile the cluster components.
You need a working container runtime on each Node in your cluster, so that the kubelet can launch Pods and their containers.
The Container Runtime Interface (CRI) is the main protocol for the communication between the kubelet and Container Runtime.
The Kubernetes Container Runtime Interface (CRI) defines the main gRPC protocol for the communication between the node components kubelet and container runtime.
The API
FEATURE STATE:
Kubernetes v1.23 [stable]The kubelet acts as a client when connecting to the container runtime via gRPC.
The runtime and image service endpoints have to be available in the container
runtime, which can be configured separately within the kubelet by using the
--container-runtime-endpoint
command line flag.
For Kubernetes v1.26 and later, the kubelet requires that the container runtime
supports the v1 CRI API. If a container runtime does not support the v1 API,
the kubelet will not register the node.
Upgrading
When upgrading the Kubernetes version on a node, the kubelet restarts. If the
container runtime does not support the v1 CRI API, the kubelet will fail to
register and report an error. If a gRPC re-dial is required because the container
runtime has been upgraded, the runtime must support the v1 CRI API for the
connection to succeed. This might require a restart of the kubelet after the
container runtime is correctly configured.
List streaming
FEATURE STATE:
Kubernetes v1.36 [alpha](disabled by default)The standard CRI list RPCs (ListContainers, ListPodSandbox, ListImages) return
all results in a single unary response. On nodes with a large number of containers
(for example, more than roughly 10,000 including both running and stopped), these
responses can exceed gRPC's default 16 MiB message size limit, causing the kubelet
to fail when reconciling state with the container runtime.
With the CRIListStreaming feature gate enabled, the kubelet uses server-side
streaming RPCs (such as StreamContainers, StreamPodSandboxes,
StreamImages) that allow the container runtime to divide results across
multiple response messages, bypassing the per-message size limit. This is
particularly useful for:
- High container churn environments (CI/CD systems)
- Large-scale batch processing workloads
If the container runtime does not support streaming RPCs, the kubelet automatically falls back to the standard unary RPCs for backward compatibility.
What's next
- Learn more about the CRI protocol definition
4 - Workloads
Understand Pods, the smallest deployable compute object in Kubernetes, and the higher-level abstractions that help you to run them.
A workload is an application running on Kubernetes. Whether your workload is a single component or several that work together, on Kubernetes you run it inside a set of pods. In Kubernetes, a Pod represents a set of one or more running containers on your cluster.
Kubernetes pods have a defined lifecycle. For example, once a pod is running in your cluster then a critical fault on the node where that pod is running means that all the pods on that node fail. Kubernetes treats that level of failure as final: you would need to create a new Pod to recover, even if the node later becomes healthy.
However, to make life considerably easier, you don't need to manage each Pod directly. Instead, you can use workload resources that manage a set of pods on your behalf. These resources configure controllers that make sure the right number of the right kind of pod are running, to match the state you specified.
Kubernetes provides several built-in workload resources:
- Deployment and ReplicaSet (replacing the legacy resource ReplicationController). Deployment is a good fit for managing a stateless application workload on your cluster, where any Pod in the Deployment is interchangeable and can be replaced if needed.
- StatefulSet lets you run one or more related Pods that do track state somehow. For example, if your workload records data persistently, you can run a StatefulSet that matches each Pod with a PersistentVolume. Your code, running in the Pods for that StatefulSet, can replicate data to other Pods in the same StatefulSet to improve overall resilience.
- DaemonSet defines Pods that provide facilities that are local to nodes. Every time you add a node to your cluster that matches the specification in a DaemonSet, the control plane schedules a Pod for that DaemonSet onto the new node. Each pod in a DaemonSet performs a job similar to a system daemon on a classic Unix / POSIX server. A DaemonSet might be fundamental to the operation of your cluster, such as a plugin to run cluster networking, it might help you to manage the node, or it could provide optional behavior that enhances the container platform you are running.
- Job and CronJob provide different ways to define tasks that run to completion and then stop. You can use a Job to define a task that runs to completion, just once. You can use a CronJob to run the same Job multiple times according a schedule.
In the wider Kubernetes ecosystem, you can find third-party workload resources that provide additional behaviors. Using a custom resource definition, you can add in a third-party workload resource if you want a specific behavior that's not part of Kubernetes' core. For example, if you wanted to run a group of Pods for your application but stop work unless all the Pods are available (perhaps for some high-throughput distributed task), then you can implement or install an extension that does provide that feature.
Workload placement
FEATURE STATE:
Kubernetes v1.35 [alpha](disabled by default)While standard workload resources (like Deployments and Jobs) manage the lifecycle of Pods, you may have complex scheduling requirements where groups of Pods must be treated as a single unit.
The Workload API allows you to define PodGroupTemplates to group Pods and apply advanced scheduling policies to them,
such as gang scheduling.
Controllers create PodGroup objects from these templates at runtime,
and Pods reference their PodGroup via the
spec.schedulingGroup field. This is particularly useful for batch processing and machine
learning workloads where "all-or-nothing" placement is required.
What's next
As well as reading about each API kind for workload management, you can read how to do specific tasks:
- Run a stateless application using a Deployment
- Run a stateful application either as a single instance or as a replicated set
- Run automated tasks with a CronJob
To learn about Kubernetes' mechanisms for separating code from configuration, visit Configuration.
There are two supporting concepts that provide backgrounds about how Kubernetes manages pods for applications:
- Garbage collection tidies up objects from your cluster after their owning resource has been removed.
- The time-to-live after finished controller removes Jobs once a defined time has passed since they completed.
Once your application is running, you might want to make it available on the internet as a Service or, for web application only, using an Ingress.
4.1 - Pods
Pods are the smallest deployable units of computing that you can create and manage in Kubernetes.
A Pod (as in a pod of whales or pea pod) is a group of one or more containers, with shared storage and network resources, and a specification for how to run the containers. A Pod's contents are always co-located and co-scheduled, and run in a shared context. A Pod models an application-specific "logical host": it contains one or more application containers which are relatively tightly coupled. In non-cloud contexts, applications executed on the same physical or virtual machine are analogous to cloud applications executed on the same logical host.
As well as application containers, a Pod can contain init containers that run during Pod startup. You can also inject ephemeral containers for debugging a running Pod.
What is a Pod?
Note:
You need to install a container runtime into each node in the cluster so that Pods can run there.The shared context of a Pod is a set of Linux namespaces, cgroups, and potentially other facets of isolation - the same things that isolate a container. Within a Pod's context, the individual applications may have further sub-isolations applied.
A Pod is similar to a set of containers with shared namespaces and shared filesystem volumes.
Pods in a Kubernetes cluster are used in two main ways:
Pods that run a single container. The "one-container-per-Pod" model is the most common Kubernetes use case; in this case, you can think of a Pod as a wrapper around a single container; Kubernetes manages Pods rather than managing the containers directly.
Pods that run multiple containers that need to work together. A Pod can encapsulate an application composed of multiple co-located containers that are tightly coupled and need to share resources. These co-located containers form a single cohesive unit.
Grouping multiple co-located and co-managed containers in a single Pod is a relatively advanced use case. You should use this pattern only in specific instances in which your containers are tightly coupled.
You don't need to run multiple containers to provide replication (for resilience or capacity); if you need multiple replicas, see Workload management.
Using Pods
The following is an example of a Pod which consists of a container running the image nginx:1.14.2.
apiVersion: v1
kind: Pod
metadata:
  name: nginx
spec:
  containers:
  - name: nginx
    image: nginx:1.14.2
    ports:
    - containerPort: 80
To create the Pod shown above, run the following command:
kubectl apply -f https://k8s.io/examples/pods/simple-pod.yaml
Pods are generally not created directly and are created using workload resources. See Working with Pods for more information on how Pods are used with workload resources.
Workload resources for managing pods
Usually you don't need to create Pods directly, even singleton Pods. Instead, create them using workload resources such as Deployment or Job. If your Pods need to track state, consider the StatefulSet resource.
Each Pod is meant to run a single instance of a given application. If you want to scale your application horizontally (to provide more overall resources by running more instances), you should use multiple Pods, one for each instance. In Kubernetes, this is typically referred to as replication. Replicated Pods are usually created and managed as a group by a workload resource and its controller.
See Pods and controllers for more information on how Kubernetes uses workload resources, and their controllers, to implement application scaling and auto-healing.
Pods natively provide two kinds of shared resources for their constituent containers: networking and storage.
Working with Pods
You'll rarely create individual Pods directly in Kubernetes—even singleton Pods. This is because Pods are designed as relatively ephemeral, disposable entities. When a Pod gets created (directly by you, or indirectly by a controller), the new Pod is scheduled to run on a Node in your cluster. The Pod remains on that node until the Pod finishes execution, the Pod object is deleted, the Pod is evicted for lack of resources, or the node fails.
Note:
Restarting a container in a Pod should not be confused with restarting a Pod. A Pod is not a process, but an environment for running container(s). A Pod persists until it is deleted.The name of a Pod must be a valid DNS subdomain value, but this can produce unexpected results for the Pod hostname. For best compatibility, the name should follow the more restrictive rules for a DNS label.
Pod OS
FEATURE STATE:
Kubernetes v1.25 [stable]You should set the .spec.os.name field to either windows or linux to indicate the OS on
which you want the pod to run. These two are the only operating systems supported for now by
Kubernetes. In the future, this list may be expanded.
In Kubernetes v1.36, the value of .spec.os.name does not affect
how the kube-scheduler
picks a node for the Pod to run on. In any cluster where there is more than one operating system for
running nodes, you should set the
kubernetes.io/os
label correctly on each node, and define pods with a nodeSelector based on the operating system
label. The kube-scheduler assigns your pod to a node based on other criteria and may or may not
succeed in picking a suitable node placement where the node OS is right for the containers in that Pod.
The Pod security standards also use this
field to avoid enforcing policies that aren't relevant to the operating system.
Pods and controllers
You can use workload resources to create and manage multiple Pods for you. A controller for the resource handles replication and rollout and automatic healing in case of Pod failure. For example, if a Node fails, a controller notices that Pods on that Node have stopped working and creates a replacement Pod. The scheduler places the replacement Pod onto a healthy Node.
Here are some examples of workload resources that manage one or more Pods:
Specifying a scheduling group
FEATURE STATE:
Kubernetes v1.35 [alpha](disabled by default)By default, Kubernetes schedules every Pod individually. However, some tightly-coupled applications need a group of Pods to be scheduled simultaneously to function correctly.
You can link a Pod to a PodGroup using the
scheduling group field
(spec.schedulingGroup). This tells the kube-scheduler that the Pod belongs to a specific
group, enabling it to apply group-level coordinated placement decisions for the entire group at once.
Pod templates
Controllers for workload resources create Pods from a pod template and manage those Pods on your behalf.
PodTemplates are specifications for creating Pods, and are included in workload resources such as Deployments, Jobs, and DaemonSets.
Each controller for a workload resource uses the PodTemplate inside the workload
object to make actual Pods. The PodTemplate is part of the desired state of whatever
workload resource you used to run your app.
When you create a Pod, you can include environment variables in the Pod template for the containers that run in the Pod.
The sample below is a manifest for a simple Job with a template that starts one
container. The container in that Pod prints a message then pauses.
apiVersion: batch/v1
kind: Job
metadata:
  name: hello
spec:
  template:
    # This is the pod template
    spec:
      containers:
      - name: hello
        image: busybox:1.28
        command: ['sh', '-c', 'echo "Hello, Kubernetes!" && sleep 3600']
      restartPolicy: OnFailure
    # The pod template ends here
Modifying the pod template or switching to a new pod template has no direct effect on the Pods that already exist. If you change the pod template for a workload resource, that resource needs to create replacement Pods that use the updated template.
For example, the StatefulSet controller ensures that the running Pods match the current pod template for each StatefulSet object. If you edit the StatefulSet to change its pod template, the StatefulSet starts to create new Pods based on the updated template. Eventually, all of the old Pods are replaced with new Pods, and the update is complete.
Each workload resource implements its own rules for handling changes to the Pod template. If you want to read more about StatefulSet specifically, read Update strategy in the StatefulSet Basics tutorial.
On Nodes, the kubelet does not directly observe or manage any of the details around pod templates and updates; those details are abstracted away. That abstraction and separation of concerns simplifies system semantics, and makes it feasible to extend the cluster's behavior without changing existing code.
Pod update and replacement
As mentioned in the previous section, when the Pod template for a workload resource is changed, the controller creates new Pods based on the updated template instead of updating or patching the existing Pods.
Kubernetes doesn't prevent you from managing Pods directly. It is possible to
update some fields of a running Pod, in place. However, Pod update operations
like
patch, and
replace
have some limitations:
Most of the metadata about a Pod is immutable. For example, you cannot change the
namespace,name,uid, orcreationTimestampfields.If the
metadata.deletionTimestampis set, no new entry can be added to themetadata.finalizerslist.Pod updates may not change fields other than
spec.containers[*].image,spec.initContainers[*].image,spec.activeDeadlineSeconds,spec.terminationGracePeriodSeconds,spec.tolerationsorspec.schedulingGates. Forspec.tolerations, you can only add new entries.When updating the
spec.activeDeadlineSecondsfield, two types of updates are allowed:- setting the unassigned field to a positive number;
- updating the field from a positive number to a smaller, non-negative number.
Pod subresources
The above update rules apply to regular pod updates, but other pod fields can be updated through subresources.
- Resize: The
resizesubresource allows container resources (spec.containers[*].resources) to be updated. See Resize Container Resources for more details. - Ephemeral Containers: The
ephemeralContainerssubresource allows ephemeral containers to be added to a Pod. See Ephemeral Containers for more details. - Status: The
statussubresource allows the pod status to be updated. This is typically only used by the Kubelet and other system controllers. - Binding: The
bindingsubresource allows setting the pod'sspec.nodeNamevia aBindingrequest. This is typically only used by the scheduler.
Pod generation
- The
metadata.generationfield is unique. It will be automatically set by the system such that new pods have ametadata.generationof 1, and every update to mutable fields in the pod's spec will increment themetadata.generationby 1.
FEATURE STATE:
Kubernetes v1.35 [stable](enabled by default)observedGenerationis a field that is captured in thestatussection of the Pod object. The Kubelet will setstatus.observedGenerationto track the pod state to the current pod status. The pod'sstatus.observedGenerationwill reflect themetadata.generationof the pod at the point that the pod status is being reported.
Note:
Thestatus.observedGeneration field is managed by the kubelet and external controllers should not modify this field.Different status fields may either be associated with the metadata.generation of the current sync loop, or with the
metadata.generation of the previous sync loop. The key distinction is whether a change in the spec is reflected
directly in the status or is an indirect result of a running process.
Direct Status Updates
For status fields where the allocated spec is directly reflected, the observedGeneration will
be associated with the current metadata.generation (Generation N).
This behavior applies to:
- Resize Status: The status of a resource resize operation.
- Allocated Resources: The resources allocated to the Pod after a resize.
- Ephemeral Containers: When a new ephemeral container is added, and it is in
Waitingstate.
Indirect Status Updates
For status fields that are an indirect result of running the spec, the observedGeneration will be associated
with the metadata.generation of the previous sync loop (Generation N-1).
This behavior applies to:
- Container Image: The
ContainerStatus.ImageIDreflects the image from the previous generation until the new image is pulled and the container is updated. - Actual Resources: During an in-progress resize, the actual resources in use still belong to the previous generation's request.
- Container state: During an in-progress resize, with require restart policy reflects the previous generation's request.
- activeDeadlineSeconds & terminationGracePeriodSeconds & deletionTimestamp: The effects of these fields on the Pod's status are a result of the previously observed specification.
Resource sharing and communication
Pods enable data sharing and communication among their constituent containers.
Storage in Pods
A Pod can specify a set of shared storage volumes. All containers in the Pod can access the shared volumes, allowing those containers to share data. Volumes also allow persistent data in a Pod to survive in case one of the containers within needs to be restarted. See Storage for more information on how Kubernetes implements shared storage and makes it available to Pods.
Pod networking
Each Pod is assigned a unique IP address for each address family. Every
container in a Pod shares the network namespace, including the IP address and
network ports. Inside a Pod (and only then), the containers that belong to the Pod
can communicate with one another using localhost. When containers in a Pod communicate
with entities outside the Pod,
they must coordinate how they use the shared network resources (such as ports).
Within a Pod, containers share an IP address and port space, and
can find each other via localhost. The containers in a Pod can also communicate
with each other using standard inter-process communications like SystemV semaphores
or POSIX shared memory. Containers in different Pods have distinct IP addresses
and can not communicate by OS-level IPC without special configuration.
Containers that want to interact with a container running in a different Pod can
use IP networking to communicate.
Containers within the Pod see the system hostname as being the same as the configured
name for the Pod. There's more about this in the networking
section.
Pod security settings
To set security constraints on Pods and containers, you use the
securityContext field in the Pod specification. This field gives you
granular control over what a Pod or individual containers can do. See Advanced Pod Configuration for more details.
For basic security configuration, you should meet the Baseline Pod security standard and run containers as non-root. You can set simple security contexts:
apiVersion: v1
kind: Pod
metadata:
  name: security-context-demo
spec:
  securityContext:
    runAsUser: 1000
    runAsGroup: 3000
    fsGroup: 2000
  containers:
  - name: sec-ctx-demo
    image: busybox
    command: ["sh", "-c", "sleep 1h"]
For advanced security context configuration including capabilities, seccomp profiles, and detailed security options, see the security concepts section.
- To learn about kernel-level security constraints that you can use, see Linux kernel security constraints for Pods and containers.
- To learn more about the Pod security context, see Configure a Security Context for a Pod or Container.
Resource requests and limits
When you specify a Pod, you can optionally specify how much of each resource a container needs. The most common resources to specify are CPU and memory (RAM).
When you specify the resource request for containers in a Pod, the kube-scheduler uses this information to decide which node to place the Pod on. When you specify a resource limit for a container, the kubelet enforces those limits so that the running container is not allowed to use more of that resource than the limit you set.
CPU limits are enforced by CPU throttling. When a container approaches its CPU limit, the kernel restricts its access to CPU. Memory limits are enforced by the kernel with out-of-memory (OOM) kills when a container exceeds its limit.
Note:
Setting CPU limits involves a trade-off. CPU limits help prevent noisy neighbor problems where a single workload starves others on the same node. This is especially important in multi-tenant environments. However, CPU limits can cause throttling even when the node has spare CPU capacity, potentially degrading latency-sensitive workload performance. Whether to set CPU limits depends on your environment, workload characteristics, and isolation requirements.For details on resource units, enforcement behavior, and configuration examples, see Resource Management for Pods and Containers.
Static Pods
Static Pods are managed directly by the kubelet daemon on a specific node, without the API server observing them. Whereas most Pods are managed by the control plane (for example, a Deployment), for static Pods, the kubelet directly supervises each static Pod (and restarts it if it fails).
Static Pods are always bound to one Kubelet on a specific node. The main use for static Pods is to run a self-hosted control plane: in other words, using the kubelet to supervise the individual control plane components.
For details, see Static Pods.
Pods with multiple containers
Pods are designed to support multiple cooperating processes (as containers) that form a cohesive unit of service. The containers in a Pod are automatically co-located and co-scheduled on the same physical or virtual machine in the cluster. The containers can share resources and dependencies, communicate with one another, and coordinate when and how they are terminated.
Pods in a Kubernetes cluster are used in two main ways:
- Pods that run a single container. The "one-container-per-Pod" model is the most common Kubernetes use case; in this case, you can think of a Pod as a wrapper around a single container; Kubernetes manages Pods rather than managing the containers directly.
- Pods that run multiple containers that need to work together. A Pod can encapsulate an application composed of multiple co-located containers that are tightly coupled and need to share resources. These co-located containers form a single cohesive unit of service—for example, one container serving data stored in a shared volume to the public, while a separate sidecar container refreshes or updates those files. The Pod wraps these containers, storage resources, and an ephemeral network identity together as a single unit.
For example, you might have a container that acts as a web server for files in a shared volume, and a separate sidecar container that updates those files from a remote source, as in the following diagram:

Some Pods have init containers as well as app containers. By default, init containers run and complete before the app containers are started.
You can also have sidecar containers that provide auxiliary services to the main application Pod (for example: a service mesh).
FEATURE STATE:
Kubernetes v1.33 [stable](enabled by default)Enabled by default, the SidecarContainers feature gate
allows you to specify restartPolicy: Always for init containers.
Setting the Always restart policy ensures that the containers where you set it are
treated as sidecars that are kept running during the entire lifetime of the Pod.
Containers that you explicitly define as sidecar containers
start up before the main application Pod and remain running until the Pod is
shut down.
Container probes
A probe is a diagnostic performed periodically by the kubelet on a container. To perform a diagnostic, the kubelet can invoke different actions:
ExecAction(performed with the help of the container runtime)TCPSocketAction(checked directly by the kubelet)HTTPGetAction(checked directly by the kubelet)
You can read more about probes in the Pod Lifecycle documentation.
What's next
- Learn about the lifecycle of a Pod.
- Read about PodDisruptionBudget and how you can use it to manage application availability during disruptions.
- Pod is a top-level resource in the Kubernetes REST API. The Pod object definition describes the object in detail.
- The Distributed System Toolkit: Patterns for Composite Containers explains common layouts for Pods with more than one container.
- Read about Pod topology spread constraints
- Read Advanced Pod Configuration to learn the topic in detail.
That page covers aspects of Pod configuration beyond the essentials, including:
- PriorityClasses
- RuntimeClasses
- advanced ways to configure scheduling: the way that Kubernetes decides which node a Pod should run on.
To understand the context for why Kubernetes wraps a common Pod API in other resources (such as StatefulSets or Deployments), you can read about the prior art, including:
4.1.1 - Pod Lifecycle
This page describes the lifecycle of a Pod. Pods follow a defined lifecycle, starting
in the Pending phase, moving through Running if at least one
of its primary containers starts OK, and then through either the Succeeded or
Failed phases depending on whether any container in the Pod terminated in failure.
While a Pod runs, the kubelet manages containers and translates the Pod's spec for the container runtime. The kubelet also manages executing probes that track the health of your application.
Like individual application containers, Pods are considered to be relatively ephemeral (rather than durable) entities. Pods are created, assigned a unique ID (UID), and scheduled to run on nodes where they remain until termination (according to restart policy) or deletion. If a Node dies, the Pods running on (or scheduled to run on) that node are marked for deletion. The control plane marks the Pods for removal after a timeout period.
Pod lifetime
While a Pod is running, the kubelet is able to restart containers to handle some kind of faults. Within a Pod, Kubernetes tracks different container states and determines what action to take to make the Pod healthy again. This is done in a polling loop that periodically reconciles the desired state (a Pod spec) with the actual state of the running containers.
In the Kubernetes API, Pods have both a specification and an actual status. The status for a Pod object consists of a set of Pod conditions. You can also inject custom readiness information into the condition data for a Pod, if that is useful to your application.
Pods are only scheduled once in their lifetime; assigning a Pod to a specific node is called binding, and the process of selecting which node to use is called scheduling. Once a Pod has been scheduled and is bound to a node, Kubernetes tries to run that Pod on the node. The Pod runs on that node until it stops, or until the Pod is terminated; if Kubernetes isn't able to start the Pod on the selected node (for example, if the node crashes before the Pod starts), then that particular Pod never starts.
You can use Pod Scheduling Readiness to delay scheduling for a Pod until all its scheduling gates are removed. For example, you might want to define a set of Pods but only trigger scheduling once all the Pods have been created.
Pods and fault recovery
If one of the containers in the Pod fails, then Kubernetes may try to restart that specific container. Read How Pods handle problems with containers to learn more.
Pods can however fail in a way that the cluster cannot recover from, and in that case Kubernetes does not attempt to heal the Pod further; instead, Kubernetes deletes the Pod and relies on other components to provide automatic healing.
If a Pod is scheduled to a node and that node then fails, the Pod is treated as unhealthy and Kubernetes eventually deletes the Pod. A Pod won't survive an eviction due to a lack of resources or Node maintenance.
Kubernetes uses a higher-level abstraction, called a controller, that handles the work of managing the relatively disposable Pod instances.
A given Pod (as defined by a UID) is never "rescheduled" to a different node; instead,
that Pod can be replaced by a new, near-identical Pod. If you make a replacement Pod, it can
even have same name (as in .metadata.name) that the old Pod had, but the replacement
would have a different .metadata.uid from the old Pod.
Kubernetes does not guarantee that a replacement for an existing Pod would be scheduled to the same node as the old Pod that was being replaced.
Associated lifetimes
When something is said to have the same lifetime as a Pod, such as a volume, that means that the thing exists as long as that specific Pod (with that exact UID) exists. If that Pod is deleted for any reason, and even if an identical replacement is created, the related thing (a volume, in this example) is also destroyed and created anew.
Figure 1.
A multi-container Pod that contains a file puller sidecar and a web server. The Pod uses an ephemeral emptyDir volume for shared storage between the containers.
Pod phase
A Pod's status field is a
PodStatus
object, which has a phase field.
The phase of a Pod is a simple, high-level summary of where the Pod is in its lifecycle. The phase is not intended to be a comprehensive rollup of observations of container or Pod state, nor is it intended to be a comprehensive state machine.
The number and meanings of Pod phase values are tightly guarded.
Other than what is documented here, nothing should be assumed about Pods that
have a given phase value.
Here are the possible values for phase:
| Value | Description |
|---|---|
Pending | The Pod has been accepted by the Kubernetes cluster, but one or more of the containers has not been set up and made ready to run. This includes time a Pod spends waiting to be scheduled as well as the time spent downloading container images over the network. |
Running | The Pod has been bound to a node, and all of the containers have been created. At least one container is still running, or is in the process of starting or restarting. |
Succeeded | All containers in the Pod have terminated in success, and will not be restarted. |
Failed | All containers in the Pod have terminated, and at least one container has terminated in failure. That is, the container either exited with non-zero status or was terminated by the system, and is not set for automatic restarting. |
Unknown | For some reason the state of the Pod could not be obtained. This phase typically occurs due to an error in communicating with the node where the Pod should be running. |
Note:
When a pod is failing to start repeatedly, CrashLoopBackOff may appear in the Status field of some kubectl commands.
Similarly, when a pod is being deleted, Terminating may appear in the Status field of some kubectl commands.
Make sure not to confuse Status, a kubectl display field for user intuition, with the pod's phase.
Pod phase is an explicit part of the Kubernetes data model and of the
Pod API.
  NAMESPACE               NAME               READY   STATUS             RESTARTS   AGE
  alessandras-namespace   alessandras-pod    0/1     CrashLoopBackOff   200        2d9h
A Pod is granted a term to terminate gracefully, which defaults to 30 seconds.
You can use the flag --force to terminate a Pod by force.
Since Kubernetes 1.27, the kubelet transitions deleted Pods to a terminal phase
(Failed or Succeeded depending on the exit statuses of the pod containers)
before their deletion from the API server, with two exceptions:
- static Pods (which are managed directly by the kubelet and represented by mirror Pods)
- force-deleted Pods without a finalizer
If a node dies or is disconnected from the rest of the cluster, Kubernetes
applies a policy for setting the phase of all Pods on the lost node to Failed.
Container states
As well as the phase of the Pod overall, Kubernetes tracks the state of each container inside a Pod. You can use container lifecycle hooks to trigger events to run at certain points in a container's lifecycle.
Once the scheduler
assigns a Pod to a Node, the kubelet starts creating containers for that Pod
using a container runtime.
There are three possible container states: Waiting, Running, and Terminated.
To check the state of a Pod's containers, you can use
kubectl describe pod <name-of-pod>. The output shows the state for each container
within that Pod.
Each state has a specific meaning:
Waiting
If a container is not in either the Running or Terminated state, it is Waiting.
A container in the Waiting state is still running the operations it requires in
order to complete start up: for example, pulling the container image from a container
image registry, or applying Secret
data.
When you use kubectl to query a Pod with a container that is Waiting, you also see
a Reason field to summarize why the container is in that state.
Running
The Running status indicates that a container is executing without issues. If there
was a postStart hook configured, it has already executed and finished. When you use
kubectl to query a Pod with a container that is Running, you also see information
about when the container entered the Running state.
Terminated
A container in the Terminated state began execution and then either ran to
completion or failed for some reason. When you use kubectl to query a Pod with
a container that is Terminated, you see a reason, an exit code, and the start and
finish time for that container's period of execution.
If a container has a preStop hook configured, this hook runs before the container enters
the Terminated state.
How Pods handle problems with containers
Kubernetes manages container failures within Pods using a restartPolicy defined
in the Pod spec. This policy determines how Kubernetes reacts to containers exiting due to errors
or other reasons, which falls in the following sequence:
- Initial crash: Kubernetes attempts an immediate restart based on the Pod
restartPolicy. - Repeated crashes: After the initial crash Kubernetes applies an exponential
backoff delay for subsequent restarts, described in
restartPolicy. This prevents rapid, repeated restart attempts from overloading the system. - CrashLoopBackOff state: This indicates that the backoff delay mechanism is currently in effect for a given container that is in a crash loop, failing and restarting repeatedly.
- Backoff reset: If a container runs successfully for a certain duration (e.g., 10 minutes), Kubernetes resets the backoff delay, treating any new crash as the first one.
In practice, a CrashLoopBackOff is a condition or event that might be seen as output
from the kubectl command, while describing or listing Pods, when a container in the Pod
fails to start properly and then continually tries and fails in a loop.
In other words, when a container enters the crash loop, Kubernetes applies the exponential backoff delay mentioned in the Container restart policy. This mechanism prevents a faulty container from overwhelming the system with continuous failed start attempts.
The CrashLoopBackOff can be caused by issues like the following:
- Application errors that cause the container to exit.
- Configuration errors, such as incorrect environment variables or missing configuration files.
- Resource constraints, where the container might not have enough memory or CPU to start properly.
- Health checks failing if the application doesn't start serving within the expected time.
- Container liveness probes or startup probes returning a
Failureresult as mentioned in the probes section.
To investigate the root cause of a CrashLoopBackOff issue, a user can:
- Check logs: Use
kubectl logs <name-of-pod>to check the logs of the container. This is often the most direct way to diagnose the issue causing the crashes. - Inspect events: Use
kubectl describe pod <name-of-pod>to see events for the Pod, which can provide hints about configuration or resource issues. - Review configuration: Ensure that the Pod configuration, including environment variables and mounted volumes, is correct and that all required external resources are available.
- Check resource limits: Make sure that the container has enough CPU and memory allocated. Sometimes, increasing the resources in the Pod definition can resolve the issue.
- Debug application: There might exist bugs or misconfigurations in the application code. Running this container image locally or in a development environment can help diagnose application specific issues.
Container restarts
When a container in your Pod stops, or experiences failure, Kubernetes can restart it. A restart isn't always appropriate; for example, init containers run only once (if successful), during Pod startup. You can configure restarts as a policy that applies to all Pods, or using container-level configuration (for example: when you define a sidecar container) or define container-level override.
Container restarts and resilience
The Kubernetes project recommends following cloud-native principles, including resilient design that accounts for unannounced or arbitrary restarts. You can achieve this either by failing the Pod and relying on automatic replacement, or you can design for container-level resilience. Either approach helps to ensure that your overall workload remains available despite partial failure.
Pod-level container restart policy
The spec of a Pod has a restartPolicy field with possible values Always, OnFailure,
and Never. The default value is Always.
The restartPolicy for a Pod applies to app containers
in the Pod and to regular init containers.
Sidecar containers
ignore the Pod-level restartPolicy field: in Kubernetes, a sidecar is defined as an
entry inside initContainers that has its container-level restartPolicy set to Always.
For init containers that exit with an error, the kubelet restarts the init container if
the Pod level restartPolicy is either OnFailure or Always:
Always: Automatically restarts the container after any termination.OnFailure: Only restarts the container if it exits with an error (non-zero exit status).Never: Does not automatically restart the terminated container.
Restart behavior comparison
The following table shows how containers behave under different restart policies and exit codes:
| Exit Code | restartPolicy: Always | restartPolicy: OnFailure | restartPolicy: Never | Sidecar Containers |
|---|---|---|---|---|
| 0 (Success) | Restarts | Does not restart | Does not restart | Always restarts |
| Non-zero (Failure) | Restarts | Restarts | Does not restart | Always restarts |
Note:
The restart behavior is particularly important when choosing between Deployments and Jobs:
- Deployments typically use
restartPolicy: Always(the only allowed value) to keep applications running continuously - Jobs commonly use
restartPolicy: OnFailureorrestartPolicy: Neverto handle batch processing tasks appropriately - Sidecar containers are init containers that always restart regardless of the Pod's
restartPolicybecause they have their own container-levelrestartPolicy: Always
Example scenarios
Here are concrete examples demonstrating the different restart behaviors:
Example 1: Web server with restartPolicy: Always (typical for Deployments)
apiVersion: v1
kind: Pod
metadata:
  name: web-server
spec:
  restartPolicy: Always  # Container restarts regardless of exit code
  containers:
  - name: nginx
    image: nginx:1.14.2
    # If this container crashes or exits for any reason, it will be restarted
Example 2: Batch job with restartPolicy: OnFailure
apiVersion: batch/v1
kind: Job
metadata:
  name: data-processor
spec:
  template:
    spec:
      restartPolicy: OnFailure  # Only restart on non-zero exit codes
      containers:
      - name: processor
        image: busybox:1.28
        command: ['sh', '-c', 'echo "Processing data..."; exit 0']
        # Exit code 0: Job completes successfully, no restart
        # Exit code 1+: Container restarts to retry the task
Example 3: One-time task with restartPolicy: Never
apiVersion: v1
kind: Pod
metadata:
  name: migration-task
spec:
  restartPolicy: Never  # Never restart, regardless of exit code
  containers:
  - name: migrate
    image: busybox:1.28
    command: ['sh', '-c', 'echo "Running migration..."; exit 1']
    # Even with exit code 1 (failure), the container will not restart
    # The Pod will remain in Failed state
Sidecar containers and restart policies
Sidecar containers have special restart behavior that differs from regular app containers:
- Sidecar containers ignore Pod-level
restartPolicy: They use their own container-levelrestartPolicyfield, which is always set toAlways - Independent lifecycle: Sidecar containers can restart independently of the main application container
- Persistent operation: Sidecar containers remain running throughout the Pod's lifetime to provide supporting services
Example: Pod with sidecar container
apiVersion: v1
kind: Pod
metadata:
  name: app-with-sidecar
spec:
  restartPolicy: OnFailure  # Applies to main container only
  initContainers:
  - name: logging-sidecar    # This is a sidecar container
    image: fluent/fluent-bit:1.8
    restartPolicy: Always    # Sidecar always restarts regardless of exit code
    # Provides logging services throughout Pod lifetime
  containers:
  - name: main-app          # This follows Pod-level restartPolicy
    image: nginx:1.14.2
    # Will only restart on failure (non-zero exit) due to Pod's OnFailure policy
Note:
While the main application container follows the Pod'srestartPolicy: OnFailure, the sidecar container will restart regardless of its exit code because sidecar containers always have restartPolicy: Always at the container level.When the kubelet is handling container restarts according to the configured restart
policy, that only applies to restarts that make replacement containers inside the
same Pod and running on the same node. After containers in a Pod exit, the kubelet
restarts them with an exponential backoff delay (10s, 20s, 40s, …), that is capped at
300 seconds (5 minutes). Once a container has executed for 10 minutes without any
problems, the kubelet resets the restart backoff timer for that container.
Sidecar containers and Pod lifecycle
explains the behaviour of init containers when specify restartPolicy field on it.
Individual container restart policy and rules
FEATURE STATE:
Kubernetes v1.35 [beta](enabled by default)If your cluster has the feature gate ContainerRestartRules enabled, you can specify
restartPolicy and restartPolicyRules on individual containers to override the Pod
restart policy. Container restart policy and rules applies to app containers
in the Pod and to regular init containers.
A Kubernetes-native sidecar container
has its container-level restartPolicy set to Always.
The container restarts will follow the same exponential backoff as pod restart policy described above. Supported container restart policies:
Always: Automatically restarts the container after any termination.OnFailure: Only restarts the container if it exits with an error (non-zero exit status).Never: Does not automatically restart the terminated container.
Additionally, individual containers can specify restartPolicyRules. If the restartPolicyRules
field is specified, then container restartPolicy must also be specified. The restartPolicyRules
define a list of rules to apply on container exit. Each rule will consist of a condition
and an action. The supported condition is exitCodes, which compares the exit code of the container
with a list of given values. The supported action is Restart, which means the container will be
restarted. The rules will be evaluated in order. On the first match, the action will be applied.
If none of the rules’ conditions matched, Kubernetes fallback to container’s configured
restartPolicy.
For example, a Pod with OnFailure restart policy that have a try-once container. This allows
Pod to only restart certain containers:
apiVersion: v1
kind: Pod
metadata:
  name: on-failure-pod
spec:
  restartPolicy: OnFailure
  containers:
  - name: try-once-container    # This container will run only once because the restartPolicy is Never.
    image: registry.k8s.io/busybox:1.27.2
    command: ['sh', '-c', 'echo "Only running once" && sleep 10 && exit 1']
    restartPolicy: Never
  - name: on-failure-container  # This container will be restarted on failure.
    image: registry.k8s.io/busybox:1.27.2
    command: ['sh', '-c', 'echo "Keep restarting" && sleep 1800 && exit 1']
A Pod with Always restart policy with an init container that only execute once. If the init
container fails, the Pod fails. This allows the Pod to fail if the initialization failed,
but also keep running once the initialization succeeds:
apiVersion: v1
kind: Pod
metadata:
  name: fail-pod-if-init-fails
spec:
  restartPolicy: Always
  initContainers:
  - name: init-once      # This init container will only try once. If it fails, the pod will fail.
    image: registry.k8s.io/busybox:1.27.2
    command: ['sh', '-c', 'echo "Failing initialization" && sleep 10 && exit 1']
    restartPolicy: Never
  containers:
  - name: main-container # This container will always be restarted once initialization succeeds.
    image: registry.k8s.io/busybox:1.27.2
    command: ['sh', '-c', 'sleep 1800 && exit 0']
A Pod with Never restart policy with a container that ignores and restarts on specific exit codes. This is useful to differentiate between restartable errors and non-restartable errors:
apiVersion: v1
kind: Pod
metadata:
  name: restart-on-exit-codes
spec:
  restartPolicy: Never
  containers:
  - name: restart-on-exit-codes
    image: registry.k8s.io/busybox:1.27.2
    command: ['sh', '-c', 'sleep 60 && exit 0']
    restartPolicy: Never     # Container restart policy must be specified if rules are specified
    restartPolicyRules:      # Only restart the container if it exits with code 42
    - action: Restart
      exitCodes:
        operator: In
        values: [42]
Restart rules can be used for many more advanced lifecycle management scenarios. Note, restart rules are affected by the same inconsistencies as the regular restart policy. The kubelet restarts, container runtime garbage collection, intermitted connectivity issues with the control plane may cause the state loss and containers may be re-run even when you expect a container not to be restarted.
Restart All Containers
FEATURE STATE:
Kubernetes v1.36 [beta](enabled by default)If your cluster has the feature gate RestartAllContainersOnContainerExits enabled, you can specify
RestartAllContainers as an action in restartPolicyRules at container level. When a container's exit
matches a rule with this action, the entire Pod is terminated and restarted in-place.
This "in-place" restart offers a more efficient way to reset a Pod's state compared to full deletion and recreation. This is especially valuable for workloads where rescheduling is costly, such as batch jobs or AI/ML training tasks.
How in-place Pod restarts work
When a RestartAllContainers action is triggered, the kubelet performs the following steps:
Fast Termination: All running containers in the Pod are terminated. The configured
terminationGracePeriodSecondsis not respected, and any configuredpreStophooks are not executed. This ensures a swift shutdown.Preservation of Pod Resources: The Pod's essential resources are preserved:
- Pod UID, IP address, and network namespace
- Pod sandbox and any attached devices
- All volumes, including
emptyDirand mounted volumes
Pod Status Update: The Pod's status is updated with a
PodRestartInPlacecondition set toTrue. This makes the restart process observable.Full Restart Sequence: Once all containers are terminated, the
PodRestartInPlacecondition is set toFalse, and the Pod begins the standard startup process:- Init containers are re-run in order.
- Sidecar and regular containers are started.
A key aspect of this feature is that all containers are restarted, including those that
previously completed successfully or failed. The RestartAllContainers action overrides
any configured container-level or Pod-level restartPolicy.
This mechanism is useful in scenarios where a clean slate for all containers is necessary, such as:
- When an
initcontainer sets up an environment that can become corrupted, this feature ensures the setup process is re-executed. - A sidecar container can monitor the health of a main application and trigger a full Pod restart if the application enters an unrecoverable state.
Consider a workload where a watcher sidecar is responsible for restarting the main application from a known-good state if it encounters an error. The watcher can exit with a specific code to trigger a full, in-place restart of the worker Pod.
apiVersion: v1
kind: Pod
metadata:
  name: ml-worker
spec:
  restartPolicy: Never # The pod itself should not restart unless explicitly told to.
  initContainers:
  - name: setup-environment
    image: registry.k8s.io/busybox:1.27.2
    command: ['sh', '-c', 'echo "Setting up environment"']
    # This init container runs once to prepare the environment.
    # It will run again after a RestartAllContainers action.
  - name: watcher-sidecar
    image: registry.k8s.io/busybox:1.27.2
    # In a real-world scenario, this would be a dedicated watcher image.
    # This command simulates the watcher exiting with a special code.
    command: ['sh', '-c', 'sleep 60; exit 88']
    restartPolicy: Always
    restartPolicyRules:
    - action: RestartAllContainers
      exitCodes:
        # Exit code 88 triggers a full pod restart.
        operator: In
        values: [88]
  containers:
  - name: main-application
    image: registry.k8s.io/busybox:1.27.2
    command: ['sh', '-c', 'echo "Application is running"; sleep 3600']
In this example:
- The Pod's overall
restartPolicyisNever. - The
watcher-sidecarruns a command and then exits with code88. - The exit code matches the rule, triggering the
RestartAllContainersaction. - The entire Pod, including the
setup-environmentinit container and themain-applicationcontainer, is then restarted in-place. The pod keeps its UID, sandbox, IP, and volumes.
Reduced container restart delay
FEATURE STATE:
Kubernetes v1.33 [alpha](disabled by default)With the alpha feature gate ReduceDefaultCrashLoopBackOffDecay enabled,
container start retries across your cluster will be reduced to begin at 1s
(instead of 10s) and increase exponentially by 2x each restart until a maximum
delay of 60s (instead of 300s which is 5 minutes).
If you use this feature along with the alpha feature
KubeletCrashLoopBackOffMax (described below), individual nodes may have
different maximum delays.
Configurable container restart delay
FEATURE STATE:
Kubernetes v1.35 [beta](enabled by default)With the feature gate KubeletCrashLoopBackOffMax enabled, you can
reconfigure the maximum delay between container start retries from the default
of 300s (5 minutes). This configuration is set per node using kubelet
configuration. In your kubelet configuration,
under crashLoopBackOff set the maxContainerRestartPeriod field between "1s" and
"300s". As described above in Container restart policy,
delays on that node will still start at 10s and increase exponentially by 2x
each restart, but will now be capped at your configured maximum. If the
maxContainerRestartPeriod you configure is less than the default initial value
of 10s, the initial delay will instead be set to the configured maximum.
See the following kubelet configuration examples:
# container restart delays will start at 10s, increasing
# 2x each time they are restarted, to a maximum of 100s
kind: KubeletConfiguration
crashLoopBackOff:
    maxContainerRestartPeriod: "100s"
# delays between container restarts will always be 2s
kind: KubeletConfiguration
crashLoopBackOff:
    maxContainerRestartPeriod: "2s"
If you use this feature along with the alpha feature
ReduceDefaultCrashLoopBackOffDecay (described above), your cluster defaults
for initial backoff and maximum backoff will no longer be 10s and 300s, but 1s
and 60s. Per node configuration takes precedence over the defaults set by
ReduceDefaultCrashLoopBackOffDecay, even if this would result in a node having
a longer maximum backoff than other nodes in the cluster.
Pod conditions
A Pod has a PodStatus, which has an array of PodConditions through which the Pod has or has not passed. The kubelet manages the following PodConditions:
PodScheduled: the Pod has been scheduled to a node.PodReadyToStartContainers: (beta feature; enabled by default) the Pod sandbox has been successfully created, networking configured, storage volumes mounted, and any dynamic resources (if requested) allocated.ContainersReady: all containers in the Pod are ready.Initialized: all init containers have completed successfully.Ready: the Pod is able to serve requests and should be added to the load balancing pools of all matching Services.DisruptionTarget: the pod is about to be terminated due to a disruption (such as preemption, eviction or garbage-collection).PodResizePending: a pod resize was requested but cannot be applied. See Pod resize status.PodResizeInProgress: the pod is in the process of resizing. See Pod resize status.
| Field name | Description |
|---|---|
type | Name of this Pod condition. |
status | Indicates whether that condition is applicable, with possible values "True", "False", or "Unknown". |
lastProbeTime | Timestamp of when the Pod condition was last probed. |
lastTransitionTime | Timestamp for when the Pod last transitioned from one status to another. |
reason | Machine-readable, UpperCamelCase text indicating the reason for the condition's last transition. |
message | Human-readable message indicating details about the last status transition. |
Pod readiness
FEATURE STATE:
Kubernetes v1.14 [stable]Your application can inject extra feedback or signals into PodStatus:
Pod readiness. To use this, set readinessGates in the Pod's spec to
specify a list of additional conditions that the kubelet evaluates for Pod readiness.
Readiness gates are determined by the current state of status.condition
fields for the Pod. If Kubernetes cannot find such a condition in the
status.conditions field of a Pod, the status of the condition
is defaulted to "False".
Here is an example:
kind: Pod
...
spec:
  readinessGates:
    - conditionType: "www.example.com/feature-1"
status:
  conditions:
    - type: Ready                              # a built-in PodCondition
      status: "False"
      lastProbeTime: null
      lastTransitionTime: 2018-01-01T00:00:00Z
    - type: "www.example.com/feature-1"        # an extra PodCondition
      status: "False"
      lastProbeTime: null
      lastTransitionTime: 2018-01-01T00:00:00Z
  containerStatuses:
    - containerID: docker://abcd...
      ready: true
...
The Pod conditions you add must have names that meet the Kubernetes label key format.
Status for Pod readiness
The kubectl patch command does not support patching object status.
To set these status.conditions for the Pod, applications and
operators should use
the PATCH action.
You can use a Kubernetes client library to
write code that sets custom Pod conditions for Pod readiness.
For a Pod that uses custom conditions, that Pod is evaluated to be ready only when both the following statements apply:
- All containers in the Pod are ready.
- All conditions specified in
readinessGatesareTrue.
When a Pod's containers are Ready but at least one custom condition is missing or
False, the kubelet sets the Pod's condition to ContainersReady.
Pod readiness to start containers
FEATURE STATE:
Kubernetes v1.29 [beta]Note:
During its early development, this condition was namedPodHasNetwork.After a Pod gets scheduled on a node, it needs to be admitted by the kubelet and
to have any required storage volumes mounted. Once these phases are complete,
the kubelet works with
a container runtime (using Container Runtime Interface (CRI)) to set up a
runtime sandbox and configure networking for the Pod. If the Pod uses
Dynamic Resource Allocation,
those resources are also allocated during this phase.
If the PodReadyToStartContainersCondition
feature gate is enabled
(it is enabled by default for Kubernetes 1.36), the
PodReadyToStartContainers condition will be added to the status.conditions field of a Pod.
The PodReadyToStartContainers condition is set to False by the kubelet when it detects a
Pod does not have a runtime sandbox with networking configured. This occurs in
the following scenarios:
- Early in the lifecycle of the Pod, when the kubelet has not yet begun to set up a sandbox for the Pod using the container runtime.
- Later in the lifecycle of the Pod, when the Pod sandbox has been destroyed due to either:
- the node rebooting, without the Pod getting evicted
- for container runtimes that use virtual machines for isolation, the Pod sandbox virtual machine rebooting, which then requires creating a new sandbox and fresh container network configuration.
After sandbox creation, network configuration, volume mounting, and (if requested) dynamic resource
allocation are complete, the kubelet sets the PodReadyToStartContainers condition to True.
Image pulling and container creation occur after this point.
For a Pod with init containers, the kubelet sets the Initialized condition to
True after the init containers have successfully completed (which happens
after successful sandbox creation and network configuration by the runtime
plugin). For a Pod without init containers, the kubelet sets the Initialized
condition to True before sandbox creation and network configuration starts.
Resizing Pods
FEATURE STATE:
Kubernetes v1.35 [stable](enabled by default)FEATURE STATE:
Kubernetes v1.36 [beta](enabled by default)Kubernetes supports changing the CPU and memory resources allocated to Pods after they are created. (For other infrastructure resources, you would need to use different techniques specific to those resources.) There are two main approaches to resizing CPU and memory:
In-place Pod resize
You can resize a Pod's container-level CPU and memory resources without recreating the Pod. This is also called in-place Pod vertical scaling. This allows you to adjust resource allocation for running containers while potentially avoiding application disruption.
If you have specified resources at the pod-level, you can also resize those in-place. For more details, see Resize CPU and Memory Resources assigned to Pods.
To perform an in-place resize, you update the Pod's desired state using the /resize
subresource. The kubelet then attempts to apply the new resource values to the running
containers. The Pod conditions
PodResizePending and PodResizeInProgress (described in Pod conditions)
indicate the status of the resize operation. For more details about resize status, see
Container Resize Status.
Key considerations for in-place resize:
- Only CPU and memory resources can be resized in-place.
- The Pod's Quality of Service (QoS) class is determined at creation and cannot be changed by resizing.
- You can configure whether a container restart is required for the resize using
resizePolicyin the container specification.
For detailed instructions on performing in-place resize, see Resize CPU and Memory Resources assigned to Containers.
Resizing by launching replacement Pods
The more cloud native approach to changing a Pod's resources is through the workload resource that manages it (such as a Deployment or StatefulSet). When you update the resource specifications in the Pod template, the workload's controller creates new Pods with the updated resources and terminates the old Pods according to its update strategy.
This approach:
- Works with any Kubernetes version.
- Can change any Pod specification, not just resources.
- Results in Pod replacement, so you should design your workload to handle planned disruptions. Consider using a PodDisruptionBudget to control availability.
- Requires that your Pods are managed by a workload resource.
You can also use a VerticalPodAutoscaler to automatically manage Pod resource recommendations and updates.
Container probes
Kubernetes lets you define probes to continuously monitor the health of containers in a Pod. A probe is a diagnostic performed periodically by the kubelet on a container. To perform a diagnostic, the kubelet either executes code within the container or makes a network request.
Based on the probe results, Kubernetes can restart unhealthy containers or stop sending traffic to containers that are not ready.
The kubelet can optionally perform and react to three kinds of probes on running
containers, each serving a different purpose. For probe mechanisms (exec,
grpc, httpGet, tcpSocket), configuration fields, and detailed usage
guidance, see Liveness, Readiness, and Startup Probes.
Startup probe
Startup probes verify whether the application within a container is started. If a startup probe is configured, Kubernetes does not execute liveness or readiness probes until the startup probe succeeds, allowing the application time to finish its initialization.
This type of probe is only executed at startup, unlike liveness and readiness probes, which are run periodically.
If the startup probe fails, the kubelet kills the container, and the container is subjected to its restart policy.
Liveness probe
Liveness probes determine when to restart a container. For example, liveness probes could catch a deadlock, where an application is running, but unable to make progress. Restarting a container in such a state can help to make the application more available despite bugs.
If a container fails its liveness probe more times than the configured tolerance,
the kubelet restarts that container.
Liveness probes do not wait for readiness probes to succeed. If you want to
wait before executing a liveness probe, you can either define
initialDelaySeconds or use a startup probe.
Readiness probe
Readiness probes determine when a container is ready to accept traffic. This is useful when waiting for an application to perform time-consuming initial tasks, such as establishing network connections, loading files, and warming caches. Readiness probes can also be useful later in the container's lifecycle, for example, when recovering from temporary faults or overloads.
If the readiness probe returns a failed state, the EndpointSlice controller removes the Pod's IP address from the EndpointSlices of all Services that match the Pod.
Readiness probes run on the container during its whole lifecycle.
Termination of Pods
Because Pods represent processes running on nodes in the cluster, it is important to
allow those processes to gracefully terminate when they are no longer needed (rather
than being abruptly stopped with a KILL signal and having no chance to clean up).
The design aim is for you to be able to request deletion and know when processes terminate, but also be able to ensure that deletes eventually complete. When you request deletion of a Pod, the cluster records and tracks the intended grace period before the Pod is allowed to be forcefully killed. With that forceful shutdown tracking in place, the kubelet attempts graceful shutdown.
Typically, with this graceful termination of the pod, kubelet makes requests to the container runtime
to attempt to stop the containers in the pod by first sending a TERM (aka. SIGTERM) signal,
with a grace period timeout, to the main process in each container.
The requests to stop the containers are processed by the container runtime asynchronously.
There is no guarantee to the order of processing for these requests.
Many container runtimes respect the STOPSIGNAL value defined in the container image and,
if different, send the container image configured STOPSIGNAL instead of TERM.
Once the grace period has expired, the KILL signal is sent to any remaining
processes, and the Pod is then deleted from the
API Server. If the kubelet or the
container runtime's management service is restarted while waiting for processes to terminate, the
cluster retries from the start including the full original grace period.
Stop Signals
The stop signal used to kill the container can be defined in the container image with the STOPSIGNAL instruction.
If no stop signal is defined in the image, the default signal of the container runtime
(SIGTERM for both containerd and CRI-O) would be used to kill the container.
Defining custom stop signals
FEATURE STATE:
Kubernetes v1.33 [alpha](disabled by default)If the ContainerStopSignals feature gate is enabled, you can configure a custom stop signal
for your containers from the container Lifecycle. We require the Pod's spec.os.name field
to be present as a requirement for defining stop signals in the container lifecycle.
The list of signals that are valid depends on the OS the Pod is scheduled to.
For Pods scheduled to Windows nodes, we only support SIGTERM and SIGKILL as valid signals.
Here is an example Pod spec defining a custom stop signal:
spec:
  os:
    name: linux
  containers:
    - name: my-container
      image: container-image:latest
      lifecycle:
        stopSignal: SIGUSR1
If a stop signal is defined in the lifecycle, this will override the signal defined in the container image. If no stop signal is defined in the container spec, the container would fall back to the default behavior.
Pod Termination Flow
Pod termination flow, illustrated with an example:
You use the
kubectltool to manually delete a specific Pod, with the default grace period (30 seconds).The Pod in the API server is updated with the time beyond which the Pod is considered "dead" along with the grace period. If you use
kubectl describeto check the Pod you're deleting, that Pod shows up as "Terminating". On the node where the Pod is running: as soon as the kubelet sees that a Pod has been marked as terminating (a graceful shutdown duration has been set), the kubelet begins the local Pod shutdown process.If one of the Pod's containers has defined a
preStophook and theterminationGracePeriodSecondsin the Pod spec is not set to 0, the kubelet runs that hook inside of the container. The defaultterminationGracePeriodSecondssetting is 30 seconds.If the
preStophook is still running after the grace period expires, the kubelet requests a small, one-off grace period extension of 2 seconds.
Note:
If thepreStophook needs longer to complete than the default grace period allows, you must modifyterminationGracePeriodSecondsto suit this.The kubelet triggers the container runtime to send a TERM signal to process 1 inside each container.
There is special ordering if the Pod has any sidecar containers defined. Otherwise, the containers in the Pod receive the TERM signal at different times and in an arbitrary order. If the order of shutdowns matters, consider using a
preStophook to synchronize (or switch to using sidecar containers).
At the same time as the kubelet is starting graceful shutdown of the Pod, the control plane evaluates whether to remove that shutting-down Pod from EndpointSlice objects, where those objects represent a Service with a configured selector. ReplicaSets and other workload resources no longer treat the shutting-down Pod as a valid, in-service replica.
Pods that shut down slowly should not continue to serve regular traffic and should start terminating and finish processing open connections. Some applications need to go beyond finishing open connections and need more graceful termination, for example, session draining and completion.
Any endpoints that represent the terminating Pods are not immediately removed from EndpointSlices, and a status indicating terminating state is exposed from the EndpointSlice API. Terminating endpoints always have their
readystatus asfalse(for backward compatibility with versions before 1.26), so load balancers will not use it for regular traffic.If traffic draining on terminating Pod is needed, the actual readiness can be checked as a condition
serving. You can find more details on how to implement connections draining in the tutorial Pods And Endpoints Termination FlowThe kubelet ensures the Pod is shut down and terminated
- When the grace period expires, if there is still any container running in the Pod, the
kubelet triggers forcible shutdown.
The container runtime sends
SIGKILLto any processes still running in any container in the Pod. The kubelet also cleans up a hiddenpausecontainer if that container runtime uses one. - The kubelet transitions the Pod into a terminal phase (
FailedorSucceededdepending on the end state of its containers). - The kubelet triggers forcible removal of the Pod object from the API server, by setting grace period to 0 (immediate deletion).
- The API server deletes the Pod's API object, which is then no longer visible from any client.
- When the grace period expires, if there is still any container running in the Pod, the
kubelet triggers forcible shutdown.
The container runtime sends
Forced Pod termination
Caution:
Forced deletions can be potentially disruptive for some workloads and their Pods.By default, all deletes are graceful within 30 seconds. The kubectl delete command supports
the --grace-period=<seconds> option which allows you to override the default and specify your
own value.
Setting the grace period to 0 forcibly and immediately deletes the Pod from the API
server. If the Pod was still running on a node, that forcible deletion triggers the kubelet to
begin immediate cleanup.
Using kubectl, You must specify an additional flag --force along with --grace-period=0
in order to perform force deletions.
When a force deletion is performed, the API server does not wait for confirmation from the kubelet that the Pod has been terminated on the node it was running on. It removes the Pod in the API immediately so a new Pod can be created with the same name. On the node, Pods that are set to terminate immediately will still be given a small grace period before being force killed.
Caution:
Immediate deletion does not wait for confirmation that the running resource has been terminated. The resource may continue to run on the cluster indefinitely.If you need to force-delete Pods that are part of a StatefulSet, refer to the task documentation for deleting Pods from a StatefulSet.
Pod shutdown and sidecar containers
If your Pod includes one or more
sidecar containers
(init containers with an Always restart policy), the kubelet will delay sending
the TERM signal to these sidecar containers until the last main container has fully terminated.
The sidecar containers will be terminated in the reverse order they are defined in the Pod spec.
This ensures that sidecar containers continue serving the other containers in the Pod until they
are no longer needed.
This means that slow termination of a main container will also delay the termination of the sidecar containers. If the grace period expires before the termination process is complete, the Pod may enter forced termination. In this case, all remaining containers in the Pod will be terminated simultaneously with a short grace period.
Similarly, if the Pod has a preStop hook that exceeds the termination grace period, emergency termination may occur.
In general, if you have used preStop hooks to control the termination order without sidecar containers, you can now
remove them and allow the kubelet to manage sidecar termination automatically.
Garbage collection of Pods
For failed Pods, the API objects remain in the cluster's API until a human or controller process explicitly removes them.
The Pod garbage collector (PodGC), which is a controller in the control plane, cleans up
terminated Pods (with a phase of Succeeded or Failed), when the number of Pods exceeds the
configured threshold (determined by terminated-pod-gc-threshold in the kube-controller-manager).
This avoids a resource leak as Pods are created and terminated over time.
Additionally, PodGC cleans up any Pods which satisfy any of the following conditions:
- are orphan Pods - bound to a node which no longer exists,
- are unscheduled terminating Pods,
- are terminating Pods, bound to a non-ready node tainted with
node.kubernetes.io/out-of-service.
Along with cleaning up the Pods, PodGC will also mark them as failed if they are in a non-terminal phase. Also, PodGC adds a Pod disruption condition when cleaning up an orphan Pod. See Pod disruption conditions for more details.
Pod behavior during kubelet restarts
If you restart the kubelet, Pods (and their containers) continue to run
even during the restart.
When there are running Pods on a node, stopping or restarting the kubelet
on that node does not cause the kubelet to stop all local Pods
before the kubelet itself stops.
To stop the Pods on a node, you can use kubectl drain.
Detection of kubelet restarts
FEATURE STATE:
Kubernetes v1.35 [deprecated](disabled by default)When the kubelet starts, it checks to see if there is already a Node with bound Pods.
If the Node's Ready condition remains unchanged,
in other words the condition has not transitioned from true to false, Kubernetes detects this a kubelet restart.
(It's possible to restart the kubelet in other ways, for example to fix a node bug,
but in these cases, Kubernetes picks the safe option and treats this as if you
stopped the kubelet and then later started it).
When the kubelet restarts, the container statuses are managed differently based on the feature gate setting:
By default, the kubelet does not change container statuses after a restart. Containers that were in set to
ready: truestate remain remain ready.If you stop the kubelet long enough for it to fail a series of node heartbeat checks, and then you wait before you start the kubelet again, Kubernetes may begin to evict Pods from that Node. However, even though Pod evictions begin to happen, Kubernetes does not mark the individual containers in those Pods as
ready: false. The Pod-level eviction happens after the control plane taints the node asnode.kubernetes.io/not-ready(due to the failed heartbeats).In Kubernetes 1.36 you can opt in to a legacy behavior where the kubelet always modify the containers
readyvalue, after a kubelet restart, to be false.This legacy behavior was the default for a long time, but caused issue for people using Kubernetes, especially in large scale deployments. Although the feature gate allows reverting to this legacy behavior temporarily, the Kubernetes project recommends that you file a bug report if you encounter problems. The
ChangeContainerStatusOnKubeletRestartfeature gate will be removed in the future.
What's next
Get hands-on experience attaching handlers to container lifecycle events.
Get hands-on experience configuring Liveness, Readiness and Startup Probes.
Learn more about container lifecycle hooks.
Learn more about sidecar containers.
For detailed information about Pod and container status in the API, see the API reference documentation covering
statusfor Pod.
4.1.2 - Pod Conditions
In Kubernetes, many objects have conditions. Conditions are markers for some aspect of the actual state of the thing the object represents. Pods have conditions, and Kubernetes Pod conditions are an important aspect of how controllers (and people doing troubleshooting) can understand the health of a Pod.
A Pod's phase provides a high-level
summary of where the Pod is in its lifecycle, but a single value cannot capture the full
picture. For example, a Pod may be in the Running phase but not yet ready to serve traffic.
Pod conditions complement the phase by tracking multiple aspects of the Pod's state
independently, such as whether it has been scheduled, whether its containers are ready,
whether a resize is in progress, or whether the Pod is about to be disrupted due to a
taint.
Structure of a Pod condition
A Pod's status includes an array of PodConditions that indicate whether the Pod has passed certain checkpoints.
Each element of the PodCondition array has the following fields:
| Field name | Description |
|---|---|
type | Name of this Pod condition. |
status | Indicates whether that condition is applicable, with possible values "True", "False", or "Unknown". |
lastProbeTime | Timestamp of when the Pod condition was last probed. |
lastTransitionTime | Timestamp for when the Pod last transitioned from one status to another. |
reason | Machine-readable, UpperCamelCase text indicating the reason for the condition's last transition. |
message | Human-readable message indicating details about the last status transition. |
observedGeneration | The .metadata.generation of the Pod at the time the condition was recorded. See Pod generation. |
Built-in Pod conditions
Kubernetes manages the following Pod conditions:
Lifecycle conditions: set as a Pod progresses through its lifecycle, roughly in this order:
PodScheduled, PodReadyToStartContainers, Initialized, ContainersReady, Ready.
Other conditions: set in response to specific operations or events:
DisruptionTarget, PodResizePending, PodResizeInProgress.
In addition to the built-in conditions above, you can define custom conditions using Pod readiness gates.
Lifecycle Pod conditions
As a Pod progresses through its lifecycle, the kubelet sets the following conditions roughly in this order:
PodScheduled: the Pod has been scheduled to a node.PodReadyToStartContainers: the Pod sandbox has been successfully created and networking configured. The sandbox and network are set up by the container runtime and CNI plugin.Initialized: all init containers have completed successfully. For a Pod without init containers, this is set toTruebefore sandbox creation.ContainersReady: all containers in the Pod are ready. A container's readiness is determined by its readiness probe, if configured.Ready: the Pod is able to serve requests and should be added to the load balancing pools of all matching Services. Pods that are notReadyare removed from Service endpoints.
Note:
TheReady condition depends on more than just ContainersReady. If the Pod specifies readinessGates, all of those custom conditions must also be True for the Pod to be Ready. See Pod readiness for details.You can inspect a Pod's conditions using kubectl:
kubectl get pod <pod-name> -o yaml
The following shows what status.conditions looks like for a running Pod:
status:
  conditions:
    - type: PodScheduled
      status: "True"
      lastProbeTime: null
      lastTransitionTime: "2026-03-29T08:52:21Z"
      observedGeneration: 1
    - type: PodReadyToStartContainers
      status: "True"
      lastProbeTime: null
      lastTransitionTime: "2026-04-11T06:02:16Z"
      observedGeneration: 1
    - type: Initialized
      status: "True"
      lastProbeTime: null
      lastTransitionTime: "2026-03-29T08:52:21Z"
      observedGeneration: 1
    - type: ContainersReady
      status: "True"
      lastProbeTime: null
      lastTransitionTime: "2026-04-11T06:02:45Z"
      observedGeneration: 1
    - type: Ready
      status: "True"
      lastProbeTime: null
      lastTransitionTime: "2026-04-11T06:02:45Z"
      observedGeneration: 1
PodReadyToStartContainers
FEATURE STATE:
Kubernetes v1.29 [beta](enabled by default)Note:
During its early development, this condition was namedPodHasNetwork.After a Pod gets scheduled on a node, it needs to be admitted by the kubelet
and to have any required storage volumes mounted. Once these phases are complete,
the kubelet works with a container runtime
(using Container Runtime Interface (CRI))
to set up a runtime sandbox and configure networking for the Pod.
If the PodReadyToStartContainersCondition feature gate is enabled
(it is enabled by default for Kubernetes 1.36),
the PodReadyToStartContainers condition will be added to the status.conditions field of a Pod.
The PodReadyToStartContainers condition is set to False by the kubelet
when it detects a Pod does not have a runtime sandbox with networking configured. This occurs in the following scenarios:
- Early in the lifecycle of the Pod, when the kubelet has not yet begun to set up a sandbox for the Pod using the container runtime.
- Later in the lifecycle of the Pod, when the Pod sandbox has been destroyed due to either:
- the node rebooting, without the Pod getting evicted
- for container runtimes that use virtual machines for isolation, the Pod sandbox virtual machine rebooting, which then requires creating a new sandbox and fresh container network configuration.
The PodReadyToStartContainers condition is set to True by the kubelet after the successful completion of sandbox creation and network configuration for the Pod by the runtime plugin. The kubelet can start pulling container images and create containers after PodReadyToStartContainers condition has been set to True.
For a Pod with init containers, the kubelet sets the Initialized condition to True after the init containers have successfully completed (which happens after successful sandbox creation and network configuration by the runtime plugin). For a Pod without init containers, the kubelet sets the Initialized condition to True before sandbox creation and network configuration starts.
Other Pod conditions
The following conditions are not part of the normal Pod lifecycle progression. They are set in response to specific operations or events.
DisruptionTarget
A dedicated Pod DisruptionTarget condition is added to indicate that
the Pod is about to be deleted due to a disruption.
The reason field of the condition additionally
indicates one of the following reasons for the Pod termination:
PreemptionByScheduler- Pod is due to be preempted by a scheduler in order to accommodate a new Pod with a higher priority. For more information, see Pod priority preemption.
DeletionByTaintManager- Pod is due to be deleted by Taint Manager (which is part of the node lifecycle controller within
kube-controller-manager) due to aNoExecutetaint that the Pod does not tolerate; see taint-based evictions. EvictionByEvictionAPI- Pod has been marked for eviction using the Kubernetes API .
DeletionByPodGC- Pod, that is bound to a no longer existing Node, is due to be deleted by Pod garbage collection.
TerminationByKubelet- Pod has been terminated by the kubelet, because of either node pressure eviction, the graceful node shutdown, or preemption for system critical pods.
In all other disruption scenarios, like eviction due to exceeding
Pod container limits,
Pods don't receive the DisruptionTarget condition because the disruptions were
probably caused by the Pod and would reoccur on retry.
Note:
A Pod disruption might be interrupted. The control plane might re-attempt to continue the disruption of the same Pod, but it is not guaranteed. As a result, theDisruptionTarget condition might be added to a Pod, but that Pod might then not actually be
deleted. In such a situation, after some time, the
Pod disruption condition will be cleared.Along with cleaning up the pods, the Pod garbage collector (PodGC) will also mark them as failed if they are in a non-terminal phase (see also Pod garbage collection).
When using a Job (or CronJob), you may want to use these Pod disruption conditions as part of your Job's Pod failure policy.
For more details, see Disruptions.
PodResizePending and PodResizeInProgress
The kubelet updates the Pod's status conditions to indicate the state of a resize request:
type: PodResizePending: The kubelet cannot immediately grant the request. Themessagefield provides an explanation of why.reason: Infeasible: The requested resize is impossible on the current node (for example, requesting more resources than the node has).reason: Deferred: The requested resize is currently not possible, but might become feasible later (for example if another pod is removed). The kubelet will retry the resize.
type: PodResizeInProgress: The kubelet has accepted the resize and allocated resources, but the changes are still being applied. This is usually brief but might take longer depending on the resource type and runtime behavior. Any errors during actuation are reported in themessagefield (along withreason: Error).
If the requested resize is Deferred, the kubelet will periodically re-attempt the resize, for example when another pod is removed or scaled down.
For more details on Pod resize, see Resize CPU and Memory Resources assigned to Containers.
Enhanced Pod readiness
Your application can inject extra feedback or signals into the Pod's .status;
this is known as enhanced Pod readiness.
To use this, set readinessGates in the Pod's spec to specify a list of additional
conditions that the kubelet evaluates for Pod readiness.
You then implement, or install, a controller that manages these custom conditions,
and the kubelet uses that as an extra input to decide if the Pod is ready.
Readiness gates are determined by the current state of status.condition fields for the Pod.
If Kubernetes cannot find such a condition in the status.conditions field of a Pod, the status of the condition is defaulted to "False".
kind: Pod
...
spec:
  readinessGates:
    - conditionType: "www.example.com/feature-1"
status:
  conditions:
    - type: Ready                              # a built-in PodCondition
      status: "False"
      lastProbeTime: null
      lastTransitionTime: 2018-01-01T00:00:00Z
    - type: "www.example.com/feature-1"        # an extra PodCondition
      status: "False"
      lastProbeTime: null
      lastTransitionTime: 2018-01-01T00:00:00Z
  containerStatuses:
    - containerID: docker://abcd...
      ready: true
...
The Pod conditions you add must have names that meet the Kubernetes label key format.
Status for Pod readiness
To set these status.conditions for the Pod, applications and
operators should use
the PATCH action on the Pod's status subresource. You can use kubectl patch
with --subresource=status, or a Kubernetes client library to write
code that sets custom Pod conditions for Pod readiness.
For a Pod that uses custom conditions, that Pod is evaluated to be ready only when both the following statements apply:
- All containers in the Pod are ready.
- All conditions specified in
readinessGatesareTrue.
When a Pod's containers are Ready but at least one custom condition is missing or False,
the kubelet sets the Pod's Ready condition to status: "False" with reason: ReadinessGatesNotReady.
What's next
- Learn about the Pod Lifecycle.
- Learn about Disruptions.
- Learn about container probes and how they affect Pod readiness.
- Learn how to resize Pod resources in-place.
4.1.3 - Init Containers
This page provides an overview of init containers: specialized containers that run before app containers in a Pod. Init containers can contain utilities or setup scripts not present in an app image.
You can specify init containers in the Pod specification alongside the containers
array (which describes app containers).
In Kubernetes, a sidecar container is a container that starts before the main application container and continues to run. This document is about init containers: containers that run to completion during Pod initialization.
Understanding init containers
A Pod can have multiple containers running apps within it, but it can also have one or more init containers, which are run before the app containers are started.
Init containers are exactly like regular containers, except:
- Init containers always run to completion.
- Each init container must complete successfully before the next one starts.
If a Pod's init container fails, the kubelet repeatedly restarts that init container until it succeeds.
However, if the Pod has a restartPolicy of Never, and an init container fails during startup of that Pod, Kubernetes treats the overall Pod as failed.
To specify an init container for a Pod, add the initContainers field into
the Pod specification,
as an array of container items (similar to the app containers field and its contents).
See Container in the
API reference for more details.
The status of the init containers is returned in .status.initContainerStatuses
field as an array of the container statuses (similar to the .status.containerStatuses
field).
Differences from regular containers
Init containers support all the fields and features of app containers, including resource limits, volumes, and security settings. However, the resource requests and limits for an init container are handled differently, as documented in Resource sharing within containers.
Regular init containers (in other words: excluding sidecar containers) do not support the
lifecycle, livenessProbe, readinessProbe, or startupProbe fields. Init containers
must run to completion before the Pod can be ready; sidecar containers continue running
during a Pod's lifetime, and do support some probes. See sidecar container
for further details about sidecar containers.
If you specify multiple init containers for a Pod, kubelet runs each init container sequentially. Each init container must succeed before the next can run. When all of the init containers have run to completion, kubelet initializes the application containers for the Pod and runs them as usual.
Differences from sidecar containers
Init containers run and complete their tasks before the main application container starts. Unlike sidecar containers, init containers are not continuously running alongside the main containers.
Init containers run to completion sequentially, and the main container does not start until all the init containers have successfully completed.
init containers do not support lifecycle, livenessProbe, readinessProbe, or
startupProbe whereas sidecar containers support all these probes to control their lifecycle.
Init containers share the same resources (CPU, memory, network) with the main application containers but do not interact directly with them. They can, however, use shared volumes for data exchange.
Using init containers
Because init containers have separate images from app containers, they have some advantages for start-up related code:
- Init containers can contain utilities or custom code for setup that are not present in an app
image. For example, there is no need to make an image
FROManother image just to use a tool likesed,awk,python, ordigduring setup. - The application image builder and deployer roles can work independently without the need to jointly build a single app image.
- Init containers can run with a different view of the filesystem than app containers in the same Pod. Consequently, they can be given access to Secrets that app containers cannot access.
- Because init containers run to completion before any app containers start, init containers offer a mechanism to block or delay app container startup until a set of preconditions are met. Once preconditions are met, all of the app containers in a Pod can start in parallel.
- Init containers can securely run utilities or custom code that would otherwise make an app container image less secure. By keeping unnecessary tools separate you can limit the attack surface of your app container image.
Examples
Here are some ideas for how to use init containers:
Wait for a Service to be created, using a shell one-line command like:
for i in {1..100}; do sleep 1; if nslookup myservice; then exit 0; fi; done; exit 1Register this Pod with a remote server from the downward API with a command like:
curl -X POST http://$MANAGEMENT_SERVICE_HOST:$MANAGEMENT_SERVICE_PORT/register -d 'instance=$(<POD_NAME>)&ip=$(<POD_IP>)'Wait for some time before starting the app container with a command like
sleep 60Clone a Git repository into a Volume
Place values into a configuration file and run a template tool to dynamically generate a configuration file for the main app container. For example, place the
POD_IPvalue in a configuration and generate the main app configuration file using Jinja.
Init containers in use
This example defines a simple Pod that has two init containers.
The first waits for myservice, and the second waits for mydb. Once both
init containers complete, the Pod runs the app container from its spec section.
apiVersion: v1
kind: Pod
metadata:
  name: myapp-pod
  labels:
    app.kubernetes.io/name: MyApp
spec:
  containers:
  - name: myapp-container
    image: busybox:1.28
    command: ['sh', '-c', 'echo The app is running! && sleep 3600']
  initContainers:
  - name: init-myservice
    image: busybox:1.28
    command: ['sh', '-c', "until nslookup myservice.$(cat /var/run/secrets/kubernetes.io/serviceaccount/namespace).svc.cluster.local; do echo waiting for myservice; sleep 2; done"]
  - name: init-mydb
    image: busybox:1.28
    command: ['sh', '-c', "until nslookup mydb.$(cat /var/run/secrets/kubernetes.io/serviceaccount/namespace).svc.cluster.local; do echo waiting for mydb; sleep 2; done"]
You can start this Pod by running:
kubectl apply -f myapp.yaml
The output is similar to this:
pod/myapp-pod created
And check on its status with:
kubectl get -f myapp.yaml
The output is similar to this:
NAME        READY     STATUS     RESTARTS   AGE
myapp-pod   0/1       Init:0/2   0          6m
or for more details:
kubectl describe -f myapp.yaml
The output is similar to this:
Name:          myapp-pod
Namespace:     default
[...]
Labels:        app.kubernetes.io/name=MyApp
Status:        Pending
[...]
Init Containers:
  init-myservice:
[...]
    State:         Running
[...]
  init-mydb:
[...]
    State:         Waiting
      Reason:      PodInitializing
    Ready:         False
[...]
Containers:
  myapp-container:
[...]
    State:         Waiting
      Reason:      PodInitializing
    Ready:         False
[...]
Events:
  FirstSeen    LastSeen    Count    From                      SubObjectPath                           Type          Reason        Message
  ---------    --------    -----    ----                      -------------                           --------      ------        -------
  16s          16s         1        {default-scheduler }                                              Normal        Scheduled     Successfully assigned myapp-pod to 172.17.4.201
  16s          16s         1        {kubelet 172.17.4.201}    spec.initContainers{init-myservice}     Normal        Pulling       pulling image "busybox"
  13s          13s         1        {kubelet 172.17.4.201}    spec.initContainers{init-myservice}     Normal        Pulled        Successfully pulled image "busybox"
  13s          13s         1        {kubelet 172.17.4.201}    spec.initContainers{init-myservice}     Normal        Created       Created container init-myservice
  13s          13s         1        {kubelet 172.17.4.201}    spec.initContainers{init-myservice}     Normal        Started       Started container init-myservice
To see logs for the init containers in this Pod, run:
kubectl logs myapp-pod -c init-myservice # Inspect the first init container
kubectl logs myapp-pod -c init-mydb      # Inspect the second init container
At this point, those init containers will be waiting to discover Services named
mydb and myservice.
Here's a configuration you can use to make those Services appear:
---
apiVersion: v1
kind: Service
metadata:
  name: myservice
spec:
  ports:
  - protocol: TCP
    port: 80
    targetPort: 9376
---
apiVersion: v1
kind: Service
metadata:
  name: mydb
spec:
  ports:
  - protocol: TCP
    port: 80
    targetPort: 9377
To create the mydb and myservice services:
kubectl apply -f services.yaml
The output is similar to this:
service/myservice created
service/mydb created
You'll then see that those init containers complete, and that the myapp-pod
Pod moves into the Running state:
kubectl get -f myapp.yaml
The output is similar to this:
NAME        READY     STATUS    RESTARTS   AGE
myapp-pod   1/1       Running   0          9m
This simple example should provide some inspiration for you to create your own init containers. What's next contains a link to a more detailed example.
Detailed behavior
During Pod startup, the kubelet delays running init containers until the networking and storage are ready. Then the kubelet runs the Pod's init containers in the order they appear in the Pod's spec.
Each init container must exit successfully before
the next container starts. If a container fails to start due to the runtime or
exits with failure, it is retried according to the Pod restartPolicy. However,
if the Pod restartPolicy is set to Always, the init containers use
restartPolicy OnFailure.
A Pod cannot be Ready until all init containers have succeeded. The ports on an
init container are not aggregated under a Service. A Pod that is initializing
is in the Pending state but should have a condition Initialized set to false.
If the Pod restarts, or is restarted, all init containers must execute again.
Changes to the init container spec are limited to the container image field.
Directly altering the image field of an init container does not restart the
Pod or trigger its recreation. If the Pod has yet to start, that change may
have an effect on how the Pod boots up.
For a pod template you can typically change any field for an init container; the impact of making that change depends on where the pod template is used.
Because init containers can be restarted, retried, or re-executed, init container
code should be idempotent. In particular, code that writes into any emptyDir volume
should be prepared for the possibility that an output file already exists.
Init containers have all of the fields of an app container. However, Kubernetes
prohibits readinessProbe from being used because init containers cannot
define readiness distinct from completion. This is enforced during validation.
Use activeDeadlineSeconds on the Pod to prevent init containers from failing forever.
The active deadline includes init containers.
However it is recommended to use activeDeadlineSeconds only if teams deploy their application
as a Job, because activeDeadlineSeconds has an effect even after initContainer finished.
The Pod which is already running correctly would be killed by activeDeadlineSeconds if you set.
The name of each app and init container in a Pod must be unique; a validation error is thrown for any container sharing a name with another.
Resource sharing within containers
Given the order of execution for init, sidecar and app containers, the following rules for resource usage apply:
- The highest of any particular resource request or limit defined on all init containers is the effective init request/limit. If any resource has no resource limit specified this is considered as the highest limit.
- The Pod's effective request/limit for a resource is the higher of:
- the sum of all app containers request/limit for a resource
- the effective init request/limit for a resource
- Scheduling is done based on effective requests/limits, which means init containers can reserve resources for initialization that are not used during the life of the Pod.
- The QoS (quality of service) tier of the Pod's effective QoS tier is the QoS tier for init containers and app containers alike.
Quota and limits are applied based on the effective Pod request and limit.
Init containers and Linux cgroups
On Linux, resource allocations for Pod level control groups (cgroups) are based on the effective Pod request and limit, the same as the scheduler.
Pod restart reasons
A Pod can restart, causing re-execution of init containers, for the following reasons:
- The Pod infrastructure container is restarted. This is uncommon and would have to be done by someone with root access to nodes.
- All containers in a Pod are terminated while
restartPolicyis set to Always, forcing a restart, and the init container completion record has been lost due to garbage collection.
The Pod will not be restarted when the init container image is changed, or the init container completion record has been lost due to garbage collection. This applies for Kubernetes v1.20 and later. If you are using an earlier version of Kubernetes, consult the documentation for the version you are using.
What's next
Learn more about the following:
- Creating a Pod that has an init container.
- Debug init containers.
- Overview of kubelet and kubectl.
- Types of probes: liveness, readiness, startup probe.
- Sidecar containers.
4.1.4 - Sidecar Containers
FEATURE STATE:
Kubernetes v1.33 [stable](enabled by default)Sidecar containers are the secondary containers that run along with the main application container within the same Pod. These containers are used to enhance or to extend the functionality of the primary app container by providing additional services, or functionality such as logging, monitoring, security, or data synchronization, without directly altering the primary application code.
Typically, you only have one app container in a Pod. For example, if you have a web application that requires a local webserver, the local webserver is a sidecar and the web application itself is the app container.
Sidecar containers in Kubernetes
Kubernetes implements sidecar containers as a special case of init containers; sidecar containers remain running after Pod startup. This document uses the term regular init containers to clearly refer to containers that only run during Pod startup.
Provided that your cluster has the SidecarContainers
feature gate enabled
(the feature is active by default since Kubernetes v1.29), you can specify a restartPolicy
for containers listed in a Pod's initContainers field.
These restartable sidecar containers are independent from other init containers and from
the main application container(s) within the same pod.
These can be started, stopped, or restarted without affecting the main application container
and other init containers.
You can also run a Pod with multiple containers that are not marked as init or sidecar
containers. This is appropriate if the containers within the Pod are required for the
Pod to work overall, but you don't need to control which containers start or stop first.
You could also do this if you need to support older versions of Kubernetes that don't
support a container-level restartPolicy field.
Example application
Here's an example of a Deployment with two containers, one of which is a sidecar:
Note:
In this example, the sidecar container is intentionally defined underinitContainers
with restartPolicy: Always. Kubernetes treats such containers as sidecars that continue
running for the lifetime of the Pod.apiVersion: apps/v1
kind: Deployment
metadata:
name: myapp
labels:
app: myapp
spec:
replicas: 1
selector:
matchLabels:
app: myapp
template:
metadata:
labels:
app: myapp
spec:
containers:
- name: myapp
image: alpine:latest
command: ['sh', '-c', 'while true; do echo "logging" >> /opt/logs.txt; sleep 1; done']
volumeMounts:
- name: data
mountPath: /opt
initContainers:
- name: logshipper
image: alpine:latest
# Setting restartPolicy: Always makes this a sidecar container.
restartPolicy: Always
command: ['sh', '-c', 'tail -F /opt/logs.txt']
volumeMounts:
- name: data
mountPath: /opt
volumes:
- name: data
emptyDir: {}Sidecar containers and Pod lifecycle
If an init container is created with its restartPolicy set to Always, it will
start and remain running during the entire life of the Pod. This can be helpful for
running supporting services separated from the main application containers.
If a readinessProbe is specified for this init container, its result will be used
to determine the ready state of the Pod.
Since these containers are defined as init containers, they benefit from the same ordering and sequential guarantees as regular init containers, allowing you to mix sidecar containers with regular init containers for complex Pod initialization flows.
Compared to regular init containers, sidecars defined within initContainers continue to
run after they have started. This is important when there is more than one entry inside
.spec.initContainers for a Pod. After a sidecar-style init container is running (the kubelet
has set the started status for that init container to true), the kubelet then starts the
next init container from the ordered .spec.initContainers list.
That status either becomes true because there is a process running in the
container and no startup probe defined, or as a result of its startupProbe succeeding.
Upon Pod termination, the kubelet postpones terminating sidecar containers until the main application container has fully stopped. The sidecar containers are then shut down in the opposite order of their appearance in the Pod specification. This approach ensures that the sidecars remain operational, supporting other containers within the Pod, until their service is no longer required.
Jobs with sidecar containers
If you define a Job that uses sidecar using Kubernetes-style init containers, the sidecar container in each Pod does not prevent the Job from completing after the main container has finished.
Here's an example of a Job with two containers, one of which is a sidecar:
apiVersion: batch/v1
kind: Job
metadata:
  name: myjob
spec:
  template:
    spec:
      containers:
        - name: myjob
          image: alpine:latest
          command: ['sh', '-c', 'echo "logging" > /opt/logs.txt']
          volumeMounts:
            - name: data
              mountPath: /opt
      initContainers:
        - name: logshipper
          image: alpine:latest
          # Setting restartPolicy: Always makes this a sidecar container.
          restartPolicy: Always
          command: ['sh', '-c', 'tail -F /opt/logs.txt']
          volumeMounts:
            - name: data
              mountPath: /opt
      restartPolicy: Never
      volumes:
        - name: data
          emptyDir: {}
Differences from application containers
Sidecar containers run alongside app containers in the same pod. However, they do not execute the primary application logic; instead, they provide supporting functionality to the main application.
Sidecar containers have their own independent lifecycles. They can be started, stopped, and restarted independently of app containers. This means you can update, scale, or maintain sidecar containers without affecting the primary application.
Sidecar containers share the same network and storage namespaces with the primary container. This co-location allows them to interact closely and share resources.
From a Kubernetes perspective, the sidecar container's graceful termination is less important.
When other containers take all allotted graceful termination time, the sidecar containers
will receive the SIGTERM signal, followed by the SIGKILL signal, before they have time to terminate gracefully.
So exit codes different from 0 (0 indicates successful exit), for sidecar containers are normal
on Pod termination and should be generally ignored by the external tooling.
Differences from init containers
Sidecar containers work alongside the main container, extending its functionality and providing additional services.
Sidecar containers run concurrently with the main application container. They are active throughout the lifecycle of the pod and can be started and stopped independently of the main container. Unlike init containers, sidecar containers support probes to control their lifecycle.
Sidecar containers can interact directly with the main application containers, because like init containers they always share the same network, and can optionally also share volumes (filesystems).
Init containers stop before the main containers start up, so init containers cannot
exchange messages with the app container in a Pod. Any data passing is one-way
(for example, an init container can put information inside an emptyDir volume).
Changing the image of a sidecar container will not cause the Pod to restart, but will trigger a container restart.
Resource sharing within containers
Given the order of execution for init, sidecar and app containers, the following rules for resource usage apply:
- The highest of any particular resource request or limit defined on all init containers is the effective init request/limit. If any resource has no resource limit specified this is considered as the highest limit.
- The Pod's effective request/limit for a resource is the sum of
pod overhead and the higher of:
- the sum of all non-init containers(app and sidecar containers) request/limit for a resource
- the effective init request/limit for a resource
- Scheduling is done based on effective requests/limits, which means init containers can reserve resources for initialization that are not used during the life of the Pod.
- The QoS (quality of service) tier of the Pod's effective QoS tier is the QoS tier for all init, sidecar and app containers alike.
Quota and limits are applied based on the effective Pod request and limit.
Sidecar containers and Linux cgroups
On Linux, resource allocations for Pod level control groups (cgroups) are based on the effective Pod request and limit, the same as the scheduler.
What's next
- Learn how to Adopt Sidecar Containers
- Read a blog post on native sidecar containers.
- Read about creating a Pod that has an init container.
- Learn about the types of probes: liveness, readiness, startup probe.
- Learn about pod overhead.
4.1.5 - Ephemeral Containers
FEATURE STATE:
Kubernetes v1.25 [stable]This page provides an overview of ephemeral containers: a special type of container that runs temporarily in an existing Pod to accomplish user-initiated actions such as troubleshooting. You use ephemeral containers to inspect services rather than to build applications.
Understanding ephemeral containers
Pods are the fundamental building block of Kubernetes applications. Since Pods are intended to be disposable and replaceable, you cannot add a container to a Pod once it has been created. Instead, you usually delete and replace Pods in a controlled fashion using deployments.
Sometimes it's necessary to inspect the state of an existing Pod, however, for example to troubleshoot a hard-to-reproduce bug. In these cases you can run an ephemeral container in an existing Pod to inspect its state and run arbitrary commands.
What is an ephemeral container?
Ephemeral containers differ from other containers in that they lack guarantees
for resources or execution, and they will never be automatically restarted, so
they are not appropriate for building applications. Ephemeral containers are
described using the same ContainerSpec as regular containers, but many fields
are incompatible and disallowed for ephemeral containers.
- Ephemeral containers may not have ports, so fields such as
ports,livenessProbe,readinessProbeare disallowed. - Pod resource allocations are immutable, so setting
resourcesis disallowed. - For a complete list of allowed fields, see the EphemeralContainer reference documentation.
Ephemeral containers are created using a special ephemeralcontainers handler
in the API rather than by adding them directly to pod.spec, so it's not
possible to add an ephemeral container using kubectl edit.
Like regular containers, you may not change or remove an ephemeral container after you have added it to a Pod.
Note:
Ephemeral containers are not supported by static pods.Uses for ephemeral containers
Ephemeral containers are useful for interactive troubleshooting when kubectl exec is insufficient because a container has crashed or a container image
doesn't include debugging utilities.
In particular, distroless images
enable you to deploy minimal container images that reduce attack surface
and exposure to bugs and vulnerabilities. Since distroless images do not include a
shell or any debugging utilities, it's difficult to troubleshoot distroless
images using kubectl exec alone.
When using ephemeral containers, it's helpful to enable process namespace sharing so you can view processes in other containers.
What's next
- Learn how to debug pods using ephemeral containers.
4.1.6 - Liveness, Readiness, and Startup Probes
Kubernetes lets you define probes to continuously monitor the health of containers in a Pod. A probe is a diagnostic performed periodically by the kubelet on a container. To perform a diagnostic, the kubelet either executes code within the container or makes a network request.
Based on the probe results, Kubernetes can restart unhealthy containers or stop sending traffic to containers that are not ready.
Types of probe
The kubelet can optionally perform and react to three kinds of probes on running containers, each serving a different purpose:
Startup probe
Startup probes verify whether the application within a container is started. If a startup probe is configured, Kubernetes does not execute liveness or readiness probes until the startup probe succeeds, allowing the application time to finish its initialization.
This type of probe is only executed at startup, unlike liveness and readiness probes, which are run periodically. If the startup probe fails, the kubelet kills the container, and the container is subjected to its restart policy.
Liveness probe
Liveness probes determine when to restart a container. For example, liveness probes could catch a deadlock, where an application is running, but unable to make progress. Restarting a container in such a state can help to make the application more available despite bugs.
If a container fails its liveness probe more times than the configured tolerance,
the kubelet restarts that container.
Liveness probes do not wait for readiness probes to succeed. If you want to
wait before executing a liveness probe, you can either define
initialDelaySeconds or use a startup probe.
Caution:
Liveness probes can be a powerful way to recover from application failures, but they should be used with caution. Liveness probes must be configured carefully to ensure that they truly indicate unrecoverable application failure, for example a deadlock.
Incorrect implementation of liveness probes can lead to cascading failures. This results in restarting of container under high load; failed client requests as your application became less scalable; and increased workload on remaining pods due to some failed pods. Understand the difference between liveness and readiness probes and when to apply them for your app.
Readiness probe
Readiness probes determine when a container is ready to accept traffic. This is useful when waiting for an application to perform time-consuming initial tasks, such as establishing network connections, loading files, and warming caches. Readiness probes can also be useful later in the container’s lifecycle, for example, when recovering from temporary faults or overloads.
If the readiness probe returns a failed state, the EndpointSlice controller removes the Pod's IP address from the EndpointSlices of all Services that match the Pod.
Readiness probes run on the container during its whole lifecycle.
Note:
If you want to be able to drain requests when the Pod is deleted, you do not necessarily need a readiness probe; when the Pod is deleted, the corresponding endpoint in the EndpointSlice will update its conditions: the endpoint ready condition will be set to false, so load balancers will not use the Pod for regular traffic. See Pod termination for more information about how the kubelet handles Pod deletion.When to use each probe
When should you use a startup probe?
Startup probes are useful for Pods that have containers that take a long time to come into service. Rather than set a long liveness interval, you can configure a separate configuration for probing the container as it starts up, allowing a time longer than the liveness interval would allow.
If your container usually starts in more than
\( initialDelaySeconds + failureThreshold \times periodSeconds \), you should specify a
startup probe that checks the same endpoint as the liveness probe. The default
for periodSeconds is 10s. You should then set its failureThreshold high
enough to allow the container to start, without changing the default values of
the liveness probe. This helps to protect against deadlocks.
When should you use a liveness probe?
If the process in your container is able to crash on its own whenever it
encounters an issue or becomes unhealthy, you do not necessarily need a liveness
probe; the kubelet will automatically perform the correct action in accordance
with the Pod's restartPolicy.
If you'd like your container to be killed and restarted if a probe fails, then
specify a liveness probe, and specify a restartPolicy of Always or
OnFailure.
A common pattern for liveness probes is to use the same low-cost HTTP endpoint
as for readiness probes, but with a higher failureThreshold. This ensures
that the pod is observed as not-ready for some period of time before it is hard
killed.
When should you use a readiness probe?
To start sending traffic to a Pod only when a probe succeeds, specify a readiness probe. The readiness probe might be the same as the liveness probe, but the existence of the readiness probe in the spec means that the Pod will start without receiving any traffic and only start receiving traffic after the probe starts succeeding.
You can also use a readiness probe to let a container take itself down for maintenance, by checking an endpoint specific to readiness that is different from the liveness probe.
When your app has a strict dependency on back-end services, you can implement both a liveness and a readiness probe. The liveness probe passes when the app itself is healthy, but the readiness probe additionally checks that each required back-end service is available. This helps you avoid directing traffic to Pods that can only respond with error messages.
For containers that need to work on loading large data, configuration files, or migrations during startup, consider using a startup probe. However, if you want to detect the difference between an app that has failed and an app that is still processing its startup data, you might prefer a readiness probe.
Check mechanisms
There are four different ways to check a container using a probe. Each probe must define exactly one of these four mechanisms:
exec- Executes a specified command inside the container. The diagnostic is considered successful if the command exits with a status code of 0.
grpc- Performs a remote procedure call using gRPC. The target
should implement gRPC health checks.
The diagnostic is considered successful if the
statusof the response isSERVING. For more details, see gRPC probes. httpGet- Performs an HTTP
GETrequest against the Pod's IP address on a specified port and path. The diagnostic is considered successful if the response has a status code greater than or equal to 200 and less than 400. For more details, see HTTP probes. tcpSocket- Performs a TCP check against the Pod's IP address on a specified port. The diagnostic is considered successful if the port is open. If the remote system (the container) closes the connection immediately after it opens, this counts as healthy. For more details, see TCP probes.
Caution:
Unlike the other mechanisms,exec probe's implementation involves the
creation/forking of multiple processes each time when executed. As a result, in
case of the clusters having higher pod densities, lower intervals of
initialDelaySeconds, periodSeconds, configuring any probe with exec
mechanism might introduce an overhead on the cpu usage of the node. In such
scenarios, consider using the alternative probe mechanisms to avoid the overhead.Probe results
The kubelet evaluates the result of each probe execution and takes action accordingly. Each probe has one of three results:
Success- The container passed the diagnostic.
Failure- The container failed the diagnostic. For liveness and startup probes, the kubelet kills the container, and the container is subjected to its restart policy. For readiness probes, the kubelet marks the container as not ready, and the Pod stops receiving traffic from matching Services.
Unknown- The diagnostic failed (no action should be taken, and the kubelet will make further checks).
If a container does not provide a particular probe, the kubelet always
considers the result as Success. For readiness probes specifically,
the result is considered Failure before the initial delay.
Configuration fields
Probes have a number of fields that you can use to more precisely control the behavior of startup, liveness and readiness checks. For example:
apiVersion: v1
kind: Pod
metadata:
  name: probe-example
spec:
  containers:
  - name: app
    image: registry.k8s.io/e2e-test-images/agnhost:2.40
    ports:
    - containerPort: 8080
    startupProbe:
      httpGet:
        path: /healthz
        port: 8080
      failureThreshold: 30
      periodSeconds: 10
    livenessProbe:
      httpGet:
        path: /healthz
        port: 8080
      initialDelaySeconds: 10
      periodSeconds: 5
      timeoutSeconds: 3
      failureThreshold: 3
    readinessProbe:
      httpGet:
        path: /ready
        port: 8080
      periodSeconds: 5
initialDelaySeconds- Number of seconds after the container has started before startup, liveness or readiness probes are initiated. If a startup probe is defined, liveness and readiness probe delays do not begin until the startup probe has succeeded. In some older Kubernetes versions, the initialDelaySeconds might be ignored if periodSeconds was set to a value higher than initialDelaySeconds. However, in current versions, initialDelaySeconds is always honored and the probe will not start until after this initial delay. Defaults to 0 seconds. Minimum value is 0.
periodSeconds- How often (in seconds) to perform the probe. Default to 10 seconds. The minimum value is 1. While a container is not Ready, the readiness probe may be executed at times other than the configured
periodSecondsinterval. This is to make the Pod ready faster. timeoutSeconds- Number of seconds after which the probe times out. Defaults to 1 second. Minimum value is 1.
successThreshold- Minimum consecutive successes for the probe to be considered successful after having failed. Defaults to 1. Must be 1 for liveness and startup Probes. Minimum value is 1.
failureThreshold- After a probe fails
failureThresholdtimes in a row, Kubernetes considers that the overall check has failed: the container is not ready/healthy/live. Defaults to 3. Minimum value is 1. For the case of a startup or liveness probe, if at leastfailureThresholdprobes have failed, Kubernetes treats the container as unhealthy and triggers a restart for that specific container. The kubelet honors the setting ofterminationGracePeriodSecondsfor that container. For a failed readiness probe, the kubelet continues running the container that failed checks, and also continues to run more probes; because the check failed, the kubelet sets theReadycondition on the Pod tofalse. terminationGracePeriodSeconds- configure a grace period for the kubelet to wait between triggering a shut down of the failed container, and then forcing the container runtime to stop that container. The default is to inherit the Pod-level value for
terminationGracePeriodSeconds(30 seconds if not specified), and the minimum value is 1. See probe-levelterminationGracePeriodSecondsfor more detail.
Caution:
Incorrect implementation of readiness probes may result in an ever growing number of processes in the container, and resource starvation if this is left unchecked.Probe-level terminationGracePeriodSeconds
FEATURE STATE:
Kubernetes v1.28 [stable]In 1.25 and above, users can specify a probe-level terminationGracePeriodSeconds
as part of the probe specification. When both a pod- and probe-level
terminationGracePeriodSeconds are set, the kubelet will use the probe-level
value.
When setting the terminationGracePeriodSeconds, note the following:
- The kubelet always honors the probe-level
terminationGracePeriodSecondsfield if it is present on a Pod. - If you have existing Pods where the
terminationGracePeriodSecondsfield is set and you no longer wish to use per-probe termination grace periods, you must delete those existing Pods.
For example:
spec:
  terminationGracePeriodSeconds: 3600  # pod-level
  containers:
  - name: test
    image: ...

    ports:
    - name: liveness-port
      containerPort: 8080

    livenessProbe:
      httpGet:
        path: /healthz
        port: liveness-port
      failureThreshold: 1
      periodSeconds: 60
      # Override pod-level terminationGracePeriodSeconds
      terminationGracePeriodSeconds: 60
Probe-level terminationGracePeriodSeconds cannot be set for readiness probes.
It will be rejected by the API server.
Probe mechanism details
HTTP probes
HTTP probes
have additional fields that can be set on httpGet:
host: Host name to connect to, defaults to the pod IP. You probably want to set "Host" inhttpHeadersinstead.scheme: Scheme to use for connecting to the host (HTTP or HTTPS). Defaults to "HTTP".path: Path to access on the HTTP server. Defaults to "/".httpHeaders: Custom headers to set in the request. HTTP allows repeated headers.port: Name or number of the port to access on the container. Number must be in the range 1 to 65535.
For an HTTP probe, the kubelet sends an HTTP request to the specified port and
path to perform the check. The kubelet sends the probe to the Pod's IP address,
unless the address is overridden by the optional host field in httpGet. If
scheme field is set to HTTPS, the kubelet sends an HTTPS request skipping
the certificate verification. In most scenarios, you do not want to set the
host field. Here's one scenario where you would set it. Suppose the container
listens on 127.0.0.1 and the Pod's hostNetwork field is true. Then host,
under httpGet, should be set to 127.0.0.1. If your pod relies on virtual
hosts, which is probably the more common case, you should not use host, but
rather set the Host header in httpHeaders.
For an HTTP probe, the kubelet sends two request headers in addition to the
mandatory Host header:
User-Agent, which defaults tokube-probe/1.36where1.36is the version of the kubelet.Accept, which defaults to*/*.
You can override these headers by defining httpHeaders for the probe.
For example:
livenessProbe:
  httpGet:
    httpHeaders:
      - name: Accept
        value: application/json

startupProbe:
  httpGet:
    httpHeaders:
      - name: User-Agent
        value: MyUserAgent
You can also remove these two headers by defining them with an empty value.
livenessProbe:
  httpGet:
    httpHeaders:
      - name: Accept
        value: ""

startupProbe:
  httpGet:
    httpHeaders:
      - name: User-Agent
        value: ""
Redirect handling
When the kubelet probes a container using HTTP, it follows redirects only if
the redirect is to the same host. This includes redirects that change the
protocol from HTTP to HTTPS, even if the probe is configured with
scheme: HTTP.
If the redirect is to a different hostname, the kubelet does not follow it.
Instead, the kubelet treats the probe as successful and records a
ProbeWarning event.
If the kubelet follows a redirect and receives 11 or more redirects in total, the probe
is considered successful and records a ProbeWarning event. For example:
Events:
  Type     Reason        Age                     From               Message
  ----     ------        ----                    ----               -------
  Normal   Scheduled     29m                     default-scheduler  Successfully assigned default/httpbin-7b8bc9cb85-bjzwn to daocloud
  Normal   Pulling       29m                     kubelet            Pulling image "docker.io/kennethreitz/httpbin"
  Normal   Pulled        24m                     kubelet            Successfully pulled image "docker.io/kennethreitz/httpbin" in 5m12.402735213s
  Normal   Created       24m                     kubelet            Created container httpbin
  Normal   Started       24m                     kubelet            Started container httpbin
 Warning  ProbeWarning  4m11s (x1197 over 24m)  kubelet            Readiness probe warning: Probe terminated redirects
Caution:
When processing an httpGet probe, the kubelet stops reading the response body after 10KiB.
The probe's success is determined solely by the response status code, which is found in the response headers.
If you probe an endpoint that returns a response body larger than 10KiB, the kubelet will still mark the probe as successful based on the status code, but it will close the connection after reaching the 10KiB limit. This abrupt closure can cause connection reset by peer or broken pipe errors to appear in your application's logs, which can be difficult to distinguish from legitimate network issues.
For reliable httpGet probes, it is strongly recommended to use dedicated health check endpoints
that return a minimal response body. If you must use an existing endpoint with a large payload,
consider using an exec probe to perform a HEAD request instead.
TCP probes
For a TCP probe, the kubelet makes the probe connection at the node, not in the
Pod, which means that you can not use a service name in the host parameter
since the kubelet is unable to resolve it.
gRPC probes
FEATURE STATE:
Kubernetes v1.27 [stable]If your application implements the gRPC Health Checking Protocol, you can configure Kubernetes to use it for application startup, liveness or readiness checks.
Here is an example manifest:
apiVersion: v1
kind: Pod
metadata:
  name: etcd-with-grpc
spec:
  containers:
  - name: etcd
    image: registry.k8s.io/etcd:3.5.1-0
    command: [ "/usr/local/bin/etcd", "--data-dir",  "/var/lib/etcd", "--listen-client-urls", "http://0.0.0.0:2379", "--advertise-client-urls", "http://127.0.0.1:2379", "--log-level", "debug"]
    ports:
    - containerPort: 2379
    livenessProbe:
      grpc:
        port: 2379
      initialDelaySeconds: 10
To use a gRPC probe, port must be configured. If you want to
distinguish probes of different types and probes for different features you can
use the service field. You can set service to the value liveness and make
your gRPC Health Checking endpoint respond to this request differently than when
you set service set to readiness. This lets you use the same endpoint for
different kinds of container health check rather than listening on two different
ports. If you want to specify your own custom service name and also specify a
probe type, the Kubernetes project recommends that you use a name that
concatenates those. For example: myservice-liveness (using - as a separator).
Note:
Unlike HTTP or TCP probes, you cannot specify the health check port by name, and you cannot configure a custom hostname.Configuration problems (for example: incorrect port or service, unimplemented health checking protocol) are considered a probe failure, similar to HTTP and TCP probes.
What's next
- Learn how to Configure Liveness, Readiness and Startup Probes.
- For the full specification of probe-related fields, see the API reference: Pod, Container, Probe
4.1.7 - Disruptions
This guide is for application owners who want to build highly available applications, and thus need to understand what types of disruptions can happen to Pods.
It is also for cluster administrators who want to perform automated cluster actions, like upgrading and autoscaling clusters.
Voluntary and involuntary disruptions
Pods do not disappear until someone (a person or a controller) destroys them, or there is an unavoidable hardware or system software error.
We call these unavoidable cases involuntary disruptions to an application. Examples are:
- a hardware failure of the physical machine backing the node
- cluster administrator deletes VM (instance) by mistake
- cloud provider or hypervisor failure makes VM disappear
- a kernel panic
- the node disappears from the cluster due to cluster network partition
- eviction of a pod due to the node being out-of-resources.
Except for the out-of-resources condition, all these conditions should be familiar to most users; they are not specific to Kubernetes.
We call other cases voluntary disruptions. These include both actions initiated by the application owner and those initiated by a Cluster Administrator. Typical application owner actions include:
- deleting the deployment or other controller that manages the pod
- updating a deployment's pod template causing a restart
- directly deleting a pod (e.g. by accident)
Cluster administrator actions include:
- Draining a node for repair or upgrade.
- Draining a node from a cluster to scale the cluster down (learn about Node Autoscaling).
- Removing a pod from a node to permit something else to fit on that node.
These actions might be taken directly by the cluster administrator, or by automation run by the cluster administrator, or by your cluster hosting provider.
Ask your cluster administrator or consult your cloud provider or distribution documentation to determine if any sources of voluntary disruptions are enabled for your cluster. If none are enabled, you can skip creating Pod Disruption Budgets.
Caution:
Not all voluntary disruptions are constrained by Pod Disruption Budgets. For example, deleting deployments or pods bypasses Pod Disruption Budgets.Dealing with disruptions
Here are some ways to mitigate involuntary disruptions:
- Ensure your pod requests the resources it needs.
- Replicate your application if you need higher availability. (Learn about running replicated stateless and stateful applications.)
- For even higher availability when running replicated applications, spread applications across racks (using anti-affinity) or across zones (if using a multi-zone cluster.)
The frequency of voluntary disruptions varies. On a basic Kubernetes cluster, there are no automated voluntary disruptions (only user-triggered ones). However, your cluster administrator or hosting provider may run some additional services which cause voluntary disruptions. For example, rolling out node software updates can cause voluntary disruptions. Also, some implementations of cluster (node) autoscaling may cause voluntary disruptions to defragment and compact nodes. Your cluster administrator or hosting provider should have documented what level of voluntary disruptions, if any, to expect. Certain configuration options, such as using PriorityClasses in your pod spec can also cause voluntary (and involuntary) disruptions.
Pod disruption budgets
FEATURE STATE:
Kubernetes v1.21 [stable]Kubernetes offers features to help you run highly available applications even when you introduce frequent voluntary disruptions.
As an application owner, you can create a PodDisruptionBudget (PDB) for each application. A PDB limits the number of Pods of a replicated application that are down simultaneously from voluntary disruptions. For example, a quorum-based application would like to ensure that the number of replicas running is never brought below the number needed for a quorum. A web front end might want to ensure that the number of replicas serving load never falls below a certain percentage of the total.
Cluster managers and hosting providers should use tools which respect PodDisruptionBudgets by calling the Eviction API instead of directly deleting pods or deployments.
For example, the kubectl drain subcommand lets you mark a node as going out of
service. When you run kubectl drain, the tool tries to evict all of the Pods on
the Node you're taking out of service. The eviction request that kubectl submits on
your behalf may be temporarily rejected, so the tool periodically retries all failed
requests until all Pods on the target node are terminated, or until a configurable timeout
is reached.
A PDB specifies the number of replicas that an application can tolerate having, relative to how
many it is intended to have. For example, a Deployment which has a .spec.replicas: 5 is
supposed to have 5 pods at any given time. If its PDB allows for there to be 4 at a time,
then the Eviction API will allow voluntary disruption of one (but not two) pods at a time.
The group of pods that comprise the application is specified using a label selector, the same as the one used by the application's controller (deployment, stateful-set, etc).
The "intended" number of pods is computed from the .spec.replicas of the workload resource
that is managing those pods. The control plane discovers the owning workload resource by
examining the .metadata.ownerReferences of the Pod.
Involuntary disruptions cannot be prevented by PDBs; however they do count against the budget.
Pods which are deleted or unavailable due to a rolling upgrade to an application do count against the disruption budget, but workload resources (such as Deployment and StatefulSet) are not limited by PDBs when doing rolling upgrades. Instead, the handling of failures during application updates is configured in the spec for the specific workload resource.
It is recommended to set AlwaysAllow Unhealthy Pod Eviction Policy
to your PodDisruptionBudgets to support eviction of misbehaving applications during a node drain.
The default behavior is to wait for the application pods to become healthy
before the drain can proceed.
When a pod is evicted using the eviction API, it is gracefully
terminated, honoring the
terminationGracePeriodSeconds setting in its PodSpec.
PodDisruptionBudget example
Consider a cluster with 3 nodes, node-1 through node-3.
The cluster is running several applications. One of them has 3 replicas initially called
pod-a, pod-b, and pod-c. Another, unrelated pod without a PDB, called pod-x, is also shown.
Initially, the pods are laid out as follows:
| node-1 | node-2 | node-3 |
|---|---|---|
| pod-a available | pod-b available | pod-c available |
| pod-x available |
All 3 pods are part of a deployment, and they collectively have a PDB which requires there be at least 2 of the 3 pods to be available at all times.
For example, assume the cluster administrator wants to reboot into a new kernel version to fix a bug in the kernel.
The cluster administrator first tries to drain node-1 using the kubectl drain command.
That tool tries to evict pod-a and pod-x. This succeeds immediately.
Both pods go into the terminating state at the same time.
This puts the cluster in this state:
| node-1 draining | node-2 | node-3 |
|---|---|---|
| pod-a terminating | pod-b available | pod-c available |
| pod-x terminating |
The deployment notices that one of the pods is terminating, so it creates a replacement
called pod-d. Since node-1 is cordoned, it lands on another node. Something has
also created pod-y as a replacement for pod-x.
(Note: for a StatefulSet, pod-a, which would be called something like pod-0, would need
to terminate completely before its replacement, which is also called pod-0 but has a
different UID, could be created. Otherwise, the example applies to a StatefulSet as well.)
Now the cluster is in this state:
| node-1 draining | node-2 | node-3 |
|---|---|---|
| pod-a terminating | pod-b available | pod-c available |
| pod-x terminating | pod-d starting | pod-y |
At some point, the pods terminate, and the cluster looks like this:
| node-1 drained | node-2 | node-3 |
|---|---|---|
| pod-b available | pod-c available | |
| pod-d starting | pod-y |
At this point, if an impatient cluster administrator tries to drain node-2 or
node-3, the drain command will block, because there are only 2 available
pods for the deployment, and its PDB requires at least 2. After some time passes, pod-d becomes available.
The cluster state now looks like this:
| node-1 drained | node-2 | node-3 |
|---|---|---|
| pod-b available | pod-c available | |
| pod-d available | pod-y |
Now, the cluster administrator tries to drain node-2.
The drain command will try to evict the two pods in some order, say
pod-b first and then pod-d. It will succeed at evicting pod-b.
But, when it tries to evict pod-d, it will be refused because that would leave only
one pod available for the deployment.
The deployment creates a replacement for pod-b called pod-e.
Because there are not enough resources in the cluster to schedule
pod-e the drain will again block. The cluster may end up in this
state:
| node-1 drained | node-2 | node-3 | no node |
|---|---|---|---|
| pod-b terminating | pod-c available | pod-e pending | |
| pod-d available | pod-y |
At this point, the cluster administrator needs to add a node back to the cluster to proceed with the upgrade.
You can see how Kubernetes varies the rate at which disruptions can happen, according to:
- how many replicas an application needs
- how long it takes to gracefully shutdown an instance
- how long it takes a new instance to start up
- the type of controller
- the cluster's resource capacity
Pod disruption conditions
FEATURE STATE:
Kubernetes v1.31 [stable](enabled by default)A dedicated Pod DisruptionTarget condition
is added to indicate
that the Pod is about to be deleted due to a disruption.
The reason field of the condition additionally
indicates one of the following reasons for the Pod termination:
PreemptionByScheduler- Pod is due to be preempted by a scheduler in order to accommodate a new Pod with a higher priority. For more information, see Pod priority preemption.
DeletionByTaintManager- Pod is due to be deleted by Taint Manager (which is part of the node lifecycle controller within
kube-controller-manager) due to aNoExecutetaint that the Pod does not tolerate; see taint-based evictions. EvictionByEvictionAPI- Pod has been marked for eviction using the Kubernetes API .
DeletionByPodGC- Pod, that is bound to a no longer existing Node, is due to be deleted by Pod garbage collection.
TerminationByKubelet- Pod has been terminated by the kubelet, because of either node pressure eviction, the graceful node shutdown, or preemption for system critical pods.
In all other disruption scenarios, like eviction due to exceeding
Pod container limits,
Pods don't receive the DisruptionTarget condition because the disruptions were
probably caused by the Pod and would reoccur on retry.
Note:
A Pod disruption might be interrupted. The control plane might re-attempt to continue the disruption of the same Pod, but it is not guaranteed. As a result, theDisruptionTarget condition might be added to a Pod, but that Pod might then not actually be
deleted. In such a situation, after some time, the
Pod disruption condition will be cleared.Along with cleaning up the pods, the Pod garbage collector (PodGC) will also mark them as failed if they are in a non-terminal phase (see also Pod garbage collection).
When using a Job (or CronJob), you may want to use these Pod disruption conditions as part of your Job's Pod failure policy.
Separating Cluster Owner and Application Owner Roles
Often, it is useful to think of the Cluster Manager and Application Owner as separate roles with limited knowledge of each other. This separation of responsibilities may make sense in these scenarios:
- when there are many application teams sharing a Kubernetes cluster, and there is natural specialization of roles
- when third-party tools or services are used to automate cluster management
Pod Disruption Budgets support this separation of roles by providing an interface between the roles.
If you do not have such a separation of responsibilities in your organization, you may not need to use Pod Disruption Budgets.
How to perform Disruptive Actions on your Cluster
If you are a Cluster Administrator, and you need to perform a disruptive action on all the nodes in your cluster, such as a node or system software upgrade, here are some options:
- Accept downtime during the upgrade.
- Failover to another complete replica cluster.
- No downtime, but may be costly both for the duplicated nodes and for human effort to orchestrate the switchover.
- Write disruption tolerant applications and use PDBs.
- No downtime.
- Minimal resource duplication.
- Allows more automation of cluster administration.
- Writing disruption-tolerant applications is tricky, but the work to tolerate voluntary disruptions largely overlaps with work to support autoscaling and tolerating involuntary disruptions.
What's next
Follow steps to protect your application by configuring a Pod Disruption Budget.
Learn more about draining nodes
Learn about updating a deployment including steps to maintain its availability during the rollout.
4.1.8 - Pod Hostname
This page explains how to set a Pod's hostname, potential side effects after configuration, and the underlying mechanics.
Default Pod hostname
When a Pod is created, its hostname (as observed from within the Pod) is derived from the Pod's metadata.name value. Both the hostname and its corresponding fully qualified domain name (FQDN) are set to the metadata.name value (from the Pod's perspective)
apiVersion: v1
kind: Pod
metadata:
  name: busybox-1
spec:
  containers:
  - image: busybox:1.28
    command:
      - sleep
      - "3600"
    name: busybox
The Pod created by this manifest will have its hostname and fully qualified domain name (FQDN) set to busybox-1.
Hostname with pod's hostname and subdomain fields
The Pod spec includes an optional hostname field.
When set, this value takes precedence over the Pod's metadata.name as the
hostname (observed from within the Pod).
For example, a Pod with spec.hostname set to my-host will have its hostname set to my-host.
The Pod spec also includes an optional subdomain field,
indicating the Pod belongs to a subdomain within its namespace.
If a Pod has spec.hostname set to "foo" and spec.subdomain set
to "bar" in the namespace my-namespace, its hostname becomes foo and its
fully qualified domain name (FQDN) becomes
foo.bar.my-namespace.svc.cluster-domain.example (observed from within the Pod).
When both hostname and subdomain are set, the cluster's DNS server will create A and/or AAAA records based on these fields. Refer to: Pod's hostname and subdomain fields.
Hostname with pod's setHostnameAsFQDN fields
FEATURE STATE:
Kubernetes v1.22 [stable]When a Pod is configured to have fully qualified domain name (FQDN), its
hostname is the short hostname. For example, if you have a Pod with the fully
qualified domain name busybox-1.busybox-subdomain.my-namespace.svc.cluster-domain.example,
then by default the hostname command inside that Pod returns busybox-1 and the
hostname --fqdn command returns the FQDN.
When both setHostnameAsFQDN: true and the subdomain field is set in the Pod spec,
the kubelet writes the Pod's FQDN
into the hostname for that Pod's namespace. In this case, both hostname and hostname --fqdn
return the Pod's FQDN.
The Pod's FQDN is constructed in the same manner as previously defined.
It is composed of the Pod's spec.hostname (if specified) or metadata.name field,
the spec.subdomain, the namespace name, and the cluster domain suffix.
Note:
In Linux, the hostname field of the kernel (the nodename field of struct utsname) is limited to 64 characters.
If a Pod enables this feature and its FQDN is longer than 64 character, it will fail to start.
The Pod will remain in Pending status (ContainerCreating as seen by kubectl) generating
error events, such as "Failed to construct FQDN from Pod hostname and cluster domain".
This means that when using this field,
you must ensure the combined length of the Pod's metadata.name (or spec.hostname)
and spec.subdomain fields results in an FQDN that does not exceed 64 characters.
Hostname with pod's hostnameOverride
FEATURE STATE:
Kubernetes v1.35 [beta](enabled by default)Setting a value for hostnameOverride in the Pod spec causes the kubelet
to unconditionally set both the Pod's hostname and fully qualified domain name (FQDN)
to the hostnameOverride value.
The hostnameOverride field has a length limitation of 64 characters
and must adhere to the DNS subdomain names standard defined in RFC 1123.
Example:
apiVersion: v1
kind: Pod
metadata:
  name: busybox-2-busybox-example-domain
spec:
  hostnameOverride: busybox-2.busybox.example.domain
  containers:
  - image: busybox:1.28
    command:
      - sleep
      - "3600"
    name: busybox
Note:
This only affects the hostname within the Pod; it does not affect the Pod's A or AAAA records in the cluster DNS server.If hostnameOverride is set alongside hostname and subdomain fields:
The hostname inside the Pod is overridden to the
hostnameOverridevalue.The Pod's A and/or AAAA records in the cluster DNS server are still generated based on the
hostnameandsubdomainfields.
Note: If hostnameOverride is set, you cannot simultaneously set the hostNetwork and setHostnameAsFQDN fields.
The API server will explicitly reject any create request attempting this combination.
For details on behavior when hostnameOverride is set in combination with
other fields (hostname, subdomain, setHostnameAsFQDN, hostNetwork),
see the table in the KEP-4762 design details.
4.1.9 - Pod Quality of Service Classes
This page introduces Quality of Service (QoS) classes in Kubernetes, and explains how Kubernetes assigns a QoS class to each Pod as a consequence of the resource constraints that you specify for the containers in that Pod. Kubernetes relies on this classification to make decisions about which Pods to evict when there are not enough available resources on a Node.
Quality of Service classes
Kubernetes classifies the Pods that you run and allocates each Pod into a specific
quality of service (QoS) class. Kubernetes uses that classification to influence how different
pods are handled. Kubernetes does this classification based on the
resource requests
of the Containers in that Pod, along with
how those requests relate to resource limits.
This is known as Quality of Service
(QoS) class. Kubernetes assigns every Pod a QoS class based on the resource requests
and limits of its component Containers. QoS classes are used by Kubernetes to decide
which Pods to evict from a Node experiencing
Node Pressure. The possible
QoS classes are Guaranteed, Burstable, and BestEffort. When a Node runs out of resources,
Kubernetes will first evict BestEffort Pods running on that Node, followed by Burstable and
finally Guaranteed Pods. When this eviction is due to resource pressure, only Pods exceeding
resource requests are candidates for eviction.
Guaranteed
Pods that are Guaranteed have the strictest resource limits and are least likely
to face eviction. They are guaranteed not to be killed until they exceed their limits
or there are no lower-priority Pods that can be preempted from the Node. They may
not acquire resources beyond their specified limits. These Pods can also make
use of exclusive CPUs using the
static CPU management policy.
Criteria
For a Pod to be given a QoS class of Guaranteed:
- Every Container in the Pod must have a memory limit and a memory request, both greater than zero.
- For every Container in the Pod, the memory limit must equal the memory request.
- Every Container in the Pod must have a CPU limit and a CPU request, both greater than zero.
- For every Container in the Pod, the CPU limit must equal the CPU request.
If instead the Pod uses Pod-level resources:
FEATURE STATE:
Kubernetes v1.34 [beta](enabled by default)- The Pod must have a Pod-level memory limit and memory request, and their values must be equal.
- The Pod must have a Pod-level CPU limit and CPU request, and their values must be equal.
Burstable
Pods that are Burstable have some lower-bound resource guarantees based on the request, but
do not require a specific limit. If a limit is not specified, it defaults to a
limit equivalent to the capacity of the Node, which allows the Pods to flexibly increase
their resources if resources are available. In the event of Pod eviction due to Node
resource pressure, these Pods are evicted only after all BestEffort Pods are evicted.
Because a Burstable Pod can include a Container that has no resource limits or requests, a Pod
that is Burstable can try to use any amount of node resources.
Criteria
A Pod is given a QoS class of Burstable if:
- The Pod does not meet the criteria for QoS class
Guaranteed. - At least one Container in the Pod has a memory or CPU request or limit, or the Pod has a Pod-level memory or CPU request or limit.
BestEffort
Pods in the BestEffort QoS class can use node resources that aren't specifically assigned
to Pods in other QoS classes. For example, if you have a node with 16 CPU cores available to the
kubelet, and you assign 4 CPU cores to a Guaranteed Pod, then a Pod in the BestEffort
QoS class can try to use any amount of the remaining 12 CPU cores.
The kubelet prefers to evict BestEffort Pods if the node comes under resource pressure.
Criteria
A Pod has a QoS class of BestEffort if it doesn't meet the criteria for either Guaranteed
or Burstable. In other words, a Pod is BestEffort only if none of the Containers in the Pod have a
memory limit or a memory request, and none of the Containers in the Pod have a
CPU limit or a CPU request, and the Pod does not have any Pod-level memory or CPU limits or requests.
Containers in a Pod can request other resources (not CPU or memory) and still be classified as
BestEffort.
Memory QoS with cgroup v2
FEATURE STATE:
Kubernetes v1.22 [alpha](disabled by default)Memory QoS uses the memory controller of cgroup v2 to manage memory throttling and protection in Kubernetes. It uses the Pod's QoS class to decide which cgroup settings to apply, but it is a separate opt-in feature. Disabling Memory QoS does not change how Pods are classified.
Memory throttling
For Burstable pods, the kubelet sets memory.high to throttle memory allocation
before the workload hits its hard limit (memory.max). The throttling threshold
is calculated as:
memory.high = requests + memoryThrottlingFactor * (limits - requests)
where memoryThrottlingFactor defaults to 0.9. For example, a container with a
256 MiB request and a 1 GiB limit gets memory.high set to roughly 947 MiB.
If a Burstable container has no memory limit, node allocatable memory is used in
place of the limit.
Guaranteed pods do not get memory.high because their requests equal their
limits. BestEffort pods do not get memory.high because they have no requests
or limits.
Configuring memory reservation
Memory reservation is controlled via the kubelet configuration field
memoryReservationPolicy:
None(default): the kubelet does not setmemory.minormemory.lowfor containers and pods. No memory is hard-locked by the kernel.TieredReservation: the kubelet sets tiered memory protection based on the Pod's QoS class:- Guaranteed pods:
memory.minis set to memory requests. The kernel will not reclaim this memory under any circumstances. - Burstable pods:
memory.lowis set to memory requests. The kernel preferentially retains this memory but may reclaim it under extreme pressure. - BestEffort pods: no memory protection is set.
- Guaranteed pods:
System requirements
Memory QoS requires Linux with cgroup v2. Kernel 5.9 or higher is recommended
because memory.high throttling on older kernels can trigger a known
livelock bug.
If the MemoryQoS feature gate is enabled on an older kernel, the kubelet logs
a warning at startup.
Some behavior is independent of QoS class
Certain behavior is independent of the QoS class assigned by Kubernetes. For example:
Any Container exceeding a resource limit will be killed and restarted by the kubelet without affecting other Containers in that Pod.
If a Container exceeds its resource request and the node it runs on faces resource pressure, the Pod it is in becomes a candidate for eviction. If this occurs, all Containers in the Pod will be terminated. Kubernetes may create a replacement Pod, usually on a different node.
The resource request of a Pod is equal to the sum of the resource requests of its component Containers, and the resource limit of a Pod is equal to the sum of the resource limits of its component Containers.
The kube-scheduler does not consider QoS class when selecting which Pods to preempt. Preemption can occur when a cluster does not have enough resources to run all the Pods you defined.
The QoS class is determined when the Pod is created and remains unchanged for the lifetime of the Pod. If you later attempt an in-place resize that would result in a different QoS class, the resize is rejected by admission.
What's next
- Learn about resource management for Pods and Containers.
- Learn about Node-pressure eviction.
- Learn about Pod priority and preemption.
- Learn about Pod disruptions.
- Learn how to assign memory resources to containers and pods.
- Learn how to assign CPU resources to containers and pods.
- Learn how to configure Quality of Service for Pods.
4.1.10 - Scheduling Group
FEATURE STATE:
Kubernetes v1.35 [alpha](disabled by default)You can link a Pod to a PodGroup to indicate
that the Pod belongs to a group of Pods scheduled together. This enables the scheduler
to apply group-level policies such as gang scheduling rather than treating each Pod independently.
Specifying a scheduling group
When the GenericWorkload
feature gate is enabled,
you can set the spec.schedulingGroup field in your Pod manifest. This field establishes a link to a specific PodGroup object in the same namespace by name.
apiVersion: v1
kind: Pod
metadata:
  name: worker-0
  namespace: some-ns
spec:
  schedulingGroup:
    podGroupName: training-worker-0
  containers:
  - name: ml-worker
    image: training:v1
The schedulingGroup field is immutable. Once set, a Pod cannot be moved to a
different PodGroup.
Behavior
When you set spec.schedulingGroup, the scheduler looks up the referenced
PodGroup and applies the
scheduling policy defined in it:
- If the
PodGroupuses thebasicpolicy, eachPodis scheduled independently using standard Kubernetes behavior. The grouping is used as group-level label. - If the
PodGroupuses thegangpolicy, thePodenters an "all-or-nothing" scheduling lifecycle. The scheduler tries to place at leastminCountPodsin the group simultaneously; none of them bind to nodes unless the minimum is met.
Missing PodGroup reference
If a Pod references a PodGroup that does not yet exist, the Pod remains pending.
The scheduler automatically reconsiders the Pod once the PodGroup is created.
This applies regardless of whether the eventual policy is basic or gang,
because the scheduler requires the PodGroup to determine the policy.
What's next
- Learn about the PodGroup API and its lifecycle.
- Read about PodGroup scheduling policies.
- Understand the gang scheduling algorithm.
4.1.11 - Static Pods
Static Pods are managed directly by the kubelet daemon on a specific node, without the API server observing them. Unlike Pods that are managed by the control plane (for example, a Deployment), the kubelet watches each static Pod and restarts it if it fails.
Static Pods are always bound to one kubelet on a specific node.
The main use for static Pods is to run a self-hosted control plane: in other words,
using the kubelet to supervise the individual
control plane components.
For example, kubeadm uses static Pods to run
kube-apiserver, kube-controller-manager, kube-scheduler, and etcd on control plane nodes.
Note:
If your cluster runs control plane components as Pods, they are likely static Pods. You can recognize their mirror Pods in thekube-system namespace
by the kubernetes.io/config.mirror annotation.Mirror Pods
The kubelet automatically tries to create a mirror Pod on the Kubernetes API server for each static Pod. This means that the Pods running on a node are visible on the API server, but cannot be controlled from there. The Pod names will be suffixed with the node hostname with a leading hyphen.
The kubelet propagates labels from the static Pod to the mirror Pod. You can use those labels as normal via selectors.
If you try to use kubectl to delete the mirror Pod from the API server,
the kubelet does not remove the static Pod. The kubelet will recreate
the mirror Pod.
Limitations
The spec of a static Pod cannot refer to other API objects, such as ServiceAccount, ConfigMap, or Secret.
Static Pods do not support ephemeral containers.
Static Pods vs DaemonSets
If you are running clustered Kubernetes and are using static Pods to run a Pod on every node, you should probably be using a DaemonSet instead.
Static Pods are not managed by the control plane, so they cannot be rolled out, rolled back, or scaled using standard Kubernetes mechanisms. DaemonSets provide these capabilities and are the recommended approach for running node-level workloads.
Static Pods are started by the kubelet before the API server is available, which makes them suitable for bootstrapping control plane components. DaemonSets require a running control plane.
What's next
- Learn how to create static Pods.
- Learn about Kubernetes components and how the control plane uses static Pods.
- Learn about DaemonSets as an alternative to static Pods.
4.1.12 - User Namespaces
FEATURE STATE:
Kubernetes v1.36 [stable](enabled by default)This page explains how user namespaces are used in Kubernetes pods. A user namespace isolates the user running inside the container from the one in the host.
A process running as root in a container can run as a different (non-root) user in the host; in other words, the process has full privileges for operations inside the user namespace, but is unprivileged for operations outside the namespace.
You can use this feature to reduce the damage a compromised container can do to the host or other pods in the same node. There are several security vulnerabilities rated either HIGH or CRITICAL that were not exploitable when user namespaces is active. It is expected user namespace will mitigate some future vulnerabilities too.
Before you begin
Note: This section links to third party projects that provide functionality required by Kubernetes. The Kubernetes project authors aren't responsible for these projects, which are listed alphabetically. To add a project to this list, read the content guide before submitting a change. More information.
This is a Linux-only feature and support is needed in Linux for idmap mounts on the filesystems used. This means:
- On the node, the filesystem you use for
/var/lib/kubelet/pods/, or the custom directory you configure for this, needs idmap mount support. - All the filesystems used in the pod's volumes must support idmap mounts.
In practice this means you need at least Linux 6.3, as tmpfs started supporting idmap mounts in that version. This is usually needed as several Kubernetes features use tmpfs (the service account token that is mounted by default uses a tmpfs, Secrets use a tmpfs, etc.)
Some popular filesystems that support idmap mounts in Linux 6.3 are: btrfs, ext4, xfs, fat, tmpfs, overlayfs.
In addition, the container runtime and its underlying OCI runtime must support user namespaces. The following OCI runtimes offer support:
To use user namespaces with Kubernetes, you also need to use a CRI container runtime to use this feature with Kubernetes pods:
- containerd: version 2.0 (and later) supports user namespaces for containers.
- CRI-O: version 1.25 (and later) supports user namespaces for containers.
You can see the status of user namespaces support in cri-dockerd tracked in an issue on GitHub.
Introduction
User namespaces is a Linux feature that allows to map users in the container to different users in the host. Furthermore, the capabilities granted to a pod in a user namespace are valid only in the namespace and void outside of it.
A pod can opt-in to use user namespaces by setting the pod.spec.hostUsers field
to false.
The kubelet will pick host UIDs/GIDs a pod is mapped to, and will do so in a way to guarantee that no two pods on the same node use the same mapping.
The runAsUser, runAsGroup, fsGroup, etc. fields in the pod.spec always
refer to the user inside the container. These users will be used for volume
mounts (specified in pod.spec.volumes) and therefore the host UID/GID will not
have any effect on writes/reads from volumes the pod can mount. In other words,
the inodes created/read in volumes mounted by the pod will be the same as if the
pod wasn't using user namespaces.
This way, a pod can easily enable and disable user namespaces (without affecting
its volume's file ownerships) and can also share volumes with pods without user
namespaces by just setting the appropriate users inside the container
(RunAsUser, RunAsGroup, fsGroup, etc.). This applies to any volume the pod
can mount, including hostPath (if the pod is allowed to mount hostPath
volumes).
By default, the valid UIDs/GIDs when this feature is enabled is the range 0-65535.
This applies to files and processes (runAsUser, runAsGroup, etc.).
Files using a UID/GID outside this range will be seen as belonging to the
overflow ID, usually 65534 (configured in /proc/sys/kernel/overflowuid and
/proc/sys/kernel/overflowgid). However, it is not possible to modify those
files, even by running as the 65534 user/group.
If the range 0-65535 is extended with a configuration knob, the aforementioned restrictions apply to the extended range.
Most applications that need to run as root but don't access other host namespaces or resources, should continue to run fine without any changes needed if user namespaces is activated.
Understanding user namespaces for pods
Several container runtimes with their default configuration (like Docker Engine, containerd, CRI-O) use Linux namespaces for isolation. Other technologies exist and can be used with those runtimes too (e.g. Kata Containers uses VMs instead of Linux namespaces). This page is applicable for container runtimes using Linux namespaces for isolation.
When creating a pod, by default, several new namespaces are used for isolation: a network namespace to isolate the network of the container, a PID namespace to isolate the view of processes, etc. If a user namespace is used, this will isolate the users in the container from the users in the node.
This means containers can run as root and be mapped to a non-root user on the
host. Inside the container the process will think it is running as root (and
therefore tools like apt, yum, etc. work fine), while in reality the process
doesn't have privileges on the host. You can verify this, for example, if you
check which user the container process is running by executing ps aux from
the host. The user ps shows is not the same as the user you see if you
execute inside the container the command id.
This abstraction limits what can happen, for example, if the container manages to escape to the host. Given that the container is running as a non-privileged user on the host, it is limited what it can do to the host.
Furthermore, as users on each pod will be mapped to different non-overlapping users in the host, it is limited what they can do to other pods too.
Capabilities granted to a pod are also limited to the pod user namespace and mostly invalid out of it, some are even completely void. Here are two examples:
CAP_SYS_MODULEdoes not have any effect if granted to a pod using user namespaces, the pod isn't able to load kernel modules.CAP_SYS_ADMINis limited to the pod's user namespace and invalid outside of it.
Without using a user namespace a container running as root, in the case of a container breakout, has root privileges on the node. And if some capability were granted to the container, the capabilities are valid on the host too. None of this is true when we use user namespaces.
If you want to know more details about what changes when user namespaces are in
use, see man 7 user_namespaces.
Set up a node to support user namespaces
By default, the kubelet assigns pods UIDs/GIDs above the range 0-65535, based on the assumption that the host's files and processes use UIDs/GIDs within this range, which is standard for most Linux distributions. This approach prevents any overlap between the UIDs/GIDs of the host and those of the pods.
Avoiding the overlap is important to mitigate the impact of vulnerabilities such as CVE-2021-25741, where a pod can potentially read arbitrary files in the host. If the UIDs/GIDs of the pod and the host don't overlap, it is limited what a pod would be able to do: the pod UID/GID won't match the host's file owner/group.
The kubelet can use a custom range for user IDs and group IDs for pods. To configure a custom range, the node needs to have:
- A user
kubeletin the system (you cannot use any other username here) - The binary
getsubidsinstalled (part of shadow-utils) and in thePATHfor the kubelet binary. - A configuration of subordinate UIDs/GIDs for the
kubeletuser (seeman 5 subuidandman 5 subgid).
This setting only gathers the UID/GID range configuration and does not change
the user executing the kubelet.
You must follow some constraints for the subordinate ID range that you assign
to the kubelet user:
The subordinate user ID, that starts the UID range for Pods, must be a multiple of 65536 and must also be greater than or equal to 65536. In other words, you cannot use any ID from the range 0-65535 for Pods; the kubelet imposes this restriction to make it difficult to create an accidentally insecure configuration.
The subordinate ID count must be a multiple of 65536
The subordinate ID count must be at least
65536 x <maxPods>where<maxPods>is the maximum number of pods that can run on the node.You must assign the same range for both user IDs and for group IDs, It doesn't matter if other users have user ID ranges that don't align with the group ID ranges.
None of the assigned ranges should overlap with any other assignment.
The subordinate configuration must be only one line. In other words, you can't have multiple ranges.
For example, you could define /etc/subuid and /etc/subgid to both have
these entries for the kubelet user:
# The format is
#   name:firstID:count of IDs
# where
# - firstID is 65536 (the minimum value possible)
# - count of IDs is 110 * 65536
#   (110 is the default limit for number of pods on the node)

kubelet:65536:7208960
ID count for each of Pods
Starting with Kubernetes v1.33, the ID count for each of Pods can be set in
KubeletConfiguration.
apiVersion: kubelet.config.k8s.io/v1beta1
kind: KubeletConfiguration
userNamespaces:
  idsPerPod: 1048576
The value of idsPerPod (uint32) must be a multiple of 65536.
The default value is 65536.
This value only applies to containers created after the kubelet was started with
this KubeletConfiguration.
Running containers are not affected by this config.
In Kubernetes prior to v1.33, the ID count for each of Pods was hard-coded to 65536.
Integration with Pod security admission checks
For Linux Pods that enable user namespaces, Kubernetes relaxes the application of Pod Security Standards in a controlled way.
If you create a Pod that uses user
namespaces, the following fields won't be constrained even in contexts that enforce the
Baseline or Restricted pod security standard. This behavior does not
present a security concern because root inside a Pod with user namespaces
actually refers to the user inside the container, that is never mapped to a
privileged user on the host. Here's the list of fields that are not checked for Pods in those
circumstances:
spec.securityContext.runAsNonRootspec.containers[*].securityContext.runAsNonRootspec.initContainers[*].securityContext.runAsNonRootspec.ephemeralContainers[*].securityContext.runAsNonRootspec.securityContext.runAsUserspec.containers[*].securityContext.runAsUserspec.initContainers[*].securityContext.runAsUserspec.ephemeralContainers[*].securityContext.runAsUser
Further, if the pod is in a context with the Baseline pod security standard, validation for the following fields will similarly be relaxed:
spec.containers[*].securityContext.procMountspec.initContainers[*].securityContext.procMountspec.ephemeralContainers[*].securityContext.procMount
with the Restricted pod security standard, a pod still must only use the default or empty ProcMount.
Limitations
When using a user namespace for the pod, it is disallowed to use other host
namespaces. In particular, if you set hostUsers: false then you are not
allowed to set any of:
hostNetwork: truehostIPC: truehostPID: true
No container can use volumeDevices (raw block volumes, like /dev/sda) either.
This includes all the container arrays in the pod spec:
containersinitContainersephemeralContainers
Filesystem support
Pods that use a user namespace require the filesystem to support idmap mounts. Some filesystems don't support idmap mounts, and therefore cannot be used with user namespaces. In such cases, the following events will be generated. Please note that the warning details depend on the container runtime you are using.
Warning Failed 1s kubelet Error: failed to create containerd task: failed to create shim task: OCI runtime create failed: runc create failed: unable to start container process: error during container init: failed to fulfil mount request: failed to set MOUNT_ATTR_IDMAP on ${your mount path} invalid argument (maybe the filesystem used doesn't support idmap mounts on this kernel?): unknown
NFS volumes cannot be mounted in a user-namespace pod because the Linux NFS client doesn't yet support idmap mounts.
For the current list of supported filesystems, see the Linux kernel’s mount_setattr(2) man page.
Metrics and observability
The kubelet exports two prometheus metrics specific to user-namespaces:
started_user_namespaced_pods_total: a counter that tracks the number of user namespaced pods that are attempted to be created.started_user_namespaced_pods_errors_total: a counter that tracks the number of errors creating user namespaced pods.
What's next
- Take a look at Use a User Namespace With a Pod
4.1.13 - Downward API
There are two ways to expose Pod and container fields to a running container: environment variables, and as files that are populated by a special volume type. Together, these two ways of exposing Pod and container fields are called the downward API.
It is sometimes useful for a container to have information about itself, without being overly coupled to Kubernetes. The downward API allows containers to consume information about themselves or the cluster without using the Kubernetes client or API server.
An example is an existing application that assumes a particular well-known environment variable holds a unique identifier. One possibility is to wrap the application, but that is tedious and error-prone, and it violates the goal of low coupling. A better option would be to use the Pod's name as an identifier, and inject the Pod's name into the well-known environment variable.
In Kubernetes, there are two ways to expose Pod and container fields to a running container:
Together, these two ways of exposing Pod and container fields are called the downward API.
Available fields
Only some Kubernetes API fields are available through the downward API. This section lists which fields you can make available.
You can pass information from available Pod-level fields using fieldRef.
At the API level, the spec for a Pod always defines at least one
Container.
You can pass information from available Container-level fields using
resourceFieldRef.
Information available via fieldRef
For some Pod-level fields, you can provide them to a container either as
an environment variable or using a downwardAPI volume. The fields available
via either mechanism are:
metadata.name- the pod's name
metadata.namespace- the pod's namespace
metadata.uid- the pod's unique ID
metadata.annotations['<KEY>']- the value of the pod's annotation named
<KEY>(for example,metadata.annotations['myannotation']) metadata.labels['<KEY>']- the text value of the pod's label named
<KEY>(for example,metadata.labels['mylabel'])
The following information is available through environment variables but not as a downwardAPI volume fieldRef:
spec.serviceAccountName- the name of the pod's service account
spec.nodeName- the name of the node where the Pod is executing
status.hostIP- the primary IP address of the node to which the Pod is assigned
status.hostIPs- the IP addresses is a dual-stack version of
status.hostIP, the first is always the same asstatus.hostIP. status.podIP- the pod's primary IP address (usually, its IPv4 address)
status.podIPs- the IP addresses is a dual-stack version of
status.podIP, the first is always the same asstatus.podIP
The following information is available through a downwardAPI volume
fieldRef, but not as environment variables:
metadata.labels- all of the pod's labels, formatted as
label-key="escaped-label-value"with one label per line metadata.annotations- all of the pod's annotations, formatted as
annotation-key="escaped-annotation-value"with one annotation per line
Information available via resourceFieldRef
These container-level fields allow you to provide information about requests and limits for resources such as CPU and memory.
Note:
FEATURE STATE:
Kubernetes v1.35 [stable](enabled by default)Container CPU and memory resources can be resized while the container is running. If this happens, a downward API volume will be updated, but environment variables will not be updated unless the container restarts. See Resize CPU and Memory Resources assigned to Containers for more details.
resource: limits.cpu- A container's CPU limit
resource: requests.cpu- A container's CPU request
resource: limits.memory- A container's memory limit
resource: requests.memory- A container's memory request
resource: limits.hugepages-*- A container's hugepages limit
resource: requests.hugepages-*- A container's hugepages request
resource: limits.ephemeral-storage- A container's ephemeral-storage limit
resource: requests.ephemeral-storage- A container's ephemeral-storage request
Fallback information for resource limits
If CPU and memory limits are not specified for a container, and you use the downward API to try to expose that information, then the kubelet defaults to exposing the maximum allocatable value for CPU and memory based on the node allocatable calculation.
What's next
You can read about downwardAPI volumes.
You can try using the downward API to expose container- or Pod-level information:
4.1.14 - Advanced Pod Configuration
This page covers advanced Pod configuration topics including PriorityClasses, RuntimeClasses, security context within Pods, and introduces aspects of scheduling.
PriorityClasses
PriorityClasses allow you to set the importance of Pods relative to other Pods.
If you assign a priority class to a Pod, Kubernetes sets the .spec.priority field for that Pod
based on the PriorityClass you specified (you cannot set .spec.priority directly).
If or when a Pod cannot be scheduled, and the problem is due to a lack of resources, the kube-scheduler
tries to preempt lower priority
Pods, in order to make scheduling of the higher priority Pod possible.
A PriorityClass is a cluster-scoped API object that maps a priority class name to an integer priority value. Higher numbers indicate higher priority.
Defining a PriorityClass
apiVersion: scheduling.k8s.io/v1
kind: PriorityClass
metadata:
  name: high-priority
value: 10000
globalDefault: false
description: "Priority class for high-priority workloads"
Specify pod priority using a PriorityClass
apiVersion: v1
kind: Pod
metadata:
  name: nginx
spec:
  containers:
  - name: nginx
    image: nginx
  priorityClassName: high-priority
Built-in PriorityClasses
Kubernetes provides two built-in PriorityClasses:
system-cluster-critical: For system components that are critical to the clustersystem-node-critical: For system components that are critical to individual nodes. This is the highest priority that Pods can have in Kubernetes.
For more information, see Pod Priority and Preemption.
RuntimeClasses
A RuntimeClass allows you to specify the low-level container runtime for a Pod. It is useful when you want to specify different container runtimes for different kinds of Pod, such as when you need different isolation levels or runtime features.
Example Pod
apiVersion: v1
kind: Pod
metadata:
  name: mypod
spec:
  runtimeClassName: myclass
  containers:
  - name: mycontainer
    image: nginx
A RuntimeClass is a cluster-scoped object that represents a container runtime that is available on some or all of your node.
The cluster administrator installs and configures the concrete runtimes backing the RuntimeClass.
They might set up that special container runtime configuration on all nodes, or perhaps just on some of them.
For more information, see the RuntimeClass documentation.
Pod and container level security context configuration
The Security context field in the Pod specification provides granular control over security settings for Pods and containers.
Pod-wide securityContext
Some aspects of security apply to the whole Pod; for other aspects, you might want to set a default, without any container-level overrides.
Here's an example of using securityContext at the Pod level:
Example Pod
apiVersion: v1
kind: Pod
metadata:
  name: security-context-demo
spec:
  securityContext:  # This applies to the entire Pod
    runAsUser: 1000
    runAsGroup: 3000
    fsGroup: 2000
  containers:
  - name: sec-ctx-demo
    image: registry.k8s.io/e2e-test-images/agnhost:2.45
    command: ["sh", "-c", "sleep 1h"]
Container-level security context
You can specify the security context just for a specific container. Here's an example:
Example Pod
apiVersion: v1
kind: Pod
metadata:
  name: security-context-demo-2
spec:
  containers:
  - name: sec-ctx-demo-2
    image: gcr.io/google-samples/node-hello:1.0
    securityContext:
      allowPrivilegeEscalation: false
      runAsNonRoot: true
      runAsUser: 1000
      capabilities:
        drop:
        - ALL
      seccompProfile:
        type: RuntimeDefault
Security context options
- User and Group IDs: Control which user/group the container runs as
- Capabilities: Add or drop Linux capabilities
- Seccomp Profiles: Set security computing profiles
- SELinux Options: Configure SELinux context
- AppArmor: Configure AppArmor profiles for additional access control
- Windows Options: Configure Windows-specific security settings
Caution:
You can also use the PodsecurityContext to allow
privileged mode
in Linux containers. Privileged mode overrides many of the other security settings in the securityContext.
Avoid using this setting unless you can't grant the equivalent permissions by using other fields in the securityContext.
You can run Windows containers in a similarly
privileged mode by setting the windowsOptions.hostProcess flag on the
Pod-level security context. For details and instructions, see
Create a Windows HostProcess Pod.For more information, see Configure a Security Context for a Pod or Container.
Influencing Pod scheduling decisions
Kubernetes provides several mechanisms to control which nodes your Pods are scheduled on.
Node selectors
The simplest form of node selection constraint:
apiVersion: v1
kind: Pod
metadata:
  name: nginx
spec:
  containers:
  - name: nginx
    image: nginx
  nodeSelector:
    disktype: ssd
Node affinity
Node affinity allows you to specify rules that constrain which nodes your Pod can be scheduled on. Here's an example of a Pod that prefers running on nodes labelled as being on a particular continent, selecting based on the value of topology.kubernetes.io/zone label.
apiVersion: v1
kind: Pod
metadata:
  name: with-node-affinity
spec:
  affinity:
    nodeAffinity:
      requiredDuringSchedulingIgnoredDuringExecution:
        nodeSelectorTerms:
        - matchExpressions:
          - key: topology.kubernetes.io/zone
            operator: In
            values:
            - antarctica-east1
            - antarctica-west1
  containers:
  - name: with-node-affinity
    image: registry.k8s.io/pause:3.8
Pod affinity and anti-affinity
In addition to node affinity, you can also constrain which nodes a Pod can be scheduled on based on the labels of other Pods that are already running on nodes. Pod affinity allows you to specify rules about where a Pod should be placed relative to other Pods.
apiVersion: v1
kind: Pod
metadata:
  name: with-pod-affinity
spec:
  affinity:
    podAffinity:
      requiredDuringSchedulingIgnoredDuringExecution:
      - labelSelector:
          matchExpressions:
          - key: app
            operator: In
            values:
            - database
        topologyKey: topology.kubernetes.io/zone
  containers:
  - name: with-pod-affinity
    image: registry.k8s.io/pause:3.8
Tolerations
Tolerations allow Pods to be scheduled on nodes with matching taints:
apiVersion: v1
kind: Pod
metadata:
  name: mypod
spec:
  containers:
  - name: myapp
    image: nginx
  tolerations:
  - key: "key"
    operator: "Equal"
    value: "value"
    effect: "NoSchedule"
For more information, see Assign Pods to Nodes.
Pod overhead
Pod overhead allows you to account for the resources consumed by the Pod infrastructure on top of the container requests and limits.
---
apiVersion: node.k8s.io/v1
kind: RuntimeClass
metadata:
  name: kvisor-runtime
handler: kvisor-runtime
overhead:
  podFixed:
    memory: "2Gi"
    cpu: "500m"
---
apiVersion: v1
kind: Pod
metadata:
  name: mypod
spec:
  runtimeClassName: kvisor-runtime
  containers:
  - name: myapp
    image: nginx
    resources:
      requests:
        memory: "64Mi"
        cpu: "250m"
      limits:
        memory: "128Mi"
        cpu: "500m"
What's next
- Read about Pod Priority and Preemption
- Read about RuntimeClasses
- Explore Configure a Security Context for a Pod or Container
- Learn how Kubernetes assigns Pods to Nodes
- Pod Overhead
4.2 - Workload API
FEATURE STATE:
Kubernetes v1.35 [alpha](disabled by default)The Workload API resource defines the scheduling requirements and structure of a multi-Pod
application. While workload controllers such as Job
manage the application's runtime state, the Workload specifies how groups of Pods
should be scheduled. The Job controller is the only built-in controller that creates
PodGroup objects from the Workload's
PodGroupTemplates at runtime.
What is a Workload?
The Workload API resource is part of the scheduling.k8s.io/v1alpha2
API group
and your cluster must have that API group enabled, as well as the GenericWorkload
feature gate,
before you can use this API.
A Workload is a static, long-lived policy template. It defines what scheduling
policies should be applied to groups of Pods, but does not track runtime state itself.
Runtime scheduling state is maintained by PodGroup
objects, which controllers create from the Workload's PodGroupTemplates.
API structure
A Workload consists of two fields: a list of PodGroupTemplates and an optional controller
reference. The entire Workload spec is immutable after creation: you cannot modify
existing templates, add new templates, or remove templates from podGroupTemplates.
PodGroupTemplates
The spec.podGroupTemplates list defines the distinct components of your workload.
For example, a machine learning job might have a driver template and a worker template.
Each entry in podGroupTemplates must have:
- A unique
namethat will be used to reference the template in thePodGroup'sspec.podGroupTemplateRef. - A scheduling policy (
basicorgang).
If the WorkloadAwarePreemption feature gate is enabled each entry in podGroups can also have priority and disruption mode.
The maximum number of PodGroupTemplates in a single Workload is 8.
apiVersion: scheduling.k8s.io/v1alpha2
kind: Workload
metadata:
  name: training-job-workload
  namespace: some-ns
spec:
  controllerRef:
    apiGroup: batch
    kind: Job
    name: training-job
  podGroupTemplates:
  - name: workers
    schedulingPolicy:
      gang:
        # The gang is schedulable only if 4 pods can run at once
        minCount: 4
    priorityClassName: high-priority # Only applicable with WorkloadAwarePreemption feature gate
    disruptionMode: PodGroup # Only applicable with WorkloadAwarePreemption feature gate
When a workload controller creates a PodGroup from one of these templates, it copies the
schedulingPolicy into the PodGroup's own spec. Changes to the Workload only affect
newly created PodGroups, not existing ones.
Referencing a workload controlling object
The controllerRef field links the Workload back to the specific high-level object defining the application,
such as a Job or a custom CRD. This is useful for observability and tooling.
This data is not used to schedule or manage the Workload.
Gang scheduling with Jobs
FEATURE STATE:
Kubernetes v1.36 [alpha](disabled by default)When the
WorkloadWithJob
feature gate is enabled, the
Job controller automatically
creates Workload and PodGroup objects for parallel indexed Jobs where
.spec.parallelism equals .spec.completions. The gang policy's minCount
is set to the Job's parallelism, so all Pods must be schedulable together
before any of them are bound to nodes.
This is the built-in path for using gang scheduling with Jobs. You do not need to create Workload or PodGroup objects yourself as the Job controller handles it automatically. Other workload controllers (such as JobSet) may manage their own Workload and PodGroup objects independently.
What's next
- Learn about PodGroup scheduling policies.
- See how PodGroups are created from Workloads in the PodGroup API overview.
- Read about how Pods reference their PodGroup via the scheduling group field.
- Learn about Topology-aware workload scheduling.
- Understand the gang scheduling algorithm.
4.2.1 - Pod Group Disruption and Priority
FEATURE STATE:
Kubernetes v1.36 [alpha](disabled by default)PodGroup can declare a disruption mode. This mode dictates how the scheduler can disrupt a running PodGroup, for example to accommodate a higher priority PodGroup. A PodGroup also has a priority, which overrides the priority of the individual pods from the group for workload-aware preemption events.
Disruption mode types
Note:
As of 1.36, thepriority or disruptionMode fields of the PodGroup are only respected
by workload-aware preemption.
During the pod scheduling phase, the scheduler does not take into account
the priority or disruptionMode fields of the PodGroup.The API supports two disruption modes: Pod and PodGroup.
The default one is Pod.
Pod
The Pod mode instructs the scheduler to treat all Pods in the group as separate entities,
allowing independent disruption of a single pod from a PodGroup.
PodGroup
The PodGroup mode emphasizes "all-or-nothing" semantics for disruption.
It instructs the scheduler that all pods from the PodGroup have to be disrupted together.
Pod group priority
PodGroup uses the same concept of PriorityClass as single Pods.
Once you have created one or more PriorityClasses,
you can create a PodGroup that specifies one of those PriorityClass names in its specification.
The priority admission controller uses the priorityClassName field and populates the integer value of the priority.
If the priority class is not found, the PodGroup is rejected.
When priorityClassName is not set for a PodGroup, Kubernetes looks for a default (a PriorityClass with globalDefault set true)
If there is no PriorityClass with globalDefault set true, a PodGroup with no priorityClassName has priority zero.
The priority of the PodGroup is an authoritative priority for all pods in the group during workload-aware preemption events, even when priorities of individual pods forming this PodGroup differ.
The following YAML is an example of a PodGroup configuration that uses the high-priority PriorityClass,
which maps to the integer priority value of 1000000.
The priority admission controller checks the specification and resolves the priority of the PodGroup to 1000000.
apiVersion: scheduling.k8s.io/v1alpha2
kind: PodGroup
metadata:
  namespace: ns-1
  name: job-1
spec:
  priorityClassName: high-priority
What's next
- Read about Workload-Aware Preemption algorithm.
- Learn about the Workload API.
4.2.2 - PodGroup Scheduling Policies
FEATURE STATE:
Kubernetes v1.35 [alpha](disabled by default)Every PodGroup must declare a scheduling policy
in its spec.schedulingPolicy field. This policy dictates how the scheduler treats the
collection of Pods in the group.
Policy types
The schedulingPolicy field supports two policy types: basic and gang.
You must specify exactly one.
Basic policy
The basic policy instructs the scheduler to evaluate all Pods on a best-effort basis.
Unlike the gang policy, a PodGroup using the basic policy is considered feasible
regardless of how many of its Pods are currently schedulable.
The primary reason to use the basic policy is to organize Pods into a group for better
observability and management, while still evaluating them together within a single, atomic
PodGroup scheduling cycle.
This policy is suited for groups that do not require simultaneous startup but logically belong together, or to open the way for group-level constraints that do not imply "all-or-nothing" placement.
schedulingPolicy:
  basic: {}
Gang policy
The gang policy enforces "all-or-nothing" scheduling. This is essential for tightly-coupled
workloads where partial startup results in deadlocks or wasted resources.
This can be used for Jobs or any other batch process where all workers must run concurrently to make progress.
The gang policy requires a minCount field, which is the minimum number of Pods that must be
schedulable simultaneously for the group to be feasible:
schedulingPolicy:
  gang:
    # The number of Pods that must be schedulable simultaneously
    # for the group to be admitted.
    minCount: 4
Setting policies via PodGroupTemplates
When using the Workload API, you define scheduling
policies inside PodGroupTemplates. The workload controller copies the policy from the
template into each PodGroup it creates, making the PodGroup self-contained. Changes to the
Workload's templates only affect newly created PodGroups, not existing ones.
For standalone PodGroups (created without a Workload), you set spec.schedulingPolicy
directly on the PodGroup itself.
What's next
- See the PodGroup API for how policies are carried at runtime.
- Learn about the Workload API that defines PodGroupTemplates.
- Read about PodGroup scheduling.
- Read about the gang scheduling algorithm.
4.2.3 - Topology-Aware Workload Scheduling
FEATURE STATE:
Kubernetes v1.36 [alpha](disabled by default)Topology-Aware Scheduling (TAS) is a feature of the Workload API that optimizes the placement of pods within the cluster.
TAS ensures that all pods within a PodGroup are co-located into a specific topology domain, such as a single server rack or zone. This minimizes inter-pod communication latency and prevents workload fragmentation across the cluster infrastructure.
Topology-aware scheduling with gang scheduling policy
When applied to PodGroups with gang scheduling policy, TAS simulates the potential assignment
(placement) of the full group of pods at once. It guarantees that at least the specified
minCount pods can fit together into the same topology domain before committing resources.
If no feasible placement is found, the entire PodGroup becomes unschedulable.
This is the recommended approach for workloads like distributed AI and ML training that strictly require proximity to minimize inter-pod communication latency.
If new pods are added to the PodGroup where some pods are already scheduled (for example, if pods
are recreated), the scheduler will force all new incoming pods to land on the exact same topology
domain where the existing pods currently reside. If that specific domain lacks sufficient capacity
for the new pods, the pods will remain pending - even if it means that less than minCount pods
are scheduled at this point.
Note:
As of v1.36 Topology-Aware Scheduling does not trigger workload or pod preemption. If no feasible placement can be found without triggering preemption, the PodGroup becomes unschedulable.Topology-aware scheduling with basic scheduling policy
Using TAS with basic scheduling policy may exhibit inconsistent behavior. The scheduler may only
observe a subset of pods when entering the PodGroup scheduling cycle - therefore placement
feasibility is only evaluated for the observed pods, rather than the entire PodGroup. To partially
mitigate this limitation, you can use scheduling gates to hold off PodGroup scheduling until all
pods within the PodGroup are in the scheduling queue.
If no feasible placement is found for the entire PodGroup, only a subset of pods may be scheduled, and they are guaranteed to meet the scheduling constraints.
If new pods are added to the PodGroup where some pods are already scheduled, the scheduler will act
the same as in case of gang policy - forcing the new pods into the same domain, unless there is
insufficient capacity (in which case the new pods will remain pending).
API configuration: scheduling constraints
Every PodGroup (or PodGroupTemplate) may optionally declare the schedulingConstraints field,
which is interpreted by the placement-based PodGroup scheduling algorithm.
If constraints are defined in PodGroupTemplate, they will be copied to referencing PodGroups.
As of Kubernetes v1.36, the API supports topology constraints.
Note:
As of Kubernetes v1.36, you can specify only a single topology constraint in each PodGroup.Topology constraint
To define a topology constraint for a PodGroup you need to set a key, which corresponds to
a Kubernetes node label, representing the target topology domain (for example, a rack or a zone).
The scheduler strictly enforces that all pods within the PodGroup are placed onto nodes that share
the exact same value for this specified label.
Here is an example of a PodGroup configured with a topology constraint:
apiVersion: scheduling.k8s.io/v1alpha2
kind: PodGroup
metadata:
  name: example-podgroup
spec:
  schedulingPolicy:
    gang:
      minCount: 4
  schedulingConstraints:
    topology:
      - key: topology.example.com/rack
What's next
- Learn about pod group policies.
- Learn about plugins related Topology-aware Scheduling
- Read about gang scheduling algorithm.
4.3 - Workload Management
Kubernetes provides several built-in APIs for declarative management of your workloads and the components of those workloads.
Ultimately, your applications run as containers inside Pods; however, managing individual Pods would be a lot of effort. For example, if a Pod fails, you probably want to run a new Pod to replace it. Kubernetes can do that for you.
You use the Kubernetes API to create a workload object that represents a higher abstraction level than a Pod, and then the Kubernetes control plane automatically manages Pod objects on your behalf, based on the specification for the workload object you defined.
The built-in APIs for managing workloads are:
Deployment (and, indirectly, ReplicaSet), the most common way to run an application on your cluster. Deployment is a good fit for managing a stateless application workload on your cluster, where any Pod in the Deployment is interchangeable and can be replaced if needed. (Deployments are a replacement for the legacy ReplicationController API).
A StatefulSet lets you manage one or more Pods – all running the same application code – where the Pods rely on having a distinct identity. This is different from a Deployment where the Pods are expected to be interchangeable. The most common use for a StatefulSet is to be able to make a link between its Pods and their persistent storage. For example, you can run a StatefulSet that associates each Pod with a PersistentVolume. If one of the Pods in the StatefulSet fails, Kubernetes makes a replacement Pod that is connected to the same PersistentVolume.
A DaemonSet defines Pods that provide facilities that are local to a specific node; for example, a driver that lets containers on that node access a storage system. You use a DaemonSet when the driver, or other node-level service, has to run on the node where it's useful. Each Pod in a DaemonSet performs a role similar to a system daemon on a classic Unix / POSIX server. A DaemonSet might be fundamental to the operation of your cluster, such as a plugin to let that node access cluster networking, it might help you to manage the node, or it could provide less essential facilities that enhance the container platform you are running. You can run DaemonSets (and their pods) across every node in your cluster, or across just a subset (for example, only install the GPU accelerator driver on nodes that have a GPU installed).
You can use a Job and / or a CronJob to define tasks that run to completion and then stop. A Job represents a one-off task, whereas each CronJob repeats according to a schedule.
Other topics in this section:
4.3.1 - Deployments
A Deployment manages a set of Pods to run an application workload, usually one that doesn't maintain state.
A Deployment provides declarative updates for Pods and ReplicaSets.
You describe a desired state in a Deployment, and the Deployment Controller changes the actual state to the desired state at a controlled rate. You can define Deployments to create new ReplicaSets, or to remove existing Deployments and adopt all their resources with new Deployments.
Note:
Do not manage ReplicaSets owned by a Deployment. Consider opening an issue in the main Kubernetes repository if your use case is not covered below.Use Case
The following are typical use cases for Deployments:
- Create a Deployment to rollout a ReplicaSet. The ReplicaSet creates Pods in the background. Check the status of the rollout to see if it succeeds or not.
- Declare the new state of the Pods by updating the PodTemplateSpec of the Deployment. A new ReplicaSet is created, and the Deployment gradually scales it up while scaling down the old ReplicaSet, ensuring Pods are replaced at a controlled rate. Each new ReplicaSet updates the revision of the Deployment.
- Rollback to an earlier Deployment revision if the current state of the Deployment is not stable. Each rollback updates the revision of the Deployment.
- Scale up the Deployment to facilitate more load.
- Pause the rollout of a Deployment to apply multiple fixes to its PodTemplateSpec and then resume it to start a new rollout.
- Use the status of the Deployment as an indicator that a rollout has stuck.
- Clean up older ReplicaSets that you don't need anymore.
Creating a Deployment
The following is an example of a Deployment. It creates a ReplicaSet to bring up three nginx Pods:
apiVersion: apps/v1
kind: Deployment
metadata:
  name: nginx-deployment
  labels:
    app: nginx
spec:
  replicas: 3
  selector:
    matchLabels:
      app: nginx
  template:
    metadata:
      labels:
        app: nginx
    spec:
      containers:
      - name: nginx
        image: nginx:1.14.2
        ports:
        - containerPort: 80
In this example:
A Deployment named
nginx-deploymentis created, indicated by the.metadata.namefield. This name will become the basis for the ReplicaSets and Pods which are created later. See Writing a Deployment Spec for more details.The Deployment creates a ReplicaSet that creates three replicated Pods, indicated by the
.spec.replicasfield.The
.spec.selectorfield defines how the created ReplicaSet finds which Pods to manage. In this case, you select a label that is defined in the Pod template (app: nginx). However, more sophisticated selection rules are possible, as long as the Pod template itself satisfies the rule.Note:
The.spec.selector.matchLabelsfield is a map of {key,value} pairs. A single {key,value} in thematchLabelsmap is equivalent to an element ofmatchExpressions, whosekeyfield is "key", theoperatoris "In", and thevaluesarray contains only "value". All of the requirements, from bothmatchLabelsandmatchExpressions, must be satisfied in order to match.The
.spec.templatefield contains the following sub-fields:- The Pods are labeled
app: nginxusing the.metadata.labelsfield. - The Pod template's specification, or
.specfield, indicates that the Pods run one container,nginx, which runs thenginxDocker Hub image at version 1.14.2. - Create one container and name it
nginxusing the.spec.containers[0].namefield.
- The Pods are labeled
Before you begin, make sure your Kubernetes cluster is up and running. Follow the steps given below to create the above Deployment:
Create the Deployment by running the following command:
kubectl apply -f https://k8s.io/examples/controllers/nginx-deployment.yamlRun
kubectl get deploymentsto check if the Deployment was created.If the Deployment is still being created, the output is similar to the following:
NAME               READY   UP-TO-DATE   AVAILABLE   AGE
nginx-deployment   0/3     0            0           1s
When you inspect the Deployments in your cluster, the following fields are displayed:
NAMElists the names of the Deployments in the namespace.READYdisplays how many replicas of the application are available to your users. It follows the pattern ready/desired.UP-TO-DATEdisplays the number of replicas that have been updated to achieve the desired state.AVAILABLEdisplays how many replicas of the application are available to your users.AGEdisplays the amount of time that the application has been running.
Notice how the number of desired replicas is 3 according to
.spec.replicasfield.To see the Deployment rollout status, run
kubectl rollout status deployment/nginx-deployment.The output is similar to:
Waiting for rollout to finish: 2 out of 3 new replicas have been updated...
deployment "nginx-deployment" successfully rolled out
Run the
kubectl get deploymentsagain a few seconds later. The output is similar to this:NAME READY UP-TO-DATE AVAILABLE AGE nginx-deployment 3/3 3 3 18sNotice that the Deployment has created all three replicas, and all replicas are up-to-date (they contain the latest Pod template) and available.
To see the ReplicaSet (
rs) created by the Deployment, runkubectl get rs. The output is similar to this:NAME DESIRED CURRENT READY AGE nginx-deployment-75675f5897 3 3 3 18sReplicaSet output shows the following fields:
NAMElists the names of the ReplicaSets in the namespace.DESIREDdisplays the desired number of replicas of the application, which you define when you create the Deployment. This is the desired state.CURRENTdisplays how many replicas are currently running.READYdisplays how many replicas of the application are available to your users.AGEdisplays the amount of time that the application has been running.
Notice that the name of the ReplicaSet is always formatted as
[DEPLOYMENT-NAME]-[HASH]. This name will become the basis for the Pods which are created.The
HASHstring is the same as thepod-template-hashlabel on the ReplicaSet.To see the labels automatically generated for each Pod, run
kubectl get pods --show-labels. The output is similar to:NAME READY STATUS RESTARTS AGE LABELS nginx-deployment-75675f5897-7ci7o 1/1 Running 0 18s app=nginx,pod-template-hash=75675f5897 nginx-deployment-75675f5897-kzszj 1/1 Running 0 18s app=nginx,pod-template-hash=75675f5897 nginx-deployment-75675f5897-qqcnn 1/1 Running 0 18s app=nginx,pod-template-hash=75675f5897The created ReplicaSet ensures that there are three
nginxPods.
Note:
You must specify an appropriate selector and Pod template labels in a Deployment
(in this case, app: nginx).
Do not overlap labels or selectors with other controllers (including other Deployments and StatefulSets). Kubernetes doesn't stop you from overlapping, and if multiple controllers have overlapping selectors those controllers might conflict and behave unexpectedly.
Pod-template-hash label
Caution:
Do not change this label.The pod-template-hash label is added by the Deployment controller to every ReplicaSet that a Deployment creates or adopts.
This label ensures that child ReplicaSets of a Deployment do not overlap. It is generated by hashing the PodTemplate of the ReplicaSet and using the resulting hash as the label value that is added to the ReplicaSet selector, Pod template labels,
and in any existing Pods that the ReplicaSet might have.
Updating a Deployment
Note:
A Deployment's rollout is triggered if and only if the Deployment's Pod template (that is,.spec.template)
is changed, for example if the labels or container images of the template are updated. Other updates, such as scaling the Deployment, do not trigger a rollout.Follow the steps given below to update your Deployment:
Let's update the nginx Pods to use the
nginx:1.16.1image instead of thenginx:1.14.2image.kubectl set image deployment.v1.apps/nginx-deployment nginx=nginx:1.16.1or use the following command:
kubectl set image deployment/nginx-deployment nginx=nginx:1.16.1where
deployment/nginx-deploymentindicates the Deployment,nginxindicates the Container the update will take place andnginx:1.16.1indicates the new image and its tag.The output is similar to:
deployment.apps/nginx-deployment image updatedAlternatively, you can
editthe Deployment and change.spec.template.spec.containers[0].imagefromnginx:1.14.2tonginx:1.16.1:kubectl edit deployment/nginx-deploymentThe output is similar to:
deployment.apps/nginx-deployment editedTo see the rollout status, run:
kubectl rollout status deployment/nginx-deploymentThe output is similar to this:
Waiting for rollout to finish: 2 out of 3 new replicas have been updated...or
deployment "nginx-deployment" successfully rolled out
Get more details on your updated Deployment:
After the rollout succeeds, you can view the Deployment by running
kubectl get deployments. The output is similar to this:NAME READY UP-TO-DATE AVAILABLE AGE nginx-deployment 3/3 3 3 36sRun
kubectl get rsto see that the Deployment updated the Pods by creating a new ReplicaSet and scaling it up to 3 replicas, as well as scaling down the old ReplicaSet to 0 replicas.kubectl get rsThe output is similar to this:
NAME                          DESIRED   CURRENT   READY   AGE
nginx-deployment-1564180365   3         3         3       6s
nginx-deployment-2035384211   0         0         0       36s
Running
get podsshould now show only the new Pods:kubectl get podsThe output is similar to this:
NAME                                READY     STATUS    RESTARTS   AGE
nginx-deployment-1564180365-khku8   1/1       Running   0          14s
nginx-deployment-1564180365-nacti   1/1       Running   0          14s
nginx-deployment-1564180365-z9gth   1/1       Running   0          14s
Next time you want to update these Pods, you only need to update the Deployment's Pod template again.
Deployment ensures that only a certain number of Pods are down while they are being updated. By default, it ensures that at least 75% of the desired number of Pods are up (25% max unavailable).
Deployment also ensures that only a certain number of Pods are created above the desired number of Pods. By default, it ensures that at most 125% of the desired number of Pods are up (25% max surge).
For example, if you look at the above Deployment closely, you will see that it first creates a new Pod, then deletes an old Pod, and creates another new one. It does not kill old Pods until a sufficient number of new Pods have come up, and does not create new Pods until a sufficient number of old Pods have been killed. It makes sure that at least 3 Pods are available and that at max 4 Pods in total are available. In case of a Deployment with 4 replicas, the number of Pods would be between 3 and 5.
Get details of your Deployment:
kubectl describe deploymentsThe output is similar to this:
Name:                   nginx-deployment
Namespace:              default
CreationTimestamp:      Thu, 30 Nov 2017 10:56:25 +0000
Labels:                 app=nginx
Annotations:            deployment.kubernetes.io/revision=2
Selector:               app=nginx
Replicas:               3 desired | 3 updated | 3 total | 3 available | 0 unavailable
StrategyType:           RollingUpdate
MinReadySeconds:        0
RollingUpdateStrategy:  25% max unavailable, 25% max surge
Pod Template:
  Labels:  app=nginx
   Containers:
    nginx:
      Image:        nginx:1.16.1
      Port:         80/TCP
      Environment:  <none>
      Mounts:       <none>
    Volumes:        <none>
  Conditions:
    Type           Status  Reason
    ----           ------  ------
    Available      True    MinimumReplicasAvailable
    Progressing    True    NewReplicaSetAvailable
  OldReplicaSets:  <none>
  NewReplicaSet:   nginx-deployment-1564180365 (3/3 replicas created)
  Events:
    Type    Reason             Age   From                   Message
    ----    ------             ----  ----                   -------
    Normal  ScalingReplicaSet  2m    deployment-controller  Scaled up replica set nginx-deployment-2035384211 to 3
    Normal  ScalingReplicaSet  24s   deployment-controller  Scaled up replica set nginx-deployment-1564180365 to 1
    Normal  ScalingReplicaSet  22s   deployment-controller  Scaled down replica set nginx-deployment-2035384211 to 2
    Normal  ScalingReplicaSet  22s   deployment-controller  Scaled up replica set nginx-deployment-1564180365 to 2
    Normal  ScalingReplicaSet  19s   deployment-controller  Scaled down replica set nginx-deployment-2035384211 to 1
    Normal  ScalingReplicaSet  19s   deployment-controller  Scaled up replica set nginx-deployment-1564180365 to 3
    Normal  ScalingReplicaSet  14s   deployment-controller  Scaled down replica set nginx-deployment-2035384211 to 0
Here you see that when you first created the Deployment, it created a ReplicaSet (nginx-deployment-2035384211) and scaled it up to 3 replicas directly. When you updated the Deployment, it created a new ReplicaSet (nginx-deployment-1564180365) and scaled it up to 1 and waited for it to come up. Then it scaled down the old ReplicaSet to 2 and scaled up the new ReplicaSet to 2 so that at least 3 Pods were available and at most 4 Pods were created at all times. It then continued scaling up and down the new and the old ReplicaSet, with the same rolling update strategy. Finally, you'll have 3 available replicas in the new ReplicaSet, and the old ReplicaSet is scaled down to 0.
Note:
Kubernetes doesn't count terminating Pods when calculating the number ofavailableReplicas, which must be between
replicas - maxUnavailable and replicas + maxSurge. As a result, you might notice that there are more Pods than
expected during a rollout, and that the total resources consumed by the Deployment is more than replicas + maxSurge
until the terminationGracePeriodSeconds of the terminating Pods expires.Rollover (aka multiple updates in-flight)
Each time a new Deployment is observed by the Deployment controller, a ReplicaSet is created to bring up
the desired Pods. If the Deployment is updated, the existing ReplicaSet that controls Pods whose labels
match .spec.selector but whose template does not match .spec.template is scaled down. Eventually, the new
ReplicaSet is scaled to .spec.replicas and all old ReplicaSets is scaled to 0.
If you update a Deployment while an existing rollout is in progress, the Deployment creates a new ReplicaSet as per the update and start scaling that up, and rolls over the ReplicaSet that it was scaling up previously -- it will add it to its list of old ReplicaSets and start scaling it down.
For example, suppose you create a Deployment to create 5 replicas of nginx:1.14.2,
but then update the Deployment to create 5 replicas of nginx:1.16.1, when only 3
replicas of nginx:1.14.2 had been created. In that case, the Deployment immediately starts
killing the 3 nginx:1.14.2 Pods that it had created, and starts creating
nginx:1.16.1 Pods. It does not wait for the 5 replicas of nginx:1.14.2 to be created
before changing course.
Label selector updates
It is generally discouraged to make label selector updates and it is suggested to plan your selectors up front.
A Deployment's label selector is immutable after creation;
it cannot be updated via kubectl patch, kubectl edit, kubectl apply, or tools like helm upgrade.
If you must change the selector, you have to delete the Deployment and recreate it.
By default, deleting the Deployment also deletes its running Pods, causing downtime; use
--cascade=orphan if you need those Pods to keep running while you recreate the Deployment
(see the implications below).
Exercise great caution and ensure you grasp the following implications:
- Additions: When you create a new Deployment with a narrower selector, the new Deployment must also have a suitable Pod template. If you have an existing manifest and you edit the manifest to narrow the selector, you need to edit the metadata of the Pod template inside that Deployment, adding the new labels to match, as otherwise the API server returns a validation error. This is a non-overlapping change: the new Deployment will not "see" the old Pods (which lack the new label), causing the old ReplicaSet to be orphaned and a brand-new ReplicaSet to be created.
- Value Updates: Changing the existing value in a selector key (e.g., from
v1tov2) results in the same behavior as additions (orphaning and recreation). - Removals: Removing an existing key from the Deployment selector does not require any changes in the Pod template labels. This is an overlapping change: the new, broader selector would match the old Pods. Existing ReplicaSets are not orphaned, and a new ReplicaSet is not created, but note that the removed label still exists in any existing Pods and ReplicaSets. You can clean that up by triggering a rollout for the Deployment.
Rolling Back a Deployment
Sometimes, you may want to rollback a Deployment; for example, when the Deployment is not stable, such as crash looping. By default, all of the Deployment's rollout history is kept in the system so that you can rollback anytime you want (you can change that by modifying revision history limit).
Note:
A Deployment's revision is created when a Deployment's rollout is triggered. This means that the new revision is created if and only if the Deployment's Pod template (.spec.template) is changed,
for example if you update the labels or container images of the template. Other updates, such as scaling the Deployment,
do not create a Deployment revision, so that you can facilitate simultaneous manual- or auto-scaling.
This means that when you roll back to an earlier revision, only the Deployment's Pod template part is
rolled back.Suppose that you made a typo while updating the Deployment, by putting the image name as
nginx:1.161instead ofnginx:1.16.1:kubectl set image deployment/nginx-deployment nginx=nginx:1.161The output is similar to this:
deployment.apps/nginx-deployment image updatedThe rollout gets stuck. You can verify it by checking the rollout status:
kubectl rollout status deployment/nginx-deploymentThe output is similar to this:
Waiting for rollout to finish: 1 out of 3 new replicas have been updated...Press Ctrl-C to stop the above rollout status watch. For more information on stuck rollouts, read more here.
You see that the number of old replicas (adding the replica count from
nginx-deployment-1564180365andnginx-deployment-2035384211) is 3, and the number of new replicas (fromnginx-deployment-3066724191) is 1.kubectl get rsThe output is similar to this:
NAME                          DESIRED   CURRENT   READY   AGE
nginx-deployment-1564180365   3         3         3       25s
nginx-deployment-2035384211   0         0         0       36s
nginx-deployment-3066724191   1         1         0       6s
Looking at the Pods created, you see that 1 Pod created by new ReplicaSet is stuck in an image pull loop.
kubectl get podsThe output is similar to this:
NAME                                READY     STATUS             RESTARTS   AGE
nginx-deployment-1564180365-70iae   1/1       Running            0          25s
nginx-deployment-1564180365-jbqqo   1/1       Running            0          25s
nginx-deployment-1564180365-hysrc   1/1       Running            0          25s
nginx-deployment-3066724191-08mng   0/1       ImagePullBackOff   0          6s
Note:
The Deployment controller stops the bad rollout automatically, and stops scaling up the new ReplicaSet. This depends on the rollingUpdate parameters (maxUnavailablespecifically) that you have specified. Kubernetes by default sets the value to 25%.Get the description of the Deployment:
kubectl describe deploymentThe output is similar to this:
Name:           nginx-deployment
Namespace:      default
CreationTimestamp:  Tue, 15 Mar 2016 14:48:04 -0700
Labels:         app=nginx
Selector:       app=nginx
Replicas:       3 desired | 1 updated | 4 total | 3 available | 1 unavailable
StrategyType:       RollingUpdate
MinReadySeconds:    0
RollingUpdateStrategy:  25% max unavailable, 25% max surge
Pod Template:
  Labels:  app=nginx
  Containers:
   nginx:
    Image:        nginx:1.161
    Port:         80/TCP
    Host Port:    0/TCP
    Environment:  <none>
    Mounts:       <none>
  Volumes:        <none>
Conditions:
  Type           Status  Reason
  ----           ------  ------
  Available      True    MinimumReplicasAvailable
  Progressing    True    ReplicaSetUpdated
OldReplicaSets:     nginx-deployment-1564180365 (3/3 replicas created)
NewReplicaSet:      nginx-deployment-3066724191 (1/1 replicas created)
Events:
  FirstSeen LastSeen    Count   From                    SubObjectPath   Type        Reason              Message
  --------- --------    -----   ----                    -------------   --------    ------              -------
  1m        1m          1       {deployment-controller }                Normal      ScalingReplicaSet   Scaled up replica set nginx-deployment-2035384211 to 3
  22s       22s         1       {deployment-controller }                Normal      ScalingReplicaSet   Scaled up replica set nginx-deployment-1564180365 to 1
  22s       22s         1       {deployment-controller }                Normal      ScalingReplicaSet   Scaled down replica set nginx-deployment-2035384211 to 2
  22s       22s         1       {deployment-controller }                Normal      ScalingReplicaSet   Scaled up replica set nginx-deployment-1564180365 to 2
  21s       21s         1       {deployment-controller }                Normal      ScalingReplicaSet   Scaled down replica set nginx-deployment-2035384211 to 1
  21s       21s         1       {deployment-controller }                Normal      ScalingReplicaSet   Scaled up replica set nginx-deployment-1564180365 to 3
  13s       13s         1       {deployment-controller }                Normal      ScalingReplicaSet   Scaled down replica set nginx-deployment-2035384211 to 0
  13s       13s         1       {deployment-controller }                Normal      ScalingReplicaSet   Scaled up replica set nginx-deployment-3066724191 to 1
To fix this, you need to rollback to a previous revision of Deployment that is stable.
Checking Rollout History of a Deployment
Follow the steps given below to check the rollout history:
First, check the revisions of this Deployment:
kubectl rollout history deployment/nginx-deploymentThe output is similar to this:
deployments "nginx-deployment" REVISION CHANGE-CAUSE 1 <none> 2 <none> 3 <none>CHANGE-CAUSEis copied from the Deployment annotationkubernetes.io/change-causeto its revisions upon creation. You can specify theCHANGE-CAUSEmessage by:- Annotating the Deployment with
kubectl annotate deployment/nginx-deployment kubernetes.io/change-cause="image updated to 1.16.1" - Manually editing the manifest of the resource.
- Using tooling that sets the annotation automatically.
Note:
In older versions of Kubernetes, you could use the--recordflag with kubectl commands to automatically populate theCHANGE-CAUSEfield. This flag is deprecated and will be removed in a future release.- Annotating the Deployment with
To see the details of each revision, run:
kubectl rollout history deployment/nginx-deployment --revision=2The output is similar to this:
deployments "nginx-deployment" revision 2
  Labels:       app=nginx
          pod-template-hash=1159050644
  Containers:
   nginx:
    Image:      nginx:1.16.1
    Port:       80/TCP
     QoS Tier:
        cpu:      BestEffort
        memory:   BestEffort
    Environment Variables:      <none>
  No volumes.
Rolling Back to a Previous Revision
Follow the steps given below to rollback the Deployment from the current version to the previous version, which is version 2.
Now you've decided to undo the current rollout and rollback to the previous revision:
kubectl rollout undo deployment/nginx-deploymentThe output is similar to this:
deployment.apps/nginx-deployment rolled backAlternatively, you can rollback to a specific revision by specifying it with
--to-revision:kubectl rollout undo deployment/nginx-deployment --to-revision=2The output is similar to this:
deployment.apps/nginx-deployment rolled backFor more details about rollout related commands, read
kubectl rollout.The Deployment is now rolled back to a previous stable revision. As you can see, a
DeploymentRollbackevent for rolling back to revision 2 is generated from Deployment controller.Check if the rollback was successful and the Deployment is running as expected, run:
kubectl get deployment nginx-deploymentThe output is similar to this:
NAME               READY   UP-TO-DATE   AVAILABLE   AGE
nginx-deployment   3/3     3            3           30m
Get the description of the Deployment:
kubectl describe deployment nginx-deploymentThe output is similar to this:
Name:                   nginx-deployment
Namespace:              default
CreationTimestamp:      Sun, 02 Sep 2018 18:17:55 -0500
Labels:                 app=nginx
Annotations:            deployment.kubernetes.io/revision=4
Selector:               app=nginx
Replicas:               3 desired | 3 updated | 3 total | 3 available | 0 unavailable
StrategyType:           RollingUpdate
MinReadySeconds:        0
RollingUpdateStrategy:  25% max unavailable, 25% max surge
Pod Template:
  Labels:  app=nginx
  Containers:
   nginx:
    Image:        nginx:1.16.1
    Port:         80/TCP
    Host Port:    0/TCP
    Environment:  <none>
    Mounts:       <none>
  Volumes:        <none>
Conditions:
  Type           Status  Reason
  ----           ------  ------
  Available      True    MinimumReplicasAvailable
  Progressing    True    NewReplicaSetAvailable
OldReplicaSets:  <none>
NewReplicaSet:   nginx-deployment-c4747d96c (3/3 replicas created)
Events:
  Type    Reason              Age   From                   Message
  ----    ------              ----  ----                   -------
  Normal  ScalingReplicaSet   12m   deployment-controller  Scaled up replica set nginx-deployment-75675f5897 to 3
  Normal  ScalingReplicaSet   11m   deployment-controller  Scaled up replica set nginx-deployment-c4747d96c to 1
  Normal  ScalingReplicaSet   11m   deployment-controller  Scaled down replica set nginx-deployment-75675f5897 to 2
  Normal  ScalingReplicaSet   11m   deployment-controller  Scaled up replica set nginx-deployment-c4747d96c to 2
  Normal  ScalingReplicaSet   11m   deployment-controller  Scaled down replica set nginx-deployment-75675f5897 to 1
  Normal  ScalingReplicaSet   11m   deployment-controller  Scaled up replica set nginx-deployment-c4747d96c to 3
  Normal  ScalingReplicaSet   11m   deployment-controller  Scaled down replica set nginx-deployment-75675f5897 to 0
  Normal  ScalingReplicaSet   11m   deployment-controller  Scaled up replica set nginx-deployment-595696685f to 1
  Normal  DeploymentRollback  15s   deployment-controller  Rolled back deployment "nginx-deployment" to revision 2
  Normal  ScalingReplicaSet   15s   deployment-controller  Scaled down replica set nginx-deployment-595696685f to 0
Scaling a Deployment
You can scale a Deployment by using the following command:
kubectl scale deployment/nginx-deployment --replicas=10
The output is similar to this:
deployment.apps/nginx-deployment scaled
Assuming horizontal Pod autoscaling is enabled in your cluster, you can set up an autoscaler for your Deployment and choose the minimum and maximum number of Pods you want to run based on the CPU utilization of your existing Pods.
kubectl autoscale deployment/nginx-deployment --min=10 --max=15 --cpu-percent=80%
The output is similar to this:
deployment.apps/nginx-deployment scaled
Proportional scaling
RollingUpdate Deployments support running multiple versions of an application at the same time. When you or an autoscaler scales a RollingUpdate Deployment that is in the middle of a rollout (either in progress or paused), the Deployment controller balances the additional replicas in the existing active ReplicaSets (ReplicaSets with Pods) in order to mitigate risk. This is called proportional scaling.
For example, you are running a Deployment with 10 replicas, maxSurge=3, and maxUnavailable=2.
Ensure that the 10 replicas in your Deployment are running.
kubectl get deployThe output is similar to this:
NAME                 DESIRED   CURRENT   UP-TO-DATE   AVAILABLE   AGE
nginx-deployment     10        10        10           10          50s
You update to a new image which happens to be unresolvable from inside the cluster.
kubectl set image deployment/nginx-deployment nginx=nginx:sometagThe output is similar to this:
deployment.apps/nginx-deployment image updatedThe image update starts a new rollout with ReplicaSet nginx-deployment-1989198191, but it's blocked due to the
maxUnavailablerequirement that you mentioned above. Check out the rollout status:kubectl get rsThe output is similar to this:
NAME                          DESIRED   CURRENT   READY     AGE
nginx-deployment-1989198191   5         5         0         9s
nginx-deployment-618515232    8         8         8         1m
Then a new scaling request for the Deployment comes along. The autoscaler increments the Deployment replicas to 15. The Deployment controller needs to decide where to add these new 5 replicas. If you weren't using proportional scaling, all 5 of them would be added in the new ReplicaSet. With proportional scaling, you spread the additional replicas across all ReplicaSets. Bigger proportions go to the ReplicaSets with the most replicas and lower proportions go to ReplicaSets with less replicas. Any leftovers are added to the ReplicaSet with the most replicas. ReplicaSets with zero replicas are not scaled up.
In our example above, 3 replicas are added to the old ReplicaSet and 2 replicas are added to the new ReplicaSet. The rollout process should eventually move all replicas to the new ReplicaSet, assuming the new replicas become healthy. To confirm this, run:
kubectl get deploy
The output is similar to this:
NAME                 DESIRED   CURRENT   UP-TO-DATE   AVAILABLE   AGE
nginx-deployment     15        18        7            8           7m
The rollout status confirms how the replicas were added to each ReplicaSet.
kubectl get rs
The output is similar to this:
NAME                          DESIRED   CURRENT   READY     AGE
nginx-deployment-1989198191   7         7         0         7m
nginx-deployment-618515232    11        11        11        7m
Pausing and Resuming a rollout of a Deployment
When you update a Deployment, or plan to, you can pause rollouts for that Deployment before you trigger one or more updates. When you're ready to apply those changes, you resume rollouts for the Deployment. This approach allows you to apply multiple fixes in between pausing and resuming without triggering unnecessary rollouts.
For example, with a Deployment that was created:
Get the Deployment details:
kubectl get deployThe output is similar to this:
NAME      DESIRED   CURRENT   UP-TO-DATE   AVAILABLE   AGE
nginx     3         3         3            3           1m
Get the rollout status:
kubectl get rsThe output is similar to this:
NAME               DESIRED   CURRENT   READY     AGE
nginx-2142116321   3         3         3         1m
Pause by running the following command:
kubectl rollout pause deployment/nginx-deploymentThe output is similar to this:
deployment.apps/nginx-deployment pausedThen update the image of the Deployment:
kubectl set image deployment/nginx-deployment nginx=nginx:1.16.1The output is similar to this:
deployment.apps/nginx-deployment image updatedNotice that no new rollout started:
kubectl rollout history deployment/nginx-deploymentThe output is similar to this:
deployments "nginx"
REVISION  CHANGE-CAUSE
1   <none>
Get the rollout status to verify that the existing ReplicaSet has not changed:
kubectl get rsThe output is similar to this:
NAME               DESIRED   CURRENT   READY     AGE
nginx-2142116321   3         3         3         2m
You can make as many updates as you wish, for example, update the resources that will be used:
kubectl set resources deployment/nginx-deployment -c=nginx --limits=cpu=200m,memory=512MiThe output is similar to this:
deployment.apps/nginx-deployment resource requirements updatedThe initial state of the Deployment prior to pausing its rollout will continue its function, but new updates to the Deployment will not have any effect as long as the Deployment rollout is paused.
Eventually, resume the Deployment rollout and observe a new ReplicaSet coming up with all the new updates:
kubectl rollout resume deployment/nginx-deploymentThe output is similar to this:
deployment.apps/nginx-deployment resumedWatch the status of the rollout until it's done.
kubectl get rs --watchThe output is similar to this:
NAME               DESIRED   CURRENT   READY     AGE
nginx-2142116321   2         2         2         2m
nginx-3926361531   2         2         0         6s
nginx-3926361531   2         2         1         18s
nginx-2142116321   1         2         2         2m
nginx-2142116321   1         2         2         2m
nginx-3926361531   3         2         1         18s
nginx-3926361531   3         2         1         18s
nginx-2142116321   1         1         1         2m
nginx-3926361531   3         3         1         18s
nginx-3926361531   3         3         2         19s
nginx-2142116321   0         1         1         2m
nginx-2142116321   0         1         1         2m
nginx-2142116321   0         0         0         2m
nginx-3926361531   3         3         3         20s
Get the status of the latest rollout:
kubectl get rsThe output is similar to this:
NAME               DESIRED   CURRENT   READY     AGE
nginx-2142116321   0         0         0         2m
nginx-3926361531   3         3         3         28s
Note:
You cannot rollback a paused Deployment until you resume it.Deployment status
A Deployment enters various states during its lifecycle. It can be progressing while rolling out a new ReplicaSet, it can be complete, or it can fail to progress.
Progressing Deployment
Kubernetes marks a Deployment as progressing when one of the following tasks is performed:
- The Deployment creates a new ReplicaSet.
- The Deployment is scaling up its newest ReplicaSet.
- The Deployment is scaling down its older ReplicaSet(s).
- New Pods become ready or available (ready for at least MinReadySeconds).
When the rollout becomes “progressing”, the Deployment controller adds a condition with the following
attributes to the Deployment's .status.conditions:
type: Progressingstatus: "True"reason: NewReplicaSetCreated|reason: FoundNewReplicaSet|reason: ReplicaSetUpdated
You can monitor the progress for a Deployment by using kubectl rollout status.
Complete Deployment
Kubernetes marks a Deployment as complete when it has the following characteristics:
- All of the replicas associated with the Deployment have been updated to the latest version you've specified, meaning any updates you've requested have been completed.
- All of the replicas associated with the Deployment are available.
- No old replicas for the Deployment are running.
When the rollout becomes “complete”, the Deployment controller sets a condition with the following
attributes to the Deployment's .status.conditions:
type: Progressingstatus: "True"reason: NewReplicaSetAvailable
This Progressing condition will retain a status value of "True" until a new rollout
is initiated. The condition holds even when availability of replicas changes (which
does instead affect the Available condition).
You can check if a Deployment has completed by using kubectl rollout status. If the rollout completed
successfully, kubectl rollout status returns a zero exit code.
kubectl rollout status deployment/nginx-deployment
The output is similar to this:
Waiting for rollout to finish: 2 of 3 updated replicas are available...
deployment "nginx-deployment" successfully rolled out
and the exit status from kubectl rollout is 0 (success):
echo $?
0
Failed Deployment
Your Deployment may get stuck trying to deploy its newest ReplicaSet without ever completing. This can occur due to some of the following factors:
- Insufficient quota
- Readiness probe failures
- Image pull errors
- Insufficient permissions
- Limit ranges
- Application runtime misconfiguration
One way you can detect this condition is to specify a deadline parameter in your Deployment spec:
(.spec.progressDeadlineSeconds). .spec.progressDeadlineSeconds denotes the
number of seconds the Deployment controller waits before indicating (in the Deployment status) that the
Deployment progress has stalled.
The following kubectl command sets the spec with progressDeadlineSeconds to make the controller report
lack of progress of a rollout for a Deployment after 10 minutes:
kubectl patch deployment/nginx-deployment -p '{"spec":{"progressDeadlineSeconds":600}}'
The output is similar to this:
deployment.apps/nginx-deployment patched
Once the deadline has been exceeded, the Deployment controller adds a DeploymentCondition with the following
attributes to the Deployment's .status.conditions:
type: Progressingstatus: "False"reason: ProgressDeadlineExceeded
This condition can also fail early and is then set to status value of "False" due to reasons as ReplicaSetCreateError.
Also, the deadline is not taken into account anymore once the Deployment rollout completes.
See the Kubernetes API conventions for more information on status conditions.
Note:
Kubernetes takes no action on a stalled Deployment other than to report a status condition withreason: ProgressDeadlineExceeded. Higher level orchestrators can take advantage of it and act accordingly, for
example, rollback the Deployment to its previous version.Note:
If you pause a Deployment rollout, Kubernetes does not check progress against your specified deadline. You can safely pause a Deployment rollout in the middle of a rollout and resume without triggering the condition for exceeding the deadline.You may experience transient errors with your Deployments, either due to a low timeout that you have set or due to any other kind of error that can be treated as transient. For example, let's suppose you have insufficient quota. If you describe the Deployment you will notice the following section:
kubectl describe deployment nginx-deployment
The output is similar to this:
<...>
Conditions:
  Type            Status  Reason
  ----            ------  ------
  Available       True    MinimumReplicasAvailable
  Progressing     True    ReplicaSetUpdated
  ReplicaFailure  True    FailedCreate
<...>
If you run kubectl get deployment nginx-deployment -o yaml, the Deployment status is similar to this:
status:
  availableReplicas: 2
  conditions:
  - lastTransitionTime: 2016-10-04T12:25:39Z
    lastUpdateTime: 2016-10-04T12:25:39Z
    message: Replica set "nginx-deployment-4262182780" is progressing.
    reason: ReplicaSetUpdated
    status: "True"
    type: Progressing
  - lastTransitionTime: 2016-10-04T12:25:42Z
    lastUpdateTime: 2016-10-04T12:25:42Z
    message: Deployment has minimum availability.
    reason: MinimumReplicasAvailable
    status: "True"
    type: Available
  - lastTransitionTime: 2016-10-04T12:25:39Z
    lastUpdateTime: 2016-10-04T12:25:39Z
    message: 'Error creating: pods "nginx-deployment-4262182780-" is forbidden: exceeded quota:
      object-counts, requested: pods=1, used: pods=3, limited: pods=2'
    reason: FailedCreate
    status: "True"
    type: ReplicaFailure
  observedGeneration: 3
  replicas: 2
  unavailableReplicas: 2
Eventually, once the Deployment progress deadline is exceeded, Kubernetes updates the status and the reason for the Progressing condition:
Conditions:
  Type            Status  Reason
  ----            ------  ------
  Available       True    MinimumReplicasAvailable
  Progressing     False   ProgressDeadlineExceeded
  ReplicaFailure  True    FailedCreate
You can address an issue of insufficient quota by scaling down your Deployment, by scaling down other
controllers you may be running, or by increasing quota in your namespace. If you satisfy the quota
conditions and the Deployment controller then completes the Deployment rollout, you'll see the
Deployment's status update with a successful condition (status: "True" and reason: NewReplicaSetAvailable).
Conditions:
  Type          Status  Reason
  ----          ------  ------
  Available     True    MinimumReplicasAvailable
  Progressing   True    NewReplicaSetAvailable
type: Available with status: "True" means that your Deployment has minimum availability. Minimum availability is dictated
by the parameters specified in the deployment strategy. type: Progressing with status: "True" means that your Deployment
is either in the middle of a rollout and it is progressing or that it has successfully completed its progress and the minimum
required new replicas are available (see the Reason of the condition for the particulars - in our case
reason: NewReplicaSetAvailable means that the Deployment is complete).
You can check if a Deployment has failed to progress by using kubectl rollout status. kubectl rollout status
returns a non-zero exit code if the Deployment has exceeded the progression deadline.
kubectl rollout status deployment/nginx-deployment
The output is similar to this:
Waiting for rollout to finish: 2 out of 3 new replicas have been updated...
error: deployment "nginx" exceeded its progress deadline
and the exit status from kubectl rollout is 1 (indicating an error):
echo $?
1
Operating on a failed deployment
All actions that apply to a complete Deployment also apply to a failed Deployment. You can scale it up/down, roll back to a previous revision, or even pause it if you need to apply multiple tweaks in the Deployment Pod template.
Clean up Policy
You can set .spec.revisionHistoryLimit field in a Deployment to specify how many old ReplicaSets for
this Deployment you want to retain. The rest will be garbage-collected in the background. By default,
it is 10.
Note:
Explicitly setting this field to 0, will result in cleaning up all the history of your Deployment thus that Deployment will not be able to roll back.The cleanup only starts after a Deployment reaches a
complete state.
If you set .spec.revisionHistoryLimit to 0, any rollout nonetheless triggers creation of a new
ReplicaSet before Kubernetes removes the old one.
Even with a non-zero revision history limit, you can have more ReplicaSets than the limit
you configure. For example, if pods are crash looping, and there are multiple rolling updates
events triggered over time, you might end up with more ReplicaSets than the
.spec.revisionHistoryLimit because the Deployment never reaches a complete state.
Canary Deployment
If you want to roll out releases to a subset of users or servers using the Deployment, you can create multiple Deployments, one for each release, following the canary pattern described in managing resources.
Writing a Deployment Spec
As with all other Kubernetes configs, a Deployment needs .apiVersion, .kind, and .metadata fields.
For general information about working with config files, see
deploying applications,
configuring containers, and using kubectl to manage resources documents.
When the control plane creates new Pods for a Deployment, the .metadata.name of the
Deployment is part of the basis for naming those Pods. The name of a Deployment must be a valid
DNS subdomain
value, but this can produce unexpected results for the Pod hostnames. For best compatibility,
the name should follow the more restrictive rules for a
DNS label.
A Deployment also needs a .spec section.
Pod Template
The .spec.template and .spec.selector are the only required fields of the .spec.
The .spec.template is a Pod template. It has exactly the same schema as a Pod, except it is nested and does not have an apiVersion or kind.
In addition to required fields for a Pod, a Pod template in a Deployment must specify appropriate labels and an appropriate restart policy. For labels, make sure not to overlap with other controllers. See selector.
Only a .spec.template.spec.restartPolicy equal to Always is
allowed, which is the default if not specified.
Replicas
.spec.replicas is an optional field that specifies the number of desired Pods. It defaults to 1.
Should you manually scale a Deployment, example via kubectl scale deployment deployment --replicas=X, and then you update that Deployment based on a manifest
(for example: by running kubectl apply -f deployment.yaml),
then applying that manifest overwrites the manual scaling that you previously did.
If a HorizontalPodAutoscaler (or any
similar API for horizontal scaling) is managing scaling for a Deployment, don't set .spec.replicas.
Instead, allow the Kubernetes
control plane to manage the
.spec.replicas field automatically.
Selector
.spec.selector is a required field that specifies a label selector
for the Pods targeted by this Deployment.
.spec.selector must match .spec.template.metadata.labels, or it will be rejected by the API.
In API version apps/v1, .spec.selector and .metadata.labels do not default to .spec.template.metadata.labels if not set. So they must be set explicitly. Also note that .spec.selector is immutable after creation of the Deployment in apps/v1.
A Deployment may terminate Pods whose labels match the selector if their template is different
from .spec.template or if the total number of such Pods exceeds .spec.replicas. It brings up new
Pods with .spec.template if the number of Pods is less than the desired number.
Note:
You should not create other Pods whose labels match this selector, either directly, by creating another Deployment, or by creating another controller such as a ReplicaSet or a ReplicationController. If you do so, the first Deployment thinks that it created these other Pods. Kubernetes does not stop you from doing this.If you have multiple controllers that have overlapping selectors, the controllers will fight with each other and won't behave correctly.
Strategy
.spec.strategy specifies the strategy used to replace old Pods by new ones.
.spec.strategy.type can be "Recreate" or "RollingUpdate". "RollingUpdate" is
the default value.
Recreate Deployment
All existing Pods are killed before new ones are created when .spec.strategy.type==Recreate.
Note:
This will only guarantee Pod termination previous to creation for upgrades. If you upgrade a Deployment, all Pods of the old revision will be terminated immediately. Successful removal is awaited before any Pod of the new revision is created. If you manually delete a Pod, the lifecycle is controlled by the ReplicaSet and the replacement will be created immediately (even if the old Pod is still in a Terminating state). If you need an "at most" guarantee for your Pods, you should consider using a StatefulSet.Rolling Update Deployment
The Deployment updates Pods in a rolling update
fashion (gradually scale down the old ReplicaSets and scale up the new one) when .spec.strategy.type==RollingUpdate. You can specify maxUnavailable and maxSurge to control
the rolling update process.
Max Unavailable
.spec.strategy.rollingUpdate.maxUnavailable is an optional field that specifies the maximum number
of Pods that can be unavailable during the update process. The value can be an absolute number (for example, 5)
or a percentage of desired Pods (for example, 10%). The absolute number is calculated from percentage by
rounding down. The value cannot be 0 if .spec.strategy.rollingUpdate.maxSurge is 0. The default value is 25%.
For example, when this value is set to 30%, the old ReplicaSet can be scaled down to 70% of desired Pods immediately when the rolling update starts. Once new Pods are ready, old ReplicaSet can be scaled down further, followed by scaling up the new ReplicaSet, ensuring that the total number of Pods available at all times during the update is at least 70% of the desired Pods.
Max Surge
.spec.strategy.rollingUpdate.maxSurge is an optional field that specifies the maximum number of Pods
that can be created over the desired number of Pods. The value can be an absolute number (for example, 5) or a
percentage of desired Pods (for example, 10%). The value cannot be 0 if maxUnavailable is 0. The absolute number
is calculated from the percentage by rounding up. The default value is 25%.
For example, when this value is set to 30%, the new ReplicaSet can be scaled up immediately when the rolling update starts, such that the total number of old and new Pods does not exceed 130% of desired Pods. Once old Pods have been killed, the new ReplicaSet can be scaled up further, ensuring that the total number of Pods running at any time during the update is at most 130% of desired Pods.
Here are some Rolling Update Deployment examples that use the maxUnavailable and maxSurge:
apiVersion: apps/v1
kind: Deployment
metadata:
 name: nginx-deployment
 labels:
   app: nginx
spec:
 replicas: 3
 selector:
   matchLabels:
     app: nginx
 template:
   metadata:
     labels:
       app: nginx
   spec:
     containers:
     - name: nginx
       image: nginx:1.14.2
       ports:
       - containerPort: 80
 strategy:
   type: RollingUpdate
   rollingUpdate:
     maxUnavailable: 1
apiVersion: apps/v1
kind: Deployment
metadata:
 name: nginx-deployment
 labels:
   app: nginx
spec:
 replicas: 3
 selector:
   matchLabels:
     app: nginx
 template:
   metadata:
     labels:
       app: nginx
   spec:
     containers:
     - name: nginx
       image: nginx:1.14.2
       ports:
       - containerPort: 80
 strategy:
   type: RollingUpdate
   rollingUpdate:
     maxSurge: 1
     maxUnavailable: 1
Progress Deadline Seconds
.spec.progressDeadlineSeconds is an optional field that specifies the number of seconds you want
to wait for your Deployment to progress before the system reports back that the Deployment has
failed progressing - surfaced as a condition with type: Progressing, status: "False".
and reason: ProgressDeadlineExceeded in the status of the resource. The Deployment controller will keep
retrying the Deployment. This defaults to 600.
If specified, this field needs to be greater than .spec.minReadySeconds.
Min Ready Seconds
.spec.minReadySeconds is an optional field that specifies the minimum number of seconds for which a newly
created Pod should be ready without any of its containers crashing, for it to be considered available.
This defaults to 0 (the Pod will be considered available as soon as it is ready). To learn more about when
a Pod is considered ready, see Container Probes.
Terminating Pods
FEATURE STATE:
Kubernetes v1.35 [beta](enabled by default)You can see the terminating pods only if the DeploymentReplicaSetTerminatingReplicas
feature gate is enabled
on the API server
and on the kube-controller-manager
Pods that become terminating due to deletion or scale down may take a long time to terminate, and may consume
additional resources during that period. As a result, the total number of all pods can temporarily exceed
.spec.replicas. Terminating pods can be tracked using the .status.terminatingReplicas field of the Deployment.
Revision History Limit
A Deployment's revision history is stored in the ReplicaSets it controls.
.spec.revisionHistoryLimit is an optional field that specifies the number of old ReplicaSets to retain
to allow rollback. These old ReplicaSets consume resources in etcd and crowd the output of kubectl get rs. The configuration of each Deployment revision is stored in its ReplicaSets; therefore, once an old ReplicaSet is deleted, you lose the ability to rollback to that revision of Deployment. By default, 10 old ReplicaSets will be kept, however its ideal value depends on the frequency and stability of new Deployments.
More specifically, setting this field to zero means that all old ReplicaSets with 0 replicas will be cleaned up. In this case, a new Deployment rollout cannot be undone, since its revision history is cleaned up.
Paused
.spec.paused is an optional boolean field for pausing and resuming a Deployment. The only difference between
a paused Deployment and one that is not paused, is that any changes into the PodTemplateSpec of the paused
Deployment will not trigger new rollouts as long as it is paused. A Deployment is not paused by default when
it is created.
What's next
- Learn more about Pods.
- Run a stateless application using a Deployment.
- Read the Deployment to understand the Deployment API.
- Read about PodDisruptionBudget and how you can use it to manage application availability during disruptions.
- Use kubectl to create a Deployment.
4.3.2 - ReplicaSet
A ReplicaSet's purpose is to maintain a stable set of replica Pods running at any given time. Usually, you define a Deployment and let that Deployment manage ReplicaSets automatically.
A ReplicaSet's purpose is to maintain a stable set of replica Pods running at any given time. As such, it is often used to guarantee the availability of a specified number of identical Pods.
How a ReplicaSet works
A ReplicaSet is defined with fields, including a selector that specifies how to identify Pods it can acquire, a number of replicas indicating how many Pods it should be maintaining, and a pod template specifying the data of new Pods it should create to meet the number of replicas criteria. A ReplicaSet then fulfills its purpose by creating and deleting Pods as needed to reach the desired number. When a ReplicaSet needs to create new Pods, it uses its Pod template.
A ReplicaSet is linked to its Pods via the Pods' metadata.ownerReferences field, which specifies what resource the current object is owned by. All Pods acquired by a ReplicaSet have their owning ReplicaSet's identifying information within their ownerReferences field. It's through this link that the ReplicaSet knows of the state of the Pods it is maintaining and plans accordingly.
A ReplicaSet identifies new Pods to acquire by using its selector. If there is a Pod that has no OwnerReference or the OwnerReference is not a Controller and it matches a ReplicaSet's selector, it will be immediately acquired by said ReplicaSet.
When to use a ReplicaSet
A ReplicaSet ensures that a specified number of pod replicas are running at any given time. However, a Deployment is a higher-level concept that manages ReplicaSets and provides declarative updates to Pods along with a lot of other useful features. Therefore, we recommend using Deployments instead of directly using ReplicaSets, unless you require custom update orchestration or don't require updates at all.
This actually means that you may never need to manipulate ReplicaSet objects: use a Deployment instead, and define your application in the spec section.
Example
apiVersion: apps/v1
kind: ReplicaSet
metadata:
  name: frontend
  labels:
    app: guestbook
    tier: frontend
spec:
  # modify replicas according to your case
  replicas: 3
  selector:
    matchLabels:
      tier: frontend
  template:
    metadata:
      labels:
        tier: frontend
    spec:
      containers:
      - name: php-redis
        image: us-docker.pkg.dev/google-samples/containers/gke/gb-frontend:v5
Saving this manifest into frontend.yaml and submitting it to a Kubernetes cluster will
create the defined ReplicaSet and the Pods that it manages.
kubectl apply -f https://kubernetes.io/examples/controllers/frontend.yaml
You can then get the current ReplicaSets deployed:
kubectl get rs
And see the frontend one you created:
NAME       DESIRED   CURRENT   READY   AGE
frontend   3         3         3       6s
You can also check on the state of the ReplicaSet:
kubectl describe rs/frontend
And you will see output similar to:
Name:         frontend
Namespace:    default
Selector:     tier=frontend
Labels:       app=guestbook
              tier=frontend
Annotations:  <none>
Replicas:     3 current / 3 desired
Pods Status:  3 Running / 0 Waiting / 0 Succeeded / 0 Failed
Pod Template:
  Labels:  tier=frontend
  Containers:
   php-redis:
    Image:        us-docker.pkg.dev/google-samples/containers/gke/gb-frontend:v5
    Port:         <none>
    Host Port:    <none>
    Environment:  <none>
    Mounts:       <none>
  Volumes:        <none>
Events:
  Type    Reason            Age   From                   Message
  ----    ------            ----  ----                   -------
  Normal  SuccessfulCreate  13s   replicaset-controller  Created pod: frontend-gbgfx
  Normal  SuccessfulCreate  13s   replicaset-controller  Created pod: frontend-rwz57
  Normal  SuccessfulCreate  13s   replicaset-controller  Created pod: frontend-wkl7w
And lastly you can check for the Pods brought up:
kubectl get pods
You should see Pod information similar to:
NAME             READY   STATUS    RESTARTS   AGE
frontend-gbgfx   1/1     Running   0          10m
frontend-rwz57   1/1     Running   0          10m
frontend-wkl7w   1/1     Running   0          10m
You can also verify that the owner reference of these pods is set to the frontend ReplicaSet. To do this, get the yaml of one of the Pods running:
kubectl get pods frontend-gbgfx -o yaml
The output will look similar to this, with the frontend ReplicaSet's info set in the metadata's ownerReferences field:
apiVersion: v1
kind: Pod
metadata:
  creationTimestamp: "2024-02-28T22:30:44Z"
  generateName: frontend-
  labels:
    tier: frontend
  name: frontend-gbgfx
  namespace: default
  ownerReferences:
  - apiVersion: apps/v1
    blockOwnerDeletion: true
    controller: true
    kind: ReplicaSet
    name: frontend
    uid: e129deca-f864-481b-bb16-b27abfd92292
...
Non-Template Pod acquisitions
While you can create bare Pods with no problems, it is strongly recommended to make sure that the bare Pods do not have labels which match the selector of one of your ReplicaSets. The reason for this is because a ReplicaSet is not limited to owning Pods specified by its template-- it can acquire other Pods in the manner specified in the previous sections.
Take the previous frontend ReplicaSet example, and the Pods specified in the following manifest:
apiVersion: v1
kind: Pod
metadata:
  name: pod1
  labels:
    tier: frontend
spec:
  containers:
  - name: hello1
    image: gcr.io/google-samples/hello-app:2.0

---

apiVersion: v1
kind: Pod
metadata:
  name: pod2
  labels:
    tier: frontend
spec:
  containers:
  - name: hello2
    image: gcr.io/google-samples/hello-app:1.0
As those Pods do not have a Controller (or any object) as their owner reference and match the selector of the frontend ReplicaSet, they will immediately be acquired by it.
Suppose you create the Pods after the frontend ReplicaSet has been deployed and has set up its initial Pod replicas to fulfill its replica count requirement:
kubectl apply -f https://kubernetes.io/examples/pods/pod-rs.yaml
The new Pods will be acquired by the ReplicaSet, and then immediately terminated as the ReplicaSet would be over its desired count.
Fetching the Pods:
kubectl get pods
The output shows that the new Pods are either already terminated, or in the process of being terminated:
NAME             READY   STATUS        RESTARTS   AGE
frontend-b2zdv   1/1     Running       0          10m
frontend-vcmts   1/1     Running       0          10m
frontend-wtsmm   1/1     Running       0          10m
pod1             0/1     Terminating   0          1s
pod2             0/1     Terminating   0          1s
If you create the Pods first:
kubectl apply -f https://kubernetes.io/examples/pods/pod-rs.yaml
And then create the ReplicaSet however:
kubectl apply -f https://kubernetes.io/examples/controllers/frontend.yaml
You shall see that the ReplicaSet has acquired the Pods and has only created new ones according to its spec until the number of its new Pods and the original matches its desired count. As fetching the Pods:
kubectl get pods
Will reveal in its output:
NAME             READY   STATUS    RESTARTS   AGE
frontend-hmmj2   1/1     Running   0          9s
pod1             1/1     Running   0          36s
pod2             1/1     Running   0          36s
In this manner, a ReplicaSet can own a non-homogeneous set of Pods
Writing a ReplicaSet manifest
As with all other Kubernetes API objects, a ReplicaSet needs the apiVersion, kind, and metadata fields.
For ReplicaSets, the kind is always a ReplicaSet.
When the control plane creates new Pods for a ReplicaSet, the .metadata.name of the
ReplicaSet is part of the basis for naming those Pods. The name of a ReplicaSet must be a valid
DNS subdomain
value, but this can produce unexpected results for the Pod hostnames. For best compatibility,
the name should follow the more restrictive rules for a
DNS label.
A ReplicaSet also needs a .spec section.
Pod Template
The .spec.template is a pod template which is also
required to have labels in place. In our frontend.yaml example we had one label: tier: frontend.
Be careful not to overlap with the selectors of other controllers, lest they try to adopt this Pod.
For the template's restart policy field,
.spec.template.spec.restartPolicy, the only allowed value is Always, which is the default.
Pod Selector
The .spec.selector field is a label selector. As discussed
earlier these are the labels used to identify potential Pods to acquire. In our
frontend.yaml example, the selector was:
matchLabels:
  tier: frontend
In the ReplicaSet, .spec.template.metadata.labels must match spec.selector, or it will
be rejected by the API.
Note:
For 2 ReplicaSets specifying the same.spec.selector but different
.spec.template.metadata.labels and .spec.template.spec fields, each ReplicaSet ignores the
Pods created by the other ReplicaSet.Replicas
You can specify how many Pods should run concurrently by setting .spec.replicas. The ReplicaSet will create/delete
its Pods to match this number.
If you do not specify .spec.replicas, then it defaults to 1.
Working with ReplicaSets
Deleting a ReplicaSet and its Pods
To delete a ReplicaSet and all of its Pods, use
kubectl delete. The
Garbage collector automatically deletes all of
the dependent Pods by default.
When using the REST API or the client-go library, you must set propagationPolicy to
Background or Foreground in the -d option. For example:
kubectl proxy --port=8080
curl -X DELETE  'localhost:8080/apis/apps/v1/namespaces/default/replicasets/frontend' \
  -d '{"kind":"DeleteOptions","apiVersion":"v1","propagationPolicy":"Foreground"}' \
  -H "Content-Type: application/json"
Deleting just a ReplicaSet
You can delete a ReplicaSet without affecting any of its Pods using
kubectl delete
with the --cascade=orphan option.
When using the REST API or the client-go library, you must set propagationPolicy to Orphan.
For example:
kubectl proxy --port=8080
curl -X DELETE  'localhost:8080/apis/apps/v1/namespaces/default/replicasets/frontend' \
  -d '{"kind":"DeleteOptions","apiVersion":"v1","propagationPolicy":"Orphan"}' \
  -H "Content-Type: application/json"
Once the original is deleted, you can create a new ReplicaSet to replace it. As long
as the old and new .spec.selector are the same, then the new one will adopt the old Pods.
However, it will not make any effort to make existing Pods match a new, different pod template.
To update Pods to a new spec in a controlled way, use a
Deployment, as
ReplicaSets do not support a rolling update directly.
Terminating Pods
FEATURE STATE:
Kubernetes v1.35 [beta](enabled by default)You can enable this feature by setting the DeploymentReplicaSetTerminatingReplicas
feature gate
on the API server
and on the kube-controller-manager
Pods that become terminating due to deletion or scale down may take a long time to terminate, and may consume
additional resources during that period. As a result, the total number of all pods can temporarily exceed
.spec.replicas. Terminating pods can be tracked using the .status.terminatingReplicas field of the ReplicaSet.
Isolating Pods from a ReplicaSet
You can remove Pods from a ReplicaSet by changing their labels. This technique may be used to remove Pods from service for debugging, data recovery, etc. Pods that are removed in this way will be replaced automatically ( assuming that the number of replicas is not also changed).
Scaling a ReplicaSet
A ReplicaSet can be easily scaled up or down by simply updating the .spec.replicas field. The ReplicaSet controller
ensures that a desired number of Pods with a matching label selector are available and operational.
When scaling down, the ReplicaSet controller chooses which pods to delete by sorting the available pods to prioritize scaling down pods based on the following general algorithm:
- Pending (and unschedulable) pods are scaled down first
- If
controller.kubernetes.io/pod-deletion-costannotation is set, then the pod with the lower value will come first. - Pods on nodes with more replicas come before pods on nodes with fewer replicas.
- If the pods' creation times differ, the pod that was created more recently comes before the older pod (the creation times are bucketed on an integer log scale).
If all of the above match, then selection is random.
Pod deletion cost
FEATURE STATE:
Kubernetes v1.22 [beta]Using the controller.kubernetes.io/pod-deletion-cost
annotation, users can set a preference regarding which pods to remove first when downscaling a ReplicaSet.
The annotation should be set on the pod, the range is [-2147483648, 2147483647]. It represents the cost of deleting a pod compared to other pods belonging to the same ReplicaSet. Pods with lower deletion cost are preferred to be deleted before pods with higher deletion cost.
The implicit value for this annotation for pods that don't set it is 0; negative values are permitted. Invalid values will be rejected by the API server.
This feature is beta and enabled by default. You can disable it using the
feature gate
PodDeletionCost in both kube-apiserver and kube-controller-manager.
Note:
- This is honored on a best-effort basis, so it does not offer any guarantees on pod deletion order.
- Users should avoid updating the annotation frequently, such as updating it based on a metric value, because doing so will generate a significant number of pod updates on the apiserver.
Example Use Case
The different pods of an application could have different utilization levels. On scale down, the application
may prefer to remove the pods with lower utilization. To avoid frequently updating the pods, the application
should update controller.kubernetes.io/pod-deletion-cost once before issuing a scale down (setting the
annotation to a value proportional to pod utilization level). This works if the application itself controls
the down scaling; for example, the driver pod of a Spark deployment.
ReplicaSet as a Horizontal Pod Autoscaler Target
A ReplicaSet can also be a target for Horizontal Pod Autoscalers (HPA). That is, a ReplicaSet can be auto-scaled by an HPA. Here is an example HPA targeting the ReplicaSet we created in the previous example.
apiVersion: autoscaling/v1
kind: HorizontalPodAutoscaler
metadata:
  name: frontend-scaler
spec:
  scaleTargetRef:
    apiVersion: apps/v1
    kind: ReplicaSet
    name: frontend
  minReplicas: 3
  maxReplicas: 10
  targetCPUUtilizationPercentage: 50
Saving this manifest into hpa-rs.yaml and submitting it to a Kubernetes cluster should
create the defined HPA that autoscales the target ReplicaSet depending on the CPU usage
of the replicated Pods.
kubectl apply -f https://k8s.io/examples/controllers/hpa-rs.yaml
Alternatively, you can use the kubectl autoscale command to accomplish the same
(and it's easier!)
kubectl autoscale rs frontend --max=10 --min=3 --cpu=50%
Alternatives to ReplicaSet
Deployment (recommended)
Deployment is an object which can own ReplicaSets and update
them and their Pods via declarative, server-side rolling updates.
While ReplicaSets can be used independently, today they're mainly used by Deployments as a mechanism to orchestrate Pod
creation, deletion and updates. When you use Deployments you don't have to worry about managing the ReplicaSets that
they create. Deployments own and manage their ReplicaSets.
As such, it is recommended to use Deployments when you want ReplicaSets.
Bare Pods
Unlike the case where a user directly created Pods, a ReplicaSet replaces Pods that are deleted or terminated for any reason, such as in the case of node failure or disruptive node maintenance, such as a kernel upgrade. For this reason, we recommend that you use a ReplicaSet even if your application requires only a single Pod. Think of it similarly to a process supervisor, only it supervises multiple Pods across multiple nodes instead of individual processes on a single node. A ReplicaSet delegates local container restarts to some agent on the node such as Kubelet.
Job
Use a Job instead of a ReplicaSet for Pods that are
expected to terminate on their own (that is, batch jobs).
DaemonSet
Use a DaemonSet instead of a ReplicaSet for Pods that provide a
machine-level function, such as machine monitoring or machine logging. These Pods have a lifetime that is tied
to a machine lifetime: the Pod needs to be running on the machine before other Pods start, and are
safe to terminate when the machine is otherwise ready to be rebooted/shutdown.
ReplicationController
ReplicaSets are the successors to ReplicationControllers. The two serve the same purpose, and behave similarly, except that a ReplicationController does not support set-based selector requirements as described in the labels user guide. As such, ReplicaSets are preferred over ReplicationControllers
What's next
- Learn about Pods.
- Learn about Deployments.
- Run a Stateless Application Using a Deployment, which relies on ReplicaSets to work.
ReplicaSetis a top-level resource in the Kubernetes REST API. Read the ReplicaSet object definition to understand the API for replica sets.- Read about PodDisruptionBudget and how you can use it to manage application availability during disruptions.
4.3.3 - StatefulSets
A StatefulSet runs a group of Pods, and maintains a sticky identity for each of those Pods. This is useful for managing applications that need persistent storage or a stable, unique network identity.
StatefulSet is the workload API object used to manage stateful applications.
Manages the deployment and scaling of a set of Pods, and provides guarantees about the ordering and uniqueness of these Pods.
Like a Deployment, a StatefulSet manages Pods that are based on an identical container spec. Unlike a Deployment, a StatefulSet maintains a sticky identity for each of its Pods. These pods are created from the same spec, but are not interchangeable: each has a persistent identifier that it maintains across any rescheduling.
If you want to use storage volumes to provide persistence for your workload, you can use a StatefulSet as part of the solution. Although individual Pods in a StatefulSet are susceptible to failure, the persistent Pod identifiers make it easier to match existing volumes to the new Pods that replace any that have failed.
Using StatefulSets
StatefulSets are valuable for applications that require one or more of the following:
- Stable, unique network identifiers.
- Stable, persistent storage.
- Ordered, graceful deployment and scaling.
- Ordered, automated rolling updates.
In the above, stable is synonymous with persistence across Pod (re)scheduling. If an application doesn't require any stable identifiers or ordered deployment, deletion, or scaling, you should deploy your application using a workload object that provides a set of stateless replicas. Deployment or ReplicaSet may be better suited to your stateless needs.
Limitations
- The storage for a given Pod must either be provisioned by a PersistentVolume Provisioner based on the requested storage class, or pre-provisioned by an admin.
- Deleting and/or scaling a StatefulSet down will not delete the volumes associated with the StatefulSet. This is done to ensure data safety, which is generally more valuable than an automatic purge of all related StatefulSet resources.
- StatefulSets currently require a Headless Service to be responsible for the network identity of the Pods. You are responsible for creating this Service.
- StatefulSets do not provide any guarantees on the termination of pods when a StatefulSet is deleted. To achieve ordered and graceful termination of the pods in the StatefulSet, it is possible to scale the StatefulSet down to 0 prior to deletion.
- When using Rolling Updates with the default
Pod Management Policy (
OrderedReady), it's possible to get into a broken state that requires manual intervention to repair.
Components
The example below demonstrates the components of a StatefulSet.
apiVersion: v1
kind: Service
metadata:
  name: nginx
  labels:
    app: nginx
spec:
  ports:
  - port: 80
    name: web
  clusterIP: None
  selector:
    app: nginx
---
apiVersion: apps/v1
kind: StatefulSet
metadata:
  name: web
spec:
  selector:
    matchLabels:
      app: nginx # has to match .spec.template.metadata.labels
  serviceName: "nginx"
  replicas: 3 # by default is 1
  minReadySeconds: 10 # by default is 0
  template:
    metadata:
      labels:
        app: nginx # has to match .spec.selector.matchLabels
    spec:
      terminationGracePeriodSeconds: 10
      containers:
      - name: nginx
        image: registry.k8s.io/nginx-slim:0.24
        ports:
        - containerPort: 80
          name: web
        volumeMounts:
        - name: www
          mountPath: /usr/share/nginx/html
  volumeClaimTemplates:
  - metadata:
      name: www
    spec:
      accessModes: [ "ReadWriteOnce" ]
      storageClassName: "my-storage-class"
      resources:
        requests:
          storage: 1Gi
Note:
This example uses theReadWriteOnce access mode, for simplicity. For
production use, the Kubernetes project recommends using the ReadWriteOncePod
access mode instead.In the above example:
- A Headless Service, named
nginx, is used to control the network domain. - The StatefulSet, named
web, has a Spec that indicates that 3 replicas of the nginx container will be launched in unique Pods. - The
volumeClaimTemplateswill provide stable storage using PersistentVolumes provisioned by a PersistentVolume Provisioner.
The name of a StatefulSet object must be a valid DNS label.
Pod Selector
You must set the .spec.selector field of a StatefulSet to match the labels of its
.spec.template.metadata.labels. Failing to specify a matching Pod Selector will result in a
validation error during StatefulSet creation.
Volume Claim Templates
You can set the .spec.volumeClaimTemplates field to create a
PersistentVolumeClaim.
This will provide stable storage to the StatefulSet if either:
- The StorageClass specified for the volume claim is set up to use dynamic provisioning.
- The cluster already contains a PersistentVolume with the correct StorageClass and sufficient available storage space.
Minimum ready seconds
FEATURE STATE:
Kubernetes v1.25 [stable].spec.minReadySeconds is an optional field that specifies the minimum number of seconds for which a newly
created Pod should be running and ready without any of its containers crashing, for it to be considered available.
This is used to check progression of a rollout when using a Rolling Update strategy.
This field defaults to 0 (the Pod will be considered available as soon as it is ready). To learn more about when
a Pod is considered ready, see Container Probes.
Pod Identity
StatefulSet Pods have a unique identity that consists of an ordinal, a stable network identity, and stable storage. The identity sticks to the Pod, regardless of which node it's (re)scheduled on.
Ordinal Index
For a StatefulSet with N replicas, each Pod in the StatefulSet
will be assigned an integer ordinal, that is unique over the Set. By default,
pods will be assigned ordinals from 0 up through N-1. The StatefulSet controller
will also add a pod label with this index: apps.kubernetes.io/pod-index.
Start ordinal
FEATURE STATE:
Kubernetes v1.31 [stable](enabled by default).spec.ordinals is an optional field that allows you to configure the integer
ordinals assigned to each Pod. It defaults to nil. Within the field, you can
configure the following options:
.spec.ordinals.start: If the.spec.ordinals.startfield is set, Pods will be assigned ordinals from.spec.ordinals.startup through.spec.ordinals.start + .spec.replicas - 1.
Stable Network ID
Each Pod in a StatefulSet derives its hostname from the name of the StatefulSet
and the ordinal of the Pod. The pattern for the constructed hostname
is $(statefulset name)-$(ordinal). The example above will create three Pods
named web-0,web-1,web-2.
A StatefulSet can use a Headless Service
to control the domain of its Pods. The domain managed by this Service takes the form:
$(service name).$(namespace).svc.cluster.local, where "cluster.local" is the
cluster domain.
As each Pod is created, it gets a matching DNS subdomain, taking the form:
$(podname).$(governing service domain), where the governing service is defined
by the serviceName field on the StatefulSet.
Depending on how DNS is configured in your cluster, you may not be able to look up the DNS name for a newly-run Pod immediately. This behavior can occur when other clients in the cluster have already sent queries for the hostname of the Pod before it was created. Negative caching (normal in DNS) means that the results of previous failed lookups are remembered and reused, even after the Pod is running, for at least a few seconds.
If you need to discover Pods promptly after they are created, you have a few options:
- Query the Kubernetes API directly (for example, using a watch) rather than relying on DNS lookups.
- Decrease the time of caching in your Kubernetes DNS provider (typically this means editing the config map for CoreDNS, which currently caches for 30 seconds).
As mentioned in the limitations section, you are responsible for creating the Headless Service responsible for the network identity of the pods.
Here are some examples of choices for Cluster Domain, Service name, StatefulSet name, and how that affects the DNS names for the StatefulSet's Pods.
| Cluster Domain | Service (ns/name) | StatefulSet (ns/name) | StatefulSet Domain | Pod DNS | Pod Hostname |
|---|---|---|---|---|---|
| cluster.local | default/nginx | default/web | nginx.default.svc.cluster.local | web-{0..N-1}.nginx.default.svc.cluster.local | web-{0..N-1} |
| cluster.local | foo/nginx | foo/web | nginx.foo.svc.cluster.local | web-{0..N-1}.nginx.foo.svc.cluster.local | web-{0..N-1} |
| kube.local | foo/nginx | foo/web | nginx.foo.svc.kube.local | web-{0..N-1}.nginx.foo.svc.kube.local | web-{0..N-1} |
Stable Storage
For each VolumeClaimTemplate entry defined in a StatefulSet, each Pod receives one
PersistentVolumeClaim. In the nginx example above, each Pod receives a single PersistentVolume
with a StorageClass of my-storage-class and 1 GiB of provisioned storage. If no StorageClass
is specified, then the default StorageClass will be used. When a Pod is (re)scheduled
onto a node, its volumeMounts mount the PersistentVolumes associated with its
PersistentVolume Claims. Note that, the PersistentVolumes associated with the
Pods' PersistentVolume Claims are not deleted when the Pods, or StatefulSet are deleted.
This must be done manually.
Pod Name Label
When the StatefulSet controller creates a Pod,
it adds a label, statefulset.kubernetes.io/pod-name, that is set to the name of
the Pod. This label allows you to attach a Service to a specific Pod in
the StatefulSet.
Pod index label
FEATURE STATE:
Kubernetes v1.32 [stable](enabled by default)When the StatefulSet controller creates a Pod,
the new Pod is labelled with apps.kubernetes.io/pod-index. The value of this label is the ordinal index of
the Pod. This label allows you to route traffic to a particular pod index, filter logs/metrics
using the pod index label, and more. Note the feature gate PodIndexLabel is enabled and locked by default for this
feature, in order to disable it, users will have to use server emulated version v1.31.
Deployment and Scaling Guarantees
- For a StatefulSet with N replicas, when Pods are being deployed, they are created sequentially, in order from {0..N-1}.
- When Pods are being deleted, they are terminated in reverse order, from {N-1..0}.
- Before a scaling operation is applied to a Pod, all of its predecessors must be Running and Ready. If
.spec.minReadySecondsis set, predecessors must be available (Ready for at leastminReadySeconds). - Before a Pod is terminated, all of its successors must be completely shutdown.
The StatefulSet should not specify a pod.Spec.TerminationGracePeriodSeconds of 0. This practice
is unsafe and strongly discouraged. For further explanation, please refer to
force deleting StatefulSet Pods.
When the nginx example above is created, three Pods will be deployed in the order web-0, web-1, web-2. web-1 will not be deployed before web-0 is Running and Ready, and web-2 will not be deployed until web-1 is Running and Ready. If web-0 should fail, after web-1 is Running and Ready, but before web-2 is launched, web-2 will not be launched until web-0 is successfully relaunched and becomes Running and Ready.
If a user were to scale the deployed example by patching the StatefulSet such that
replicas=1, web-2 would be terminated first. web-1 would not be terminated until web-2
is fully shutdown and deleted. If web-0 were to fail after web-2 has been terminated and
is completely shutdown, but prior to web-1's termination, web-1 would not be terminated
until web-0 is Running and Ready.
Pod Management Policies
StatefulSet allows you to relax its ordering guarantees while
preserving its uniqueness and identity guarantees via its .spec.podManagementPolicy field.
OrderedReady Pod Management
OrderedReady pod management is the default for StatefulSets. It implements the behavior
described in Deployment and Scaling Guarantees.
Parallel Pod Management
Parallel pod management tells the StatefulSet controller to launch or
terminate all Pods in parallel, and to not wait for Pods to become Running
and Ready or completely terminated prior to launching or terminating another
Pod.
For scaling operations, this means all Pods are created or terminated simultaneously.
For rolling updates when .spec.updateStrategy.rollingUpdate.maxUnavailable
is greater than 1, the StatefulSet controller terminates and creates up to maxUnavailable Pods
simultaneously (also known as "bursting"). This can speed up updates but may result in Pods becoming ready out of order, which might not be suitable for applications requiring strict ordering.
Update strategies
A StatefulSet's .spec.updateStrategy field allows you to configure
and disable automated rolling updates for containers, labels, resource request/limits, and
annotations for the Pods in a StatefulSet. There are two possible values:
OnDelete- When a StatefulSet's
.spec.updateStrategy.typeis set toOnDelete, the StatefulSet controller will not automatically update the Pods in a StatefulSet. Users must manually delete Pods to cause the controller to create new Pods that reflect modifications made to a StatefulSet's.spec.template. RollingUpdate- The
RollingUpdateupdate strategy implements automated, rolling updates for the Pods in a StatefulSet. This is the default update strategy.
Rolling Updates
When a StatefulSet's .spec.updateStrategy.type is set to RollingUpdate, the
StatefulSet controller will delete and recreate each Pod in the StatefulSet. It will proceed
in the same order as Pod termination (from the largest ordinal to the smallest), updating
each Pod one at a time.
The Kubernetes control plane waits until an updated Pod is Running and Ready prior
to updating its predecessor. If you have set .spec.minReadySeconds (see
Minimum Ready Seconds), the control plane additionally waits that
amount of time after the Pod turns ready, before moving on.
Partitioned rolling updates
The RollingUpdate update strategy can be partitioned, by specifying a
.spec.updateStrategy.rollingUpdate.partition. If a partition is specified, all Pods with an
ordinal that is greater than or equal to the partition will be updated when the StatefulSet's
.spec.template is updated. All Pods with an ordinal that is less than the partition will not
be updated, and, even if they are deleted, they will be recreated at the previous version. If a
StatefulSet's .spec.updateStrategy.rollingUpdate.partition is greater than its .spec.replicas,
updates to its .spec.template will not be propagated to its Pods.
In most cases you will not need to use a partition, but they are useful if you want to stage an
update, roll out a canary, or perform a phased roll out.
Maximum unavailable Pods
FEATURE STATE:
Kubernetes v1.35 [beta]You can control the maximum number of Pods that can be unavailable during an update
by specifying the .spec.updateStrategy.rollingUpdate.maxUnavailable field.
The value can be an absolute number (for example, 5) or a percentage of desired
Pods (for example, 10%). Absolute number is calculated from the percentage value
by rounding it up. This field cannot be 0. The default setting is 1.
This field applies to all Pods in the range 0 to replicas - 1. If there is any
unavailable Pod in the range 0 to replicas - 1, it will be counted towards
maxUnavailable.
Note:
ThemaxUnavailable field is in Beta stage and it is disabled by default.Forced rollback
When using Rolling Updates with the default
Pod Management Policy (OrderedReady),
it's possible to get into a broken state that requires manual intervention to repair.
If you update the Pod template to a configuration that never becomes Running and Ready (for example, due to a bad binary or application-level configuration error), StatefulSet will stop the rollout and wait.
In this state, it's not enough to revert the Pod template to a good configuration. Due to a known issue, StatefulSet will continue to wait for the broken Pod to become Ready (which never happens) before it will attempt to revert it back to the working configuration.
After reverting the template, you must also delete any Pods that StatefulSet had already attempted to run with the bad configuration. StatefulSet will then begin to recreate the Pods using the reverted template.
Revision history
ControllerRevision is a Kubernetes API resource used by controllers, such as the StatefulSet controller, to track historical configuration changes.
StatefulSets use ControllerRevisions to maintain a revision history, enabling rollbacks and version tracking.
How StatefulSets track changes using ControllerRevisions
When you update a StatefulSet's Pod template (spec.template), the StatefulSet controller:
- Prepares a new ControllerRevision object
- Stores a snapshot of the Pod template and metadata
- Assigns an incremental revision number
Key Properties
See ControllerRevision to learn more about key properties and other details.
Managing Revision History
Control retained revisions with .spec.revisionHistoryLimit:
apiVersion: apps/v1
kind: StatefulSet
metadata:
  name: webapp
spec:
  revisionHistoryLimit: 5  # Keep last 5 revisions
  # ... other spec fields ...
- Default: 10 revisions retained if unspecified
- Cleanup: Oldest revisions are garbage-collected when exceeding the limit
Performing Rollbacks
You can revert to a previous configuration using:
# View revision history
kubectl rollout history statefulset/webapp

# Rollback to a specific revision
kubectl rollout undo statefulset/webapp --to-revision=3
This will:
- Apply the Pod template from revision 3
- Create a new ControllerRevision with an updated revision number
Inspecting ControllerRevisions
To view associated ControllerRevisions:
# List all revisions for the StatefulSet
kubectl get controllerrevisions -l app.kubernetes.io/name=webapp

# View detailed configuration of a specific revision
kubectl get controllerrevision/webapp-3 -o yaml
Best Practices
Retention Policy
- Set
revisionHistoryLimitbetween 5–10 for most workloads. - Increase only if deep rollback history is required.
Monitoring
Regularly check revisions with:
kubectl get controllerrevisions
- Alert on rapid revision count growth.
Avoid
- Manual edits to ControllerRevision objects.
- Using revisions as a backup mechanism (use actual backup tools).
- Setting
revisionHistoryLimit: 0(disables rollback capability).
PersistentVolumeClaim retention
FEATURE STATE:
Kubernetes v1.32 [stable](enabled by default)The optional .spec.persistentVolumeClaimRetentionPolicy field controls if
and how PVCs are deleted during the lifecycle of a StatefulSet. You must enable the
StatefulSetAutoDeletePVC feature gate
on the API server and the controller manager to use this field.
Once enabled, there are two policies you can configure for each StatefulSet:
whenDeleted- Configures the volume retention behavior that applies when the StatefulSet is deleted.
whenScaled- Configures the volume retention behavior that applies when the replica count of the StatefulSet is reduced; for example, when scaling down the set.
For each policy that you can configure, you can set the value to either Delete or Retain.
Delete- The PVCs created from the StatefulSet
volumeClaimTemplateare deleted for each Pod affected by the policy. With thewhenDeletedpolicy all PVCs from thevolumeClaimTemplateare deleted after their Pods have been deleted. With thewhenScaledpolicy, only PVCs corresponding to Pod replicas being scaled down are deleted, after their Pods have been deleted. Retain(default)- PVCs from the
volumeClaimTemplateare not affected when their Pod is deleted. This is the behavior before this new feature.
Bear in mind that these policies only apply when Pods are being removed due to the StatefulSet being deleted or scaled down. For example, if a Pod associated with a StatefulSet fails due to node failure, and the control plane creates a replacement Pod, the StatefulSet retains the existing PVC. The existing volume is unaffected, and the cluster will attach it to the node where the new Pod is about to launch.
The default for policies is Retain, matching the StatefulSet behavior before this new feature.
Here is an example policy:
apiVersion: apps/v1
kind: StatefulSet
...
spec:
  persistentVolumeClaimRetentionPolicy:
    whenDeleted: Retain
    whenScaled: Delete
...
The StatefulSet controller adds
owner references
to its PVCs, which are then deleted by the garbage collector after the Pod is terminated. This enables the Pod to
cleanly unmount all volumes before the PVCs are deleted (and before the backing PV and
volume are deleted, depending on the retain policy). When you set the whenDeleted
policy to Delete, an owner reference to the StatefulSet instance is placed on all PVCs
associated with that StatefulSet.
The whenScaled policy must delete PVCs only when a Pod is scaled down, and not when a
Pod is deleted for another reason. When reconciling, the StatefulSet controller compares
its desired replica count to the actual Pods present on the cluster. Any StatefulSet Pod
whose id greater than the replica count is condemned and marked for deletion. If the
whenScaled policy is Delete, the condemned Pods are first set as owners to the
associated StatefulSet template PVCs, before the Pod is deleted. This causes the PVCs
to be garbage collected after only the condemned Pods have terminated.
This means that if the controller crashes and restarts, no Pod will be deleted before its owner reference has been updated appropriate to the policy. If a condemned Pod is force-deleted while the controller is down, the owner reference may or may not have been set up, depending on when the controller crashed. It may take several reconcile loops to update the owner references, so some condemned Pods may have set up owner references and others may not. For this reason we recommend waiting for the controller to come back up, which will verify owner references before terminating Pods. If that is not possible, the operator should verify the owner references on PVCs to ensure the expected objects are deleted when Pods are force-deleted.
Replicas
.spec.replicas is an optional field that specifies the number of desired Pods. It defaults to 1.
Should you manually scale a StatefulSet, via kubectl scale statefulset statefulset --replicas=X, and then you update that StatefulSet
based on a manifest (for example: by running kubectl apply -f statefulset.yaml), then applying that manifest overwrites the manual scaling
that you previously did.
If a HorizontalPodAutoscaler
(or any similar API for horizontal scaling) is managing scaling for a
Statefulset, don't set .spec.replicas. Instead, allow the Kubernetes
control plane to manage
the .spec.replicas field automatically.
What's next
- Learn about Pods.
- Find out how to use StatefulSets
- Follow an example of deploying a stateful application.
- Follow an example of deploying Cassandra with Stateful Sets.
- Follow an example of running a replicated stateful application.
- Learn how to scale a StatefulSet.
- Learn what's involved when you delete a StatefulSet.
- Learn how to configure a Pod to use a volume for storage.
- Learn how to configure a Pod to use a PersistentVolume for storage.
StatefulSetis a top-level resource in the Kubernetes REST API. Read the StatefulSet object definition to understand the API for stateful sets.- Read about PodDisruptionBudget and how you can use it to manage application availability during disruptions.
4.3.4 - DaemonSet
A DaemonSet defines Pods that provide node-local facilities. These might be fundamental to the operation of your cluster, such as a networking helper tool, or be part of an add-on.
A DaemonSet ensures that all (or some) Nodes run a copy of a Pod. As nodes are added to the cluster, Pods are added to them. As nodes are removed from the cluster, those Pods are garbage collected. Deleting a DaemonSet will clean up the Pods it created.
Some typical uses of a DaemonSet are:
- running a cluster storage daemon on every node
- running a logs collection daemon on every node
- running a node monitoring daemon on every node
In a simple case, one DaemonSet, covering all nodes, would be used for each type of daemon. A more complex setup might use multiple DaemonSets for a single type of daemon, but with different flags and/or different memory and cpu requests for different hardware types.
Writing a DaemonSet Spec
Create a DaemonSet
You can describe a DaemonSet in a YAML file. For example, the daemonset.yaml file below
describes a DaemonSet that runs the fluentd-elasticsearch Docker image:
apiVersion: apps/v1
kind: DaemonSet
metadata:
  name: fluentd-elasticsearch
  namespace: kube-system
  labels:
    k8s-app: fluentd-logging
spec:
  selector:
    matchLabels:
      name: fluentd-elasticsearch
  template:
    metadata:
      labels:
        name: fluentd-elasticsearch
    spec:
      tolerations:
      # these tolerations are to have the daemonset runnable on control plane nodes
      # remove them if your control plane nodes should not run pods
      - key: node-role.kubernetes.io/control-plane
        operator: Exists
        effect: NoSchedule
      - key: node-role.kubernetes.io/master
        operator: Exists
        effect: NoSchedule
      containers:
      - name: fluentd-elasticsearch
        image: quay.io/fluentd_elasticsearch/fluentd:v5.0.1
        resources:
          limits:
            memory: 200Mi
          requests:
            cpu: 100m
            memory: 200Mi
        volumeMounts:
        - name: varlog
          mountPath: /var/log
      # it may be desirable to set a high priority class to ensure that a DaemonSet Pod
      # preempts running Pods
      # priorityClassName: important
      terminationGracePeriodSeconds: 30
      volumes:
      - name: varlog
        hostPath:
          path: /var/log
Create a DaemonSet based on the YAML file:
kubectl apply -f https://k8s.io/examples/controllers/daemonset.yaml
Required Fields
As with all other Kubernetes config, a DaemonSet needs apiVersion, kind, and metadata fields. For
general information about working with config files, see
running stateless applications
and object management using kubectl.
The name of a DaemonSet object must be a valid DNS subdomain name.
A DaemonSet also needs a
.spec
section.
Pod Template
The .spec.template is one of the required fields in .spec.
The .spec.template is a pod template.
It has exactly the same schema as a Pod,
except it is nested and does not have an apiVersion or kind.
In addition to required fields for a Pod, a Pod template in a DaemonSet has to specify appropriate labels (see pod selector).
A Pod Template in a DaemonSet must have a RestartPolicy
equal to Always, or be unspecified, which defaults to Always.
Pod Selector
The .spec.selector field is a pod selector. It works the same as the .spec.selector of
a Job.
You must specify a pod selector that matches the labels of the
.spec.template.
Also, once a DaemonSet is created,
its .spec.selector can not be mutated. Mutating the pod selector can lead to the
unintentional orphaning of Pods, and it was found to be confusing to users.
The .spec.selector is an object consisting of two fields:
matchLabels- works the same as the.spec.selectorof a ReplicationController.matchExpressions- allows to build more sophisticated selectors by specifying key, list of values and an operator that relates the key and values.
When the two are specified the result is ANDed.
The .spec.selector must match the .spec.template.metadata.labels.
Config with these two not matching will be rejected by the API.
Running Pods on select Nodes
If you specify a .spec.template.spec.nodeSelector, then the DaemonSet controller will
create Pods on nodes which match that node selector.
Likewise if you specify a .spec.template.spec.affinity,
then DaemonSet controller will create Pods on nodes which match that
node affinity.
If you do not specify either, then the DaemonSet controller will create Pods on all nodes.
How Daemon Pods are scheduled
A DaemonSet can be used to ensure that all eligible nodes run a copy of a Pod.
The DaemonSet controller creates a Pod for each eligible node and adds the
spec.affinity.nodeAffinity field of the Pod to match the target host. After
the Pod is created, the default scheduler typically takes over and then binds
the Pod to the target host by setting the .spec.nodeName field. If the new
Pod cannot fit on the node, the default scheduler may preempt (evict) some of
the existing Pods based on the
priority
of the new Pod.
Note:
If it's important that the DaemonSet pod run on each node, it's often desirable to set the.spec.template.spec.priorityClassName of the DaemonSet to a
PriorityClass
with a higher priority to ensure that this eviction occurs.The user can specify a different scheduler for the Pods of the DaemonSet, by
setting the .spec.template.spec.schedulerName field of the DaemonSet.
The original node affinity specified at the
.spec.template.spec.affinity.nodeAffinity field (if specified) is taken into
consideration by the DaemonSet controller when evaluating the eligible nodes,
but is replaced on the created Pod with the node affinity that matches the name
of the eligible node.
nodeAffinity:
  requiredDuringSchedulingIgnoredDuringExecution:
    nodeSelectorTerms:
    - matchFields:
      - key: metadata.name
        operator: In
        values:
        - target-host-name
Taints and tolerations
The DaemonSet controller automatically adds a set of tolerations to DaemonSet Pods:
| Toleration key | Effect | Details |
|---|---|---|
node.kubernetes.io/not-ready | NoExecute | DaemonSet Pods can be scheduled onto nodes that are not healthy or ready to accept Pods. Any DaemonSet Pods running on such nodes will not be evicted. |
node.kubernetes.io/unreachable | NoExecute | DaemonSet Pods can be scheduled onto nodes that are unreachable from the node controller. Any DaemonSet Pods running on such nodes will not be evicted. |
node.kubernetes.io/disk-pressure | NoSchedule | DaemonSet Pods can be scheduled onto nodes with disk pressure issues. |
node.kubernetes.io/memory-pressure | NoSchedule | DaemonSet Pods can be scheduled onto nodes with memory pressure issues. |
node.kubernetes.io/pid-pressure | NoSchedule | DaemonSet Pods can be scheduled onto nodes with process pressure issues. |
node.kubernetes.io/unschedulable | NoSchedule | DaemonSet Pods can be scheduled onto nodes that are unschedulable. |
node.kubernetes.io/network-unavailable | NoSchedule | Only added for DaemonSet Pods that request host networking, i.e., Pods having spec.hostNetwork: true. Such DaemonSet Pods can be scheduled onto nodes with unavailable network. |
You can add your own tolerations to the Pods of a DaemonSet as well, by defining these in the Pod template of the DaemonSet.
Because the DaemonSet controller sets the
node.kubernetes.io/unschedulable:NoSchedule toleration automatically,
Kubernetes can run DaemonSet Pods on nodes that are marked as unschedulable.
If you use a DaemonSet to provide an important node-level function, such as cluster networking, it is helpful that Kubernetes places DaemonSet Pods on nodes before they are ready. For example, without that special toleration, you could end up in a deadlock situation where the node is not marked as ready because the network plugin is not running there, and at the same time the network plugin is not running on that node because the node is not yet ready.
Communicating with Daemon Pods
Some possible patterns for communicating with Pods in a DaemonSet are:
- Push: Pods in the DaemonSet are configured to send updates to another service, such as a stats database. They do not have clients.
- NodeIP and Known Port: Pods in the DaemonSet can use a
hostPort, so that the pods are reachable via the node IPs. Clients know the list of node IPs somehow, and know the port by convention. - DNS: Create a headless service
with the same pod selector, and then discover DaemonSets using the
endpointsresource or retrieve multiple A records from DNS. - Service: Create a service with the same Pod selector, and use the service to reach a daemon on a random node. Use Service Internal Traffic Policy to limit to pods on the same node.
Updating a DaemonSet
If node labels are changed, the DaemonSet will promptly add Pods to newly matching nodes and delete Pods from newly not-matching nodes.
You can modify the Pods that a DaemonSet creates. However, Pods do not allow all fields to be updated. Also, the DaemonSet controller will use the original template the next time a node (even with the same name) is created.
You can delete a DaemonSet. If you specify --cascade=orphan with kubectl, then the Pods
will be left on the nodes. If you subsequently create a new DaemonSet with the same selector,
the new DaemonSet adopts the existing Pods. If any Pods need replacing the DaemonSet replaces
them according to its updateStrategy.
You can perform a rolling update on a DaemonSet.
Alternatives to DaemonSet
Init scripts
It is certainly possible to run daemon processes by directly starting them on a node (e.g. using
init, upstartd, or systemd). This is perfectly fine. However, there are several advantages to
running such processes via a DaemonSet:
- Ability to monitor and manage logs for daemons in the same way as applications.
- Same config language and tools (e.g. Pod templates,
kubectl) for daemons and applications. - Running daemons in containers with resource limits increases isolation between daemons from app containers. However, this can also be accomplished by running the daemons in a container but not in a Pod.
Bare Pods
It is possible to create Pods directly which specify a particular node to run on. However, a DaemonSet replaces Pods that are deleted or terminated for any reason, such as in the case of node failure or disruptive node maintenance, such as a kernel upgrade. For this reason, you should use a DaemonSet rather than creating individual Pods.
Static Pods
It is possible to create Pods by writing a file to a certain directory watched by Kubelet. These are called static pods. Unlike DaemonSet, static Pods cannot be managed with kubectl or other Kubernetes API clients. Static Pods do not depend on the apiserver, making them useful in cluster bootstrapping cases. Also, static Pods may be deprecated in the future.
Deployments
DaemonSets are similar to Deployments in that they both create Pods, and those Pods have processes which are not expected to terminate (e.g. web servers, storage servers).
Use a Deployment for stateless services, like frontends, where scaling up and down the number of replicas and rolling out updates are more important than controlling exactly which host the Pod runs on. Use a DaemonSet when it is important that a copy of a Pod always run on all or certain hosts, if the DaemonSet provides node-level functionality that allows other Pods to run correctly on that particular node.
For example, network plugins often include a component that runs as a DaemonSet. The DaemonSet component makes sure that the node where it's running has working cluster networking.
What's next
- Learn about Pods:
- Learn about static Pods, which are useful for running Kubernetes control plane components.
- Find out how to use DaemonSets:
- Perform a rolling update on a DaemonSet.
- Perform a rollback on a DaemonSet (for example, if a roll out didn't work how you expected).
- Understand how Kubernetes assigns Pods to Nodes.
- Learn about device plugins and add ons, which often run as DaemonSets.
DaemonSetis a top-level resource in the Kubernetes REST API. Read the DaemonSet object definition to understand the API for daemon sets.
4.3.5 - Jobs
Jobs represent one-off tasks that run to completion and then stop.
A Job creates one or more Pods and will continue to retry execution of the Pods until a specified number of them successfully terminate. As pods successfully complete, the Job tracks the successful completions. When a specified number of successful completions is reached, the task (ie, Job) is complete. Deleting a Job will clean up the Pods it created. Suspending a Job will delete its active Pods until the Job is resumed again.
A simple case is to create one Job object in order to reliably run one Pod to completion. The Job object will start a new Pod if the first Pod fails or is deleted (for example due to a node hardware failure or a node reboot).
You can also use a Job to run multiple Pods in parallel.
If you want to run a Job (either a single task, or several in parallel) on a schedule, see CronJob.
Running an example Job
Here is an example Job config. It computes π to 2000 places and prints it out. It takes around 10s to complete.
apiVersion: batch/v1
kind: Job
metadata:
  name: pi
spec:
  template:
    spec:
      containers:
      - name: pi
        image: perl:5.34.0
        command: ["perl",  "-Mbignum=bpi", "-wle", "print bpi(2000)"]
      restartPolicy: Never
  backoffLimit: 4
You can run the example with this command:
kubectl apply -f https://kubernetes.io/examples/controllers/job.yaml
The output is similar to this:
job.batch/pi created
Check on the status of the Job with kubectl:
Name:           pi
Namespace:      default
Selector:       batch.kubernetes.io/controller-uid=c9948307-e56d-4b5d-8302-ae2d7b7da67c
Labels:         batch.kubernetes.io/controller-uid=c9948307-e56d-4b5d-8302-ae2d7b7da67c
                batch.kubernetes.io/job-name=pi
                ...
Annotations:    batch.kubernetes.io/job-tracking: ""
Parallelism:    1
Completions:    1
Start Time:     Mon, 02 Dec 2019 15:20:11 +0200
Completed At:   Mon, 02 Dec 2019 15:21:16 +0200
Duration:       65s
Pods Statuses:  0 Running / 1 Succeeded / 0 Failed
Pod Template:
  Labels:  batch.kubernetes.io/controller-uid=c9948307-e56d-4b5d-8302-ae2d7b7da67c
           batch.kubernetes.io/job-name=pi
  Containers:
   pi:
    Image:      perl:5.34.0
    Port:       <none>
    Host Port:  <none>
    Command:
      perl
      -Mbignum=bpi
      -wle
      print bpi(2000)
    Environment:  <none>
    Mounts:       <none>
  Volumes:        <none>
Events:
  Type    Reason            Age   From            Message
  ----    ------            ----  ----            -------
  Normal  SuccessfulCreate  21s   job-controller  Created pod: pi-xf9p4
  Normal  Completed         18s   job-controller  Job completed
apiVersion: batch/v1
kind: Job
metadata:
  annotations: batch.kubernetes.io/job-tracking: ""
             ...
  creationTimestamp: "2022-11-10T17:53:53Z"
  generation: 1
  labels:
    batch.kubernetes.io/controller-uid: 863452e6-270d-420e-9b94-53a54146c223
    batch.kubernetes.io/job-name: pi
  name: pi
  namespace: default
  resourceVersion: "4751"
  uid: 204fb678-040b-497f-9266-35ffa8716d14
spec:
  backoffLimit: 4
  completionMode: NonIndexed
  completions: 1
  parallelism: 1
  selector:
    matchLabels:
      batch.kubernetes.io/controller-uid: 863452e6-270d-420e-9b94-53a54146c223
  suspend: false
  template:
    metadata:
      creationTimestamp: null
      labels:
        batch.kubernetes.io/controller-uid: 863452e6-270d-420e-9b94-53a54146c223
        batch.kubernetes.io/job-name: pi
    spec:
      containers:
      - command:
        - perl
        - -Mbignum=bpi
        - -wle
        - print bpi(2000)
        image: perl:5.34.0
        imagePullPolicy: IfNotPresent
        name: pi
        resources: {}
        terminationMessagePath: /dev/termination-log
        terminationMessagePolicy: File
      dnsPolicy: ClusterFirst
      restartPolicy: Never
      schedulerName: default-scheduler
      securityContext: {}
      terminationGracePeriodSeconds: 30
status:
  active: 1
  ready: 0
  startTime: "2022-11-10T17:53:57Z"
  uncountedTerminatedPods: {}
To view completed Pods of a Job, use kubectl get pods.
To list all the Pods that belong to a Job in a machine readable form, you can use a command like this:
pods=$(kubectl get pods --selector=batch.kubernetes.io/job-name=pi --output=jsonpath='{.items[*].metadata.name}')
echo $pods
The output is similar to this:
pi-5rwd7
Here, the selector is the same as the selector for the Job. The --output=jsonpath option specifies an expression
with the name from each Pod in the returned list.
View the standard output of one of the pods:
kubectl logs $pods
Another way to view the logs of a Job:
kubectl logs jobs/pi
The output is similar to this:
3.1415926535897932384626433832795028841971693993751058209749445923078164062862089986280348253421170679821480865132823066470938446095505822317253594081284811174502841027019385211055596446229489549303819644288109756659334461284756482337867831652712019091456485669234603486104543266482133936072602491412737245870066063155881748815209209628292540917153643678925903600113305305488204665213841469519415116094330572703657595919530921861173819326117931051185480744623799627495673518857527248912279381830119491298336733624406566430860213949463952247371907021798609437027705392171762931767523846748184676694051320005681271452635608277857713427577896091736371787214684409012249534301465495853710507922796892589235420199561121290219608640344181598136297747713099605187072113499999983729780499510597317328160963185950244594553469083026425223082533446850352619311881710100031378387528865875332083814206171776691473035982534904287554687311595628638823537875937519577818577805321712268066130019278766111959092164201989380952572010654858632788659361533818279682303019520353018529689957736225994138912497217752834791315155748572424541506959508295331168617278558890750983817546374649393192550604009277016711390098488240128583616035637076601047101819429555961989467678374494482553797747268471040475346462080466842590694912933136770289891521047521620569660240580381501935112533824300355876402474964732639141992726042699227967823547816360093417216412199245863150302861829745557067498385054945885869269956909272107975093029553211653449872027559602364806654991198818347977535663698074265425278625518184175746728909777727938000816470600161452491921732172147723501414419735685481613611573525521334757418494684385233239073941433345477624168625189835694855620992192221842725502542568876717904946016534668049886272327917860857843838279679766814541009538837863609506800642251252051173929848960841284886269456042419652850222106611863067442786220391949450471237137869609563643719172874677646575739624138908658326459958133904780275901
Writing a Job spec
As with all other Kubernetes config, a Job needs apiVersion, kind, and metadata fields.
When the control plane creates new Pods for a Job, the .metadata.name of the
Job is part of the basis for naming those Pods. The name of a Job must be a valid
DNS subdomain
value, but this can produce unexpected results for the Pod hostnames. For best compatibility,
the name should follow the more restrictive rules for a
DNS label.
Even when the name is a DNS subdomain, the name must be no longer than 63
characters.
A Job also needs a .spec section.
Job Labels
Job labels will have batch.kubernetes.io/ prefix for job-name and controller-uid.
Pod Template
The .spec.template is the only required field of the .spec.
The .spec.template is a pod template.
It has exactly the same schema as a Pod,
except it is nested and does not have an apiVersion or kind.
In addition to required fields for a Pod, a pod template in a Job must specify appropriate labels (see pod selector) and an appropriate restart policy.
Only a RestartPolicy
equal to Never or OnFailure is allowed.
Pod selector
The .spec.selector field is optional. In almost all cases you should not specify it.
See section specifying your own pod selector.
Parallel execution for Jobs
There are three main types of task suitable to run as a Job:
- Non-parallel Jobs
- normally, only one Pod is started, unless the Pod fails.
- the Job is complete as soon as its Pod terminates successfully.
- Parallel Jobs with a fixed completion count:
- specify a non-zero positive value for
.spec.completions. - the Job represents the overall task, and is complete when there are
.spec.completionssuccessful Pods. - when using
.spec.completionMode="Indexed", each Pod gets a different index in the range 0 to.spec.completions-1.
- specify a non-zero positive value for
- Parallel Jobs with a work queue:
- do not specify
.spec.completions, default to.spec.parallelism. - the Pods must coordinate amongst themselves or an external service to determine what each should work on. For example, a Pod might fetch a batch of up to N items from the work queue.
- each Pod is independently capable of determining whether or not all its peers are done, and thus that the entire Job is done.
- when any Pod from the Job terminates with success, no new Pods are created.
- once at least one Pod has terminated with success and all Pods are terminated, then the Job is completed with success.
- once any Pod has exited with success, no other Pod should still be doing any work for this task or writing any output. They should all be in the process of exiting.
- do not specify
For a non-parallel Job, you can leave both .spec.completions and .spec.parallelism unset.
When both are unset, both are defaulted to 1.
For a fixed completion count Job, you should set .spec.completions to the number of completions needed.
You can set .spec.parallelism, or leave it unset and it will default to 1.
For a work queue Job, you must leave .spec.completions unset, and set .spec.parallelism to
a non-negative integer.
For more information about how to make use of the different types of job, see the job patterns section.
Controlling parallelism
The requested parallelism (.spec.parallelism) can be set to any non-negative value.
If it is unspecified, it defaults to 1.
If it is specified as 0, then the Job is effectively paused until it is increased.
Actual parallelism (number of pods running at any instant) may be more or less than requested parallelism, for a variety of reasons:
- For fixed completion count Jobs, the actual number of pods running in parallel will not exceed the number of
remaining completions. Higher values of
.spec.parallelismare effectively ignored. - For work queue Jobs, no new Pods are started after any Pod has succeeded -- remaining Pods are allowed to complete, however.
- If the Job Controller has not had time to react.
- If the Job controller failed to create Pods for any reason (lack of
ResourceQuota, lack of permission, etc.), then there may be fewer pods than requested. - The Job controller may throttle new Pod creation due to excessive previous pod failures in the same Job.
- When a Pod is gracefully shut down, it takes time to stop.
Completion mode
FEATURE STATE:
Kubernetes v1.24 [stable]Jobs with fixed completion count - that is, jobs that have non null
.spec.completions - can have a completion mode that is specified in .spec.completionMode:
NonIndexed(default): the Job is considered complete when there have been.spec.completionssuccessfully completed Pods. In other words, each Pod completion is homologous to each other. Note that Jobs that have null.spec.completionsare implicitlyNonIndexed.Indexed: the Pods of a Job get an associated completion index from 0 to.spec.completions-1. The index is available through four mechanisms:- The Pod annotation
batch.kubernetes.io/job-completion-index. - The Pod label
batch.kubernetes.io/job-completion-index(for v1.28 and later). Note the feature gatePodIndexLabelmust be enabled to use this label, and it is enabled by default. - As part of the Pod hostname, following the pattern
$(job-name)-$(index). When you use an Indexed Job in combination with a Service, Pods within the Job can use the deterministic hostnames to address each other via DNS. For more information about how to configure this, see Job with Pod-to-Pod Communication. - From the containerized task, in the environment variable
JOB_COMPLETION_INDEX.
The Job is considered complete when there is one successfully completed Pod for each index. For more information about how to use this mode, see Indexed Job for Parallel Processing with Static Work Assignment.
- The Pod annotation
Note:
Although rare, more than one Pod could be started for the same index (due to various reasons such as node failures, kubelet restarts, or Pod evictions). In this case, only the first Pod that completes successfully will count towards the completion count and update the status of the Job. The other Pods that are running or completed for the same index will be deleted by the Job controller once they are detected.Integrate with Workload APIs
FEATURE STATE:
Kubernetes v1.36 [alpha](disabled by default)When the WorkloadWithJob feature gate is enabled,
the Job controller automatically creates
Workload and
PodGroup objects
for qualifying parallel Jobs before creating any Pods.
This enables native gang scheduling
where all Pods in a Job are scheduled together or none are scheduled.
Qualifying criteria
The Job controller creates a Workload with a gang scheduling policy when the Job meets all of the following conditions:
.spec.parallelismis greater than 1.spec.completionModeisIndexed.spec.parallelismequals.spec.completions.spec.template.spec.schedulingGroupis not set
Jobs that do not match these criteria continue to schedule Pods independently,
with no Workload or PodGroup created.
For example, the following Job runs 8 parallel indexed workers. When the feature
is enabled, the Job controller creates a Workload and PodGroup with
minCount: 8 before creating any Pods, ensuring all 8 workers are
scheduled together:
apiVersion: batch/v1
kind: Job
metadata:
  name: distributed-training
  namespace: training
spec:
  parallelism: 8
  completions: 8
  completionMode: Indexed
  template:
    spec:
      restartPolicy: Never
      containers:
      - name: trainer
        image: training-image:latest
        resources:
          limits:
            nvidia.com/gpu: 1
When the Job controller processes this Job, it automatically:
- Creates a Workload object in the same namespace. The Workload contains a
podGroupTemplatewith a gang scheduling policy whereminCountequals the Job's parallelism. - Creates a PodGroup object based on that template. The PodGroup is a standalone runtime scheduling unit that carries an inline copy of the gang policy.
- Creates Pods with
spec.schedulingGroup.podGroupNameset to the PodGroup name, linking each Pod to its scheduling group.
Discovery of these objects is based on spec references (controllerRef and
podGroupTemplateRef).
The Workload and PodGroup are owned by the Job (via ownerReferences) and are
automatically garbage collected when the Job is deleted.
Opt-out for higher-level controllers
If a Job's Pod template already has spec.schedulingGroup set, the Job controller
does not create Workload or PodGroup objects. This allows higher-level controllers
such as JobSet to manage the Workload and PodGroup lifecycle themselves.
CronJob behavior
Jobs created by a CronJob do not have schedulingGroup set in the PodTemplate.
If a CronJob-created Job matches the gang scheduling criteria, the Job controller
creates a separate Workload and PodGroup for each Job instance.
Limitations for Alpha release
- Each Job maps to exactly one
PodGroup. All Pods in the Job belong to the same scheduling group. - The
minCountin the gang policy is immutable. Updates to.spec.parallelismare rejected for Jobs that use gang scheduling. See Elastic Indexed Jobs for details on this restriction. - Suspended Jobs retain their
WorkloadandPodGroupobjects; they are not deleted on suspend or recreated on resume.
Handling Pod and container failures
A container in a Pod may fail for a number of reasons, such as because the process in it exited with
a non-zero exit code, or the container was killed for exceeding a memory limit, etc. If this
happens, and the .spec.template.spec.restartPolicy = "OnFailure", then the Pod stays
on the node, but the container is re-run. Therefore, your program needs to handle the case when it is
restarted locally, or else specify .spec.template.spec.restartPolicy = "Never".
See pod lifecycle for more information on restartPolicy.
An entire Pod can also fail, for a number of reasons, such as when the pod is kicked off the node
(node is upgraded, rebooted, deleted, etc.), or if a container of the Pod fails and the
.spec.template.spec.restartPolicy = "Never". When a Pod fails, then the Job controller
starts a new Pod. This means that your application needs to handle the case when it is restarted in a new
pod. In particular, it needs to handle temporary files, locks, incomplete output and the like
caused by previous runs.
By default, each pod failure is counted towards the .spec.backoffLimit limit,
see pod backoff failure policy. However, you can
customize handling of pod failures by setting the Job's pod failure policy.
Additionally, you can choose to count the pod failures independently for each
index of an Indexed Job by setting the .spec.backoffLimitPerIndex field
(for more information, see backoff limit per index).
Note that even if you specify .spec.parallelism = 1 and .spec.completions = 1 and
.spec.template.spec.restartPolicy = "Never", the same program may
sometimes be started twice.
If you do specify .spec.parallelism and .spec.completions both greater than 1, then there may be
multiple pods running at once. Therefore, your pods must also be tolerant of concurrency.
If you specify the .spec.podFailurePolicy field, the Job controller does not consider a terminating
Pod (a pod that has a .metadata.deletionTimestamp field set) as a failure until that Pod is
terminal (its .status.phase is Failed or Succeeded). However, the Job controller
creates a replacement Pod as soon as the termination becomes apparent. Once the
pod terminates, the Job controller evaluates .backoffLimit and .podFailurePolicy
for the relevant Job, taking this now-terminated Pod into consideration.
If either of these requirements is not satisfied, the Job controller counts
a terminating Pod as an immediate failure, even if that Pod later terminates
with phase: "Succeeded".
Pod backoff failure policy
There are situations where you want to fail a Job after some amount of retries
due to a logical error in configuration etc.
To do so, set .spec.backoffLimit to specify the number of retries before
considering a Job as failed.
The .spec.backoffLimit is set by default to 6, unless the
backoff limit per index (only Indexed Job) is specified.
When .spec.backoffLimitPerIndex is specified, then .spec.backoffLimit defaults
to 2147483647 (MaxInt32).
Failed Pods associated with the Job are recreated by the Job controller with an exponential back-off delay (10s, 20s, 40s ...) capped at six minutes.
The number of retries is calculated in two ways:
- The number of Pods with
.status.phase = "Failed". - When using
restartPolicy = "OnFailure", the number of retries in all the containers of Pods with.status.phaseequal toPendingorRunning.
If either of the calculations reaches the .spec.backoffLimit, the Job is
considered failed.
Note:
If your Job hasrestartPolicy = "OnFailure", keep in mind that your Pod running the job
will be terminated once the job backoff limit has been reached. This can make debugging
the Job's executable more difficult. We suggest setting
restartPolicy = "Never" when debugging the Job or using a logging system to ensure output
from failed Jobs is not lost inadvertently.Backoff limit per index
FEATURE STATE:
Kubernetes v1.33 [stable](enabled by default)When you run an indexed Job, you can choose to handle retries
for pod failures independently for each index. To do so, set the
.spec.backoffLimitPerIndex to specify the maximal number of pod failures
per index.
When the per-index backoff limit is exceeded for an index, Kubernetes considers the index as failed and adds it to the
.status.failedIndexes field. The succeeded indexes, those with a successfully
executed pods, are recorded in the .status.completedIndexes field, regardless of whether you set
the backoffLimitPerIndex field.
Note that a failing index does not interrupt execution of other indexes. Once all indexes finish for a Job where you specified a backoff limit per index, if at least one of those indexes did fail, the Job controller marks the overall Job as failed, by setting the Failed condition in the status. The Job gets marked as failed even if some, potentially nearly all, of the indexes were processed successfully.
You can additionally limit the maximal number of indexes marked failed by
setting the .spec.maxFailedIndexes field.
When the number of failed indexes exceeds the maxFailedIndexes field, the
Job controller triggers termination of all remaining running Pods for that Job.
Once all pods are terminated, the entire Job is marked failed by the Job
controller, by setting the Failed condition in the Job status.
Here is an example manifest for a Job that defines a backoffLimitPerIndex:
apiVersion: batch/v1
kind: Job
metadata:
  name: job-backoff-limit-per-index-example
spec:
  completions: 10
  parallelism: 3
  completionMode: Indexed  # required for the feature
  backoffLimitPerIndex: 1  # maximal number of failures per index
  maxFailedIndexes: 5      # maximal number of failed indexes before terminating the Job execution
  template:
    spec:
      restartPolicy: Never # required for the feature
      containers:
      - name: example
        image: python
        command:           # The jobs fails as there is at least one failed index
                           # (all even indexes fail in here), yet all indexes
                           # are executed as maxFailedIndexes is not exceeded.
        - python3
        - -c
        - |
          import os, sys
          print("Hello world")
          if int(os.environ.get("JOB_COMPLETION_INDEX")) % 2 == 0:
            sys.exit(1)
In the example above, the Job controller allows for one restart for each of the indexes. When the total number of failed indexes exceeds 5, then the entire Job is terminated.
Once the job is finished, the Job status looks as follows:
kubectl get -o yaml job job-backoff-limit-per-index-example
  status:
    completedIndexes: 1,3,5,7,9
    failedIndexes: 0,2,4,6,8
    succeeded: 5          # 1 succeeded pod for each of 5 succeeded indexes
    failed: 10            # 2 failed pods (1 retry) for each of 5 failed indexes
    conditions:
    - message: Job has failed indexes
      reason: FailedIndexes
      status: "True"
      type: FailureTarget
    - message: Job has failed indexes
      reason: FailedIndexes
      status: "True"
      type: Failed
The Job controller adds the FailureTarget Job condition to trigger
Job termination and cleanup. When all of the
Job Pods are terminated, the Job controller adds the Failed condition
with the same values for reason and message as the FailureTarget Job
condition. For details, see Termination of Job Pods.
Additionally, you may want to use the per-index backoff along with a
pod failure policy. When using
per-index backoff, there is a new FailIndex action available which allows you to
avoid unnecessary retries within an index.
Pod failure policy
FEATURE STATE:
Kubernetes v1.31 [stable](enabled by default)A Pod failure policy, defined with the .spec.podFailurePolicy field, enables
your cluster to handle Pod failures based on the container exit codes and the
Pod conditions.
In some situations, you may want to have a better control when handling Pod
failures than the control provided by the Pod backoff failure policy,
which is based on the Job's .spec.backoffLimit. These are some examples of use cases:
- To optimize costs of running workloads by avoiding unnecessary Pod restarts, you can terminate a Job as soon as one of its Pods fails with an exit code indicating a software bug.
- To guarantee that your Job finishes even if there are disruptions, you can
ignore Pod failures caused by disruptions (such as preemption,
API-initiated eviction
or taint-based eviction) so
that they don't count towards the
.spec.backoffLimitlimit of retries.
You can configure a Pod failure policy, in the .spec.podFailurePolicy field,
to meet the above use cases. This policy can handle Pod failures based on the
container exit codes and the Pod conditions.
Here is a manifest for a Job that defines a podFailurePolicy:
apiVersion: batch/v1
kind: Job
metadata:
  name: job-pod-failure-policy-example
spec:
  completions: 12
  parallelism: 3
  template:
    spec:
      restartPolicy: Never
      containers:
      - name: main
        image: docker.io/library/bash:5
        command: ["bash"]        # example command simulating a bug which triggers the FailJob action
        args:
        - -c
        - echo "Hello world!" && sleep 5 && exit 42
  backoffLimit: 6
  podFailurePolicy:
    rules:
    - action: FailJob
      onExitCodes:
        containerName: main      # optional
        operator: In             # one of: In, NotIn
        values: [42]
    - action: Ignore             # one of: Ignore, FailJob, Count
      onPodConditions:
      - type: DisruptionTarget   # indicates Pod disruption
In the example above, the first rule of the Pod failure policy specifies that
the Job should be marked failed if the main container fails with the 42 exit
code. The following are the rules for the main container specifically:
- an exit code of 0 means that the container succeeded
- an exit code of 42 means that the entire Job failed
- any other exit code represents that the container failed, and hence the entire
Pod. The Pod will be re-created if the total number of restarts is
below
backoffLimit. If thebackoffLimitis reached the entire Job failed.
Note:
Because the Pod template specifies arestartPolicy: Never,
the kubelet does not restart the main container in that particular Pod.The second rule of the Pod failure policy, specifying the Ignore action for
failed Pods with condition DisruptionTarget excludes Pod disruptions from
being counted towards the .spec.backoffLimit limit of retries.
Note:
If the Job failed, either by the Pod failure policy or Pod backoff failure policy, and the Job is running multiple Pods, Kubernetes terminates all the Pods in that Job that are still Pending or Running.These are some requirements and semantics of the API:
- if you want to use a
.spec.podFailurePolicyfield for a Job, you must also define that Job's pod template with.spec.restartPolicyset toNever. - the Pod failure policy rules you specify under
spec.podFailurePolicy.rulesare evaluated in order. Once a rule matches a Pod failure, the remaining rules are ignored. When no rule matches the Pod failure, the default handling applies. - you may want to restrict a rule to a specific container by specifying its name
in
spec.podFailurePolicy.rules[*].onExitCodes.containerName. When not specified the rule applies to all containers. When specified, it should match one the container orinitContainernames in the Pod template. - you may specify the action taken when a Pod failure policy is matched by
spec.podFailurePolicy.rules[*].action. Possible values are:FailJob: use to indicate that the Pod's job should be marked as Failed and all running Pods should be terminated.Ignore: use to indicate that the counter towards the.spec.backoffLimitshould not be incremented and a replacement Pod should be created.Count: use to indicate that the Pod should be handled in the default way. The counter towards the.spec.backoffLimitshould be incremented.FailIndex: use this action along with backoff limit per index to avoid unnecessary retries within the index of a failed pod.
Note:
When you use apodFailurePolicy, the job controller only matches Pods in the
Failed phase. Pods with a deletion timestamp that are not in a terminal phase
(Failed or Succeeded) are considered still terminating. This implies that
terminating pods retain a tracking finalizer
until they reach a terminal phase.
Since Kubernetes 1.27, Kubelet transitions deleted pods to a terminal phase
(see: Pod Phase). This
ensures that deleted pods have their finalizers removed by the Job controller.Note:
Starting with Kubernetes v1.28, when Pod failure policy is used, the Job controller recreates terminating Pods only once these Pods reach the terminalFailed phase. This behavior is similar
to podReplacementPolicy: Failed. For more information, see Pod replacement policy.When you use the podFailurePolicy, and the Job fails due to the pod
matching the rule with the FailJob action, then the Job controller triggers
the Job termination process by adding the FailureTarget condition.
For more details, see Job termination and cleanup.
Success policy
When creating an Indexed Job, you can define when a Job can be declared as succeeded using a .spec.successPolicy,
based on the pods that succeeded.
By default, a Job succeeds when the number of succeeded Pods equals .spec.completions.
These are some situations where you might want additional control for declaring a Job succeeded:
- When running simulations with different parameters, you might not need all the simulations to succeed for the overall Job to be successful.
- When following a leader-worker pattern, only the success of the leader determines the success or failure of a Job. Examples of this are frameworks like MPI and PyTorch etc.
You can configure a success policy, in the .spec.successPolicy field,
to meet the above use cases. This policy can handle Job success based on the
succeeded pods. After the Job meets the success policy, the job controller terminates the lingering Pods.
A success policy is defined by rules. Each rule can take one of the following forms:
- When you specify the
succeededIndexesonly, once all indexes specified in thesucceededIndexessucceed, the job controller marks the Job as succeeded. ThesucceededIndexesmust be a list of intervals between 0 and.spec.completions-1. - When you specify the
succeededCountonly, once the number of succeeded indexes reaches thesucceededCount, the job controller marks the Job as succeeded. - When you specify both
succeededIndexesandsucceededCount, once the number of succeeded indexes from the subset of indexes specified in thesucceededIndexesreaches thesucceededCount, the job controller marks the Job as succeeded.
Note that when you specify multiple rules in the .spec.successPolicy.rules,
the job controller evaluates the rules in order. Once the Job meets a rule, the job controller ignores remaining rules.
Here is a manifest for a Job with successPolicy:
apiVersion: batch/v1
kind: Job
metadata:
  name: job-success
spec:
  parallelism: 10
  completions: 10
  completionMode: Indexed # Required for the success policy
  successPolicy:
    rules:
      - succeededIndexes: 0,2-3
        succeededCount: 1
  template:
    spec:
      containers:
      - name: main
        image: python
        command:          # Provided that at least one of the Pods with 0, 2, and 3 indexes has succeeded,
                          # the overall Job is a success.
          - python3
          - -c
          - |
            import os, sys
            if os.environ.get("JOB_COMPLETION_INDEX") == "2":
              sys.exit(0)
            else:
              sys.exit(1)
      restartPolicy: Never
In the example above, both succeededIndexes and succeededCount have been specified.
Therefore, the job controller will mark the Job as succeeded and terminate the lingering Pods
when either of the specified indexes, 0, 2, or 3, succeed.
The Job that meets the success policy gets the SuccessCriteriaMet condition with a SuccessPolicy reason.
After the removal of the lingering Pods is issued, the Job gets the Complete condition.
Note that the succeededIndexes is represented as intervals separated by a hyphen.
The number are listed in represented by the first and last element of the series, separated by a hyphen.
Note:
When you specify both a success policy and some terminating policies such as.spec.backoffLimit and .spec.podFailurePolicy,
once the Job meets either policy, the job controller respects the terminating policy and ignores the success policy.Job termination and cleanup
When a Job completes, no more Pods are created, but the Pods are usually not deleted either.
Keeping them around allows you to still view the logs of completed pods to check for errors, warnings, or other diagnostic output.
The job object also remains after it is completed so that you can view its status. It is up to the user to delete
old jobs after noting their status. Delete the job with kubectl (e.g. kubectl delete jobs/pi or kubectl delete -f ./job.yaml).
When you delete the job using kubectl, all the pods it created are deleted too.
By default, a Job will run uninterrupted unless a Pod fails (restartPolicy=Never)
or a Container exits in error (restartPolicy=OnFailure), at which point the Job defers to the
.spec.backoffLimit described above. Once .spec.backoffLimit has been reached the Job will
be marked as failed and any running Pods will be terminated.
Another way to terminate a Job is by setting an active deadline.
Do this by setting the .spec.activeDeadlineSeconds field of the Job to a number of seconds.
The activeDeadlineSeconds applies to the duration of the job, no matter how many Pods are created.
Once a Job reaches activeDeadlineSeconds, all of its running Pods are terminated and the Job status
will become type: Failed with reason: DeadlineExceeded.
Note that a Job's .spec.activeDeadlineSeconds takes precedence over its .spec.backoffLimit.
Therefore, a Job that is retrying one or more failed Pods will not deploy additional Pods once
it reaches the time limit specified by activeDeadlineSeconds, even if the backoffLimit is not yet reached.
Example:
apiVersion: batch/v1
kind: Job
metadata:
  name: pi-with-timeout
spec:
  backoffLimit: 5
  activeDeadlineSeconds: 100
  template:
    spec:
      containers:
      - name: pi
        image: perl:5.34.0
        command: ["perl", "-Mbignum=bpi", "-wle", "print bpi(2000)"]
      restartPolicy: Never
Note that both the Job spec and the Pod template spec
within the Job have an activeDeadlineSeconds field. Ensure that you set this field at the proper level.
Keep in mind that the restartPolicy applies to the Pod, and not to the Job itself:
there is no automatic Job restart once the Job status is type: Failed.
That is, the Job termination mechanisms activated with .spec.activeDeadlineSeconds
and .spec.backoffLimit result in a permanent Job failure that requires manual intervention to resolve.
Terminal Job conditions
A Job has two possible terminal states, each of which has a corresponding Job condition:
- Succeeded: Job condition
Complete - Failed: Job condition
Failed
Jobs fail for the following reasons:
- The number of Pod failures exceeded the specified
.spec.backoffLimitin the Job specification. For details, see Pod backoff failure policy. - The Job runtime exceeded the specified
.spec.activeDeadlineSeconds - An indexed Job that used
.spec.backoffLimitPerIndexhas failed indexes. For details, see Backoff limit per index. - The number of failed indexes in the Job exceeded the specified
spec.maxFailedIndexes. For details, see Backoff limit per index - A failed Pod matches a rule in
.spec.podFailurePolicythat has theFailJobaction. For details about how Pod failure policy rules might affect failure evaluation, see Pod failure policy.
Jobs succeed for the following reasons:
- The number of succeeded Pods reached the specified
.spec.completions - The criteria specified in
.spec.successPolicyare met. For details, see Success policy.
In Kubernetes v1.31 and later the Job controller delays the addition of the
terminal conditions,Failed or Complete, until all of the Job Pods are terminated.
In Kubernetes v1.30 and earlier, the Job controller added the Complete or the
Failed Job terminal conditions as soon as the Job termination process was
triggered and all Pod finalizers were removed. However, some Pods would still
be running or terminating at the moment that the terminal condition was added.
In Kubernetes v1.31 and later, the controller only adds the Job terminal conditions
after all of the Pods are terminated. You can control this behavior by using the
JobManagedBy and the JobPodReplacementPolicy (both enabled by default)
feature gates.
Termination of Job pods
The Job controller adds the FailureTarget condition or the SuccessCriteriaMet
condition to the Job to trigger Pod termination after a Job meets either the
success or failure criteria.
Factors like terminationGracePeriodSeconds might increase the amount of time
from the moment that the Job controller adds the FailureTarget condition or the
SuccessCriteriaMet condition to the moment that all of the Job Pods terminate
and the Job controller adds a terminal condition
(Failed or Complete).
You can use the FailureTarget or the SuccessCriteriaMet condition to evaluate
whether the Job has failed or succeeded without having to wait for the controller
to add a terminal condition.
For example, you might want to decide when to create a replacement Job
that replaces a failed Job. If you replace the failed Job when the FailureTarget
condition appears, your replacement Job runs sooner, but could result in Pods
from the failed and the replacement Job running at the same time, using
extra compute resources.
Alternatively, if your cluster has limited resource capacity, you could choose to
wait until the Failed condition appears on the Job, which would delay your
replacement Job but would ensure that you conserve resources by waiting
until all of the failed Pods are removed.
Clean up finished jobs automatically
Finished Jobs are usually no longer needed in the system. Keeping them around in the system will put pressure on the API server. If the Jobs are managed directly by a higher level controller, such as CronJobs, the Jobs can be cleaned up by CronJobs based on the specified capacity-based cleanup policy.
TTL mechanism for finished Jobs
FEATURE STATE:
Kubernetes v1.23 [stable]Another way to clean up finished Jobs (either Complete or Failed)
automatically is to use a TTL mechanism provided by a
TTL controller for
finished resources, by specifying the .spec.ttlSecondsAfterFinished field of
the Job.
When the TTL controller cleans up the Job, it will delete the Job cascadingly, i.e. delete its dependent objects, such as Pods, together with the Job. Note that when the Job is deleted, its lifecycle guarantees, such as finalizers, will be honored.
For example:
apiVersion: batch/v1
kind: Job
metadata:
  name: pi-with-ttl
spec:
  ttlSecondsAfterFinished: 100
  template:
    spec:
      containers:
      - name: pi
        image: perl:5.34.0
        command: ["perl", "-Mbignum=bpi", "-wle", "print bpi(2000)"]
      restartPolicy: Never
The Job pi-with-ttl will be eligible to be automatically deleted, 100
seconds after it finishes.
If the field is set to 0, the Job will be eligible to be automatically deleted
immediately after it finishes. If the field is unset, this Job won't be cleaned
up by the TTL controller after it finishes.
Note:
It is recommended to set ttlSecondsAfterFinished field because unmanaged jobs
(Jobs that you created directly, and not indirectly through other workload APIs
such as CronJob) have a default deletion
policy of orphanDependents causing Pods created by an unmanaged Job to be left around
after that Job is fully deleted.
Even though the control plane eventually
garbage collects
the Pods from a deleted Job after they either fail or complete, sometimes those
lingering pods may cause cluster performance degradation or in worst case cause the
cluster to go offline due to this degradation.
You can use LimitRanges and ResourceQuotas to place a cap on the amount of resources that a particular namespace can consume.
Job patterns
The Job object can be used to process a set of independent but related work items. These might be emails to be sent, frames to be rendered, files to be transcoded, ranges of keys in a NoSQL database to scan, and so on.
In a complex system, there may be multiple different sets of work items. Here we are just considering one set of work items that the user wants to manage together — a batch job.
There are several different patterns for parallel computation, each with strengths and weaknesses. The tradeoffs are:
- One Job object for each work item, versus a single Job object for all work items. One Job per work item creates some overhead for the user and for the system to manage large numbers of Job objects. A single Job for all work items is better for large numbers of items.
- Number of Pods created equals number of work items, versus each Pod can process multiple work items. When the number of Pods equals the number of work items, the Pods typically requires less modification to existing code and containers. Having each Pod process multiple work items is better for large numbers of items.
- Several approaches use a work queue. This requires running a queue service, and modifications to the existing program or container to make it use the work queue. Other approaches are easier to adapt to an existing containerised application.
- When the Job is associated with a headless Service, you can enable the Pods within a Job to communicate with each other to collaborate in a computation.
The tradeoffs are summarized here, with columns 2 to 4 corresponding to the above tradeoffs. The pattern names are also links to examples and more detailed description.
| Pattern | Single Job object | Fewer pods than work items? | Use app unmodified? |
|---|---|---|---|
| Queue with Pod Per Work Item | ✓ | sometimes | |
| Queue with Variable Pod Count | ✓ | ✓ | |
| Indexed Job with Static Work Assignment | ✓ | ✓ | |
| Job with Pod-to-Pod Communication | ✓ | sometimes | sometimes |
| Job Template Expansion | ✓ |
When you specify completions with .spec.completions, each Pod created by the Job controller
has an identical spec.
This means that all pods for a task will have the same command line and the same
image, the same volumes, and (almost) the same environment variables. These patterns
are different ways to arrange for pods to work on different things.
This table shows the required settings for .spec.parallelism and .spec.completions for each of the patterns.
Here, W is the number of work items.
| Pattern | .spec.completions | .spec.parallelism |
|---|---|---|
| Queue with Pod Per Work Item | W | any |
| Queue with Variable Pod Count | null | any |
| Indexed Job with Static Work Assignment | W | any |
| Job with Pod-to-Pod Communication | W | W |
| Job Template Expansion | 1 | should be 1 |
Advanced usage
Suspending a Job
FEATURE STATE:
Kubernetes v1.24 [stable]When a Job is created, the Job controller will immediately begin creating Pods to satisfy the Job's requirements and will continue to do so until the Job is complete. However, you may want to temporarily suspend a Job's execution and resume it later, or start Jobs in suspended state and have a custom controller decide later when to start them.
To suspend a Job, you can update the .spec.suspend field of
the Job to true; later, when you want to resume it again, update it to false.
Creating a Job with .spec.suspend set to true will create it in the suspended
state.
In Kubernetes 1.35 or later the .status.startTime field is cleared on Job suspension
when the MutableSchedulingDirectivesForSuspendedJobs
feature gate is enabled.
When a Job is resumed from suspension, its .status.startTime field will be
reset to the current time. This means that the .spec.activeDeadlineSeconds
timer will be stopped and reset when a Job is suspended and resumed.
When you suspend a Job, any running Pods that don't have a status of Completed
will be terminated
with a SIGTERM signal. The Pod's graceful termination period will be honored and
your Pod must handle this signal in this period. This may involve saving
progress for later or undoing changes. Pods terminated this way will not count
towards the Job's completions count.
An example Job definition in the suspended state can be like so:
kubectl get job myjob -o yaml
apiVersion: batch/v1
kind: Job
metadata:
  name: myjob
spec:
  suspend: true
  parallelism: 1
  completions: 5
  template:
    spec:
      ...
You can also toggle Job suspension by patching the Job using the command line.
Suspend an active Job:
kubectl patch job/myjob --type=strategic --patch '{"spec":{"suspend":true}}'
Resume a suspended Job:
kubectl patch job/myjob --type=strategic --patch '{"spec":{"suspend":false}}'
The Job's status can be used to determine if a Job is suspended or has been suspended in the past:
kubectl get jobs/myjob -o yaml
apiVersion: batch/v1
kind: Job
# .metadata and .spec omitted
status:
  conditions:
  - lastProbeTime: "2021-02-05T13:14:33Z"
    lastTransitionTime: "2021-02-05T13:14:33Z"
    status: "True"
    type: Suspended
  startTime: "2021-02-05T13:13:48Z"
The Job condition of type "Suspended" with status "True" means the Job is
suspended; the lastTransitionTime field can be used to determine how long the
Job has been suspended for. If the status of that condition is "False", then the
Job was previously suspended and is now running. If such a condition does not
exist in the Job's status, the Job has never been stopped.
Events are also created when the Job is suspended and resumed:
kubectl describe jobs/myjob
Name:           myjob
...
Events:
  Type    Reason            Age   From            Message
  ----    ------            ----  ----            -------
  Normal  SuccessfulCreate  12m   job-controller  Created pod: myjob-hlrpl
  Normal  SuccessfulDelete  11m   job-controller  Deleted pod: myjob-hlrpl
  Normal  Suspended         11m   job-controller  Job suspended
  Normal  SuccessfulCreate  3s    job-controller  Created pod: myjob-jvb44
  Normal  Resumed           3s    job-controller  Job resumed
The last four events, particularly the "Suspended" and "Resumed" events, are
directly a result of toggling the .spec.suspend field. In the time between
these two events, we see that no Pods were created, but Pod creation restarted
as soon as the Job was resumed.
Mutable Scheduling Directives
FEATURE STATE:
Kubernetes v1.27 [stable]In most cases, a parallel job will want the pods to run with constraints, like all in the same zone, or all either on GPU model x or y but not a mix of both.
The suspend field is the first step towards achieving those semantics. Suspend allows a custom queue controller to decide when a job should start; However, once a job is unsuspended, a custom queue controller has no influence on where the pods of a job will actually land.
This feature allows updating a Job's scheduling directives before it starts, which gives custom queue controllers the ability to influence pod placement while at the same time offloading actual pod-to-node assignment to kube-scheduler.
The fields in a Job's pod template that can be updated are node affinity, node selector, tolerations, labels, annotations and scheduling gates.
Mutable Scheduling Directives for suspended Jobs
FEATURE STATE:
Kubernetes v1.36 [beta](enabled by default)In Kubernetes 1.34 or earlier mutating of Pod's scheduling directives is allowed only for
suspended Jobs that have never been unsuspended before. In Kubernetes 1.35, this is allowed
for any suspended Jobs when the MutableSchedulingDirectivesForSuspendedJobs feature gate is enabled.
Additionally, this feature gate enables clearing of the .status.startTime field on Job suspension.
Mutable Pod resources for suspended Jobs
FEATURE STATE:
Kubernetes v1.36 [beta](enabled by default)A cluster administrator can define admission controls in Kubernetes, modifying the resource requests or limits for a Job, based on policy rules.
With this feature, Kubernetes also lets you modify the pod template of a suspended job, to change the resource requirements of the Pods in the Job. This is different from in-place Pod resize which lets you update resources, one Pod at a time, for Pods that are already running.
The client that sets the new resource requests or limits can be different from the client that initially created the Job, and does not need to be a cluster administrator.
Specifying your own Pod selector
Normally, when you create a Job object, you do not specify .spec.selector.
The system defaulting logic adds this field when the Job is created.
It picks a selector value that will not overlap with any other jobs.
However, in some cases, you might need to override this automatically set selector.
To do this, you can specify the .spec.selector of the Job.
Be very careful when doing this. If you specify a label selector which is not
unique to the pods of that Job, and which matches unrelated Pods, then pods of the unrelated
job may be deleted, or this Job may count other Pods as completing it, or one or both
Jobs may refuse to create Pods or run to completion. If a non-unique selector is
chosen, then other controllers (e.g. ReplicationController) and their Pods may behave
in unpredictable ways too. Kubernetes will not stop you from making a mistake when
specifying .spec.selector.
Here is an example of a case when you might want to use this feature.
Say Job old is already running. You want existing Pods
to keep running, but you want the rest of the Pods it creates
to use a different pod template and for the Job to have a new name.
You cannot update the Job because these fields are not updatable.
Therefore, you delete Job old but leave its pods
running, using kubectl delete jobs/old --cascade=orphan.
Before deleting it, you make a note of what selector it uses:
kubectl get job old -o yaml
The output is similar to this:
kind: Job
metadata:
  name: old
  ...
spec:
  selector:
    matchLabels:
      batch.kubernetes.io/controller-uid: a8f3d00d-c6d2-11e5-9f87-42010af00002
  ...
Then you create a new Job with name new and you explicitly specify the same selector.
Since the existing Pods have label batch.kubernetes.io/controller-uid=a8f3d00d-c6d2-11e5-9f87-42010af00002,
they are controlled by Job new as well.
You need to specify manualSelector: true in the new Job since you are not using
the selector that the system normally generates for you automatically.
kind: Job
metadata:
  name: new
  ...
spec:
  manualSelector: true
  selector:
    matchLabels:
      batch.kubernetes.io/controller-uid: a8f3d00d-c6d2-11e5-9f87-42010af00002
  ...
The new Job itself will have a different uid from a8f3d00d-c6d2-11e5-9f87-42010af00002. Setting
manualSelector: true tells the system that you know what you are doing and to allow this
mismatch.
Job tracking with finalizers
FEATURE STATE:
Kubernetes v1.26 [stable]The control plane keeps track of the Pods that belong to any Job and notices if
any such Pod is removed from the API server. To do that, the Job controller
creates Pods with the finalizer batch.kubernetes.io/job-tracking. The
controller removes the finalizer only after the Pod has been accounted for in
the Job status, allowing the Pod to be removed by other controllers or users.
Note:
See My pod stays terminating if you observe that pods from a Job are stuck with the tracking finalizer.Elastic Indexed Jobs
FEATURE STATE:
Kubernetes v1.31 [stable](enabled by default)You can scale Indexed Jobs up or down by mutating both .spec.parallelism
and .spec.completions together such that .spec.parallelism == .spec.completions.
When scaling down, Kubernetes removes the Pods with higher indexes.
Use cases for elastic Indexed Jobs include batch workloads which require scaling an indexed Job, such as MPI, Horovod, Ray, and PyTorch training jobs.
Note:
When theWorkloadWithJob
feature gate is enabled and a Job matches the
gang scheduling criteria,
updates to .spec.parallelism are rejected because the Workload's minCount field
is immutable. To scale a gang-scheduled Job, delete and recreate it with the
new parallelism value.Delayed creation of replacement pods
FEATURE STATE:
Kubernetes v1.34 [stable](enabled by default)By default, the Job controller recreates Pods as soon they either fail or are terminating (have a deletion timestamp).
This means that, at a given time, when some of the Pods are terminating, the number of running Pods for a Job
can be greater than parallelism or greater than one Pod per index (if you are using an Indexed Job).
You may choose to create replacement Pods only when the terminating Pod is fully terminal (has status.phase: Failed).
To do this, set the .spec.podReplacementPolicy: Failed.
The default replacement policy depends on whether the Job has a podFailurePolicy set.
With no Pod failure policy defined for a Job, omitting the podReplacementPolicy field selects the
TerminatingOrFailed replacement policy:
the control plane creates replacement Pods immediately upon Pod deletion
(as soon as the control plane sees that a Pod for this Job has deletionTimestamp set).
For Jobs with a Pod failure policy set, the default podReplacementPolicy is Failed, and no other
value is permitted.
See Pod failure policy to learn more about Pod failure policies for Jobs.
kind: Job
metadata:
  name: new
  ...
spec:
  podReplacementPolicy: Failed
  ...
Provided your cluster has the feature gate enabled, you can inspect the .status.terminating field of a Job.
The value of the field is the number of Pods owned by the Job that are currently terminating.
kubectl get jobs/myjob -o yaml
apiVersion: batch/v1
kind: Job
# .metadata and .spec omitted
status:
  terminating: 3 # three Pods are terminating and have not yet reached the Failed phase
Delegation of managing a Job object to external controller
FEATURE STATE:
Kubernetes v1.35 [stable](enabled by default)This feature allows you to disable the built-in Job controller, for a specific Job, and delegate reconciliation of the Job to an external controller.
You indicate the controller that reconciles the Job by setting a custom value
for the spec.managedBy field - any value
other than kubernetes.io/job-controller. The value of the field is immutable.
Note:
When using this feature, make sure the controller indicated by the field is installed, otherwise the Job may not be reconciled at all.Note:
When developing an external Job controller be aware that your controller needs to operate in a fashion conformant with the definitions of the API spec and status fields of the Job object.
Please review these in detail in the Job API. We also recommend that you run the e2e conformance tests for the Job object to verify your implementation.
Finally, when developing an external Job controller make sure it does not use the
batch.kubernetes.io/job-tracking finalizer, reserved for the built-in controller.
Alternatives
Bare Pods
When the node that a Pod is running on reboots or fails, the pod is terminated and will not be restarted. However, a Job will create new Pods to replace terminated ones. For this reason, we recommend that you use a Job rather than a bare Pod, even if your application requires only a single Pod.
Replication Controller
Jobs are complementary to Replication Controllers. A Replication Controller manages Pods which are not expected to terminate (e.g. web servers), and a Job manages Pods that are expected to terminate (e.g. batch tasks).
As discussed in Pod Lifecycle, Job is only appropriate
for pods with RestartPolicy equal to OnFailure or Never.
Note:
IfRestartPolicy is not set, the default value is Always.Single Job starts controller Pod
Another pattern is for a single Job to create a Pod which then creates other Pods, acting as a sort of custom controller for those Pods. This allows the most flexibility, but may be somewhat complicated to get started with and offers less integration with Kubernetes.
An advantage of this approach is that the overall process gets the completion guarantee of a Job object, but maintains complete control over what Pods are created and how work is assigned to them.
What's next
- Learn about Pods.
- Read about different ways of running Jobs:
- Coarse Parallel Processing Using a Work Queue
- Fine Parallel Processing Using a Work Queue
- Use an indexed Job for parallel processing with static work assignment
- Create multiple Jobs based on a template: Parallel Processing using Expansions
- Follow the links within Clean up finished jobs automatically to learn more about how your cluster can clean up completed and / or failed tasks.
Jobis part of the Kubernetes REST API. Read the Job object definition to understand the API for jobs.- Read about
CronJob, which you can use to define a series of Jobs that will run based on a schedule, similar to the UNIX toolcron. - Practice how to configure handling of retriable and non-retriable pod failures
using
podFailurePolicy, based on the step-by-step examples. - Learn about gang scheduling for all-or-nothing scheduling of parallel Jobs.
4.3.6 - Automatic Cleanup for Finished Jobs
A time-to-live mechanism to clean up old Jobs that have finished execution.
FEATURE STATE:
Kubernetes v1.23 [stable]When your Job has finished, it's useful to keep that Job in the API (and not immediately delete the Job) so that you can tell whether the Job succeeded or failed.
Kubernetes' TTL-after-finished controller provides a TTL (time to live) mechanism to limit the lifetime of Job objects that have finished execution.
Cleanup for finished Jobs
The TTL-after-finished controller is only supported for Jobs. You can use this mechanism to clean
up finished Jobs (either Complete or Failed) automatically by specifying the
.spec.ttlSecondsAfterFinished field of a Job, as in this
example.
The TTL-after-finished controller assumes that a Job is eligible to be cleaned up
TTL seconds after the Job has finished. The timer starts once the
status condition of the Job changes to show that the Job is either Complete or Failed; once the TTL has
expired, that Job becomes eligible for
cascading removal. When the
TTL-after-finished controller cleans up a job, it will delete it cascadingly, that is to say it will delete
its dependent objects together with it.
Kubernetes honors object lifecycle guarantees on the Job, such as waiting for finalizers.
You can set the TTL seconds at any time. Here are some examples for setting the
.spec.ttlSecondsAfterFinished field of a Job:
- Specify this field in the Job manifest, so that a Job can be cleaned up automatically some time after it finishes.
- Manually set this field of existing, already finished Jobs, so that they become eligible for cleanup.
- Use a mutating admission webhook to set this field dynamically at Job creation time. Cluster administrators can use this to enforce a TTL policy for finished jobs.
- Use a
mutating admission webhook
to set this field dynamically after the Job has finished, and choose
different TTL values based on job status, labels. For this case, the webhook needs
to detect changes to the
.statusof the Job and only set a TTL when the Job is being marked as completed. - Write your own controller to manage the cleanup TTL for Jobs that match a particular selector.
Caveats
Updating TTL for finished Jobs
You can modify the TTL period, e.g. .spec.ttlSecondsAfterFinished field of Jobs,
after the job is created or has finished. If you extend the TTL period after the
existing ttlSecondsAfterFinished period has expired, Kubernetes doesn't guarantee
to retain that Job, even if an update to extend the TTL returns a successful API
response.
Time skew
Because the TTL-after-finished controller uses timestamps stored in the Kubernetes jobs to determine whether the TTL has expired or not, this feature is sensitive to time skew in your cluster, which may cause the control plane to clean up Job objects at the wrong time.
Clocks aren't always correct, but the difference should be very small. Please be aware of this risk when setting a non-zero TTL.
What's next
Refer to the Kubernetes Enhancement Proposal (KEP) for adding this mechanism.
4.3.7 - CronJob
A CronJob starts one-time Jobs on a repeating schedule.
FEATURE STATE:
Kubernetes v1.21 [stable]A CronJob creates Jobs on a repeating schedule.
CronJob is meant for performing regular scheduled actions such as backups, report generation, and so on. One CronJob object is like one line of a crontab (cron table) file on a Unix system. It runs a Job periodically on a given schedule, written in Cron format.
CronJobs have limitations and idiosyncrasies. For example, in certain circumstances, a single CronJob can create multiple concurrent Jobs. See the limitations below.
When the control plane creates new Jobs and (indirectly) Pods for a CronJob, the .metadata.name
of the CronJob is part of the basis for naming those Pods. The name of a CronJob must be a valid
DNS subdomain
value, but this can produce unexpected results for the Pod hostnames. For best compatibility,
the name should follow the more restrictive rules for a
DNS label.
Even when the name is a DNS subdomain, the name must be no longer than 52
characters. This is because the CronJob controller will automatically append
11 characters to the name you provide and there is a constraint that the
length of a Job name is no more than 63 characters.
Example
This example CronJob manifest prints the current time and a hello message every minute:
apiVersion: batch/v1
kind: CronJob
metadata:
  name: hello
spec:
  schedule: "* * * * *"
  jobTemplate:
    spec:
      template:
        spec:
          containers:
          - name: hello
            image: busybox:1.28
            imagePullPolicy: IfNotPresent
            command:
            - /bin/sh
            - -c
            - date; echo Hello from the Kubernetes cluster
          restartPolicy: OnFailure
(Running Automated Tasks with a CronJob takes you through this example in more detail).
Writing a CronJob spec
Schedule syntax
The .spec.schedule field is required. The value of that field follows the Cron syntax:
# ┌───────────── minute (0 - 59)
# │ ┌───────────── hour (0 - 23)
# │ │ ┌───────────── day of the month (1 - 31)
# │ │ │ ┌───────────── month (1 - 12)
# │ │ │ │ ┌───────────── day of the week (0 - 6) (Sunday to Saturday)
# │ │ │ │ │                                   OR sun, mon, tue, wed, thu, fri, sat
# │ │ │ │ │
# │ │ │ │ │
# * * * * *
For example, 0 3 * * 1 means this task is scheduled to run weekly on a Monday at 3 AM.
The format also includes extended "Vixie cron" step values. As explained in the FreeBSD manual:
Step values can be used in conjunction with ranges. Following a range with
/<number>specifies skips of the number's value through the range. For example,0-23/2can be used in the hours field to specify command execution every other hour (the alternative in the V7 standard is0,2,4,6,8,10,12,14,16,18,20,22). Steps are also permitted after an asterisk, so if you want to say "every two hours", just use*/2.
Note:
A question mark (?) in the schedule has the same meaning as an asterisk *, that is,
it stands for any of available value for a given field.Other than the standard syntax, some macros like @monthly can also be used:
| Entry | Description | Equivalent to |
|---|---|---|
| @yearly (or @annually) | Run once a year at midnight of 1 January | 0 0 1 1 * |
| @monthly | Run once a month at midnight of the first day of the month | 0 0 1 * * |
| @weekly | Run once a week at midnight on Sunday morning | 0 0 * * 0 |
| @daily (or @midnight) | Run once a day at midnight | 0 0 * * * |
| @hourly | Run once an hour at the beginning of the hour | 0 * * * * |
To generate CronJob schedule expressions, you can also use web tools like crontab.guru.
Job template
The .spec.jobTemplate defines a template for the Jobs that the CronJob creates, and it is required.
It has exactly the same schema as a Job, except that
it is nested and does not have an apiVersion or kind.
You can specify common metadata for the templated Jobs, such as
labels or
annotations.
For information about writing a Job .spec, see Writing a Job Spec.
Deadline for delayed Job start
The .spec.startingDeadlineSeconds field is optional.
This field defines a deadline (in whole seconds) for starting the Job, if that Job misses its scheduled time
for any reason.
After missing the deadline, the CronJob skips that instance of the Job (future occurrences are still scheduled). For example, if you have a backup Job that runs twice a day, you might allow it to start up to 8 hours late, but no later, because a backup taken any later wouldn't be useful: you would instead prefer to wait for the next scheduled run.
For Jobs that miss their configured deadline, Kubernetes treats them as failed Jobs.
If you don't specify startingDeadlineSeconds for a CronJob, the Job occurrences have no deadline.
If the .spec.startingDeadlineSeconds field is set (not null), the CronJob
controller measures the time between when a Job is expected to be created and
now. If the difference is higher than that limit, it will skip this execution.
For example, if it is set to 200, it allows a Job to be created for up to 200
seconds after the actual schedule.
Concurrency policy
The .spec.concurrencyPolicy field is also optional.
It specifies how to treat concurrent executions of a Job that is created by this CronJob.
The spec may specify only one of the following concurrency policies:
Allow(default): The CronJob allows concurrently running JobsForbid: The CronJob does not allow concurrent runs; if it is time for a new Job run and the previous Job run hasn't finished yet, the CronJob skips the new Job run. Also note that when the previous Job run finishes,.spec.startingDeadlineSecondsis still taken into account and may result in a new Job run.Replace: If it is time for a new Job run and the previous Job run hasn't finished yet, the CronJob replaces the currently running Job run with a new Job run
Note that concurrency policy only applies to the Jobs created by the same CronJob. If there are multiple CronJobs, their respective Jobs are always allowed to run concurrently.
Schedule suspension
You can suspend execution of Jobs for a CronJob, by setting the optional .spec.suspend field
to true. The field defaults to false.
This setting does not affect Jobs that the CronJob has already started.
If you do set that field to true, all subsequent executions are suspended (they remain scheduled, but the CronJob controller does not start the Jobs to run the tasks) until you unsuspend the CronJob.
Caution:
Executions that are suspended during their scheduled time count as missed Jobs. When.spec.suspend changes from true to false on an existing CronJob without a
starting deadline, the missed Jobs are scheduled immediately.Jobs history limits
The .spec.successfulJobsHistoryLimit and .spec.failedJobsHistoryLimit fields specify
how many completed and failed Jobs should be kept. Both fields are optional.
.spec.successfulJobsHistoryLimit: This field specifies the number of successful finished jobs to keep. The default value is3. Setting this field to0will not keep any successful jobs..spec.failedJobsHistoryLimit: This field specifies the number of failed finished jobs to keep. The default value is1. Setting this field to0will not keep any failed jobs.
For another way to clean up Jobs automatically, see Clean up finished Jobs automatically.
Time zones
FEATURE STATE:
Kubernetes v1.27 [stable]For CronJobs with no time zone specified, the kube-controller-manager interprets schedules relative to its local time zone.
You can specify a time zone for a CronJob by setting .spec.timeZone to the name
of a valid time zone.
For example, setting .spec.timeZone: "Etc/UTC" instructs Kubernetes to interpret
the schedule relative to Coordinated Universal Time.
A time zone database from the Go standard library is included in the binaries and used as a fallback in case an external database is not available on the system.
CronJob limitations
Unsupported TimeZone specification
Specifying a timezone using CRON_TZ or TZ variables inside .spec.schedule
is not officially supported (and never has been). If you try to set a schedule
that includes TZ or CRON_TZ timezone specification, Kubernetes will fail to
create or update the resource with a validation error. You should specify time zones
using the time zone field, instead.
Modifying a CronJob
By design, a CronJob contains a template for new Jobs. If you modify an existing CronJob, the changes you make will apply to new Jobs that start to run after your modification is complete. Jobs (and their Pods) that have already started continue to run without changes. That is, the CronJob does not update existing Jobs, even if those remain running.
Job creation
A CronJob creates a Job object approximately once per execution time of its schedule. The scheduling is approximate because there are certain circumstances where two Jobs might be created, or no Job might be created. Kubernetes tries to avoid those situations, but does not completely prevent them. Therefore, the Jobs that you define should be idempotent.
Starting with Kubernetes v1.32, CronJobs apply an annotation
batch.kubernetes.io/cronjob-scheduled-timestamp to their created Jobs. This annotation
indicates the originally scheduled creation time for the Job and is formatted in RFC3339.
If startingDeadlineSeconds is set to a large value or left unset (the default)
and if concurrencyPolicy is set to Allow, the Jobs will always run
at least once.
Caution:
IfstartingDeadlineSeconds is set to a value less than 10 seconds, the CronJob may not be scheduled. This is because the CronJob controller checks things every 10 seconds.For every CronJob, the CronJob Controller checks how many schedules it missed in the duration from its last scheduled time until now. If there are more than 100 missed schedules, then it does not start the Job and logs the error.
too many missed start times. Set or decrease .spec.startingDeadlineSeconds or check clock skew
This behavior is applicable for catch-up scheduling and does not mean the CronJob will stop running.
For example, when using concurrencyPolicy: Forbid, long-running Jobs may cause scheduled times to be skipped, but a new Job can be created once the previous Job completes.
It is important to note that if the startingDeadlineSeconds field is set (not nil), the controller counts how many missed Jobs occurred from the value of startingDeadlineSeconds until now rather than from the last scheduled time until now. For example, if startingDeadlineSeconds is 200, the controller counts how many missed Jobs occurred in the last 200 seconds.
A CronJob is counted as missed if it has failed to be created at its scheduled time. For example, if concurrencyPolicy is set to Forbid and a CronJob was attempted to be scheduled when there was a previous schedule still running, then it would count as missed.
For example, suppose a CronJob is set to schedule a new Job every one minute beginning at 08:30:00, and its
startingDeadlineSeconds field is not set. If the CronJob controller happens to
be down from 08:29:00 to 10:21:00, the Job will not start as the number of missed Jobs which missed their schedule is greater than 100.
To illustrate this concept further, suppose a CronJob is set to schedule a new Job every one minute beginning at 08:30:00, and its
startingDeadlineSeconds is set to 200 seconds. If the CronJob controller happens to
be down for the same period as the previous example (08:29:00 to 10:21:00,) the Job will still start at 10:22:00. This happens as the controller now checks how many missed schedules happened in the last 200 seconds (i.e., 3 missed schedules), rather than from the last scheduled time until now.
The CronJob is only responsible for creating Jobs that match its schedule, and the Job in turn is responsible for the management of the Pods it represents.
What's next
- Learn about Pods and Jobs, two concepts that CronJobs rely upon.
- Read about the detailed format
of CronJob
.spec.schedulefields. - For instructions on creating and working with CronJobs, and for an example of a CronJob manifest, see Running automated tasks with CronJobs.
CronJobis part of the Kubernetes REST API. Read the CronJob API reference for more details.
4.3.8 - ReplicationController
Legacy API for managing workloads that can scale horizontally. Superseded by the Deployment and ReplicaSet APIs.
A ReplicationController ensures that a specified number of pod replicas are running at any one time. In other words, a ReplicationController makes sure that a pod or a homogeneous set of pods is always up and available.
How a ReplicationController works
If there are too many pods, the ReplicationController terminates the extra pods. If there are too few, the ReplicationController starts more pods. Unlike manually created pods, the pods maintained by a ReplicationController are automatically replaced if they fail, are deleted, or are terminated. For example, your pods are re-created on a node after disruptive maintenance such as a kernel upgrade. For this reason, you should use a ReplicationController even if your application requires only a single pod. A ReplicationController is similar to a process supervisor, but instead of supervising individual processes on a single node, the ReplicationController supervises multiple pods across multiple nodes.
ReplicationController is often abbreviated to "rc" in discussion, and as a shortcut in kubectl commands.
A simple case is to create one ReplicationController object to reliably run one instance of a Pod indefinitely. A more complex use case is to run several identical replicas of a replicated service, such as web servers.
Running an example ReplicationController
This example ReplicationController config runs three copies of the nginx web server.
apiVersion: v1
kind: ReplicationController
metadata:
  name: nginx
spec:
  replicas: 3
  selector:
    app: nginx
  template:
    metadata:
      name: nginx
      labels:
        app: nginx
    spec:
      containers:
      - name: nginx
        image: nginx
        ports:
        - containerPort: 80
Run the example job by downloading the example file and then running this command:
kubectl apply -f https://k8s.io/examples/controllers/replication.yaml
The output is similar to this:
replicationcontroller/nginx created
Check on the status of the ReplicationController using this command:
kubectl describe replicationcontrollers/nginx
The output is similar to this:
Name:        nginx
Namespace:   default
Selector:    app=nginx
Labels:      app=nginx
Annotations:    <none>
Replicas:    3 current / 3 desired
Pods Status: 0 Running / 3 Waiting / 0 Succeeded / 0 Failed
Pod Template:
  Labels:       app=nginx
  Containers:
   nginx:
    Image:              nginx
    Port:               80/TCP
    Environment:        <none>
    Mounts:             <none>
  Volumes:              <none>
Events:
  FirstSeen       LastSeen     Count    From                        SubobjectPath    Type      Reason              Message
  ---------       --------     -----    ----                        -------------    ----      ------              -------
  20s             20s          1        {replication-controller }                    Normal    SuccessfulCreate    Created pod: nginx-qrm3m
  20s             20s          1        {replication-controller }                    Normal    SuccessfulCreate    Created pod: nginx-3ntk0
  20s             20s          1        {replication-controller }                    Normal    SuccessfulCreate    Created pod: nginx-4ok8v
Here, three pods are created, but none is running yet, perhaps because the image is being pulled. A little later, the same command may show:
Pods Status: 3 Running / 0 Waiting / 0 Succeeded / 0 Failed
To list all the pods that belong to the ReplicationController in a machine readable form, you can use a command like this:
pods=$(kubectl get pods --selector=app=nginx --output=jsonpath={.items..metadata.name})
echo $pods
The output is similar to this:
nginx-3ntk0 nginx-4ok8v nginx-qrm3m
Here, the selector is the same as the selector for the ReplicationController (seen in the
kubectl describe output), and in a different form in replication.yaml. The --output=jsonpath option
specifies an expression with the name from each pod in the returned list.
Writing a ReplicationController Manifest
As with all other Kubernetes config, a ReplicationController needs apiVersion, kind, and metadata fields.
When the control plane creates new Pods for a ReplicationController, the .metadata.name of the
ReplicationController is part of the basis for naming those Pods. The name of a ReplicationController must be a valid
DNS subdomain
value, but this can produce unexpected results for the Pod hostnames. For best compatibility,
the name should follow the more restrictive rules for a
DNS label.
For general information about working with configuration files, see object management.
A ReplicationController also needs a .spec section.
Pod Template
The .spec.template is the only required field of the .spec.
The .spec.template is a pod template. It has exactly the same schema as a Pod, except it is nested and does not have an apiVersion or kind.
In addition to required fields for a Pod, a pod template in a ReplicationController must specify appropriate labels and an appropriate restart policy. For labels, make sure not to overlap with other controllers. See pod selector.
Only a .spec.template.spec.restartPolicy equal to Always is allowed, which is the default if not specified.
For local container restarts, ReplicationControllers delegate to an agent on the node, for example the Kubelet.
Labels on the ReplicationController
The ReplicationController can itself have labels (.metadata.labels). Typically, you
would set these the same as the .spec.template.metadata.labels; if .metadata.labels is not specified
then it defaults to .spec.template.metadata.labels. However, they are allowed to be
different, and the .metadata.labels do not affect the behavior of the ReplicationController.
Pod Selector
The .spec.selector field is a label selector. A ReplicationController
manages all the pods with labels that match the selector. It does not distinguish
between pods that it created or deleted and pods that another person or process created or
deleted. This allows the ReplicationController to be replaced without affecting the running pods.
If specified, the .spec.template.metadata.labels must be equal to the .spec.selector, or it will
be rejected by the API. If .spec.selector is unspecified, it will be defaulted to
.spec.template.metadata.labels.
Also you should not normally create any pods whose labels match this selector, either directly, with another ReplicationController, or with another controller such as Job. If you do so, the ReplicationController thinks that it created the other pods. Kubernetes does not stop you from doing this.
If you do end up with multiple controllers that have overlapping selectors, you will have to manage the deletion yourself (see below).
Multiple Replicas
You can specify how many pods should run concurrently by setting .spec.replicas to the number
of pods you would like to have running concurrently. The number running at any time may be higher
or lower, such as if the replicas were just increased or decreased, or if a pod is gracefully
shutdown, and a replacement starts early.
If you do not specify .spec.replicas, then it defaults to 1.
Working with ReplicationControllers
Deleting a ReplicationController and its Pods
To delete a ReplicationController and all its pods, use kubectl delete. Kubectl will scale the ReplicationController to zero and wait
for it to delete each pod before deleting the ReplicationController itself. If this kubectl
command is interrupted, it can be restarted.
When using the REST API or client library, you need to do the steps explicitly (scale replicas to 0, wait for pod deletions, then delete the ReplicationController).
Deleting only a ReplicationController
You can delete a ReplicationController without affecting any of its pods.
Using kubectl, specify the --cascade=orphan option to kubectl delete.
When using the REST API or client library, you can delete the ReplicationController object.
Once the original is deleted, you can create a new ReplicationController to replace it. As long
as the old and new .spec.selector are the same, then the new one will adopt the old pods.
However, it will not make any effort to make existing pods match a new, different pod template.
To update pods to a new spec in a controlled way, use a rolling update.
Isolating pods from a ReplicationController
Pods may be removed from a ReplicationController's target set by changing their labels. This technique may be used to remove pods from service for debugging and data recovery. Pods that are removed in this way will be replaced automatically (assuming that the number of replicas is not also changed).
Common usage patterns
Rescheduling
As mentioned above, whether you have 1 pod you want to keep running, or 1000, a ReplicationController will ensure that the specified number of pods exists, even in the event of node failure or pod termination (for example, due to an action by another control agent).
Scaling
The ReplicationController enables scaling the number of replicas up or down, either manually or by an auto-scaling control agent, by updating the replicas field.
Rolling updates
The ReplicationController is designed to facilitate rolling updates to a service by replacing pods one-by-one.
As explained in #1353, the recommended approach is to create a new ReplicationController with 1 replica, scale the new (+1) and old (-1) controllers one by one, and then delete the old controller after it reaches 0 replicas. This predictably updates the set of pods regardless of unexpected failures.
Ideally, the rolling update controller would take application readiness into account, and would ensure that a sufficient number of pods were productively serving at any given time.
The two ReplicationControllers would need to create pods with at least one differentiating label, such as the image tag of the primary container of the pod, since it is typically image updates that motivate rolling updates.
Multiple release tracks
In addition to running multiple releases of an application while a rolling update is in progress, it's common to run multiple releases for an extended period of time, or even continuously, using multiple release tracks. The tracks would be differentiated by labels.
For instance, a service might target all pods with tier in (frontend), environment in (prod). Now say you have 10 replicated pods that make up this tier. But you want to be able to 'canary' a new version of this component. You could set up a ReplicationController with replicas set to 9 for the bulk of the replicas, with labels tier=frontend, environment=prod, track=stable, and another ReplicationController with replicas set to 1 for the canary, with labels tier=frontend, environment=prod, track=canary. Now the service is covering both the canary and non-canary pods. But you can mess with the ReplicationControllers separately to test things out, monitor the results, etc.
Using ReplicationControllers with Services
Multiple ReplicationControllers can sit behind a single service, so that, for example, some traffic goes to the old version, and some goes to the new version.
A ReplicationController will never terminate on its own, but it isn't expected to be as long-lived as services. Services may be composed of pods controlled by multiple ReplicationControllers, and it is expected that many ReplicationControllers may be created and destroyed over the lifetime of a service (for instance, to perform an update of pods that run the service). Both services themselves and their clients should remain oblivious to the ReplicationControllers that maintain the pods of the services.
Writing programs for Replication
Pods created by a ReplicationController are intended to be fungible and semantically identical, though their configurations may become heterogeneous over time. This is an obvious fit for replicated stateless servers, but ReplicationControllers can also be used to maintain availability of master-elected, sharded, and worker-pool applications. Such applications should use dynamic work assignment mechanisms, such as the RabbitMQ work queues, as opposed to static/one-time customization of the configuration of each pod, which is considered an anti-pattern. Any pod customization performed, such as vertical auto-sizing of resources (for example, cpu or memory), should be performed by another online controller process, not unlike the ReplicationController itself.
Responsibilities of the ReplicationController
The ReplicationController ensures that the desired number of pods matches its label selector and are operational. Currently, only terminated pods are excluded from its count. In the future, readiness and other information available from the system may be taken into account, we may add more controls over the replacement policy, and we plan to emit events that could be used by external clients to implement arbitrarily sophisticated replacement and/or scale-down policies.
The ReplicationController is forever constrained to this narrow responsibility. It itself will not perform readiness nor liveness probes. Rather than performing auto-scaling, it is intended to be controlled by an external auto-scaler (as discussed in #492), which would change its replicas field. We will not add scheduling policies (for example, spreading) to the ReplicationController. Nor should it verify that the pods controlled match the currently specified template, as that would obstruct auto-sizing and other automated processes. Similarly, completion deadlines, ordering dependencies, configuration expansion, and other features belong elsewhere. We even plan to factor out the mechanism for bulk pod creation (#170).
The ReplicationController is intended to be a composable building-block primitive. We expect higher-level APIs and/or tools to be built on top of it and other complementary primitives for user convenience in the future. The "macro" operations currently supported by kubectl (run, scale) are proof-of-concept examples of this. For instance, we could imagine something like Asgard managing ReplicationControllers, auto-scalers, services, scheduling policies, canaries, etc.
API Object
Replication controller is a top-level resource in the Kubernetes REST API. More details about the API object can be found at: ReplicationController API object.
Alternatives to ReplicationController
ReplicaSet
ReplicaSet is the next-generation ReplicationController that supports the new set-based label selector.
It's mainly used by Deployment as a mechanism to orchestrate pod creation, deletion and updates.
Note that we recommend using Deployments instead of directly using Replica Sets, unless you require custom update orchestration or don't require updates at all.
Deployment (Recommended)
Deployment is a higher-level API object that updates its underlying Replica Sets and their Pods. Deployments are recommended if you want the rolling update functionality, because they are declarative, server-side, and have additional features.
Bare Pods
Unlike in the case where a user directly created pods, a ReplicationController replaces pods that are deleted or terminated for any reason, such as in the case of node failure or disruptive node maintenance, such as a kernel upgrade. For this reason, we recommend that you use a ReplicationController even if your application requires only a single pod. Think of it similarly to a process supervisor, only it supervises multiple pods across multiple nodes instead of individual processes on a single node. A ReplicationController delegates local container restarts to some agent on the node, such as the kubelet.
Job
Use a Job instead of a ReplicationController for pods that are expected to terminate on their own
(that is, batch jobs).
DaemonSet
Use a DaemonSet instead of a ReplicationController for pods that provide a
machine-level function, such as machine monitoring or machine logging. These pods have a lifetime that is tied
to a machine lifetime: the pod needs to be running on the machine before other pods start, and are
safe to terminate when the machine is otherwise ready to be rebooted/shutdown.
What's next
- Learn about Pods.
- Learn about Deployment, the replacement for ReplicationController.
ReplicationControlleris part of the Kubernetes REST API. Read the ReplicationController object definition to understand the API for replication controllers.
4.4 - PodGroup API
FEATURE STATE:
Kubernetes v1.35 [alpha](disabled by default)A PodGroup is a runtime object that represents a group of Pods scheduled together as a single unit. While the Workload API defines scheduling policy templates, PodGroups are the runtime counterparts that carry both the policy and the scheduling status for a specific instance of that group.
What is a PodGroup?
The PodGroup API resource is part of the scheduling.k8s.io/v1alpha2
API group
and your cluster must have that API group enabled, as well as the GenericWorkload
feature gate,
before you can use this API.
A PodGroup is a self-contained scheduling unit. It defines the group of Pods that should be scheduled together, carries the scheduling policy that governs placement, and records the runtime status of that scheduling decision.
API structure
A PodGroup consists of a spec that defines the desired scheduling behavior and
a status that reflects the current scheduling state.
Scheduling policy
Each PodGroup carries a scheduling policy
(basic or gang) in spec.schedulingPolicy. When a workload controller creates
the PodGroup, this policy is copied from the Workload's PodGroupTemplate at creation time.
For standalone PodGroups, you set the policy directly.
spec:
  schedulingPolicy:
    gang:
      minCount: 4
Template reference
The optional spec.podGroupTemplateRef links the PodGroup back to the PodGroupTemplate
in the Workload it was created from. This is useful for observability and tooling.
spec:
  podGroupTemplateRef:
    workload:
      workloadName: training-policy
      podGroupTemplateName: worker
Requesting DRA devices for a PodGroup
FEATURE STATE:
Kubernetes v1.36 [alpha](disabled by default)Devices available through
Dynamic Resource Allocation (DRA)
can be requested by a PodGroup through its spec.resourceClaims field:
apiVersion: scheduling.k8s.io/v1alpha2
kind: PodGroup
metadata:
  name: training-group
  namespace: some-ns
spec:
  ...
  resourceClaims:
  - name: pg-claim
    resourceClaimName: my-pg-claim
  - name: pg-claim-template
    resourceClaimTemplateName: my-pg-template
ResourceClaims
associated with PodGroups can be shared by all Pods belonging to the group. With
only a reference to the PodGroup in the ResourceClaim's status.reservedFor
instead of each individual Pod, any number of Pods in the same PodGroup can
share a ResourceClaim. ResourceClaims can also be generated from
ResourceClaimTemplates
for each PodGroup, allowing the devices allocated to each generated
ResourceClaim to be shared by the Pods in each PodGroup.
For more details and a more complete example, see the DRA documentation.
Status
The scheduler updates status.conditions to report whether the group has been
successfully scheduled. The primary condition is PodGroupScheduled, which is True
when all required Pods have been placed and False when scheduling fails.
Note:
ThePodGroupScheduled condition reflects the initial scheduling decision only.
The scheduler does not update it if Pods later fail or are evicted. See
Limitations
for details.See the PodGroup lifecycle page for the full list of conditions and reasons.
Creating a PodGroup
A PodGroup API resource is part of the scheduling.k8s.io/v1alpha2
API group.
(and your cluster must have that API group enabled, as well as the GenericWorkload
feature gate,
before you can use this API).
The following manifest creates a PodGroup with a gang scheduling policy that requires at least 4 Pods to be schedulable simultaneously:
apiVersion: scheduling.k8s.io/v1alpha2
kind: PodGroup
metadata:
  name: training-worker-0
  namespace: default
spec:
  schedulingPolicy:
    gang:
      minCount: 4
You can inspect PodGroups in your cluster:
kubectl get podgroups
To see the full status including scheduling conditions:
kubectl describe podgroup training-worker-0
How it fits together
The relationship between controllers, Workloads, PodGroups, and Pods follows this pattern:
- The workload controller creates a Workload that defines PodGroupTemplates with scheduling policies.
- For each runtime instance, the controller creates a PodGroup from one of the Workload's PodGroupTemplates.
- The controller creates Pods that reference the PodGroup
via the
spec.schedulingGroup.podGroupNamefield.
The Job controller is the only built-in workload controller that follows this pattern for now. Custom controllers can implement the same flow for their own workload types.
apiVersion: scheduling.k8s.io/v1alpha2
kind: Workload
metadata:
  name: training-policy
spec:
  podGroupTemplates:
  - name: worker
    schedulingPolicy:
      gang:
        minCount: 4
---
apiVersion: scheduling.k8s.io/v1alpha2
kind: PodGroup
metadata:
  name: training-worker-0
spec:
  podGroupTemplateRef:
    workload:
      workloadName: training-policy
      podGroupTemplateName: worker
  schedulingPolicy:
    gang:
      minCount: 4
---
apiVersion: v1
kind: Pod
metadata:
  name: worker-0
spec:
  schedulingGroup:
    podGroupName: training-worker-0
  containers:
  - name: ml-worker
    image: training:v1
The Workload acts as a long-lived policy definition, while PodGroups handle the transient, per-instance runtime state. This separation means that status updates for individual PodGroups do not contend on the shared Workload object.
What's next
- Learn about the PodGroup lifecycle in detail.
- Read about the Workload API that provides PodGroupTemplates.
- See how Pods reference their PodGroup via the scheduling group field.
- Understand the gang scheduling algorithm.
4.4.1 - PodGroup Lifecycle
FEATURE STATE:
Kubernetes v1.35 [alpha](disabled by default)A PodGroup is scheduled as a unit and protected from premature deletion while its Pods are still running.
Ownership and lifecycle
PodGroups are owned by the workload controller that created them (for example, a Job)
via standard ownerReferences. When the owning object is deleted, PodGroups are
automatically garbage collected.
PodGroup names must be unique within a namespace and must be valid
DNS subdomains.
Creation ordering
Controllers must create objects in this order:
Workload— the scheduling policy template.PodGroup— the runtime instance.Pods— withspec.schedulingGroup.podGroupNamepointing to thePodGroup.
If a PodGroup includes a podGroupTemplateRef that points to a Workload that does
not exist (or is being deleted), the API server rejects the PodGroup creation request.
The referenced Workload must exist before the PodGroup can be created.
If a Pod references a PodGroup that does not yet exist, the Pod remains pending.
The scheduler automatically queues the Pod for scheduling once the PodGroup is created.
Deletion protection
A PodGroup cannot be fully deleted while any of its Pods are still running.
A dedicated finalizer ensures that deletion is blocked until all Pods referencing the
PodGroup have reached a terminal phase (Succeeded or Failed).
Controller-managed and user-managed PodGroups
In most cases, workload controllers (for example, Job) create PodGroups automatically
(controller-managed). The controller determines the podGroupName for each Pod
at creation time, similar to how a DaemonSet sets node affinity per Pod.
If you need more control over naming and lifecycle, you can create PodGroup objects directly and set
spec.schedulingGroup.podGroupName in your Pod templates yourself
(user-managed). This gives you full control over PodGroup creation and naming.
Limitations
- All Pods in a
PodGroupmust use the same.spec.schedulerName. If a mismatch is detected, the scheduler rejects all Pods in the group as unschedulable. - The
spec.schedulingPolicy.gang.minCountfield on a PodGroup is immutable. Once created, you cannot change the minimum number of Pods that must be schedulable for the group to be admitted. - The
spec.schedulingGroupfield on a Pod is immutable. Once set, a Pod cannot move to a different PodGroup. - The maximum number of
PodGroupTemplatesin a singleWorkloadis 8. - The
PodGroupScheduledcondition reflects the outcome of the initial scheduling attempt only. Once the condition is set toTrue, the scheduler does not update it if Pods later fail, are evicted, or stop running.
What's next
- Learn about the PodGroup API overview and structure.
- Learn about the Workload API that provides
PodGroupTemplates. - See how Pods reference their PodGroup via the scheduling group field.
- Understand the gang scheduling algorithm.
- Read PodGroup scheduling policies for details on
basicandgang.
4.5 - Managing Workloads
You've deployed your application and exposed it via a Service. Now what? Kubernetes provides a number of tools to help you manage your application deployment, including scaling and updating.
Organizing resource configurations
Many applications require multiple resources to be created, such as a Deployment along with a Service.
Management of multiple resources can be simplified by grouping them together in the same file
(separated by --- in YAML). For example:
apiVersion: v1
kind: Service
metadata:
  name: my-nginx-svc
  labels:
    app: nginx
spec:
  type: LoadBalancer
  ports:
  - port: 80
  selector:
    app: nginx
---
apiVersion: apps/v1
kind: Deployment
metadata:
  name: my-nginx
  labels:
    app: nginx
spec:
  replicas: 3
  selector:
    matchLabels:
      app: nginx
  template:
    metadata:
      labels:
        app: nginx
    spec:
      containers:
      - name: nginx
        image: nginx:1.14.2
        ports:
        - containerPort: 80
Multiple resources can be created the same way as a single resource:
kubectl apply -f https://k8s.io/examples/application/nginx-app.yaml
service/my-nginx-svc created
deployment.apps/my-nginx created
The resources will be created in the order they appear in the manifest. Therefore, it's best to specify the Service first, since that will ensure the scheduler can spread the pods associated with the Service as they are created by the controller(s), such as Deployment.
kubectl apply also accepts multiple -f arguments:
kubectl apply -f https://k8s.io/examples/application/nginx/nginx-svc.yaml \
  -f https://k8s.io/examples/application/nginx/nginx-deployment.yaml
It is a recommended practice to put resources related to the same microservice or application tier into the same file, and to group all of the files associated with your application in the same directory. If the tiers of your application bind to each other using DNS, you can deploy all of the components of your stack together.
A URL can also be specified as a configuration source, which is handy for deploying directly from manifests in your source control system:
kubectl apply -f https://k8s.io/examples/application/nginx/nginx-deployment.yaml
deployment.apps/my-nginx created
If you need to define more manifests, such as adding a ConfigMap, you can do that too.
External tools
This section lists only the most common tools used for managing workloads on Kubernetes. To see a larger list, view Application definition and image build in the CNCF Landscape.
Helm
🛇 This item links to a third party project or product that is not part of Kubernetes itself. More information
Helm is a tool for managing packages of pre-configured Kubernetes resources. These packages are known as Helm charts.
Kustomize
Kustomize traverses a Kubernetes manifest to add, remove or update configuration options. It is available both as a standalone binary and as a native feature of kubectl.
Bulk operations in kubectl
Resource creation isn't the only operation that kubectl can perform in bulk. It can also extract
resource names from configuration files in order to perform other operations, in particular to
delete the same resources you created:
kubectl delete -f https://k8s.io/examples/application/nginx-app.yaml
deployment.apps "my-nginx" deleted
service "my-nginx-svc" deleted
In the case of two resources, you can specify both resources on the command line using the resource/name syntax:
kubectl delete deployments/my-nginx services/my-nginx-svc
For larger numbers of resources, you'll find it easier to specify the selector (label query)
specified using -l or --selector, to filter resources by their labels:
kubectl delete deployment,services -l app=nginx
deployment.apps "my-nginx" deleted
service "my-nginx-svc" deleted
Chaining and filtering
Because kubectl outputs resource names in the same syntax it accepts, you can chain operations
using $() or xargs:
kubectl get $(kubectl create -f docs/concepts/cluster-administration/nginx/ -o name | grep service/ )
kubectl create -f docs/concepts/cluster-administration/nginx/ -o name | grep service/ | xargs -i kubectl get '{}'
The output might be similar to:
NAME           TYPE           CLUSTER-IP   EXTERNAL-IP   PORT(S)      AGE
my-nginx-svc   LoadBalancer   10.0.0.208   <pending>     80/TCP       0s
With the above commands, first you create resources under docs/concepts/cluster-administration/nginx/ and print
the resources created with -o name output format (print each resource as resource/name).
Then you grep only the Service, and then print it with kubectl get.
Recursive operations on local files
If you happen to organize your resources across several subdirectories within a particular
directory, you can recursively perform the operations on the subdirectories also, by specifying
--recursive or -R alongside the --filename/-f argument.
For instance, assume there is a directory project/k8s/development that holds all of the
manifests needed for the development environment,
organized by resource type:
project/k8s/development
├── configmap
│   └── my-configmap.yaml
├── deployment
│   └── my-deployment.yaml
└── pvc
    └── my-pvc.yaml
By default, performing a bulk operation on project/k8s/development will stop at the first level
of the directory, not processing any subdirectories. If you had tried to create the resources in
this directory using the following command, we would have encountered an error:
kubectl apply -f project/k8s/development
error: you must provide one or more resources by argument or filename (.json|.yaml|.yml|stdin)
Instead, specify the --recursive or -R command line argument along with the --filename/-f argument:
kubectl apply -f project/k8s/development --recursive
configmap/my-config created
deployment.apps/my-deployment created
persistentvolumeclaim/my-pvc created
The --recursive argument works with any operation that accepts the --filename/-f argument such as:
kubectl create, kubectl get, kubectl delete, kubectl describe, or even kubectl rollout.
The --recursive argument also works when multiple -f arguments are provided:
kubectl apply -f project/k8s/namespaces -f project/k8s/development --recursive
namespace/development created
namespace/staging created
configmap/my-config created
deployment.apps/my-deployment created
persistentvolumeclaim/my-pvc created
If you're interested in learning more about kubectl, go ahead and read
Command line tool (kubectl).
Updating your application without an outage
At some point, you'll eventually need to update your deployed application, typically by specifying
a new image or image tag. kubectl supports several update operations, each of which is applicable
to different scenarios.
You can run multiple copies of your app, and use a rollout to gradually shift the traffic to new healthy Pods. Eventually, all the running Pods would have the new software.
This section of the page guides you through how to create and update applications with Deployments.
Let's say you were running version 1.14.2 of nginx:
kubectl create deployment my-nginx --image=nginx:1.14.2
deployment.apps/my-nginx created
Ensure that there is 1 replica:
kubectl scale --replicas 1 deployments/my-nginx --subresource='scale' --type='merge' -p '{"spec":{"replicas": 1}}'
deployment.apps/my-nginx scaled
and allow Kubernetes to add more temporary replicas during a rollout, by setting a surge maximum of 100%:
kubectl patch --type='merge' -p '{"spec":{"strategy":{"rollingUpdate":{"maxSurge": "100%" }}}}'
deployment.apps/my-nginx patched
To update to version 1.16.1, change .spec.template.spec.containers[0].image from nginx:1.14.2
to nginx:1.16.1 using kubectl edit:
kubectl edit deployment/my-nginx
# Change the manifest to use the newer container image, then save your changes
That's it! The Deployment will declaratively update the deployed nginx application progressively behind the scene. It ensures that only a certain number of old replicas may be down while they are being updated, and only a certain number of new replicas may be created above the desired number of pods. To learn more details about how this happens, visit Deployment.
You can use rollouts with DaemonSets, Deployments, or StatefulSets.
Managing rollouts
You can use kubectl rollout to manage a
progressive update of an existing application.
For example:
kubectl apply -f my-deployment.yaml

# wait for rollout to finish
kubectl rollout status deployment/my-deployment --timeout 10m # 10 minute timeout
or
kubectl apply -f backing-stateful-component.yaml

# don't wait for rollout to finish, just check the status
kubectl rollout status statefulsets/backing-stateful-component --watch=false
You can also pause, resume or cancel a rollout.
Visit kubectl rollout to learn more.
Canary deployments
Another scenario where multiple labels are needed is to distinguish deployments of different releases or configurations of the same component. It is common practice to deploy a canary of a new application release (specified via image tag in the pod template) side by side with the previous release so that the new release can receive live production traffic before fully rolling it out.
For instance, you can use a track label to differentiate different releases.
The primary, stable release would have a track label with value as stable:
name: frontend
replicas: 3
...
labels:
   app: guestbook
   tier: frontend
   track: stable
...
image: gb-frontend:v3
and then you can create a new release of the guestbook frontend that carries the track label
with different value (i.e. canary), so that two sets of pods would not overlap:
name: frontend-canary
replicas: 1
...
labels:
app: guestbook
tier: frontend
track: canary
...
image: gb-frontend:v4
The frontend service would span both sets of replicas by selecting the common subset of their
labels (i.e. omitting the track label), so that the traffic will be redirected to both
applications:
selector:
app: guestbook
tier: frontend
You can tweak the number of replicas of the stable and canary releases to determine the ratio of each release that will receive live production traffic (in this case, 3:1). Once you're confident, you can update the stable track to the new application release and remove the canary one.
Updating annotations
Sometimes you would want to attach annotations to resources. Annotations are arbitrary
non-identifying metadata for retrieval by API clients such as tools or libraries.
This can be done with kubectl annotate. For example:
kubectl annotate pods my-nginx-v4-9gw19 description='my frontend running nginx'
kubectl get pods my-nginx-v4-9gw19 -o yaml
apiVersion: v1
kind: pod
metadata:
annotations:
description: my frontend running nginx
...
For more information, see annotations and kubectl annotate.
Scaling your application
When load on your application grows or shrinks, use kubectl to scale your application.
For instance, to decrease the number of nginx replicas from 3 to 1, do:
kubectl scale deployment/my-nginx --replicas=1
deployment.apps/my-nginx scaled
Now you only have one pod managed by the deployment.
kubectl get pods -l app=my-nginx
NAME READY STATUS RESTARTS AGE
my-nginx-2035384211-j5fhi 1/1 Running 0 30m
To have the system automatically choose the number of nginx replicas as needed, ranging from 1 to 3, do:
# This requires an existing source of container and Pod metrics
kubectl autoscale deployment/my-nginx --min=1 --max=3
horizontalpodautoscaler.autoscaling/my-nginx autoscaled
Now your nginx replicas will be scaled up and down as needed, automatically.
For more information, please see kubectl scale, kubectl autoscale and horizontal pod autoscaler document.
In-place updates of resources
Sometimes it's necessary to make narrow, non-disruptive updates to resources you've created.
kubectl apply
It is suggested to maintain a set of configuration files in source control
(see configuration as code),
so that they can be maintained and versioned along with the code for the resources they configure.
Then, you can use kubectl apply
to push your configuration changes to the cluster.
This command will compare the version of the configuration that you're pushing with the previous version and apply the changes you've made, without overwriting any automated changes to properties you haven't specified.
kubectl apply -f https://k8s.io/examples/application/nginx/nginx-deployment.yaml
deployment.apps/my-nginx configured
To learn more about the underlying mechanism, read server-side apply.
kubectl edit
Alternatively, you may also update resources with kubectl edit:
kubectl edit deployment/my-nginx
This is equivalent to first get the resource, edit it in text editor, and then apply the
resource with the updated version:
kubectl get deployment my-nginx -o yaml > /tmp/nginx.yaml
vi /tmp/nginx.yaml
# do some edit, and then save the file
kubectl apply -f /tmp/nginx.yaml
deployment.apps/my-nginx configured
rm /tmp/nginx.yaml
This allows you to do more significant changes more easily. Note that you can specify the editor
with your EDITOR or KUBE_EDITOR environment variables.
For more information, please see kubectl edit.
kubectl patch
You can use kubectl patch to update API objects in place.
This subcommand supports JSON patch,
JSON merge patch, and strategic merge patch.
See Update API Objects in Place Using kubectl patch for more details.
Disruptive updates
In some cases, you may need to update resource fields that cannot be updated once initialized, or
you may want to make a recursive change immediately, such as to fix broken pods created by a
Deployment. To change such fields, use replace --force, which deletes and re-creates the
resource. In this case, you can modify your original configuration file:
kubectl replace -f https://k8s.io/examples/application/nginx/nginx-deployment.yaml --force
deployment.apps/my-nginx deleted
deployment.apps/my-nginx replaced
What's next
4.6 - Autoscaling Workloads
With autoscaling, you can automatically update your workloads in one way or another. This allows your cluster to react to changes in resource demand more elastically and efficiently.
In Kubernetes, you can scale a workload depending on the current demand of resources. This allows your cluster to react to changes in resource demand more elastically and efficiently.
When you scale a workload, you can either increase or decrease the number of replicas managed by the workload, or adjust the resources available to the replicas in-place.
The first approach is referred to as horizontal scaling, while the second is referred to as vertical scaling.
There are manual and automatic ways to scale your workloads, depending on your use case.
Scaling workloads manually
Kubernetes supports manual scaling of workloads. Horizontal scaling can be done
using the kubectl CLI.
For vertical scaling, you need to patch the resource definition of your workload.
See below for examples of both strategies.
- Horizontal scaling: Running multiple instances of your app
- Vertical scaling: Resizing CPU and memory resources assigned to containers
Scaling workloads automatically
Kubernetes also supports automatic scaling of workloads, which is the focus of this page.
The concept of Autoscaling in Kubernetes refers to the ability to automatically update an object that manages a set of Pods (for example a Deployment).
Scaling workloads horizontally
In Kubernetes, you can automatically scale a workload horizontally using a HorizontalPodAutoscaler (HPA).
It is implemented as a Kubernetes API resource and a controller and periodically adjusts the number of replicas in a workload to match observed resource utilization such as CPU or memory usage.
There is a walkthrough tutorial of configuring a HorizontalPodAutoscaler for a Deployment.
Scaling workloads vertically
FEATURE STATE:
Kubernetes v1.25 [stable]You can automatically scale a workload vertically using a VerticalPodAutoscaler (VPA). Unlike the HPA, the VPA doesn't come with Kubernetes by default, but is a an add-on that you or a cluster administrator may need to deploy before you can use it.
Once installed, it allows you to create CustomResourceDefinitions (CRDs) for your workloads which define how and when to scale the resources of the managed replicas.
Note:
You will need to have the Metrics Server installed to your cluster for the VPA to work.In-place pod vertical scaling
FEATURE STATE:
Kubernetes v1.35 [stable](enabled by default)As of Kubernetes 1.36, VPA does not support resizing pods in-place, but this integration is being worked on. For manually resizing pods in-place, see Resize Container Resources In-Place.
Autoscaling based on cluster size
For workloads that need to be scaled based on the size of the cluster (for example
cluster-dns or other system components), you can use the
Cluster Proportional Autoscaler.
Just like the VPA, it is not part of the Kubernetes core, but hosted as its
own project on GitHub.
The Cluster Proportional Autoscaler watches the number of schedulable nodes and cores and scales the number of replicas of the target workload accordingly.
If the number of replicas should stay the same, you can scale your workloads vertically according to the cluster size using the Cluster Proportional Vertical Autoscaler. The project is currently in beta and can be found on GitHub.
While the Cluster Proportional Autoscaler scales the number of replicas of a workload, the Cluster Proportional Vertical Autoscaler adjusts the resource requests for a workload (for example a Deployment or DaemonSet) based on the number of nodes and/or cores in the cluster.
Event driven Autoscaling
It is also possible to scale workloads based on events, for example using the Kubernetes Event Driven Autoscaler (KEDA).
KEDA is a CNCF-graduated project enabling you to scale your workloads based on the number of events to be processed, for example the amount of messages in a queue. There exists a wide range of adapters for different event sources to choose from.
Autoscaling based on schedules
Another strategy for scaling your workloads is to schedule the scaling operations, for example in order to reduce resource consumption during off-peak hours.
Similar to event driven autoscaling, such behavior can be achieved using KEDA in conjunction with
its Cron scaler.
The Cron scaler allows you to define schedules (and time zones) for scaling your workloads in or out.
Scaling cluster infrastructure
If scaling workloads isn't enough to meet your needs, you can also scale your cluster infrastructure itself.
Scaling the cluster infrastructure normally means adding or removing nodes. Read Node autoscaling for more information.
What's next
- Learn more about scaling horizontally
- Resize Container Resources In-Place
- Autoscale the DNS Service in a Cluster
- Learn about Node autoscaling
4.7 - Horizontal Pod Autoscaling
In Kubernetes, a HorizontalPodAutoscaler automatically updates a workload resource (such as a Deployment or StatefulSet), with the aim of automatically scaling capacity to match demand.
Horizontal scaling means that the response to increased load is to deploy more Pods. This is different from vertical scaling, which for Kubernetes would mean assigning more resources (for example: memory or CPU) to the Pods that are already running for the workload.
If the load decreases, and the number of Pods is above the configured minimum, the HorizontalPodAutoscaler instructs the workload resource (the Deployment, StatefulSet, or other similar resource) to scale back down.
Horizontal pod autoscaling does not apply to objects that can't be scaled (for example: a DaemonSet.)
The HorizontalPodAutoscaler is implemented as a Kubernetes API resource and a controller. The resource determines the behavior of the controller. The horizontal pod autoscaling controller, running within the Kubernetes control plane, periodically adjusts the desired scale of its target (for example, a Deployment) to match observed metrics such as average CPU utilization, average memory utilization, or any other custom metric you specify.
There is walkthrough example of using horizontal pod autoscaling.
How does a HorizontalPodAutoscaler work?
graph BT
hpa[HorizontalPodAutoscaler] --> scale[Scale]
subgraph rc[Deployment]
scale
end
scale -.-> pod1[Pod 1]
scale -.-> pod2[Pod 2]
scale -.-> pod3[Pod N]
classDef hpa fill:#D5A6BD,stroke:#1E1E1D,stroke-width:1px,color:#1E1E1D;
classDef rc fill:#F9CB9C,stroke:#1E1E1D,stroke-width:1px,color:#1E1E1D;
classDef scale fill:#B6D7A8,stroke:#1E1E1D,stroke-width:1px,color:#1E1E1D;
classDef pod fill:#9FC5E8,stroke:#1E1E1D,stroke-width:1px,color:#1E1E1D;
class hpa hpa;
class rc rc;
class scale scale;
class pod1,pod2,pod3 pod
Figure 1. HorizontalPodAutoscaler controls the scale of a Deployment and its ReplicaSet
Kubernetes implements horizontal pod autoscaling as a control loop that runs intermittently
(it is not a continuous process). The interval is set by the
--horizontal-pod-autoscaler-sync-period parameter to the
kube-controller-manager
(and the default interval is 15 seconds).
Once during each period, the controller manager queries the resource utilization against the
metrics specified in each HorizontalPodAutoscaler definition. The controller manager
finds the target resource defined by the scaleTargetRef,
then selects the pods based on the target resource's .spec.selector labels,
and obtains the metrics from either the resource metrics API (for per-pod resource metrics),
or the custom metrics API (for all other metrics).
For per-pod resource metrics (like CPU), the controller fetches the metrics from the resource metrics API for each Pod targeted by the HorizontalPodAutoscaler. Then, if a target utilization value is set, the controller calculates the utilization value as a percentage of the equivalent resource request on the containers in each Pod. If a target raw value is set, the raw metric values are used directly. The controller then takes the mean of the utilization or the raw value (depending on the type of target specified) across all targeted Pods, and produces a ratio used to scale the number of desired replicas.
Please note that if some of the Pod's containers do not have the relevant resource request set, CPU utilization for the Pod will not be defined and the autoscaler will not take any action for that metric. See the algorithm details section below for more information about how the autoscaling algorithm works.
For per-pod custom metrics, the controller functions similarly to per-pod resource metrics, except that it works with raw values, not utilization values.
For object metrics and external metrics, a single metric is fetched, which describes the object in question. This metric is compared to the target value, to produce a ratio as above. In the
autoscaling/v2API version, this value can optionally be divided by the number of Pods before the comparison is made.
The common use for HorizontalPodAutoscaler is to configure it to fetch metrics from
aggregated APIs
(metrics.k8s.io, custom.metrics.k8s.io, or external.metrics.k8s.io). The metrics.k8s.io API is
usually provided by an add-on named Metrics Server, which needs to be launched separately.
For more information about resource metrics, see
Metrics Server.
Support for metrics APIs explains the stability guarantees and support status for these different APIs.
The HorizontalPodAutoscaler controller accesses corresponding workload resources that support scaling (such as Deployments
and StatefulSet). These resources each have a subresource named scale, an interface that allows you to dynamically set the
number of replicas and examine each of their current states.
For general information about subresources in the Kubernetes API, see
Kubernetes API Concepts.
Algorithm details
From the most basic perspective, the HorizontalPodAutoscaler controller operates on the ratio between desired metric value and current metric value:
$$\begin{equation*}
desiredReplicas = ceil\left\lceil currentReplicas \times \frac{currentMetricValue}{desiredMetricValue} \right\rceil
\end{equation*}$$
For example, if the current metric value is 200m, and the desired value
is 100m, the number of replicas will be doubled, since
\( { 200.0 \div 100.0 } = 2.0 \).
If the current value is instead 50m, you'll halve the number of
replicas, since \( { 50.0 \div 100.0 } = 0.5 \). The control plane skips any scaling
action if the ratio is sufficiently close to 1.0 (within a
configurable tolerance, 0.1 by default).
When a targetAverageValue or targetAverageUtilization is specified,
the currentMetricValue is computed by taking the average of the given
metric across all Pods in the HorizontalPodAutoscaler's scale target.
Before checking the tolerance and deciding on the final values, the control
plane also considers whether any metrics are missing, and how many Pods
are Ready.
For per-pod resource metrics, all Pods with a deletion timestamp set
(objects with a deletion timestamp are in the process of being shut
down / removed) are ignored, and all failed Pods are discarded.
For external and object metrics, the replica count is based on the
number of Running and Ready Pods; terminating Pods that are still Ready
continue to count toward that total.
If a particular Pod is missing metrics, it is set aside for later; Pods with missing metrics will be used to adjust the final scaling amount.
When scaling on CPU, if any pod has yet to become ready (it's still initializing, or possibly is unhealthy) or the most recent metric point for the pod was before it became ready, that pod is set aside as well.
Due to technical constraints, the HorizontalPodAutoscaler controller
cannot exactly determine the first time a pod becomes ready when
determining whether to set aside certain CPU metrics. Instead, it
considers a Pod "not yet ready" if it's unready and transitioned to
ready within a short, configurable window of time since it started.
This value is configured with the --horizontal-pod-autoscaler-initial-readiness-delay
command line option, and its default is 30 seconds.
Once a pod has become ready, it considers any transition to
ready to be the first if it occurred within a longer, configurable time
since it started. This value is configured with the
--horizontal-pod-autoscaler-cpu-initialization-period command line option,
and its default is 5 minutes.
The \( currentMetricValue \over desiredMetricValue \) base scale ratio is then calculated, using the remaining pods not set aside or discarded from above.
If there were any missing metrics, the control plane recomputes the average more conservatively, assuming those pods were consuming 100% of the desired value in case of a scale down, and 0% in case of a scale up. This dampens the magnitude of any potential scale.
Furthermore, if any not-yet-ready pods were present, and the workload would have scaled up without factoring in missing metrics or not-yet-ready pods, the controller conservatively assumes that the not-yet-ready pods are consuming 0% of the desired metric, further dampening the magnitude of a scale up.
After factoring in the not-yet-ready pods and missing metrics, the controller recalculates the usage ratio. If the new ratio reverses the scale direction, or is within the tolerance, the controller doesn't take any scaling action. In other cases, the new ratio is used to decide any change to the number of Pods.
Note that the original value for the average utilization is reported back via the HorizontalPodAutoscaler status, without factoring in the not-yet-ready pods or missing metrics, even when the new usage ratio is used.
If multiple metrics are specified in a HorizontalPodAutoscaler, this
calculation is done for each metric, and then the largest of the desired
replica counts is chosen. If any of these metrics cannot be converted
into a desired replica count (e.g. due to an error fetching the metrics
from the metrics APIs) and a scale down is suggested by the metrics which
can be fetched, scaling is skipped. This means that the HPA is still capable
of scaling up if one or more metrics give a desiredReplicas greater than
the current value.
Finally, right before HPA scales the target, the scale recommendation is recorded. The
controller considers all recommendations within a configurable window choosing the
highest recommendation from within that window. You can configure this value using the
--horizontal-pod-autoscaler-downscale-stabilization command line option, which defaults to 5 minutes.
This means that scaledowns will occur gradually, smoothing out the impact of rapidly
fluctuating metric values.
Pod readiness and autoscaling metrics
The HorizontalPodAutoscaler (HPA) controller includes two command line options that influence how CPU metrics are collected from Pods during startup:
--horizontal-pod-autoscaler-cpu-initialization-period(default: 5 minutes)
This defines the time window after a Pod starts during which its CPU usage is ignored unless:
- The Pod is in a Ready state and
- The metric sample was taken entirely during the period it was Ready.
This command line option helps exclude misleading high CPU usage from initializing Pods (for example: Java apps warming up) in HPA scaling decisions.
--horizontal-pod-autoscaler-initial-readiness-delay(default: 30 seconds)
This defines a short delay period after a Pod starts during which the HPA controller treats Pods that are currently Unready as still initializing, even if they have previously transitioned to Ready briefly.
It is designed to:
- Avoid including Pods that rapidly fluctuate between Ready and Unready during startup.
- Ensure stability in the initial readiness signal before HPA considers their metrics valid.
You can only set these command line options cluster-wide.
Key behaviors for pod readiness
- If a Pod is
Readyand remainsReady, it can be counted as contributing metrics even within the delay. - If a Pod rapidly toggles between
ReadyandUnready, metrics are ignored until it’s considered stablyReady.
Good practice for pod readiness
- Configure a
startupProbethat doesn't pass until the high CPU usage has passed, or - Ensure your
readinessProbeonly reportsReadyafter the CPU spike subsides, usinginitialDelaySeconds.
And ideally also set --horizontal-pod-autoscaler-cpu-initialization-period to cover the startup duration.
API object
The HorizontalPodAutoscaler is an API kind in the Kubernetes
autoscaling API group. The current stable version can be found in
the autoscaling/v2 API version which includes support for scaling on
memory and custom metrics. The new fields introduced in
autoscaling/v2 are preserved as annotations when working with
autoscaling/v1.
When you create a HorizontalPodAutoscaler API object, make sure the name specified is a valid DNS subdomain name. More details about the API object can be found at HorizontalPodAutoscaler Object.
Stability of workload scale
When managing the scale of a group of replicas using the HorizontalPodAutoscaler, it is possible that the number of replicas keeps fluctuating frequently due to the dynamic nature of the metrics evaluated. This is sometimes referred to as thrashing, or flapping. It's similar to the concept of hysteresis in cybernetics.
Autoscaling during rolling update
Kubernetes lets you perform a rolling update on a Deployment. In that
case, the Deployment manages the underlying ReplicaSets for you.
When you configure autoscaling for a Deployment, you bind a
HorizontalPodAutoscaler to a single Deployment. The HorizontalPodAutoscaler
manages the replicas field of the Deployment. The deployment controller is responsible
for setting the replicas of the underlying ReplicaSets so that they add up to a suitable
number during the rollout and also afterwards.
If you perform a rolling update of a StatefulSet that has an autoscaled number of replicas, the StatefulSet directly manages its set of Pods (there is no intermediate resource similar to ReplicaSet).
Support for resource metrics
Any HPA target can be scaled based on the resource usage of the pods in the scaling target.
When defining the pod specification the resource requests like cpu and memory should
be specified. This is used to determine the resource utilization and used by the HPA controller
to scale the target up or down. To use resource utilization based scaling specify a metric source
like this:
type: Resource
resource:
name: cpu
target:
type: Utilization
averageUtilization: 60
With this metric the HPA controller will keep the average utilization of the pods in the scaling target at 60%. Utilization is the ratio between the current usage of resource to the requested resources of the pod. See Algorithm for more details about how the utilization is calculated and averaged.
Note:
Since the resource usages of all the containers are summed up the total pod utilization may not accurately represent the individual container resource usage. This could lead to situations where a single container might be running with high usage and the HPA will not scale out because the overall pod usage is still within acceptable limits.Container resource metrics
FEATURE STATE:
Kubernetes v1.30 [stable](enabled by default)The HorizontalPodAutoscaler API also supports a container metric source where the HPA can track the resource usage of individual containers across a set of Pods, in order to scale the target resource. This lets you configure scaling thresholds for the containers that matter most in a particular Pod. For example, if you have a web application and a sidecar container that provides logging, you can scale based on the resource use of the web application, ignoring the sidecar container and its resource use.
If you revise the target resource to have a new Pod specification with a different set of containers, you should revise the HPA spec if that newly added container should also be used for scaling. If the specified container in the metric source is not present or only present in a subset of the pods then those pods are ignored and the recommendation is recalculated. See Algorithm for more details about the calculation. To use container resources for autoscaling define a metric source as follows:
type: ContainerResource
containerResource:
name: cpu
container: application
target:
type: Utilization
averageUtilization: 60
In the above example the HPA controller scales the target such that the average utilization of the cpu
in the application container of all the pods is 60%.
Note:
If you change the name of a container that a HorizontalPodAutoscaler is tracking, you can make that change in a specific order to ensure scaling remains available and effective whilst the change is being applied. Before you update the resource that defines the container (such as a Deployment), you should update the associated HPA to track both the new and old container names. This way, the HPA is able to calculate a scaling recommendation throughout the update process.
Once you have rolled out the container name change to the workload resource, tidy up by removing the old container name from the HPA specification.
Scaling on custom metrics
FEATURE STATE:
Kubernetes v1.23 [stable](the autoscaling/v2beta2 API version previously provided this ability as a beta feature)
Provided that you use the autoscaling/v2 API version, you can configure a HorizontalPodAutoscaler
to scale based on a custom metric (that is not built in to Kubernetes or any Kubernetes component).
The HorizontalPodAutoscaler controller then queries for these custom metrics from the Kubernetes
API.
See Support for metrics APIs for the requirements.
Scaling on multiple metrics
FEATURE STATE:
Kubernetes v1.23 [stable](the autoscaling/v2beta2 API version previously provided this ability as a beta feature)
Provided that you use the autoscaling/v2 API version, you can specify multiple metrics for a
HorizontalPodAutoscaler to scale on. Then, the HorizontalPodAutoscaler controller evaluates each metric,
and proposes a new scale based on that metric. The HorizontalPodAutoscaler takes the maximum scale
recommended for each metric and sets the workload to that size (provided that this isn't larger than the
overall maximum that you configured).
Support for metrics APIs
By default, the HorizontalPodAutoscaler controller retrieves metrics from a series of APIs. In order for it to access these APIs, cluster administrators must ensure that:
The API aggregation layer is enabled.
The corresponding APIs are registered:
For resource metrics, this is the
metrics.k8s.ioAPI, generally provided by metrics-server. It can be launched as a cluster add-on.For custom metrics, this is the
custom.metrics.k8s.ioAPI. It's provided by "adapter" API servers provided by metrics solution vendors. Check with your metrics pipeline to see if there is a Kubernetes metrics adapter available.For external metrics, this is the
external.metrics.k8s.ioAPI. It may be provided by the custom metrics adapters provided above.
For more information on these different metrics paths and how they differ please see the relevant design proposals for the HPA V2, custom.metrics.k8s.io and external.metrics.k8s.io.
For examples of how to use them see the walkthrough for using custom metrics and the walkthrough for using external metrics.
Configurable scaling behavior
FEATURE STATE:
Kubernetes v1.23 [stable](the autoscaling/v2beta2 API version previously provided this ability as a beta feature)
If you use the v2 HorizontalPodAutoscaler API, you can use the behavior field
(see the API reference)
to configure separate scale-up and scale-down behaviors.
You specify these behaviors by setting scaleUp and / or scaleDown
under the behavior field.
Scaling policies let you control the rate of change of replicas while scaling. Also two settings can be used to prevent flapping: you can specify a stabilization window for smoothing replica counts, and a tolerance to ignore minor metric fluctuations below a specified threshold.
Scaling policies
One or more scaling policies can be specified in the behavior section of the spec.
When multiple policies are specified the policy which allows the highest amount of
change is the policy which is selected by default. The following example shows this behavior
while scaling down:
behavior:
scaleDown:
policies:
- type: Pods
value: 4
periodSeconds: 60
- type: Percent
value: 10
periodSeconds: 60
periodSeconds indicates the length of time in the past for which the policy must hold true.
The maximum value that you can set for periodSeconds is 1800 (half an hour).
The first policy (Pods) allows at most 4 replicas to be scaled down in one minute. The second policy
(Percent) allows at most 10% of the current replicas to be scaled down in one minute.
Since by default the policy which allows the highest amount of change is selected, the second policy will only be used when the number of pod replicas is more than 40. With 40 or less replicas, the first policy will be applied. For instance if there are 80 replicas and the target has to be scaled down to 10 replicas then during the first step 8 replicas will be reduced. In the next iteration when the number of replicas is 72, 10% of the pods is 7.2 but the number is rounded up to 8. On each loop of the autoscaler controller the number of pods to be change is re-calculated based on the number of current replicas. When the number of replicas falls below 40 the first policy (Pods) is applied and 4 replicas will be reduced at a time.
The policy selection can be changed by specifying the selectPolicy field for a scaling
direction. By setting the value to Min which would select the policy which allows the
smallest change in the replica count. Setting the value to Disabled completely disables
scaling in that direction.
Stabilization window
The stabilization window is used to restrict the flapping of replica count when the metrics used for scaling keep fluctuating. The autoscaling algorithm uses this window to infer a previous desired state and avoid unwanted changes to workload scale.
For example, in the following example snippet, a stabilization window is specified for scaleDown.
behavior:
scaleDown:
stabilizationWindowSeconds: 300
When the metrics indicate that the target should be scaled down the algorithm looks into previously computed desired states, and uses the highest value from the specified interval. In the above example, all desired states from the past 5 minutes will be considered.
This approximates a rolling maximum, and avoids having the scaling algorithm frequently remove Pods only to trigger recreating an equivalent Pod just moments later.
Tolerance
FEATURE STATE:
Kubernetes v1.35 [beta](enabled by default)The tolerance field configures a threshold for metric variations, preventing the
autoscaler from scaling for changes below that value.
This tolerance is defined as the amount of variation around the desired metric value under which no scaling will occur. For example, consider a HorizontalPodAutoscaler configured with a target memory consumption of 100MiB and a scale-up tolerance of 5%:
behavior:
scaleUp:
tolerance: 0.05 # 5% tolerance for scale up
With this configuration, the HPA algorithm will only consider scaling up if the memory consumption is higher than 105MiB (that is: 5% above the target).
If you don't set this field, the HPA applies the default cluster-wide tolerance of 10%. This
default can be updated for both scale-up and scale-down using the
kube-controller-manager
--horizontal-pod-autoscaler-tolerance command line argument. (You can't use the Kubernetes API
to configure this default value.)
Default behavior
To use the custom scaling not all fields have to be specified. Only values which need to be customized can be specified. These custom values are merged with default values. The default values match the existing behavior in the HPA algorithm.
behavior:
scaleDown:
stabilizationWindowSeconds: 300
policies:
- type: Percent
value: 100
periodSeconds: 15
scaleUp:
stabilizationWindowSeconds: 0
policies:
- type: Percent
value: 100
periodSeconds: 15
- type: Pods
value: 4
periodSeconds: 15
selectPolicy: Max
For scaling down the stabilization window is 300 seconds (or the value of the
--horizontal-pod-autoscaler-downscale-stabilization command line option, if provided). There is only a single policy
for scaling down which allows a 100% of the currently running replicas to be removed which
means the scaling target can be scaled down to the minimum allowed replicas.
For scaling up there is no stabilization window. When the metrics indicate that the target should be
scaled up the target is scaled up immediately. There are 2 policies where 4 pods or a 100% of the currently
running replicas may at most be added every 15 seconds till the HPA reaches its steady state.
Example: change downscale stabilization window
To provide a custom downscale stabilization window of 1 minute, the following behavior would be added to the HPA:
behavior:
scaleDown:
stabilizationWindowSeconds: 60
Example: limit scale down rate
To limit the rate at which pods are removed by the HPA to 10% per minute, the following behavior would be added to the HPA:
behavior:
scaleDown:
policies:
- type: Percent
value: 10
periodSeconds: 60
To ensure that no more than 5 Pods are removed per minute, you can add a second scale-down
policy with a fixed size of 5, and set selectPolicy to minimum. Setting selectPolicy to Min means
that the autoscaler chooses the policy that affects the smallest number of Pods:
behavior:
scaleDown:
policies:
- type: Percent
value: 10
periodSeconds: 60
- type: Pods
value: 5
periodSeconds: 60
selectPolicy: Min
Example: disable scale down
The selectPolicy value of Disabled turns off scaling the given direction.
So to prevent downscaling the following policy would be used:
behavior:
scaleDown:
selectPolicy: Disabled
Support for HorizontalPodAutoscaler in kubectl
HorizontalPodAutoscaler, like every API resource, is supported in a standard way by kubectl.
You can create a new autoscaler using kubectl create command.
You can list autoscalers by kubectl get hpa or get detailed description by kubectl describe hpa.
Finally, you can delete an autoscaler using kubectl delete hpa.
In addition, there is a special kubectl autoscale command for creating a HorizontalPodAutoscaler object.
For instance, executing kubectl autoscale rs foo --min=2 --max=5 --cpu=80%
will create an autoscaler for ReplicaSet foo, with target CPU utilization set to 80%
and the number of replicas between 2 and 5.
Implicit maintenance-mode deactivation
You can implicitly deactivate the HPA for a target without the
need to change the HPA configuration itself. If the target's desired replica count
is set to 0, and the HPA's minimum replica count is greater than 0, the HPA
stops adjusting the target (and sets the ScalingActive Condition on itself
to false) until you reactivate it by manually adjusting the target's desired
replica count or HPA's minimum replica count.
Migrating Deployments and StatefulSets to horizontal autoscaling
When an HPA is enabled, it is recommended that the value of spec.replicas of
the Deployment and / or StatefulSet be removed from their
manifest(s). If this isn't done, any time
a change to that object is applied, for example via kubectl apply -f deployment.yaml, this will instruct Kubernetes to scale the current number of Pods
to the value of the spec.replicas key. This may not be
desired and could be troublesome when an HPA is active, resulting in thrashing or flapping behavior.
Keep in mind that the removal of spec.replicas may incur a one-time
degradation of Pod counts as the default value of this key is 1 (reference
Deployment Replicas).
Upon the update, all Pods except 1 will begin their termination procedures. Any
deployment application afterwards will behave as normal and respect a rolling
update configuration as desired. You can avoid this degradation by choosing one of the following two
methods based on how you are modifying your deployments:
kubectl apply edit-last-applied deployment/<deployment_name>- In the editor, remove
spec.replicas. When you save and exit the editor,kubectlapplies the update. No changes to Pod counts happen at this step. - You can now remove
spec.replicasfrom the manifest. If you use source code management, also commit your changes or take whatever other steps for revising the source code are appropriate for how you track updates. - From here on out you can run
kubectl apply -f deployment.yaml
When using the Server-Side Apply you can follow the transferring ownership guidelines, which cover this exact use case.
What's next
If you configure autoscaling in your cluster, you may also want to consider using node autoscaling to ensure you are running the right number of nodes. You can also read more about vertical Pod autoscaling.
For more information on HorizontalPodAutoscaler:
- Read a walkthrough example for horizontal pod autoscaling.
- Read documentation for
kubectl autoscale. - If you would like to write your own custom metrics adapter, check out the boilerplate to get started.
- Read the API reference for HorizontalPodAutoscaler.
4.8 - Resource managers
In order to support latency-critical and high-throughput workloads, Kubernetes offers a suite of Resource Managers. The managers aim to co-ordinate and optimize the alignment of node's resources for pods configured with a specific requirement for CPUs, devices, and memory (hugepages) resources.
Topology manager
FEATURE STATE:
Kubernetes v1.27 [stable](enabled by default)Topology Manager is a kubelet component that aims to coordinate the set of components that are responsible for these optimizations. To learn more, read Control Topology Management Policies on a Node.
CPU manager
FEATURE STATE:
Kubernetes v1.26 [stable](enabled by default)CPU Manager is a kubelet component that provides exclusive resource allocation for CPU resources. It consults with the Topology Manager to make resource assignment decisions. To learn more, read Control CPU Management Policies on the Node.
Policies for assigning CPUs to Pods
Once a Pod is bound to a Node, the kubelet on that node may need to either multiplex the existing hardware (for example, sharing CPUs across multiple Pods) or allocate hardware by dedicating some resource (for example, assigning one of more CPUs for a Pod's exclusive use).
By default, the kubelet uses CFS quota to enforce pod CPU limits. When the node runs many CPU-bound pods, the workload can move to different CPU cores depending on whether the pod is throttled and which CPU cores are available at scheduling time. Many workloads are not sensitive to this migration and thus work fine without any intervention.
However, in workloads where CPU cache affinity and scheduling latency significantly affect workload performance, the kubelet allows alternative CPU management policies to determine some placement preferences on the node. This is implemented using the CPU Manager and its policy. There are two available policies:
none: thenonepolicy explicitly enables the existing default CPU affinity scheme, providing no affinity beyond what the OS scheduler does automatically. Limits on CPU usage for Guaranteed pods and Burstable pods are enforced using CFS quota.static: thestaticpolicy allows containers inGuaranteedpods with integer CPUrequestsaccess to exclusive CPUs on the node. This exclusivity is enforced using the cpuset cgroup controller.
Note:
System services such as the container runtime and the kubelet itself can continue to run on these exclusive CPUs. The exclusivity only extends to other pods.CPU Manager doesn't support offlining and onlining of CPUs at runtime.
Static policy
The static policy enables finer-grained CPU management and exclusive CPU assignment.
This policy manages a shared pool of CPUs that initially contains all CPUs in the
node. The amount of exclusively allocatable CPUs is equal to the total
number of CPUs in the node minus any CPU reservations set by the kubelet configuration.
CPUs reserved by these options are taken, in integer quantity, from the initial shared pool in ascending order by physical
core ID. This shared pool is the set of CPUs on which any containers in
BestEffort and Burstable pods run. Containers in Guaranteed pods with fractional
CPU requests also run on CPUs in the shared pool. Only containers that are
part of a Guaranteed pod and have integer CPU requests are assigned
exclusive CPUs.
Note:
The kubelet requires a CPU reservation greater than zero when the static policy is enabled. This is because a zero CPU reservation would allow the shared pool to become empty.As Guaranteed pods whose containers fit the requirements for being statically
assigned are scheduled to the node, CPUs are removed from the shared pool and
placed in the cpuset for the container. CFS quota is not used to bound
the CPU usage of these containers as their usage is bound by the scheduling domain
itself. In others words, the number of CPUs in the container cpuset is equal to the integer
CPU limit specified in the pod spec. This static assignment increases CPU
affinity and decreases context switches due to throttling for the CPU-bound
workload.
Consider the containers in the following pod specs:
spec:
containers:
- name: nginx
image: nginx
The pod above runs in the BestEffort QoS class because no resource requests or
limits are specified. It runs in the shared pool.
spec:
containers:
- name: nginx
image: nginx
resources:
limits:
memory: "200Mi"
requests:
memory: "100Mi"
The pod above runs in the Burstable QoS class because resource requests do not
equal limits and the cpu quantity is not specified. It runs in the shared
pool.
spec:
containers:
- name: nginx
image: nginx
resources:
limits:
memory: "200Mi"
cpu: "2"
requests:
memory: "100Mi"
cpu: "1"
The pod above runs in the Burstable QoS class because resource requests do not
equal limits. It runs in the shared pool.
spec:
containers:
- name: nginx
image: nginx
resources:
limits:
memory: "200Mi"
cpu: "2"
requests:
memory: "200Mi"
cpu: "2"
The pod above runs in the Guaranteed QoS class because requests are equal to limits.
And the container's resource limit for the CPU resource is an integer greater than
or equal to one. The nginx container is granted 2 exclusive CPUs.
spec:
containers:
- name: nginx
image: nginx
resources:
limits:
memory: "200Mi"
cpu: "1.5"
requests:
memory: "200Mi"
cpu: "1.5"
The pod above runs in the Guaranteed QoS class because requests are equal to limits.
But the container's resource limit for the CPU resource is a fraction. It runs in
the shared pool.
spec:
containers:
- name: nginx
image: nginx
resources:
limits:
memory: "200Mi"
cpu: "2"
The pod above runs in the Guaranteed QoS class because only limits are specified
and requests are set equal to limits when not explicitly specified. And the
container's resource limit for the CPU resource is an integer greater than or
equal to one. The nginx container is granted 2 exclusive CPUs.
Static policy options
Here are the available policy options for the static CPU management policy, listed in alphabetical order:
align-by-socket(alpha, hidden by default)- Align CPUs by physical package / socket boundary, rather than logical NUMA boundaries (available since Kubernetes v1.25)
distribute-cpus-across-cores(alpha, hidden by default)- Allocate virtual cores, sometimes called hardware threads, across different physical cores (available since Kubernetes v1.31)
distribute-cpus-across-numa(beta, visible by default)- Spread CPUs across different NUMA domains, aiming for an even balance between the selected domains (available since Kubernetes v1.23)
full-pcpus-only(GA, visible by default)- Always allocate full physical cores (available since Kubernetes v1.22, GA since Kubernetes v1.33)
strict-cpu-reservation(GA, visible by default)- Prevent all the pods regardless of their Quality of Service class to run on reserved CPUs (available since Kubernetes v1.32, GA since Kubernetes v1.35)
prefer-align-cpus-by-uncorecache(GA, visible by default)- Align CPUs by uncore (Last-Level) cache boundary on a best-effort way (available since Kubernetes v1.32)
You can toggle groups of options on and off based upon their maturity level using the following feature gates:
CPUManagerPolicyBetaOptions(default enabled). Disable to hide beta-level options.CPUManagerPolicyAlphaOptions(default disabled). Enable to show alpha-level options.
You will still have to enable each option using the cpuManagerPolicyOptions field in the
kubelet configuration file.
For more detail about the individual options you can configure, read on.
full-pcpus-only
If the full-pcpus-only policy option is specified, the static policy will always allocate full physical cores.
By default, without this option, the static policy allocates CPUs using a topology-aware best-fit allocation.
On SMT enabled systems, the policy can allocate individual virtual cores, which correspond to hardware threads.
This can lead to different containers sharing the same physical cores; this behaviour in turn contributes
to the noisy neighbours problem.
With the option enabled, the pod will be admitted by the kubelet only if the CPU request of all its containers
can be fulfilled by allocating full physical cores.
If the pod does not pass the admission, it will be put in Failed state with the message SMTAlignmentError.
distribute-cpus-across-numa
If the distribute-cpus-across-numapolicy option is specified, the static
policy will evenly distribute CPUs across NUMA nodes in cases where more than
one NUMA node is required to satisfy the allocation.
By default, the CPUManager will pack CPUs onto one NUMA node until it is
filled, with any remaining CPUs simply spilling over to the next NUMA node.
This can cause undesired bottlenecks in parallel code relying on barriers (and
similar synchronization primitives), as this type of code tends to run only as
fast as its slowest worker (which is slowed down by the fact that fewer CPUs
are available on at least one NUMA node).
By distributing CPUs evenly across NUMA nodes, application developers can more
easily ensure that no single worker suffers from NUMA effects more than any
other, improving the overall performance of these types of applications.
align-by-socket
If the align-by-socket policy option is specified, CPUs will be considered
aligned at the socket boundary when deciding how to allocate CPUs to a
container. By default, the CPUManager aligns CPU allocations at the NUMA
boundary, which could result in performance degradation if CPUs need to be
pulled from more than one NUMA node to satisfy the allocation. Although it
tries to ensure that all CPUs are allocated from the minimum number of NUMA
nodes, there is no guarantee that those NUMA nodes will be on the same socket.
By directing the CPUManager to explicitly align CPUs at the socket boundary
rather than the NUMA boundary, we are able to avoid such issues. Note, this
policy option is not compatible with TopologyManager single-numa-node
policy and does not apply to hardware where the number of sockets is greater
than number of NUMA nodes.
distribute-cpus-across-cores
If the distribute-cpus-across-cores policy option is specified, the static policy
will attempt to allocate virtual cores (hardware threads) across different physical cores.
By default, the CPUManager tends to pack CPUs onto as few physical cores as possible,
which can lead to contention among CPUs on the same physical core and result
in performance bottlenecks. By enabling the distribute-cpus-across-cores policy,
the static policy ensures that CPUs are distributed across as many physical cores
as possible, reducing the contention on the same physical core and thereby
improving overall performance. However, it is important to note that this strategy
might be less effective when the system is heavily loaded. Under such conditions,
the benefit of reducing contention diminishes. Conversely, default behavior
can help in reducing inter-core communication overhead, potentially providing
better performance under high load conditions.
strict-cpu-reservation
The reservedSystemCPUs parameter in KubeletConfiguration,
or the deprecated kubelet command line option --reserved-cpus, defines an explicit CPU set for OS system daemons
and kubernetes system daemons. More details of this parameter can be found on the
Explicitly Reserved CPU List page.
By default, this isolation is implemented only for guaranteed pods with integer CPU requests not for burstable and best-effort pods
(and guaranteed pods with fractional CPU requests). Admission is only comparing the CPU requests against the allocatable CPUs.
Since the CPU limit is higher than the request, the default behaviour allows burstable and best-effort pods to use up the capacity
of reservedSystemCPUs and cause host OS services to starve in real life deployments.
If the strict-cpu-reservation policy option is enabled, the static policy will not allow
any workload to use the CPU cores specified in reservedSystemCPUs.
prefer-align-cpus-by-uncorecache
If the prefer-align-cpus-by-uncorecache policy is specified, the static policy
will allocate CPU resources for individual containers such that all CPUs assigned
to a container share the same uncore cache block (also known as the Last-Level Cache
or LLC). By default, the CPUManager will tightly pack CPU assignments which can
result in containers being assigned CPUs from multiple uncore caches. This option
enables the CPUManager to allocate CPUs in a way that maximizes the efficient use
of the uncore cache. Allocation is performed on a best-effort basis, aiming to
affine as many CPUs as possible within the same uncore cache. If the container's
CPU requirement exceeds the CPU capacity of a single uncore cache, the CPUManager
minimizes the number of uncore caches used in order to maintain optimal uncore
cache alignment. Specific workloads can benefit in performance from the reduction
of inter-cache latency and noisy neighbors at the cache level. If the CPUManager
cannot align optimally while the node has sufficient resources, the container will
still be admitted using the default packed behavior.
Memory manager
FEATURE STATE:
Kubernetes v1.32 [stable](enabled by default)Memory Manager is a kubelet component that provides exclusive resource allocation for memory resources. It consults with the Topology Manager to make resource assignment decisions. To learn more, read Control Memory Management Policies on a Node.
Policies for assigning memory to Pods
The Kubernetes Memory Manager allocates RAM (memory, and optionally Linux huge pages) resources
for pods in the Guaranteed QoS class.
The Memory Manager employs hint generation protocol to yield the most suitable NUMA affinity for a pod. The Memory Manager feeds the central manager (Topology Manager) with these affinity hints. Based on both the hints and Topology Manager policy, the pod is rejected or admitted to the node.
Moreover, the Memory Manager ensures that the memory which a pod requests is allocated from a minimum number of NUMA nodes.
To learn more, read Control Memory Management Policies on a Node.
Device manager
FEATURE STATE:
Kubernetes v1.26 [stable]Device Manager is a kubelet component that allocates hardware devices to pods using the device plugin API. It consults with the Topology Manager, using topology information provided by device plugins, to make resource assignment decisions. To learn more, read Device Plugin Integration with the Topology Manager.
Pod-level resource managers
FEATURE STATE:
Kubernetes v1.36 [alpha](disabled by default)Pod-level resource support for the existing resource managers (Topology, CPU,
and Memory) extends them to handle pod-level resource specifications. When
enabled (via the PodLevelResources and PodLevelResourceManagers feature
gates), the resource managers can use .spec.resources directly as the basis
for their allocation decisions, evolving from a strictly per-container
allocation model to a pod-centric one. This partitioning scheme introduces a
more flexible and powerful resource management model, particularly for
performance-sensitive workloads. It allows you to define hybrid allocation
models where some containers in a Pod receive exclusive, NUMA-aligned resources,
while others share the remaining resources from a pod-level shared pool.
It is important to differentiate between the capabilities offered by each
Topology Manager scope, and how this modifies the behavior of the resource
managers. The pod scope enables allocation based on the entire pod's budget,
creating a pod-level shared pool for non-Guaranteed containers, alongside
exclusive allocations. In contrast, the container scope allows for a hybrid
allocation model where individual containers can get exclusive, NUMA-aligned
resources while others run in the node's shared pool, without aligning the
entire pod as a single unit.
Both standard init containers and restartable init containers (sidecars) are fully supported. They can be granted exclusive resource slices or utilize the pod's shared pool, and their lifecycle rules (e.g., reusable resources for standard init containers vs. persistent reservations for sidecars) are respected by the pod-level resource managers.
Glossary
- Pod level resources specification
- The resource budget defined at the Pod level in
.spec.resources, that specifies the collective requests and limits for the entire pod. - Guaranteed Container
- Within the context of this feature, a container is considered
Guaranteedif it specifies resource requests equal to its limits for both CPU (exclusive CPU allocation requires a positive integer value) and Memory. This status makes it eligible for exclusive resource allocation from the resource managers. - Exclusive slice
- A dedicated portion of resources (for example: specific CPUs or memory pages) allocated solely to a single container, ensuring isolation from other containers.
- Pod shared pool
- The subset of a pod's allocated resources that remains after all exclusive slices have been reserved. These resources are shared by all containers in the pod that do not receive an exclusive allocation. While containers in this pool share resources with each other, they are strictly isolated from the exclusive slices and the general node-wide shared pool.
How pod-level resource managers work
The CPU and Memory resource managers operate differently depending on the configured Topology Manager scope.
Topology manager's pod scope and pod-level resources
When the Topology Manager scope is set to pod, the Kubelet performs a single
NUMA alignment for the entire pod based on the resource budget defined in
.spec.resources.
The resulting NUMA-aligned resource pool is then partitioned:
- Exclusive Slices: Containers that specify
Guaranteedresources (requests equal to limits for both CPU and memory, and the CPU request is a positive integer) are allocated exclusive slices from the pod's total allocation. - Pod Shared Pool: The remaining resources form a shared pool that is shared among all other containers in the pod that do not receive an exclusive allocation. While containers in this pool share resources with each other, they are strictly isolated from the exclusive slices and the general node-wide shared pool.
Note that when standard init containers run to completion, their resources are added to a per-pod reusable set, rather than being returned to the node's resource pool. Because they run sequentially, these resources are made reusable for subsequent app containers (either for their own exclusive slices or for the shared pool).
This allows you to co-locate containers that require exclusive resources (for example: a high-performance primary application) with those that do not (for example: sidecars for logging or monitoring), all within a single NUMA-aligned pod.
Consider the containers in the following pod spec, where the Topology Manager
scope is pod and the pod has a total budget of 4 CPUs. main-app requests an
exclusive 2 CPU slice, while the sidecars share the remaining 2 CPUs in the
pod's shared pool:
apiVersion: v1
kind: Pod
metadata:
name: pod-scope-mixed
annotations:
kubernetes.io/description: "A pod demonstrating pod-level scope where one container gets exclusive resources and others share the remaining pod resources in a shared pool."
spec:
# At Pod level, the Pod has CPU request equal to limits and memory request
# also equal to memory limits. The main-app container meets the requirements
# for the Guaranteed QoS class at container level, and the sidecar containers
# don't specify any resource request. Under pod scope, this means that the
# kubelet could statically assign 4 CPUs to the overall Pod, of which 2 are
# assigned exclusively to the main-app container, and the remaining 2 are
# shared by the sidecars in the pod's shared pool.
resources:
requests:
cpu: "4"
memory: "4Gi"
limits:
cpu: "4"
memory: "4Gi"
initContainers:
- name: metrics-sidecar
image: registry.example/example-image:v1
restartPolicy: Always
- name: logging-sidecar
image: registry.example/example-image:v1
restartPolicy: Always
containers:
- name: main-app
image: registry.example/example-image:v1
resources:
requests:
cpu: "2"
memory: "2Gi"
limits:
cpu: "2"
memory: "2Gi"
Important considerations:
When using pod-level resources with the Topology manager's pod scope, there are some important considerations:
Empty shared pool restriction: This configuration does not allow pod specifications that would produce an empty pod shared pool if there are containers that require one. If the sum of resource requests from all containers that are
Guaranteedexactly equals the total resource budget, and there is at least one other container that requires a shared pool, the pod will be rejected at admission.For example, the following pod asks for a pod-level budget of 4 CPUs.
main-apprequires an exclusive 3 CPUs andmetrics-sidecarrequires an exclusive 1 CPU. Because there are 0 CPUs left in the shared pool forlogging-sidecar, this pod is rejected (the same validation is applied for memory):Wasted resources: Any resources overallocated when using the
podscope (the total container requests sum to less than the pod-level budget and there are no shared pool containers, or the shared pool containers don't fully utilize the remaining amount) will be assigned and reserved for the pod, effectively being wasted during the whole execution of the pod.Persistent pool: The pod's total resource pool (the NUMA alignment and total reserved capacity) is persistent. If a shared-pool container crashes and restarts, the pod's overall resource reservation remains safely anchored on the node. The resources are only released back to the node's general pool when the entire pod is terminated.
Topology manager's container scope and pod-level resources
When the Topology Manager scope is set to container, the Kubelet evaluates
each container individually for exclusive allocation.
If the overall pod achieves a Guaranteed QoS class (through of having
appropriate values in the Pod-level .spec.resources), you can mix and match
containers:
- Containers with their own
Guaranteedrequests receive exclusive NUMA-aligned resources. - Other
non-Guaranteedcontainers in the pod run in the node's shared pool. - The collective resource consumption of all containers is still enforced by
the pod's
.spec.resourceslimits.
This scope is useful when you have an infrastructure sidecar that needs to be aligned to a specific NUMA node for device access, while the main workload can run in the general node shared pool.
Consider the containers in the following pod spec, where the Topology Manager
scope is container and the pod represents a workload with an infrastructure
sidecar and two application workers, with a total budget of 4 CPUs. The
infrastructure-sidecar gets an exclusive, NUMA-aligned 2 CPU slice. The two
application workers (worker-1 and worker-2) run in the general, node-wide
shared pool:
apiVersion: v1
kind: Pod
metadata:
name: container-scope-mixed
annotations:
kubernetes.io/description: "A pod demonstrating container-level scope where one container gets exclusive resources and others run in the node's shared pool."
spec:
# At Pod level, the Pod has CPU request equal to limits and memory request
# also equal to memory limits. The infrastructure-sidecar container meets the
# requirements for the Guaranteed QoS class at container level, and the worker
# containers don't specify any resource request. Under container scope, the
# kubelet evaluates containers individually for exclusive allocation. This
# means the infrastructure-sidecar gets an exclusive 2 CPU slice, while the
# worker containers run in the node's general shared pool, all while bounded
# by the overall pod limits.
resources:
requests:
cpu: "4"
memory: "4Gi"
limits:
cpu: "4"
memory: "4Gi"
initContainers:
- name: infrastructure-sidecar
image: registry.example/example-image:v1
restartPolicy: Always
resources:
requests:
cpu: "2"
memory: "2Gi"
limits:
cpu: "2"
memory: "2Gi"
containers:
- name: worker-1
image: registry.example/example-image:v1
- name: worker-2
image: registry.example/example-image:v1
CPU quota (CFS)
When running mixed workloads within a pod, isolation is enforced differently depending on the allocation:
- Exclusive Containers: Containers granted exclusive CPU slices have their CPU CFS quota enforcement disabled, allowing them to run without being throttled by the Linux scheduler.
- Pod Shared Pool Containers: Containers falling into the pod shared pool have CPU CFS quotas enabled, ensuring they do not consume more than the leftover pod budget and preventing them from interfering with the exclusive containers.
Persistent pool and restarts
The pod's total resource pool (the NUMA alignment and total reserved capacity) is persistent. If a container utilizing the pod's shared pool crashes and restarts, the pod's overall resource reservation remains safely anchored on the node. The resources are only released back to the node's general pool when the entire pod is terminated.
Kubelet downgrades and state checkpoints
Caution:
Enabling the PodLevelResourceManagers feature introduces new state versions
for the CPU and Memory managers.
If you downgrade the Kubelet to a version that does not support this feature, or
if you explicitly disable the feature gates after they have been active, the
older Kubelet will fail to read the newer checkpoint files due to this version
incompatibility. To recover, administrators must drain the affected node,
manually delete the
internal state checkpoint files
(cpu_manager_state and memory_manager_state), and restart the Kubelet.
Observability and metrics
You can monitor the behavior and health of the resource managers across both
container-level and pod-level allocations using the following Kubelet metrics
(enabled via the PodLevelResourceManagers feature gate):
resource_manager_allocations_total: Counts the total number of exclusive resource allocations performed by a manager. Thesourcelabel ("pod" or "node") distinguishes between allocations drawn from the node-level pool versus a pre-allocated pod-level pool.resource_manager_allocation_errors_total: Counts errors encountered during exclusive resource allocation, distinguished by the intended allocationsource("pod" or "node").resource_manager_container_assignments: Tracks the cumulative number of containers that will be granted a specific type of resource assignment. Theassignment_typelabel ("node_exclusive", "pod_exclusive", "pod_shared") provides visibility into how many containers are running with exclusive resources (from the node or pod pool) versus the pod-level shared pool.
Limitations and caveats
- The functionality is only implemented for the
staticCPU Manager policy and theStaticMemory Manager policy. Note that theBestEffortpolicy is not supported for the Memory Manager. - This feature is only supported on Linux nodes. On Windows nodes, the resource managers will act as a no-op for pod-level allocations.
What's next
For more detailed information on node-level resource managers, see:
For more detailed information on how to configure and use pod-level resource managers, see:
4.9 - Vertical Pod Autoscaling
In Kubernetes, a VerticalPodAutoscaler automatically updates a workload management resource (such as a Deployment or StatefulSet), with the aim of automatically adjusting infrastructure resource requests and limits to match actual usage.
Vertical scaling means that the response to increased resource demand is to assign more resources (for example: memory or CPU) to the Pods that are already running for the workload. This is also known as rightsizing, or sometimes autopilot. This is different from horizontal scaling, which for Kubernetes would mean deploying more Pods to distribute the load.
If the resource usage decreases, and the Pod resource requests are above optimal levels, the VerticalPodAutoscaler instructs the workload resource (the Deployment, StatefulSet, or other similar resource) to adjust resource requests back down, preventing resource waste.
The VerticalPodAutoscaler is implemented as a Kubernetes API resource and a controller. The resource determines the behavior of the controller. The vertical pod autoscaling controller, running within the Kubernetes data plane, periodically adjusts the resource requests and limits of its target (for example, a Deployment) based on analysis of historical resource utilization, the amount of resources available in the cluster, and real-time events such as out-of-memory (OOM) conditions.
API object
The VerticalPodAutoscaler is defined as a Custom Resource Definition (CRD) in Kubernetes. Unlike HorizontalPodAutoscaler, which is part of the core Kubernetes API, VPA must be installed separately in your cluster.
The current stable API version is autoscaling.k8s.io/v1. More details about the VPA installation and API can be found in the VPA GitHub repository.
How does a VerticalPodAutoscaler work?

Figure 1. VerticalPodAutoscaler controls the resource requests and limits of Pods in a Deployment
Kubernetes implements vertical pod autoscaling through multiple cooperating components that run intermittently (it is not a continuous process). The VPA consists of three main components:
- The recommender, which analyzes resource usage and provides recommendations.
- The updater, that Pod resource requests either by evicting Pods or modifying them in place.
- And the VPA admission controller webhook, which applies resource recommendations to new or recreated Pods.
Once during each period, the Recommender queries the resource utilization for Pods targeted by each VerticalPodAutoscaler definition. The Recommender finds the target resource defined by the targetRef, then selects the pods based on the target resource's .spec.selector labels, and obtains the metrics from the resource metrics API to analyze actual CPU and memory consumption.
The Recommender analyzes both current and historical resource usage data (CPU and memory) for each Pod targeted by the VerticalPodAutoscaler. It examines:
- Historical consumption patterns over time to identify trends
- Peak usage and variance to ensure sufficient headroom
- Out-of-memory (OOM) events and other resource-related incidents
Based on this analysis, the Recommender calculates three types of recommendations:
- Target recommendation (optimal resources for typical usage)
- Lower bound (minimum viable resources)
- Upper bound (maximum reasonable resources).
These recommendations are stored in the VerticalPodAutoscaler resource's .status.recommendation field.
The updater component monitors the VerticalPodAutoscaler resources and compares current Pod resource requests with the recommendations. When the difference exceeds configured thresholds and the update policy allows it, the updater can either:
- Evict Pods, triggering their recreation with new resource requests (traditional approach)
- Update Pod resources in place without eviction, when the cluster supports in-place Pod resource updates
The chosen method depends on the configured update mode, cluster capabilities, and the type of resource change needed. In-place updates, when available, avoid Pod disruption but may have limitations on which resources can be modified. The updater respects PodDisruptionBudgets to minimize service impact.
The admission controller operates as a mutating webhook that intercepts Pod creation requests. It
checks if the Pod is targeted by a VerticalPodAutoscaler and, if so, applies the recommended
resource requests and limits before the Pod is created. More specifically, the admission controller uses the Target recommendation in the VerticalPodAutoscaler resource's .status.recommendation stanza as the new resource requests. The admission controller ensures new Pods start with appropriately sized resource allocations, whether they're created during initial deployment, after an eviction by the updater, or due to scaling operations.
The VerticalPodAutoscaler requires a metrics source, such as Kubernetes' Metrics Server add-on,
to be installed in the cluster.
The VPA components fetch metrics from the metrics.k8s.io API. The Metrics Server needs to be launched separately as it is not deployed by default in most clusters. For more information about resource metrics, see Metrics Server.
Update modes
A VerticalPodAutoscaler supports different update modes that control how and when
resource recommendations are applied to your Pods. You configure the update mode using
the updateMode field in the VPA spec under updatePolicy:
---
apiVersion: autoscaling.k8s.io/v1
kind: VerticalPodAutoscaler
metadata:
name: my-app-vpa
spec:
targetRef:
apiVersion: "apps/v1"
kind: Deployment
name: my-app
updatePolicy:
updateMode: "Recreate" # Off, Initial, Recreate, InPlaceOrRecreate, InPlace
Off
In the Off update mode, the VPA recommender still analyzes resource usage and generates
recommendations, but these recommendations are not automatically applied to Pods.
The recommendations are only stored in the VPA object's .status field.
You can use a tool such as kubectl to view the .status and the recommendations in it.
Initial
In Initial mode, VPA only sets resource requests when Pods are first created. It does not update resources for already running Pods, even if recommendations change over time. The recommendations apply only during Pod creation.
Recreate
In Recreate mode, VPA actively manages Pod resources by evicting Pods when their current resource requests differ significantly from recommendations. When a Pod is evicted, the workload controller (managing a Deployment, StatefulSet, etc) creates a replacement Pod, and the VPA admission controller applies the updated resource requests to the new Pod.
InPlaceOrRecreate
In InPlaceOrRecreate mode, VPA attempts to update Pod resource requests and limits without restarting the Pod when possible. However, if in-place updates cannot be performed for a particular resource change, VPA falls back to evicting the Pod
(similar to Recreate mode) and allowing the workload controller to create a replacement Pod with updated resources.
In this mode, the updater applies recommendations in-place using the Resize Container Resources In-Place feature.
InPlace
This mode is available as an alpha feature in VPA 1.7.0 and requires
Kubernetes 1.33 or later with the InPlacePodVerticalScaling cluster feature
gate enabled, and the InPlace feature gate enabled on the VPA updater and
admission controller. It uses the
in-place Pod resize
feature to apply updates without disrupting the Pod.
In InPlace mode, VPA attempts to update Pod resource requests and limits without
restarting or evicting the Pod. Unlike InPlaceOrRecreate, this mode never falls
back to eviction. If an in-place update cannot be applied (for example, because the
node does not have enough capacity), VPA defers the update and retries it in a
subsequent reconciliation loop.
To use InPlace mode, enable the InPlace feature gate on both the VPA updater
and admission controller:
--feature-gates=InPlace=true
Then set updateMode to "InPlace" in your VPA spec:
apiVersion: autoscaling.k8s.io/v1
kind: VerticalPodAutoscaler
metadata:
name: my-app-vpa
spec:
targetRef:
apiVersion: "apps/v1"
kind: Deployment
name: my-app
updatePolicy:
updateMode: "InPlace"
Key difference from InPlaceOrRecreate: When a resize is deferred, in progress,
or infeasible, InPlace mode always waits and retries — it never evicts the Pod,
regardless of how long the update is pending.
Auto (deprecated)
Note:
TheAuto update mode is deprecated since VPA version 1.4.0. Use Recreate for
eviction-based updates, or InPlaceOrRecreate for in-place updates with eviction fallback.Auto mode is currently an alias for Recreate mode and behaves identically. It was introduced to allow for future expansion of automatic update strategies.
Resource policies
Resource policies allow you to fine-tune how the VerticalPodAutoscaler generates recommendations and applies updates. You can set boundaries for resource recommendations, specify which resources to manage, and configure different policies for individual containers within a Pod.
You define resource policies in the resourcePolicy field of the VPA spec:
apiVersion: autoscaling.k8s.io/v1
kind: VerticalPodAutoscaler
metadata:
name: my-app-vpa
spec:
targetRef:
apiVersion: "apps/v1"
kind: Deployment
name: my-app
updatePolicy:
updateMode: "Recreate"
resourcePolicy:
containerPolicies:
- containerName: "application"
minAllowed:
cpu: 100m
memory: 128Mi
maxAllowed:
cpu: 2
memory: 2Gi
controlledResources:
- cpu
- memory
controlledValues: RequestsAndLimits
minAllowed and maxAllowed
These fields set boundaries for VPA recommendations.
The VPA will never recommend resources below minAllowed or above maxAllowed, even if the actual usage data suggests different values.
controlledResources
The controlledResources field specifies which resource types VPA should manage for a container in a Pod.
If not specified, VPA manages both CPU and memory by default. You can restrict VPA to manage only specific resources.
Valid resource names include cpu and memory.
controlledValues
The controlledValues field determines whether VPA controls resource requests, limits, or both:
- RequestsAndLimits
- VPA sets both requests and limits. The limit scales proportionally to the request based on the request-to-limit ratio defined in the Pod spec. This is the default mode.
- RequestsOnly
- VPA only sets requests, leaving limits unchanged. Limits are respected and can still trigger throttling or out-of-memory kills if usage exceeds them.
See requests and limits to learn more about those two concepts.
LimitRange resources
The admission controller and updater VPA components post-process recommendations to comply with the constraints defined in LimitRanges. The LimitRange resources with type Pod and Container are checked in the Kubernetes cluster.
For example, if the max field in a Container LimitRange resource is exceeded, both VPA components lower the limit to the value defined in the max field, and the request is proportionally decreased to maintain the request-to-limit ratio in the Pod spec.
What's next
If you configure autoscaling in your cluster, you may also want to consider using node autoscaling to ensure you are running the right number of nodes. You can also read more about horizontal Pod autoscaling.
5 - Services, Load Balancing, and Networking
Concepts and resources behind networking in Kubernetes.
The Kubernetes network model
The Kubernetes network model is built out of several pieces:
Each pod in a cluster gets its own unique cluster-wide IP address.
- A pod has its own private network namespace which is shared by
all of the containers within the pod. Processes running in
different containers in the same pod can communicate with each
other over
localhost.
- A pod has its own private network namespace which is shared by
all of the containers within the pod. Processes running in
different containers in the same pod can communicate with each
other over
The pod network (also called a cluster network) handles communication between pods. It ensures that (barring intentional network segmentation):
All pods can communicate with all other pods, whether they are on the same node or on different nodes. Pods can communicate with each other directly, without the use of proxies or address translation (NAT).
On Windows, this rule does not apply to host-network pods.
Agents on a node (such as system daemons, or kubelet) can communicate with all pods on that node.
The Service API lets you provide a stable (long lived) IP address or hostname for a service implemented by one or more backend pods, where the individual pods making up the service can change over time.
Kubernetes automatically manages EndpointSlice objects to provide information about the pods currently backing a Service.
A service proxy implementation monitors the set of Service and EndpointSlice objects, and programs the data plane to route service traffic to its backends, by using operating system or cloud provider APIs to intercept or rewrite packets.
The Gateway API (or its predecessor, Ingress) allows you to make Services accessible to clients that are outside the cluster.
- A simpler, but less-configurable, mechanism for cluster
ingress is available via the Service API's
type: LoadBalancer, when using a supported Cloud Provider.
- A simpler, but less-configurable, mechanism for cluster
ingress is available via the Service API's
NetworkPolicy is a built-in Kubernetes API that allows you to control traffic between pods, or between pods and the outside world.
In older container systems, there was no automatic connectivity between containers on different hosts, and so it was often necessary to explicitly create links between containers, or to map container ports to host ports to make them reachable by containers on other hosts. This is not needed in Kubernetes; Kubernetes's model is that pods can be treated much like VMs or physical hosts from the perspectives of port allocation, naming, service discovery, load balancing, application configuration, and migration.
Only a few parts of this model are implemented by Kubernetes itself. For the other parts, Kubernetes defines the APIs, but the corresponding functionality is provided by external components, some of which are optional:
Pod network namespace setup is handled by system-level software implementing the Container Runtime Interface.
The pod network itself is managed by a pod network implementation. On Linux, most container runtimes use the Container Networking Interface (CNI) to interact with the pod network implementation, so these implementations are often called CNI plugins.
Kubernetes provides a default implementation of service proxying, called kube-proxy, but some pod network implementations instead use their own service proxy that is more tightly integrated with the rest of the implementation.
NetworkPolicy is generally also implemented by the pod network implementation. (Some simpler pod network implementations don't implement NetworkPolicy, or an administrator may choose to configure the pod network without NetworkPolicy support. In these cases, the API will still be present, but it will have no effect.)
There are many implementations of the Gateway API, some of which are specific to particular cloud environments, some more focused on "bare metal" environments, and others more generic.
What's next
The Connecting Applications with Services tutorial lets you learn about Services and Kubernetes networking with a hands-on example.
Cluster Networking explains how to set up networking for your cluster, and also provides an overview of the technologies involved.
To learn about specific networking concepts, see:
- Service - expose an application behind a single outward-facing endpoint
- Ingress - protocol-aware HTTP/HTTPS routing using URIs, hostnames, and paths
- Gateway API - dynamic infrastructure provisioning and advanced traffic routing
- Network Policies - control traffic flow at the IP address or port level (OSI layer 3 or 4)
- DNS for Services and Pods - discover services within your cluster using DNS
5.1 - Service
Expose an application running in your cluster behind a single outward-facing endpoint, even when the workload is split across multiple backends.
In Kubernetes, a Service is a method for exposing a network application that is running as one or more Pods in your cluster.
A key aim of Services in Kubernetes is that you don't need to modify your existing application to use an unfamiliar service discovery mechanism. You can run code in Pods, whether this is a code designed for a cloud-native world, or an older app you've containerized. You use a Service to make that set of Pods available on the network so that clients can interact with it.
If you use a Deployment to run your app, that Deployment can create and destroy Pods dynamically. From one moment to the next, you don't know how many of those Pods are working and healthy; you might not even know what those healthy Pods are named. Kubernetes Pods are created and destroyed to match the desired state of your cluster. Pods are ephemeral resources (you should not expect that an individual Pod is reliable and durable).
Each Pod gets its own IP address (Kubernetes expects network plugins to ensure this). For a given Deployment in your cluster, the set of Pods running in one moment in time could be different from the set of Pods running that application a moment later.
This leads to a problem: if some set of Pods (call them "backends") provides functionality to other Pods (call them "frontends") inside your cluster, how do the frontends find out and keep track of which IP address to connect to, so that the frontend can use the backend part of the workload?
Enter Services.
Services in Kubernetes
The Service API, part of Kubernetes, is an abstraction to help you expose groups of Pods over a network. Each Service object defines a logical set of endpoints (usually these endpoints are Pods) along with a policy about how to make those pods accessible.
For example, consider a stateless image-processing backend which is running with 3 replicas. Those replicas are fungible—frontends do not care which backend they use. While the actual Pods that compose the backend set may change, the frontend clients should not need to be aware of that, nor should they need to keep track of the set of backends themselves.
The Service abstraction enables this decoupling.
The set of Pods targeted by a Service is usually determined by a selector that you define. To learn about other ways to define Service endpoints, see Services without selectors.
If your workload speaks HTTP, you might choose to use an Ingress to control how web traffic reaches that workload. Ingress is not a Service type, but it acts as the entry point for your cluster. An Ingress lets you consolidate your routing rules into a single resource, so that you can expose multiple components of your workload, running separately in your cluster, behind a single listener.
The Gateway API for Kubernetes provides extra capabilities beyond Ingress and Service. You can add Gateway to your cluster - it is a family of extension APIs, implemented using CustomResourceDefinitions - and then use these to configure access to network services that are running in your cluster.
Cloud-native service discovery
If you're able to use Kubernetes APIs for service discovery in your application, you can query the API server for matching EndpointSlices. Kubernetes updates the EndpointSlices for a Service whenever the set of Pods in a Service changes.
For non-native applications, Kubernetes offers ways to place a network port or load balancer in between your application and the backend Pods.
Either way, your workload can use these service discovery mechanisms to find the target it wants to connect to.
Defining a Service
A Service is an object
(the same way that a Pod or a ConfigMap is an object). You can create,
view or modify Service definitions using the Kubernetes API. Usually
you use a tool such as kubectl to make those API calls for you.
For example, suppose you have a set of Pods that each listen on TCP port 9376
and are labelled as app.kubernetes.io/name=MyApp. You can define a Service to
publish that TCP listener:
apiVersion: v1
kind: Service
metadata:
name: my-service
spec:
selector:
app.kubernetes.io/name: MyApp
ports:
- protocol: TCP
port: 80
targetPort: 9376
Applying this manifest creates a new Service named "my-service" with the default
ClusterIP service type. The Service
targets TCP port 9376 on any Pod with the app.kubernetes.io/name: MyApp label.
Kubernetes assigns this Service an IP address (the cluster IP), that is used by the virtual IP address mechanism. For more details on that mechanism, read Virtual IPs and Service Proxies.
The controller for that Service continuously scans for Pods that match its selector, and then makes any necessary updates to the set of EndpointSlices for the Service.
The name of a Service object must be a valid RFC 1123 label name.
Note:
A Service can map any incomingport to a targetPort. By default and
for convenience, the targetPort is set to the same value as the port
field.Port definitions
Port definitions in Pods have names, and you can reference these names in the
targetPort attribute of a Service. For example, we can bind the targetPort
of the Service to the Pod port in the following way:
apiVersion: v1
kind: Service
metadata:
name: nginx-service
spec:
selector:
app.kubernetes.io/name: proxy
ports:
- name: name-of-service-port
protocol: TCP
port: 80
targetPort: http-web-svc
---
apiVersion: v1
kind: Pod
metadata:
name: nginx
labels:
app.kubernetes.io/name: proxy
spec:
containers:
- name: nginx
image: nginx:stable
ports:
- containerPort: 80
name: http-web-svc
This works even if there is a mixture of Pods in the Service using a single configured name, with the same network protocol available via different port numbers. This offers a lot of flexibility for deploying and evolving your Services. For example, you can change the port numbers that Pods expose in the next version of your backend software, without breaking clients.
The default protocol for Services is TCP; you can also use any other supported protocol.
Because many Services need to expose more than one port, Kubernetes supports
multiple port definitions for a single Service.
Each port definition can have the same protocol, or a different one.
Services without selectors
Services most commonly abstract access to Kubernetes Pods thanks to the selector, but when used with a corresponding set of EndpointSlices objects and without a selector, the Service can abstract other kinds of backends, including ones that run outside the cluster.
For example:
- You want to have an external database cluster in production, but in your test environment you use your own databases.
- You want to point your Service to a Service in a different Namespace or on another cluster.
- You are migrating a workload to Kubernetes. While evaluating the approach, you run only a portion of your backends in Kubernetes.
In any of these scenarios you can define a Service without specifying a selector to match Pods. For example:
apiVersion: v1
kind: Service
metadata:
name: my-service
spec:
ports:
- name: http
protocol: TCP
port: 80
targetPort: 9376
Because this Service has no selector, the corresponding EndpointSlice objects are not created automatically. You can map the Service to the network address and port where it's running, by adding an EndpointSlice object manually. For example:
apiVersion: discovery.k8s.io/v1
kind: EndpointSlice
metadata:
name: my-service-1 # by convention, use the name of the Service
# as a prefix for the name of the EndpointSlice
labels:
# You should set the "kubernetes.io/service-name" label.
# Set its value to match the name of the Service
kubernetes.io/service-name: my-service
addressType: IPv4
ports:
- name: http # should match with the name of the service port defined above
appProtocol: http
protocol: TCP
port: 9376
endpoints:
- addresses:
- "10.4.5.6"
- addresses:
- "10.1.2.3"
Custom EndpointSlices
When you create an EndpointSlice object for a Service, you can
use any name for the EndpointSlice. Each EndpointSlice in a namespace must have a
unique name. You link an EndpointSlice to a Service by setting the
kubernetes.io/service-name label
on that EndpointSlice.
Note:
The endpoint IPs must not be: loopback (127.0.0.0/8 for IPv4, ::1/128 for IPv6), or link-local (169.254.0.0/16 and 224.0.0.0/24 for IPv4, fe80::/64 for IPv6).
The endpoint IP addresses cannot be the cluster IPs of other Kubernetes Services, because kube-proxy doesn't support virtual IPs as a destination.
For an EndpointSlice that you create yourself, or in your own code,
you should also pick a value to use for the label
endpointslice.kubernetes.io/managed-by.
If you create your own controller code to manage EndpointSlices, consider using a
value similar to "my-domain.example/name-of-controller". If you are using a third
party tool, use the name of the tool in all-lowercase and change spaces and other
punctuation to dashes (-).
If people are directly using a tool such as kubectl to manage EndpointSlices,
use a name that describes this manual management, such as "staff" or
"cluster-admins". You should
avoid using the reserved value "controller", which identifies EndpointSlices
managed by Kubernetes' own control plane.
Accessing a Service without a selector
Accessing a Service without a selector works the same as if it had a selector. In the example for a Service without a selector, traffic is routed to one of the two endpoints defined in the EndpointSlice manifest: a TCP connection to 10.1.2.3 or 10.4.5.6, on port 9376.
Note:
The Kubernetes API server does not allow proxying to endpoints that are not mapped to pods. Actions such askubectl port-forward service/<service-name> forwardedPort:servicePort where the service has no
selector will fail due to this constraint. This prevents the Kubernetes API server
from being used as a proxy to endpoints the caller may not be authorized to access.An ExternalName Service is a special case of Service that does not have
selectors and uses DNS names instead. For more information, see the
ExternalName section.
EndpointSlices
FEATURE STATE:
Kubernetes v1.21 [stable]EndpointSlices are objects that represent a subset (a slice) of the backing network endpoints for a Service.
Your Kubernetes cluster tracks how many endpoints each EndpointSlice represents. If there are so many endpoints for a Service that a threshold is reached, then Kubernetes adds another empty EndpointSlice and stores new endpoint information there. By default, Kubernetes makes a new EndpointSlice once the existing EndpointSlices all contain at least 100 endpoints. Kubernetes does not make the new EndpointSlice until an extra endpoint needs to be added.
See EndpointSlices for more information about this API.
Endpoints (deprecated)
FEATURE STATE:
Kubernetes v1.33 [deprecated]The EndpointSlice API is the evolution of the older Endpoints API. The deprecated Endpoints API has several problems relative to EndpointSlice:
- It does not support dual-stack clusters.
- It does not contain information needed to support newer features, such as trafficDistribution.
- It will truncate the list of endpoints if it is too long to fit in a single object.
Because of this, it is recommended that all clients use the EndpointSlice API rather than Endpoints.
Over-capacity endpoints
Kubernetes limits the number of endpoints that can fit in a single Endpoints object. When there are over 1000 backing endpoints for a Service, Kubernetes truncates the data in the Endpoints object. Because a Service can be linked with more than one EndpointSlice, the 1000 backing endpoint limit only affects the legacy Endpoints API.
In that case, Kubernetes selects at most 1000 possible backend endpoints to store
into the Endpoints object, and sets an
annotation on the Endpoints:
endpoints.kubernetes.io/over-capacity: truncated.
The control plane also removes that annotation if the number of backend Pods drops below 1000.
Traffic is still sent to backends, but any load balancing mechanism that relies on the legacy Endpoints API only sends traffic to at most 1000 of the available backing endpoints.
The same API limit means that you cannot manually update an Endpoints to have more than 1000 endpoints.
Application protocol
FEATURE STATE:
Kubernetes v1.20 [stable]The appProtocol field provides a way to specify an application protocol for
each Service port. This is used as a hint for implementations to offer
richer behavior for protocols that they understand.
The value of this field is mirrored by the corresponding
Endpoints and EndpointSlice objects.
This field follows standard Kubernetes label syntax. Valid values are one of:
Implementation-defined prefixed names such as
mycompany.com/my-custom-protocol.Kubernetes-defined prefixed names:
| Protocol | Description |
|---|---|
kubernetes.io/h2c | HTTP/2 over cleartext as described in RFC 9113 |
kubernetes.io/ws | WebSocket over cleartext as described in RFC 6455 |
kubernetes.io/wss | WebSocket over TLS as described in RFC 6455 |
Multi-port Services
For some Services, you need to expose more than one port. Kubernetes lets you configure multiple port definitions on a Service object. When using multiple ports for a Service, you must give all of your ports names so that these are unambiguous. For example:
apiVersion: v1
kind: Service
metadata:
name: my-service
spec:
selector:
app.kubernetes.io/name: MyApp
ports:
- name: http
protocol: TCP
port: 80
targetPort: 9376
- name: https
protocol: TCP
port: 443
targetPort: 9377
Note:
As with Kubernetes names in general, names for ports
must only contain lowercase alphanumeric characters and -. Port names must
also start and end with an alphanumeric character.
For example, the names 123-abc and web are valid, but 123_abc and -web are not.
Service type
For some parts of your application (for example, frontends) you may want to expose a Service onto an external IP address, one that's accessible from outside of your cluster.
Kubernetes Service types allow you to specify what kind of Service you want.
The available type values and their behaviors are:
ClusterIP- Exposes the Service on a cluster-internal IP. Choosing this value
makes the Service only reachable from within the cluster. This is the
default that is used if you don't explicitly specify a
typefor a Service. You can expose the Service to the public internet using an Ingress or a Gateway. NodePort- Exposes the Service on each Node's IP at a static port (the
NodePort). To make the node port available, Kubernetes sets up a cluster IP address, the same as if you had requested a Service oftype: ClusterIP. LoadBalancer- Exposes the Service externally using an external load balancer. Kubernetes does not directly offer a load balancing component; you must provide one, or you can integrate your Kubernetes cluster with a cloud provider.
ExternalName- Maps the Service to the contents of the
externalNamefield (for example, to the hostnameapi.foo.bar.example). The mapping configures your cluster's DNS server to return aCNAMErecord with that external hostname value. No proxying of any kind is set up.
The type field in the Service API is designed as nested functionality - each level
adds to the previous. However there is an exception to this nested design. You can
define a LoadBalancer Service by
disabling the load balancer NodePort allocation.
type: ClusterIP
This default Service type assigns an IP address from a pool of IP addresses that your cluster has reserved for that purpose.
Several of the other types for Service build on the ClusterIP type as a
foundation.
If you define a Service that has the .spec.clusterIP set to "None" then
Kubernetes does not assign an IP address. See headless Services
for more information.
Choosing your own IP address
You can specify your own cluster IP address as part of a Service creation
request. To do this, set the .spec.clusterIP field. For example, if you
already have an existing DNS entry that you wish to reuse, or legacy systems
that are configured for a specific IP address and difficult to re-configure.
The IP address that you choose must be a valid IPv4 or IPv6 address from within the
service-cluster-ip-range CIDR range that is configured for the API server.
If you try to create a Service with an invalid clusterIP address value, the API
server will return a 422 HTTP status code to indicate that there's a problem.
Read avoiding collisions to learn how Kubernetes helps reduce the risk and impact of two different Services both trying to use the same IP address.
type: NodePort
If you set the type field to NodePort, the Kubernetes control plane
allocates a port from a range specified by --service-node-port-range flag (default: 30000-32767).
Each node proxies that port (the same port number on every Node) into your Service.
Your Service reports the allocated port in its .spec.ports[*].nodePort field.
Using a NodePort gives you the freedom to set up your own load balancing solution, to configure environments that are not fully supported by Kubernetes, or even to expose one or more nodes' IP addresses directly.
For a node port Service, Kubernetes additionally allocates a port (TCP, UDP or
SCTP to match the protocol of the Service). Every node in the cluster configures
itself to listen on that assigned port and to forward traffic to one of the ready
endpoints associated with that Service. You'll be able to contact the type: NodePort
Service, from outside the cluster, by connecting to any node using the appropriate
protocol (for example: TCP), and the appropriate port (as assigned to that Service).
Choosing your own port
If you want a specific port number, you can specify a value in the nodePort
field. The control plane will either allocate you that port or report that
the API transaction failed.
This means that you need to take care of possible port collisions yourself.
You also have to use a valid port number, one that's inside the range configured
for NodePort use.
Here is an example manifest for a Service of type: NodePort that specifies
a NodePort value (30007, in this example):
apiVersion: v1
kind: Service
metadata:
name: my-service
spec:
type: NodePort
selector:
app.kubernetes.io/name: MyApp
ports:
- port: 80
# By default and for convenience, the `targetPort` is set to
# the same value as the `port` field.
targetPort: 80
# Optional field
# By default and for convenience, the Kubernetes control plane
# will allocate a port from a range (default: 30000-32767)
nodePort: 30007
Reserve Nodeport ranges to avoid collisions
The policy for assigning ports to NodePort services applies to both the auto-assignment and the manual assignment scenarios. When a user wants to create a NodePort service that uses a specific port, the target port may conflict with another port that has already been assigned.
To avoid this problem, the port range for NodePort services is divided into two bands. Dynamic port assignment uses the upper band by default, and it may use the lower band once the upper band has been exhausted. Users can then allocate from the lower band with a lower risk of port collision.
When using the default NodePort range 30000-32767, the bands are partitioned as follows:
- Static band: 30000-30085
- Dynamic band: 30086-32767
See Avoid Collisions Assigning Ports to NodePort Services for more details on how the static and dynamic bands are calculated.
Custom IP address configuration for type: NodePort Services
You can set up nodes in your cluster to use a particular IP address for serving node port services. You might want to do this if each node is connected to multiple networks (for example: one network for application traffic, and another network for traffic between nodes and the control plane).
If you want to specify particular IP address(es) to proxy the port, you can set the
--nodeport-addresses flag for kube-proxy or the equivalent nodePortAddresses
field of the kube-proxy configuration file
to particular IP block(s).
This flag takes a comma-delimited list of IP blocks (e.g. 10.0.0.0/8, 192.0.2.0/25)
to specify IP address ranges that kube-proxy should consider as local to this node.
For example, if you start kube-proxy with the --nodeport-addresses=127.0.0.0/8 flag,
kube-proxy only selects the loopback interface for NodePort Services.
The default for --nodeport-addresses is an empty list.
This means that kube-proxy should consider all available network interfaces for NodePort.
(That's also compatible with earlier Kubernetes releases.)
Note:
This Service is visible as<NodeIP>:spec.ports[*].nodePort and .spec.clusterIP:spec.ports[*].port.
If the --nodeport-addresses flag for kube-proxy or the equivalent field
in the kube-proxy configuration file is set, <NodeIP> would be a filtered
node IP address (or possibly IP addresses).type: LoadBalancer
On cloud providers which support external load balancers, setting the type
field to LoadBalancer provisions a load balancer for your Service.
The actual creation of the load balancer happens asynchronously, and
information about the provisioned balancer is published in the Service's
.status.loadBalancer field.
For example:
apiVersion: v1
kind: Service
metadata:
name: my-service
spec:
selector:
app.kubernetes.io/name: MyApp
ports:
- protocol: TCP
port: 80
targetPort: 9376
clusterIP: 10.0.171.239
type: LoadBalancer
status:
loadBalancer:
ingress:
- ip: 192.0.2.127
Traffic from the external load balancer is directed at the backend Pods. The cloud provider decides how it is load balanced.
To implement a Service of type: LoadBalancer, Kubernetes typically starts off
by making the changes that are equivalent to you requesting a Service of
type: NodePort. The cloud-controller-manager component then configures the external
load balancer to forward traffic to that assigned node port.
You can configure a load balanced Service to omit assigning a node port, provided that the cloud provider implementation supports this.
Some cloud providers allow you to specify the loadBalancerIP. In those cases, the load-balancer is created
with the user-specified loadBalancerIP. If the loadBalancerIP field is not specified,
the load balancer is set up with an ephemeral IP address. If you specify a loadBalancerIP
but your cloud provider does not support the feature, the loadbalancerIP field that you
set is ignored.
Note:
The.spec.loadBalancerIP field for a Service was deprecated in Kubernetes v1.24.
This field was under-specified and its meaning varies across implementations. It also cannot support dual-stack networking. This field may be removed in a future API version.
If you're integrating with a provider that supports specifying the load balancer IP address(es) for a Service via a (provider specific) annotation, you should switch to doing that.
If you are writing code for a load balancer integration with Kubernetes, avoid using this field. You can integrate with Gateway rather than Service, or you can define your own (provider specific) annotations on the Service that specify the equivalent detail.
Node liveness impact on load balancer traffic
Load balancer health checks are critical to modern applications. They are used to
determine which server (virtual machine, or IP address) the load balancer should
dispatch traffic to. The Kubernetes APIs do not define how health checks have to be
implemented for Kubernetes managed load balancers, instead it's the cloud providers
(and the people implementing integration code) who decide on the behavior. Load
balancer health checks are extensively used within the context of supporting the
externalTrafficPolicy field for Services.
Load balancers with mixed protocol types
FEATURE STATE:
Kubernetes v1.26 [stable](enabled by default)By default, for LoadBalancer type of Services, when there is more than one port defined, all ports must have the same protocol, and the protocol must be one which is supported by the cloud provider.
The feature gate MixedProtocolLBService (enabled by default for the kube-apiserver as of v1.24) allows the use of
different protocols for LoadBalancer type of Services, when there is more than one port defined.
Note:
The set of protocols that can be used for load balanced Services is defined by your cloud provider; they may impose restrictions beyond what the Kubernetes API enforces.Disabling load balancer NodePort allocation
FEATURE STATE:
Kubernetes v1.24 [stable]You can optionally disable node port allocation for a Service of type: LoadBalancer, by setting
the field spec.allocateLoadBalancerNodePorts to false. This should only be used for load balancer implementations
that route traffic directly to pods as opposed to using node ports. By default, spec.allocateLoadBalancerNodePorts
is true and type LoadBalancer Services will continue to allocate node ports. If spec.allocateLoadBalancerNodePorts
is set to false on an existing Service with allocated node ports, those node ports will not be de-allocated automatically.
You must explicitly remove the nodePorts entry in every Service port to de-allocate those node ports.
Specifying class of load balancer implementation
FEATURE STATE:
Kubernetes v1.24 [stable]For a Service with type set to LoadBalancer, the .spec.loadBalancerClass field
enables you to use a load balancer implementation other than the cloud provider default.
By default, .spec.loadBalancerClass is not set and a LoadBalancer
type of Service uses the cloud provider's default load balancer implementation if the
cluster is configured with a cloud provider using the --cloud-provider component
flag.
If you specify .spec.loadBalancerClass, it is assumed that a load balancer
implementation that matches the specified class is watching for Services.
Any default load balancer implementation (for example, the one provided by
the cloud provider) will ignore Services that have this field set.
spec.loadBalancerClass can be set on a Service of type LoadBalancer only.
Once set, it cannot be changed.
The value of spec.loadBalancerClass must be a label-style identifier,
with an optional prefix such as "internal-vip" or "example.com/internal-vip".
Unprefixed names are reserved for end-users.
Load balancer IP address mode
For a Service of type: LoadBalancer, a controller can set .status.loadBalancer.ingress.ipMode.
The .status.loadBalancer.ingress.ipMode specifies how the load-balancer IP behaves.
It may be specified only when the .status.loadBalancer.ingress.ip field is also specified.
There are two possible values for .status.loadBalancer.ingress.ipMode: "VIP" and "Proxy".
The default value is "VIP" meaning that traffic is delivered to the node
with the destination set to the load-balancer's IP and port.
There are two cases when setting this to "Proxy", depending on how the load-balancer
from the cloud provider delivers the traffics:
- If the traffic is delivered to the node then DNATed to the pod, the destination would be set to the node's IP and node port;
- If the traffic is delivered directly to the pod, the destination would be set to the pod's IP and port.
Service implementations may use this information to adjust traffic routing.
Internal load balancer
In a mixed environment it is sometimes necessary to route traffic from Services inside the same (virtual) network address block.
In a split-horizon DNS environment you would need two Services to be able to route both external and internal traffic to your endpoints.
To set an internal load balancer, add one of the following annotations to your Service depending on the cloud service provider you're using:
Select one of the tabs.
metadata:
name: my-service
annotations:
networking.gke.io/load-balancer-type: "Internal"
metadata:
name: my-service
annotations:
service.beta.kubernetes.io/aws-load-balancer-scheme: "internal"
metadata:
name: my-service
annotations:
service.beta.kubernetes.io/azure-load-balancer-internal: "true"
metadata:
name: my-service
annotations:
service.kubernetes.io/ibm-load-balancer-cloud-provider-ip-type: "private"
metadata:
name: my-service
annotations:
service.beta.kubernetes.io/openstack-internal-load-balancer: "true"
metadata:
name: my-service
annotations:
service.beta.kubernetes.io/cce-load-balancer-internal-vpc: "true"
metadata:
annotations:
service.kubernetes.io/qcloud-loadbalancer-internal-subnetid: subnet-xxxxx
metadata:
annotations:
service.beta.kubernetes.io/alibaba-cloud-loadbalancer-address-type: "intranet"
metadata:
name: my-service
annotations:
service.beta.kubernetes.io/oci-load-balancer-internal: true
type: ExternalName
Services of type ExternalName map a Service to a DNS name, not to a typical selector such as
my-service or cassandra. You specify these Services with the spec.externalName parameter.
This Service definition, for example, maps
the my-service Service in the prod namespace to my.database.example.com:
apiVersion: v1
kind: Service
metadata:
name: my-service
namespace: prod
spec:
type: ExternalName
externalName: my.database.example.com
Note:
A Service of type: ExternalName accepts an IPv4 address string,
but treats that string as a DNS name comprised of digits,
not as an IP address (the internet does not however allow such names in DNS).
Services with external names that resemble IPv4
addresses are not resolved by DNS servers.
If you want to map a Service directly to a specific IP address, consider using headless Services.
When looking up the host my-service.prod.svc.cluster.local, the cluster DNS Service
returns a CNAME record with the value my.database.example.com. Accessing
my-service works in the same way as other Services but with the crucial
difference that redirection happens at the DNS level rather than via proxying or
forwarding. Should you later decide to move your database into your cluster, you
can start its Pods, add appropriate selectors or endpoints, and change the
Service's type.
Caution:
You may have trouble using ExternalName for some common protocols, including HTTP and HTTPS. If you use ExternalName then the hostname used by clients inside your cluster is different from the name that the ExternalName references.
For protocols that use hostnames this difference may lead to errors or unexpected responses.
HTTP requests will have a Host: header that the origin server does not recognize;
TLS servers will not be able to provide a certificate matching the hostname that the client connected to.
Headless Services
Sometimes you don't need load-balancing and a single Service IP. In
this case, you can create what are termed headless Services, by explicitly
specifying "None" for the cluster IP address (.spec.clusterIP).
You can use a headless Service to interface with other service discovery mechanisms, without being tied to Kubernetes' implementation.
For headless Services, a cluster IP is not allocated, kube-proxy does not handle these Services, and there is no load balancing or proxying done by the platform for them.
A headless Service allows a client to connect to whichever Pod it prefers, directly. Services that are headless don't
configure routes and packet forwarding using
virtual IP addresses and proxies; instead, headless Services report the
endpoint IP addresses of the individual pods via internal DNS records, served through the cluster's
DNS service.
To define a headless Service, you make a Service with .spec.type set to ClusterIP (which is also the default for type),
and you additionally set .spec.clusterIP to None.
The string value None is a special case and is not the same as leaving the .spec.clusterIP field unset.
How DNS is automatically configured depends on whether the Service has selectors defined:
With selectors
For headless Services that define selectors, the endpoints controller creates EndpointSlices in the Kubernetes API, and modifies the DNS configuration to return A or AAAA records (IPv4 or IPv6 addresses) that point directly to the Pods backing the Service.
Without selectors
For headless Services that do not define selectors, the control plane does not create EndpointSlice objects. However, the DNS system looks for and configures either:
- DNS CNAME records for
type: ExternalNameServices. - DNS A / AAAA records for all IP addresses of the Service's ready endpoints,
for all Service types other than
ExternalName.- For IPv4 endpoints, the DNS system creates A records.
- For IPv6 endpoints, the DNS system creates AAAA records.
When you define a headless Service without a selector, the port must
match the targetPort.
Discovering services
For clients running inside your cluster, Kubernetes supports two primary modes of finding a Service: environment variables and DNS.
Environment variables
When a Pod is run on a Node, the kubelet adds a set of environment variables
for each active Service. It adds {SVCNAME}_SERVICE_HOST and {SVCNAME}_SERVICE_PORT variables,
where the Service name is upper-cased and dashes are converted to underscores.
For example, the Service redis-primary which exposes TCP port 6379 and has been
allocated cluster IP address 10.0.0.11, produces the following environment
variables:
REDIS_PRIMARY_SERVICE_HOST=10.0.0.11
REDIS_PRIMARY_SERVICE_PORT=6379
REDIS_PRIMARY_PORT=tcp://10.0.0.11:6379
REDIS_PRIMARY_PORT_6379_TCP=tcp://10.0.0.11:6379
REDIS_PRIMARY_PORT_6379_TCP_PROTO=tcp
REDIS_PRIMARY_PORT_6379_TCP_PORT=6379
REDIS_PRIMARY_PORT_6379_TCP_ADDR=10.0.0.11
Note:
When you have a Pod that needs to access a Service, and you are using the environment variable method to publish the port and cluster IP to the client Pods, you must create the Service before the client Pods come into existence. Otherwise, those client Pods won't have their environment variables populated.
If you only use DNS to discover the cluster IP for a Service, you don't need to worry about this ordering issue.
Kubernetes also supports and provides variables that are compatible with Docker
Engine's "legacy container links" feature.
You can read makeLinkVariables
to see how this is implemented in Kubernetes.
DNS
You can (and almost always should) set up a DNS service for your Kubernetes cluster using an add-on.
A cluster-aware DNS server, such as CoreDNS, watches the Kubernetes API for new Services and creates a set of DNS records for each one. If DNS has been enabled throughout your cluster then all Pods should automatically be able to resolve Services by their DNS name.
For example, if you have a Service called my-service in a Kubernetes
namespace my-ns, the control plane and the DNS Service acting together
create a DNS record for my-service.my-ns. Pods in the my-ns namespace
should be able to find the service by doing a name lookup for my-service
(my-service.my-ns would also work).
Pods in other namespaces must qualify the name as my-service.my-ns. These names
will resolve to the cluster IP assigned for the Service.
Kubernetes also supports DNS SRV (Service) records for named ports. If the
my-service.my-ns Service has a port named http with the protocol set to
TCP, you can do a DNS SRV query for _http._tcp.my-service.my-ns to discover
the port number for http, as well as the IP address.
The Kubernetes DNS server is the only way to access ExternalName Services.
You can find more information about ExternalName resolution in
DNS for Services and Pods.
Virtual IP addressing mechanism
Read Virtual IPs and Service Proxies explains the mechanism Kubernetes provides to expose a Service with a virtual IP address.
Traffic policies
You can set the .spec.internalTrafficPolicy and .spec.externalTrafficPolicy fields
to control how Kubernetes routes traffic to healthy (“ready”) backends.
See Traffic Policies for more details.
Traffic distribution control
The .spec.trafficDistribution field provides another way to influence traffic
routing within a Kubernetes Service. While traffic policies focus on strict
semantic guarantees, traffic distribution allows you to express preferences
(such as routing to topologically closer endpoints). This can help optimize for
performance, cost, or reliability. In Kubernetes 1.36, the
following values are supported:
PreferSameZone- Indicates a preference for routing traffic to endpoints that are in the same zone as the client.
PreferSameNode- Indicates a preference for routing traffic to endpoints that are on the same node as the client.
PreferClose(deprecated)- This is an older alias for
PreferSameZonethat is less clear about the semantics.
If the field is not set, the implementation will apply its default routing strategy.
See Traffic Distribution for more details
Session stickiness
If you want to make sure that connections from a particular client are passed to the same Pod each time, you can configure session affinity based on the client's IP address. Read session affinity to learn more.
External IPs
FEATURE STATE:
Kubernetes v1.36 [deprecated]All users should begin migrating away from externalIPs.
Consider using an external load balancer controller or a Gateway API
implementation instead.
If there are external IPs that route to one or more cluster nodes, Kubernetes Services
can be exposed on those externalIPs. When network traffic arrives into the cluster, with
the external IP (as destination IP) and the port matching that Service, rules and routes
that Kubernetes has configured ensure that the traffic is routed to one of the endpoints
for that Service.
When you define a Service, you can specify externalIPs for any
service type.
In the example below, the Service named "my-service" can be accessed by clients using TCP,
on "198.51.100.32:80" (calculated from .spec.externalIPs[] and .spec.ports[].port).
apiVersion: v1
kind: Service
metadata:
name: my-service
spec:
selector:
app.kubernetes.io/name: MyApp
ports:
- name: http
protocol: TCP
port: 80
targetPort: 49152
externalIPs:
- 198.51.100.32
Note:
Kubernetes does not manage allocation ofexternalIPs; these are the responsibility
of the cluster administrator.API Object
Service is a top-level resource in the Kubernetes REST API. You can find more details about the Service API object.
What's next
Learn more about Services and how they fit into Kubernetes:
- Follow the Connecting Applications with Services tutorial.
- Read about Ingress, which exposes HTTP and HTTPS routes from outside the cluster to Services within your cluster.
- Read about Gateway, an extension to Kubernetes that provides more flexibility than Ingress.
For more context, read the following:
5.2 - Ingress
Make your HTTP (or HTTPS) network service available using a protocol-aware configuration mechanism, that understands web concepts like URIs, hostnames, paths, and more. The Ingress concept lets you map traffic to different backends based on rules you define via the Kubernetes API.
FEATURE STATE:
Kubernetes v1.19 [stable]An API object that manages external access to the services in a cluster, typically HTTP.
Ingress may provide load balancing, SSL termination and name-based virtual hosting.
Note:
The Kubernetes project recommends using Gateway instead of Ingress. The Ingress API has been frozen.
This means that:
- The Ingress API is generally available, and is subject to the stability guarantees for generally available APIs. The Kubernetes project has no plans to remove Ingress from Kubernetes.
- The Ingress API is no longer being developed, and will have no further changes or updates made to it.
Terminology
For clarity, this guide defines the following terms:
- Node: A worker machine in Kubernetes, part of a cluster.
- Cluster: A set of Nodes that run containerized applications managed by Kubernetes. For this example, and in most common Kubernetes deployments, nodes in the cluster are not part of the public internet.
- Edge router: A router that enforces the firewall policy for your cluster. This could be a gateway managed by a cloud provider or a physical piece of hardware.
- Cluster network: A set of links, logical or physical, that facilitate communication within a cluster according to the Kubernetes networking model.
- Service: A Kubernetes Service that identifies a set of Pods using label selectors. Unless mentioned otherwise, Services are assumed to have virtual IPs only routable within the cluster network.
What is Ingress?
Ingress exposes HTTP and HTTPS routes from outside the cluster to services within the cluster. Traffic routing is controlled by rules defined on the Ingress resource.
Here is a simple example where an Ingress sends all its traffic to one Service:

Figure. Ingress
An Ingress may be configured to give Services externally-reachable URLs, load balance traffic, terminate SSL / TLS, and offer name-based virtual hosting. An Ingress controller is responsible for fulfilling the Ingress, usually with a load balancer, though it may also configure your edge router or additional frontends to help handle the traffic.
An Ingress does not expose arbitrary ports or protocols. Exposing services other than HTTP and HTTPS to the internet typically uses a service of type Service.Type=NodePort or Service.Type=LoadBalancer.
Prerequisites
You must have an Ingress controller to satisfy an Ingress. Only creating an Ingress resource has no effect.
You can choose from a number of Ingress controllers.
Ideally, all Ingress controllers should fit the reference specification. In reality, the various Ingress controllers operate slightly differently.
Note:
Make sure you review your Ingress controller's documentation to understand the caveats of choosing it.The Ingress resource
A minimal Ingress resource example:
apiVersion: networking.k8s.io/v1
kind: Ingress
metadata:
name: minimal-ingress
spec:
ingressClassName: nginx-example
rules:
- http:
paths:
- path: /testpath
pathType: Prefix
backend:
service:
name: test
port:
number: 80
An Ingress needs apiVersion, kind, metadata and spec fields.
The name of an Ingress object must be a valid
DNS subdomain name.
For general information about working with config files, see
deploying applications,
configuring containers,
managing resources.
Ingress controllers frequently use annotations to configure behavior.
Review the documentation for your choice of ingress controller to learn which annotations are expected and / or supported.
The Ingress spec has all the information needed to configure a load balancer or proxy server. Most importantly, it contains a list of rules matched against all incoming requests. Ingress resource only supports rules for directing HTTP(S) traffic.
If the ingressClassName is omitted, a default Ingress class
should be defined.
Some ingress controllers work even without the definition of a default IngressClass. Even if you use an ingress controller that is able to operate without any IngressClass, the Kubernetes project still recommends that you define a default IngressClass.
Ingress rules
Each HTTP rule contains the following information:
- An optional host. In this example, no host is specified, so the rule applies to all inbound HTTP traffic through the IP address specified. If a host is provided (for example, foo.bar.com), the rules apply to that host.
- A list of paths (for example,
/testpath), each of which has an associated backend defined with aservice.nameand aservice.port.nameorservice.port.number. Both the host and path must match the content of an incoming request before the load balancer directs traffic to the referenced Service. - A backend is a combination of Service and port names as described in the Service doc or a custom resource backend by way of a CRD. HTTP (and HTTPS) requests to the Ingress that match the host and path of the rule are sent to the listed backend.
A defaultBackend is often configured in an Ingress controller to service any requests that do not
match a path in the spec.
DefaultBackend
An Ingress with no rules sends all traffic to a single default backend and .spec.defaultBackend
is the backend that should handle requests in that case.
The defaultBackend is conventionally a configuration option of the
Ingress controller and
is not specified in your Ingress resources.
If no .spec.rules are specified, .spec.defaultBackend must be specified.
If defaultBackend is not set, the handling of requests that do not match any of the rules will be up to the
ingress controller (consult the documentation for your ingress controller to find out how it handles this case).
If none of the hosts or paths match the HTTP request in the Ingress objects, the traffic is routed to your default backend.
Resource backends
A Resource backend is an ObjectRef to another Kubernetes resource within the
same namespace as the Ingress object. A Resource is a mutually exclusive
setting with Service, and will fail validation if both are specified. A common
usage for a Resource backend is to ingress data to an object storage backend
with static assets.
apiVersion: networking.k8s.io/v1
kind: Ingress
metadata:
name: ingress-resource-backend
spec:
defaultBackend:
resource:
apiGroup: k8s.example.com
kind: StorageBucket
name: static-assets
rules:
- http:
paths:
- path: /icons
pathType: ImplementationSpecific
backend:
resource:
apiGroup: k8s.example.com
kind: StorageBucket
name: icon-assets
After creating the Ingress above, you can view it with the following command:
kubectl describe ingress ingress-resource-backend
Name: ingress-resource-backend
Namespace: default
Address:
Default backend: APIGroup: k8s.example.com, Kind: StorageBucket, Name: static-assets
Rules:
Host Path Backends
---- ---- --------
*
/icons APIGroup: k8s.example.com, Kind: StorageBucket, Name: icon-assets
Annotations: <none>
Events: <none>
Path types
Each path in an Ingress is required to have a corresponding path type. Paths
that do not include an explicit pathType will fail validation. There are three
supported path types:
ImplementationSpecific: With this path type, matching is up to the IngressClass. Implementations can treat this as a separatepathTypeor treat it identically toPrefixorExactpath types.Exact: Matches the URL path exactly and with case sensitivity.Prefix: Matches based on a URL path prefix split by/. Matching is case sensitive and done on a path element by element basis. A path element refers to the list of labels in the path split by the/separator. A request is a match for path p if every p is an element-wise prefix of p of the request path.Note:
If the last element of the path is a substring of the last element in request path, it is not a match (for example:/foo/barmatches/foo/bar/baz, but does not match/foo/barbaz).
Examples
| Kind | Path(s) | Request path(s) | Matches? |
|---|---|---|---|
| Prefix | / | (all paths) | Yes |
| Exact | /foo | /foo | Yes |
| Exact | /foo | /bar | No |
| Exact | /foo | /foo/ | No |
| Exact | /foo/ | /foo | No |
| Prefix | /foo | /foo, /foo/ | Yes |
| Prefix | /foo/ | /foo, /foo/ | Yes |
| Prefix | /aaa/bb | /aaa/bbb | No |
| Prefix | /aaa/bbb | /aaa/bbb | Yes |
| Prefix | /aaa/bbb/ | /aaa/bbb | Yes, ignores trailing slash |
| Prefix | /aaa/bbb | /aaa/bbb/ | Yes, matches trailing slash |
| Prefix | /aaa/bbb | /aaa/bbb/ccc | Yes, matches subpath |
| Prefix | /aaa/bbb | /aaa/bbbxyz | No, does not match string prefix |
| Prefix | /, /aaa | /aaa/ccc | Yes, matches /aaa prefix |
| Prefix | /, /aaa, /aaa/bbb | /aaa/bbb | Yes, matches /aaa/bbb prefix |
| Prefix | /, /aaa, /aaa/bbb | /ccc | Yes, matches / prefix |
| Prefix | /aaa | /ccc | No, uses default backend |
| Mixed | /foo (Prefix), /foo (Exact) | /foo | Yes, prefers Exact |
Multiple matches
In some cases, multiple paths within an Ingress will match a request. In those cases precedence will be given first to the longest matching path. If two paths are still equally matched, precedence will be given to paths with an exact path type over prefix path type.
Hostname wildcards
Hosts can be precise matches (for example “foo.bar.com”) or a wildcard (for
example “*.foo.com”). Precise matches require that the HTTP host header
matches the host field. Wildcard matches require the HTTP host header is
equal to the suffix of the wildcard rule.
| Host | Host header | Match? |
|---|---|---|
*.foo.com | bar.foo.com | Matches based on shared suffix |
*.foo.com | baz.bar.foo.com | No match, wildcard only covers a single DNS label |
*.foo.com | foo.com | No match, wildcard only covers a single DNS label |
apiVersion: networking.k8s.io/v1
kind: Ingress
metadata:
name: ingress-wildcard-host
spec:
rules:
- host: "foo.bar.com"
http:
paths:
- pathType: Prefix
path: "/bar"
backend:
service:
name: service1
port:
number: 80
- host: "*.foo.com"
http:
paths:
- pathType: Prefix
path: "/foo"
backend:
service:
name: service2
port:
number: 80
Ingress class
Ingresses can be implemented by different controllers, often with different configuration. Each Ingress should specify a class, a reference to an IngressClass resource that contains additional configuration including the name of the controller that should implement the class.
apiVersion: networking.k8s.io/v1
kind: IngressClass
metadata:
name: external-lb
spec:
controller: example.com/ingress-controller
parameters:
apiGroup: k8s.example.com
kind: IngressParameters
name: external-lb
The .spec.parameters field of an IngressClass lets you reference another
resource that provides configuration related to that IngressClass.
The specific type of parameters to use depends on the ingress controller
that you specify in the .spec.controller field of the IngressClass.
IngressClass scope
Depending on your ingress controller, you may be able to use parameters that you set cluster-wide, or just for one namespace.
The default scope for IngressClass parameters is cluster-wide.
If you set the .spec.parameters field and don't set
.spec.parameters.scope, or if you set .spec.parameters.scope to
Cluster, then the IngressClass refers to a cluster-scoped resource.
The kind (in combination the apiGroup) of the parameters
refers to a cluster-scoped API (possibly a custom resource), and
the name of the parameters identifies a specific cluster scoped
resource for that API.
For example:
---
apiVersion: networking.k8s.io/v1
kind: IngressClass
metadata:
name: external-lb-1
spec:
controller: example.com/ingress-controller
parameters:
# The parameters for this IngressClass are specified in a
# ClusterIngressParameter (API group k8s.example.net) named
# "external-config-1". This definition tells Kubernetes to
# look for a cluster-scoped parameter resource.
scope: Cluster
apiGroup: k8s.example.net
kind: ClusterIngressParameter
name: external-config-1
FEATURE STATE:
Kubernetes v1.23 [stable]If you set the .spec.parameters field and set
.spec.parameters.scope to Namespace, then the IngressClass refers
to a namespaced-scoped resource. You must also set the namespace
field within .spec.parameters to the namespace that contains
the parameters you want to use.
The kind (in combination the apiGroup) of the parameters
refers to a namespaced API (for example: ConfigMap), and
the name of the parameters identifies a specific resource
in the namespace you specified in namespace.
Namespace-scoped parameters help the cluster operator delegate control over the configuration (for example: load balancer settings, API gateway definition) that is used for a workload. If you used a cluster-scoped parameter then either:
- the cluster operator team needs to approve a different team's changes every time there's a new configuration change being applied.
- the cluster operator must define specific access controls, such as RBAC roles and bindings, that let the application team make changes to the cluster-scoped parameters resource.
The IngressClass API itself is always cluster-scoped.
Here is an example of an IngressClass that refers to parameters that are namespaced:
---
apiVersion: networking.k8s.io/v1
kind: IngressClass
metadata:
name: external-lb-2
spec:
controller: example.com/ingress-controller
parameters:
# The parameters for this IngressClass are specified in an
# IngressParameter (API group k8s.example.com) named "external-config",
# that's in the "external-configuration" namespace.
scope: Namespace
apiGroup: k8s.example.com
kind: IngressParameter
namespace: external-configuration
name: external-config
Deprecated annotation
Before the IngressClass resource and ingressClassName field were added in
Kubernetes 1.18, Ingress classes were specified with a
kubernetes.io/ingress.class annotation on the Ingress. This annotation was
never formally defined, but was widely supported by Ingress controllers.
The newer ingressClassName field on Ingresses is a replacement for that
annotation, but is not a direct equivalent. While the annotation was generally
used to reference the name of the Ingress controller that should implement the
Ingress, the field is a reference to an IngressClass resource that contains
additional Ingress configuration, including the name of the Ingress controller.
Default IngressClass
You can mark a particular IngressClass as default for your cluster. Setting the
ingressclass.kubernetes.io/is-default-class annotation to true on an
IngressClass resource will ensure that new Ingresses without an
ingressClassName field specified will be assigned this default IngressClass.
Caution:
If you have more than one IngressClass marked as the default for your cluster, the admission controller prevents creating new Ingress objects that don't have aningressClassName specified. You can resolve this by ensuring that at most 1
IngressClass is marked as default in your cluster.Start by defining a default IngressClass. It is recommended though, to specify the default IngressClass:
apiVersion: networking.k8s.io/v1
kind: IngressClass
metadata:
labels:
app.kubernetes.io/component: controller
name: example-class
annotations:
ingressclass.kubernetes.io/is-default-class: "true"
spec:
controller: k8s.io/example-class
Types of Ingress
Ingress backed by a single Service
There are existing Kubernetes concepts that allow you to expose a single Service (see alternatives). You can also do this with an Ingress by specifying a default backend with no rules.
apiVersion: networking.k8s.io/v1
kind: Ingress
metadata:
name: test-ingress
spec:
defaultBackend:
service:
name: test
port:
number: 80
If you create it using kubectl apply -f you should be able to view the state
of the Ingress you added:
kubectl get ingress test-ingress
NAME CLASS HOSTS ADDRESS PORTS AGE
test-ingress external-lb * 203.0.113.123 80 59s
Where 203.0.113.123 is the IP allocated by the Ingress controller to satisfy
this Ingress.
Note:
Ingress controllers and load balancers may take a minute or two to allocate an IP address. Until that time, you often see the address listed as<pending>.Simple fanout
A fanout configuration routes traffic from a single IP address to more than one Service, based on the HTTP URI being requested. An Ingress allows you to keep the number of load balancers down to a minimum. For example, a setup like:

Figure. Ingress Fan Out
It would require an Ingress such as:
apiVersion: networking.k8s.io/v1
kind: Ingress
metadata:
name: simple-fanout-example
spec:
rules:
- host: foo.bar.com
http:
paths:
- path: /foo
pathType: Prefix
backend:
service:
name: service1
port:
number: 4200
- path: /bar
pathType: Prefix
backend:
service:
name: service2
port:
number: 8080
When you create the Ingress with kubectl apply -f:
kubectl describe ingress simple-fanout-example
Name: simple-fanout-example
Namespace: default
Address: 178.91.123.132
Default backend: default-http-backend:80 (10.8.2.3:8080)
Rules:
Host Path Backends
---- ---- --------
foo.bar.com
/foo service1:4200 (10.8.0.90:4200)
/bar service2:8080 (10.8.0.91:8080)
Events:
Type Reason Age From Message
---- ------ ---- ---- -------
Normal ADD 22s loadbalancer-controller default/test
The Ingress controller provisions an implementation-specific load balancer
that satisfies the Ingress, as long as the Services (service1, service2) exist.
When it has done so, you can see the address of the load balancer at the
Address field.
Note:
Depending on the Ingress controller you are using, you may need to create a default-http-backend Service.Name based virtual hosting
Name-based virtual hosts support routing HTTP traffic to multiple host names at the same IP address.

Figure. Ingress Name Based Virtual hosting
The following Ingress tells the backing load balancer to route requests based on the Host header.
apiVersion: networking.k8s.io/v1
kind: Ingress
metadata:
name: name-virtual-host-ingress
spec:
rules:
- host: foo.bar.com
http:
paths:
- pathType: Prefix
path: "/"
backend:
service:
name: service1
port:
number: 80
- host: bar.foo.com
http:
paths:
- pathType: Prefix
path: "/"
backend:
service:
name: service2
port:
number: 80
If you create an Ingress resource without any hosts defined in the rules, then any web traffic to the IP address of your Ingress controller can be matched without a name based virtual host being required.
For example, the following Ingress routes traffic
requested for first.bar.com to service1, second.bar.com to service2,
and any traffic whose request host header doesn't match first.bar.com
and second.bar.com to service3.
apiVersion: networking.k8s.io/v1
kind: Ingress
metadata:
name: name-virtual-host-ingress-no-third-host
spec:
rules:
- host: first.bar.com
http:
paths:
- pathType: Prefix
path: "/"
backend:
service:
name: service1
port:
number: 80
- host: second.bar.com
http:
paths:
- pathType: Prefix
path: "/"
backend:
service:
name: service2
port:
number: 80
- http:
paths:
- pathType: Prefix
path: "/"
backend:
service:
name: service3
port:
number: 80
TLS
You can secure an Ingress by specifying a Secret
that contains a TLS private key and certificate. The Ingress resource only
supports a single TLS port, 443, and assumes TLS termination at the ingress point
(traffic to the Service and its Pods is in plaintext).
If the TLS configuration section in an Ingress specifies different hosts, they are
multiplexed on the same port according to the hostname specified through the
SNI TLS extension (provided the Ingress controller supports SNI). The TLS secret
must contain keys named tls.crt and tls.key that contain the certificate
and private key to use for TLS. For example:
apiVersion: v1
kind: Secret
metadata:
name: testsecret-tls
namespace: default
data:
tls.crt: base64 encoded cert
tls.key: base64 encoded key
type: kubernetes.io/tls
Referencing this secret in an Ingress tells the Ingress controller to
secure the channel from the client to the load balancer using TLS. You need to make
sure the TLS secret you created came from a certificate that contains a Common
Name (CN), also known as a Fully Qualified Domain Name (FQDN) for https-example.foo.com.
Note:
Keep in mind that TLS will not work on the default rule because the certificates would have to be issued for all the possible sub-domains. Therefore,hosts in the tls section need to explicitly match the host in the rules
section.apiVersion: networking.k8s.io/v1
kind: Ingress
metadata:
name: tls-example-ingress
spec:
tls:
- hosts:
- https-example.foo.com
secretName: testsecret-tls
rules:
- host: https-example.foo.com
http:
paths:
- path: /
pathType: Prefix
backend:
service:
name: service1
port:
number: 80
Note:
There is a gap between TLS features supported by various ingress controllers. You should refer to the documentation for the ingress controller(s) you've chosen to understand how TLS works in your environment.Load balancing
An Ingress controller is bootstrapped with some load balancing policy settings that it applies to all Ingress, such as the load balancing algorithm, backend weight scheme, and others. More advanced load balancing concepts (e.g. persistent sessions, dynamic weights) are not yet exposed through the Ingress. You can instead get these features through the load balancer used for a Service.
It's also worth noting that even though health checks are not exposed directly through the Ingress, there exist parallel concepts in Kubernetes such as readiness probes that allow you to achieve the same end result. Please review the controller specific documentation to see how they handle health checks.
Updating an Ingress
To update an existing Ingress to add a new Host, you can update it by editing the resource:
kubectl describe ingress test
Name: test
Namespace: default
Address: 178.91.123.132
Default backend: default-http-backend:80 (10.8.2.3:8080)
Rules:
Host Path Backends
---- ---- --------
foo.bar.com
/foo service1:80 (10.8.0.90:80)
Events:
Type Reason Age From Message
---- ------ ---- ---- -------
Normal ADD 35s loadbalancer-controller default/test
kubectl edit ingress test
This pops up an editor with the existing configuration in YAML format. Modify it to include the new Host:
spec:
rules:
- host: foo.bar.com
http:
paths:
- backend:
service:
name: service1
port:
number: 80
path: /foo
pathType: Prefix
- host: bar.baz.com
http:
paths:
- backend:
service:
name: service2
port:
number: 80
path: /foo
pathType: Prefix
..
After you save your changes, kubectl updates the resource in the API server, which tells the Ingress controller to reconfigure the load balancer.
Verify this:
kubectl describe ingress test
Name: test
Namespace: default
Address: 178.91.123.132
Default backend: default-http-backend:80 (10.8.2.3:8080)
Rules:
Host Path Backends
---- ---- --------
foo.bar.com
/foo service1:80 (10.8.0.90:80)
bar.baz.com
/foo service2:80 (10.8.0.91:80)
Events:
Type Reason Age From Message
---- ------ ---- ---- -------
Normal ADD 45s loadbalancer-controller default/test
You can achieve the same outcome by invoking kubectl replace -f on a modified Ingress YAML file.
Failing across availability zones
Techniques for spreading traffic across failure domains differ between cloud providers. Please check the documentation of the relevant Ingress controller for details.
Alternatives
You can expose a Service in multiple ways that don't directly involve the Ingress resource:
What's next
- Learn about the Ingress API
- Learn about Ingress controllers
5.3 - Ingress Controllers
In order for an Ingress to work in your cluster, there must be an ingress controller running. You need to select at least one ingress controller and make sure it is set up in your cluster. This page lists common ingress controllers that you can deploy.
Note:
The Kubernetes project recommends using Gateway instead of Ingress. The Ingress API has been frozen.
This means that:
- The Ingress API is generally available, and is subject to the stability guarantees for generally available APIs. The Kubernetes project has no plans to remove Ingress from Kubernetes.
- The Ingress API is no longer being developed, and will have no further changes or updates made to it.
Ingress controllers
Kubernetes as a project supports and maintains AWS, and GCE ingress controllers.
Third party ingress controllers
Note: This section links to third party projects that provide functionality required by Kubernetes. The Kubernetes project authors aren't responsible for these projects, which are listed alphabetically. To add a project to this list, read the content guide before submitting a change. More information.
- AKS Application Gateway Ingress Controller is an ingress controller that configures the Azure Application Gateway.
- Alibaba Cloud API Gateway Ingress is an ingress controller that configures the Alibaba Cloud Native API Gateway, which is also the commercial version of Higress.
- Apache APISIX ingress controller is an Apache APISIX-based ingress controller.
- Avi Kubernetes Operator provides L4-L7 load-balancing using VMware NSX Advanced Load Balancer.
- BFE Ingress Controller is a BFE-based ingress controller.
- BunkerWeb Ingress Controller is an ingress controller for BunkerWeb, WAF (Web Application Firewall) based on nginx.
- Cilium Ingress Controller is an ingress controller powered by Cilium.
- The Citrix ingress controller works with Citrix Application Delivery Controller.
- Contour is an Envoy based ingress controller.
- Emissary-Ingress API Gateway is an Envoy-based ingress controller.
- EnRoute is an Envoy based API gateway that can run as an ingress controller.
- F5 BIG-IP Container Ingress Services for Kubernetes lets you use an Ingress to configure F5 BIG-IP virtual servers.
- FortiADC Ingress Controller support the Kubernetes Ingress resources and allows you to manage FortiADC objects from Kubernetes
- Gloo is an open-source ingress controller based on Envoy, which offers API gateway functionality.
- HAProxy Ingress is an ingress controller for HAProxy.
- Higress is an Envoy based API gateway that can run as an ingress controller.
- The HAProxy Ingress Controller for Kubernetes is also an ingress controller for HAProxy.
- Istio Ingress is an Istio based ingress controller.
- The Kong Ingress Controller for Kubernetes is an ingress controller driving Kong Gateway.
- Kusk Gateway is an OpenAPI-driven ingress controller based on Envoy.
- The NGINX Ingress Controller for Kubernetes works with the NGINX webserver (as a proxy).
- The ngrok-operator is a controller for ngrok that supports both Ingress and Gateway API for adding secure public access to your K8s Services.
- The OCI Native Ingress Controller is an Ingress controller for Oracle Cloud Infrastructure which allows you to manage the OCI Load Balancer.
- OpenNJet Ingress Controller is a OpenNJet-based ingress controller.
- The Pomerium Ingress Controller is based on Pomerium, which offers context-aware access policy.
- Skipper HTTP router and reverse proxy for service composition, including use cases like Kubernetes Ingress, designed as a library to build your custom proxy.
- The Traefik Kubernetes Ingress provider is an ingress controller for the Traefik proxy.
- Tyk Operator extends Ingress with Custom Resources to bring API Management capabilities to Ingress. Tyk Operator works with the Open Source Tyk Gateway & Tyk Cloud control plane.
- Voyager is an ingress controller for HAProxy.
- Wallarm Ingress Controller is an Ingress Controller that provides WAAP (WAF) and API Security capabilities.
Using multiple Ingress controllers
You may deploy any number of ingress controllers using ingress class
within a cluster. Note the .metadata.name of your ingress class resource. When you create an ingress you would need that name to specify the ingressClassName field on your Ingress object (refer to IngressSpec v1 reference). ingressClassName is a replacement of the older annotation method.
If you do not specify an IngressClass for an Ingress, and your cluster has exactly one IngressClass marked as default, then Kubernetes applies the cluster's default IngressClass to the Ingress.
You mark an IngressClass as default by setting the ingressclass.kubernetes.io/is-default-class annotation on that IngressClass, with the string value "true".
Ideally, all ingress controllers should fulfill this specification, but the various ingress controllers operate slightly differently.
Note:
Make sure you review your ingress controller's documentation to understand the caveats of choosing it.What's next
- Learn more about Ingress.
5.4 - Gateway API
Gateway API is a family of API kinds that provide dynamic infrastructure provisioning and advanced traffic routing.
Make network services available by using an extensible, role-oriented, protocol-aware configuration mechanism. Gateway API is an add-on containing API kinds that provide dynamic infrastructure provisioning and advanced traffic routing.
Design principles
The following principles shaped the design and architecture of Gateway API:
- Role-oriented: Gateway API kinds are modeled after organizational roles that are
responsible for managing Kubernetes service networking:
- Infrastructure Provider: Manages infrastructure that allows multiple isolated clusters to serve multiple tenants, e.g. a cloud provider.
- Cluster Operator: Manages clusters and is typically concerned with policies, network access, application permissions, etc.
- Application Developer: Manages an application running in a cluster and is typically concerned with application-level configuration and Service composition.
- Portable: Gateway API specifications are defined as custom resources and are supported by many implementations.
- Expressive: Gateway API kinds support functionality for common traffic routing use cases such as header-based matching, traffic weighting, and others that were only possible in Ingress by using custom annotations.
- Extensible: Gateway allows for custom resources to be linked at various layers of the API. This makes granular customization possible at the appropriate places within the API structure.
Resource model
Gateway API has four stable API kinds:
GatewayClass: Defines a set of gateways with common configuration and managed by a controller that implements the class.
Gateway: Defines an instance of traffic handling infrastructure, such as cloud load balancer.
HTTPRoute: Defines HTTP-specific rules for mapping traffic from a Gateway listener to a representation of backend network endpoints. These endpoints are often represented as a Service.
GRPCRoute: Defines gRPC-specific rules for mapping traffic from a Gateway listener to a representation of backend network endpoints. These endpoints are often represented as a Service.
Gateway API is organized into different API kinds that have interdependent relationships to support
the role-oriented nature of organizations. A Gateway object is associated with exactly one GatewayClass;
the GatewayClass describes the gateway controller responsible for managing Gateways of this class.
One or more route kinds such as HTTPRoute, are then associated to Gateways. A Gateway can filter the routes
that may be attached to its listeners, forming a bidirectional trust model with routes.
The following figure illustrates the relationships of the three stable Gateway API kinds:

GatewayClass
Gateways can be implemented by different controllers, often with different configurations. A Gateway must reference a GatewayClass that contains the name of the controller that implements the class.
A minimal GatewayClass example:
apiVersion: gateway.networking.k8s.io/v1
kind: GatewayClass
metadata:
name: example-class
spec:
controllerName: example.com/gateway-controller
In this example, a controller that has implemented Gateway API is configured to manage GatewayClasses
with the controller name example.com/gateway-controller. Gateways of this class will be managed by
the implementation's controller.
See the GatewayClass reference for a full definition of this API kind.
Gateway
A Gateway describes an instance of traffic handling infrastructure. It defines a network endpoint that can be used for processing traffic, i.e. filtering, balancing, splitting, etc. for backends such as a Service. For example, a Gateway may represent a cloud load balancer or an in-cluster proxy server that is configured to accept HTTP traffic.
A typical Gateway resource example:
apiVersion: gateway.networking.k8s.io/v1
kind: Gateway
metadata:
name: example-gateway
namespace: example-namespace
spec:
gatewayClassName: example-class
listeners:
- name: http
protocol: HTTP
port: 80
hostname: "www.example.com"
allowedRoutes:
namespaces:
from: Same
In this example, an instance of traffic handling infrastructure is programmed to listen for HTTP
traffic on port 80. Since the addresses field is unspecified, an address or hostname is assigned
to the Gateway by the implementation's controller. This address is used as a network endpoint for
processing traffic of backend network endpoints defined in routes.
See the Gateway reference for a full definition of this API kind.
Note:
By default, a Gateway only accepts Routes from the same namespace. Cross-namespace Routes require configuringallowedRoutes.HTTPRoute
The HTTPRoute kind specifies routing behavior of HTTP requests from a Gateway listener to backend network endpoints. For a Service backend, an implementation may represent the backend network endpoint as a Service IP or the backing EndpointSlices of the Service. An HTTPRoute represents configuration that is applied to the underlying Gateway implementation. For example, defining a new HTTPRoute may result in configuring additional traffic routes in a cloud load balancer or in-cluster proxy server.
A typical HTTPRoute example:
apiVersion: gateway.networking.k8s.io/v1
kind: HTTPRoute
metadata:
name: example-httproute
spec:
parentRefs:
- name: example-gateway
hostnames:
- "www.example.com"
rules:
- matches:
- path:
type: PathPrefix
value: /login
backendRefs:
- name: example-svc
port: 8080
In this example, HTTP traffic from Gateway example-gateway with the Host: header set to www.example.com
and the request path specified as /login will be routed to Service example-svc on port 8080.
See the HTTPRoute reference for a full definition of this API kind.
GRPCRoute
The GRPCRoute kind specifies routing behavior of gRPC requests from a Gateway listener to backend network endpoints. For a Service backend, an implementation may represent the backend network endpoint as a Service IP or the backing EndpointSlices of the Service. A GRPCRoute represents configuration that is applied to the underlying Gateway implementation. For example, defining a new GRPCRoute may result in configuring additional traffic routes in a cloud load balancer or in-cluster proxy server.
Gateways supporting GRPCRoute are required to support HTTP/2 without an initial upgrade from HTTP/1, so gRPC traffic is guaranteed to flow properly.
A typical GRPCRoute example:
apiVersion: gateway.networking.k8s.io/v1
kind: GRPCRoute
metadata:
name: example-grpcroute
spec:
parentRefs:
- name: example-gateway
hostnames:
- "svc.example.com"
rules:
- backendRefs:
- name: example-svc
port: 50051
In this example, gRPC traffic from Gateway example-gateway with the host set to svc.example.com
will be directed to the service example-svc on port 50051 from the same namespace.
GRPCRoute allows matching specific gRPC services, as per the following example:
apiVersion: gateway.networking.k8s.io/v1
kind: GRPCRoute
metadata:
name: example-grpcroute
spec:
parentRefs:
- name: example-gateway
hostnames:
- "svc.example.com"
rules:
- matches:
- method:
service: com.example
method: Login
backendRefs:
- name: foo-svc
port: 50051
In this case, the GRPCRoute will match any traffic for svc.example.com and apply its routing rules to forward the traffic to the correct backend. Since there is only one match specified,only requests for the com.example.User.Login method to svc.example.com will be forwarded. RPCs of any other method` will not be matched by this Route.
See the GRPCRoute reference for a full definition of this API kind.
Request flow
Here is a simple example of HTTP traffic being routed to a Service by using a Gateway and an HTTPRoute:

In this example, the request flow for a Gateway implemented as a reverse proxy is:
- The client starts to prepare an HTTP request for the URL
http://www.example.com - The client's DNS resolver queries for the destination name and learns a mapping to one or more IP addresses associated with the Gateway.
- The client sends a request to the Gateway IP address; the reverse proxy receives the HTTP request and uses the Host: header to match a configuration that was derived from the Gateway and attached HTTPRoute.
- Optionally, the reverse proxy can perform request header and/or path matching based on match rules of the HTTPRoute.
- Optionally, the reverse proxy can modify the request; for example, to add or remove headers, based on filter rules of the HTTPRoute.
- Lastly, the reverse proxy forwards the request to one or more backends.
Conformance
Gateway API covers a broad set of features and is widely implemented. This combination requires clear conformance definitions and tests to ensure that the API provides a consistent experience wherever it is used.
See the conformance documentation to understand details such as release channels, support levels, and running conformance tests.
Migrating from Ingress
Gateway API is the successor to the Ingress API. However, it does not include the Ingress kind. As a result, a one-time conversion from your existing Ingress resources to Gateway API resources is necessary.
Refer to the ingress migration guide for details on migrating Ingress resources to Gateway API resources.
What's next
Instead of Gateway API resources being natively implemented by Kubernetes, the specifications are defined as Custom Resources supported by a wide range of implementations. Install the Gateway API CRDs or follow the installation instructions of your selected implementation. After installing an implementation, use the Getting Started guide to help you quickly start working with Gateway API.
Note:
Make sure to review the documentation of your selected implementation to understand any caveats.Refer to the API specification for additional details of all Gateway API kinds.
5.5 - EndpointSlices
The EndpointSlice API is the mechanism that Kubernetes uses to let your Service scale to handle large numbers of backends, and allows the cluster to update its list of healthy backends efficiently.
FEATURE STATE:
EndpointSlices track the IP addresses of backend endpoints.
EndpointSlices are normally associated with a
Service and the backend endpoints typically represent
Pods.Kubernetes v1.21 [stable]EndpointSlice API
In Kubernetes, an EndpointSlice contains references to a set of network endpoints. The control plane automatically creates EndpointSlices for any Kubernetes Service that has a selector specified. These EndpointSlices include references to all the Pods that match the Service selector. EndpointSlices group network endpoints together by unique combinations of IP family, protocol, port number, and Service name. The name of a EndpointSlice object must be a valid DNS subdomain name.
As an example, here's a sample EndpointSlice object, that's owned by the example
Kubernetes Service.
apiVersion: discovery.k8s.io/v1
kind: EndpointSlice
metadata:
name: example-abc
labels:
kubernetes.io/service-name: example
addressType: IPv4
ports:
- name: http
protocol: TCP
port: 80
endpoints:
- addresses:
- "10.1.2.3"
conditions:
ready: true
hostname: pod-1
nodeName: node-1
zone: us-west2-a
By default, the control plane creates and manages EndpointSlices to have no
more than 100 endpoints each. You can configure this with the
--max-endpoints-per-slice
kube-controller-manager
flag, up to a maximum of 1000.
EndpointSlices act as the source of truth for kube-proxy when it comes to how to route internal traffic.
Address types
EndpointSlices support two address types:
- IPv4
- IPv6
Each EndpointSlice object represents a specific IP address type. If you have
a Service that is available via IPv4 and IPv6, there will be at least two
EndpointSlice objects (one for IPv4, and one for IPv6).
Conditions
The EndpointSlice API stores conditions about endpoints that may be useful for consumers.
The three conditions are serving, terminating, and ready.
Serving
FEATURE STATE:
Kubernetes v1.26 [stable]The serving condition indicates that the endpoint is currently serving responses, and
so it should be used as a target for Service traffic. For endpoints backed by a Pod, this
maps to the Pod's Ready condition.
Terminating
FEATURE STATE:
Kubernetes v1.26 [stable]The terminating condition indicates that the endpoint is
terminating. For endpoints backed by a Pod, this condition is set when
the Pod is first deleted (that is, when it receives a deletion
timestamp, but most likely before the Pod's containers exit).
Service proxies will normally ignore endpoints that are terminating,
but they may route traffic to endpoints that are both serving and
terminating if all available endpoints are terminating. (This
helps to ensure that no Service traffic is lost during rolling updates
of the underlying Pods.)
Ready
The ready condition is essentially a shortcut for checking
"serving and not terminating" (though it will also always be
true for Services with spec.publishNotReadyAddresses set to
true).
Topology information
Each endpoint within an EndpointSlice can contain relevant topology information. The topology information includes the location of the endpoint and information about the corresponding Node and zone. These are available in the following per endpoint fields on EndpointSlices:
nodeName- The name of the Node this endpoint is on.zone- The zone this endpoint is in.
Management
Most often, the control plane (specifically, the endpoint slice controller) creates and manages EndpointSlice objects. There are a variety of other use cases for EndpointSlices, such as service mesh implementations, that could result in other entities or controllers managing additional sets of EndpointSlices.
To ensure that multiple entities can manage EndpointSlices without interfering
with each other, Kubernetes defines the
label
endpointslice.kubernetes.io/managed-by, which indicates the entity managing
an EndpointSlice.
The endpoint slice controller sets endpointslice-controller.k8s.io as the value
for this label on all EndpointSlices it manages. Other entities managing
EndpointSlices should also set a unique value for this label.
Ownership
In most use cases, EndpointSlices are owned by the Service that the endpoint
slice object tracks endpoints for. This ownership is indicated by an owner
reference on each EndpointSlice as well as a kubernetes.io/service-name
label that enables simple lookups of all EndpointSlices belonging to a Service.
Distribution of EndpointSlices
Each EndpointSlice has a set of ports that applies to all endpoints within the resource. When named ports are used for a Service, Pods may end up with different target port numbers for the same named port, requiring different EndpointSlices.
The control plane tries to fill EndpointSlices as full as possible, but does not actively rebalance them. The logic is fairly straightforward:
- Iterate through existing EndpointSlices, remove endpoints that are no longer desired and update matching endpoints that have changed.
- Iterate through EndpointSlices that have been modified in the first step and fill them up with any new endpoints needed.
- If there's still new endpoints left to add, try to fit them into a previously unchanged slice and/or create new ones.
Importantly, the third step prioritizes limiting EndpointSlice updates over a perfectly full distribution of EndpointSlices. As an example, if there are 10 new endpoints to add and 2 EndpointSlices with room for 5 more endpoints each, this approach will create a new EndpointSlice instead of filling up the 2 existing EndpointSlices. In other words, a single EndpointSlice creation is preferable to multiple EndpointSlice updates.
With kube-proxy running on each Node and watching EndpointSlices, every change to an EndpointSlice becomes relatively expensive since it will be transmitted to every Node in the cluster. This approach is intended to limit the number of changes that need to be sent to every Node, even if it may result with multiple EndpointSlices that are not full.
In practice, this less than ideal distribution should be rare. Most changes processed by the EndpointSlice controller will be small enough to fit in an existing EndpointSlice, and if not, a new EndpointSlice is likely going to be necessary soon anyway. Rolling updates of Deployments also provide a natural repacking of EndpointSlices with all Pods and their corresponding endpoints getting replaced.
Duplicate endpoints
Due to the nature of EndpointSlice changes, endpoints may be represented in more than one EndpointSlice at the same time. This naturally occurs as changes to different EndpointSlice objects can arrive at the Kubernetes client watch / cache at different times.
Note:
Clients of the EndpointSlice API must iterate through all the existing EndpointSlices associated to a Service and build a complete list of unique network endpoints. It is important to mention that endpoints may be duplicated in different EndpointSlices.
You can find a reference implementation for how to perform this endpoint aggregation
and deduplication as part of the EndpointSliceCache code within kube-proxy.
EndpointSlice mirroring
FEATURE STATE:
Kubernetes v1.33 [deprecated]The EndpointSlice API is a replacement for the older Endpoints API. To preserve compatibility with older controllers and user workloads that expect kube-proxy to route traffic based on Endpoints resources, the cluster's control plane mirrors most user-created Endpoints resources to corresponding EndpointSlices.
(However, this feature, like the rest of the Endpoints API, is deprecated. Users who manually specify endpoints for selectorless Services should do so by creating EndpointSlice resources directly, rather than by creating Endpoints resources and allowing them to be mirrored.)
The control plane mirrors Endpoints resources unless:
- the Endpoints resource has a
endpointslice.kubernetes.io/skip-mirrorlabel set totrue. - the Endpoints resource has a
control-plane.alpha.kubernetes.io/leaderannotation. - the corresponding Service resource does not exist.
- the corresponding Service resource has a non-nil selector.
Individual Endpoints resources may translate into multiple EndpointSlices. This will occur if an Endpoints resource has multiple subsets or includes endpoints with multiple IP families (IPv4 and IPv6). A maximum of 1000 addresses per subset will be mirrored to EndpointSlices.
What's next
- Follow the Connecting Applications with Services tutorial
- Read the API reference for the EndpointSlice API
- Read the API reference for the Endpoints API
5.6 - Network Policies
If you want to control traffic flow at the IP address or port level (OSI layer 3 or 4), NetworkPolicies allow you to specify rules for traffic flow within your cluster, and also between Pods and the outside world. Your cluster must use a network plugin that supports NetworkPolicy enforcement.
If you want to control traffic flow at the IP address or port level for TCP, UDP, and SCTP protocols, then you might consider using Kubernetes NetworkPolicies for particular applications in your cluster. NetworkPolicies are an application-centric construct which allow you to specify how a pod is allowed to communicate with various network "entities" (we use the word "entity" here to avoid overloading the more common terms such as "endpoints" and "services", which have specific Kubernetes connotations) over the network. NetworkPolicies apply to a connection with a pod on one or both ends, and are not relevant to other connections.
The entities that a Pod can communicate with are identified through a combination of the following three identifiers:
- Other pods that are allowed (exception: a pod cannot block access to itself)
- Namespaces that are allowed
- IP blocks (exception: traffic to and from the node where a Pod is running is always allowed, regardless of the IP address of the Pod or the node)
When defining a pod- or namespace-based NetworkPolicy, you use a selector to specify what traffic is allowed to and from the Pod(s) that match the selector.
Meanwhile, when IP-based NetworkPolicies are created, we define policies based on IP blocks (CIDR ranges).
Prerequisites
Network policies are implemented by the network plugin. To use network policies, you must be using a networking solution which supports NetworkPolicy. Creating a NetworkPolicy resource without a controller that implements it will have no effect.
The two sorts of pod isolation
There are two sorts of isolation for a pod: isolation for egress, and isolation for ingress. They concern what connections may be established. "Isolation" here is not absolute, rather it means "some restrictions apply". The alternative, "non-isolated for $direction", means that no restrictions apply in the stated direction. The two sorts of isolation (or not) are declared independently, and are both relevant for a connection from one pod to another.
By default, a pod is non-isolated for egress; all outbound connections are allowed.
A pod is isolated for egress if there is any NetworkPolicy that both selects the pod and has
"Egress" in its policyTypes; we say that such a policy applies to the pod for egress.
When a pod is isolated for egress, the only allowed connections from the pod are those allowed by
the egress list of some NetworkPolicy that applies to the pod for egress. Reply traffic for those
allowed connections will also be implicitly allowed.
The effects of those egress lists combine additively.
By default, a pod is non-isolated for ingress; all inbound connections are allowed.
A pod is isolated for ingress if there is any NetworkPolicy that both selects the pod and
has "Ingress" in its policyTypes; we say that such a policy applies to the pod for ingress.
When a pod is isolated for ingress, the only allowed connections into the pod are those from
the pod's node and those allowed by the ingress list of some NetworkPolicy that applies to
the pod for ingress. Reply traffic for those allowed connections will also be implicitly allowed.
The effects of those ingress lists combine additively.
Network policies do not conflict; they are additive. If any policy or policies apply to a given pod for a given direction, the connections allowed in that direction from that pod is the union of what the applicable policies allow. Thus, order of evaluation does not affect the policy result.
For a connection from a source pod to a destination pod to be allowed, both the egress policy on the source pod and the ingress policy on the destination pod need to allow the connection. If either side does not allow the connection, it will not happen.
The NetworkPolicy resource
See the NetworkPolicy reference for a full definition of the resource.
An example NetworkPolicy might look like this:
apiVersion: networking.k8s.io/v1
kind: NetworkPolicy
metadata:
name: test-network-policy
namespace: default
spec:
podSelector:
matchLabels:
role: db
policyTypes:
- Ingress
- Egress
ingress:
- from:
- ipBlock:
cidr: 172.17.0.0/16
except:
- 172.17.1.0/24
- namespaceSelector:
matchLabels:
project: myproject
- podSelector:
matchLabels:
role: frontend
ports:
- protocol: TCP
port: 6379
egress:
- to:
- ipBlock:
cidr: 10.0.0.0/24
ports:
- protocol: TCP
port: 5978
Note:
POSTing this to the API server for your cluster will have no effect unless your chosen networking solution supports network policy.Mandatory Fields: As with all other Kubernetes config, a NetworkPolicy needs apiVersion,
kind, and metadata fields. For general information about working with config files, see
Configure a Pod to Use a ConfigMap,
and Object Management.
spec: NetworkPolicy spec has all the information needed to define a particular network policy in the given namespace.
podSelector: Each NetworkPolicy includes a podSelector which selects the grouping of pods to
which the policy applies. The example policy selects pods with the label "role=db". An empty
podSelector selects all pods in the namespace.
policyTypes: Each NetworkPolicy includes a policyTypes list which may include either
Ingress, Egress, or both. The policyTypes field indicates whether or not the given policy
applies to ingress traffic to selected pod, egress traffic from selected pods, or both. If no
policyTypes are specified on a NetworkPolicy then by default Ingress will always be set and
Egress will be set if the NetworkPolicy has any egress rules.
ingress: Each NetworkPolicy may include a list of allowed ingress rules. Each rule allows
traffic which matches both the from and ports sections. The example policy contains a single
rule, which matches traffic on a single port, from one of three sources, the first specified via
an ipBlock, the second via a namespaceSelector and the third via a podSelector.
egress: Each NetworkPolicy may include a list of allowed egress rules. Each rule allows
traffic which matches both the to and ports sections. The example policy contains a single
rule, which matches traffic on a single port to any destination in 10.0.0.0/24.
So, the example NetworkPolicy:
isolates
role=dbpods in thedefaultnamespace for both ingress and egress traffic (if they weren't already isolated)(Ingress rules) allows connections to all pods in the
defaultnamespace with the labelrole=dbon TCP port 6379 from:- any pod in the
defaultnamespace with the labelrole=frontend - any pod in a namespace with the label
project=myproject - IP addresses in the ranges
172.17.0.0–172.17.0.255and172.17.2.0–172.17.255.255(ie, all of172.17.0.0/16except172.17.1.0/24)
- any pod in the
(Egress rules) allows connections from any pod in the
defaultnamespace with the labelrole=dbto CIDR10.0.0.0/24on TCP port 5978
See the Declare Network Policy walkthrough for further examples.
Behavior of to and from selectors
There are four kinds of selectors that can be specified in an ingress from section or egress
to section:
podSelector: This selects particular Pods in the same namespace as the NetworkPolicy which should be allowed as ingress sources or egress destinations.
namespaceSelector: This selects particular namespaces for which all Pods should be allowed as ingress sources or egress destinations.
namespaceSelector and podSelector: A single to/from entry that specifies both
namespaceSelector and podSelector selects particular Pods within particular namespaces. Be
careful to use correct YAML syntax. For example:
...
ingress:
- from:
- namespaceSelector:
matchLabels:
user: alice
podSelector:
matchLabels:
role: client
...
This policy contains a single from element allowing connections from Pods with the label
role=client in namespaces with the label user=alice. But the following policy is different:
...
ingress:
- from:
- namespaceSelector:
matchLabels:
user: alice
- podSelector:
matchLabels:
role: client
...
It contains two elements in the from array, and allows connections from Pods in the local
Namespace with the label role=client, or from any Pod in any namespace with the label
user=alice.
When in doubt, use kubectl describe to see how Kubernetes has interpreted the policy.
ipBlock: This selects particular IP CIDR ranges to allow as ingress sources or egress destinations. These should be cluster-external IPs, since Pod IPs are ephemeral and unpredictable.
Cluster ingress and egress mechanisms often require rewriting the source or destination IP
of packets. In cases where this happens, it is not defined whether this happens before or
after NetworkPolicy processing, and the behavior may be different for different
combinations of network plugin, cloud provider, Service implementation, etc.
In the case of ingress, this means that in some cases you may be able to filter incoming
packets based on the actual original source IP, while in other cases, the "source IP" that
the NetworkPolicy acts on may be the IP of a LoadBalancer or of the Pod's node, etc.
For egress, this means that connections from pods to Service IPs that get rewritten to
cluster-external IPs may or may not be subject to ipBlock-based policies.
Default policies
By default, if no policies exist in a namespace, then all ingress and egress traffic is allowed to and from pods in that namespace. The following examples let you change the default behavior in that namespace.
Default deny all ingress traffic
You can create a "default" ingress isolation policy for a namespace by creating a NetworkPolicy that selects all pods but does not allow any ingress traffic to those pods.
---
apiVersion: networking.k8s.io/v1
kind: NetworkPolicy
metadata:
name: default-deny-ingress
spec:
podSelector: {}
policyTypes:
- Ingress
This ensures that even pods that aren't selected by any other NetworkPolicy will still be isolated for ingress. This policy does not affect isolation for egress from any pod.
Allow all ingress traffic
If you want to allow all incoming connections to all pods in a namespace, you can create a policy that explicitly allows that.
---
apiVersion: networking.k8s.io/v1
kind: NetworkPolicy
metadata:
name: allow-all-ingress
spec:
podSelector: {}
ingress:
- {}
policyTypes:
- Ingress
With this policy in place, no additional policy or policies can cause any incoming connection to those pods to be denied. This policy has no effect on isolation for egress from any pod.
Default deny all egress traffic
You can create a "default" egress isolation policy for a namespace by creating a NetworkPolicy that selects all pods but does not allow any egress traffic from those pods.
---
apiVersion: networking.k8s.io/v1
kind: NetworkPolicy
metadata:
name: default-deny-egress
spec:
podSelector: {}
policyTypes:
- Egress
This ensures that even pods that aren't selected by any other NetworkPolicy will not be allowed egress traffic. This policy does not change the ingress isolation behavior of any pod.
Caution:
A default deny-all egress policy also blocks DNS traffic. If your workloads need DNS resolution, you must add a separate NetworkPolicy that allows egress to your cluster's DNS service.Allow all egress traffic
If you want to allow all connections from all pods in a namespace, you can create a policy that explicitly allows all outgoing connections from pods in that namespace.
---
apiVersion: networking.k8s.io/v1
kind: NetworkPolicy
metadata:
name: allow-all-egress
spec:
podSelector: {}
egress:
- {}
policyTypes:
- Egress
With this policy in place, no additional policy or policies can cause any outgoing connection from those pods to be denied. This policy has no effect on isolation for ingress to any pod.
Default deny all ingress and all egress traffic
You can create a "default" policy for a namespace which prevents all ingress AND egress traffic by creating the following NetworkPolicy in that namespace.
---
apiVersion: networking.k8s.io/v1
kind: NetworkPolicy
metadata:
name: default-deny-all
spec:
podSelector: {}
policyTypes:
- Ingress
- Egress
This ensures that even pods that aren't selected by any other NetworkPolicy will not be allowed ingress or egress traffic.
Network traffic filtering
NetworkPolicy is defined for layer 4 connections (TCP, UDP, and optionally SCTP). For all the other protocols, the behaviour may vary across network plugins.
Note:
You must be using a CNI plugin that supports SCTP protocol NetworkPolicies.When a deny all network policy is defined, it is only guaranteed to deny TCP, UDP and SCTP
connections. For other protocols, such as ARP or ICMP, the behaviour is undefined.
The same applies to allow rules: when a specific pod is allowed as ingress source or egress destination,
it is undefined what happens with (for example) ICMP packets. Protocols such as ICMP may be allowed by some
network plugins and denied by others.
Targeting a range of ports
FEATURE STATE:
Kubernetes v1.25 [stable]When writing a NetworkPolicy, you can target a range of ports instead of a single port.
This is achievable with the usage of the endPort field, as the following example:
apiVersion: networking.k8s.io/v1
kind: NetworkPolicy
metadata:
name: multi-port-egress
namespace: default
spec:
podSelector:
matchLabels:
role: db
policyTypes:
- Egress
egress:
- to:
- ipBlock:
cidr: 10.0.0.0/24
ports:
- protocol: TCP
port: 32000
endPort: 32768
The above rule allows any Pod with label role=db on the namespace default to communicate
with any IP within the range 10.0.0.0/24 over TCP, provided that the target
port is between the range 32000 and 32768.
The following restrictions apply when using this field:
- The
endPortfield must be equal to or greater than theportfield. endPortcan only be defined ifportis also defined.- Both ports must be numeric.
Note:
Your cluster must be using a CNI plugin that supports theendPort field in NetworkPolicy specifications.
If your network plugin
does not support the endPort field and you specify a NetworkPolicy with that,
the policy will be applied only for the single port field.Targeting multiple namespaces by label
In this scenario, your Egress NetworkPolicy targets more than one namespace using their
label names. For this to work, you need to label the target namespaces. For example:
kubectl label namespace frontend namespace=frontend
kubectl label namespace backend namespace=backend
Add the labels under namespaceSelector in your NetworkPolicy document. For example:
apiVersion: networking.k8s.io/v1
kind: NetworkPolicy
metadata:
name: egress-namespaces
spec:
podSelector:
matchLabels:
app: myapp
policyTypes:
- Egress
egress:
- to:
- namespaceSelector:
matchExpressions:
- key: namespace
operator: In
values: ["frontend", "backend"]
Note:
It is not possible to directly specify the name of the namespaces in a NetworkPolicy. You must use anamespaceSelector with matchLabels or matchExpressions to select the
namespaces based on their labels.Targeting a Namespace by its name
The Kubernetes control plane sets an immutable label kubernetes.io/metadata.name on all
namespaces, the value of the label is the namespace name.
While NetworkPolicy cannot target a namespace by its name with some object field, you can use the standardized label to target a specific namespace.
Pod lifecycle
Note:
The following applies to clusters with a conformant networking plugin and a conformant implementation of NetworkPolicy.When a new NetworkPolicy object is created, it may take some time for a network plugin to handle the new object. If a pod that is affected by a NetworkPolicy is created before the network plugin has completed NetworkPolicy handling, that pod may be started unprotected, and isolation rules will be applied when the NetworkPolicy handling is completed.
Once the NetworkPolicy is handled by a network plugin,
All newly created pods affected by a given NetworkPolicy will be isolated before they are started. Implementations of NetworkPolicy must ensure that filtering is effective throughout the Pod lifecycle, even from the very first instant that any container in that Pod is started. Because they are applied at Pod level, NetworkPolicies apply equally to init containers, sidecar containers, and regular containers.
Allow rules will be applied eventually after the isolation rules (or may be applied at the same time). In the worst case, a newly created pod may have no network connectivity at all when it is first started, if isolation rules were already applied, but no allow rules were applied yet.
Every created NetworkPolicy will be handled by a network plugin eventually, but there is no way to tell from the Kubernetes API when exactly that happens.
Therefore, pods must be resilient against being started up with different network connectivity than expected. If you need to make sure the pod can reach certain destinations before being started, you can use an init container to wait for those destinations to be reachable before kubelet starts the app containers.
Every NetworkPolicy will be applied to all selected pods eventually. Because the network plugin may implement NetworkPolicy in a distributed manner, it is possible that pods may see a slightly inconsistent view of network policies when the pod is first created, or when pods or policies change. For example, a newly-created pod that is supposed to be able to reach both Pod A on Node 1 and Pod B on Node 2 may find that it can reach Pod A immediately, but cannot reach Pod B until a few seconds later.
NetworkPolicy and hostNetwork pods
NetworkPolicy behaviour for hostNetwork pods is undefined, but it should be limited to 2 possibilities:
- The network plugin can distinguish
hostNetworkpod traffic from all other traffic (including being able to distinguish traffic from differenthostNetworkpods on the same node), and will apply NetworkPolicy tohostNetworkpods just like it does to pod-network pods. - The network plugin cannot properly distinguish
hostNetworkpod traffic, and so it ignoreshostNetworkpods when matchingpodSelectorandnamespaceSelector. Traffic to/fromhostNetworkpods is treated the same as all other traffic to/from the node IP. (This is the most common implementation.)
This applies when
a
hostNetworkpod is selected byspec.podSelector.... spec: podSelector: matchLabels: role: client ...a
hostNetworkpod is selected by apodSelectorornamespaceSelectorin aningressoregressrule.... ingress: - from: - podSelector: matchLabels: role: client ...
At the same time, since hostNetwork pods have the same IP addresses as the nodes they reside on,
their connections will be treated as node connections. For example, you can allow traffic
from a hostNetwork Pod using an ipBlock rule.
What you can't do with network policies (at least, not yet)
As of Kubernetes 1.36, the following functionality does not exist in the NetworkPolicy API, but you might be able to implement workarounds using Operating System components (such as SELinux, OpenVSwitch, IPTables, and so on) or Layer 7 technologies (Ingress controllers, Service Mesh implementations) or admission controllers. In case you are new to network security in Kubernetes, its worth noting that the following User Stories cannot (yet) be implemented using the NetworkPolicy API.
- Forcing internal cluster traffic to go through a common gateway (this might be best served with a service mesh or other proxy).
- Anything TLS related (use a service mesh or ingress controller for this).
- Node specific policies (you can use CIDR notation for these, but you cannot target nodes by their Kubernetes identities specifically).
- Targeting of services by name (you can, however, target pods or namespaces by their labels, which is often a viable workaround).
- Creation or management of "Policy requests" that are fulfilled by a third party.
- Default policies which are applied to all namespaces or pods (there are some third party Kubernetes distributions and projects which can do this).
- Advanced policy querying and reachability tooling.
- The ability to log network security events (for example connections that are blocked or accepted).
- The ability to explicitly deny policies (currently the model for NetworkPolicies are deny by default, with only the ability to add allow rules).
- The ability to prevent loopback or incoming host traffic (Pods cannot currently block localhost access, nor do they have the ability to block access from their resident node).
NetworkPolicy's impact on existing connections
When the set of NetworkPolicies that applies to an existing connection changes - this could happen either due to a change in NetworkPolicies or if the relevant labels of the namespaces/pods selected by the policy (both subject and peers) are changed in the middle of an existing connection - it is implementation defined as to whether the change will take effect for that existing connection or not. Example: A policy is created that leads to denying a previously allowed connection, the underlying network plugin implementation is responsible for defining if that new policy will close the existing connections or not. It is recommended not to modify policies/pods/namespaces in ways that might affect existing connections.
What's next
- See the Declare Network Policy walkthrough for further examples.
- See more recipes for common scenarios enabled by the NetworkPolicy resource.
5.7 - DNS for Services and Pods
Your workload can discover Services within your cluster using DNS; this page explains how that works.
Kubernetes creates DNS records for Services and Pods. You can contact Services with consistent DNS names instead of IP addresses.
Kubernetes publishes information about Pods and Services which is used to program DNS. kubelet configures Pods' DNS so that running containers can look up Services by name rather than IP.
Services defined in the cluster are assigned DNS names. By default, a client Pod's DNS search list includes the Pod's own namespace and the cluster's default domain.
Namespaces of Services
A DNS query may return different results based on the namespace of the Pod making it. DNS queries that don't specify a namespace are limited to the Pod's namespace. Access Services in other namespaces by specifying it in the DNS query.
For example, consider a Pod in a test namespace. A data Service is in
the prod namespace.
A query for data returns no results, because it uses the Pod's test namespace.
A query for data.prod returns the intended result, because it specifies the
namespace.
DNS queries may be expanded using the Pod's /etc/resolv.conf. kubelet
configures this file for each Pod. For example, a query for just data may be
expanded to data.test.svc.cluster.local. The values of the search option
are used to expand queries. To learn more about DNS queries, see
the resolv.conf manual page.
nameserver 10.32.0.10
search <namespace>.svc.cluster.local svc.cluster.local cluster.local
options ndots:5
In summary, a Pod in the test namespace can successfully resolve either
data.prod or data.prod.svc.cluster.local.
DNS Records
What objects get DNS records?
- Services
- Pods
The following sections detail the supported DNS record types and layout that is supported. Any other layout or names or queries that happen to work are considered implementation details and are subject to change without warning. For more up-to-date specification, see Kubernetes DNS-Based Service Discovery.
Services
A/AAAA records
"Normal" (not headless) Services are assigned DNS A and/or AAAA records,
depending on the IP family or families of the Service, with a name of the form
my-svc.my-namespace.svc.cluster-domain.example. This resolves to the cluster IP
of the Service.
Headless Services
(without a cluster IP) are also assigned DNS A and/or AAAA records,
with a name of the form my-svc.my-namespace.svc.cluster-domain.example. Unlike normal
Services, this resolves to the set of IPs of all of the Pods selected by the Service.
Clients are expected to consume the set or else use standard round-robin
selection from the set.
SRV records
SRV Records are created for named ports that are part of normal or headless services.
- For each named port, the SRV record has the form
_port-name._port-protocol.my-svc.my-namespace.svc.cluster-domain.example. - For a regular Service, this resolves to the port number and the domain name:
my-svc.my-namespace.svc.cluster-domain.example. - For a headless Service, this resolves to multiple answers, one for each Pod
that is backing the Service, and contains the port number and the domain name of the Pod
of the form
hostname.my-svc.my-namespace.svc.cluster-domain.example.
Pods
A/AAAA records
Kube-DNS versions, prior to the implementation of the DNS specification, had the following DNS resolution:
<pod-IPv4-address>.<namespace>.pod.<cluster-domain>
For example, if a Pod in the default namespace has the IP address 172.17.0.3,
and the domain name for your cluster is cluster.local, then the Pod has a DNS name:
172-17-0-3.default.pod.cluster.local
Some cluster DNS mechanisms, like CoreDNS, also provide A records for:
<pod-ipv4-address>.<service-name>.<my-namespace>.svc.<cluster-domain.example>
For example, if a Pod in the cafe namespace has the IP address 172.17.0.3,
is an endpoint of a Service named barista, and the domain name for your cluster is
cluster.local, then the Pod would have this service-scoped DNS A record.
172-17-0-3.barista.cafe.svc.cluster.local
Pod's hostname and subdomain fields
Currently when a Pod is created, its hostname (as observed from within the Pod)
is the Pod's metadata.name value.
The Pod spec has an optional hostname field, which can be used to specify a
different hostname. When specified, it takes precedence over the Pod's name to be
the hostname of the Pod (again, as observed from within the Pod). For example,
given a Pod with spec.hostname set to "my-host", the Pod will have its
hostname set to "my-host".
The Pod spec also has an optional subdomain field which can be used to indicate
that the pod is part of sub-group of the namespace. For example, a Pod with spec.hostname
set to "foo", and spec.subdomain set to "bar", in namespace "my-namespace", will
have its hostname set to "foo" and its fully qualified domain name (FQDN) set to
"foo.bar.my-namespace.svc.cluster.local" (once more, as observed from within
the Pod).
If there exists a headless Service in the same namespace as the Pod, with the same name as the subdomain, the cluster's DNS Server also returns A and/or AAAA records for the Pod's fully qualified hostname.
Example:
apiVersion: v1
kind: Service
metadata:
name: busybox-subdomain
spec:
selector:
name: busybox
clusterIP: None
ports:
- name: foo # name is not required for single-port Services
port: 1234
---
apiVersion: v1
kind: Pod
metadata:
name: busybox1
labels:
name: busybox
spec:
hostname: busybox-1
subdomain: busybox-subdomain
containers:
- image: busybox:1.28
command:
- sleep
- "3600"
name: busybox
---
apiVersion: v1
kind: Pod
metadata:
name: busybox2
labels:
name: busybox
spec:
hostname: busybox-2
subdomain: busybox-subdomain
containers:
- image: busybox:1.28
command:
- sleep
- "3600"
name: busybox
Given the above Service "busybox-subdomain" and the Pods which set spec.subdomain
to "busybox-subdomain", the first Pod will see its own FQDN as
"busybox-1.busybox-subdomain.my-namespace.svc.cluster-domain.example". DNS serves
A and/or AAAA records at that name, pointing to the Pod's IP. Both Pods "busybox1" and
"busybox2" will have their own address records.
An EndpointSlice can specify the DNS hostname for any endpoint addresses, along with its IP.
Note:
A and AAAA records are not created for Pod names sincehostname is missing for the Pod.
A Pod with no hostname but with subdomain will only create the
A or AAAA record for the headless Service (busybox-subdomain.my-namespace.svc.cluster-domain.example),
pointing to the Pods' IP addresses. Also, the Pod needs to be ready in order to have a
record unless publishNotReadyAddresses=True is set on the Service.Pod's setHostnameAsFQDN field
FEATURE STATE:
Kubernetes v1.22 [stable]When a Pod is configured to have fully qualified domain name (FQDN), its
hostname is the short hostname. For example, if you have a Pod with the fully
qualified domain name busybox-1.busybox-subdomain.my-namespace.svc.cluster-domain.example,
then by default the hostname command inside that Pod returns busybox-1 and the
hostname --fqdn command returns the FQDN.
When you set setHostnameAsFQDN: true in the Pod spec, the kubelet writes the Pod's FQDN
into the hostname for that Pod's namespace. In this case, both hostname and hostname --fqdn
return the Pod's FQDN.
Note:
In Linux, the hostname field of the kernel (the nodename field of struct utsname) is limited to 64 characters.
If a Pod enables this feature and its FQDN is longer than 64 character, it will fail to start.
The Pod will remain in Pending status (ContainerCreating as seen by kubectl) generating
error events, such as Failed to construct FQDN from Pod hostname and cluster domain,
FQDN long-FQDN is too long (64 characters is the max, 70 characters requested).
One way of improving user experience for this scenario is to create an
admission webhook controller
to control FQDN size when users create top level objects, for example, Deployment.
Pod's DNS Policy
DNS policies can be set on a per-Pod basis. Currently Kubernetes supports the
following Pod-specific DNS policies. These policies are specified in the
dnsPolicy field of a Pod Spec.
"
Default": The Pod inherits the name resolution configuration from the node that the Pods run on. See related discussion for more details."
ClusterFirst": Any DNS query that does not match the configured cluster domain suffix, such as "www.kubernetes.io", is forwarded to an upstream nameserver by the DNS server. Cluster administrators may have extra stub-domain and upstream DNS servers configured. See related discussion for details on how DNS queries are handled in those cases."
ClusterFirstWithHostNet": For Pods running with hostNetwork, you should explicitly set its DNS policy to "ClusterFirstWithHostNet". Otherwise, Pods running with hostNetwork and"ClusterFirst"will fallback to the behavior of the"Default"policy.Note:
This is not supported on Windows. See below for details."
None": It allows a Pod to ignore DNS settings from the Kubernetes environment. All DNS settings are supposed to be provided using thednsConfigfield in the Pod Spec. See Pod's DNS config subsection below.
Note:
"Default" is not the default DNS policy. IfdnsPolicy is not
explicitly specified, then "ClusterFirst" is used.The example below shows a Pod with its DNS policy set to
"ClusterFirstWithHostNet" because it has hostNetwork set to true.
apiVersion: v1
kind: Pod
metadata:
name: busybox
namespace: default
spec:
containers:
- image: busybox:1.28
command:
- sleep
- "3600"
imagePullPolicy: IfNotPresent
name: busybox
restartPolicy: Always
hostNetwork: true
dnsPolicy: ClusterFirstWithHostNet
Pod's DNS Config
FEATURE STATE:
Kubernetes v1.14 [stable]Pod's DNS Config allows users more control on the DNS settings for a Pod.
The dnsConfig field is optional and it can work with any dnsPolicy settings.
However, when a Pod's dnsPolicy is set to "None", the dnsConfig field has
to be specified.
Below are the properties a user can specify in the dnsConfig field:
nameservers: a list of IP addresses that will be used as DNS servers for the Pod. There can be at most 3 IP addresses specified. When the Pod'sdnsPolicyis set to "None", the list must contain at least one IP address, otherwise this property is optional. The servers listed will be combined to the base nameservers generated from the specified DNS policy with duplicate addresses removed.searches: a list of DNS search domains for hostname lookup in the Pod. This property is optional. When specified, the provided list will be merged into the base search domain names generated from the chosen DNS policy. Duplicate domain names are removed. Kubernetes allows up to 32 search domains.options: an optional list of objects where each object may have anameproperty (required) and avalueproperty (optional). The contents in this property will be merged to the options generated from the specified DNS policy. Duplicate entries are removed.
The following is an example Pod with custom DNS settings:
apiVersion: v1
kind: Pod
metadata:
namespace: default
name: dns-example
spec:
containers:
- name: test
image: nginx
dnsPolicy: "None"
dnsConfig:
nameservers:
- 192.0.2.1 # this is an example
searches:
- ns1.svc.cluster-domain.example
- my.dns.search.suffix
options:
- name: ndots
value: "2"
- name: edns0
When the Pod above is created, the container test gets the following contents
in its /etc/resolv.conf file:
nameserver 192.0.2.1
search ns1.svc.cluster-domain.example my.dns.search.suffix
options ndots:2 edns0
For IPv6 setup, search path and name server should be set up like this:
kubectl exec -it dns-example -- cat /etc/resolv.conf
The output is similar to this:
nameserver 2001:db8:30::a
search default.svc.cluster-domain.example svc.cluster-domain.example cluster-domain.example
options ndots:5
DNS search domain list limits
FEATURE STATE:
Kubernetes 1.28 [stable]Kubernetes itself does not limit the DNS Config until the length of the search domain list exceeds 32 or the total length of all search domains exceeds 2048. This limit applies to the node's resolver configuration file, the Pod's DNS Config, and the merged DNS Config respectively.
Note:
Some container runtimes of earlier versions may have their own restrictions on the number of DNS search domains. Depending on the container runtime environment, the pods with a large number of DNS search domains may get stuck in the pending state.
It is known that containerd v1.5.5 or earlier and CRI-O v1.21 or earlier have this problem.
DNS resolution on Windows nodes
ClusterFirstWithHostNetis not supported for Pods that run on Windows nodes. Windows treats all names with a.as a FQDN and skips FQDN resolution.- On Windows, there are multiple DNS resolvers that can be used. As these come with
slightly different behaviors, using the
Resolve-DNSNamepowershell cmdlet for name query resolutions is recommended. - On Linux, you have a DNS suffix list, which is used after resolution of a name as fully
qualified has failed.
On Windows, you can only have 1 DNS suffix, which is the DNS suffix associated with that
Pod's namespace (example:
mydns.svc.cluster.local). Windows can resolve FQDNs, Services, or network name which can be resolved with this single suffix. For example, a Pod spawned in thedefaultnamespace, will have the DNS suffixdefault.svc.cluster.local. Inside a Windows Pod, you can resolve bothkubernetes.default.svc.cluster.localandkubernetes, but not the partially qualified names (kubernetes.defaultorkubernetes.default.svc).
What's next
For guidance on administering DNS configurations, check Configure DNS Service.
5.8 - IPv4/IPv6 dual-stack
Kubernetes lets you configure single-stack IPv4 networking, single-stack IPv6 networking, or dual stack networking with both network families active. This page explains how.
FEATURE STATE:
Kubernetes v1.23 [stable]IPv4/IPv6 dual-stack networking enables the allocation of both IPv4 and IPv6 addresses to Pods and Services.
IPv4/IPv6 dual-stack networking is enabled by default for your Kubernetes cluster starting in 1.21, allowing the simultaneous assignment of both IPv4 and IPv6 addresses.
Supported Features
IPv4/IPv6 dual-stack on your Kubernetes cluster provides the following features:
- Dual-stack Pod networking (a single IPv4 and IPv6 address assignment per Pod)
- IPv4 and IPv6 enabled Services
- Pod off-cluster egress routing (eg. the Internet) via both IPv4 and IPv6 interfaces
Prerequisites
The following prerequisites are needed in order to utilize IPv4/IPv6 dual-stack Kubernetes clusters:
Kubernetes 1.20 or later
For information about using dual-stack services with earlier Kubernetes versions, refer to the documentation for that version of Kubernetes.
Provider support for dual-stack networking (Cloud provider or otherwise must be able to provide Kubernetes nodes with routable IPv4/IPv6 network interfaces)
A network plugin that supports dual-stack networking.
Configure IPv4/IPv6 dual-stack
To configure IPv4/IPv6 dual-stack, set dual-stack cluster network assignments:
- kube-apiserver:
--service-cluster-ip-range=<IPv4 CIDR>,<IPv6 CIDR>
- kube-controller-manager:
--cluster-cidr=<IPv4 CIDR>,<IPv6 CIDR>--service-cluster-ip-range=<IPv4 CIDR>,<IPv6 CIDR>--node-cidr-mask-size-ipv4|--node-cidr-mask-size-ipv6defaults to /24 for IPv4 and /64 for IPv6
- kube-proxy:
--cluster-cidr=<IPv4 CIDR>,<IPv6 CIDR>
- kubelet:
--node-ip=<IPv4 IP>,<IPv6 IP>- This option is required for bare metal dual-stack nodes (nodes that do not define a
cloud provider with the
--cloud-providerflag). If you are using a cloud provider and choose to override the node IPs chosen by the cloud provider, set the--node-ipoption. - (The legacy built-in cloud providers do not support dual-stack
--node-ip.)
- This option is required for bare metal dual-stack nodes (nodes that do not define a
cloud provider with the
Note:
An example of an IPv4 CIDR: 10.244.0.0/16 (though you would supply your own address range)
An example of an IPv6 CIDR: fdXY:IJKL:MNOP:15::/64 (this shows the format but is not a valid
address - see RFC 4193)
Services
You can create Services which can use IPv4, IPv6, or both.
The address family of a Service defaults to the address family of the first service cluster IP
range (configured via the --service-cluster-ip-range flag to the kube-apiserver).
When you define a Service you can optionally configure it as dual stack. To specify the behavior you want, you
set the .spec.ipFamilyPolicy field to one of the following values:
SingleStack: Single-stack service. The control plane allocates a cluster IP for the Service, using the first configured service cluster IP range.PreferDualStack: Allocates both IPv4 and IPv6 cluster IPs for the Service when dual-stack is enabled. If dual-stack is not enabled or supported, it falls back to single-stack behavior.RequireDualStack: Allocates Service.spec.clusterIPsfrom both IPv4 and IPv6 address ranges when dual-stack is enabled. If dual-stack is not enabled or supported, the Service API object creation fails.- Selects the
.spec.clusterIPfrom the list of.spec.clusterIPsbased on the address family of the first element in the.spec.ipFamiliesarray.
- Selects the
If you would like to define which IP family to use for single stack or define the order of IP
families for dual-stack, you can choose the address families by setting an optional field,
.spec.ipFamilies, on the Service.
Note:
The.spec.ipFamilies field is conditionally mutable: you can add or remove a secondary
IP address family, but you cannot change the primary IP address family of an existing Service.You can set .spec.ipFamilies to any of the following array values:
["IPv4"]["IPv6"]["IPv4","IPv6"](dual stack)["IPv6","IPv4"](dual stack)
The first family you list is used for the legacy .spec.clusterIP field.
Dual-stack Service configuration scenarios
These examples demonstrate the behavior of various dual-stack Service configuration scenarios.
Dual-stack options on new Services
This Service specification does not explicitly define
.spec.ipFamilyPolicy. When you create this Service, Kubernetes assigns a cluster IP for the Service from the first configuredservice-cluster-ip-rangeand sets the.spec.ipFamilyPolicytoSingleStack. (Services without selectors and headless Services with selectors will behave in this same way.)apiVersion: v1 kind: Service metadata: name: my-service labels: app.kubernetes.io/name: MyApp spec: selector: app.kubernetes.io/name: MyApp ports: - protocol: TCP port: 80This Service specification explicitly defines
PreferDualStackin.spec.ipFamilyPolicy. When you create this Service on a dual-stack cluster, Kubernetes assigns both IPv4 and IPv6 addresses for the service. The control plane updates the.specfor the Service to record the IP address assignments. The field.spec.clusterIPsis the primary field, and contains both assigned IP addresses;.spec.clusterIPis a secondary field with its value calculated from.spec.clusterIPs.- For the
.spec.clusterIPfield, the control plane records the IP address that is from the same address family as the first service cluster IP range. - On a single-stack cluster, the
.spec.clusterIPsand.spec.clusterIPfields both only list one address. - On a cluster with dual-stack enabled, specifying
RequireDualStackin.spec.ipFamilyPolicybehaves the same asPreferDualStack.
apiVersion: v1 kind: Service metadata: name: my-service labels: app.kubernetes.io/name: MyApp spec: ipFamilyPolicy: PreferDualStack selector: app.kubernetes.io/name: MyApp ports: - protocol: TCP port: 80- For the
This Service specification explicitly defines
IPv6andIPv4in.spec.ipFamiliesas well as definingPreferDualStackin.spec.ipFamilyPolicy. When Kubernetes assigns an IPv6 and IPv4 address in.spec.clusterIPs,.spec.clusterIPis set to the IPv6 address because that is the first element in the.spec.clusterIPsarray, overriding the default.apiVersion: v1 kind: Service metadata: name: my-service labels: app.kubernetes.io/name: MyApp spec: ipFamilyPolicy: PreferDualStack ipFamilies: - IPv6 - IPv4 selector: app.kubernetes.io/name: MyApp ports: - protocol: TCP port: 80
Dual-stack defaults on existing Services
These examples demonstrate the default behavior when dual-stack is newly enabled on a cluster where Services already exist. (Upgrading an existing cluster to 1.21 or beyond will enable dual-stack.)
When dual-stack is enabled on a cluster, existing Services (whether
IPv4orIPv6) are configured by the control plane to set.spec.ipFamilyPolicytoSingleStackand set.spec.ipFamiliesto the address family of the existing Service. The existing Service cluster IP will be stored in.spec.clusterIPs.apiVersion: v1 kind: Service metadata: name: my-service labels: app.kubernetes.io/name: MyApp spec: selector: app.kubernetes.io/name: MyApp ports: - protocol: TCP port: 80You can validate this behavior by using kubectl to inspect an existing service.
kubectl get svc my-service -o yamlapiVersion: v1 kind: Service metadata: labels: app.kubernetes.io/name: MyApp name: my-service spec: clusterIP: 10.0.197.123 clusterIPs: - 10.0.197.123 ipFamilies: - IPv4 ipFamilyPolicy: SingleStack ports: - port: 80 protocol: TCP targetPort: 80 selector: app.kubernetes.io/name: MyApp type: ClusterIP status: loadBalancer: {}When dual-stack is enabled on a cluster, existing headless Services with selectors are configured by the control plane to set
.spec.ipFamilyPolicytoSingleStackand set.spec.ipFamiliesto the address family of the first service cluster IP range (configured via the--service-cluster-ip-rangeflag to the kube-apiserver) even though.spec.clusterIPis set toNone.apiVersion: v1 kind: Service metadata: name: my-service labels: app.kubernetes.io/name: MyApp spec: selector: app.kubernetes.io/name: MyApp ports: - protocol: TCP port: 80You can validate this behavior by using kubectl to inspect an existing headless service with selectors.
kubectl get svc my-service -o yamlapiVersion: v1 kind: Service metadata: labels: app.kubernetes.io/name: MyApp name: my-service spec: clusterIP: None clusterIPs: - None ipFamilies: - IPv4 ipFamilyPolicy: SingleStack ports: - port: 80 protocol: TCP targetPort: 80 selector: app.kubernetes.io/name: MyApp
Switching Services between single-stack and dual-stack
Services can be changed from single-stack to dual-stack and from dual-stack to single-stack.
To change a Service from single-stack to dual-stack, change
.spec.ipFamilyPolicyfromSingleStacktoPreferDualStackorRequireDualStackas desired. When you change this Service from single-stack to dual-stack, Kubernetes assigns the missing address family so that the Service now has IPv4 and IPv6 addresses.Edit the Service specification updating the
.spec.ipFamilyPolicyfromSingleStacktoPreferDualStack.Before:
spec: ipFamilyPolicy: SingleStackAfter:
spec: ipFamilyPolicy: PreferDualStackTo change a Service from dual-stack to single-stack, change
.spec.ipFamilyPolicyfromPreferDualStackorRequireDualStacktoSingleStack. When you change this Service from dual-stack to single-stack, Kubernetes retains only the first element in the.spec.clusterIPsarray, and sets.spec.clusterIPto that IP address and sets.spec.ipFamiliesto the address family of.spec.clusterIPs.
Headless Services without selector
For Headless Services without selectors
and without .spec.ipFamilyPolicy explicitly set, the .spec.ipFamilyPolicy field defaults to
RequireDualStack.
Service type LoadBalancer
To provision a dual-stack load balancer for your Service:
- Set the
.spec.typefield toLoadBalancer - Set
.spec.ipFamilyPolicyfield toPreferDualStackorRequireDualStack
Note:
To use a dual-stackLoadBalancer type Service, your cloud provider must support IPv4 and IPv6
load balancers.Egress traffic
If you want to enable egress traffic in order to reach off-cluster destinations (eg. the public Internet) from a Pod that uses non-publicly routable IPv6 addresses, you need to enable the Pod to use a publicly routed IPv6 address via a mechanism such as transparent proxying or IP masquerading. The ip-masq-agent project supports IP masquerading on dual-stack clusters.
Note:
Ensure your CNI provider supports IPv6.Windows support
Kubernetes on Windows does not support single-stack "IPv6-only" networking. However, dual-stack IPv4/IPv6 networking for pods and nodes with single-family services is supported.
You can use IPv4/IPv6 dual-stack networking with l2bridge networks.
Note:
Overlay (VXLAN) networks on Windows do not support dual-stack networking.You can read more about the different network modes for Windows within the Networking on Windows topic.
What's next
5.9 - Topology Aware Routing
Topology Aware Routing provides a mechanism to help keep network traffic within the zone where it originated. Preferring same-zone traffic between Pods in your cluster can help with reliability, performance (network latency and throughput), or cost.
FEATURE STATE:
Kubernetes v1.23 [beta]Note:
Prior to Kubernetes 1.27, this feature was known as Topology Aware Hints.Topology Aware Routing adjusts routing behavior to prefer keeping traffic in the zone it originated from. In some cases this can help reduce costs or improve network performance.
Motivation
Kubernetes clusters are increasingly deployed in multi-zone environments. Topology Aware Routing provides a mechanism to help keep traffic within the zone it originated from. When calculating the endpoints for a Service, the EndpointSlice controller considers the topology (region and zone) of each endpoint and populates the hints field to allocate it to a zone. Cluster components such as kube-proxy can then consume those hints, and use them to influence how the traffic is routed (favoring topologically closer endpoints).
Enabling Topology Aware Routing
Note:
Prior to Kubernetes 1.27, this behavior was controlled using theservice.kubernetes.io/topology-aware-hints annotation.You can enable Topology Aware Routing for a Service by setting the
service.kubernetes.io/topology-mode annotation to Auto. When there are
enough endpoints available in each zone, Topology Hints will be populated on
EndpointSlices to allocate individual endpoints to specific zones, resulting in
traffic being routed closer to where it originated from.
When it works best
This feature works best when:
1. Incoming traffic is evenly distributed
If a large proportion of traffic is originating from a single zone, that traffic could overload the subset of endpoints that have been allocated to that zone. This feature is not recommended when incoming traffic is expected to originate from a single zone.
2. The Service has 3 or more endpoints per zone
In a three zone cluster, this means 9 or more endpoints. If there are fewer than 3 endpoints per zone, there is a high (≈50%) probability that the EndpointSlice controller will not be able to allocate endpoints evenly and instead will fall back to the default cluster-wide routing approach.
How It Works
The "Auto" heuristic attempts to proportionally allocate a number of endpoints to each zone. Note that this heuristic works best for Services that have a significant number of endpoints.
EndpointSlice controller
The EndpointSlice controller is responsible for setting hints on EndpointSlices when this heuristic is enabled. The controller allocates a proportional amount of endpoints to each zone. This proportion is based on the allocatable CPU cores for nodes running in that zone. For example, if one zone had 2 CPU cores and another zone only had 1 CPU core, the controller would allocate twice as many endpoints to the zone with 2 CPU cores.
The following example shows what an EndpointSlice looks like when hints have been populated:
apiVersion: discovery.k8s.io/v1
kind: EndpointSlice
metadata:
name: example-hints
labels:
kubernetes.io/service-name: example-svc
addressType: IPv4
ports:
- name: http
protocol: TCP
port: 80
endpoints:
- addresses:
- "10.1.2.3"
conditions:
ready: true
hostname: pod-1
zone: zone-a
hints:
forZones:
- name: "zone-a"
kube-proxy
The kube-proxy component filters the endpoints it routes to based on the hints set by the EndpointSlice controller. In most cases, this means that the kube-proxy is able to route traffic to endpoints in the same zone. Sometimes the controller allocates endpoints from a different zone to ensure more even distribution of endpoints between zones. This would result in some traffic being routed to other zones.
Safeguards
The Kubernetes control plane and the kube-proxy on each node apply some safeguard rules before using Topology Aware Hints. If these don't check out, the kube-proxy selects endpoints from anywhere in your cluster, regardless of the zone.
Insufficient number of endpoints: If there are less endpoints than zones in a cluster, the controller will not assign any hints.
Impossible to achieve balanced allocation: In some cases, it will be impossible to achieve a balanced allocation of endpoints among zones. For example, if zone-a is twice as large as zone-b, but there are only 2 endpoints, an endpoint allocated to zone-a may receive twice as much traffic as zone-b. The controller does not assign hints if it can't get this "expected overload" value below an acceptable threshold for each zone. Importantly this is not based on real-time feedback. It is still possible for individual endpoints to become overloaded.
One or more Nodes has insufficient information: If any node does not have a
topology.kubernetes.io/zonelabel or is not reporting a value for allocatable CPU, the control plane does not set any topology-aware endpoint hints and so kube-proxy does not filter endpoints by zone.One or more endpoints does not have a zone hint: When this happens, the kube-proxy assumes that a transition from or to Topology Aware Hints is underway. Filtering endpoints for a Service in this state would be dangerous so the kube-proxy falls back to using all endpoints.
A zone is not represented in hints: If the kube-proxy is unable to find at least one endpoint with a hint targeting the zone it is running in, it falls back to using endpoints from all zones. This is most likely to happen as you add a new zone into your existing cluster.
Constraints
Topology Aware Hints are not used when
internalTrafficPolicyis set toLocalon a Service. It is possible to use both features in the same cluster on different Services, just not on the same Service.This approach will not work well for Services that have a large proportion of traffic originating from a subset of zones. Instead this assumes that incoming traffic will be roughly proportional to the capacity of the Nodes in each zone.
The EndpointSlice controller ignores unready nodes as it calculates the proportions of each zone. This could have unintended consequences if a large portion of nodes are unready.
The EndpointSlice controller ignores nodes with the
node-role.kubernetes.io/control-planeornode-role.kubernetes.io/masterlabel set. This could be problematic if workloads are also running on those nodes.The EndpointSlice controller does not take into account tolerations when deploying or calculating the proportions of each zone. If the Pods backing a Service are limited to a subset of Nodes in the cluster, this will not be taken into account.
This may not work well with autoscaling. For example, if a lot of traffic is originating from a single zone, only the endpoints allocated to that zone will be handling that traffic. That could result in Horizontal Pod Autoscaler either not picking up on this event, or newly added pods starting in a different zone.
Custom heuristics
Kubernetes is deployed in many different ways, there is no single heuristic for allocating endpoints to zones will work for every use case. A key goal of this feature is to enable custom heuristics to be developed if the built in heuristic does not work for your use case. The first steps to enable custom heuristics were included in the 1.27 release. This is a limited implementation that may not yet cover some relevant and plausible situations.
What's next
- Follow the Connecting Applications with Services tutorial
- Learn about the
trafficDistribution
field, which is closely related to the
service.kubernetes.io/topology-modeannotation and provides flexible options for traffic routing within Kubernetes.
5.10 - Networking on Windows
Kubernetes supports running nodes on either Linux or Windows. You can mix both kinds of node within a single cluster. This page provides an overview to networking specific to the Windows operating system.
Container networking on Windows
Networking for Windows containers is exposed through CNI plugins. Windows containers function similarly to virtual machines in regards to networking. Each container has a virtual network adapter (vNIC) which is connected to a Hyper-V virtual switch (vSwitch). The Host Networking Service (HNS) and the Host Compute Service (HCS) work together to create containers and attach container vNICs to networks. HCS is responsible for the management of containers whereas HNS is responsible for the management of networking resources such as:
- Virtual networks (including creation of vSwitches)
- Endpoints / vNICs
- Namespaces
- Policies including packet encapsulations, load-balancing rules, ACLs, and NAT rules.
The Windows HNS and vSwitch implement namespacing and can
create virtual NICs as needed for a pod or container. However, many configurations such
as DNS, routes, and metrics are stored in the Windows registry database rather than as
files inside /etc, which is how Linux stores those configurations. The Windows registry for the container
is separate from that of the host, so concepts like mapping /etc/resolv.conf from
the host into a container don't have the same effect they would on Linux. These must
be configured using Windows APIs run in the context of that container. Therefore
CNI implementations need to call the HNS instead of relying on file mappings to pass
network details into the pod or container.
Network modes
Windows supports five different networking drivers/modes: L2bridge, L2tunnel, Overlay (Beta), Transparent, and NAT. In a heterogeneous cluster with Windows and Linux worker nodes, you need to select a networking solution that is compatible on both Windows and Linux. The following table lists the out-of-tree plugins are supported on Windows, with recommendations on when to use each CNI:
| Network Driver | Description | Container Packet Modifications | Network Plugins | Network Plugin Characteristics |
|---|---|---|---|---|
| L2bridge | Containers are attached to an external vSwitch. Containers are attached to the underlay network, although the physical network doesn't need to learn the container MACs because they are rewritten on ingress/egress. | MAC is rewritten to host MAC, IP may be rewritten to host IP using HNS OutboundNAT policy. | win-bridge, Azure-CNI, Flannel host-gateway uses win-bridge | win-bridge uses L2bridge network mode, connects containers to the underlay of hosts, offering best performance. Requires user-defined routes (UDR) for inter-node connectivity. |
| L2Tunnel | This is a special case of l2bridge, but only used on Azure. All packets are sent to the virtualization host where SDN policy is applied. | MAC rewritten, IP visible on the underlay network | Azure-CNI | Azure-CNI allows integration of containers with Azure vNET, and allows them to leverage the set of capabilities that Azure Virtual Network provides. For example, securely connect to Azure services or use Azure NSGs. See azure-cni for some examples |
| Overlay | Containers are given a vNIC connected to an external vSwitch. Each overlay network gets its own IP subnet, defined by a custom IP prefix.The overlay network driver uses VXLAN encapsulation. | Encapsulated with an outer header. | win-overlay, Flannel VXLAN (uses win-overlay) | win-overlay should be used when virtual container networks are desired to be isolated from underlay of hosts (e.g. for security reasons). Allows for IPs to be re-used for different overlay networks (which have different VNID tags) if you are restricted on IPs in your datacenter. This option requires KB4489899 on Windows Server 2019. |
| Transparent (special use case for ovn-kubernetes) | Requires an external vSwitch. Containers are attached to an external vSwitch which enables intra-pod communication via logical networks (logical switches and routers). | Packet is encapsulated either via GENEVE or STT tunneling to reach pods which are not on the same host. Packets are forwarded or dropped via the tunnel metadata information supplied by the ovn network controller. NAT is done for north-south communication. | ovn-kubernetes | Deploy via ansible. Distributed ACLs can be applied via Kubernetes policies. IPAM support. Load-balancing can be achieved without kube-proxy. NATing is done without using iptables/netsh. |
| NAT (not used in Kubernetes) | Containers are given a vNIC connected to an internal vSwitch. DNS/DHCP is provided using an internal component called WinNAT | MAC and IP is rewritten to host MAC/IP. | nat | Included here for completeness |
As outlined above, the Flannel CNI plugin is also supported on Windows via the VXLAN network backend (Beta support ; delegates to win-overlay) and host-gateway network backend (stable support; delegates to win-bridge).
This plugin supports delegating to one of the reference CNI plugins (win-overlay,
win-bridge), to work in conjunction with Flannel daemon on Windows (Flanneld) for
automatic node subnet lease assignment and HNS network creation. This plugin reads
in its own configuration file (cni.conf), and aggregates it with the environment
variables from the FlannelD generated subnet.env file. It then delegates to one of
the reference CNI plugins for network plumbing, and sends the correct configuration
containing the node-assigned subnet to the IPAM plugin (for example: host-local).
For Node, Pod, and Service objects, the following network flows are supported for TCP/UDP traffic:
- Pod → Pod (IP)
- Pod → Pod (Name)
- Pod → Service (Cluster IP)
- Pod → Service (PQDN, but only if there are no ".")
- Pod → Service (FQDN)
- Pod → external (IP)
- Pod → external (DNS)
- Node → Pod
- Pod → Node
IP address management (IPAM)
The following IPAM options are supported on Windows:
- host-local
- azure-vnet-ipam (for azure-cni only)
- Windows Server IPAM (fallback option if no IPAM is set)
Direct Server Return (DSR)
FEATURE STATE:
Kubernetes v1.34 [stable](enabled by default)Load balancing mode where the IP address fixups and the LBNAT occurs at the container vSwitch port directly; service traffic arrives with the source IP set as the originating pod IP. This provides performance optimizations by allowing the return traffic routed through load balancers to bypass the load balancer and respond directly to the client; reducing load on the load balancer and also reducing overall latency. For more information, read Direct Server Return (DSR) in a nutshell.
Load balancing and Services
A Kubernetes Service is an abstraction that defines a logical set of Pods and a means to access them over a network. In a cluster that includes Windows nodes, you can use the following types of Service:
NodePortClusterIPLoadBalancerExternalName
Windows container networking differs in some important ways from Linux networking. The Microsoft documentation for Windows Container Networking provides additional details and background.
On Windows, you can use the following settings to configure Services and load balancing behavior:
| Feature | Description | Minimum Supported Windows OS build | How to enable |
|---|---|---|---|
| Session affinity | Ensures that connections from a particular client are passed to the same Pod each time. | Windows Server 2022 | Set service.spec.sessionAffinity to "ClientIP" |
| Direct Server Return (DSR) | See DSR notes above. | Windows Server 2019 | Set the following command line argument (assuming version 1.36): --enable-dsr=true |
| Preserve-Destination | Skips DNAT of service traffic, thereby preserving the virtual IP of the target service in packets reaching the backend Pod. Also disables node-node forwarding. | Windows Server, version 1903 | Set "preserve-destination": "true" in service annotations and enable DSR in kube-proxy. |
| IPv4/IPv6 dual-stack networking | Native IPv4-to-IPv4 in parallel with IPv6-to-IPv6 communications to, from, and within a cluster | Windows Server 2019 | See IPv4/IPv6 dual-stack |
| Client IP preservation | Ensures that source IP of incoming ingress traffic gets preserved. Also disables node-node forwarding. | Windows Server 2019 | Set service.spec.externalTrafficPolicy to "Local" and enable DSR in kube-proxy |
Limitations
The following networking functionality is not supported on Windows nodes:
- Host networking mode
- Local NodePort access from the node itself (works for other nodes or external clients)
- More than 64 backend pods (or unique destination addresses) for a single Service
- IPv6 communication between Windows pods connected to overlay networks
- Local Traffic Policy in non-DSR mode
- Outbound communication using the ICMP protocol via the
win-overlay,win-bridge, or using the Azure-CNI plugin. Specifically, the Windows data plane (VFP) doesn't support ICMP packet transpositions, and this means:- ICMP packets directed to destinations within the same network (such as pod to pod communication via ping) work as expected;
- TCP/UDP packets work as expected;
- ICMP packets directed to pass through a remote network (e.g. pod to external internet communication via ping) cannot be transposed and thus will not be routed back to their source;
- Since TCP/UDP packets can still be transposed, you can substitute
ping <destination>withcurl <destination>when debugging connectivity with the outside world.
Other limitations:
- Windows reference network plugins win-bridge and win-overlay do not implement
CNI spec v0.4.0,
due to a missing
CHECKimplementation. - The Flannel VXLAN CNI plugin has the following limitations on Windows:
- Node-pod connectivity is only possible for local pods with Flannel v0.12.0 (or higher).
- Flannel is restricted to using VNI 4096 and UDP port 4789. See the official Flannel VXLAN backend docs for more details on these parameters.
5.11 - Service ClusterIP allocation
In Kubernetes, Services are an abstract way to expose
an application running on a set of Pods. Services
can have a cluster-scoped virtual IP address (using a Service of type: ClusterIP).
Clients can connect using that virtual IP address, and Kubernetes then load-balances traffic to that
Service across the different backing Pods.
How Service ClusterIPs are allocated?
When Kubernetes needs to assign a virtual IP address for a Service, that assignment happens one of two ways:
- dynamically
- the cluster's control plane automatically picks a free IP address from within the configured IP range for
type: ClusterIPServices. - statically
- you specify an IP address of your choice, from within the configured IP range for Services.
Across your whole cluster, every Service ClusterIP must be unique.
Trying to create a Service with a specific ClusterIP that has already
been allocated will return an error.
Why do you need to reserve Service Cluster IPs?
Sometimes you may want to have Services running in well-known IP addresses, so other components and users in the cluster can use them.
The best example is the DNS Service for the cluster. As a soft convention, some Kubernetes installers assign the 10th IP address from the Service IP range to the DNS service. Assuming you configured your cluster with Service IP range 10.96.0.0/16 and you want your DNS Service IP to be 10.96.0.10, you'd have to create a Service like this:
apiVersion: v1
kind: Service
metadata:
labels:
k8s-app: kube-dns
kubernetes.io/cluster-service: "true"
kubernetes.io/name: CoreDNS
name: kube-dns
namespace: kube-system
spec:
clusterIP: 10.96.0.10
ports:
- name: dns
port: 53
protocol: UDP
targetPort: 53
- name: dns-tcp
port: 53
protocol: TCP
targetPort: 53
selector:
k8s-app: kube-dns
type: ClusterIP
But, as it was explained before, the IP address 10.96.0.10 has not been reserved. If other Services are created before or in parallel with dynamic allocation, there is a chance they can allocate this IP. Hence, you will not be able to create the DNS Service because it will fail with a conflict error.
How can you avoid Service ClusterIP conflicts?
The allocation strategy implemented in Kubernetes to allocate ClusterIPs to Services reduces the risk of collision.
The ClusterIP range is divided, based on the formula min(max(16, cidrSize / 16), 256),
described as never less than 16 or more than 256 with a graduated step between them.
Dynamic IP assignment uses the upper band by default, once this has been exhausted it will use the lower range. This will allow users to use static allocations on the lower band with a low risk of collision.
Examples
Example 1
This example uses the IP address range: 10.96.0.0/24 (CIDR notation) for the IP addresses of Services.
Range Size: 28 - 2 = 254
Band Offset: min(max(16, 256/16), 256) = min(16, 256) = 16
Static band start: 10.96.0.1
Static band end: 10.96.0.16
Range end: 10.96.0.254
pie showData
title 10.96.0.0/24
"Static" : 16
"Dynamic" : 238
Example 2
This example uses the IP address range: 10.96.0.0/20 (CIDR notation) for the IP addresses of Services.
Range Size: 212 - 2 = 4094
Band Offset: min(max(16, 4096/16), 256) = min(256, 256) = 256
Static band start: 10.96.0.1
Static band end: 10.96.1.0
Range end: 10.96.15.254
pie showData
title 10.96.0.0/20
"Static" : 256
"Dynamic" : 3838
Example 3
This example uses the IP address range: 10.96.0.0/16 (CIDR notation) for the IP addresses of Services.
Range Size: 216 - 2 = 65534
Band Offset: min(max(16, 65536/16), 256) = min(4096, 256) = 256
Static band start: 10.96.0.1
Static band ends: 10.96.1.0
Range end: 10.96.255.254
pie showData
title 10.96.0.0/16
"Static" : 256
"Dynamic" : 65278
What's next
- Read about Service External Traffic Policy
- Read about Connecting Applications with Services
- Read about Services
5.12 - Service Internal Traffic Policy
If two Pods in your cluster want to communicate, and both Pods are actually running on the same node, use Service Internal Traffic Policy to keep network traffic within that node. Avoiding a round trip via the cluster network can help with reliability, performance (network latency and throughput), or cost.
FEATURE STATE:
Kubernetes v1.26 [stable]Service Internal Traffic Policy enables internal traffic restrictions to only route internal traffic to endpoints within the node the traffic originated from. The "internal" traffic here refers to traffic originated from Pods in the current cluster. This can help to reduce costs and improve performance.
Using Service Internal Traffic Policy
You can enable the internal-only traffic policy for a
Service, by setting its
.spec.internalTrafficPolicy to Local. This tells kube-proxy to only use node local
endpoints for cluster internal traffic.
Note:
For pods on nodes with no endpoints for a given Service, the Service behaves as if it has zero endpoints (for Pods on this node) even if the service does have endpoints on other nodes.The following example shows what a Service looks like when you set
.spec.internalTrafficPolicy to Local:
apiVersion: v1
kind: Service
metadata:
name: my-service
spec:
selector:
app.kubernetes.io/name: MyApp
ports:
- protocol: TCP
port: 80
targetPort: 9376
internalTrafficPolicy: Local
How it works
The kube-proxy filters the endpoints it routes to based on the
spec.internalTrafficPolicy setting. When it's set to Local, only node local
endpoints are considered. When it's Cluster (the default), or is not set,
Kubernetes considers all endpoints.
What's next
- Read about Topology Aware Routing
- Read about Service External Traffic Policy
- Follow the Connecting Applications with Services tutorial
6 - Storage
Ways to provide both long-term and temporary storage to Pods in your cluster.
6.1 - Volumes
Kubernetes volumes provide a way for containers in a Pod to access and share data via the filesystem. There are different kinds of volume that you can use for different purposes, such as:
- populating a configuration file based on a ConfigMap or a Secret
- providing some temporary scratch space for a Pod
- sharing a filesystem between two different containers in the same Pod
- sharing a filesystem between two different Pods (even if those Pods run on different nodes)
- durably storing data so that it stays available even if the Pod restarts or is replaced
- passing configuration information to an app running in a container, based on details of the Pod the container is in (for example: telling a sidecar container what namespace the Pod is running in)
- providing read-only access to data in a different container image
Data sharing can be between different local processes within a container, or between different containers, or between Pods.
Why volumes are important
Data persistence: On-disk files in a container are ephemeral, which presents some problems for non-trivial applications when running in containers. One problem occurs when a container crashes or is stopped; the container state is not saved, so all of the files that were created or modified during the lifetime of the container are lost. After a crash, kubelet restarts the container with a clean state.
Shared storage: Another problem occurs when multiple containers are running in a
Podand need to share files. It can be challenging to set up and access a shared filesystem across all of the containers.
The Kubernetes volume abstraction can help you to solve both of these problems.
Before you learn about volumes, PersistentVolumes, and PersistentVolumeClaims, you should read up about Pods and make sure that you understand how Kubernetes uses Pods to run containers.
How volumes work
Kubernetes supports many types of volumes. A Pod can use any number of volume types simultaneously. Ephemeral volume types have a lifetime linked to a specific Pod, but persistent volumes exist beyond the lifetime of any individual Pod. When a Pod ceases to exist, Kubernetes destroys ephemeral volumes; however, Kubernetes does not destroy persistent volumes. For any kind of volume in a given Pod, data is preserved across container restarts.
At its core, a volume is a directory, possibly with some data in it, which is accessible to the containers in a pod. How that directory comes to be, the medium that backs it, and the contents of it are determined by the particular volume type used.
To use a volume, specify the volumes to provide for the Pod in .spec.volumes
and declare where to mount those volumes into containers in .spec.containers[*].volumeMounts.
When a Pod is launched, a process in the container sees a filesystem view composed from the initial contents of the container image, plus volumes (if defined) mounted inside the container. The process sees a root filesystem that initially matches the contents of the container image. Any writes to within that filesystem hierarchy, if allowed, affect what that process views when it performs a subsequent filesystem access. Volumes are mounted at specified paths within the container filesystem. For each container defined within a Pod, you must independently specify where to mount each volume that the container uses.
Volumes cannot mount within other volumes (but see Using subPath for a related mechanism). Also, a volume cannot contain a hard link to anything in a different volume.
Types of volumes
Kubernetes supports several types of volumes.
configMap
A ConfigMap
provides a way to inject configuration data into Pods.
The data stored in a ConfigMap can be referenced in a volume of type
configMap and then consumed by containerized applications running in a Pod.
When referencing a ConfigMap, you provide the name of the ConfigMap in the
volume. You can customize the path to use for a specific
entry in the ConfigMap. The following configuration shows how to mount
the log-config ConfigMap onto a Pod called configmap-pod:
apiVersion: v1
kind: Pod
metadata:
name: configmap-pod
spec:
containers:
- name: test
image: busybox:1.28
command: ['sh', '-c', 'echo "The app is running!" && tail -f /dev/null']
volumeMounts:
- name: config-vol
mountPath: /etc/config
volumes:
- name: config-vol
configMap:
name: log-config
items:
- key: log_level
path: log_level.conf
The log-config ConfigMap is mounted as a volume, and all contents stored in
its log_level entry are mounted into the Pod at path /etc/config/log_level.conf.
Note that this path is derived from the volume's mountPath and the path
keyed with log_level.
Note:
You must create a ConfigMap before you can use it.
A ConfigMap is always mounted as
readOnly.A container using a ConfigMap as a
subPathvolume mount will not receive updates when the ConfigMap changes.Text data is exposed as files using the UTF-8 character encoding. For other character encodings, use
binaryData.
downwardAPI
A downwardAPI volume makes downward API
data available to applications. Within the volume, you can find the exposed
data as read-only files in plain text format.
Note:
A container using the downward API as asubPath volume mount does not
receive updates when field values change.See Expose Pod Information to Containers Through Files to learn more.
emptyDir
For a Pod that defines an emptyDir volume, the volume is created when the Pod is assigned to a node.
As the name says, the emptyDir volume is initially empty. All containers in the Pod can read and write the same
files in the emptyDir volume, though that volume can be mounted at the same
or different paths in each container. When a Pod is removed from a node for
any reason, the data in the emptyDir is deleted permanently.
Note:
A container crashing does not remove a Pod from a node. The data in anemptyDir volume
is safe across container crashes.Some uses for an emptyDir are:
- scratch space, such as for a disk-based merge sort
- checkpointing a long computation for recovery from crashes
- holding files that a content-manager container fetches while a webserver container serves the data
The emptyDir.medium field controls where emptyDir volumes are stored. By
default emptyDir volumes are stored on whatever medium that backs the node
such as disk, SSD, or network storage, depending on your environment. If you set
the emptyDir.medium field to "Memory", Kubernetes mounts a tmpfs (RAM-backed
filesystem) for you instead. While tmpfs is very fast, be aware that, unlike
disks, files you write count against the memory limit of the container that wrote them.
A size limit can be specified for the default medium, which limits the capacity
of the emptyDir volume. The storage is allocated from
node ephemeral storage.
If that is filled up from another source (for example, log files or image overlays),
the emptyDir may run out of capacity before this limit.
If no size is specified, memory-backed volumes are sized to node allocatable memory.
Caution:
Please check here for points to note in terms of resource management when using memory-backedemptyDir.emptyDir configuration example
apiVersion: v1
kind: Pod
metadata:
name: test-pd
spec:
containers:
- image: registry.k8s.io/test-webserver
name: test-container
volumeMounts:
- mountPath: /cache
name: cache-volume
volumes:
- name: cache-volume
emptyDir:
sizeLimit: 500Mi
emptyDir memory configuration example
apiVersion: v1
kind: Pod
metadata:
name: test-pd
spec:
containers:
- image: registry.k8s.io/test-webserver
name: test-container
volumeMounts:
- mountPath: /cache
name: cache-volume
volumes:
- name: cache-volume
emptyDir:
sizeLimit: 500Mi
medium: Memory
fc (fibre channel)
An fc volume type allows an existing fibre channel block storage volume
to be mounted in a Pod. You can specify single or multiple target world wide names (WWNs)
using the parameter targetWWNs in your Volume configuration. If multiple WWNs are specified,
targetWWNs expect that those WWNs are from multi-path connections.
Note:
You must configure FC SAN Zoning to allocate and mask those LUNs (volumes) to the target WWNs beforehand so that Kubernetes hosts can access them.gcePersistentDisk (deprecated)
In Kubernetes 1.36, all operations for the in-tree gcePersistentDisk type
are redirected to the pd.csi.storage.gke.io CSI driver.
The gcePersistentDisk in-tree storage driver was deprecated in the Kubernetes v1.17 release
and then removed entirely in the v1.28 release.
The Kubernetes project suggests that you use the Google Compute Engine Persistent Disk CSI third party storage driver instead.
gitRepo (disabled)
Warning:
Kubernetes 1.36 does not include the gitRepo volume
driver. The last version that provided a way to use this driver was Kubernetes
v1.35, and it has been deprecated since the v1.11 minor
release.
To provision a Pod that has a Git repository mounted, you can mount an
emptyDir volume into an init container
that clones the repo using Git, then mount the EmptyDir into the Pod's container.
You can restrict the use of gitRepo volumes in your cluster using
policies, such as
ValidatingAdmissionPolicy.
You can use the following Common Expression Language (CEL) expression as
part of a policy to reject use of gitRepo volumes:
!has(object.spec.volumes) || !object.spec.volumes.exists(v, has(v.gitRepo))
hostPath
A hostPath volume mounts a file or directory from the host node's filesystem
into your Pod. This is not something that most Pods will need, but it offers a
powerful escape hatch for some applications.
Warning:
Using the hostPath volume type presents many security risks.
If you can avoid using a hostPath volume, you should. For example,
define a local PersistentVolume, and use that instead.
If you are restricting access to specific directories on the node using
admission-time validation, that restriction is only effective when you
additionally require that any mounts of that hostPath volume are
read only. If you allow a read-write mount of any host path by an
untrusted Pod, the containers in that Pod may be able to subvert the
read-write host mount.
Take care when using hostPath volumes, whether these are mounted as read-only
or as read-write, because:
- Access to the host filesystem can expose privileged system credentials (such as for the kubelet) or privileged APIs (such as the container runtime socket) that can be used for container escape or to attack other parts of the cluster.
- Pods with identical configuration (such as created from a PodTemplate) may behave differently on different nodes due to different files on the nodes.
hostPathvolume usage is not treated as ephemeral storage usage. You need to monitor the disk usage by yourself because excessivehostPathdisk usage will lead to disk pressure on the node.
Some uses for a hostPath are:
- running a container that needs access to node-level system components
(such as a container that transfers system logs to a central location,
accessing those logs using a read-only mount of
/var/log) - making a configuration file stored on the host system available read-only to a static Pod; unlike normal Pods, static Pods cannot access ConfigMaps
hostPath volume types
In addition to the required path property, you can optionally specify a
type for a hostPath volume.
The available values for type are:
| Value | Behavior |
|---|---|
"" | Empty string (default) is for backward compatibility, which means that no checks will be performed before mounting the hostPath volume. |
DirectoryOrCreate | If nothing exists at the given path, an empty directory will be created there as needed with permission set to 0755, having the same group and ownership with Kubelet. |
Directory | A directory must exist at the given path. |
FileOrCreate | If nothing exists at the given path, an empty file will be created there as needed with permission set to 0644, having the same group and ownership with Kubelet. |
File | A file must exist at the given path. |
Socket | A UNIX socket must exist at the given path. |
CharDevice | (Linux nodes only) A character device must exist at the given path. |
BlockDevice | (Linux nodes only) A block device must exist at the given path. |
Caution:
TheFileOrCreate mode does not create the parent directory of the file. If the parent directory
of the mounted file does not exist, the Pod fails to start. To ensure that this mode works,
you can try to mount directories and files separately, as shown in the
FileOrCreate example for hostPath.Some files or directories created on the underlying hosts might only be
accessible by root. You then either need to run your process as root in a
privileged container
or modify the file permissions on the host to read from or write to a hostPath volume.
hostPath configuration example
---
# This manifest mounts /data/foo on the host as /foo inside the
# single container that runs within the hostpath-example-linux Pod.
#
# The mount into the container is read-only.
apiVersion: v1
kind: Pod
metadata:
name: hostpath-example-linux
spec:
os: { name: linux }
nodeSelector:
kubernetes.io/os: linux
containers:
- name: example-container
image: registry.k8s.io/test-webserver
volumeMounts:
- mountPath: /foo
name: example-volume
readOnly: true
volumes:
- name: example-volume
# mount /data/foo, but only if that directory already exists
hostPath:
path: /data/foo # directory location on host
type: Directory # this field is optional
---
# This manifest mounts C:\Data\foo on the host as C:\foo, inside the
# single container that runs within the hostpath-example-windows Pod.
#
# The mount into the container is read-only.
apiVersion: v1
kind: Pod
metadata:
name: hostpath-example-windows
spec:
os: { name: windows }
nodeSelector:
kubernetes.io/os: windows
containers:
- name: example-container
image: microsoft/windowsservercore:1709
volumeMounts:
- name: example-volume
mountPath: "C:\\foo"
readOnly: true
volumes:
# mount C:\Data\foo from the host, but only if that directory already exists
- name: example-volume
hostPath:
path: "C:\\Data\\foo" # directory location on host
type: Directory # this field is optional
hostPath FileOrCreate configuration example
The following manifest defines a Pod that mounts /var/local/aaa
inside the single container in the Pod. If the node does not
already have a path /var/local/aaa, the kubelet creates
it as a directory and then mounts it into the Pod.
If /var/local/aaa already exists but is not a directory,
the Pod fails. Additionally, the kubelet attempts to make
a file named /var/local/aaa/1.txt inside that directory
(as seen from the host); if something already exists at
that path and isn't a regular file, the Pod fails.
Here's the example manifest:
apiVersion: v1
kind: Pod
metadata:
name: test-webserver
spec:
os: { name: linux }
nodeSelector:
kubernetes.io/os: linux
containers:
- name: test-webserver
image: registry.k8s.io/test-webserver:latest
volumeMounts:
- mountPath: /var/local/aaa
name: mydir
- mountPath: /var/local/aaa/1.txt
name: myfile
volumes:
- name: mydir
hostPath:
# Ensure the file directory is created.
path: /var/local/aaa
type: DirectoryOrCreate
- name: myfile
hostPath:
path: /var/local/aaa/1.txt
type: FileOrCreate
image
FEATURE STATE:
Kubernetes v1.36 [stable](enabled by default)An image volume source represents an OCI object (a container image or
artifact) which is available on the kubelet's host machine.
An example of using the image volume source is:
apiVersion: v1
kind: Pod
metadata:
name: image-volume
spec:
containers:
- name: shell
command: ["sleep", "infinity"]
image: debian
volumeMounts:
- name: volume
mountPath: /volume
volumes:
- name: volume
image:
reference: quay.io/crio/artifact:v2
pullPolicy: IfNotPresent
The volume is resolved at Pod startup, depending on which pullPolicy value is
provided:
Always- The kubelet always attempts to pull the reference. If the pull fails,
the kubelet sets the Pod to
Failed. Never- The kubelet never pulls the reference and only uses a local image or artifact.
The Pod becomes
Failedif any layers of the image aren't already present locally, or if the manifest for that image isn't already cached. IfNotPresent- The kubelet pulls if the reference isn't already present on disk. The Pod becomes
Failedif the reference isn't present and the pull fails.
The volume gets re-resolved if the Pod gets deleted and recreated, which means that new remote content will become available on Pod recreation. A failure to resolve or pull the image during Pod startup will block containers from starting and may add significant latency. Failures will be retried using normal volume backoff and will be reported on the Pod reason and message.
The types of objects that may be mounted by this volume are defined by the
container runtime implementation on a host machine. At a minimum, they must include
all valid types supported by the container image field. The OCI object gets
mounted in a single directory (spec.containers[*].volumeMounts[*].mountPath)
and will be mounted read-only.
Besides that:
subPathorsubPathExprmounts for containers (spec.containers[*].volumeMounts[*].subPath,spec.containers[*].volumeMounts[*].subPathExpr) are only supported from Kubernetes v1.33.- The field
spec.securityContext.fsGroupChangePolicyhas no effect on this volume type. - The
AlwaysPullImagesAdmission Controller does also work for this volume source like for container images.
The following fields are available for the image type:
reference- Artifact reference to be used. For example, you could specify
registry.k8s.io/conformance:v1.36.0to load the files from the Kubernetes conformance test image. Behaves in the same way aspod.spec.containers[*].image. Pull secrets will be assembled in the same way as for the container image by looking up node credentials, service account image pull secrets, and Pod spec image pull secrets. This field is optional to allow higher level config management to default or override container images in workload controllers like Deployments and StatefulSets. More info about container images. pullPolicy- Policy for pulling OCI objects. Possible values are:
Always,Never, orIfNotPresent. Defaults toAlwaysif:latesttag is specified, orIfNotPresentotherwise.
See the Use an Image Volume With a Pod example for more details on how to use the volume source.
iscsi
An iscsi volume allows an existing iSCSI (SCSI over IP) volume to be mounted
into your Pod. Unlike emptyDir, which is erased when a Pod is removed, the
contents of an iscsi volume are preserved, and the volume is merely
unmounted. This means that an iscsi volume can be pre-populated with data, and
that data can be shared between Pods.
Note:
You must have your own iSCSI server running with the volume created before you can use it.A feature of iSCSI is that it can be mounted as read-only by multiple consumers simultaneously. This means that you can pre-populate a volume with your dataset and then serve it in parallel from as many Pods as you need. Unfortunately, iSCSI volumes can only be mounted by a single consumer in read-write mode. Simultaneous writers are not allowed.
local
A local volume represents a mounted local storage device such as a disk,
partition or directory.
Local volumes can only be used as a statically created PersistentVolume. Dynamic provisioning is not supported.
Compared to hostPath volumes, local volumes are used in a durable and
portable manner without manually scheduling Pods to nodes. The system is aware
of the volume's node constraints by looking at the node affinity on the PersistentVolume.
However, local volumes are subject to the availability of the underlying
node and are not suitable for all applications. If a node becomes unhealthy,
then the local volume becomes inaccessible to the Pod. The Pod using this volume
is unable to run. Applications using local volumes must be able to tolerate this
reduced availability, as well as potential data loss, depending on the
durability characteristics of the underlying disk.
The following example shows a PersistentVolume using a local volume and
nodeAffinity:
apiVersion: v1
kind: PersistentVolume
metadata:
name: example-pv
spec:
capacity:
storage: 100Gi
volumeMode: Filesystem
accessModes:
- ReadWriteOnce
persistentVolumeReclaimPolicy: Delete
storageClassName: local-storage
local:
path: /mnt/disks/ssd1
nodeAffinity:
required:
nodeSelectorTerms:
- matchExpressions:
- key: kubernetes.io/hostname
operator: In
values:
- example-node
You must set a PersistentVolume nodeAffinity when using local volumes.
The Kubernetes scheduler uses the PersistentVolume nodeAffinity to schedule
these Pods to the correct node.
PersistentVolume volumeMode can be set to "Block" (instead of the default
value "Filesystem") to expose the local volume as a raw block device.
When using local volumes, it is recommended to create a StorageClass with
volumeBindingMode set to WaitForFirstConsumer. For more details, see the
local StorageClass example.
Delaying volume binding ensures that the PersistentVolumeClaim binding decision
will also be evaluated with any other node constraints the Pod may have,
such as node resource requirements, node selectors, Pod affinity, and Pod anti-affinity.
An external static provisioner can be run separately for improved management of the local volume lifecycle. Note that this provisioner does not support dynamic provisioning yet. For an example on how to run an external local provisioner, see the local volume provisioner user guide.
Note:
The local PersistentVolume requires manual cleanup and deletion by the user if the external static provisioner is not used to manage the volume lifecycle.nfs
An nfs volume allows an existing NFS (Network File System) share to be
mounted into a Pod. Unlike emptyDir, which is erased when a Pod is
removed, the contents of an nfs volume are preserved, and the volume is merely
unmounted. This means that an NFS volume can be pre-populated with data, and
that data can be shared between Pods. NFS can be mounted by multiple
writers simultaneously.
apiVersion: v1
kind: Pod
metadata:
name: test-pd
spec:
containers:
- image: registry.k8s.io/test-webserver
name: test-container
volumeMounts:
- mountPath: /my-nfs-data
name: test-volume
volumes:
- name: test-volume
nfs:
server: my-nfs-server.example.com
path: /my-nfs-volume
readOnly: true
Note:
You must have your own NFS server running with the share exported before you can use it.
Also note that you can't specify NFS mount options in a Pod spec. You can either set mount options server-side or use /etc/nfsmount.conf. You can also mount NFS volumes via PersistentVolumes, which do allow you to set mount options.
persistentVolumeClaim
A persistentVolumeClaim volume is used to mount a
PersistentVolume into a Pod. PersistentVolumeClaims
are a way for users to "claim" durable storage (such as an iSCSI volume)
without knowing the details of the particular cloud environment.
See the information about PersistentVolumes for more details.
portworxVolume (deprecated)
FEATURE STATE:
Kubernetes v1.25 [deprecated]A portworxVolume is an elastic block storage layer that runs hyperconverged with
Kubernetes. Portworx fingerprints storage
in a server, tiers based on capabilities, and aggregates capacity across multiple servers.
Portworx runs in-guest in virtual machines or on bare metal Linux nodes.
A portworxVolume can be dynamically created through Kubernetes, or it can also
be pre-provisioned and referenced inside a Pod.
Here is an example Pod referencing a pre-provisioned Portworx volume:
apiVersion: v1
kind: Pod
metadata:
name: test-portworx-volume-pod
spec:
containers:
- image: registry.k8s.io/test-webserver
name: test-container
volumeMounts:
- mountPath: /mnt
name: pxvol
volumes:
- name: pxvol
# This Portworx volume must already exist.
portworxVolume:
volumeID: "pxvol"
fsType: "<fs-type>"
Note:
Make sure you have an existing PortworxVolume with the namepxvol
before using it in the Pod.Portworx CSI migration
FEATURE STATE:
Kubernetes v1.33 [stable](enabled by default)In Kubernetes 1.36, all operations for the in-tree
Portworx volumes are redirected to the pxd.portworx.com
Container Storage Interface (CSI) Driver by default.
Portworx CSI Driver
must be installed on the cluster.
projected
A projected volume maps several existing volume sources into the same directory. For more details, see projected volumes.
secret
A secret volume is used to pass sensitive information, such as passwords, to
Pods. You can store secrets in the Kubernetes API and mount them as files for
use by Pods without coupling to Kubernetes directly. secret volumes are
backed by tmpfs (a RAM-backed filesystem), so they are never written to
non-volatile storage.
Note:
You must create a Secret in the Kubernetes API before you can use it.
A Secret is always mounted as
readOnly.A container using a Secret as a
subPathvolume mount will not receive Secret updates.
For more details, see Configuring Secrets.
Using subPath
Sometimes, it is useful to share one volume for multiple uses in a single Pod.
The volumeMounts[*].subPath property specifies a sub-path inside the referenced volume
instead of its root.
The following example shows how to configure a Pod with a LAMP stack (Linux, Apache, MySQL, PHP)
using a single, shared volume. This sample subPath configuration is not recommended
for production use.
The PHP application's code and assets map to the volume's html folder and
the MySQL database is stored in the volume's mysql folder. For example:
apiVersion: v1
kind: Pod
metadata:
name: my-lamp-site
spec:
containers:
- name: mysql
image: mysql
env:
- name: MYSQL_ROOT_PASSWORD
value: "rootpasswd"
volumeMounts:
- mountPath: /var/lib/mysql
name: site-data
subPath: mysql
- name: php
image: php:7.0-apache
volumeMounts:
- mountPath: /var/www/html
name: site-data
subPath: html
volumes:
- name: site-data
persistentVolumeClaim:
claimName: my-lamp-site-data
Using subPath with expanded environment variables
FEATURE STATE:
Kubernetes v1.17 [stable]Use the subPathExpr field to construct subPath directory names from
downward API environment variables.
The subPath and subPathExpr properties are mutually exclusive.
In this example, a Pod uses subPathExpr to create a directory pod1 within
the hostPath volume /var/log/pods.
The hostPath volume takes the Pod name from the downwardAPI.
The host directory /var/log/pods/pod1 is mounted at /logs in the container.
apiVersion: v1
kind: Pod
metadata:
name: pod1
spec:
containers:
- name: container1
env:
- name: POD_NAME
valueFrom:
fieldRef:
apiVersion: v1
fieldPath: metadata.name
image: busybox:1.28
command: [ "sh", "-c", "while [ true ]; do echo 'Hello'; sleep 10; done | tee -a /logs/hello.txt" ]
volumeMounts:
- name: workdir1
mountPath: /logs
# The variable expansion uses round brackets (not curly brackets).
subPathExpr: $(POD_NAME)
restartPolicy: Never
volumes:
- name: workdir1
hostPath:
path: /var/log/pods
Resources
The storage medium (such as Disk or SSD) of an emptyDir volume is determined by the
medium of the filesystem holding the kubelet root dir (typically
/var/lib/kubelet). There is no limit on how much space an emptyDir or
hostPath volume can consume, and no isolation between containers or
Pods.
To learn about requesting space using a resource specification, see how to manage resources.
Out-of-tree volume plugins
The out-of-tree volume plugins include Container Storage Interface (CSI), and also FlexVolume (which is deprecated). These plugins enable storage vendors to create custom storage plugins without adding their plugin source code to the Kubernetes repository.
Previously, all volume plugins were "in-tree". The "in-tree" plugins were built, linked, compiled, and shipped with the core Kubernetes binaries. This meant that adding a new storage system to Kubernetes (a volume plugin) required checking code into the core Kubernetes code repository.
Both CSI and FlexVolume allow volume plugins to be developed independently of the Kubernetes code base, and deployed (installed) on Kubernetes clusters as extensions.
For storage vendors looking to create an out-of-tree volume plugin, please refer to the volume plugin FAQ.
csi
Container Storage Interface (CSI) defines a standard interface for container orchestration systems (like Kubernetes) to expose arbitrary storage systems to their container workloads.
Please read the CSI design proposal for more information.
Note:
Support for CSI spec versions 0.2 and 0.3 is deprecated in Kubernetes v1.13 and will be removed in a future release.Note:
CSI drivers may not be compatible across all Kubernetes releases. Please check the specific CSI driver's documentation for supported deployment steps for each Kubernetes release and a compatibility matrix.Once a CSI-compatible volume driver is deployed on a Kubernetes cluster, users
may use the csi volume type to attach or mount the volumes exposed by the
CSI driver.
A csi volume can be used in a Pod in three different ways:
- through a reference to a PersistentVolumeClaim
- with a generic ephemeral volume
- with a CSI ephemeral volume if the driver supports that
The following fields are available to storage administrators to configure a CSI persistent volume:
driver: A string value that specifies the name of the volume driver to use. This value must correspond to the value returned in theGetPluginInfoResponseby the CSI driver as defined in the CSI spec. It is used by Kubernetes to identify which CSI driver to call out to, and by CSI driver components to identify which PV objects belong to the CSI driver.volumeHandle: A string value that uniquely identifies the volume. This value must correspond to the value returned in thevolume.idfield of theCreateVolumeResponseby the CSI driver as defined in the CSI spec. The value is passed asvolume_idin all calls to the CSI volume driver when referencing the volume.readOnly: An optional boolean value indicating whether the volume is to be "ControllerPublished" (attached) as read-only. Default is false. This value is passed to the CSI driver via thereadonlyfield in theControllerPublishVolumeRequest.fsType: If the PV'sVolumeModeisFilesystem, then this field may be used to specify the filesystem that should be used to mount the volume. If the volume has not been formatted and formatting is supported, this value will be used to format the volume. This value is passed to the CSI driver via theVolumeCapabilityfield ofControllerPublishVolumeRequest,NodeStageVolumeRequest, andNodePublishVolumeRequest.volumeAttributes: A map of string to string that specifies static properties of a volume. This map must correspond to the map returned in thevolume.attributesfield of theCreateVolumeResponseby the CSI driver as defined in the CSI spec. The map is passed to the CSI driver via thevolume_contextfield in theControllerPublishVolumeRequest,NodeStageVolumeRequest, andNodePublishVolumeRequest.controllerPublishSecretRef: A reference to the secret object containing sensitive information to pass to the CSI driver to complete the CSIControllerPublishVolumeandControllerUnpublishVolumecalls. This field is optional, and may be empty if no secret is required. If the Secret contains more than one secret, all secrets are passed.nodeExpandSecretRef: A reference to the secret containing sensitive information to pass to the CSI driver to complete the CSINodeExpandVolumecall. This field is optional and may be empty if no secret is required. If the object contains more than one secret, all secrets are passed. When you have configured secret data for node-initiated volume expansion, the kubelet passes that data via theNodeExpandVolume()call to the CSI driver. All supported versions of Kubernetes offer thenodeExpandSecretReffield, and have it available by default. Kubernetes releases prior to v1.25 did not include this support.- Enable the feature gate
named
CSINodeExpandSecretfor each kube-apiserver and for the kubelet on every node. Since Kubernetes version 1.27, this feature has been enabled by default and no explicit enablement of the feature gate is required. You must also be using a CSI driver that supports or requires secret data during node-initiated storage resize operations. nodePublishSecretRef: A reference to the secret object containing sensitive information to pass to the CSI driver to complete the CSINodePublishVolumecall. This field is optional and may be empty if no secret is required. If the secret object contains more than one secret, all secrets are passed.nodeStageSecretRef: A reference to the secret object containing sensitive information to pass to the CSI driver to complete the CSINodeStageVolumecall. This field is optional and may be empty if no secret is required. If the Secret contains more than one secret, all secrets are passed.
CSI raw block volume support
FEATURE STATE:
Kubernetes v1.18 [stable]Vendors with external CSI drivers can implement raw block volume support in Kubernetes workloads.
You can set up your PersistentVolume/PersistentVolumeClaim with raw block volume support as usual, without any CSI-specific changes.
CSI ephemeral volumes
FEATURE STATE:
Kubernetes v1.25 [stable]You can directly configure CSI volumes within the Pod specification. Volumes specified in this way are ephemeral and do not persist across Pod restarts. See Ephemeral Volumes for more information.
For more information on how to develop a CSI driver, refer to the kubernetes-csi documentation
Windows CSI proxy
FEATURE STATE:
Kubernetes v1.22 [stable]CSI node plugins need to perform various privileged operations like scanning of disk devices and mounting of file systems. These operations differ for each host operating system. For Linux worker nodes, containerized CSI node plugins are typically deployed as privileged containers. For Windows worker nodes, privileged operations for containerized CSI node plugins are supported using csi-proxy, a community-managed, stand-alone binary that needs to be pre-installed on each Windows node.
For more details, refer to the deployment guide of the CSI plugin you wish to deploy.
Migrating to CSI drivers from in-tree plugins
FEATURE STATE:
Kubernetes v1.25 [stable]The CSIMigration feature directs operations against existing in-tree
plugins to corresponding CSI plugins (which are expected to be installed and configured).
As a result, operators do not have to make any
configuration changes to existing Storage Classes, PersistentVolumes, or PersistentVolumeClaims
(referring to in-tree plugins) when transitioning to a CSI driver that supersedes an in-tree plugin.
Note:
Existing PVs created by an in-tree volume plugin can still be used in the future without any configuration changes, even after the migration to CSI is completed for that volume type, and even after you upgrade to a version of Kubernetes that doesn't have compiled-in support for that kind of storage.
As part of that migration, you - or another cluster administrator - must have installed and configured the appropriate CSI driver for that storage. The core of Kubernetes does not install that software for you.
After that migration, you can also define new PVCs and PVs that refer to the legacy, built-in storage integrations. Provided you have the appropriate CSI driver installed and configured, the PV creation continues to work, even for brand-new volumes. The actual storage management now happens through the CSI driver.
The operations and features that are supported include: provisioning/delete, attach/detach, mount/unmount, and resizing of volumes.
In-tree plugins that support CSIMigration and have a corresponding CSI driver implemented
are listed in Types of Volumes.
flexVolume (deprecated)
FEATURE STATE:
Kubernetes v1.23 [deprecated]FlexVolume is an out-of-tree plugin interface that uses an exec-based model to interface with storage drivers. The FlexVolume driver binaries must be installed in a pre-defined volume plugin path on each node, and in some cases, the control plane nodes as well.
Pods interact with FlexVolume drivers through the flexVolume in-tree volume plugin.
The following FlexVolume plugins, deployed as PowerShell scripts on the host, support Windows nodes:
Note:
FlexVolume is deprecated. Using an out-of-tree CSI driver is the recommended way to integrate external storage with Kubernetes.
Maintainers of the FlexVolume driver should implement a CSI Driver and help migrate users of FlexVolume drivers to CSI. Users of FlexVolume should move their workloads to use the equivalent CSI Driver.
Mount propagation
Caution:
Mount propagation is a low-level feature that does not work consistently on all volume types. The Kubernetes project recommends only using mount propagation withhostPath
or memory-backed emptyDir volumes. See
Kubernetes issue #95049
for more context.Mount propagation allows for sharing volumes mounted by a container to other containers in the same Pod, or even to other Pods on the same node.
Mount propagation of a volume is controlled by the mountPropagation field
in containers[*].volumeMounts. Its values are:
None- This volume mount will not receive any subsequent mounts that are mounted to this volume or any of its subdirectories by the host. In a similar fashion, no mounts created by the container will be visible on the host. This is the default mode.This mode is equal to
rprivatemount propagation as described inmount(8)However, the CRI runtime may choose
rslavemount propagation (i.e.,HostToContainer) whenrprivatepropagation is not applicable. cri-dockerd (Docker) is known to chooserslavemount propagation when the mount source contains the Docker daemon's root directory (/var/lib/docker).HostToContainer- This volume mount will receive all subsequent mounts that are mounted to this volume or any of its subdirectories.In other words, if the host mounts anything inside the volume mount, the container will see it mounted there.
Similarly, if any Pod with
Bidirectionalmount propagation to the same volume mounts anything there, the container withHostToContainermount propagation will see it.This mode is equal to
rslavemount propagation as described in themount(8)Bidirectional- This volume mount behaves the same as theHostToContainermount. In addition, all volume mounts created by the container will be propagated back to the host and to all containers of all Pods that use the same volume.A typical use case for this mode is a Pod with a FlexVolume or CSI driver, or a Pod that needs to mount something on the host using a
hostPathvolume.This mode is equal to
rsharedmount propagation as described in themount(8)Warning:
Bidirectionalmount propagation can be dangerous. It can damage the host operating system, and therefore, it is allowed only in privileged containers. Familiarity with Linux kernel behavior is strongly recommended. In addition, any volume mounts created by containers in Pods must be destroyed (unmounted) by the containers on termination.
Read-only mounts
A mount can be made read-only by setting the .spec.containers[*].volumeMounts[*].readOnly
field to true.
This does not make the volume itself read-only, but that specific container will
not be able to write to it.
Other containers in the Pod may mount the same volume as read-write.
On Linux, read-only mounts are not recursively read-only by default.
For example, consider a Pod that mounts the hosts /mnt as a hostPath volume. If
there is another filesystem mounted read-write on /mnt/<SUBMOUNT> (such as tmpfs,
NFS, or USB storage), the volume mounted into the container(s) will also have a writeable
/mnt/<SUBMOUNT>, even if the mount itself was specified as read-only.
Recursive read-only mounts
FEATURE STATE:
Kubernetes v1.33 [stable](enabled by default)Recursive read-only mounts can be enabled by setting the
RecursiveReadOnlyMounts feature gate
for kubelet and kube-apiserver, and setting the .spec.containers[*].volumeMounts[*].recursiveReadOnly
field for a Pod.
The allowed values are:
Disabled(default): no effect.Enabled: makes the mount recursively read-only. Needs all the following requirements to be satisfied:readOnlyis set totruemountPropagationis unset, or set toNone- The host is running with Linux kernel v5.12 or later
- The CRI-level container runtime supports recursive read-only mounts
- The OCI-level container runtime supports recursive read-only mounts.
It will fail if any of these is not true.
IfPossible: attempts to applyEnabled, and falls back toDisabledif the feature is not supported by the kernel or the runtime class.
Example:
apiVersion: v1
kind: Pod
metadata:
name: rro
spec:
volumes:
- name: mnt
hostPath:
# tmpfs is mounted on /mnt/tmpfs
path: /mnt
containers:
- name: busybox
image: busybox
args: ["sleep", "infinity"]
volumeMounts:
# /mnt-rro/tmpfs is not writable
- name: mnt
mountPath: /mnt-rro
readOnly: true
mountPropagation: None
recursiveReadOnly: Enabled
# /mnt-ro/tmpfs is writable
- name: mnt
mountPath: /mnt-ro
readOnly: true
# /mnt-rw/tmpfs is writable
- name: mnt
mountPath: /mnt-rw
When this property is recognized by kubelet and kube-apiserver,
the .status.containerStatuses[*].volumeMounts[*].recursiveReadOnly field is set to either
Enabled or Disabled.
Implementations
Note: This section links to third party projects that provide functionality required by Kubernetes. The Kubernetes project authors aren't responsible for these projects, which are listed alphabetically. To add a project to this list, read the content guide before submitting a change. More information.
The following container runtimes are known to support recursive read-only mounts.
CRI-level:
- containerd, since v2.0
- CRI-O, since v1.30
OCI-level:
What's next
Follow an example of deploying WordPress and MySQL with Persistent Volumes.
6.2 - Persistent Volumes
This document describes persistent volumes in Kubernetes. Familiarity with volumes, StorageClasses and VolumeAttributesClasses is suggested.
Introduction
Managing storage is a distinct problem from managing compute instances. The PersistentVolume subsystem provides an API for users and administrators that abstracts details of how storage is provided from how it is consumed. To do this, we introduce two new API resources: PersistentVolume and PersistentVolumeClaim.
A PersistentVolume (PV) is a piece of storage in the cluster that has been provisioned by an administrator or dynamically provisioned using Storage Classes. It is a resource in the cluster just like a node is a cluster resource. PVs are volume plugins like Volumes, but have a lifecycle independent of any individual Pod that uses the PV. This API object captures the details of the implementation of the storage, be that NFS, iSCSI, or a cloud-provider-specific storage system.
A PersistentVolumeClaim (PVC) is a request for storage by a user. It is similar to a Pod. Pods consume node resources and PVCs consume PV resources. Pods can request specific levels of resources (CPU and Memory). Claims can request specific size and access modes (e.g., they can be mounted ReadWriteOnce, ReadOnlyMany, ReadWriteMany, or ReadWriteOncePod, see AccessModes).
While PersistentVolumeClaims allow a user to consume abstract storage resources, it is common that users need PersistentVolumes with varying properties, such as performance, for different problems. Cluster administrators need to be able to offer a variety of PersistentVolumes that differ in more ways than size and access modes, without exposing users to the details of how those volumes are implemented. For these needs, there is the StorageClass resource.
See the detailed walkthrough with working examples.
Lifecycle of a volume and claim
PVs are resources in the cluster. PVCs are requests for those resources and also act as claim checks to the resource. The interaction between PVs and PVCs follows this lifecycle:
Provisioning
There are two ways PVs may be provisioned: statically or dynamically.
Static
A cluster administrator creates a number of PVs. They carry the details of the real storage, which is available for use by cluster users. They exist in the Kubernetes API and are available for consumption.
Dynamic
When none of the static PVs the administrator created match a user's PersistentVolumeClaim,
the cluster may try to dynamically provision a volume specially for the PVC.
This provisioning is based on StorageClasses: the PVC must request a
storage class and
the administrator must have created and configured that class for dynamic
provisioning to occur. Claims that request the class "" effectively disable
dynamic provisioning for themselves.
To enable dynamic storage provisioning based on storage class, the cluster administrator
needs to enable the DefaultStorageClass
admission controller
on the API server. This can be done, for example, by ensuring that DefaultStorageClass is
among the comma-delimited, ordered list of values for the --enable-admission-plugins flag of
the API server component. For more information on API server command-line flags,
check kube-apiserver documentation.
Binding
A user creates, or in the case of dynamic provisioning, has already created, a PersistentVolumeClaim with a specific amount of storage requested and with certain access modes. A control loop in the control plane watches for new PVCs, finds a matching PV (if possible), and binds them together. If a PV was dynamically provisioned for a new PVC, the loop will always bind that PV to the PVC. Otherwise, the user will always get at least what they asked for, but the volume may be in excess of what was requested. Once bound, PersistentVolumeClaim binds are exclusive, regardless of how they were bound. A PVC to PV binding is a one-to-one mapping, using a ClaimRef which is a bi-directional binding between the PersistentVolume and the PersistentVolumeClaim.
Claims will remain unbound indefinitely if a matching volume does not exist. Claims will be bound as matching volumes become available. For example, a cluster provisioned with many 50Gi PVs would not match a PVC requesting 100Gi. The PVC can be bound when a 100Gi PV is added to the cluster.
Using
Pods use claims as volumes. The cluster inspects the claim to find the bound volume and mounts that volume for a Pod. For volumes that support multiple access modes, the user specifies which mode is desired when using their claim as a volume in a Pod.
Once a user has a claim and that claim is bound, the bound PV belongs to the
user for as long as they need it. Users schedule Pods and access their claimed
PVs by including a persistentVolumeClaim section in a Pod's volumes block.
See Claims As Volumes for more details on this.
Storage Object in Use Protection
The purpose of the Storage Object in Use Protection feature is to ensure that PersistentVolumeClaims (PVCs) in active use by a Pod and PersistentVolume (PVs) that are bound to PVCs are not removed from the system, as this may result in data loss.
Note:
PVC is in active use by a Pod when a Pod object exists that is using the PVC.If a user deletes a PVC in active use by a Pod, the PVC is not removed immediately. PVC removal is postponed until the PVC is no longer actively used by any Pods. Also, if an admin deletes a PV that is bound to a PVC, the PV is not removed immediately. PV removal is postponed until the PV is no longer bound to a PVC.
You can see that a PVC is protected when the PVC's status is Terminating and the
Finalizers list includes kubernetes.io/pvc-protection:
kubectl describe pvc hostpath
Name: hostpath
Namespace: default
StorageClass: example-hostpath
Status: Terminating
Volume:
Labels: <none>
Annotations: volume.beta.kubernetes.io/storage-class=example-hostpath
volume.beta.kubernetes.io/storage-provisioner=example.com/hostpath
Finalizers: [kubernetes.io/pvc-protection]
...
You can see that a PV is protected when the PV's status is Terminating and
the Finalizers list includes kubernetes.io/pv-protection too:
kubectl describe pv task-pv-volume
Name: task-pv-volume
Labels: type=local
Annotations: <none>
Finalizers: [kubernetes.io/pv-protection]
StorageClass: standard
Status: Terminating
Claim:
Reclaim Policy: Delete
Access Modes: RWO
Capacity: 1Gi
Message:
Source:
Type: HostPath (bare host directory volume)
Path: /tmp/data
HostPathType:
Events: <none>
Reclaiming
When a user is done with their volume, they can delete the PVC objects from the API that allows reclamation of the resource. The reclaim policy for a PersistentVolume tells the cluster what to do with the volume after it has been released of its claim. Currently, volumes can either be Retained, Recycled, or Deleted.
Retain
The Retain reclaim policy allows for manual reclamation of the resource.
When the PersistentVolumeClaim is deleted, the PersistentVolume still exists
and the volume is considered "released". But it is not yet available for
another claim because the previous claimant's data remains on the volume.
An administrator can manually reclaim the volume with the following steps.
- Delete the PersistentVolume. The associated storage asset in external infrastructure still exists after the PV is deleted.
- Manually clean up the data on the associated storage asset accordingly.
- Manually delete the associated storage asset.
If you want to reuse the same storage asset, create a new PersistentVolume with the same storage asset definition.
Delete
For volume plugins that support the Delete reclaim policy, deletion removes
both the PersistentVolume object from Kubernetes, as well as the associated
storage asset in the external infrastructure. Volumes that were dynamically provisioned
inherit the reclaim policy of their StorageClass, which
defaults to Delete. The administrator should configure the StorageClass
according to users' expectations; otherwise, the PV must be edited or
patched after it is created. See
Change the Reclaim Policy of a PersistentVolume.
Recycle
Warning:
TheRecycle reclaim policy is deprecated. Instead, the recommended approach
is to use dynamic provisioning.If supported by the underlying volume plugin, the Recycle reclaim policy performs
a basic scrub (rm -rf /thevolume/*) on the volume and makes it available again for a new claim.
However, an administrator can configure a custom recycler Pod template using
the Kubernetes controller manager command line arguments as described in the
reference.
The custom recycler Pod template must contain a volumes specification, as
shown in the example below:
apiVersion: v1
kind: Pod
metadata:
name: pv-recycler
namespace: default
spec:
restartPolicy: Never
volumes:
- name: vol
hostPath:
path: /any/path/it/will/be/replaced
containers:
- name: pv-recycler
image: "registry.k8s.io/busybox"
command: ["/bin/sh", "-c", "test -e /scrub && rm -rf /scrub/..?* /scrub/.[!.]* /scrub/* && test -z \"$(ls -A /scrub)\" || exit 1"]
volumeMounts:
- name: vol
mountPath: /scrub
However, the particular path specified in the custom recycler Pod template in the
volumes part is replaced with the particular path of the volume that is being recycled.
PersistentVolume deletion protection finalizer
FEATURE STATE:
Kubernetes v1.33 [stable](enabled by default)Finalizers can be added on a PersistentVolume to ensure that PersistentVolumes
having Delete reclaim policy are deleted only after the backing storage are deleted.
The finalizer external-provisioner.volume.kubernetes.io/finalizer(introduced
in v1.31) is added to both dynamically provisioned and statically provisioned
CSI volumes.
The finalizer kubernetes.io/pv-controller(introduced in v1.31) is added to
dynamically provisioned in-tree plugin volumes and skipped for statically
provisioned in-tree plugin volumes.
The following is an example of dynamically provisioned in-tree plugin volume:
kubectl describe pv pvc-74a498d6-3929-47e8-8c02-078c1ece4d78
Name: pvc-74a498d6-3929-47e8-8c02-078c1ece4d78
Labels: <none>
Annotations: kubernetes.io/createdby: vsphere-volume-dynamic-provisioner
pv.kubernetes.io/bound-by-controller: yes
pv.kubernetes.io/provisioned-by: kubernetes.io/vsphere-volume
Finalizers: [kubernetes.io/pv-protection kubernetes.io/pv-controller]
StorageClass: vcp-sc
Status: Bound
Claim: default/vcp-pvc-1
Reclaim Policy: Delete
Access Modes: RWO
VolumeMode: Filesystem
Capacity: 1Gi
Node Affinity: <none>
Message:
Source:
Type: vSphereVolume (a Persistent Disk resource in vSphere)
VolumePath: [vsanDatastore] d49c4a62-166f-ce12-c464-020077ba5d46/kubernetes-dynamic-pvc-74a498d6-3929-47e8-8c02-078c1ece4d78.vmdk
FSType: ext4
StoragePolicyName: vSAN Default Storage Policy
Events: <none>
The finalizer external-provisioner.volume.kubernetes.io/finalizer is added for CSI volumes.
The following is an example:
Name: pvc-2f0bab97-85a8-4552-8044-eb8be45cf48d
Labels: <none>
Annotations: pv.kubernetes.io/provisioned-by: csi.vsphere.vmware.com
Finalizers: [kubernetes.io/pv-protection external-provisioner.volume.kubernetes.io/finalizer]
StorageClass: fast
Status: Bound
Claim: demo-app/nginx-logs
Reclaim Policy: Delete
Access Modes: RWO
VolumeMode: Filesystem
Capacity: 200Mi
Node Affinity: <none>
Message:
Source:
Type: CSI (a Container Storage Interface (CSI) volume source)
Driver: csi.vsphere.vmware.com
FSType: ext4
VolumeHandle: 44830fa8-79b4-406b-8b58-621ba25353fd
ReadOnly: false
VolumeAttributes: storage.kubernetes.io/csiProvisionerIdentity=1648442357185-8081-csi.vsphere.vmware.com
type=vSphere CNS Block Volume
Events: <none>
When the CSIMigration{provider} feature flag is enabled for a specific in-tree volume plugin,
the kubernetes.io/pv-controller finalizer is replaced by the
external-provisioner.volume.kubernetes.io/finalizer finalizer.
The finalizers ensure that the PV object is removed only after the volume is deleted
from the storage backend provided the reclaim policy of the PV is Delete. This
also ensures that the volume is deleted from storage backend irrespective of the
order of deletion of PV and PVC.
Reserving a PersistentVolume
The control plane can bind PersistentVolumeClaims to matching PersistentVolumes in the cluster. However, if you want a PVC to bind to a specific PV, you need to pre-bind them.
By specifying a PersistentVolume in a PersistentVolumeClaim, you declare a binding
between that specific PV and PVC. If the PersistentVolume exists and has not reserved
PersistentVolumeClaims through its claimRef field, then the PersistentVolume and
PersistentVolumeClaim will be bound.
The binding happens regardless of some volume matching criteria, including node affinity. The control plane still checks that storage class, access modes, and requested storage size are valid.
apiVersion: v1
kind: PersistentVolumeClaim
metadata:
name: foo-pvc
namespace: foo
spec:
storageClassName: "" # Empty string must be explicitly set otherwise default StorageClass will be set
volumeName: foo-pv
...
This method does not guarantee any binding privileges to the PersistentVolume.
If other PersistentVolumeClaims could use the PV that you specify, you first
need to reserve that storage volume. Specify the relevant PersistentVolumeClaim
in the claimRef field of the PV so that other PVCs can not bind to it.
apiVersion: v1
kind: PersistentVolume
metadata:
name: foo-pv
spec:
storageClassName: ""
claimRef:
name: foo-pvc
namespace: foo
...
This is useful if you want to consume PersistentVolumes that have their persistentVolumeReclaimPolicy set
to Retain, including cases where you are reusing an existing PV.
Expanding Persistent Volumes Claims
FEATURE STATE:
Kubernetes v1.24 [stable]Support for expanding PersistentVolumeClaims (PVCs) is enabled by default. You can expand the following types of volumes:
- csi (including some CSI migrated volume types)
- flexVolume (deprecated)
- portworxVolume (deprecated)
You can only expand a PVC if its storage class's allowVolumeExpansion field is set to true.
apiVersion: storage.k8s.io/v1
kind: StorageClass
metadata:
name: example-vol-default
provisioner: vendor-name.example/magicstorage
parameters:
resturl: "http://192.168.10.100:8080"
restuser: ""
secretNamespace: ""
secretName: ""
allowVolumeExpansion: true
To request a larger volume for a PVC, edit the PVC object and specify a larger size. This triggers expansion of the volume that backs the underlying PersistentVolume. A new PersistentVolume is never created to satisfy the claim. Instead, an existing volume is resized.
Warning:
Directly editing the size of a PersistentVolume can prevent an automatic resize of that volume. If you edit the capacity of a PersistentVolume, and then edit the.spec of a matching
PersistentVolumeClaim to make the size of the PersistentVolumeClaim match the PersistentVolume,
then no storage resize happens.
The Kubernetes control plane will see that the desired state of both resources matches,
conclude that the backing volume size has been manually
increased and that no resize is necessary.CSI Volume expansion
FEATURE STATE:
Kubernetes v1.24 [stable]Support for expanding CSI volumes is enabled by default but it also requires a specific CSI driver to support volume expansion. Refer to documentation of the specific CSI driver for more information.
Resizing a volume containing a file system
You can only resize volumes containing a file system if the file system is XFS, Ext3, or Ext4.
When a volume contains a file system, the file system is only resized when a new Pod is using
the PersistentVolumeClaim in ReadWrite mode. File system expansion is either done when a Pod is starting up
or when a Pod is running and the underlying file system supports online expansion.
FlexVolumes (deprecated since Kubernetes v1.23) allow resize if the driver is configured with the
RequiresFSResize capability to true. The FlexVolume can be resized on Pod restart.
Resizing an in-use PersistentVolumeClaim
FEATURE STATE:
Kubernetes v1.24 [stable]In this case, you don't need to delete and recreate a Pod or deployment that is using an existing PVC. Any in-use PVC automatically becomes available to its Pod as soon as its file system has been expanded. This feature has no effect on PVCs that are not in use by a Pod or deployment. You must create a Pod that uses the PVC before the expansion can complete.
Similar to other volume types - FlexVolume volumes can also be expanded when in-use by a Pod.
Note:
FlexVolume resize is possible only when the underlying driver supports resize.Recovering from Failure when Expanding Volumes
If a user specifies a new size that is too big to be satisfied by underlying storage system, expansion of PVC will be continuously retried until user or cluster administrator takes some action. This can be undesirable and hence Kubernetes provides following methods of recovering from such failures.
If expanding underlying storage fails, the cluster administrator can manually recover the Persistent Volume Claim (PVC) state and cancel the resize requests. Otherwise, the resize requests are continuously retried by the controller without administrator intervention.
- Mark the PersistentVolume(PV) that is bound to the PersistentVolumeClaim(PVC)
with
Retainreclaim policy. - Delete the PVC. Since PV has
Retainreclaim policy - we will not lose any data when we recreate the PVC. - Delete the
claimRefentry from PV specs, so as new PVC can bind to it. This should make the PVAvailable. - Re-create the PVC with smaller size than PV and set
volumeNamefield of the PVC to the name of the PV. This should bind new PVC to existing PV. - Don't forget to restore the reclaim policy of the PV.
If expansion has failed for a PVC, you can retry expansion with a
smaller size than the previously requested value. To request a new expansion attempt with a
smaller proposed size, edit .spec.resources for that PVC and choose a value that is less than the
value you previously tried.
This is useful if expansion to a higher value did not succeed because of capacity constraint.
If that has happened, or you suspect that it might have, you can retry expansion by specifying a
size that is within the capacity limits of underlying storage provider. You can monitor status of
resize operation by watching .status.allocatedResourceStatuses and events on the PVC.
Note that,
although you can specify a lower amount of storage than what was requested previously,
the new value must still be higher than .status.capacity.
Kubernetes does not support shrinking a PVC to less than its current size.
Types of Persistent Volumes
PersistentVolume types are implemented as plugins. Kubernetes currently supports the following plugins:
csi- Container Storage Interface (CSI)fc- Fibre Channel (FC) storagehostPath- HostPath volume (for single node testing only; WILL NOT WORK in a multi-node cluster; consider usinglocalvolume instead)iscsi- iSCSI (SCSI over IP) storagelocal- local storage devices mounted on nodes.nfs- Network File System (NFS) storage
The following types of PersistentVolume are deprecated but still available.
If you are using these volume types except for flexVolume, cephfs and rbd,
please install corresponding CSI drivers.
awsElasticBlockStore- AWS Elastic Block Store (EBS) (migration on by default starting v1.23)azureDisk- Azure Disk (migration on by default starting v1.23)azureFile- Azure File (migration on by default starting v1.24)cinder- Cinder (OpenStack block storage) (migration on by default starting v1.21)flexVolume- FlexVolume (deprecated starting v1.23, no migration plan and no plan to remove support)gcePersistentDisk- GCE Persistent Disk (migration on by default starting v1.23)portworxVolume- Portworx volume (migration on by default starting v1.31)vsphereVolume- vSphere VMDK volume (migration on by default starting v1.25)
Older versions of Kubernetes also supported the following in-tree PersistentVolume types:
cephfs(not available starting v1.31)flocker- Flocker storage. (not available starting v1.25)glusterfs- GlusterFS storage. (not available starting v1.26)photonPersistentDisk- Photon controller persistent disk. (not available starting v1.15)quobyte- Quobyte volume. (not available starting v1.25)rbd- Rados Block Device (RBD) volume (not available starting v1.31)scaleIO- ScaleIO volume. (not available starting v1.21)storageos- StorageOS volume. (not available starting v1.25)
Persistent Volumes
Each PV contains a spec and status, which is the specification and status of the volume. The name of a PersistentVolume object must be a valid DNS subdomain name.
apiVersion: v1
kind: PersistentVolume
metadata:
name: pv0003
spec:
capacity:
storage: 5Gi
volumeMode: Filesystem
accessModes:
- ReadWriteOnce
persistentVolumeReclaimPolicy: Recycle
storageClassName: slow
mountOptions:
- hard
- nfsvers=4.1
nfs:
path: /tmp
server: 172.17.0.2
Note:
Helper programs relating to the volume type may be required for consumption of a PersistentVolume within a cluster. In this example, the PersistentVolume is of type NFS and the helper program /sbin/mount.nfs is required to support the mounting of NFS filesystems.Capacity
Generally, a PV will have a specific storage capacity. This is set using the PV's
capacity attribute which is a Quantity value.
Currently, storage size is the only resource that can be set or requested. Future attributes may include IOPS, throughput, etc.
Volume Mode
FEATURE STATE:
Kubernetes v1.18 [stable]Kubernetes supports two volumeModes of PersistentVolumes: Filesystem and Block.
volumeMode is an optional API parameter.
Filesystem is the default mode used when volumeMode parameter is omitted.
A volume with volumeMode: Filesystem is mounted into Pods into a directory. If the volume
is backed by a block device and the device is empty, Kubernetes creates a filesystem
on the device before mounting it for the first time.
You can set the value of volumeMode to Block to use a volume as a raw block device.
Such volume is presented into a Pod as a block device, without any filesystem on it.
This mode is useful to provide a Pod the fastest possible way to access a volume, without
any filesystem layer between the Pod and the volume. On the other hand, the application
running in the Pod must know how to handle a raw block device.
See Raw Block Volume Support
for an example on how to use a volume with volumeMode: Block in a Pod.
Access Modes
A PersistentVolume can be mounted on a host in any way supported by the resource provider. As shown in the table below, providers will have different capabilities and each PV's access modes are set to the specific modes supported by that particular volume. For example, NFS can support multiple read/write clients, but a specific NFS PV might be exported on the server as read-only. Each PV gets its own set of access modes describing that specific PV's capabilities.
The access modes are:
ReadWriteOnce- the volume can be mounted as read-write by a single node. ReadWriteOnce access mode still can allow multiple pods to access (read from or write to) that volume when the pods are running on the same node. For single pod access, please see ReadWriteOncePod.
ReadOnlyMany- the volume can be mounted as read-only by many nodes.
ReadWriteMany- the volume can be mounted as read-write by many nodes.
ReadWriteOncePod- FEATURE STATE:the volume can be mounted as read-write by a single Pod. Use ReadWriteOncePod access mode if you want to ensure that only one pod across the whole cluster can read that PVC or write to it.
Kubernetes v1.29 [stable]
Note:
The ReadWriteOncePod access mode is only supported for
CSI volumes and Kubernetes version
1.22+. To use this feature you will need to update the following
CSI sidecars
to these versions or greater:
In the CLI, the access modes are abbreviated to:
- RWO - ReadWriteOnce
- ROX - ReadOnlyMany
- RWX - ReadWriteMany
- RWOP - ReadWriteOncePod
Note:
Kubernetes uses volume access modes to match PersistentVolumeClaims and PersistentVolumes. In some cases, the volume access modes also constrain where the PersistentVolume can be mounted. Volume access modes do not enforce write protection once the storage has been mounted. Even if the access modes are specified as ReadWriteOnce, ReadOnlyMany, or ReadWriteMany, they don't set any constraints on the volume. For example, even if a PersistentVolume is created as ReadOnlyMany, it is no guarantee that it will be read-only. If the access modes are specified as ReadWriteOncePod, the volume is constrained and can be mounted on only a single Pod.Important! A volume can only be mounted using one access mode at a time, even if it supports many.
| Volume Plugin | ReadWriteOnce | ReadOnlyMany | ReadWriteMany | ReadWriteOncePod |
|---|---|---|---|---|
| AzureFile | ✓ | ✓ | ✓ | - |
| CephFS | ✓ | ✓ | ✓ | - |
| CSI | depends on the driver | depends on the driver | depends on the driver | depends on the driver |
| FC | ✓ | ✓ | - | - |
| FlexVolume | ✓ | ✓ | depends on the driver | - |
| HostPath | ✓ | - | - | - |
| iSCSI | ✓ | ✓ | - | - |
| NFS | ✓ | ✓ | ✓ | - |
| RBD | ✓ | ✓ | - | - |
| VsphereVolume | ✓ | - | - (works when Pods are collocated) | - |
| PortworxVolume | ✓ | - | ✓ | - |
Class
A PV can have a class, which is specified by setting the
storageClassName attribute to the name of a
StorageClass.
A PV of a particular class can only be bound to PVCs requesting
that class. A PV with no storageClassName has no class and can only be bound
to PVCs that request no particular class.
In the past, the annotation volume.beta.kubernetes.io/storage-class was used instead
of the storageClassName attribute. This annotation is still working; however,
it will become fully deprecated in a future Kubernetes release.
Reclaim Policy
Current reclaim policies are:
- Retain -- manual reclamation
- Recycle -- basic scrub (
rm -rf /thevolume/*) - Delete -- delete the volume
For Kubernetes 1.36, only nfs and hostPath volume types support recycling.
Mount Options
A Kubernetes administrator can specify additional mount options for when a Persistent Volume is mounted on a node.
Note:
Not all Persistent Volume types support mount options.The following volume types support mount options:
csi(including CSI migrated volume types)iscsinfs
Mount options are not validated. If a mount option is invalid, the mount fails.
In the past, the annotation volume.beta.kubernetes.io/mount-options was used instead
of the mountOptions attribute. This annotation is still working; however,
it will become fully deprecated in a future Kubernetes release.
Node Affinity
Note:
For most volume types, you do not need to set this field. You need to explicitly set this for local volumes.A PV can specify node affinity to define constraints that limit what nodes this
volume can be accessed from. Pods that use a PV will only be scheduled to nodes
that are selected by the node affinity. To specify node affinity, set
nodeAffinity in the .spec of a PV. The
PersistentVolume
API reference has more details on this field.
Updates to node affinity
FEATURE STATE:
Kubernetes v1.35 [alpha](disabled by default)If the MutablePVNodeAffinity feature gate is enabled in your cluster,
the .spec.nodeAffinity field of a PersistentVolume is mutable.
This allows cluster administrators or external storage controller to update the node affinity of a PersistentVolume when the data is migrated,
without interrupting the running pods.
When updating the node affinity, you should ensure that the new node affinity still matches the nodes where the volume is currently in use. For the pods violating the new affinity, if the pod is already running, it may continue to run. But Kubernetes does not support this configuration. You should terminate the violating pods soon. Due to in memory caching, the pods created after the update may still be scheduled according to the old node affinity for a short period of time.
To use this feature, you should enable the MutablePVNodeAffinity feature gate on the following components:
kube-apiserverkubelet
Phase
A PersistentVolume will be in one of the following phases:
Available- a free resource that is not yet bound to a claim
Bound- the volume is bound to a claim
Released- the claim has been deleted, but the associated storage resource is not yet reclaimed by the cluster
Failed- the volume has failed its (automated) reclamation
You can see the name of the PVC bound to the PV using kubectl describe persistentvolume <name>.
Phase transition timestamp
FEATURE STATE:
Kubernetes v1.31 [stable](enabled by default)The .status field for a PersistentVolume can include an alpha lastPhaseTransitionTime field. This field records
the timestamp of when the volume last transitioned its phase. For newly created
volumes the phase is set to Pending and lastPhaseTransitionTime is set to
the current time.
PersistentVolumeClaims
Each PVC contains a spec and status, which is the specification and status of the claim. The name of a PersistentVolumeClaim object must be a valid DNS subdomain name.
apiVersion: v1
kind: PersistentVolumeClaim
metadata:
name: myclaim
spec:
accessModes:
- ReadWriteOnce
volumeMode: Filesystem
resources:
requests:
storage: 8Gi
storageClassName: slow
selector:
matchLabels:
release: "stable"
matchExpressions:
- {key: environment, operator: In, values: [dev]}
Access Modes
Claims use the same conventions as volumes when requesting storage with specific access modes.
Volume Modes
Claims use the same convention as volumes to indicate the consumption of the volume as either a filesystem or block device.
Volume Name
Claims can use the volumeName field to explicitly bind to a specific PersistentVolume. You can also leave
volumeName unset, indicating that you'd like Kubernetes to set up a new PersistentVolume
that matches the claim.
If the specified PV is already bound to another PVC, the binding will be stuck
in a pending state.
Resources
Claims, like Pods, can request specific quantities of a resource. In this case, the request is for storage. The same resource model applies to both volumes and claims.
Note:
ForFilesystem volumes, the storage request refers to the "outer" volume size
(i.e. the allocated size from the storage backend).
This means that the writeable size may be slightly lower for providers that
build a filesystem on top of a block device, due to filesystem overhead.
This is especially visible with XFS, where many metadata features are enabled by default.Selector
Claims can specify a label selector to further filter the set of volumes. Only the volumes whose labels match the selector can be bound to the claim. The selector can consist of two fields:
matchLabels- the volume must have a label with this valuematchExpressions- a list of requirements made by specifying key, list of values, and operator that relates the key and values. Valid operators includeIn,NotIn,Exists, andDoesNotExist.
All of the requirements, from both matchLabels and matchExpressions, are
ANDed together – they must all be satisfied in order to match.
Class
A claim can request a particular class by specifying the name of a
StorageClass
using the attribute storageClassName.
Only PVs of the requested class, ones with the same storageClassName as the PVC,
can be bound to the PVC.
PVCs don't necessarily have to request a class. A PVC with its storageClassName set
equal to "" is always interpreted to be requesting a PV with no class, so it
can only be bound to PVs with no class (no annotation or one set equal to "").
A PVC with no storageClassName is not quite the same and is treated differently
by the cluster, depending on whether the
DefaultStorageClass admission plugin
is turned on.
- If the admission plugin is turned on, the administrator may specify a default StorageClass.
All PVCs that have no
storageClassNamecan be bound only to PVs of that default. Specifying a default StorageClass is done by setting the annotationstorageclass.kubernetes.io/is-default-classequal totruein a StorageClass object. If the administrator does not specify a default, the cluster responds to PVC creation as if the admission plugin were turned off. If more than one default StorageClass is specified, the newest default is used when the PVC is dynamically provisioned. - If the admission plugin is turned off, there is no notion of a default StorageClass.
All PVCs that have
storageClassNameset to""can be bound only to PVs that havestorageClassNamealso set to"". However, PVCs with missingstorageClassNamecan be updated later once default StorageClass becomes available. If the PVC gets updated it will no longer bind to PVs that havestorageClassNamealso set to"".
See retroactive default StorageClass assignment for more details.
Depending on installation method, a default StorageClass may be deployed to a Kubernetes cluster by addon manager during installation.
When a PVC specifies a selector in addition to requesting a StorageClass,
the requirements are ANDed together: only a PV of the requested class and with
the requested labels may be bound to the PVC.
Note:
Currently, a PVC with a non-emptyselector can't have a PV dynamically provisioned for it.In the past, the annotation volume.beta.kubernetes.io/storage-class was used instead
of storageClassName attribute. This annotation is still working; however,
it won't be supported in a future Kubernetes release.
Retroactive default StorageClass assignment
FEATURE STATE:
Kubernetes v1.28 [stable]You can create a PersistentVolumeClaim without specifying a storageClassName
for the new PVC, and you can do so even when no default StorageClass exists
in your cluster. In this case, the new PVC creates as you defined it, and the
storageClassName of that PVC remains unset until default becomes available.
When a default StorageClass becomes available, the control plane identifies any
existing PVCs without storageClassName. For the PVCs that either have an empty
value for storageClassName or do not have this key, the control plane then
updates those PVCs to set storageClassName to match the new default StorageClass.
If you have an existing PVC where the storageClassName is "", and you configure
a default StorageClass, then this PVC will not get updated.
In order to keep binding to PVs with storageClassName set to ""
(while a default StorageClass is present), you need to set the storageClassName
of the associated PVC to "".
This behavior helps administrators change default StorageClass by removing the
old one first and then creating or setting another one. This brief window while
there is no default causes PVCs without storageClassName created at that time
to not have any default, but due to the retroactive default StorageClass
assignment this way of changing defaults is safe.
Unused PVC tracking
FEATURE STATE:
Kubernetes v1.36 [alpha](disabled by default)When enabled, the PVC protection controller adds an Unused
condition to each
PersistentVolumeClaim to indicate whether it is currently referenced by any
non-terminal Pod.
The condition has two states:
Unusedwith status"True"(reasonNoPodsUsingPVC)- No non-terminal Pod references this PVC. The
lastTransitionTimerecords when the PVC became unused. Unusedwith status"False"(reasonPodUsingPVC)- At least one non-terminal Pod currently references this PVC. The
lastTransitionTimerecords when the PVC started being used.
A Pod is considered non-terminal if its phase is not Succeeded or Failed.
This means that a Pending Pod (even one that has not yet been scheduled) counts
as using the PVC.
The lastTransitionTime of the Unused condition can be used by cluster
administrators, monitoring tools, and external controllers to identify PVCs that
have been unused for a long time. For example, to find all PVCs that have been
unused for more than 30 days, you could query for PVCs where the Unused
condition has status: "True" and lastTransitionTime is older than 30 days.
Note:
The unused duration indicated by this condition may be shorter than the actual unused time because of processing delays in the controller or because the feature was enabled after the PVC was already unused. The condition is not updated when a PVC hasdeletionTimestamp set (that is, PVCs that are being deleted).Claims As Volumes
Pods access storage by using the claim as a volume. Claims must exist in the same namespace as the Pod using the claim. The cluster finds the claim in the Pod's namespace and uses it to get the PersistentVolume backing the claim. The volume is then mounted to the host and into the Pod.
apiVersion: v1
kind: Pod
metadata:
name: mypod
spec:
containers:
- name: myfrontend
image: nginx
volumeMounts:
- mountPath: "/var/www/html"
name: mypd
volumes:
- name: mypd
persistentVolumeClaim:
claimName: myclaim
A Note on Namespaces
PersistentVolumes binds are exclusive, and since PersistentVolumeClaims are
namespaced objects, mounting claims with "Many" modes (ROX, RWX) is only
possible within one namespace.
PersistentVolumes typed hostPath
A hostPath PersistentVolume uses a file or directory on the Node to emulate
network-attached storage. See
an example of hostPath typed volume.
Raw Block Volume Support
FEATURE STATE:
Kubernetes v1.18 [stable]The following volume plugins support raw block volumes, including dynamic provisioning where applicable:
- CSI (including some CSI migrated volume types)
- FC (Fibre Channel)
- iSCSI
- Local volume
PersistentVolume using a Raw Block Volume
apiVersion: v1
kind: PersistentVolume
metadata:
name: block-pv
spec:
capacity:
storage: 10Gi
accessModes:
- ReadWriteOnce
volumeMode: Block
persistentVolumeReclaimPolicy: Retain
fc:
targetWWNs: ["50060e801049cfd1"]
lun: 0
readOnly: false
PersistentVolumeClaim requesting a Raw Block Volume
apiVersion: v1
kind: PersistentVolumeClaim
metadata:
name: block-pvc
spec:
accessModes:
- ReadWriteOnce
volumeMode: Block
resources:
requests:
storage: 10Gi
Pod specification adding Raw Block Device path in container
apiVersion: v1
kind: Pod
metadata:
name: pod-with-block-volume
spec:
containers:
- name: fc-container
image: fedora:26
command: ["/bin/sh", "-c"]
args: [ "tail -f /dev/null" ]
volumeDevices:
- name: data
devicePath: /dev/xvda
volumes:
- name: data
persistentVolumeClaim:
claimName: block-pvc
Note:
When adding a raw block device for a Pod, you specify the device path in the container instead of a mount path.Binding Block Volumes
If a user requests a raw block volume by indicating this using the volumeMode
field in the PersistentVolumeClaim spec, the binding rules differ slightly from
previous releases that didn't consider this mode as part of the spec.
Listed is a table of possible combinations the user and admin might specify for
requesting a raw block device. The table indicates if the volume will be bound or
not given the combinations: Volume binding matrix for statically provisioned volumes:
| PV volumeMode | PVC volumeMode | Result |
|---|---|---|
| unspecified | unspecified | BIND |
| unspecified | Block | NO BIND |
| unspecified | Filesystem | BIND |
| Block | unspecified | NO BIND |
| Block | Block | BIND |
| Block | Filesystem | NO BIND |
| Filesystem | Filesystem | BIND |
| Filesystem | Block | NO BIND |
| Filesystem | unspecified | BIND |
Note:
Only statically provisioned volumes are supported for alpha release. Administrators should take care to consider these values when working with raw block devices.Volume Snapshot and Restore Volume from Snapshot Support
FEATURE STATE:
Kubernetes v1.20 [stable]Volume snapshots only support the out-of-tree CSI volume plugins. For details, see Volume Snapshots. In-tree volume plugins are deprecated. You can read about the deprecated volume plugins in the Volume Plugin FAQ.
Create a PersistentVolumeClaim from a Volume Snapshot
apiVersion: v1
kind: PersistentVolumeClaim
metadata:
name: restore-pvc
spec:
storageClassName: csi-hostpath-sc
dataSource:
name: new-snapshot-test
kind: VolumeSnapshot
apiGroup: snapshot.storage.k8s.io
accessModes:
- ReadWriteOnce
resources:
requests:
storage: 10Gi
Volume Cloning
Volume Cloning only available for CSI volume plugins.
Create PersistentVolumeClaim from an existing PVC
apiVersion: v1
kind: PersistentVolumeClaim
metadata:
name: cloned-pvc
spec:
storageClassName: my-csi-plugin
dataSource:
name: existing-src-pvc-name
kind: PersistentVolumeClaim
accessModes:
- ReadWriteOnce
resources:
requests:
storage: 10Gi
Volume populators and data sources
Volume cloning and
snapshot restore pre-populate
a new volume from a built-in data source. Volume populators extend this mechanism so that
a PersistentVolumeClaim can be pre-populated from other kinds of source (a custom resource),
referenced through its dataSourceRef field:
apiVersion: v1
kind: PersistentVolumeClaim
metadata:
name: populated-pvc
spec:
dataSourceRef:
name: example-name
kind: ExampleDataSource
apiGroup: example.storage.k8s.io
accessModes:
- ReadWriteOnce
resources:
requests:
storage: 10Gi
For details, including cross-namespace data sources, see Volume Populators and Data Sources.
Writing Portable Configuration
If you're writing configuration templates or examples that run on a wide range of clusters and need persistent storage, it is recommended that you use the following pattern:
- Include PersistentVolumeClaim objects in your bundle of config (alongside Deployments, ConfigMaps, etc).
- Do not include PersistentVolume objects in the config, since the user instantiating the config may not have permission to create PersistentVolumes.
- Give the user the option of providing a storage class name when instantiating
the template.
- If the user provides a storage class name, put that value into the
persistentVolumeClaim.storageClassNamefield. This will cause the PVC to match the right storage class if the cluster has StorageClasses enabled by the admin. - If the user does not provide a storage class name, leave the
persistentVolumeClaim.storageClassNamefield as nil. This will cause a PV to be automatically provisioned for the user with the default StorageClass in the cluster. Many cluster environments have a default StorageClass installed, or administrators can create their own default StorageClass.
- If the user provides a storage class name, put that value into the
- In your tooling, watch for PVCs that are not getting bound after some time and surface this to the user, as this may indicate that the cluster has no dynamic storage support (in which case the user should create a matching PV) or the cluster has no storage system (in which case the user cannot deploy config requiring PVCs).
What's next
- Learn more about Creating a PersistentVolume.
- Learn more about Creating a PersistentVolumeClaim.
- Read the Persistent Storage design document.
API references
Read about the APIs described in this page:
6.3 - Projected Volumes
This document describes projected volumes in Kubernetes. Familiarity with volumes is suggested.
Introduction
A projected volume maps several existing volume sources into the same directory.
Currently, the following types of volume sources can be projected:
All sources are required to be in the same namespace as the Pod. For more details, see the all-in-one volume design document.
Example configuration with a secret, a downwardAPI, and a configMap
apiVersion: v1
kind: Pod
metadata:
name: volume-test
spec:
containers:
- name: container-test
image: busybox:1.28
command: ["sleep", "3600"]
volumeMounts:
- name: all-in-one
mountPath: "/projected-volume"
readOnly: true
volumes:
- name: all-in-one
projected:
sources:
- secret:
name: mysecret
items:
- key: username
path: my-group/my-username
- downwardAPI:
items:
- path: "labels"
fieldRef:
fieldPath: metadata.labels
- path: "cpu_limit"
resourceFieldRef:
containerName: container-test
resource: limits.cpu
- configMap:
name: myconfigmap
items:
- key: config
path: my-group/my-config
Example configuration: secrets with a non-default permission mode set
apiVersion: v1
kind: Pod
metadata:
name: volume-test
spec:
containers:
- name: container-test
image: busybox:1.28
command: ["sleep", "3600"]
volumeMounts:
- name: all-in-one
mountPath: "/projected-volume"
readOnly: true
volumes:
- name: all-in-one
projected:
sources:
- secret:
name: mysecret
items:
- key: username
path: my-group/my-username
- secret:
name: mysecret2
items:
- key: password
path: my-group/my-password
mode: 0777
Each projected volume source is listed in the spec under sources. The
parameters are nearly the same with two exceptions:
- For secrets, the
secretNamefield has been changed tonameto be consistent with ConfigMap naming. - The
defaultModecan only be specified at the projected level and not for each volume source. However, as illustrated above, you can explicitly set themodefor each individual projection.
serviceAccountToken projected volumes
You can inject the token for the current service account into a Pod at a specified path. For example:
apiVersion: v1
kind: Pod
metadata:
name: sa-token-test
spec:
containers:
- name: container-test
image: busybox:1.28
command: ["sleep", "3600"]
volumeMounts:
- name: token-vol
mountPath: "/service-account"
readOnly: true
serviceAccountName: default
volumes:
- name: token-vol
projected:
sources:
- serviceAccountToken:
audience: api
expirationSeconds: 3600
path: token
The example Pod has a projected volume containing the injected service account
token. Containers in this Pod can use that token to access the Kubernetes API
server, authenticating with the identity of the pod's ServiceAccount.
The audience field contains the intended audience of the
token. A recipient of the token must identify itself with an identifier specified
in the audience of the token, and otherwise should reject the token. This field
is optional and it defaults to the identifier of the API server.
The expirationSeconds is the expected duration of validity of the service account
token. It defaults to 1 hour and must be at least 10 minutes (600 seconds). An administrator
can also limit its maximum value by specifying the --service-account-max-token-expiration
option for the API server. The path field specifies a relative path to the mount point
of the projected volume.
Note:
A container using a projected volume source as asubPath
volume mount will not receive updates for those volume sources.clusterTrustBundle projected volumes
FEATURE STATE:
Kubernetes v1.33 [beta](disabled by default)Note:
To use this feature in Kubernetes 1.36, you must enable support for ClusterTrustBundle objects with theClusterTrustBundle feature gate and
--runtime-config=certificates.k8s.io/v1beta1/clustertrustbundles=true kube-apiserver flag,
then enable the ClusterTrustBundleProjection feature gate.The clusterTrustBundle projected volume source injects the contents of one or more
ClusterTrustBundle
objects as an automatically-updating file in the container filesystem.
ClusterTrustBundles can be selected either by name or by signer name.
To select by name, use the name field to designate a single ClusterTrustBundle object.
To select by signer name, use the signerName field (and optionally the
labelSelector field) to designate a set of ClusterTrustBundle objects that use
the given signer name. If labelSelector is not present, then all
ClusterTrustBundles for that signer are selected.
The kubelet deduplicates the certificates in the selected ClusterTrustBundle objects,
normalizes the PEM representations (discarding comments and headers), reorders the certificates,
and writes them into the file named by path.
As the set of selected ClusterTrustBundles or their content changes, kubelet keeps the file up-to-date.
By default, the kubelet will prevent the pod from starting if the named ClusterTrustBundle is not found,
or if signerName / labelSelector do not match any ClusterTrustBundles.
If this behavior is not what you want, then set the optional field to true,
and the pod will start up with an empty file at path.
apiVersion: v1
kind: Pod
metadata:
name: sa-ctb-name-test
spec:
containers:
- name: container-test
image: busybox
command: ["sleep", "3600"]
volumeMounts:
- name: token-vol
mountPath: "/root-certificates"
readOnly: true
serviceAccountName: default
volumes:
- name: token-vol
projected:
sources:
- clusterTrustBundle:
name: example
path: example-roots.pem
- clusterTrustBundle:
signerName: "example.com/mysigner"
labelSelector:
matchLabels:
version: live
path: mysigner-roots.pem
optional: true
podCertificate projected volumes
FEATURE STATE:
Kubernetes v1.35 [beta](disabled by default)Note:
In Kubernetes 1.36, you must enable support for Pod Certificates using thePodCertificateRequest feature gate
and the --runtime-config=certificates.k8s.io/v1beta1/podcertificaterequests=true
kube-apiserver flag.The podCertificate projected volumes source securely provisions a private key
and X.509 certificate chain for pod to use as client or server credentials.
Kubelet will then handle refreshing the private key and certificate chain when
they get close to expiration. The application just has to make sure that it
reloads the file promptly when it changes, with a mechanism like inotify or
polling.
Each podCertificate projection supports the following configuration fields:
signerName: The signer you want to issue the certificate. Note that signers may have their own access requirements, and may refuse to issue certificates to your pod.keyType: The type of private key that should be generated. Valid values areED25519,ECDSAP256,ECDSAP384,ECDSAP521,RSA3072, andRSA4096.maxExpirationSeconds: The maximum lifetime you will accept for the certificate issued to the pod. If not set, will be defaulted to86400(24 hours). Must be at least3600(1 hour), and at most7862400(91 days). Kubernetes built-in signers are restricted to a max lifetime of86400(1 day). The signer is allowed to issue a certificate with a lifetime shorter than what you've specified.credentialBundlePath: Relative path within the projection where the credential bundle should be written. The credential bundle is a PEM-formatted file, where the first block is a "PRIVATE KEY" block that contains a PKCS#8-serialized private key, and the remaining blocks are "CERTIFICATE" blocks that comprise the certificate chain (leaf certificate and any intermediates).keyPathandcertificateChainPath: Separate paths where Kubelet should write just the private key or certificate chain.userAnnotations: a map that allows you to pass additional information to the signer implementation. It is copied verbatim into thespec.unverifiedUserAnnotationsfield of the PodCertificateRequest objects that Kubelet creates. Entries are subject to the same validation as object metadata annotations, with the addition that all keys must be domain-prefixed. No restrictions are placed on values, except an overall size limitation on the entire field. Other than these basic validations, the API server does not conduct any extra validations. The signer implementations should be very careful when consuming this data. Signers must not inherently trust this data without first performing the appropriate verification steps. Signers should document the keys and values they support. Signers should deny requests that contain keys they do not recognize.
Note:
Most applications should prefer usingcredentialBundlePath unless they need
the key and certificates in separate files for compatibility reasons. Kubelet
uses an atomic writing strategy based on symlinks to make sure that when you
open the files it projects, you read either the old content or the new content.
However, if you read the key and certificate chain from separate files, Kubelet
may rotate the credentials after your first read and before your second read,
resulting in your application loading a mismatched key and certificate.# Sample Pod spec that uses a podCertificate projection to request an ED25519
# private key, a certificate from the `coolcert.example.com/foo` signer, and
# write the results to `/var/run/my-x509-credentials/credentialbundle.pem`.
apiVersion: v1
kind: Pod
metadata:
namespace: default
name: podcertificate-pod
spec:
serviceAccountName: default
containers:
- image: debian
name: main
command: ["sleep", "infinity"]
volumeMounts:
- name: my-x509-credentials
mountPath: /var/run/my-x509-credentials
volumes:
- name: my-x509-credentials
projected:
defaultMode: 0644
sources:
- podCertificate:
keyType: ED25519
signerName: coolcert.example.com/foo
credentialBundlePath: credentialbundle.pem
userAnnotations:
example.com/annotation1: "value1"
example.com/annotation2: "value2"
SecurityContext interactions
The proposal for file permission handling in projected service account volume enhancement introduced the projected files having the correct owner permissions set.
Linux
In Linux pods that have a projected volume and RunAsUser set in the Pod
SecurityContext,
the projected files have the correct ownership set including container user
ownership.
When all containers in a pod have the same runAsUser set in their
PodSecurityContext
or container
SecurityContext,
then the kubelet ensures that the contents of the serviceAccountToken volume are owned by that user,
and the token file has its permission mode set to 0600.
Note:
Ephemeral containers added to a Pod after it is created do not change volume permissions that were set when the pod was created.
If a Pod's serviceAccountToken volume permissions were set to 0600 because
all other containers in the Pod have the same runAsUser, ephemeral
containers must use the same runAsUser to be able to read the token.
Windows
In Windows pods that have a projected volume and RunAsUsername set in the
Pod SecurityContext, the ownership is not enforced due to the way user
accounts are managed in Windows. Windows stores and manages local user and group
accounts in a database file called Security Account Manager (SAM). Each
container maintains its own instance of the SAM database, to which the host has
no visibility into while the container is running. Windows containers are
designed to run the user mode portion of the OS in isolation from the host,
hence the maintenance of a virtual SAM database. As a result, the kubelet running
on the host does not have the ability to dynamically configure host file
ownership for virtualized container accounts. It is recommended that if files on
the host machine are to be shared with the container then they should be placed
into their own volume mount outside of C:\.
By default, the projected files will have the following ownership as shown for an example projected volume file:
PS C:\> Get-Acl C:\var\run\secrets\kubernetes.io\serviceaccount\..2021_08_31_22_22_18.318230061\ca.crt | Format-List
Path : Microsoft.PowerShell.Core\FileSystem::C:\var\run\secrets\kubernetes.io\serviceaccount\..2021_08_31_22_22_18.318230061\ca.crt
Owner : BUILTIN\Administrators
Group : NT AUTHORITY\SYSTEM
Access : NT AUTHORITY\SYSTEM Allow FullControl
BUILTIN\Administrators Allow FullControl
BUILTIN\Users Allow ReadAndExecute, Synchronize
Audit :
Sddl : O:BAG:SYD:AI(A;ID;FA;;;SY)(A;ID;FA;;;BA)(A;ID;0x1200a9;;;BU)
This implies all administrator users like ContainerAdministrator will have
read, write and execute access while, non-administrator users will have read and
execute access.
Note:
In general, granting the container access to the host is discouraged as it can open the door for potential security exploits.
Creating a Windows Pod with RunAsUser in it's SecurityContext will result in
the Pod being stuck at ContainerCreating forever. So it is advised to not use
the Linux only RunAsUser option with Windows Pods.
6.4 - Ephemeral Volumes
This document describes ephemeral volumes in Kubernetes. Familiarity with volumes is suggested, in particular PersistentVolumeClaim and PersistentVolume.
Some applications need additional storage but don't care whether that data is stored persistently across restarts. For example, caching services are often limited by memory size and can move infrequently used data into storage that is slower than memory with little impact on overall performance.
Other applications expect some read-only input data to be present in files, like configuration data or secret keys.
Ephemeral volumes are designed for these use cases. Because volumes follow the Pod's lifetime and get created and deleted along with the Pod, Pods can be stopped and restarted without being limited to where some persistent volume is available.
Ephemeral volumes are specified inline in the Pod spec, which simplifies application deployment and management.
Types of ephemeral volumes
Kubernetes supports several different kinds of ephemeral volumes for different purposes:
- emptyDir: empty at Pod startup, with storage coming locally from the kubelet base directory (usually the root disk) or RAM
- configMap, downwardAPI, secret: inject different kinds of Kubernetes data into a Pod
- image: allows mounting container image files or artifacts, directly to a Pod.
- CSI ephemeral volumes: similar to the previous volume kinds, but provided by special CSI drivers which specifically support this feature
- generic ephemeral volumes, which can be provided by all storage drivers that also support persistent volumes
emptyDir, configMap, downwardAPI, secret are provided as
local ephemeral storage.
They are managed by kubelet on each node.
CSI ephemeral volumes must be provided by third-party CSI storage drivers.
Generic ephemeral volumes can be provided by third-party CSI storage drivers, but also by any other storage driver that supports dynamic provisioning. Some CSI drivers are written specifically for CSI ephemeral volumes and do not support dynamic provisioning: those then cannot be used for generic ephemeral volumes.
The advantage of using third-party drivers is that they can offer functionality that Kubernetes itself does not support, for example storage with different performance characteristics than the disk that is managed by kubelet, or injecting different data.
CSI ephemeral volumes
FEATURE STATE:
Kubernetes v1.25 [stable]Note:
CSI ephemeral volumes are only supported by a subset of CSI drivers. The Kubernetes CSI Drivers list shows which drivers support ephemeral volumes.Conceptually, CSI ephemeral volumes are similar to configMap,
downwardAPI and secret volume types: the storage is managed locally on each
node and is created together with other local resources after a Pod has been
scheduled onto a node. Kubernetes has no concept of rescheduling Pods
anymore at this stage. Volume creation has to be unlikely to fail,
otherwise Pod startup gets stuck. In particular, storage capacity
aware Pod scheduling is not
supported for these volumes. They are currently also not covered by
the storage resource usage limits of a Pod, because that is something
that kubelet can only enforce for storage that it manages itself.
Here's an example manifest for a Pod that uses CSI ephemeral storage:
kind: Pod
apiVersion: v1
metadata:
name: my-csi-app
spec:
containers:
- name: my-frontend
image: busybox:1.28
volumeMounts:
- mountPath: "/data"
name: my-csi-inline-vol
command: [ "sleep", "1000000" ]
volumes:
- name: my-csi-inline-vol
csi:
driver: inline.storage.kubernetes.io
volumeAttributes:
foo: bar
The volumeAttributes determine what volume is prepared by the
driver. These attributes are specific to each driver and not
standardized. See the documentation of each CSI driver for further
instructions.
CSI driver restrictions
CSI ephemeral volumes allow users to provide volumeAttributes
directly to the CSI driver as part of the Pod spec. A CSI driver
allowing volumeAttributes that are typically restricted to
administrators is NOT suitable for use in an inline ephemeral volume.
For example, parameters that are normally defined in the StorageClass
should not be exposed to users through the use of inline ephemeral volumes.
Cluster administrators who need to restrict the CSI drivers that are allowed to be used as inline volumes within a Pod spec may do so by:
- Removing
EphemeralfromvolumeLifecycleModesin the CSIDriver spec, which prevents the driver from being used as an inline ephemeral volume. - Using an admission webhook to restrict how this driver is used.
Generic ephemeral volumes
FEATURE STATE:
Kubernetes v1.23 [stable]Generic ephemeral volumes are similar to emptyDir volumes in the
sense that they provide a per-pod directory for scratch data that is
usually empty after provisioning. But they may also have additional
features:
- Storage can be local or network-attached.
- Volumes can have a fixed size that Pods are not able to exceed.
- Volumes may have some initial data, depending on the driver and parameters.
- Typical operations on volumes are supported assuming that the driver supports them, including snapshotting, cloning, resizing, and storage capacity tracking.
Example:
kind: Pod
apiVersion: v1
metadata:
name: my-app
spec:
containers:
- name: my-frontend
image: busybox:1.28
volumeMounts:
- mountPath: "/scratch"
name: scratch-volume
command: [ "sleep", "1000000" ]
volumes:
- name: scratch-volume
ephemeral:
volumeClaimTemplate:
metadata:
labels:
type: my-frontend-volume
spec:
accessModes: [ "ReadWriteOnce" ]
storageClassName: "scratch-storage-class"
resources:
requests:
storage: 1Gi
Lifecycle and PersistentVolumeClaim
The key design idea is that the parameters for a volume claim are allowed inside a volume source of the Pod. Labels, annotations and the whole set of fields for a PersistentVolumeClaim are supported. When such a Pod gets created, the ephemeral volume controller then creates an actual PersistentVolumeClaim object in the same namespace as the Pod and ensures that the PersistentVolumeClaim gets deleted when the Pod gets deleted.
That triggers volume binding and/or provisioning, either immediately if
the StorageClass uses immediate volume binding or when the Pod is
tentatively scheduled onto a node (WaitForFirstConsumer volume
binding mode). The latter is recommended for generic ephemeral volumes
because then the scheduler is free to choose a suitable node for
the Pod. With immediate binding, the scheduler is forced to select a node that has
access to the volume once it is available.
In terms of resource ownership,
a Pod that has generic ephemeral storage is the owner of the PersistentVolumeClaim(s)
that provide that ephemeral storage. When the Pod is deleted,
the Kubernetes garbage collector deletes the PVC, which then usually
triggers deletion of the volume because the default reclaim policy of
storage classes is to delete volumes. You can create quasi-ephemeral local storage
using a StorageClass with a reclaim policy of retain: the storage outlives the Pod,
and in this case you need to ensure that volume clean up happens separately.
While these PVCs exist, they can be used like any other PVC. In particular, they can be referenced as data source in volume cloning or snapshotting. The PVC object also holds the current status of the volume.
PersistentVolumeClaim naming
Naming of the automatically created PVCs is deterministic: the name is
a combination of the Pod name and volume name, with a hyphen (-) in the
middle. In the example above, the PVC name will be
my-app-scratch-volume. This deterministic naming makes it easier to
interact with the PVC because one does not have to search for it once
the Pod name and volume name are known.
The deterministic naming also introduces a potential conflict between different Pods (a Pod "pod-a" with volume "scratch" and another Pod with name "pod" and volume "a-scratch" both end up with the same PVC name "pod-a-scratch") and between Pods and manually created PVCs.
Such conflicts are detected: a PVC is only used for an ephemeral volume if it was created for the Pod. This check is based on the ownership relationship. An existing PVC is not overwritten or modified. But this does not resolve the conflict because without the right PVC, the Pod cannot start.
Caution:
Take care when naming Pods and volumes inside the same namespace, so that these conflicts can't occur.Security
Using generic ephemeral volumes allows users to create PVCs indirectly if they can create Pods, even if they do not have permission to create PVCs directly. Cluster administrators must be aware of this. If this does not fit their security model, they should use an admission webhook that rejects objects like Pods that have a generic ephemeral volume.
The normal namespace quota for PVCs still applies, so even if users are allowed to use this new mechanism, they cannot use it to circumvent other policies.
What's next
Ephemeral volumes managed by kubelet
CSI ephemeral volumes
- For more information on the design, see the Ephemeral Inline CSI volumes KEP.
- For more information on further development of this feature, see the enhancement tracking issue #596.
Generic ephemeral volumes
- For more information on the design, see the Generic ephemeral inline volumes KEP.
6.5 - Storage Classes
This document describes the concept of a StorageClass in Kubernetes. Familiarity with volumes and persistent volumes is suggested.
A StorageClass provides a way for administrators to describe the classes of storage they offer. Different classes might map to quality-of-service levels, or to backup policies, or to arbitrary policies determined by the cluster administrators. Kubernetes itself is unopinionated about what classes represent.
The Kubernetes concept of a storage class is similar to “profiles” in some other storage system designs.
StorageClass objects
Each StorageClass contains the fields provisioner, parameters, and
reclaimPolicy, which are used when a PersistentVolume belonging to the
class needs to be dynamically provisioned to satisfy a PersistentVolumeClaim (PVC).
The name of a StorageClass object is significant, and is how users can request a particular class. Administrators set the name and other parameters of a class when first creating StorageClass objects.
As an administrator, you can specify a default StorageClass that applies to any PVCs that don't request a specific class. For more details, see the PersistentVolumeClaim concept.
Here's an example of a StorageClass:
apiVersion: storage.k8s.io/v1
kind: StorageClass
metadata:
name: low-latency
annotations:
storageclass.kubernetes.io/is-default-class: "false"
provisioner: csi-driver.example-vendor.example
reclaimPolicy: Retain # default value is Delete
allowVolumeExpansion: true
mountOptions:
- discard # this might enable UNMAP / TRIM at the block storage layer
volumeBindingMode: WaitForFirstConsumer
parameters:
guaranteedReadWriteLatency: "true" # provider-specific
Default StorageClass
You can mark a StorageClass as the default for your cluster. For instructions on setting the default StorageClass, see Change the default StorageClass.
When a PVC does not specify a storageClassName, the default StorageClass is
used.
If you set the
storageclass.kubernetes.io/is-default-class
annotation to true on more than one StorageClass in your cluster, and you then
create a PersistentVolumeClaim with no storageClassName set, Kubernetes
uses the most recently created default StorageClass.
Note:
You should try to only have one StorageClass in your cluster that is marked as the default. The reason that Kubernetes allows you to have multiple default StorageClasses is to allow for seamless migration.You can create a PersistentVolumeClaim without specifying a storageClassName
for the new PVC, and you can do so even when no default StorageClass exists
in your cluster. In this case, the new PVC creates as you defined it, and the
storageClassName of that PVC remains unset until a default becomes available.
You can have a cluster without any default StorageClass. If you don't mark any StorageClass as default (and one hasn't been set for you by, for example, a cloud provider), then Kubernetes cannot apply that defaulting for PersistentVolumeClaims that need it.
If or when a default StorageClass becomes available, the control plane identifies any
existing PVCs without storageClassName. For the PVCs that either have an empty
value for storageClassName or do not have this key, the control plane then
updates those PVCs to set storageClassName to match the new default StorageClass.
If you have an existing PVC where the storageClassName is "", and you configure
a default StorageClass, then this PVC will not get updated.
In order to keep binding to PVs with storageClassName set to ""
(while a default StorageClass is present), you need to set the storageClassName
of the associated PVC to "".
Provisioner
Each StorageClass has a provisioner that determines what volume plugin is used for provisioning PVs. This field must be specified.
| Volume Plugin | Internal Provisioner | Config Example |
|---|---|---|
| AzureFile | ✓ | Azure File |
| CephFS | - | - |
| FC | - | - |
| FlexVolume | - | - |
| iSCSI | - | - |
| Local | - | Local |
| NFS | - | NFS |
| PortworxVolume | ✓ | Portworx Volume |
| RBD | - | Ceph RBD |
| VsphereVolume | ✓ | vSphere |
You are not restricted to specifying the "internal" provisioners listed here (whose names are prefixed with "kubernetes.io" and shipped alongside Kubernetes). You can also run and specify external provisioners, which are independent programs that follow a specification defined by Kubernetes. Authors of external provisioners have full discretion over where their code lives, how the provisioner is shipped, how it needs to be run, what volume plugin it uses (including Flex), etc. The repository kubernetes-sigs/sig-storage-lib-external-provisioner houses a library for writing external provisioners that implements the bulk of the specification. Some external provisioners are listed under the repository kubernetes-sigs/sig-storage-lib-external-provisioner.
For example, NFS doesn't provide an internal provisioner, but an external provisioner can be used. There are also cases when 3rd party storage vendors provide their own external provisioner.
Reclaim policy
PersistentVolumes that are dynamically created by a StorageClass will have the
reclaim policy
specified in the reclaimPolicy field of the class, which can be
either Delete or Retain. If no reclaimPolicy is specified when a
StorageClass object is created, it will default to Delete.
PersistentVolumes that are created manually and managed via a StorageClass will have whatever reclaim policy they were assigned at creation.
Volume expansion
PersistentVolumes can be configured to be expandable. This allows you to resize the volume by editing the corresponding PVC object, requesting a new larger amount of storage.
The following types of volumes support volume expansion, when the underlying
StorageClass has the field allowVolumeExpansion set to true.
| Volume type | Required Kubernetes version for volume expansion |
|---|---|
| Azure File | 1.11 |
| CSI | 1.24 |
| FlexVolume | 1.13 |
| Portworx | 1.11 |
| rbd | 1.11 |
Note:
You can only use the volume expansion feature to grow a Volume, not to shrink it.Mount options
PersistentVolumes that are dynamically created by a StorageClass will have the
mount options specified in the mountOptions field of the class.
If the volume plugin does not support mount options but mount options are specified, provisioning will fail. Mount options are not validated on either the class or PV. If a mount option is invalid, the PV mount fails.
Volume binding mode
The volumeBindingMode field controls when
volume binding and dynamic provisioning
should occur. When unset, Immediate mode is used by default.
The Immediate mode indicates that volume binding and dynamic
provisioning occurs once the PersistentVolumeClaim is created. For storage
backends that are topology-constrained and not globally accessible from all Nodes
in the cluster, PersistentVolumes will be bound or provisioned without knowledge of the Pod's scheduling
requirements. This may result in unschedulable Pods.
A cluster administrator can address this issue by specifying the WaitForFirstConsumer mode which
will delay the binding and provisioning of a PersistentVolume until a Pod using the PersistentVolumeClaim is created.
PersistentVolumes will be selected or provisioned conforming to the topology that is
specified by the Pod's scheduling constraints. These include, but are not limited to, resource
requirements,
node selectors,
pod affinity and
anti-affinity,
and taints and tolerations.
The following plugins support WaitForFirstConsumer with dynamic provisioning:
- CSI volumes, provided that the specific CSI driver supports this
The following plugins support WaitForFirstConsumer with pre-created PersistentVolume binding:
- CSI volumes, provided that the specific CSI driver supports this
local
Note:
If you choose to use WaitForFirstConsumer, do not use nodeName in the Pod spec
to specify node affinity.
If nodeName is used in this case, the scheduler will be bypassed and PVC will remain in pending state.
Instead, you can use node selector for kubernetes.io/hostname:
apiVersion: v1
kind: Pod
metadata:
name: task-pv-pod
spec:
nodeSelector:
kubernetes.io/hostname: kube-01
volumes:
- name: task-pv-storage
persistentVolumeClaim:
claimName: task-pv-claim
containers:
- name: task-pv-container
image: nginx
ports:
- containerPort: 80
name: "http-server"
volumeMounts:
- mountPath: "/usr/share/nginx/html"
name: task-pv-storage
Allowed topologies
When a cluster operator specifies the WaitForFirstConsumer volume binding mode, it is no longer necessary
to restrict provisioning to specific topologies in most situations. However,
if still required, allowedTopologies can be specified.
This example demonstrates how to restrict the topology of provisioned volumes to specific
zones and should be used as a replacement for the zone and zones parameters for the
supported plugins.
apiVersion: storage.k8s.io/v1
kind: StorageClass
metadata:
name: standard
provisioner: example.com/example
parameters:
type: pd-standard
volumeBindingMode: WaitForFirstConsumer
allowedTopologies:
- matchLabelExpressions:
- key: topology.kubernetes.io/zone
values:
- us-central-1a
- us-central-1b
Parameters
StorageClasses have parameters that describe volumes belonging to the storage
class. Different parameters may be accepted depending on the provisioner.
When a parameter is omitted, some default is used.
There can be at most 512 parameters defined for a StorageClass. The total length of the parameters object including its keys and values cannot exceed 256 KiB.
AWS EBS
Kubernetes 1.36 does not include a awsElasticBlockStore volume type.
The AWSElasticBlockStore in-tree storage driver was deprecated in the Kubernetes v1.19 release and then removed entirely in the v1.27 release.
The Kubernetes project suggests that you use the AWS EBS out-of-tree storage driver instead.
Here is an example StorageClass for the AWS EBS CSI driver:
apiVersion: storage.k8s.io/v1
kind: StorageClass
metadata:
name: ebs-sc
provisioner: ebs.csi.aws.com
volumeBindingMode: WaitForFirstConsumer
parameters:
csi.storage.k8s.io/fstype: xfs
type: io1
iopsPerGB: "50"
encrypted: "true"
tagSpecification_1: "key1=value1"
tagSpecification_2: "key2=value2"
allowedTopologies:
- matchLabelExpressions:
- key: topology.ebs.csi.aws.com/zone
values:
- us-east-2c
tagSpecification: Tags with this prefix are applied to dynamically provisioned EBS volumes.
AWS EFS
To configure AWS EFS storage, you can use the out-of-tree AWS_EFS_CSI_DRIVER.
kind: StorageClass
apiVersion: storage.k8s.io/v1
metadata:
name: efs-sc
provisioner: efs.csi.aws.com
parameters:
provisioningMode: efs-ap
fileSystemId: fs-92107410
directoryPerms: "700"
provisioningMode: The type of volume to be provisioned by Amazon EFS. Currently, only access point based provisioning is supported (efs-ap).fileSystemId: The file system under which the access point is created.directoryPerms: The directory permissions of the root directory created by the access point.
For more details, refer to the AWS_EFS_CSI_Driver Dynamic Provisioning documentation.
NFS
To configure NFS storage, you can use the in-tree driver or the NFS CSI driver for Kubernetes (recommended).
apiVersion: storage.k8s.io/v1
kind: StorageClass
metadata:
name: example-nfs
provisioner: example.com/external-nfs
parameters:
server: nfs-server.example.com
path: /share
readOnly: "false"
server: Server is the hostname or IP address of the NFS server.path: Path that is exported by the NFS server.readOnly: A flag indicating whether the storage will be mounted as read only (default false).
Kubernetes doesn't include an internal NFS provisioner. You need to use an external provisioner to create a StorageClass for NFS. Here are some examples:
vSphere
There are two types of provisioners for vSphere storage classes:
- CSI provisioner:
csi.vsphere.vmware.com - vCP provisioner:
kubernetes.io/vsphere-volume
In-tree provisioners are deprecated. For more information on the CSI provisioner, see Kubernetes vSphere CSI Driver and vSphereVolume CSI migration.
CSI Provisioner
The vSphere CSI StorageClass provisioner works with Tanzu Kubernetes clusters. For an example, refer to the vSphere CSI repository.
vCP Provisioner
The following examples use the VMware Cloud Provider (vCP) StorageClass provisioner.
Create a StorageClass with a user specified disk format.
apiVersion: storage.k8s.io/v1 kind: StorageClass metadata: name: fast provisioner: kubernetes.io/vsphere-volume parameters: diskformat: zeroedthickdiskformat:thin,zeroedthickandeagerzeroedthick. Default:"thin".Create a StorageClass with a disk format on a user specified datastore.
apiVersion: storage.k8s.io/v1 kind: StorageClass metadata: name: fast provisioner: kubernetes.io/vsphere-volume parameters: diskformat: zeroedthick datastore: VSANDatastoredatastore: The user can also specify the datastore in the StorageClass. The volume will be created on the datastore specified in the StorageClass, which in this case isVSANDatastore. This field is optional. If the datastore is not specified, then the volume will be created on the datastore specified in the vSphere config file used to initialize the vSphere Cloud Provider.Storage Policy Management inside kubernetes
Using existing vCenter SPBM policy
One of the most important features of vSphere for Storage Management is policy based Management. Storage Policy Based Management (SPBM) is a storage policy framework that provides a single unified control plane across a broad range of data services and storage solutions. SPBM enables vSphere administrators to overcome upfront storage provisioning challenges, such as capacity planning, differentiated service levels and managing capacity headroom.
The SPBM policies can be specified in the StorageClass using the
storagePolicyNameparameter.Virtual SAN policy support inside Kubernetes
Vsphere Infrastructure (VI) Admins will have the ability to specify custom Virtual SAN Storage Capabilities during dynamic volume provisioning. You can now define storage requirements, such as performance and availability, in the form of storage capabilities during dynamic volume provisioning. The storage capability requirements are converted into a Virtual SAN policy which are then pushed down to the Virtual SAN layer when a persistent volume (virtual disk) is being created. The virtual disk is distributed across the Virtual SAN datastore to meet the requirements.
You can see Storage Policy Based Management for dynamic provisioning of volumes for more details on how to use storage policies for persistent volumes management.
Ceph RBD (deprecated)
Note:
FEATURE STATE:
Kubernetes v1.28 [deprecated]This internal provisioner of Ceph RBD is deprecated. Please use CephFS RBD CSI driver.
apiVersion: storage.k8s.io/v1
kind: StorageClass
metadata:
name: fast
provisioner: kubernetes.io/rbd # This provisioner is deprecated
parameters:
monitors: 198.19.254.105:6789
adminId: kube
adminSecretName: ceph-secret
adminSecretNamespace: kube-system
pool: kube
userId: kube
userSecretName: ceph-secret-user
userSecretNamespace: default
fsType: ext4
imageFormat: "2"
imageFeatures: "layering"
monitors: Ceph monitors, comma delimited. This parameter is required.adminId: Ceph client ID that is capable of creating images in the pool. Default is "admin".adminSecretName: Secret Name foradminId. This parameter is required. The provided secret must have type "kubernetes.io/rbd".adminSecretNamespace: The namespace foradminSecretName. Default is "default".pool: Ceph RBD pool. Default is "rbd".userId: Ceph client ID that is used to map the RBD image. Default is the same asadminId.userSecretName: The name of Ceph Secret foruserIdto map RBD image. It must exist in the same namespace as PVCs. This parameter is required. The provided secret must have type "kubernetes.io/rbd", for example created in this way:kubectl create secret generic ceph-secret --type="kubernetes.io/rbd" \ --from-literal=key='QVFEQ1pMdFhPUnQrSmhBQUFYaERWNHJsZ3BsMmNjcDR6RFZST0E9PQ==' \ --namespace=kube-systemuserSecretNamespace: The namespace foruserSecretName.fsType: fsType that is supported by kubernetes. Default:"ext4".imageFormat: Ceph RBD image format, "1" or "2". Default is "2".imageFeatures: This parameter is optional and should only be used if you setimageFormatto "2". Currently supported features arelayeringonly. Default is "", and no features are turned on.
Azure Disk
Kubernetes 1.36 does not include a azureDisk volume type.
The azureDisk in-tree storage driver was deprecated in the Kubernetes v1.19 release
and then removed entirely in the v1.27 release.
The Kubernetes project suggests that you use the Azure Disk third party storage driver instead.
Azure File (deprecated)
apiVersion: storage.k8s.io/v1
kind: StorageClass
metadata:
name: azurefile
provisioner: kubernetes.io/azure-file
parameters:
skuName: Standard_LRS
location: eastus
storageAccount: azure_storage_account_name # example value
skuName: Azure storage account SKU tier. Default is empty.location: Azure storage account location. Default is empty.storageAccount: Azure storage account name. Default is empty. If a storage account is not provided, all storage accounts associated with the resource group are searched to find one that matchesskuNameandlocation. If a storage account is provided, it must reside in the same resource group as the cluster, andskuNameandlocationare ignored.secretNamespace: the namespace of the secret that contains the Azure Storage Account Name and Key. Default is the same as the Pod.secretName: the name of the secret that contains the Azure Storage Account Name and Key. Default isazure-storage-account-<accountName>-secretreadOnly: a flag indicating whether the storage will be mounted as read only. Defaults to false which means a read/write mount. This setting will impact theReadOnlysetting in VolumeMounts as well.
During storage provisioning, a secret named by secretName is created for the
mounting credentials. If the cluster has enabled both
RBAC and
Controller Roles,
add the create permission of resource secret for clusterrole
system:controller:persistent-volume-binder.
In a multi-tenancy context, it is strongly recommended to set the value for
secretNamespace explicitly, otherwise the storage account credentials may
be read by other users.
Portworx volume (deprecated)
apiVersion: storage.k8s.io/v1
kind: StorageClass
metadata:
name: portworx-io-priority-high
provisioner: kubernetes.io/portworx-volume # This provisioner is deprecated
parameters:
repl: "1"
snap_interval: "70"
priority_io: "high"
fs: filesystem to be laid out:none/xfs/ext4(default:ext4).block_size: block size in Kbytes (default:32).repl: number of synchronous replicas to be provided in the form of replication factor1..3(default:1) A string is expected here i.e."1"and not1.priority_io: determines whether the volume will be created from higher performance or a lower priority storagehigh/medium/low(default:low).snap_interval: clock/time interval in minutes for when to trigger snapshots. Snapshots are incremental based on difference with the prior snapshot, 0 disables snaps (default:0). A string is expected here i.e."70"and not70.aggregation_level: specifies the number of chunks the volume would be distributed into, 0 indicates a non-aggregated volume (default:0). A string is expected here i.e."0"and not0ephemeral: specifies whether the volume should be cleaned-up after unmount or should be persistent.emptyDiruse case can set this value to true andpersistent volumesuse case such as for databases like Cassandra should set to false,true/false(defaultfalse). A string is expected here i.e."true"and nottrue.
Local
apiVersion: storage.k8s.io/v1
kind: StorageClass
metadata:
name: local-storage
provisioner: kubernetes.io/no-provisioner # indicates that this StorageClass does not support automatic provisioning
volumeBindingMode: WaitForFirstConsumer
Local volumes do not support dynamic provisioning in Kubernetes 1.36;
however a StorageClass should still be created to delay volume binding until a Pod is actually
scheduled to the appropriate node. This is specified by the WaitForFirstConsumer volume
binding mode.
Delaying volume binding allows the scheduler to consider all of a Pod's scheduling constraints when choosing an appropriate PersistentVolume for a PersistentVolumeClaim.
6.6 - Volume Attributes Classes
FEATURE STATE:
Kubernetes v1.36 [stable](enabled by default)This page assumes that you are familiar with StorageClasses, volumes and PersistentVolumes in Kubernetes.
A VolumeAttributesClass provides a way for administrators to describe the mutable "classes" of storage they offer. Different classes might map to different quality-of-service levels. Kubernetes itself is un-opinionated about what these classes represent.
This feature is generally available (GA) as of version 1.34, and users have the option to disable it.
You can also only use VolumeAttributesClasses with storage backed by
Container Storage Interface, and only where the
relevant CSI driver implements the ModifyVolume API.
The VolumeAttributesClass API
Each VolumeAttributesClass contains the driverName and parameters, which are
used when a PersistentVolume (PV) belonging to the class needs to be dynamically provisioned
or modified.
The name of a VolumeAttributesClass object is significant and is how users can request a particular class.
Administrators set the name and other parameters of a class when first creating VolumeAttributesClass objects.
While the name of a VolumeAttributesClass object in a PersistentVolumeClaim is mutable, the parameters in an existing class are immutable.
apiVersion: storage.k8s.io/v1
kind: VolumeAttributesClass
metadata:
name: silver
driverName: pd.csi.storage.gke.io
parameters:
provisioned-iops: "3000"
provisioned-throughput: "50"
Provisioner
Each VolumeAttributesClass has a provisioner that determines what volume plugin is used for
provisioning PVs. The field driverName must be specified.
The feature support for VolumeAttributesClass is implemented in kubernetes-csi/external-provisioner.
You are not restricted to specifying the kubernetes-csi/external-provisioner. You can also run and specify external provisioners, which are independent programs that follow a specification defined by Kubernetes. Authors of external provisioners have full discretion over where their code lives, how the provisioner is shipped, how it needs to be run, what volume plugin it uses, etc.
To understand how the provisioner works with VolumeAttributesClass, refer to the CSI external-provisioner documentation.
Resizer
Each VolumeAttributesClass has a resizer that determines what volume plugin is used
for modifying PVs. The field driverName must be specified.
The modifying volume feature support for VolumeAttributesClass is implemented in kubernetes-csi/external-resizer.
For example, an existing PersistentVolumeClaim is using a VolumeAttributesClass named silver:
apiVersion: v1
kind: PersistentVolumeClaim
metadata:
name: test-pv-claim
spec:
…
volumeAttributesClassName: silver
…
A new VolumeAttributesClass gold is available in the cluster:
apiVersion: storage.k8s.io/v1
kind: VolumeAttributesClass
metadata:
name: gold
driverName: pd.csi.storage.gke.io
parameters:
iops: "4000"
throughput: "60"
The end user can update the PVC with the new VolumeAttributesClass gold and apply:
apiVersion: v1
kind: PersistentVolumeClaim
metadata:
name: test-pv-claim
spec:
…
volumeAttributesClassName: gold
…
To understand how the resizer works with VolumeAttributesClass, refer to the CSI external-resizer documentation.
Parameters
VolumeAttributeClasses have parameters that describe volumes belonging to them. Different parameters may be accepted
depending on the provisioner or the resizer. For example, the value 4000, for the parameter iops,
and the parameter throughput are specific to GCE PD.
When a parameter is omitted, the default is used at volume provisioning.
If a user applies the PVC with a different VolumeAttributesClass with omitted parameters, the default value of
the parameters may be used depending on the CSI driver implementation.
Please refer to the related CSI driver documentation for more details.
There can be at most 512 parameters defined for a VolumeAttributesClass. The total length of the parameters object including its keys and values cannot exceed 256 KiB.
6.7 - Dynamic Volume Provisioning
Dynamic volume provisioning allows storage volumes to be created on-demand.
Without dynamic provisioning, cluster administrators have to manually make
calls to their cloud or storage provider to create new storage volumes, and
then create PersistentVolume objects
to represent them in Kubernetes. The dynamic provisioning feature eliminates
the need for cluster administrators to pre-provision storage. Instead, it
automatically provisions storage when users create
PersistentVolumeClaim objects.
Background
The implementation of dynamic volume provisioning is based on the API object StorageClass
from the API group storage.k8s.io. A cluster administrator can define as many
StorageClass objects as needed, each specifying a volume plugin (aka
provisioner) that provisions a volume and the set of parameters to pass to
that provisioner when provisioning.
A cluster administrator can define and expose multiple flavors of storage (from
the same or different storage systems) within a cluster, each with a custom set
of parameters. This design also ensures that end users don't have to worry
about the complexity and nuances of how storage is provisioned, but still
have the ability to select from multiple storage options.
For more details, see the Storage Classes concept.
Enabling Dynamic Provisioning
To enable dynamic provisioning, a cluster administrator needs to pre-create one or more StorageClass objects for users. StorageClass objects define which provisioner should be used and what parameters should be passed to that provisioner when dynamic provisioning is invoked. The name of a StorageClass object must be a valid DNS subdomain name.
The following manifest creates a storage class "slow" which provisions standard disk-like persistent disks.
apiVersion: storage.k8s.io/v1
kind: StorageClass
metadata:
name: slow
provisioner: kubernetes.io/gce-pd
parameters:
type: pd-standard
The following manifest creates a storage class "fast" which provisions SSD-like persistent disks.
apiVersion: storage.k8s.io/v1
kind: StorageClass
metadata:
name: fast
provisioner: kubernetes.io/gce-pd
parameters:
type: pd-ssd
Using Dynamic Provisioning
Users request dynamically provisioned storage by including a storage class in
their PersistentVolumeClaim. Before Kubernetes v1.6, this was done via the
volume.beta.kubernetes.io/storage-class annotation. However, this annotation
is deprecated since v1.9. Users now can and should instead use the
storageClassName field of the PersistentVolumeClaim object. The value of
this field must match the name of a StorageClass configured by the
administrator (see Enabling Dynamic Provisioning).
To select the "fast" storage class, for example, a user would create the following PersistentVolumeClaim:
apiVersion: v1
kind: PersistentVolumeClaim
metadata:
name: claim1
spec:
accessModes:
- ReadWriteOnce
storageClassName: fast
resources:
requests:
storage: 30Gi
This claim results in an SSD-like Persistent Disk being automatically provisioned. When the claim is deleted, the volume is destroyed.
Defaulting Behavior
Dynamic provisioning can be enabled on a cluster such that all claims are dynamically provisioned if no storage class is specified. A cluster administrator can enable this behavior by:
- Marking one
StorageClassobject as default. - Making sure that the
DefaultStorageClassadmission controller is enabled on the API server.
An administrator can mark a specific StorageClass as default by adding the
storageclass.kubernetes.io/is-default-class annotation to it.
When a default StorageClass exists in a cluster and a user creates a
PersistentVolumeClaim with storageClassName unspecified, the
DefaultStorageClass admission controller automatically adds the
storageClassName field pointing to the default storage class.
Note that if you set the storageclass.kubernetes.io/is-default-class
annotation to true on more than one StorageClass in your cluster, and you then
create a PersistentVolumeClaim with no storageClassName set, Kubernetes
uses the most recently created default StorageClass.
Topology Awareness
In Multi-Zone clusters, Pods can be spread across Zones in a Region. Single-Zone storage backends should be provisioned in the Zones where Pods are scheduled. This can be accomplished by setting the Volume Binding Mode.
6.8 - Volume Snapshots
In Kubernetes, a VolumeSnapshot represents a snapshot of a volume on a storage system. This document assumes that you are already familiar with Kubernetes persistent volumes.
Introduction
Similar to how API resources PersistentVolume and PersistentVolumeClaim are
used to provision volumes for users and administrators, VolumeSnapshotContent
and VolumeSnapshot API resources are provided to create volume snapshots for
users and administrators.
A VolumeSnapshotContent is a snapshot taken from a volume in the cluster that
has been provisioned by an administrator. It is a resource in the cluster just
like a PersistentVolume is a cluster resource.
A VolumeSnapshot is a request for snapshot of a volume by a user. It is similar
to a PersistentVolumeClaim.
VolumeSnapshotClass allows you to specify different attributes belonging to a
VolumeSnapshot. These attributes may differ among snapshots taken from the same
volume on the storage system and therefore cannot be expressed by using the same
StorageClass of a PersistentVolumeClaim.
Volume snapshots provide Kubernetes users with a standardized way to copy a volume's contents at a particular point in time without creating an entirely new volume. This functionality enables, for example, database administrators to backup databases before performing edit or delete modifications.
Users need to be aware of the following when using this feature:
- API Objects
VolumeSnapshot,VolumeSnapshotContent, andVolumeSnapshotClassare CRDs, not part of the core API. VolumeSnapshotsupport is only available for CSI drivers.- As part of the deployment process of
VolumeSnapshot, the Kubernetes team provides a snapshot controller to be deployed into the control plane, and a sidecar helper container called csi-snapshotter to be deployed together with the CSI driver. The snapshot controller watchesVolumeSnapshotandVolumeSnapshotContentobjects and is responsible for the creation and deletion ofVolumeSnapshotContentobject. The sidecar csi-snapshotter watchesVolumeSnapshotContentobjects and triggersCreateSnapshotandDeleteSnapshotoperations against a CSI endpoint. - There is also a validating webhook server which provides tightened validation on snapshot objects. This should be installed by the Kubernetes distros along with the snapshot controller and CRDs, not CSI drivers. It should be installed in all Kubernetes clusters that has the snapshot feature enabled.
- CSI drivers may or may not have implemented the volume snapshot functionality. The CSI drivers that have provided support for volume snapshot will likely use the csi-snapshotter. See CSI Driver documentation for details.
- The CRDs and snapshot controller installations are the responsibility of the Kubernetes distribution.
For advanced use cases, such as creating group snapshots of multiple volumes, see the external CSI Volume Group Snapshot documentation.
Lifecycle of a volume snapshot and volume snapshot content
VolumeSnapshotContents are resources in the cluster. VolumeSnapshots are requests
for those resources. The interaction between VolumeSnapshotContents and VolumeSnapshots
follow this lifecycle:
Provisioning Volume Snapshot
There are two ways snapshots may be provisioned: pre-provisioned or dynamically provisioned.
Pre-provisioned
A cluster administrator creates a number of VolumeSnapshotContents. They carry the details
of the real volume snapshot on the storage system which is available for use by cluster users.
They exist in the Kubernetes API and are available for consumption.
Dynamic
Instead of using a pre-existing snapshot, you can request that a snapshot to be dynamically taken from a PersistentVolumeClaim. The VolumeSnapshotClass specifies storage provider-specific parameters to use when taking a snapshot.
Binding
The snapshot controller handles the binding of a VolumeSnapshot object with an appropriate
VolumeSnapshotContent object, in both pre-provisioned and dynamically provisioned scenarios.
The binding is a one-to-one mapping.
In the case of pre-provisioned binding, the VolumeSnapshot will remain unbound until the requested VolumeSnapshotContent object is created.
Persistent Volume Claim as Snapshot Source Protection
The purpose of this protection is to ensure that in-use PersistentVolumeClaim API objects are not removed from the system while a snapshot is being taken from it (as this may result in data loss).
While a snapshot is being taken of a PersistentVolumeClaim, that PersistentVolumeClaim is in-use. If you delete a PersistentVolumeClaim API object in active use as a snapshot source, the PersistentVolumeClaim object is not removed immediately. Instead, removal of the PersistentVolumeClaim object is postponed until the snapshot is readyToUse or aborted.
Delete
Deletion is triggered by deleting the VolumeSnapshot object, and the DeletionPolicy
will be followed. If the DeletionPolicy is Delete, then the underlying storage snapshot
will be deleted along with the VolumeSnapshotContent object. If the DeletionPolicy is
Retain, then both the underlying snapshot and VolumeSnapshotContent remain.
VolumeSnapshots
Each VolumeSnapshot contains a spec and a status.
apiVersion: snapshot.storage.k8s.io/v1
kind: VolumeSnapshot
metadata:
name: new-snapshot-test
spec:
volumeSnapshotClassName: csi-hostpath-snapclass
source:
persistentVolumeClaimName: pvc-test
persistentVolumeClaimName is the name of the PersistentVolumeClaim data source
for the snapshot. This field is required for dynamically provisioning a snapshot.
A volume snapshot can request a particular class by specifying the name of a
VolumeSnapshotClass
using the attribute volumeSnapshotClassName. If nothing is set, then the
default class is used if available.
For pre-provisioned snapshots, you need to specify a volumeSnapshotContentName
as the source for the snapshot as shown in the following example. The
volumeSnapshotContentName source field is required for pre-provisioned snapshots.
apiVersion: snapshot.storage.k8s.io/v1
kind: VolumeSnapshot
metadata:
name: test-snapshot
spec:
source:
volumeSnapshotContentName: test-content
Volume Snapshot Contents
Each VolumeSnapshotContent contains a spec and status. In dynamic provisioning,
the snapshot common controller creates VolumeSnapshotContent objects. Here is an example:
apiVersion: snapshot.storage.k8s.io/v1
kind: VolumeSnapshotContent
metadata:
name: snapcontent-72d9a349-aacd-42d2-a240-d775650d2455
spec:
deletionPolicy: Delete
driver: hostpath.csi.k8s.io
source:
volumeHandle: ee0cfb94-f8d4-11e9-b2d8-0242ac110002
sourceVolumeMode: Filesystem
volumeSnapshotClassName: csi-hostpath-snapclass
volumeSnapshotRef:
name: new-snapshot-test
namespace: default
uid: 72d9a349-aacd-42d2-a240-d775650d2455
volumeHandle is the unique identifier of the volume created on the storage
backend and returned by the CSI driver during the volume creation. This field
is required for dynamically provisioning a snapshot.
It specifies the volume source of the snapshot.
For pre-provisioned snapshots, you (as cluster administrator) are responsible
for creating the VolumeSnapshotContent object as follows.
apiVersion: snapshot.storage.k8s.io/v1
kind: VolumeSnapshotContent
metadata:
name: new-snapshot-content-test
spec:
deletionPolicy: Delete
driver: hostpath.csi.k8s.io
source:
snapshotHandle: 7bdd0de3-aaeb-11e8-9aae-0242ac110002
sourceVolumeMode: Filesystem
volumeSnapshotRef:
name: new-snapshot-test
namespace: default
snapshotHandle is the unique identifier of the volume snapshot created on
the storage backend. This field is required for the pre-provisioned snapshots.
It specifies the CSI snapshot id on the storage system that this
VolumeSnapshotContent represents.
sourceVolumeMode is the mode of the volume whose snapshot is taken. The value
of the sourceVolumeMode field can be either Filesystem or Block. If the
source volume mode is not specified, Kubernetes treats the snapshot as if the
source volume's mode is unknown.
volumeSnapshotRef is the reference of the corresponding VolumeSnapshot. Note that
when the VolumeSnapshotContent is being created as a pre-provisioned snapshot, the
VolumeSnapshot referenced in volumeSnapshotRef might not exist yet.
Converting the volume mode of a Snapshot
If the VolumeSnapshots API installed on your cluster supports the sourceVolumeMode
field, then the API has the capability to prevent unauthorized users from converting
the mode of a volume.
To check if your cluster has capability for this feature, run the following command:
$ kubectl get crd volumesnapshotcontent -o yaml
If you want to allow users to create a PersistentVolumeClaim from an existing
VolumeSnapshot, but with a different volume mode than the source, the annotation
snapshot.storage.kubernetes.io/allow-volume-mode-change: "true"needs to be added to
the VolumeSnapshotContent that corresponds to the VolumeSnapshot.
For pre-provisioned snapshots, spec.sourceVolumeMode needs to be populated
by the cluster administrator.
An example VolumeSnapshotContent resource with this feature enabled would look like:
apiVersion: snapshot.storage.k8s.io/v1
kind: VolumeSnapshotContent
metadata:
name: new-snapshot-content-test
annotations:
- snapshot.storage.kubernetes.io/allow-volume-mode-change: "true"
spec:
deletionPolicy: Delete
driver: hostpath.csi.k8s.io
source:
snapshotHandle: 7bdd0de3-aaeb-11e8-9aae-0242ac110002
sourceVolumeMode: Filesystem
volumeSnapshotRef:
name: new-snapshot-test
namespace: default
Provisioning Volumes from Snapshots
You can provision a new volume, pre-populated with data from a snapshot, by using
the dataSource field in the PersistentVolumeClaim object.
For more details, see Volume Snapshot and Restore Volume from Snapshot.
6.9 - Volume Snapshot Classes
This document describes the concept of VolumeSnapshotClass in Kubernetes. Familiarity with volume snapshots and storage classes is suggested.
Introduction
Just like StorageClass provides a way for administrators to describe the "classes" of storage they offer when provisioning a volume, VolumeSnapshotClass provides a way to describe the "classes" of storage when provisioning a volume snapshot.
The VolumeSnapshotClass Resource
Each VolumeSnapshotClass contains the fields driver, deletionPolicy, and parameters,
which are used when a VolumeSnapshot belonging to the class needs to be
dynamically provisioned.
The name of a VolumeSnapshotClass object is significant, and is how users can request a particular class. Administrators set the name and other parameters of a class when first creating VolumeSnapshotClass objects, and the objects cannot be updated once they are created.
Note:
Installation of the CRDs is the responsibility of the Kubernetes distribution. Without the required CRDs present, the creation of a VolumeSnapshotClass fails.apiVersion: snapshot.storage.k8s.io/v1
kind: VolumeSnapshotClass
metadata:
name: csi-hostpath-snapclass
driver: hostpath.csi.k8s.io
deletionPolicy: Delete
parameters:
Administrators can specify a default VolumeSnapshotClass for VolumeSnapshots
that don't request any particular class to bind to by adding the
snapshot.storage.kubernetes.io/is-default-class: "true" annotation:
apiVersion: snapshot.storage.k8s.io/v1
kind: VolumeSnapshotClass
metadata:
name: csi-hostpath-snapclass
annotations:
snapshot.storage.kubernetes.io/is-default-class: "true"
driver: hostpath.csi.k8s.io
deletionPolicy: Delete
parameters:
If multiple CSI drivers exist, a default VolumeSnapshotClass can be specified for each of them.
VolumeSnapshotClass dependencies
When you create a VolumeSnapshot without specifying a VolumeSnapshotClass, Kubernetes automatically selects a default VolumeSnapshotClass that has a CSI driver matching the CSI driver of the PVC’s StorageClass.
This behavior allows multiple default VolumeSnapshotClass objects to coexist in a cluster, as long as each one is associated with a unique CSI driver.
Always ensure that there is only one default VolumeSnapshotClass for each CSI driver. If multiple default VolumeSnapshotClass objects are created using the same CSI driver, a VolumeSnapshot creation will fail because Kubernetes cannot determine which one to use.
Driver
Volume snapshot classes have a driver that determines what CSI volume plugin is used for provisioning VolumeSnapshots. This field must be specified.
DeletionPolicy
Volume snapshot classes have a deletionPolicy.
It enables you to configure what happens to a VolumeSnapshotContent when the VolumeSnapshot
object it is bound to is to be deleted. The deletionPolicy of a volume snapshot class can
either be Retain or Delete. This field must be specified.
If the deletionPolicy is Delete, then the underlying storage snapshot will be
deleted along with the VolumeSnapshotContent object. If the deletionPolicy is Retain,
then both the underlying snapshot and VolumeSnapshotContent remain.
Parameters
Volume snapshot classes have parameters that describe volume snapshots belonging to
the volume snapshot class. Different parameters may be accepted depending on the
driver.
6.10 - CSI Volume Cloning
This document describes the concept of cloning existing CSI Volumes in Kubernetes. Familiarity with Volumes is suggested.
Introduction
The CSI Volume Cloning feature adds
support for specifying existing PVCs
in the dataSource field to indicate a user would like to clone a Volume.
A Clone is defined as a duplicate of an existing Kubernetes Volume that can be consumed as any standard Volume would be. The only difference is that upon provisioning, rather than creating a "new" empty Volume, the back end device creates an exact duplicate of the specified Volume.
The implementation of cloning, from the perspective of the Kubernetes API, adds the ability to specify an existing PVC as a dataSource during new PVC creation. The source PVC must be bound and available (not in use).
Users need to be aware of the following when using this feature:
- Cloning support (
VolumePVCDataSource) is only available for CSI drivers. - Cloning support is only available for dynamic provisioners.
- CSI drivers may or may not have implemented the volume cloning functionality.
- You can only clone a PVC when it exists in the same namespace as the destination PVC (source and destination must be in the same namespace).
- Cloning is supported with a different Storage Class.
- Destination volume can be the same or a different storage class as the source.
- Default storage class can be used and storageClassName omitted in the spec.
- Cloning can only be performed between two volumes that use the same VolumeMode setting (if you request a block mode volume, the source MUST also be block mode)
Provisioning
Clones are provisioned like any other PVC with the exception of adding a dataSource that references an existing PVC in the same namespace.
apiVersion: v1
kind: PersistentVolumeClaim
metadata:
name: clone-of-pvc-1
namespace: myns
spec:
accessModes:
- ReadWriteOnce
storageClassName: cloning
resources:
requests:
storage: 5Gi
dataSource:
kind: PersistentVolumeClaim
name: pvc-1
Note:
You must specify a capacity value forspec.resources.requests.storage, and the
value you specify must be the same or larger than the capacity of the source volume.The result is a new PVC with the name clone-of-pvc-1 that has the exact same
content as the specified source pvc-1.
Usage
Upon availability of the new PVC, the cloned PVC is consumed the same as other PVC. It's also expected at this point that the newly created PVC is an independent object. It can be consumed, cloned, snapshotted, or deleted independently and without consideration for it's original dataSource PVC. This also implies that the source is not linked in any way to the newly created clone, it may also be modified or deleted without affecting the newly created clone.
6.11 - Volume Populators and Data Sources
This document describes volume populators and data sources in Kubernetes. Familiarity with persistent volumes is suggested.
When you create a PersistentVolumeClaim, the volume that Kubernetes provisions for it normally starts empty. A data source lets you instead request that the new volume be pre-populated with existing data. Volume populators are the controllers that carry out that population, based on the data source that the PersistentVolumeClaim references.
Kubernetes has built-in support for data sources that clone an existing volume or that restore a volume snapshot. Custom volume populators extend this mechanism. The data source is a custom resource, that is, an object whose type is defined by a CustomResourceDefinition. A populator controller watches for PersistentVolumeClaims that reference such a resource and fills the new volume from it.
Volume populators and data sources
FEATURE STATE:
Kubernetes v1.24 [beta]Kubernetes supports custom volume populators.
To use custom volume populators, you must enable the AnyVolumeDataSource
feature gate for
the kube-apiserver and kube-controller-manager.
Volume populators take advantage of a PVC spec field called dataSourceRef. Unlike the
dataSource field, which can only contain either a reference to another PersistentVolumeClaim
or to a VolumeSnapshot, the dataSourceRef field can contain a reference to any object in the
same namespace, except for core objects other than PVCs. For clusters that have the feature
gate enabled, use of the dataSourceRef is preferred over dataSource.
Data source references
The dataSourceRef field behaves almost the same as the dataSource field. If one is
specified while the other is not, the API server will give both fields the same value. Neither
field can be changed after creation, and attempting to specify different values for the two
fields will result in a validation error. Therefore the two fields will always have the same
contents.
There are two differences between the dataSourceRef field and the dataSource field that
users should be aware of:
- The
dataSourcefield ignores invalid values (as if the field was blank) while thedataSourceReffield never ignores values and will cause an error if an invalid value is used. Invalid values are any core object (objects with no apiGroup) except for PVCs. - The
dataSourceReffield may contain different types of objects, while thedataSourcefield only allows PVCs and VolumeSnapshots.
When the CrossNamespaceVolumeDataSource feature is enabled, there are additional differences:
- The
dataSourcefield only allows local objects, while thedataSourceReffield allows objects in any namespaces. - When namespace is specified,
dataSourceanddataSourceRefare not synced.
Users should always use dataSourceRef on clusters that have the feature gate enabled, and
fall back to dataSource on clusters that do not. It is not necessary to look at both fields
under any circumstance. The duplicated values with slightly different semantics exist only for
backwards compatibility. In particular, a mixture of older and newer controllers are able to
interoperate because the fields are the same.
Using volume populators
Volume populators are controllers that can
create non-empty volumes, where the contents of the volume are determined by a Custom Resource.
Users create a populated volume by referring to a Custom Resource using the dataSourceRef field:
apiVersion: v1
kind: PersistentVolumeClaim
metadata:
name: populated-pvc
spec:
dataSourceRef:
name: example-name
kind: ExampleDataSource
apiGroup: example.storage.k8s.io
accessModes:
- ReadWriteOnce
resources:
requests:
storage: 10Gi
Because volume populators are external components, attempts to create a PVC that uses one can fail if not all the correct components are installed. External controllers should generate events on the PVC to provide feedback on the status of the creation, including warnings if the PVC cannot be created due to some missing component.
You can install the alpha volume data source validator controller into your cluster. That controller generates warning Events on a PVC in the case that no populator is registered to handle that kind of data source. When a suitable populator is installed for a PVC, it's the responsibility of that populator controller to report Events that relate to volume creation and issues during the process.
Cross namespace data sources
FEATURE STATE:
Kubernetes v1.26 [alpha]Kubernetes supports cross namespace volume data sources.
To use cross namespace volume data sources, you must enable the AnyVolumeDataSource
and CrossNamespaceVolumeDataSource
feature gates for
the kube-apiserver and kube-controller-manager.
Also, you must enable the CrossNamespaceVolumeDataSource feature gate for the csi-provisioner.
Enabling the CrossNamespaceVolumeDataSource feature gate allows you to specify
a namespace in the dataSourceRef field.
Note:
When you specify a namespace for a volume data source, Kubernetes checks for a ReferenceGrant in the other namespace before accepting the reference. ReferenceGrant is part of thegateway.networking.k8s.io extension APIs.
See ReferenceGrant
in the Gateway API documentation for details.
This means that you must extend your Kubernetes cluster with at least ReferenceGrant from the
Gateway API before you can use this mechanism.Using a cross-namespace volume data source
FEATURE STATE:
Kubernetes v1.26 [alpha]Create a ReferenceGrant to allow the namespace owner to accept the reference.
You define a populated volume by specifying a cross namespace volume data source
using the dataSourceRef field. You must already have a valid ReferenceGrant
in the source namespace:
apiVersion: gateway.networking.k8s.io/v1beta1
kind: ReferenceGrant
metadata:
name: allow-ns1-pvc
namespace: default
spec:
from:
- group: ""
kind: PersistentVolumeClaim
namespace: ns1
to:
- group: snapshot.storage.k8s.io
kind: VolumeSnapshot
name: new-snapshot-demo
apiVersion: v1
kind: PersistentVolumeClaim
metadata:
name: foo-pvc
namespace: ns1
spec:
storageClassName: example
accessModes:
- ReadWriteOnce
resources:
requests:
storage: 1Gi
dataSourceRef:
apiGroup: snapshot.storage.k8s.io
kind: VolumeSnapshot
name: new-snapshot-demo
namespace: default
volumeMode: Filesystem
What's next
- Learn about Persistent Volumes.
- Learn about CSI Volume Cloning.
- Learn about Volume Snapshots.
- Read about the feature gates mentioned on this page.
6.12 - Storage Capacity
Storage capacity is limited and may vary depending on the node on which a pod runs: network-attached storage might not be accessible by all nodes, or storage is local to a node to begin with.
FEATURE STATE:
Kubernetes v1.24 [stable]This page describes how Kubernetes keeps track of storage capacity and how the scheduler uses that information to schedule Pods onto nodes that have access to enough storage capacity for the remaining missing volumes. Without storage capacity tracking, the scheduler may choose a node that doesn't have enough capacity to provision a volume and multiple scheduling retries will be needed.
Before you begin
Kubernetes v1.36 includes cluster-level API support for storage capacity tracking. To use this you must also be using a CSI driver that supports capacity tracking. Consult the documentation for the CSI drivers that you use to find out whether this support is available and, if so, how to use it. If you are not running Kubernetes v1.36, check the documentation for that version of Kubernetes.
API
There are two API extensions for this feature:
- CSIStorageCapacity objects: these get produced by a CSI driver in the namespace where the driver is installed. Each object contains capacity information for one storage class and defines which nodes have access to that storage.
- The
CSIDriverSpec.StorageCapacityfield: when set totrue, the Kubernetes scheduler will consider storage capacity for volumes that use the CSI driver.
Scheduling
Storage capacity information is used by the Kubernetes scheduler if:
- a Pod uses a volume that has not been created yet,
- that volume uses a StorageClass which references a CSI driver and
uses
WaitForFirstConsumervolume binding mode, and - the
CSIDriverobject for the driver hasStorageCapacityset to true.
In that case, the scheduler only considers nodes for the Pod which
have enough storage available to them. This check is very
simplistic and only compares the size of the volume against the
capacity listed in CSIStorageCapacity objects with a topology that
includes the node.
For volumes with Immediate volume binding mode, the storage driver
decides where to create the volume, independently of Pods that will
use the volume. The scheduler then schedules Pods onto nodes where the
volume is available after the volume has been created.
For CSI ephemeral volumes, scheduling always happens without considering storage capacity. This is based on the assumption that this volume type is only used by special CSI drivers which are local to a node and do not need significant resources there.
Rescheduling
When a node has been selected for a Pod with WaitForFirstConsumer
volumes, that decision is still tentative. The next step is that the
CSI storage driver gets asked to create the volume with a hint that the
volume is supposed to be available on the selected node.
Because Kubernetes might have chosen a node based on out-dated capacity information, it is possible that the volume cannot really be created. The node selection is then reset and the Kubernetes scheduler tries again to find a node for the Pod.
Limitations
Storage capacity tracking increases the chance that scheduling works on the first try, but cannot guarantee this because the scheduler has to decide based on potentially out-dated information. Usually, the same retry mechanism as for scheduling without any storage capacity information handles scheduling failures.
One situation where scheduling can fail permanently is when a Pod uses multiple volumes: one volume might have been created already in a topology segment which then does not have enough capacity left for another volume. Manual intervention is necessary to recover from this, for example by increasing capacity or deleting the volume that was already created.
What's next
- For more information on the design, see the Storage Capacity Constraints for Pod Scheduling KEP.
6.13 - Node-specific Volume Limits
This page describes the maximum number of volumes that can be attached to a Node for various cloud providers.
Cloud providers like Google, Amazon, and Microsoft typically have a limit on how many volumes can be attached to a Node. It is important for Kubernetes to respect those limits. Otherwise, Pods scheduled on a Node could get stuck waiting for volumes to attach.
Kubernetes default limits
The Kubernetes scheduler has default limits on the number of volumes that can be attached to a Node:
| Cloud service | Maximum volumes per Node |
|---|---|
| Amazon Elastic Block Store (EBS) | 39 |
| Google Persistent Disk | 16 |
| Microsoft Azure Disk Storage | 16 |
Dynamic volume limits
FEATURE STATE:
Kubernetes v1.17 [stable]Dynamic volume limits are supported for following volume types.
- Amazon EBS
- Google Persistent Disk
- Azure Disk
- CSI
For volumes managed by in-tree volume plugins, Kubernetes automatically determines the Node type and enforces the appropriate maximum number of volumes for the node. For example:
On Google Compute Engine, up to 127 volumes can be attached to a node, depending on the node type.
For Amazon EBS disks on M5,C5,R5,T3 and Z1D instance types, Kubernetes allows only 25 volumes to be attached to a Node. For other instance types on Amazon Elastic Compute Cloud (EC2), Kubernetes allows 39 volumes to be attached to a Node.
On Azure, up to 64 disks can be attached to a node, depending on the node type. For more details, refer to Sizes for virtual machines in Azure.
If a CSI storage driver advertises a maximum number of volumes for a Node (using
NodeGetInfo), the kube-scheduler honors that limit. Refer to the CSI specifications for details.For volumes managed by in-tree plugins that have been migrated to a CSI driver, the maximum number of volumes will be the one reported by the CSI driver.
Mutable CSI Node Allocatable Count
FEATURE STATE:
Kubernetes v1.36 [stable](enabled by default)CSI drivers can dynamically adjust the maximum number of volumes that can be attached to a Node at runtime. This enhances scheduling accuracy and reduces pod scheduling failures due to changes in resource availability.
To use this feature, you must enable the MutableCSINodeAllocatableCount feature gate on the following components:
kube-apiserverkubelet
Periodic Updates
When enabled, CSI drivers can request periodic updates to their volume limits by setting the nodeAllocatableUpdatePeriodSeconds field in the CSIDriver specification. For example:
apiVersion: storage.k8s.io/v1
kind: CSIDriver
metadata:
name: hostpath.csi.k8s.io
spec:
nodeAllocatableUpdatePeriodSeconds: 60
Kubelet will periodically call the corresponding CSI driver’s NodeGetInfo endpoint to refresh the maximum number of attachable volumes, using the interval specified in nodeAllocatableUpdatePeriodSeconds. The minimum allowed value for this field is 10 seconds.
If a volume attachment operation fails with a ResourceExhausted error (gRPC code 8), Kubernetes triggers an immediate update to the allocatable volume count for that Node. Additionally, kubelet marks affected pods as Failed, allowing their controllers to handle recreation. This prevents pods from getting stuck indefinitely in the ContainerCreating state.
Preventing Pod placement without CSI driver
FEATURE STATE:
Kubernetes v1.35 [alpha](disabled by default)If VolumeLimitScaling feature gate is enabled and a CSI driver has corresponding CSIDriver object installed with spec.preventPodSchedulingIfMissing set to true then scheduler will prevent pod placement to nodes that do not yet have CSI driver installed. For example:
apiVersion: storage.k8s.io/v1
kind: CSIDriver
metadata:
name: hostpath.csi.k8s.io
spec:
preventPodSchedulingIfMissing: true
This limitation only applies to pods that require corresponding CSI volume.
CSI volume attach limits and cluster autoscaler
If --enable-csi-node-aware-scheduling option is enabled in cluster-autoscaler, then cluster-autoscaler can
accurately calculate number of nodes required to satisfy pending pods that require CSI volumes.
If you are using cluster-autoscaler in your
Kubernetes cluster, we do not recommend preventing pod placement via PreventPodSchedulingIfMissing field,
unless cluster-autoscaler also has --enable-csi-node-aware-scheduling command line option enabled. Underlying reason for this limitation while VolumeLimitScaling
feature remains in alpha is - preventing pod placement can break scheduling simulation cluster-autoscaler runs if cluster-autoscaler is not already aware of CSI volume limits. We expect this limitation to go away once --enable-csi-node-aware-scheduling becomes enabled by default in cluster-autoscaler.
Command line --enable-csi-node-aware-scheduling in cluster-autoscaler can be enabled regardless of VolumeLimitScaling feature state in Kubernetes. We recommend enabling it if your cluster is
using CSI volumes and you are running into issues related to, too many pods crowding a node when a new node is spun via cluster-autoscaler, because current version of
cluster-autoscaler does not compute correct number of nodes required to satisfy all pending pods.
6.14 - Local ephemeral storage
Nodes have local ephemeral storage, backed by locally-attached writeable devices or, sometimes, by RAM. "Ephemeral" means that there is no long-term guarantee about durability.
Pods use ephemeral local storage for scratch space, caching, and for logs.
The kubelet can provide scratch space to Pods using local ephemeral storage to
mount emptyDir
volumes into containers.
The kubelet also uses this kind of storage to hold node-level container logs, container images, and the writable layers of running containers.
Caution:
If a node fails, the data in its ephemeral storage can be lost. Your applications cannot expect any performance SLAs (disk IOPS for example) from local ephemeral storage.Note:
To make the resource quota work on ephemeral-storage, two things need to be done:
- An admin sets the resource quota for ephemeral-storage in a namespace.
- A user needs to specify limits for the ephemeral-storage resource in the Pod spec.
If the user doesn't specify the ephemeral-storage resource limit in the Pod spec, the resource quota is not enforced on ephemeral-storage.
Kubernetes lets you track, reserve and limit the amount of ephemeral local storage a Pod can consume.
Configurations for local ephemeral storage
Kubernetes supports the following ways to configure local ephemeral storage on a node:
In this configuration, you place all different kinds of ephemeral local data
(emptyDir volumes, writeable layers, container images, logs) into one filesystem.
The kubelet also writes node-level container logs and treats these similarly to ephemeral local storage.
The kubelet writes logs to files inside its configured log directory (/var/log
by default); and has a base directory for other locally stored data
(/var/lib/kubelet by default).
Typically, both /var/lib/kubelet and /var/log are on the system root filesystem,
and the kubelet is designed with that layout in mind.
Your node can have as many other filesystems, not used for Kubernetes, as you like.
You use one filesystem on the node for ephemeral data from running Pods, such as
logs and emptyDir volumes. You can also use this filesystem for other data,
such as system logs that are not related to Kubernetes; it can even be the root
filesystem.
The kubelet also writes node-level container logs into the first filesystem, and treats these similarly to ephemeral local storage.
You also use a separate filesystem, backed by a different logical storage device. In this configuration, the container runtime stores both container image layers and writeable layers on this second filesystem. Configure this storage location in your container runtime, not in the kubelet.
The first filesystem does not hold any image layers or writeable layers.
Your node can have as many other filesystems, not used for Kubernetes, as you like.
In this configuration, container image layers are on a separate filesystem, and
container writeable layers are on the same filesystem as the kubelet's ephemeral
data, such as logs and emptyDir volumes.
This layout requires support for the containerfs eviction signals. For details
about the feature gate and the container runtimes that support this layout, see
node-pressure eviction.
The node-pressure eviction
page refers to these observed filesystems as nodefs, imagefs, and
containerfs. Those names do not always mean separate mount points.
The kubelet can measure local storage use when you set up the node using one of the supported configurations for local ephemeral storage.
If you have a different configuration, then the kubelet does not apply resource limits for ephemeral local storage.
Note:
The kubelet trackstmpfs emptyDir volumes as container memory use, rather
than as local ephemeral storage.Note:
The kubelet can only track ephemeral storage on the filesystems it observes through the supported layouts. If you mount extra filesystems under paths such as/var/lib/kubelet, /var/log, or the container runtime storage directory
outside those layouts, the kubelet might not report ephemeral storage correctly.Setting requests and limits for local ephemeral storage
You can specify ephemeral-storage for managing local ephemeral storage. Each
container of a Pod can specify either or both of the following:
spec.containers[].resources.limits.ephemeral-storagespec.containers[].resources.requests.ephemeral-storage
Limits and requests for ephemeral-storage are measured in byte quantities.
You can express storage as a plain integer or as a fixed-point number using one of these suffixes:
E, P, T, G, M, k. You can also use the power-of-two equivalents: Ei, Pi, Ti, Gi,
Mi, Ki. For example, the following quantities all represent roughly the same value:
128974848129e6129M123Mi
Pay attention to the case of the suffixes. If you request 400m of ephemeral-storage, this is a request
for 0.4 bytes. Someone who types that probably meant to ask for 400 mebibytes (400Mi)
or 400 megabytes (400M).
In the following example, the Pod has two containers. Each container has a request of
2GiB of local ephemeral storage. Each container has a limit of 4GiB of local ephemeral
storage. Therefore, the Pod has a request of 4GiB of local ephemeral storage, and
a limit of 8GiB of local ephemeral storage. 500Mi of that limit could be
consumed by the emptyDir volume.
apiVersion: v1
kind: Pod
metadata:
name: frontend
spec:
containers:
- name: app
image: images.my-company.example/app:v4
resources:
requests:
ephemeral-storage: "2Gi"
limits:
ephemeral-storage: "4Gi"
volumeMounts:
- name: ephemeral
mountPath: "/tmp"
- name: log-aggregator
image: images.my-company.example/log-aggregator:v6
resources:
requests:
ephemeral-storage: "2Gi"
limits:
ephemeral-storage: "4Gi"
volumeMounts:
- name: ephemeral
mountPath: "/tmp"
volumes:
- name: ephemeral
emptyDir:
sizeLimit: 500Mi
How Pods with ephemeral-storage requests are scheduled
When you create a Pod, the Kubernetes scheduler selects a node for the Pod to run on. Each node has a maximum amount of local ephemeral storage it can provide for Pods. For more information, see Node Allocatable.
The scheduler ensures that the sum of the resource requests of the scheduled containers is less than the capacity of the node.
Ephemeral storage consumption management
If the kubelet is managing local ephemeral storage as a resource, then the kubelet measures storage use in:
emptyDirvolumes, except tmpfsemptyDirvolumes- directories holding node-level logs
- writeable container layers
If a Pod is using more ephemeral storage than you allow it to, the kubelet sets an eviction signal that triggers Pod eviction.
For container-level isolation, if a container's writable layer and log usage exceeds its storage limit, the kubelet marks the Pod for eviction.
For pod-level isolation the kubelet works out an overall Pod storage limit by
summing the limits for the containers in that Pod. In this case, if the sum of
the local ephemeral storage usage from all containers and also the Pod's emptyDir
volumes exceeds the overall Pod storage limit, then the kubelet also marks the Pod
for eviction.
Caution:
If the kubelet is not measuring local ephemeral storage, then a Pod that exceeds its local storage limit will not be evicted for breaching local storage resource limits.
However, if the filesystem space for writeable container layers, node-level logs,
or emptyDir volumes falls low, the node
taints itself as short on local storage
and this taint triggers eviction for any Pods that don't specifically tolerate the taint.
See the supported configurations for ephemeral local storage.
The kubelet supports different ways to measure Pod storage use:
The kubelet performs regular, scheduled checks that scan each emptyDir volume,
container log directory, and writeable container layer.
The scan measures how much space is used.
Note:
In this mode, the kubelet does not track open file descriptors for deleted files.
If you (or a container) create a file inside an emptyDir volume,
something then opens that file, and you delete the file while it is still open,
then the inode for the deleted file stays until you close that file
but the kubelet does not categorize the space as in use.
FEATURE STATE:
Kubernetes v1.31 [beta](disabled by default)Project quotas are an operating-system level feature for managing
storage use on filesystems. With Kubernetes, you can enable project
quotas for monitoring storage use. Make sure that the filesystem
backing the emptyDir volumes, on the node, provides project quota support.
For example, XFS and ext4fs offer project quotas.
Note:
Project quotas let you monitor storage use; they do not enforce limits.Kubernetes uses project IDs starting from 1048576. The IDs in use are
registered in /etc/projects and /etc/projid. If project IDs in
this range are used for other purposes on the system, those project
IDs must be registered in /etc/projects and /etc/projid so that
Kubernetes does not use them.
Quotas are faster and more accurate than directory scanning. When a directory is assigned to a project, all files created under a directory are created in that project, and the kernel merely has to keep track of how many blocks are in use by files in that project. If a file is created and deleted, but has an open file descriptor, it continues to consume space. Quota tracking records that space accurately whereas directory scans overlook the storage used by deleted files.
To use quotas to track a pod's resource usage, the pod must be in a user namespace. Within user namespaces, the kernel restricts changes to projectIDs on the filesystem, ensuring the reliability of storage metrics calculated by quotas.
If you want to use project quotas, you should:
Enable the
LocalStorageCapacityIsolationFSQuotaMonitoring=truefeature gate using thefeatureGatesfield in the kubelet configuration.Ensure the
UserNamespacesSupportfeature gate is enabled, and that the kernel, CRI implementation and OCI runtime support user namespaces.Ensure that the root filesystem (or optional runtime filesystem) has project quotas enabled. All XFS filesystems support project quotas. For ext4 filesystems, you need to enable the project quota tracking feature while the filesystem is not mounted.
# For ext4, with /dev/block-device not mounted sudo tune2fs -O project -Q prjquota /dev/block-deviceEnsure that the root filesystem (or optional runtime filesystem) is mounted with project quotas enabled. For both XFS and ext4fs, the mount option is named
prjquota.
If you don't want to use project quotas, you should:
- Disable the
LocalStorageCapacityIsolationFSQuotaMonitoringfeature gate using thefeatureGatesfield in the kubelet configuration.
What's next
- Read about project quotas in XFS
6.15 - Volume Health Monitoring
FEATURE STATE:
Kubernetes v1.21 [alpha]CSI volume health monitoring allows CSI Drivers to detect abnormal volume conditions from the underlying storage systems and report them as events on PVCs or Pods.
Volume health monitoring
Kubernetes volume health monitoring is part of how Kubernetes implements the Container Storage Interface (CSI). Volume health monitoring feature is implemented in two components: an External Health Monitor controller, and the kubelet.
If a CSI Driver supports Volume Health Monitoring feature from the controller side, an event will be reported on the related PersistentVolumeClaim (PVC) when an abnormal volume condition is detected on a CSI volume.
The External Health Monitor controller
also watches for node failure events. You can enable node failure monitoring by setting
the enable-node-watcher flag to true. When the external health monitor detects a node
failure event, the controller reports an Event will be reported on the PVC to indicate
that pods using this PVC are on a failed node.
If a CSI Driver supports Volume Health Monitoring feature from the node side,
an Event will be reported on every Pod using the PVC when an abnormal volume
condition is detected on a CSI volume. In addition, Volume Health information
is exposed as Kubelet VolumeStats metrics. A new metric kubelet_volume_stats_health_status_abnormal
is added. This metric includes two labels: namespace and persistentvolumeclaim.
The count is either 1 or 0. 1 indicates the volume is unhealthy, 0 indicates volume
is healthy. For more information, please check
KEP.
What's next
See the CSI driver documentation to find out which CSI drivers have implemented this feature.
6.16 - Windows Storage
This page provides an storage overview specific to the Windows operating system.
Persistent storage
Windows has a layered filesystem driver to mount container layers and create a copy filesystem based on NTFS. All file paths in the container are resolved only within the context of that container.
- With Docker, volume mounts can only target a directory in the container, and not an individual file. This limitation does not apply to containerd.
- Volume mounts cannot project files or directories back to the host filesystem.
- Read-only filesystems are not supported because write access is always required for the Windows registry and SAM database. However, read-only volumes are supported.
- Volume user-masks and permissions are not available. Because the SAM is not shared between the host & container, there's no mapping between them. All permissions are resolved within the context of the container.
As a result, the following storage functionality is not supported on Windows nodes:
- Volume subpath mounts: only the entire volume can be mounted in a Windows container
- Subpath volume mounting for Secrets
- Host mount projection
- Read-only root filesystem (mapped volumes still support
readOnly) - Block device mapping
- Memory as the storage medium (for example,
emptyDir.mediumset toMemory) - File system features like uid/gid; per-user Linux filesystem permissions
- Setting secret permissions with DefaultMode (due to UID/GID dependency)
- NFS based storage/volume support
- Expanding the mounted volume (resizefs)
Kubernetes volumes enable complex applications, with data persistence and Pod volume sharing requirements, to be deployed on Kubernetes. Management of persistent volumes associated with a specific storage back-end or protocol includes actions such as provisioning/de-provisioning/resizing of volumes, attaching/detaching a volume to/from a Kubernetes node and mounting/dismounting a volume to/from individual containers in a pod that needs to persist data.
Volume management components are shipped as Kubernetes volume plugin. The following broad classes of Kubernetes volume plugins are supported on Windows:
FlexVolume plugins- Please note that FlexVolumes have been deprecated as of 1.23
CSI Plugins
In-tree volume plugins
The following in-tree plugins support persistent storage on Windows nodes:
7 - Configuration
Resources that Kubernetes provides for configuring Pods.
7.1 - ConfigMaps
A ConfigMap is an API object used to store non-confidential data in key-value pairs. Pods can consume ConfigMaps as environment variables, command-line arguments, or as configuration files in a volume.
A ConfigMap allows you to decouple environment-specific configuration from your container images, so that your applications are easily portable.
Caution:
ConfigMap does not provide secrecy or encryption. If the data you want to store are confidential, use a Secret rather than a ConfigMap, or use additional (third party) tools to keep your data private.Motivation
Use a ConfigMap for setting configuration data separately from application code.
For example, imagine that you are developing an application that you can run on your
own computer (for development) and in the cloud (to handle real traffic).
You write the code to look in an environment variable named DATABASE_HOST.
Locally, you set that variable to localhost. In the cloud, you set it to
refer to a Kubernetes Service
that exposes the database component to your cluster.
This lets you fetch a container image running in the cloud and
debug the exact same code locally if needed.
Note:
A ConfigMap is not designed to hold large chunks of data. The data stored in a ConfigMap cannot exceed 1 MiB. If you need to store settings that are larger than this limit, you may want to consider mounting a volume or use a separate database or file service.ConfigMap object
A ConfigMap is an API object
that lets you store configuration for other objects to use. Unlike most
Kubernetes objects that have a spec, a ConfigMap has data and binaryData
fields. These fields accept key-value pairs as their values. Both the data
field and the binaryData are optional. The data field is designed to
contain UTF-8 strings while the binaryData field is designed to
contain binary data as base64-encoded strings.
The name of a ConfigMap must be a valid DNS subdomain name.
Each key under the data or the binaryData field must consist of
alphanumeric characters, -, _ or .. The keys stored in data must not
overlap with the keys in the binaryData field.
Starting from v1.19, you can add an immutable field to a ConfigMap
definition to create an immutable ConfigMap.
ConfigMaps and Pods
You can write a Pod spec that refers to a ConfigMap and configures the container(s)
in that Pod based on the data in the ConfigMap. The Pod and the ConfigMap must be in
the same namespace.
Here's an example ConfigMap that has some keys with single values, and other keys where the value looks like a fragment of a configuration format.
apiVersion: v1
kind: ConfigMap
metadata:
name: game-demo
data:
# property-like keys; each key maps to a simple value
player_initial_lives: "3"
ui_properties_file_name: "user-interface.properties"
# file-like keys
game.properties: |
enemy.types=aliens,monsters
player.maximum-lives=5
user-interface.properties: |
color.good=purple
color.bad=yellow
allow.textmode=true
There are four different ways that you can use a ConfigMap to configure a container inside a Pod:
- Inside a container command and args
- Environment variables for a container
- Add a file in read-only volume, for the application to read
- Write code to run inside the Pod that uses the Kubernetes API to read a ConfigMap
These different methods lend themselves to different ways of modeling the data being consumed. For the first three methods, the kubelet uses the data from the ConfigMap when it launches container(s) for a Pod.
The fourth method means you have to write code to read the ConfigMap and its data. However, because you're using the Kubernetes API directly, your application can subscribe to get updates whenever the ConfigMap changes, and react when that happens. By accessing the Kubernetes API directly, this technique also lets you access a ConfigMap in a different namespace.
Here's an example Pod that uses values from game-demo to configure a Pod:
apiVersion: v1
kind: Pod
metadata:
name: configmap-demo-pod
spec:
containers:
- name: demo
image: alpine
command: ["sleep", "3600"]
env:
# Define the environment variable
- name: PLAYER_INITIAL_LIVES # Notice that the case is different here
# from the key name in the ConfigMap.
valueFrom:
configMapKeyRef:
name: game-demo # The ConfigMap this value comes from.
key: player_initial_lives # The key to fetch.
- name: UI_PROPERTIES_FILE_NAME
valueFrom:
configMapKeyRef:
name: game-demo
key: ui_properties_file_name
volumeMounts:
- name: config
mountPath: "/config"
readOnly: true
volumes:
# You set volumes at the Pod level, then mount them into containers inside that Pod
- name: config
configMap:
# Provide the name of the ConfigMap you want to mount.
name: game-demo
# An array of keys from the ConfigMap to create as files
items:
- key: "game.properties"
path: "game.properties"
- key: "user-interface.properties"
path: "user-interface.properties"
A ConfigMap doesn't differentiate between single line property values and multi-line file-like values. What matters is how Pods and other objects consume those values.
For this example, defining a volume and mounting it inside the demo
container as /config creates two files,
/config/game.properties and /config/user-interface.properties,
even though there are four keys in the ConfigMap. This is because the Pod
definition specifies an items array in the volumes section.
If you omit the items array entirely, every key in the ConfigMap becomes
a file with the same name as the key, and you get 4 files.
Using ConfigMaps
ConfigMaps can be mounted as data volumes. ConfigMaps can also be used by other parts of the system, without being directly exposed to the Pod. For example, ConfigMaps can hold data that other parts of the system should use for configuration.
The most common way to use ConfigMaps is to configure settings for containers running in a Pod in the same namespace. You can also use a ConfigMap separately.
For example, you might encounter addons or operators that adjust their behavior based on a ConfigMap.
Using ConfigMaps as files from a Pod
To consume a ConfigMap in a volume in a Pod:
- Create a ConfigMap or use an existing one. Multiple Pods can reference the same ConfigMap.
- Modify your Pod definition to add a volume under
.spec.volumes[]. Name the volume anything, and have a.spec.volumes[].configMap.namefield set to reference your ConfigMap object. - Add a
.spec.containers[].volumeMounts[]to each container that needs the ConfigMap. Specify.spec.containers[].volumeMounts[].readOnly = trueand.spec.containers[].volumeMounts[].mountPathto an unused directory name where you would like the ConfigMap to appear. - Modify your image or command line so that the program looks for files in
that directory. Each key in the ConfigMap
datamap becomes the filename undermountPath.
This is an example of a Pod that mounts a ConfigMap in a volume:
apiVersion: v1
kind: Pod
metadata:
name: mypod
spec:
containers:
- name: mypod
image: redis
volumeMounts:
- name: foo
mountPath: "/etc/foo"
readOnly: true
volumes:
- name: foo
configMap:
name: myconfigmap
Each ConfigMap you want to use needs to be referred to in .spec.volumes.
If there are multiple containers in the Pod, then each container needs its
own volumeMounts block, but only one .spec.volumes is needed per ConfigMap.
Mounted ConfigMaps are updated automatically
When a ConfigMap currently consumed in a volume is updated, projected keys are eventually updated as well.
The kubelet checks whether the mounted ConfigMap is fresh on every periodic sync.
However, the kubelet uses its local cache for getting the current value of the ConfigMap.
The type of the cache is configurable using the configMapAndSecretChangeDetectionStrategy field in
the KubeletConfiguration struct.
A ConfigMap can be either propagated by watch (default), ttl-based, or by redirecting
all requests directly to the API server.
As a result, the total delay from the moment when the ConfigMap is updated to the moment
when new keys are projected to the Pod can be as long as the kubelet sync period + cache
propagation delay, where the cache propagation delay depends on the chosen cache type
(it equals to watch propagation delay, ttl of cache, or zero correspondingly).
ConfigMaps consumed as environment variables are not updated automatically and require a pod restart.
Note:
A container using a ConfigMap as a subPath volume mount will not receive ConfigMap updates.Using Configmaps as environment variables
To use a Configmap in an environment variable in a Pod:
- For each container in your Pod specification, add an environment variable
for each Configmap key that you want to use to the
env[].valueFrom.configMapKeyReffield. - Modify your image and/or command line so that the program looks for values in the specified environment variables.
This is an example of defining a ConfigMap as a pod environment variable:
The following ConfigMap (myconfigmap.yaml) stores two properties: username and access_level:
apiVersion: v1
kind: ConfigMap
metadata:
name: myconfigmap
data:
username: k8s-admin
access_level: "1"
The following command will create the ConfigMap object:
kubectl apply -f myconfigmap.yaml
The following Pod consumes the content of the ConfigMap as environment variables:
apiVersion: v1
kind: Pod
metadata:
name: env-configmap
spec:
containers:
- name: app
command: ["/bin/sh", "-c", "printenv"]
image: busybox:latest
envFrom:
- configMapRef:
name: myconfigmap
The envFrom field instructs Kubernetes to create environment variables from the sources nested within it.
The inner configMapRef refers to a ConfigMap by its name and selects all its key-value pairs.
Add the Pod to your cluster, then retrieve its logs to see the output from the printenv command.
This should confirm that the two key-value pairs from the ConfigMap have been set as environment variables:
kubectl apply -f env-configmap.yaml
kubectl logs pod/env-configmap
The output is similar to this:
...
username: "k8s-admin"
access_level: "1"
...
Sometimes a Pod won't require access to all the values in a ConfigMap.
For example, you could have another Pod which only uses the username value from the ConfigMap.
For this use case, you can use the env.valueFrom syntax instead, which lets you select individual keys in
a ConfigMap. The name of the environment variable can also be different from the key within the ConfigMap.
For example:
apiVersion: v1
kind: Pod
metadata:
name: env-configmap
spec:
containers:
- name: envars-test-container
image: nginx
env:
- name: CONFIGMAP_USERNAME
valueFrom:
configMapKeyRef:
name: myconfigmap
key: username
In the Pod created from this manifest, you will see that the environment variable
CONFIGMAP_USERNAME is set to the value of the username value from the ConfigMap.
Other keys from the ConfigMap data are not copied into the environment.
It's important to note that the range of characters allowed for environment variable names in pods is restricted. If any keys do not meet the rules, those keys are not made available to your container, though the Pod is allowed to start.
Immutable ConfigMaps
FEATURE STATE:
Kubernetes v1.21 [stable]The Kubernetes feature Immutable Secrets and ConfigMaps provides an option to set individual Secrets and ConfigMaps as immutable. For clusters that extensively use ConfigMaps (at least tens of thousands of unique ConfigMap to Pod mounts), preventing changes to their data has the following advantages:
- protects you from accidental (or unwanted) updates that could cause applications outages
- improves performance of your cluster by significantly reducing load on kube-apiserver, by closing watches for ConfigMaps marked as immutable.
You can create an immutable ConfigMap by setting the immutable field to true.
For example:
apiVersion: v1
kind: ConfigMap
metadata:
...
data:
...
immutable: true
Once a ConfigMap is marked as immutable, it is not possible to revert this change
nor to mutate the contents of the data or the binaryData field. You can
only delete and recreate the ConfigMap. Because existing Pods maintain a mount point
to the deleted ConfigMap, it is recommended to recreate these pods.
What's next
- Read about Secrets.
- Read Configure a Pod to Use a ConfigMap.
- Read about changing a ConfigMap (or any other Kubernetes object)
- Read The Twelve-Factor App to understand the motivation for separating code from configuration.
7.2 - Secrets
A Secret is an object that contains a small amount of sensitive data such as a password, a token, or a key. Such information might otherwise be put in a Pod specification or in a container image. Using a Secret means that you don't need to include confidential data in your application code.
Because Secrets can be created independently of the Pods that use them, there is less risk of the Secret (and its data) being exposed during the workflow of creating, viewing, and editing Pods. Kubernetes, and applications that run in your cluster, can also take additional precautions with Secrets, such as avoiding writing sensitive data to nonvolatile storage.
Secrets are similar to ConfigMaps but are specifically intended to hold confidential data.
Caution:
Kubernetes Secrets are, by default, stored unencrypted in the API server's underlying data store (etcd). Anyone with API access can retrieve or modify a Secret, and so can anyone with access to etcd. Additionally, anyone who is authorized to create a Pod in a namespace can use that access to read any Secret in that namespace; this includes indirect access such as the ability to create a Deployment.
In order to safely use Secrets, take at least the following steps:
- Enable Encryption at Rest for Secrets.
- Enable or configure RBAC rules with least-privilege access to Secrets.
- Restrict Secret access to specific containers.
- Consider using external Secret store providers.
For more guidelines to manage and improve the security of your Secrets, refer to Good practices for Kubernetes Secrets.
See Information security for Secrets for more details.
Uses for Secrets
You can use Secrets for purposes such as the following:
- Set environment variables for a container.
- Provide credentials such as SSH keys or passwords to Pods.
- Allow the kubelet to pull container images from private registries.
The Kubernetes control plane also uses Secrets; for example, bootstrap token Secrets are a mechanism to help automate node registration.
Use case: dotfiles in a secret volume
You can make your data "hidden" by defining a key that begins with a dot.
This key represents a dotfile or "hidden" file. For example, when the following Secret
is mounted into a volume, secret-volume, the volume will contain a single file,
called .secret-file, and the dotfile-test-container will have this file
present at the path /etc/secret-volume/.secret-file.
Note:
Files beginning with dot characters are hidden from the output ofls -l;
you must use ls -la to see them when listing directory contents.apiVersion: v1
kind: Secret
metadata:
name: dotfile-secret
data:
.secret-file: dmFsdWUtMg0KDQo=
---
apiVersion: v1
kind: Pod
metadata:
name: secret-dotfiles-pod
spec:
volumes:
- name: secret-volume
secret:
secretName: dotfile-secret
containers:
- name: dotfile-test-container
image: registry.k8s.io/busybox
command:
- ls
- "-l"
- "/etc/secret-volume"
volumeMounts:
- name: secret-volume
readOnly: true
mountPath: "/etc/secret-volume"Use case: Secret visible to one container in a Pod
Consider a program that needs to handle HTTP requests, do some complex business logic, and then sign some messages with an HMAC. Because it has complex application logic, there might be an unnoticed remote file reading exploit in the server, which could expose the private key to an attacker.
This could be divided into two processes in two containers: a frontend container which handles user interaction and business logic, but which cannot see the private key; and a signer container that can see the private key, and responds to simple signing requests from the frontend (for example, over localhost networking).
With this partitioned approach, an attacker now has to trick the application server into doing something rather arbitrary, which may be harder than getting it to read a file.
Alternatives to Secrets
Rather than using a Secret to protect confidential data, you can pick from alternatives.
Here are some of your options:
- If your cloud-native component needs to authenticate to another application that you know is running within the same Kubernetes cluster, you can use a ServiceAccount and its tokens to identify your client.
- There are third-party tools that you can run, either within or outside your cluster, that manage sensitive data. For example, a service that Pods access over HTTPS, that reveals a Secret if the client correctly authenticates (for example, with a ServiceAccount token).
- For authentication, you can implement a custom signer for X.509 certificates, and use CertificateSigningRequests to let that custom signer issue certificates to Pods that need them.
- You can use a device plugin to expose node-local encryption hardware to a specific Pod. For example, you can schedule trusted Pods onto nodes that provide a Trusted Platform Module, configured out-of-band.
You can also combine two or more of those options, including the option to use Secret objects themselves.
For example: implement (or deploy) an operator that fetches short-lived session tokens from an external service, and then creates Secrets based on those short-lived session tokens. Pods running in your cluster can make use of the session tokens, and operator ensures they are valid. This separation means that you can run Pods that are unaware of the exact mechanisms for issuing and refreshing those session tokens.
Types of Secret
When creating a Secret, you can specify its type using the type field of
the Secret
resource, or certain equivalent kubectl command line flags (if available).
The Secret type is used to facilitate programmatic handling of the Secret data.
Kubernetes provides several built-in types for some common usage scenarios. These types vary in terms of the validations performed and the constraints Kubernetes imposes on them.
| Built-in Type | Usage |
|---|---|
Opaque | arbitrary user-defined data |
kubernetes.io/service-account-token | ServiceAccount token |
kubernetes.io/dockercfg | serialized ~/.dockercfg file |
kubernetes.io/dockerconfigjson | serialized ~/.docker/config.json file |
kubernetes.io/basic-auth | credentials for basic authentication |
kubernetes.io/ssh-auth | credentials for SSH authentication |
kubernetes.io/tls | data for a TLS client or server |
bootstrap.kubernetes.io/token | bootstrap token data |
You can define and use your own Secret type by assigning a non-empty string as the
type value for a Secret object (an empty string is treated as an Opaque type).
Kubernetes doesn't impose any constraints on the type name. However, if you are using one of the built-in types, you must meet all the requirements defined for that type.
If you are defining a type of Secret that's for public use, follow the convention
and structure the Secret type to have your domain name before the name, separated
by a /. For example: cloud-hosting.example.net/cloud-api-credentials.
Opaque Secrets
Opaque is the default Secret type if you don't explicitly specify a type in
a Secret manifest. When you create a Secret using kubectl, you must use the
generic subcommand to indicate an Opaque Secret type. For example, the
following command creates an empty Secret of type Opaque:
kubectl create secret generic empty-secret
kubectl get secret empty-secret
The output looks like:
NAME TYPE DATA AGE
empty-secret Opaque 0 2m6s
The DATA column shows the number of data items stored in the Secret.
In this case, 0 means you have created an empty Secret.
ServiceAccount token Secrets
A kubernetes.io/service-account-token type of Secret is used to store a
token credential that identifies a
ServiceAccount. This
is a legacy mechanism that provides long-lived ServiceAccount credentials to
Pods.
In Kubernetes v1.22 and later, the recommended approach is to obtain a
short-lived, automatically rotating ServiceAccount token by using the
TokenRequest
API instead. You can get these short-lived tokens using the following methods:
- Call the
TokenRequestAPI either directly or by using an API client likekubectl. For example, you can use thekubectl create tokencommand. - Request a mounted token in a projected volume in your Pod manifest. Kubernetes creates the token and mounts it in the Pod. The token is automatically invalidated when the Pod that it's mounted in is deleted. For details, see Launch a Pod using service account token projection.
Note:
You should only create a ServiceAccount token Secret if you can't use theTokenRequest API to obtain a token,
and the security exposure of persisting a non-expiring token credential
in a readable API object is acceptable to you. For instructions, see
Manually create a long-lived API token for a ServiceAccount.When using this Secret type, you need to ensure that the
kubernetes.io/service-account.name annotation is set to an existing
ServiceAccount name. If you are creating both the ServiceAccount and
the Secret objects, you should create the ServiceAccount object first.
After the Secret is created, a Kubernetes controller
fills in some other fields such as the kubernetes.io/service-account.uid annotation, and the
token key in the data field, which is populated with an authentication token.
The following example configuration declares a ServiceAccount token Secret:
apiVersion: v1
kind: Secret
metadata:
name: secret-sa-sample
annotations:
kubernetes.io/service-account.name: "sa-name"
type: kubernetes.io/service-account-token
data:
extra: YmFyCg==After creating the Secret, wait for Kubernetes to populate the token key in the data field.
See the ServiceAccount
documentation for more information on how ServiceAccounts work.
You can also check the automountServiceAccountToken field and the
serviceAccountName field of the
Pod
for information on referencing ServiceAccount credentials from within Pods.
Docker config Secrets
If you are creating a Secret to store credentials for accessing a container image registry,
you must use one of the following type values for that Secret:
kubernetes.io/dockercfg: store a serialized~/.dockercfgwhich is the legacy format for configuring Docker command line. The Secretdatafield contains a.dockercfgkey whose value is the content of a base64 encoded~/.dockercfgfile.kubernetes.io/dockerconfigjson: store a serialized JSON that follows the same format rules as the~/.docker/config.jsonfile, which is a new format for~/.dockercfg. The Secretdatafield must contain a.dockerconfigjsonkey for which the value is the content of a base64 encoded~/.docker/config.jsonfile.
Below is an example for a kubernetes.io/dockercfg type of Secret:
apiVersion: v1
kind: Secret
metadata:
name: secret-dockercfg
type: kubernetes.io/dockercfg
data:
.dockercfg: |
eyJhdXRocyI6eyJodHRwczovL2V4YW1wbGUvdjEvIjp7ImF1dGgiOiJvcGVuc2VzYW1lIn19fQo=Note:
If you do not want to perform the base64 encoding, you can choose to use thestringData field instead.When you create Docker config Secrets using a manifest, the API
server checks whether the expected key exists in the data field, and
it verifies if the value provided can be parsed as a valid JSON. The API
server doesn't validate if the JSON actually is a Docker config file.
You can also use kubectl to create a Secret for accessing a container
registry, such as when you don't have a Docker configuration file:
kubectl create secret docker-registry secret-tiger-docker \
--docker-email=tiger@acme.example \
--docker-username=tiger \
--docker-password=pass1234 \
--docker-server=my-registry.example:5000
This command creates a Secret of type kubernetes.io/dockerconfigjson.
Retrieve the .data.dockerconfigjson field from that new Secret and decode the
data:
kubectl get secret secret-tiger-docker -o jsonpath='{.data.*}' | base64 -d
The output is equivalent to the following JSON document (which is also a valid Docker configuration file):
{
"auths": {
"my-registry.example:5000": {
"username": "tiger",
"password": "pass1234",
"email": "tiger@acme.example",
"auth": "dGlnZXI6cGFzczEyMzQ="
}
}
}
Caution:
The auth value there is base64 encoded; it is obscured but not secret.
Anyone who can read that Secret can learn the registry access bearer token.
It is suggested to use credential providers to dynamically and securely provide pull secrets on-demand.
Basic authentication Secret
The kubernetes.io/basic-auth type is provided for storing credentials needed
for basic authentication. When using this Secret type, the data field of the
Secret must contain one of the following two keys:
username: the user name for authenticationpassword: the password or token for authentication
Both values for the above two keys are base64 encoded strings. You can
alternatively provide the clear text content using the stringData field in the
Secret manifest.
The following manifest is an example of a basic authentication Secret:
apiVersion: v1
kind: Secret
metadata:
name: secret-basic-auth
type: kubernetes.io/basic-auth
stringData:
username: admin # required field for kubernetes.io/basic-auth
password: t0p-Secret # required field for kubernetes.io/basic-authNote:
ThestringData field for a Secret does not work well with server-side apply.The basic authentication Secret type is provided only for convenience.
You can create an Opaque type for credentials used for basic authentication.
However, using the defined and public Secret type (kubernetes.io/basic-auth) helps other
people to understand the purpose of your Secret, and sets a convention for what key names
to expect.
SSH authentication Secrets
The builtin type kubernetes.io/ssh-auth is provided for storing data used in
SSH authentication. When using this Secret type, you will have to specify a
ssh-privatekey key-value pair in the data (or stringData) field
as the SSH credential to use.
The following manifest is an example of a Secret used for SSH public/private key authentication:
apiVersion: v1
kind: Secret
metadata:
name: secret-ssh-auth
type: kubernetes.io/ssh-auth
data:
# the data is abbreviated in this example
ssh-privatekey: |
UG91cmluZzYlRW1vdGljb24lU2N1YmE=The SSH authentication Secret type is provided only for convenience.
You can create an Opaque type for credentials used for SSH authentication.
However, using the defined and public Secret type (kubernetes.io/ssh-auth) helps other
people to understand the purpose of your Secret, and sets a convention for what key names
to expect.
The Kubernetes API verifies that the required keys are set for a Secret of this type.
Caution:
SSH private keys do not establish trusted communication between an SSH client and host server on their own. A secondary means of establishing trust is needed to mitigate "man in the middle" attacks, such as aknown_hosts file added to a ConfigMap.TLS Secrets
The kubernetes.io/tls Secret type is for storing
a certificate and its associated key that are typically used for TLS.
One common use for TLS Secrets is to configure encryption in transit for
an Ingress, but you can also use it
with other resources or directly in your workload.
When using this type of Secret, the tls.key and the tls.crt key must be provided
in the data (or stringData) field of the Secret configuration, although the API
server doesn't actually validate the values for each key.
As an alternative to using stringData, you can use the data field to provide
the base64 encoded certificate and private key. For details, see
Constraints on Secret names and data.
The following YAML contains an example config for a TLS Secret:
apiVersion: v1
kind: Secret
metadata:
name: secret-tls
type: kubernetes.io/tls
data:
# values are base64 encoded, which obscures them but does NOT provide
# any useful level of confidentiality
# Replace the following values with your own base64-encoded certificate and key.
tls.crt: "REPLACE_WITH_BASE64_CERT"
tls.key: "REPLACE_WITH_BASE64_KEY"The TLS Secret type is provided only for convenience.
You can create an Opaque type for credentials used for TLS authentication.
However, using the defined and public Secret type (kubernetes.io/tls)
helps ensure the consistency of Secret format in your project. The API server
verifies if the required keys are set for a Secret of this type.
To create a TLS Secret using kubectl, use the tls subcommand:
kubectl create secret tls my-tls-secret \
--cert=path/to/cert/file \
--key=path/to/key/file
The public/private key pair must exist before hand. The public key certificate for --cert must be .PEM encoded
and must match the given private key for --key.
Bootstrap token Secrets
The bootstrap.kubernetes.io/token Secret type is for
tokens used during the node bootstrap process. It stores tokens used to sign
well-known ConfigMaps.
A bootstrap token Secret is usually created in the kube-system namespace and
named in the form bootstrap-token-<token-id> where <token-id> is a 6 character
string of the token ID.
As a Kubernetes manifest, a bootstrap token Secret might look like the following:
apiVersion: v1
kind: Secret
metadata:
name: bootstrap-token-5emitj
namespace: kube-system
type: bootstrap.kubernetes.io/token
data:
auth-extra-groups: c3lzdGVtOmJvb3RzdHJhcHBlcnM6a3ViZWFkbTpkZWZhdWx0LW5vZGUtdG9rZW4=
expiration: MjAyMC0wOS0xM1QwNDozOToxMFo=
token-id: NWVtaXRq
token-secret: a3E0Z2lodnN6emduMXAwcg==
usage-bootstrap-authentication: dHJ1ZQ==
usage-bootstrap-signing: dHJ1ZQ==A bootstrap token Secret has the following keys specified under data:
token-id: A random 6 character string as the token identifier. Required.token-secret: A random 16 character string as the actual token Secret. Required.description: A human-readable string that describes what the token is used for. Optional.expiration: An absolute UTC time using RFC3339 specifying when the token should be expired. Optional.usage-bootstrap-<usage>: A boolean flag indicating additional usage for the bootstrap token.auth-extra-groups: A comma-separated list of group names that will be authenticated as in addition to thesystem:bootstrappersgroup.
You can alternatively provide the values in the stringData field of the Secret
without base64 encoding them:
apiVersion: v1
kind: Secret
metadata:
# Note how the Secret is named
name: bootstrap-token-5emitj
# A bootstrap token Secret usually resides in the kube-system namespace
namespace: kube-system
type: bootstrap.kubernetes.io/token
stringData:
auth-extra-groups: "system:bootstrappers:kubeadm:default-node-token"
expiration: "2020-09-13T04:39:10Z"
# This token ID is used in the name
token-id: "5emitj"
token-secret: "kq4gihvszzgn1p0r"
# This token can be used for authentication
usage-bootstrap-authentication: "true"
# and it can be used for signing
usage-bootstrap-signing: "true"Note:
ThestringData field for a Secret does not work well with server-side apply.Working with Secrets
Creating a Secret
There are several options to create a Secret:
Constraints on Secret names and data
The name of a Secret object must be a valid DNS subdomain name.
You can specify the data and/or the stringData field when creating a
configuration file for a Secret. The data and the stringData fields are optional.
The values for all keys in the data field have to be base64-encoded strings.
If the conversion to base64 string is not desirable, you can choose to specify
the stringData field instead, which accepts arbitrary strings as values.
The keys of data and stringData must consist of alphanumeric characters,
-, _ or .. All key-value pairs in the stringData field are internally
merged into the data field. If a key appears in both the data and the
stringData field, the value specified in the stringData field takes
precedence.
Size limit
Individual Secrets are limited to 1MiB in size. This is to discourage creation of very large Secrets that could exhaust the API server and kubelet memory. However, creation of many smaller Secrets could also exhaust memory. You can use a resource quota to limit the number of Secrets (or other resources) in a namespace.
Editing a Secret
You can edit an existing Secret unless it is immutable. To edit a Secret, use one of the following methods:
You can also edit the data in a Secret using the Kustomize tool. However, this
method creates a new Secret object with the edited data.
Depending on how you created the Secret, as well as how the Secret is used in
your Pods, updates to existing Secret objects are propagated automatically to
Pods that use the data. For more information, refer to Using Secrets as files from a Pod section.
Using a Secret
Secrets can be mounted as data volumes or exposed as environment variables to be used by a container in a Pod. Secrets can also be used by other parts of the system, without being directly exposed to the Pod. For example, Secrets can hold credentials that other parts of the system should use to interact with external systems on your behalf.
Secret volume sources are validated to ensure that the specified object reference actually points to an object of type Secret. Therefore, a Secret needs to be created before any Pods that depend on it.
If the Secret cannot be fetched (perhaps because it does not exist, or due to a temporary lack of connection to the API server) the kubelet periodically retries running that Pod. The kubelet also reports an Event for that Pod, including details of the problem fetching the Secret.
Optional Secrets
When you reference a Secret in a Pod, you can mark the Secret as optional, such as in the following example. If an optional Secret doesn't exist, Kubernetes ignores it.
apiVersion: v1
kind: Pod
metadata:
name: mypod
spec:
containers:
- name: mypod
image: redis
volumeMounts:
- name: foo
mountPath: "/etc/foo"
readOnly: true
volumes:
- name: foo
secret:
secretName: mysecret
optional: trueBy default, Secrets are required. None of a Pod's containers will start until all non-optional Secrets are available.
If a Pod references a specific key in a non-optional Secret and that Secret does exist, but is missing the named key, the Pod fails during startup.
Using Secrets as files from a Pod
If you want to access data from a Secret in a Pod, one way to do that is to have Kubernetes make the value of that Secret be available as a file inside the filesystem of one or more of the Pod's containers.
For instructions, refer to Create a Pod that has access to the secret data through a Volume.
When a volume contains data from a Secret, and that Secret is updated, Kubernetes tracks this and updates the data in the volume, using an eventually-consistent approach.
Note:
A container using a Secret as a subPath volume mount does not receive automated Secret updates.The kubelet keeps a cache of the current keys and values for the Secrets that are used in
volumes for pods on that node.
You can configure the way that the kubelet detects changes from the cached values. The
configMapAndSecretChangeDetectionStrategy field in the
kubelet configuration controls
which strategy the kubelet uses. The default strategy is Watch.
Updates to Secrets can be either propagated by an API watch mechanism (the default), based on a cache with a defined time-to-live, or polled from the cluster API server on each kubelet synchronisation loop.
As a result, the total delay from the moment when the Secret is updated to the moment when new keys are projected to the Pod can be as long as the kubelet sync period + cache propagation delay, where the cache propagation delay depends on the chosen cache type (following the same order listed in the previous paragraph, these are: watch propagation delay, the configured cache TTL, or zero for direct polling).
Using Secrets as environment variables
To use a Secret in an environment variable in a Pod:
- For each container in your Pod specification, add an environment variable
for each Secret key that you want to use to the
env[].valueFrom.secretKeyReffield. - Modify your image and/or command line so that the program looks for values in the specified environment variables.
For instructions, refer to Define container environment variables using Secret data.
It's important to note that the range of characters allowed for environment variable names in pods is restricted. If any keys do not meet the rules, those keys are not made available to your container, though the Pod is allowed to start.
Container image pull Secrets
If you want to fetch container images from a private repository, you need a way for the kubelet on each node to authenticate to that repository. You can configure image pull Secrets to make this possible. These Secrets are configured at the Pod level.
Using imagePullSecrets
The imagePullSecrets field is a list of references to Secrets in the same namespace.
You can use an imagePullSecrets to pass a Secret that contains a Docker (or other) image registry
password to the kubelet. The kubelet uses this information to pull a private image on behalf of your Pod.
See the PodSpec API
for more information about the imagePullSecrets field.
Manually specifying an imagePullSecret
You can learn how to specify imagePullSecrets from the
container images
documentation.
Arranging for imagePullSecrets to be automatically attached
You can manually create imagePullSecrets, and reference these from a ServiceAccount. Any Pods
created with that ServiceAccount or created with that ServiceAccount by default, will get their
imagePullSecrets field set to that of the service account.
See Add ImagePullSecrets to a service account
for a detailed explanation of that process.
Using Secrets with static Pods
You cannot use ConfigMaps or Secrets with static Pods.
Immutable Secrets
FEATURE STATE:
Kubernetes v1.21 [stable]Kubernetes lets you mark specific Secrets (and ConfigMaps) as immutable. Preventing changes to the data of an existing Secret has the following benefits:
- protects you from accidental (or unwanted) updates that could cause applications outages
- (for clusters that extensively use Secrets - at least tens of thousands of unique Secret to Pod mounts), switching to immutable Secrets improves the performance of your cluster by significantly reducing load on kube-apiserver. The kubelet does not need to maintain a [watch] on any Secrets that are marked as immutable.
Marking a Secret as immutable
You can create an immutable Secret by setting the immutable field to true. For example,
apiVersion: v1
kind: Secret
metadata: ...
data: ...
immutable: true
You can also update any existing mutable Secret to make it immutable.
Note:
Once a Secret or ConfigMap is marked as immutable, it is not possible to revert this change nor to mutate the contents of thedata field. You can only delete and recreate the Secret.
Existing Pods maintain a mount point to the deleted Secret - it is recommended to recreate
these pods.Information security for Secrets
Although ConfigMap and Secret work similarly, Kubernetes applies some additional protection for Secret objects.
Secrets often hold values that span a spectrum of importance, many of which can cause escalations within Kubernetes (e.g. service account tokens) and to external systems. Even if an individual app can reason about the power of the Secrets it expects to interact with, other apps within the same namespace can render those assumptions invalid.
Authorization configuration affects how Secret data can be accessed within a namespace.
For example, granting list or watch permissions on Secrets allows a subject
to read all Secret data in that namespace, not only the Secrets explicitly
referenced by its Pods. Restrict access to the minimum set of permissions
required for a workload to function, and avoid granting broad roles such as
cluster-admin unless required for administrative purposes.
Also see the Authorization documentation.
A Secret is only sent to a node if a Pod on that node requires it.
For mounting Secrets into Pods, the kubelet stores a copy of the data into a tmpfs
so that the confidential data is not written to durable storage.
Once the Pod that depends on the Secret is deleted, the kubelet deletes its local copy
of the confidential data from the Secret.
There may be several containers in a Pod. By default, containers you define only have access to the default ServiceAccount and its related Secret. You must explicitly define environment variables or map a volume into a container in order to provide access to any other Secret.
There may be Secrets for several Pods on the same node. However, only the Secrets that a Pod requests are potentially visible within its containers. Therefore, one Pod does not have access to the Secrets of another Pod.
Configure least-privilege access to Secrets
To enhance the security measures around Secrets, use separate namespaces to isolate access to mounted secrets.
Warning:
Any containers that run withprivileged: true on a node can access all
Secrets used on that node.What's next
- For guidelines to manage and improve the security of your Secrets, refer to Good practices for Kubernetes Secrets.
- Learn how to manage Secrets using
kubectl - Learn how to manage Secrets using config file
- Learn how to manage Secrets using kustomize
- Read the API reference for
Secret
7.3 - Resource Management for Pods and Containers
When you specify a Pod, you can optionally specify how much of each resource a container needs. The most common resources to specify are CPU and memory (RAM); there are others.
When you specify the resource request for containers in a Pod, the kube-scheduler uses this information to decide which node to place the Pod on. When you specify a resource limit for a container, the kubelet enforces those limits so that the running container is not allowed to use more of that resource than the limit you set. The kubelet also reserves at least the request amount of that system resource specifically for that container to use.
Requests and limits
If the node where a Pod is running has enough of a resource available, it's possible (and
allowed) for a container to use more resource than its request for that resource specifies.
For example, if you set a memory request of 256 MiB for a container, and that container is in
a Pod scheduled to a Node with 8GiB of memory and no other Pods, then the container can try to use
more RAM.
Limits are a different story. Both cpu and memory limits are applied by the kubelet (and
container runtime),
and are ultimately enforced by the kernel. On Linux nodes, the Linux kernel
enforces limits with
cgroups.
The behavior of cpu and memory limit enforcement is slightly different.
cpu limits are enforced by CPU throttling. When a container approaches
its cpu limit, the kernel will restrict access to the CPU corresponding to the
container's limit. Thus, a cpu limit is a hard limit the kernel enforces.
Containers may not use more CPU than is specified in their cpu limit.
memory limits are enforced by the kernel with out of memory (OOM) kills. When
a container uses more than its memory limit, the kernel may terminate it. However,
terminations only happen when the kernel detects memory pressure. Thus, a
container that over allocates memory may not be immediately killed. This means
memory limits are enforced reactively. A container may use more memory than
its memory limit, but if it does, it may get killed.
Note:
There is an alpha featureMemoryQoS which adds memory throttling and optional
tiered memory reservation on Linux nodes using cgroup v2. For details, see
Memory QoS with cgroup v2.Note:
If you specify a limit for a resource, but do not specify any request, and no admission-time mechanism has applied a default request for that resource, then Kubernetes copies the limit you specified and uses it as the requested value for the resource.Resource types
A resource type has a base unit and can be requested, limited, or both. Kubernetes has the following built-in resource types:
| Resource type | Description | Base unit |
|---|---|---|
cpu | Compute processing | cpu (core) |
memory | RAM | Bytes |
ephemeral-storage | Local ephemeral storage | Bytes |
hugepages-<size> | Huge pages (Linux only) | Bytes |
Clusters can also provide extended resources (resources with a custom name, typically exposed by device plugins).
Huge pages
For Linux workloads, you can specify huge page resources. Huge pages are a Linux-specific feature where the node kernel allocates blocks of memory that are much larger than the default page size.
For example, on a system where the default page size is 4KiB, you could specify a limit,
hugepages-2Mi: 80Mi. If the container tries allocating over 40 2MiB huge pages (a
total of 80 MiB), that allocation fails.
Note:
You cannot overcommithugepages-* resources.
This is different from the memory and cpu resources.CPU and memory are collectively referred to as compute resources, or resources. Compute resources are measurable quantities that can be requested, allocated, and consumed. They are distinct from API resources. API resources, such as Pods and Services are objects that can be read and modified through the Kubernetes API server.
Resource requests and limits of Pod and container
For each container, you can specify resource limits and requests, including the following:
spec.containers[].resources.limits.cpuspec.containers[].resources.limits.memoryspec.containers[].resources.limits.ephemeral-storagespec.containers[].resources.limits.hugepages-<size>spec.containers[].resources.requests.cpuspec.containers[].resources.requests.memoryspec.containers[].resources.requests.ephemeral-storagespec.containers[].resources.requests.hugepages-<size>
Although you can only specify requests and limits for individual containers, it is also useful to think about the overall resource requests and limits for a Pod. For a particular resource, a Pod resource request/limit is the sum of the resource requests/limits of that type for each container in the Pod.
Pod-level resource specification
FEATURE STATE:
Kubernetes v1.34 [beta](enabled by default)Provided your cluster has the PodLevelResources
feature gate enabled,
you can specify resource requests and limits at
the Pod level. At the Pod level, Kubernetes 1.36
only supports resource requests or limits for specific resource types: cpu and /
or memory and / or hugepages. With this feature, Kubernetes allows you to declare an overall resource
budget for the Pod, which is especially helpful when dealing with a large number of
containers where it can be difficult to accurately gauge individual resource needs.
Additionally, it enables containers within a Pod to share idle resources with each
other, improving resource utilization.
For a Pod, you can specify resource limits and requests for CPU and memory by including the following:
spec.resources.limits.cpuspec.resources.limits.memoryspec.resources.limits.hugepages-<size>spec.resources.requests.cpuspec.resources.requests.memoryspec.resources.requests.hugepages-<size>
Resource units in Kubernetes
CPU resource units
Limits and requests for CPU resources are measured in cpu units. In Kubernetes, 1 CPU unit is equivalent to 1 physical CPU core, or 1 virtual core, depending on whether the node is a physical host or a virtual machine running inside a physical machine.
Fractional requests are allowed. When you define a container with
spec.containers[].resources.requests.cpu set to 0.5, you are requesting half
as much CPU time compared to if you asked for 1.0 CPU.
For CPU resource units, the quantity expression 0.1 is equivalent to the
expression 100m, which can be read as "one hundred millicpu". Some people say
"one hundred millicores", and this is understood to mean the same thing.
CPU resource is always specified as an absolute amount of resource, never as a relative amount. For example,
500m CPU represents the roughly same amount of computing power whether that container
runs on a single-core, dual-core, or 48-core machine.
Note:
Kubernetes doesn't allow you to specify CPU resources with a precision finer than
1m or 0.001 CPU. To avoid accidentally using an invalid CPU quantity, it's useful to specify CPU units using the milliCPU form
instead of the decimal form when using less than 1 CPU unit.
For example, you have a Pod that uses 5m or 0.005 CPU and would like to decrease
its CPU resources. By using the decimal form, it's harder to spot that 0.0005 CPU
is an invalid value, while by using the milliCPU form, it's easier to spot that
0.5m is an invalid value.
Memory resource units
Limits and requests for memory are measured in bytes. You can express memory as
a plain integer or as a fixed-point number using one of these
quantity suffixes:
E, P, T, G, M, k. You can also use the power-of-two equivalents: Ei, Pi, Ti, Gi,
Mi, Ki. The Kubernetes API also allows m as a suffix (for millibytes: 1/1000 of a byte),
but this isn't useful to specify: you must always assign whole numbers of bytes, or sometimes larger chunks such as multiples of 1 gibibyte.
Here are some examples of memory quantities that represent roughly the same value:
128974848, 129e6, 129M, 128974848000m, 123Mi
Pay attention to the case of the suffixes. "M" means megabytes, while "m" means millibytes. If you request 400m of memory, this is a request for 0.4 bytes. Someone who types that probably meant to ask for 400 mebibytes (400Mi)
or 400 megabytes (400M).
Container resources example
The following Pod has two containers. Both containers are defined with a request for 0.25 CPU and 64MiB (226 bytes) of memory. Each container has a limit of 0.5 CPU and 128MiB of memory. You can say the Pod has a request of 0.5 CPU and 128 MiB of memory, and a limit of 1 CPU and 256MiB of memory.
---
apiVersion: v1
kind: Pod
metadata:
name: frontend
spec:
containers:
- name: app
image: images.my-company.example/app:v4
resources:
requests:
memory: "64Mi"
cpu: "250m"
limits:
memory: "128Mi"
cpu: "500m"
- name: log-aggregator
image: images.my-company.example/log-aggregator:v6
resources:
requests:
memory: "64Mi"
cpu: "250m"
limits:
memory: "128Mi"
cpu: "500m"
Pod resources example
FEATURE STATE:
Kubernetes v1.34 [beta](enabled by default)This feature can be enabled by setting the PodLevelResources
feature gate.
The following Pod has an explicit request of 1 CPU and 100 MiB of memory, and an
explicit limit of 1 CPU and 200 MiB of memory. The pod-resources-demo-ctr-1
container has explicit requests and limits set. However, the
pod-resources-demo-ctr-2 container will simply share the resources available
within the Pod resource boundaries, as it does not have explicit requests and limits
set.
apiVersion: v1
kind: Pod
metadata:
name: pod-resources-demo
namespace: pod-resources-example
spec:
resources:
limits:
cpu: "1"
memory: "200Mi"
requests:
cpu: "1"
memory: "100Mi"
containers:
- name: pod-resources-demo-ctr-1
image: nginx
resources:
limits:
cpu: "0.5"
memory: "100Mi"
requests:
cpu: "0.5"
memory: "50Mi"
- name: pod-resources-demo-ctr-2
image: fedora
command:
- sleep
- inf
How Pods with resource requests are scheduled
When you create a Pod, the Kubernetes scheduler selects a node for the Pod to run on. Each node has a maximum capacity for each of the resource types: the amount of CPU and memory it can provide for Pods. The scheduler ensures that, for each resource type, the sum of the resource requests of the scheduled containers is less than the capacity of the node. Note that although actual memory or CPU resource usage on nodes is very low, the scheduler still refuses to place a Pod on a node if the capacity check fails. This protects against a resource shortage on a node when resource usage later increases, for example, during a daily peak in request rate.
How Kubernetes applies resource requests and limits
When the kubelet starts a container as part of a Pod, the kubelet passes that container's requests and limits for memory and CPU to the container runtime.
On Linux, the container runtime typically configures kernel cgroups that apply and enforce the limits you defined.
- The CPU limit defines a hard ceiling on how much CPU time the container can use. During each scheduling interval (time slice), the Linux kernel checks to see if this limit is exceeded; if so, the kernel waits before allowing that cgroup to resume execution.
- The CPU request typically defines a weighting. If several different containers (cgroups) want to run on a contended system, workloads with larger CPU requests are allocated more CPU time than workloads with small requests.
- The memory request is mainly used during (Kubernetes) Pod scheduling. On a node that uses
cgroups v2, the container runtime might use the memory request as a hint to set
memory.minandmemory.low. - The memory limit defines a memory limit for that cgroup. If the container tries to allocate more memory than this limit, the Linux kernel out-of-memory subsystem activates and, typically, intervenes by stopping one of the processes in the container that tried to allocate memory. If that process is the container's PID 1, and the container is marked as restartable, Kubernetes restarts the container.
- The memory limit for the Pod or container can also apply to pages in memory backed
volumes, such as an
emptyDir. The kubelet trackstmpfsemptyDir volumes as container memory use, rather than as local ephemeral storage. When using memory backedemptyDir, be sure to check the notes below.
If a container exceeds its memory request and the node that it runs on becomes short of memory overall, it is likely that the Pod the container belongs to will be evicted.
A container might or might not be allowed to exceed its CPU limit for extended periods of time. However, container runtimes don't terminate Pods or containers for excessive CPU usage.
To determine whether a container cannot be scheduled or is being killed due to resource limits, see the Troubleshooting section.
Resizing container resources
After creating a Pod, you may need to adjust its CPU or memory resources based on actual usage patterns. Kubernetes provides two approaches for resizing Pod resources:
In-place resize
FEATURE STATE:
Kubernetes v1.35 [stable](enabled by default)You can modify the CPU and memory requests and limits of containers
in a running Pod without recreating it. This is called in-place Pod vertical scaling
or in-place Pod resize. To perform an in-place resize, update the container's resource
specifications using the Pod's /resize subresource. You can control whether a container
restart is required by setting the resizePolicy field in the container specification.
Note:
In-place resize currently applies to container-level resources. For resizing Pod-level resources, see Resize Pod CPU and Memory Resources.Resizing by launching replacement Pods
The cloud native approach to changing a Pod's resources is to update the Pod template in the workload object (such as a Deployment or StatefulSet) and let the workload's controller replace Pods with new ones that have the updated resources. This approach works with any Kubernetes version and can change any Pod specification.
For more details about Pod resizing, see Resizing Pods. For detailed instructions on in-place resize, see Resize CPU and Memory Resources assigned to Containers. You can also use the Vertical Pod Autoscaler to automatically manage Pod resource recommendations.
Monitoring compute & memory resource usage
The kubelet reports the resource usage of a Pod as part of the Pod
status.
If optional tools for monitoring are available in your cluster, then Pod resource usage can be retrieved either from the Metrics API directly or from your monitoring tools.
Considerations for memory backed emptyDir volumes
Caution:
If you do not specify asizeLimit for an emptyDir volume, that volume may
consume up to that pod's memory limit (Pod.spec.containers[].resources.limits.memory).
If you do not set a memory limit, the pod has no upper bound on memory consumption,
and can consume all available memory on the node. Kubernetes schedules pods based
on resource requests (Pod.spec.containers[].resources.requests) and will not
consider memory usage above the request when deciding if another pod can fit on
a given node. This can result in a denial of service and cause the OS to do
out-of-memory (OOM) handling. It is possible to create any number of emptyDirs
that could potentially consume all available memory on the node, making OOM
more likely.From the perspective of memory management, there are some similarities between
when a process uses memory as a work area and when using memory-backed
emptyDir. But when using memory as a volume, like memory-backed emptyDir,
there are additional points below that you should be careful of:
- Files stored on a memory-backed volume are almost entirely managed by the user application. Unlike when used as a work area for a process, you can not rely on things like language-level garbage collection.
- The purpose of writing files to a volume is to save data or pass it between applications. Neither Kubernetes nor the OS may automatically delete files from a volume, so memory used by those files can not be reclaimed when the system or the pod are under memory pressure.
- A memory-backed
emptyDiris useful because of its performance, but memory is generally much smaller in size and much higher in cost than other storage media, such as disks or SSDs. Using large amounts of memory foremptyDirvolumes may affect the normal operation of your pod or of the whole node, so should be used carefully.
If you are administering a cluster or namespace, you can also set
ResourceQuota that limits memory use;
you may also want to define a LimitRange
for additional enforcement.
If you specify a spec.containers[].resources.limits.memory for each Pod,
then the maximum size of an emptyDir volume will be the pod's memory limit.
As an alternative, a cluster administrator can enforce size limits for
emptyDir volumes in new Pods using a policy mechanism such as
ValidatingAdmissionPolicy.
Local ephemeral storage
For general concepts about local ephemeral storage and hints about configuring the requests and/or limits of ephemeral storage for a container, please check the local ephemeral storage page.
Resource monitoring for local ephemeral storage
The kubelet can measure how much local ephemeral storage is being used. It does this as long as you have enabled local ephemeral storage capacity isolation.
Kubernetes tracks the amount of ephemeral storage a Pod uses from the following:
- Writing to the container's writable layer (rootfs), container images, or both.
- Writing to local
emptyDirvolumes. - The Pod's own logs (usually stored under
/var/log/pods). - System files managed by Kubernetes that are mapped into the Pod, such as
/etc/hosts.
Extended resources
Extended resources are fully-qualified resource names outside the
kubernetes.io domain. They allow cluster operators to advertise and users to
consume the non-Kubernetes-built-in resources.
There are two steps required to use Extended Resources. First, the cluster operator must advertise an Extended Resource. Second, users must request the Extended Resource in Pods.
Managing extended resources
Node-level extended resources
Node-level extended resources are tied to nodes.
Device plugin managed resources
See Device Plugin for how to advertise device plugin managed resources on each node.
Other resources
To advertise a new node-level extended resource, the cluster operator can
submit a PATCH HTTP request to the API server to specify the available
quantity in the status.capacity for a node in the cluster. After this
operation, the node's status.capacity will include a new resource. The
status.allocatable field is updated automatically with the new resource
asynchronously by the kubelet.
Because the scheduler uses the node's status.allocatable value when
evaluating Pod fitness, the scheduler only takes account of the new value after
that asynchronous update. There may be a short delay between patching the
node capacity with a new resource and the time when the first Pod that requests
the resource can be scheduled on that node.
Example:
Here is an example showing how to use curl to form an HTTP request that
advertises five "example.com/foo" resources on node k8s-node-1 whose master
is k8s-master.
curl --header "Content-Type: application/json-patch+json" \
--request PATCH \
--data '[{"op": "add", "path": "/status/capacity/example.com~1foo", "value": "5"}]' \
http://k8s-master:8080/api/v1/nodes/k8s-node-1/status
Note:
In the preceding request,~1 is the encoding for the character /
in the patch path. The operation path value in JSON-Patch is interpreted as a
JSON-Pointer. For more details, see
IETF RFC 6901, section 3.Cluster-level extended resources
Cluster-level extended resources are not tied to nodes. They are usually managed by scheduler extenders, which handle the resource consumption and resource quota.
You can specify the extended resources that are handled by scheduler extenders in scheduler configuration
Example:
The following configuration for a scheduler policy indicates that the cluster-level extended resource "example.com/foo" is handled by the scheduler extender.
- The scheduler sends a Pod to the scheduler extender only if the Pod requests "example.com/foo".
- The
ignoredBySchedulerfield specifies that the scheduler does not check the "example.com/foo" resource in itsPodFitsResourcespredicate.
{
"kind": "Policy",
"apiVersion": "v1",
"extenders": [
{
"urlPrefix":"<extender-endpoint>",
"bindVerb": "bind",
"managedResources": [
{
"name": "example.com/foo",
"ignoredByScheduler": true
}
]
}
]
}
Extended resources allocation by DRA
Extended resources allocation by DRA allows cluster administrators to specify an extendedResourceName
in DeviceClass, then the devices matching the DeviceClass can be requested from a pod's extended
resource requests. Read more about
Extended Resource allocation by DRA.
Consuming extended resources
Users can consume extended resources in Pod specs like CPU and memory. The scheduler takes care of the resource accounting so that no more than the available amount is simultaneously allocated to Pods.
The API server restricts quantities of extended resources to whole numbers.
Examples of valid quantities are 3, 3000m and 3Ki. Examples of
invalid quantities are 0.5 and 1500m (because 1500m would result in 1.5).
Note:
Extended resources replace Opaque Integer Resources. Users can use any domain name prefix other thankubernetes.io which is reserved.To consume an extended resource in a Pod, include the resource name as a key
in the spec.containers[].resources.limits map in the container spec.
Note:
Extended resources cannot be overcommitted, so request and limit must be equal if both are present in a container spec.A Pod is scheduled only if all of the resource requests are satisfied, including
CPU, memory and any extended resources. The Pod remains in the PENDING state
as long as the resource request cannot be satisfied.
Example:
The Pod below requests 2 CPUs and 1 "example.com/foo" (an extended resource).
apiVersion: v1
kind: Pod
metadata:
name: my-pod
spec:
containers:
- name: my-container
image: myimage
resources:
requests:
cpu: 2
example.com/foo: 1
limits:
example.com/foo: 1
PID limiting
Process ID (PID) limits allow for the configuration of a kubelet to limit the number of PIDs that a given Pod can consume. See PID Limiting for information.
Troubleshooting
My Pods are pending with event message FailedScheduling
If the scheduler cannot find any node where a Pod can fit, the Pod remains
unscheduled until a place can be found. An
Event is produced
each time the scheduler fails to find a place for the Pod. You can use kubectl
to view the events for a Pod; for example:
kubectl describe pod frontend | grep -A 9999999999 Events
Events:
Type Reason Age From Message
---- ------ ---- ---- -------
Warning FailedScheduling 23s default-scheduler 0/42 nodes available: insufficient cpu
In the preceding example, the Pod named "frontend" fails to be scheduled due to insufficient CPU resource on any node. Similar error messages can also suggest failure due to insufficient memory (PodExceedsFreeMemory). In general, if a Pod is pending with a message of this type, there are several things to try:
- Add more nodes to the cluster.
- Terminate unneeded Pods to make room for pending Pods.
- Check that the Pod is not larger than all the nodes. For example, if all the
nodes have a capacity of
cpu: 1, then a Pod with a request ofcpu: 1.1will never be scheduled. - Check for node taints. If most of your nodes are tainted, and the new Pod does not tolerate that taint, the scheduler only considers placements onto the remaining nodes that don't have that taint.
You can check node capacities and amounts allocated with the
kubectl describe nodes command. For example:
kubectl describe nodes e2e-test-node-pool-4lw4
Name: e2e-test-node-pool-4lw4
[ ... lines removed for clarity ...]
Capacity:
cpu: 2
memory: 7679792Ki
pods: 110
Allocatable:
cpu: 1800m
memory: 7474992Ki
pods: 110
[ ... lines removed for clarity ...]
Non-terminated Pods: (5 in total)
Namespace Name CPU Requests CPU Limits Memory Requests Memory Limits
--------- ---- ------------ ---------- --------------- -------------
kube-system fluentd-gcp-v1.38-28bv1 100m (5%) 0 (0%) 200Mi (2%) 200Mi (2%)
kube-system kube-dns-3297075139-61lj3 260m (13%) 0 (0%) 100Mi (1%) 170Mi (2%)
kube-system kube-proxy-e2e-test-... 100m (5%) 0 (0%) 0 (0%) 0 (0%)
kube-system monitoring-influxdb-grafana-v4-z1m12 200m (10%) 200m (10%) 600Mi (8%) 600Mi (8%)
kube-system node-problem-detector-v0.1-fj7m3 20m (1%) 200m (10%) 20Mi (0%) 100Mi (1%)
Allocated resources:
(Total limits may be over 100 percent, i.e., overcommitted.)
CPU Requests CPU Limits Memory Requests Memory Limits
------------ ---------- --------------- -------------
680m (34%) 400m (20%) 920Mi (11%) 1070Mi (13%)
In the preceding output, you can see that if a Pod requests more than 1.120 CPUs or more than 6.23Gi of memory, that Pod will not fit on the node.
By looking at the “Pods” section, you can see which Pods are taking up space on the node.
The amount of resources available to Pods is less than the node capacity because
system daemons use a portion of the available resources. Within the Kubernetes API,
each Node has a .status.allocatable field
(see NodeStatus
for details).
The .status.allocatable field describes the amount of resources that are available
to Pods on that node (for example: 15 virtual CPUs and 7538 MiB of memory).
For more information on node allocatable resources in Kubernetes, see
Reserve Compute Resources for System Daemons.
You can configure resource quotas to limit the total amount of resources that a namespace can consume. Kubernetes enforces quotas for objects in particular namespace when there is a ResourceQuota in that namespace. For example, if you assign specific namespaces to different teams, you can add ResourceQuotas into those namespaces. Setting resource quotas helps to prevent one team from using so much of any resource that this over-use affects other teams.
You should also consider what access you grant to that namespace: full write access to a namespace allows someone with that access to remove any resource, including a configured ResourceQuota.
My container is terminated
Your container might get terminated because it is resource-starved. To check
whether a container is being killed because it is hitting a resource limit, call
kubectl describe pod on the Pod of interest:
kubectl describe pod simmemleak-hra99
The output is similar to:
Name: simmemleak-hra99
Namespace: default
Image(s): saadali/simmemleak
Node: kubernetes-node-tf0f/10.240.216.66
Labels: name=simmemleak
Status: Running
Reason:
Message:
IP: 10.244.2.75
Containers:
simmemleak:
Image: saadali/simmemleak:latest
Limits:
cpu: 100m
memory: 50Mi
State: Running
Started: Tue, 07 Jul 2019 12:54:41 -0700
Last State: Terminated
Reason: OOMKilled
Exit Code: 137
Started: Fri, 07 Jul 2019 12:54:30 -0700
Finished: Fri, 07 Jul 2019 12:54:33 -0700
Ready: False
Restart Count: 5
Conditions:
Type Status
Ready False
Events:
Type Reason Age From Message
---- ------ ---- ---- -------
Normal Scheduled 42s default-scheduler Successfully assigned simmemleak-hra99 to kubernetes-node-tf0f
Normal Pulled 41s kubelet Container image "saadali/simmemleak:latest" already present on machine
Normal Created 41s kubelet Created container simmemleak
Normal Started 40s kubelet Started container simmemleak
Normal Killing 32s kubelet Killing container with id ead3fb35-5cf5-44ed-9ae1-488115be66c6: Need to kill Pod
In the preceding example, the Restart Count: 5 indicates that the simmemleak
container in the Pod was terminated and restarted five times (so far).
The OOMKilled reason shows that the container tried to use more memory than its limit.
Your next step might be to check the application code for a memory leak. If you find that the application is behaving how you expect, consider setting a higher memory limit (and possibly request) for that container.
What's next
- Get hands-on experience assigning Memory resources to containers and Pods.
- Get hands-on experience assigning CPU resources to containers and Pods.
- Read how the API reference defines a container and its resource requirements
- Read more about the local ephemeral storage
- Read more about the kube-scheduler configuration reference (v1)
- Read more about Quality of Service classes for Pods
- Read more about Extended Resource allocation by DRA
7.4 - Organizing Cluster Access Using kubeconfig Files
Use kubeconfig files to organize information about clusters, users, namespaces, and
authentication mechanisms. The kubectl command-line tool uses kubeconfig files to
find the information it needs to choose a cluster and communicate with the API server
of a cluster.
Note:
A file that is used to configure access to clusters is called a kubeconfig file. This is a generic way of referring to configuration files. It does not mean that there is a file namedkubeconfig.Warning:
Only use kubeconfig files from trusted sources. Using a specially-crafted kubeconfig file could result in malicious code execution or file exposure. If you must use an untrusted kubeconfig file, inspect it carefully first, much as you would a shell script.By default, kubectl looks for a file named config in the $HOME/.kube directory.
You can specify other kubeconfig files by setting the KUBECONFIG environment
variable or by setting the
--kubeconfig flag.
For step-by-step instructions on creating and specifying kubeconfig files, see Configure Access to Multiple Clusters.
Supporting multiple clusters, users, and authentication mechanisms
Suppose you have several clusters, and your users and components authenticate in a variety of ways. For example:
- A running kubelet might authenticate using certificates.
- A user might authenticate using tokens.
- Administrators might have sets of certificates that they provide to individual users.
With kubeconfig files, you can organize your clusters, users, and namespaces. You can also define contexts to quickly and easily switch between clusters and namespaces.
Context
A context element in a kubeconfig file is used to group access parameters
under a convenient name. Each context has three parameters: cluster, namespace, and user.
By default, the kubectl command-line tool uses parameters from
the current context to communicate with the cluster.
To choose the current context:
kubectl config use-context
The KUBECONFIG environment variable
The KUBECONFIG environment variable holds a list of kubeconfig files.
For Linux and Mac, the list is colon-delimited. For Windows, the list
is semicolon-delimited. The KUBECONFIG environment variable is not
required. If the KUBECONFIG environment variable doesn't exist,
kubectl uses the default kubeconfig file, $HOME/.kube/config.
If the KUBECONFIG environment variable does exist, kubectl uses
an effective configuration that is the result of merging the files
listed in the KUBECONFIG environment variable.
Merging kubeconfig files
To see your configuration, enter this command:
kubectl config view
As described previously, the output might be from a single kubeconfig file, or it might be the result of merging several kubeconfig files.
Here are the rules that kubectl uses when it merges kubeconfig files:
If the
--kubeconfigflag is set, use only the specified file. Do not merge. Only one instance of this flag is allowed.Otherwise, if the
KUBECONFIGenvironment variable is set, use it as a list of files that should be merged. Merge the files listed in theKUBECONFIGenvironment variable according to these rules:- Ignore empty filenames.
- Produce errors for files with content that cannot be deserialized.
- The first file to set a particular value or map key wins.
- Never change the value or map key.
Example: Preserve the context of the first file to set
current-context. Example: If two files specify ared-user, use only values from the first file'sred-user. Even if the second file has non-conflicting entries underred-user, discard them.
For an example of setting the
KUBECONFIGenvironment variable, see Setting the KUBECONFIG environment variable.Otherwise, use the default kubeconfig file,
$HOME/.kube/config, with no merging.Determine the context to use based on the first hit in this chain:
- Use the
--contextcommand-line flag if it exists. - Use the
current-contextfrom the merged kubeconfig files.
An empty context is allowed at this point.
- Use the
Determine the cluster and user. At this point, there might or might not be a context. Determine the cluster and user based on the first hit in this chain, which is run twice: once for user and once for cluster:
- Use a command-line flag if it exists:
--useror--cluster. - If the context is non-empty, take the user or cluster from the context.
The user and cluster can be empty at this point.
- Use a command-line flag if it exists:
Determine the actual cluster information to use. At this point, there might or might not be cluster information. Build each piece of the cluster information based on this chain; the first hit wins:
- Use command line flags if they exist:
--server,--certificate-authority,--insecure-skip-tls-verify. - If any cluster information attributes exist from the merged kubeconfig files, use them.
- If there is no server location, fail.
- Use command line flags if they exist:
Determine the actual user information to use. Build user information using the same rules as cluster information, except allow only one authentication technique per user:
- Use command line flags if they exist:
--client-certificate,--client-key,--username,--password,--token. - Use the
userfields from the merged kubeconfig files. - If there are two conflicting techniques, fail.
- Use command line flags if they exist:
For any information still missing, use default values and potentially prompt for authentication information.
File references
File and path references in a kubeconfig file are relative to the location of the kubeconfig file.
File references on the command line are relative to the current working directory.
In $HOME/.kube/config, relative paths are stored relatively, and absolute paths
are stored absolutely.
Proxy
You can configure kubectl to use a proxy per cluster using proxy-url in your kubeconfig file, like this:
apiVersion: v1
kind: Config
clusters:
- cluster:
proxy-url: http://proxy.example.org:3128
server: https://k8s.example.org/k8s/clusters/c-xxyyzz
name: development
users:
- name: developer
contexts:
- context:
name: development
What's next
7.5 - Resource Management for Windows nodes
This page outlines the differences in how resources are managed between Linux and Windows.
On Linux nodes, cgroups are used as a pod boundary for resource control. Containers are created within that boundary for network, process and file system isolation. The Linux cgroup APIs can be used to gather CPU, I/O, and memory use statistics.
In contrast, Windows uses a job object per container with a system namespace filter to contain all processes in a container and provide logical isolation from the host. (Job objects are a Windows process isolation mechanism and are different from what Kubernetes refers to as a Job).
There is no way to run a Windows container without the namespace filtering in place. This means that system privileges cannot be asserted in the context of the host, and thus privileged containers are not available on Windows. Containers cannot assume an identity from the host because the Security Account Manager (SAM) is separate.
Memory management
Windows does not have an out-of-memory process killer as Linux does. Windows always treats all user-mode memory allocations as virtual, and pagefiles are mandatory.
Windows nodes do not overcommit memory for processes. The net effect is that Windows won't reach out of memory conditions the same way Linux does, and processes page to disk instead of being subject to out of memory (OOM) termination. If memory is over-provisioned and all physical memory is exhausted, then paging can slow down performance.
CPU management
Windows can limit the amount of CPU time allocated for different processes but cannot guarantee a minimum amount of CPU time.
On Windows, the kubelet supports a command-line flag to set the
scheduling priority of the
kubelet process: --windows-priorityclass. This flag allows the kubelet process to get
more CPU time slices when compared to other processes running on the Windows host.
More information on the allowable values and their meaning is available at
Windows Priority Classes.
To ensure that running Pods do not starve the kubelet of CPU cycles, set this flag to ABOVE_NORMAL_PRIORITY_CLASS or above.
Resource reservation
To account for memory and CPU used by the operating system, the container runtime, and by
Kubernetes host processes such as the kubelet, you can (and should) reserve
memory and CPU resources with the --kube-reserved and/or --system-reserved kubelet flags.
On Windows these values are only used to calculate the node's
allocatable resources.
Caution:
As you deploy workloads, set resource memory and CPU limits on containers.
This also subtracts from NodeAllocatable and helps the cluster-wide scheduler in determining which pods to place on which nodes.
Scheduling pods without limits may over-provision the Windows nodes and in extreme cases can cause the nodes to become unhealthy.
On Windows, a good practice is to reserve at least 2GiB of memory.
To determine how much CPU to reserve, identify the maximum pod density for each node and monitor the CPU usage of the system services running there, then choose a value that meets your workload needs.
8 - Security
Concepts for keeping your cloud-native workload secure.
This section of the Kubernetes documentation aims to help you learn to run workloads more securely, and about the essential aspects of keeping a Kubernetes cluster secure.
Kubernetes is based on a cloud-native architecture, and draws on advice from the CNCF about good practice for cloud native information security.
Read Cloud Native Security and Kubernetes for the broader context about how to secure your cluster and the applications that you're running on it.
Kubernetes security mechanisms
Kubernetes includes several APIs and security controls, as well as ways to define policies that can form part of how you manage information security.
Control plane protection
A key security mechanism for any Kubernetes cluster is to control access to the Kubernetes API.
Kubernetes expects you to configure and use TLS to provide data encryption in transit within the control plane, and between the control plane and its clients. You can also enable encryption at rest for the data stored within Kubernetes control plane; this is separate from using encryption at rest for your own workloads' data, which might also be a good idea.
Secrets
The Secret API provides basic protection for configuration values that require confidentiality.
Workload protection
Enforce Pod security standards to ensure that Pods and their containers are isolated appropriately. You can also use RuntimeClasses to define custom isolation if you need it.
Network policies let you control network traffic between Pods, or between Pods and the network outside your cluster.
You can deploy security controls from the wider ecosystem to implement preventative or detective controls around Pods, their containers, and the images that run in them.
Admission control
Admission controllers are plugins that intercept Kubernetes API requests and can validate or mutate the requests based on specific fields in the request. Thoughtfully designing these controllers helps to avoid unintended disruptions as Kubernetes APIs change across version updates. For design considerations, see Admission Webhook Good Practices.
Auditing
Kubernetes audit logging provides a security-relevant, chronological set of records documenting the sequence of actions in a cluster. The cluster audits the activities generated by users, by applications that use the Kubernetes API, and by the control plane itself.
Cloud provider security
Note: Items on this page refer to vendors external to Kubernetes. The Kubernetes project authors aren't responsible for those third-party products or projects. To add a vendor, product or project to this list, read the content guide before submitting a change. More information.
If you are running a Kubernetes cluster on your own hardware or a different cloud provider, consult your documentation for security best practices. Here are links to some of the popular cloud providers' security documentation:
| IaaS Provider | Link |
|---|---|
| Alibaba Cloud | https://www.alibabacloud.com/trust-center |
| Amazon Web Services | https://aws.amazon.com/security |
| Google Cloud Platform | https://cloud.google.com/security |
| Huawei Cloud | https://www.huaweicloud.com/intl/en-us/securecenter/overallsafety |
| IBM Cloud | https://www.ibm.com/cloud/security |
| Microsoft Azure | https://docs.microsoft.com/en-us/azure/security/azure-security |
| Oracle Cloud Infrastructure | https://www.oracle.com/security |
| Tencent Cloud | https://www.tencentcloud.com/solutions/data-security-and-information-protection |
| VMware vSphere | https://www.vmware.com/solutions/security/hardening-guides |
Policies
You can define security policies using Kubernetes-native mechanisms, such as NetworkPolicy (declarative control over network packet filtering) or ValidatingAdmissionPolicy (declarative restrictions on what changes someone can make using the Kubernetes API).
However, you can also rely on policy implementations from the wider ecosystem around Kubernetes. Kubernetes provides extension mechanisms to let those ecosystem projects implement their own policy controls on source code review, container image approval, API access controls, networking, and more.
For more information about policy mechanisms and Kubernetes, read Policies.
What's next
Learn about related Kubernetes security topics:
- Securing your cluster
- Known vulnerabilities in Kubernetes (and links to further information)
- Data encryption in transit for the control plane
- Data encryption at rest
- Controlling Access to the Kubernetes API
- Network policies for Pods
- Secrets in Kubernetes
- Pod security standards
- RuntimeClasses
Learn the context:
Get certified:
- Certified Kubernetes Security Specialist certification and official training course.
Read more in this section:
8.1 - Cloud Native Security and Kubernetes
Concepts for keeping your cloud native workload secure.
Kubernetes is based on a cloud native architecture and draws on advice from the CNCF about good practices for cloud native information security.
Read on for an overview of how Kubernetes is designed to help you deploy a secure cloud native platform.
Cloud native information security
The CNCF white paper on cloud native security defines security controls and practices that are appropriate to different lifecycle phases.
Develop lifecycle phase
- Ensure the integrity of development environments.
- Design applications following good practices for information security, appropriate for your context.
- Consider end user security as part of solution design.
To achieve this, you can:
- Adopt an architecture, such as zero trust, that minimizes attack surfaces, even for internal threats.
- Define a code review process that considers security concerns.
- Build a threat model of your system or application that identifies trust boundaries. Use that threat model to identify risks and determine how to treat them.
- Incorporate advanced security automation, such as fuzzing and security chaos engineering, where it's justified.
Distribute lifecycle phase
- Ensure the security of the supply chain for container images you execute.
- Ensure the security of the supply chain for the cluster and other components that execute your application. For example, this might include an external database that your cloud native application uses for persistence.
To achieve this, you can:
- Scan container images and other artifacts for known vulnerabilities.
- Ensure that software distribution uses encryption in transit, with a chain of trust for the software source.
- Adopt and follow processes to update dependencies when updates are available, especially in response to security announcements.
- Use validation mechanisms such as digital certificates for supply chain assurance.
- Subscribe to feeds and other mechanisms to alert you to security risks.
- Restrict access to artifacts. Place container images in a private registry that only allows authorized clients to pull images.
Deploy lifecycle phase
Ensure appropriate restrictions on what can be deployed, who can deploy it, and where it can be deployed. You can enforce measures from the distribute phase, such as verifying the cryptographic identity of container image artifacts.
You can deploy different applications and cluster components into different namespaces. Containers and namespaces both provide isolation mechanisms that are relevant to information security.
When you deploy Kubernetes, you also set the foundation for your applications' runtime environment: a Kubernetes cluster (or multiple clusters). That infrastructure must provide the security guarantees that higher layers expect.
Runtime lifecycle phase
The Runtime phase comprises three critical areas: access, compute, and storage.
Runtime protection: access
The Kubernetes API is what makes your cluster work. Protecting this API is key to providing effective cluster security.
Other pages in the Kubernetes documentation have more detail about how to set up specific aspects of access control. The security checklist provides suggested basic checks for your cluster.
Beyond that, securing your cluster means implementing effective authentication and authorization for API access. Use ServiceAccounts to provide and manage security identities for workloads and cluster components.
Kubernetes uses TLS to protect API traffic; make sure to deploy the cluster using TLS (including for traffic between nodes and the control plane) and protect the encryption keys. If you use Kubernetes' own API for CertificateSigningRequests, pay special attention to restricting misuse there.
Runtime protection: compute
Containers provide two things: isolation between applications and a mechanism to combine those isolated applications to run on the same host computer. Those two aspects—isolation and aggregation—mean that runtime security involves identifying trade-offs and finding an appropriate balance.
Kubernetes relies on a container runtime to set up and run containers. The Kubernetes project does not recommend a specific container runtime, and you should make sure that the runtime(s) you choose meet your information security needs.
To protect your compute at runtime, you can:
Enforce Pod Security Standards for applications to help ensure they run with only the necessary privileges.
Run a specialized operating system on your nodes that is designed specifically for running containerized workloads. This is typically based on a read-only operating system (immutable image) that provides only the services essential for running containers.
Container-specific operating systems help isolate system components and present a reduced attack surface in case of a container escape.
Define ResourceQuotas to fairly allocate shared resources, and use mechanisms such as LimitRanges to ensure that Pods specify their resource requirements.
Partition workloads across different nodes to improve isolation. Use node isolation mechanisms, either from Kubernetes itself or from the ecosystem, to ensure that Pods with different trust contexts run on separate sets of nodes.
Use a container runtime that provides security restrictions.
On Linux nodes, use a Linux security module such as AppArmor or seccomp.
Runtime protection: storage
To protect storage for your cluster and the applications that run there, you can:
- Integrate your cluster with an external storage plugin that provides encryption at rest for volumes.
- Enable encryption at rest for API objects.
- Protect data durability using backups, and verify that you can restore them whenever needed.
- Authenticate connections between cluster nodes and any network storage they rely upon.
- Implement data encryption within your own application.
For encryption keys, generating these within specialized hardware provides the best protection against disclosure risks. A hardware security module can let you perform cryptographic operations without allowing the security key to be copied elsewhere.
Networking and security
You should also consider network security measures, such as NetworkPolicy or a service mesh. Some network plugins for Kubernetes provide encryption for your cluster network using technologies such as a virtual private network (VPN) overlay. By design, Kubernetes lets you use your own networking plugin for your cluster. If you use managed Kubernetes, the provider may have already selected a network plugin for you.
The network plugin you choose and the way you integrate it can have a strong impact on the security of information in transit.
Observability and runtime security
Kubernetes lets you extend your cluster with extra tooling. You can set up third party solutions to help you monitor or troubleshoot your applications and the clusters they are running. You also get some basic observability features built in to Kubernetes itself. Your code running in containers can generate logs, publish metrics, or provide other observability data; at deploy time, you need to make sure your cluster provides an appropriate level of protection there.
If you set up a metrics dashboard or something similar, review the chain of components that populate data into that dashboard, as well as the dashboard itself. Make sure that the whole chain is designed with enough resilience and integrity protection that you can rely on it even during an incident where your cluster might be degraded.
Where appropriate, deploy security measures below the Kubernetes layer, such as cryptographically measured boot or authenticated distribution of time (which helps ensure the fidelity of logs and audit records).
For a high-assurance environment, deploy cryptographic protections to ensure that logs are both tamper-proof and confidential.
What's next
Cloud native security
- CNCF white paper on cloud native security.
- CNCF white paper on good practices for securing a software supply chain.
- Fixing the Kubernetes clusterf**k: Understanding security from the kernel up (FOSDEM 2020)
- Kubernetes Security Best Practices (Kubernetes Forum Seoul 2019)
- Towards Measured Boot Out of the Box (Linux Security Summit 2016)
Kubernetes and information security
8.2 - Pod Security Standards
A detailed look at the different policy levels defined in the Pod Security Standards.
The Pod Security Standards define three different policies to broadly cover the security spectrum. These policies are cumulative and range from highly-permissive to highly-restrictive. This guide outlines the requirements of each policy.
| Profile | Description |
|---|---|
| Privileged | Unrestricted policy, providing the widest possible level of permissions. This policy allows for known privilege escalations. |
| Baseline | Minimally restrictive policy which prevents known privilege escalations. Allows the default (minimally specified) Pod configuration. |
| Restricted | Heavily restricted policy, following current Pod hardening best practices. |
Profile Details
Privileged
The Privileged policy is purposely-open, and entirely unrestricted. This type of policy is typically aimed at system- and infrastructure-level workloads managed by privileged, trusted users.
The Privileged policy is defined by an absence of restrictions. If you define a Pod where the Privileged security policy applies, the Pod you define is able to bypass typical container isolation mechanisms. For example, you can define a Pod that has access to the node's host network.
Baseline
The Baseline policy is aimed at ease of adoption for common containerized workloads while preventing known privilege escalations. This policy is targeted at application operators and developers of non-critical applications. The following listed controls should be enforced/disallowed:
Note:
In this table, wildcards (*) indicate all elements in a list. For example,
spec.containers[*].securityContext refers to the Security Context object for all defined
containers. If any of the listed containers fails to meet the requirements, the entire pod will
fail validation.| Control | Policy |
|---|---|
| HostProcess | Windows Pods offer the ability to run HostProcess containers which enables privileged access to the Windows host machine. Privileged access to the host is disallowed in the Baseline policy. FEATURE STATE:
Kubernetes v1.26 [stable]Restricted Fields
Allowed Values
|
| Host Namespaces | Sharing the host namespaces must be disallowed. Restricted Fields
Allowed Values
|
| Privileged Containers | Privileged Pods disable most security mechanisms and must be disallowed. Restricted Fields
Allowed Values
|
| Capabilities | Adding additional capabilities beyond those listed below must be disallowed. Restricted Fields
Allowed Values
|
| HostPath Volumes | HostPath volumes must be forbidden. Restricted Fields
Allowed Values
|
| Host Ports | HostPorts should be disallowed entirely (recommended) or restricted to a known list Restricted Fields
Allowed Values
|
| Host Probes / Lifecycle Hooks (v1.34+) | The Host field in probes and lifecycle hooks must be disallowed. Restricted Fields
Allowed Values
|
| AppArmor | On supported hosts, the Restricted Fields
Allowed Values
Allowed Values
|
| SELinux | Setting the SELinux type is restricted, and setting a custom SELinux user or role option is forbidden. Restricted Fields
Allowed Values
Restricted Fields
Allowed Values
|
/proc Mount Type | The default Restricted Fields
Allowed Values
|
| Seccomp | Seccomp profile must not be explicitly set to Restricted Fields
Allowed Values
|
| Sysctls | Sysctls can disable security mechanisms or affect all containers on a host, and should be disallowed except for an allowed "safe" subset. A sysctl is considered safe if it is namespaced in the container or the Pod, and it is isolated from other Pods or processes on the same Node. Restricted Fields
Allowed Values
|
Restricted
The Restricted policy is aimed at enforcing current Pod hardening best practices, at the expense of some compatibility. It is targeted at operators and developers of security-critical applications, as well as lower-trust users. The following listed controls should be enforced/disallowed:
Note:
In this table, wildcards (*) indicate all elements in a list. For example,
spec.containers[*].securityContext refers to the Security Context object for all defined
containers. If any of the listed containers fails to meet the requirements, the entire pod will
fail validation.| Control | Policy |
| Everything from the Baseline policy | |
| Volume Types | The Restricted policy only permits the following volume types. Restricted Fields
Allowed Values Every item in thespec.volumes[*] list must set one of the following fields to a non-null value:
|
| Privilege Escalation (v1.8+) | Privilege escalation (such as via set-user-ID or set-group-ID file mode) should not be allowed. This is Linux only policy in v1.25+ Restricted Fields
Allowed Values
|
| Running as Non-root | Containers must be required to run as non-root users. Restricted Fields
Allowed Values
nil if the pod-level
spec.securityContext.runAsNonRoot is set to true. |
| Running as Non-root user (v1.23+) | Containers must not set runAsUser to 0 Restricted Fields
Allowed Values
|
| Seccomp (v1.19+) | Seccomp profile must be explicitly set to one of the allowed values. Both the Restricted Fields
Allowed Values
nil if the pod-level
spec.securityContext.seccompProfile.type field is set appropriately.
Conversely, the pod-level field may be undefined/nil if _all_ container-
level fields are set. |
| Capabilities (v1.22+) | Containers must drop Restricted Fields
Allowed Values
Restricted Fields
Allowed Values
|
Policy Instantiation
Decoupling policy definition from policy instantiation allows for a common understanding and consistent language of policies across clusters, independent of the underlying enforcement mechanism.
As mechanisms mature, they will be defined below on a per-policy basis. The methods of enforcement of individual policies are not defined here.
Pod Security Admission Controller
Alternatives
Note: This section links to third party projects that provide functionality required by Kubernetes. The Kubernetes project authors aren't responsible for these projects, which are listed alphabetically. To add a project to this list, read the content guide before submitting a change. More information.
Other alternatives for enforcing policies are being developed in the Kubernetes ecosystem, such as:
Pod OS field
Kubernetes lets you use nodes that run either Linux or Windows. You can mix both kinds of
node in one cluster.
Windows in Kubernetes has some limitations and differentiators from Linux-based
workloads. Specifically, many of the Pod securityContext fields
have no effect on Windows.
Note:
Kubelets prior to v1.24 don't enforce the pod OS field, and if a cluster has nodes on versions earlier than v1.24 the Restricted policies should be pinned to a version prior to v1.25.Restricted Pod Security Standard changes
Another important change, made in Kubernetes v1.25 is that the Restricted policy
has been updated to use the pod.spec.os.name field. Based on the OS name, certain policies that are specific
to a particular OS can be relaxed for the other OS.
OS-specific policy controls
Restrictions on the following controls are only required if .spec.os.name is not windows:
- Privilege Escalation
- Seccomp
- Linux Capabilities
User namespaces
User Namespaces are a Linux-only feature to run workloads with increased isolation. How they work together with Pod Security Standards is described in the documentation for Pods that use user namespaces.
FAQ
Why isn't there a profile between Privileged and Baseline?
The three profiles defined here have a clear linear progression from most secure (Restricted) to least secure (Privileged), and cover a broad set of workloads. Privileges required above the Baseline policy are typically very application specific, so we do not offer a standard profile in this niche. This is not to say that the privileged profile should always be used in this case, but that policies in this space need to be defined on a case-by-case basis.
SIG Auth may reconsider this position in the future, should a clear need for other profiles arise.
What's the difference between a security profile and a security context?
Security Contexts configure Pods and Containers at runtime. Security contexts are defined as part of the Pod and container specifications in the Pod manifest, and represent parameters to the container runtime.
Security profiles are control plane mechanisms to enforce specific settings in the Security Context, as well as other related parameters outside the Security Context. As of July 2021, Pod Security Policies are deprecated in favor of the built-in Pod Security Admission Controller.
What about sandboxed Pods?
There is currently no API standard that controls whether a Pod is considered sandboxed or not. Sandbox Pods may be identified by the use of a sandboxed runtime (such as gVisor or Kata Containers), but there is no standard definition of what a sandboxed runtime is.
The protections necessary for sandboxed workloads can differ from others. For example, the need to restrict privileged permissions is lessened when the workload is isolated from the underlying kernel. This allows for workloads requiring heightened permissions to still be isolated.
Additionally, the protection of sandboxed workloads is highly dependent on the method of sandboxing. As such, no single recommended profile is recommended for all sandboxed workloads.
8.3 - Pod Security Admission
An overview of the Pod Security Admission Controller, which can enforce the Pod Security Standards.
FEATURE STATE:
Kubernetes v1.25 [stable]The Kubernetes Pod Security Standards define different isolation levels for Pods. These standards let you define how you want to restrict the behavior of pods in a clear, consistent fashion.
Kubernetes offers a built-in Pod Security admission controller to enforce the Pod Security Standards. Pod security restrictions are applied at the namespace level when pods are created.
Built-in Pod Security admission enforcement
This page is part of the documentation for Kubernetes v1.36. If you are running a different version of Kubernetes, consult the documentation for that release.
Pod Security levels
Pod Security admission places requirements on a Pod's Security
Context and other related fields according
to the three levels defined by the Pod Security
Standards: privileged, baseline, and
restricted. Refer to the Pod Security Standards
page for an in-depth look at those requirements.
Pod Security Admission labels for namespaces
Once the feature is enabled or the webhook is installed, you can configure namespaces to define the admission control mode you want to use for pod security in each namespace. Kubernetes defines a set of labels that you can set to define which of the predefined Pod Security Standard levels you want to use for a namespace. The label you select defines what action the control plane takes if a potential violation is detected:
| Mode | Description |
|---|---|
| enforce | Policy violations will cause the pod to be rejected. |
| audit | Policy violations will trigger the addition of an audit annotation to the event recorded in the audit log, but are otherwise allowed. |
| warn | Policy violations will trigger a user-facing warning, but are otherwise allowed. |
A namespace can configure any or all modes, or even set a different level for different modes.
For each mode, there are two labels that determine the policy used:
# The per-mode level label indicates which policy level to apply for the mode.
#
# MODE must be one of `enforce`, `audit`, or `warn`.
# LEVEL must be one of `privileged`, `baseline`, or `restricted`.
pod-security.kubernetes.io/<MODE>: <LEVEL>
# Optional: per-mode version label that can be used to pin the policy to the
# version that shipped with a given Kubernetes minor version (for example v1.36).
#
# MODE must be one of `enforce`, `audit`, or `warn`.
# VERSION must be a valid Kubernetes minor version, or `latest`.
pod-security.kubernetes.io/<MODE>-version: <VERSION>
Check out Enforce Pod Security Standards with Namespace Labels to see example usage.
Workload resources and Pod templates
Pods are often created indirectly, by creating a workload object such as a Deployment or Job. The workload object defines a Pod template and a controller for the workload resource creates Pods based on that template. To help catch violations early, both the audit and warning modes are applied to the workload resources. However, enforce mode is not applied to workload resources, only to the resulting pod objects.
Exemptions
You can define exemptions from pod security enforcement in order to allow the creation of pods that would have otherwise been prohibited due to the policy associated with a given namespace. Exemptions can be statically configured in the Admission Controller configuration.
Exemptions must be explicitly enumerated. Requests meeting exemption criteria are ignored by the
Admission Controller (all enforce, audit and warn behaviors are skipped). Exemption dimensions include:
- Usernames: requests from users with an exempt authenticated (or impersonated) username are ignored.
- RuntimeClassNames: pods and workload resources specifying an exempt runtime class name are ignored.
- Namespaces: pods and workload resources in an exempt namespace are ignored.
Caution:
Most pods are created by a controller in response to a workload resource, meaning that exempting an end user will only exempt them from enforcement when creating pods directly, but not when creating a workload resource. Controller service accounts (such assystem:serviceaccount:kube-system:replicaset-controller)
should generally not be exempted, as doing so would implicitly exempt any user that can create the
corresponding workload resource.Updates to the following pod fields are exempt from policy checks, meaning that if a pod update request only changes these fields, it will not be denied even if the pod is in violation of the current policy level:
- Any metadata updates except changes to the seccomp or AppArmor annotations:
seccomp.security.alpha.kubernetes.io/pod(deprecated)container.seccomp.security.alpha.kubernetes.io/*(deprecated)container.apparmor.security.beta.kubernetes.io/*(deprecated)
- Valid updates to
.spec.activeDeadlineSeconds - Valid updates to
.spec.tolerations
Metrics
Here are the Prometheus metrics exposed by kube-apiserver:
pod_security_errors_total: This metric indicates the number of errors preventing normal evaluation. Non-fatal errors may result in the latest restricted profile being used for enforcement.pod_security_evaluations_total: This metric indicates the number of policy evaluations that have occurred, not counting ignored or exempt requests during exporting.pod_security_exemptions_total: This metric indicates the number of exempt requests, not counting ignored or out of scope requests.
What's next
- Pod Security Standards
- Enforcing Pod Security Standards
- Enforce Pod Security Standards by Configuring the Built-in Admission Controller
- Enforce Pod Security Standards with Namespace Labels
If you are running an older version of Kubernetes and want to upgrade to a version of Kubernetes that does not include PodSecurityPolicies, read migrate from PodSecurityPolicy to the Built-In PodSecurity Admission Controller.
8.4 - Service Accounts
Learn about ServiceAccount objects in Kubernetes.
This page introduces the ServiceAccount object in Kubernetes, providing information about how service accounts work, use cases, limitations, alternatives, and links to resources for additional guidance.
What are service accounts?
A service account is a type of non-human account that, in Kubernetes, provides a distinct identity in a Kubernetes cluster. Application Pods, system components, and entities inside and outside the cluster can use a specific ServiceAccount's credentials to identify as that ServiceAccount. This identity is useful in various situations, including authenticating to the API server or implementing identity-based security policies.
Service accounts exist as ServiceAccount objects in the API server. Service accounts have the following properties:
Namespaced: Each service account is bound to a Kubernetes namespace. Every namespace gets a
defaultServiceAccount upon creation.Lightweight: Service accounts exist in the cluster and are defined in the Kubernetes API. You can quickly create service accounts to enable specific tasks.
Portable: A configuration bundle for a complex containerized workload might include service account definitions for the system's components. The lightweight nature of service accounts and the namespaced identities make the configurations portable.
Service accounts are different from user accounts, which are authenticated human users in the cluster. By default, user accounts don't exist in the Kubernetes API server; instead, the API server treats user identities as opaque data. You can authenticate as a user account using multiple methods. Some Kubernetes distributions might add custom extension APIs to represent user accounts in the API server.
| Description | ServiceAccount | User or group |
|---|---|---|
| Location | Kubernetes API (ServiceAccount object) | External |
| Access control | Kubernetes RBAC or other authorization mechanisms | Kubernetes RBAC or other identity and access management mechanisms |
| Intended use | Workloads, automation | People |
Default service accounts
When you create a cluster, Kubernetes automatically creates a ServiceAccount
object named default for every namespace in your cluster. The default
service accounts in each namespace get no permissions by default other than the
default API discovery permissions
that Kubernetes grants to all authenticated principals if role-based access control (RBAC) is enabled.
If you delete the default ServiceAccount object in a namespace, the
control plane
replaces it with a new one.
If you deploy a Pod in a namespace, and you don't
manually assign a ServiceAccount to the Pod, Kubernetes
assigns the default ServiceAccount for that namespace to the Pod.
Use cases for Kubernetes service accounts
As a general guideline, you can use service accounts to provide identities in the following scenarios:
- Your Pods need to communicate with the Kubernetes API server, for example in
situations such as the following:
- Providing read-only access to sensitive information stored in Secrets.
- Granting cross-namespace access, such as allowing a
Pod in namespace
exampleto read, list, and watch for Lease objects in thekube-node-leasenamespace.
- Your Pods need to communicate with an external service. For example, a workload Pod requires an identity for a commercially available cloud API, and the commercial provider allows configuring a suitable trust relationship.
- Authenticating to a private image registry using an
imagePullSecret. - An external service needs to communicate with the Kubernetes API server. For example, authenticating to the cluster as part of a CI/CD pipeline.
- You use third-party security software in your cluster that relies on the ServiceAccount identity of different Pods to group those Pods into different contexts.
How to use service accounts
To use a Kubernetes service account, you do the following:
Create a ServiceAccount object using a Kubernetes client like
kubectlor a manifest that defines the object.Grant permissions to the ServiceAccount object using an authorization mechanism such as RBAC.
Assign the ServiceAccount object to Pods during Pod creation.
If you're using the identity from an external service, retrieve the ServiceAccount token and use it from that service instead.
For instructions, refer to Configure Service Accounts for Pods.
Grant permissions to a ServiceAccount
You can use the built-in Kubernetes role-based access control (RBAC) mechanism to grant the minimum permissions required by each service account. You create a role, which grants access, and then bind the role to your ServiceAccount. RBAC lets you define a minimum set of permissions so that the service account permissions follow the principle of least privilege. Pods that use that service account don't get more permissions than are required to function correctly.
For instructions, refer to ServiceAccount permissions.
Cross-namespace access using a ServiceAccount
You can use RBAC to allow service accounts in one namespace to perform actions
on resources in a different namespace in the cluster. For example, consider a
scenario where you have a service account and Pod in the dev namespace and
you want your Pod to see Jobs running in the maintenance namespace. You could
create a Role object that grants permissions to list Job objects. Then,
you'd create a RoleBinding object in the maintenance namespace to bind the
Role to the ServiceAccount object. Now, Pods in the dev namespace can list
Job objects in the maintenance namespace using that service account.
Assign a ServiceAccount to a Pod
To assign a ServiceAccount to a Pod, you set the spec.serviceAccountName
field in the Pod specification. Kubernetes then automatically provides the
credentials for that ServiceAccount to the Pod. In v1.22 and later, Kubernetes
gets a short-lived, automatically rotating token using the TokenRequest
API and mounts the token as a
projected volume.
By default, Kubernetes provides the Pod
with the credentials for an assigned ServiceAccount, whether that is the
default ServiceAccount or a custom ServiceAccount that you specify.
To prevent Kubernetes from automatically injecting
credentials for a specified ServiceAccount or the default ServiceAccount, set the
automountServiceAccountToken field in your Pod specification to false.
In versions earlier than 1.22, Kubernetes provides a long-lived, static token to the Pod as a Secret.
Manually retrieve ServiceAccount credentials
If you need the credentials for a ServiceAccount to mount in a non-standard location, or for an audience that isn't the API server, use one of the following methods:
- TokenRequest API (recommended): Request a short-lived service account token from within your own application code. The token expires automatically and can rotate upon expiration. If you have a legacy application that is not aware of Kubernetes, you could use a sidecar container within the same pod to fetch these tokens and make them available to the application workload.
- Token Volume Projection (also recommended): In Kubernetes v1.20 and later, use the Pod specification to tell the kubelet to add the service account token to the Pod as a projected volume. Projected tokens expire automatically, and the kubelet rotates the token before it expires.
- Service Account Token Secrets (not recommended): You can mount service account tokens as Kubernetes Secrets in Pods. These tokens don't expire and don't rotate. In versions prior to v1.24, a permanent token was automatically created for each service account. This method is not recommended anymore, especially at scale, because of the risks associated with static, long-lived credentials. The LegacyServiceAccountTokenNoAutoGeneration feature gate (which was enabled by default from Kubernetes v1.24 to v1.26), prevented Kubernetes from automatically creating these tokens for ServiceAccounts. The feature gate is removed in v1.27, because it was elevated to GA status; you can still create indefinite service account tokens manually, but should take into account the security implications.
Node audience restriction for service account tokens
FEATURE STATE:
Kubernetes v1.33 [beta](enabled by default)When the ServiceAccountNodeAudienceRestriction feature gate
is enabled, the NodeRestriction
admission plugin limits which audiences a kubelet can request when creating service
account tokens via the TokenRequest API. By default, the kubelet can only request
tokens for audiences already referenced by pods on that node (through projected service
account token volumes or CSI driver token requests). Administrators can grant
kubelets access to additional audiences using RBAC rules with the
request-serviceaccounts-token-audience verb.
This restriction applies only to kubelets (node identities) and does not affect other
callers of the TokenRequest API. For details and RBAC examples,
see Service account token audience restriction.
Note:
For applications running outside your Kubernetes cluster, you might be considering
creating a long-lived ServiceAccount token that is stored in a Secret. This allows authentication, but the Kubernetes project recommends you avoid this approach.
Long-lived bearer tokens represent a security risk as, once disclosed, the token
can be misused. Instead, consider using an alternative. For example, your external
application can authenticate using a well-protected private key and a certificate,
or using a custom mechanism such as an authentication webhook that you implement yourself.
You can also use TokenRequest to obtain short-lived tokens for your external application.
Restricting access to Secrets (deprecated)
FEATURE STATE:
Kubernetes v1.32 [deprecated]Note:
kubernetes.io/enforce-mountable-secrets is deprecated since Kubernetes v1.32. Use separate namespaces to isolate access to mounted secrets.Kubernetes provides an annotation called kubernetes.io/enforce-mountable-secrets
that you can add to your ServiceAccounts. When this annotation is applied,
the ServiceAccount's secrets can only be mounted on specified types of resources,
enhancing the security posture of your cluster.
You can add the annotation to a ServiceAccount using a manifest:
apiVersion: v1
kind: ServiceAccount
metadata:
annotations:
kubernetes.io/enforce-mountable-secrets: "true"
name: my-serviceaccount
namespace: my-namespace
When this annotation is set to "true", the Kubernetes control plane ensures that the Secrets from this ServiceAccount are subject to certain mounting restrictions.
- The name of each Secret that is mounted as a volume in a Pod must appear in the
secretsfield of the Pod's ServiceAccount. - The name of each Secret referenced using
envFromin a Pod must also appear in thesecretsfield of the Pod's ServiceAccount. - The name of each Secret referenced using
imagePullSecretsin a Pod must also appear in thesecretsfield of the Pod's ServiceAccount.
By understanding and enforcing these restrictions, cluster administrators can maintain a tighter security profile and ensure that secrets are accessed only by the appropriate resources.
Authenticating service account credentials
ServiceAccounts use signed
JSON Web Tokens (JWTs)
to authenticate to the Kubernetes API server, and to any other system where a
trust relationship exists. Depending on how the token was issued
(either time-limited using a TokenRequest or using a legacy mechanism with
a Secret), a ServiceAccount token might also have an expiry time, an audience,
and a time after which the token starts being valid. When a client that is
acting as a ServiceAccount tries to communicate with the Kubernetes API server,
the client includes an Authorization: Bearer <token> header with the HTTP
request. The API server checks the validity of that bearer token as follows:
- Checks the token signature.
- Checks whether the token has expired.
- Checks whether object references in the token claims are currently valid.
- Checks whether the token is currently valid.
- Checks the audience claims.
The TokenRequest API produces bound tokens for a ServiceAccount. This binding is linked to the lifetime of the client, such as a Pod, that is acting as that ServiceAccount. See Token Volume Projection for an example of a bound pod service account token's JWT schema and payload.
For tokens issued using the TokenRequest API, the API server also checks that
the specific object reference that is using the ServiceAccount still exists,
matching by the unique ID of that
object. For legacy tokens that are mounted as Secrets in Pods, the API server
checks the token against the Secret.
For more information about the authentication process, refer to Authentication.
Authenticating service account credentials in your own code
If you have services of your own that need to validate Kubernetes service account credentials, you can use the following methods:
- TokenReview API (recommended)
- OIDC discovery
The Kubernetes project recommends that you use the TokenReview API, because this method invalidates tokens that are bound to API objects such as Secrets, ServiceAccounts, Pods or Nodes when those objects are deleted. For example, if you delete the Pod that contains a projected ServiceAccount token, the cluster invalidates that token immediately and a TokenReview immediately fails. If you use OIDC validation instead, your clients continue to treat the token as valid until the token reaches its expiration timestamp.
Your application should always define the audience that it accepts, and should check that the token's audiences match the audiences that the application expects. This helps to minimize the scope of the token so that it can only be used in your application and nowhere else.
Alternatives
- Issue your own tokens using another mechanism, and then use Webhook Token Authentication to validate bearer tokens using your own validation service.
- Provide your own identities to Pods.
Use the SPIFFE CSI driver plugin to provide SPIFFE SVIDs as X.509 certificate pairs to Pods.
🛇 This item links to a third party project or product that is not part of Kubernetes itself. More informationUse a service mesh such as Istio to provide certificates to Pods.
- Authenticate from outside the cluster to the API server without using service account tokens:
- Configure the API server to accept OpenID Connect (OIDC) tokens from your identity provider.
- Use service accounts or user accounts created using an external Identity and Access Management (IAM) service, such as from a cloud provider, to authenticate to your cluster.
- Use the CertificateSigningRequest API with client certificates.
- Configure the kubelet to retrieve credentials from an image registry.
- Use a Device Plugin to access a virtual Trusted Platform Module (TPM), which then allows authentication using a private key.
What's next
- Learn how to manage your ServiceAccounts as a cluster administrator.
- Learn how to assign a ServiceAccount to a Pod.
- Read the ServiceAccount API reference.
8.5 - Pod Security Policies
Removed feature
PodSecurityPolicy was deprecated in Kubernetes v1.21, and removed from Kubernetes in v1.25.Instead of using PodSecurityPolicy, you can enforce similar restrictions on Pods using either or both:
- Pod Security Admission
- a 3rd party admission plugin, that you deploy and configure yourself
For a migration guide, see Migrate from PodSecurityPolicy to the Built-In PodSecurity Admission Controller. For more information on the removal of this API, see PodSecurityPolicy Deprecation: Past, Present, and Future.
If you are not running Kubernetes v1.36, check the documentation for your version of Kubernetes.
8.6 - Security For Linux Nodes
This page describes security considerations and best practices specific to the Linux operating system.
Protection for Secret data on nodes
On Linux nodes, memory-backed volumes (such as secret
volume mounts, or emptyDir with medium: Memory)
are implemented with a tmpfs filesystem.
If you have swap configured and use an older Linux kernel (or a current kernel and an unsupported configuration of Kubernetes), memory backed volumes can have data written to persistent storage.
The Linux kernel officially supports the noswap option from version 6.3,
therefore it is recommended the used kernel version is 6.3 or later,
or supports the noswap option via a backport, if swap is enabled on the node.
Read swap memory management for more info.
8.7 - Security For Windows Nodes
This page describes security considerations and best practices specific to the Windows operating system.
Protection for Secret data on nodes
On Windows, data from Secrets are written out in clear text onto the node's local storage (as compared to using tmpfs / in-memory filesystems on Linux). As a cluster operator, you should take both of the following additional measures:
- Use file ACLs to secure the Secrets' file location.
- Apply volume-level encryption using BitLocker.
Container users
RunAsUsername can be specified for Windows Pods or containers to execute the container processes as specific user. This is roughly equivalent to RunAsUser.
Windows containers offer two default user accounts, ContainerUser and ContainerAdministrator. The differences between these two user accounts are covered in When to use ContainerAdmin and ContainerUser user accounts within Microsoft's Secure Windows containers documentation.
Local users can be added to container images during the container build process.
Note:
- Nano Server based images run as
ContainerUserby default - Server Core based images run as
ContainerAdministratorby default
Windows containers can also run as Active Directory identities by utilizing Group Managed Service Accounts
Pod-level security isolation
Linux-specific pod security context mechanisms (such as SELinux, AppArmor, Seccomp, or custom POSIX capabilities) are not supported on Windows nodes.
Privileged containers are not supported on Windows. Instead HostProcess containers can be used on Windows to perform many of the tasks performed by privileged containers on Linux.
8.8 - Controlling Access to the Kubernetes API
This page provides an overview of controlling access to the Kubernetes API.
Users access the Kubernetes API using kubectl,
client libraries, or by making REST requests. Both human users and
Kubernetes service accounts can be
authorized for API access.
When a request reaches the API, it goes through several stages, illustrated in the
following diagram:

Transport security
By default, the Kubernetes API server listens on port 6443 on the first non-localhost
network interface, protected by TLS. In a typical production Kubernetes cluster, the
API serves on port 443. The port can be changed with the --secure-port, and the
listening IP address with the --bind-address flag.
The API server presents a certificate. This certificate may be signed using
a private certificate authority (CA), or based on a public key infrastructure linked
to a generally recognized CA. The certificate and corresponding private key can be set
by using the --tls-cert-file and --tls-private-key-file flags.
If your cluster uses a private certificate authority, you need a copy of that CA
certificate configured into your ~/.kube/config on the client, so that you can
trust the connection and be confident it was not intercepted.
Your client can present a TLS client certificate at this stage.
Authentication
Once TLS is established, the HTTP request moves to the Authentication step. This is shown as step 1 in the diagram. The cluster creation script or cluster admin configures the API server to run one or more Authenticator modules. Authenticators are described in more detail in Authentication.
The input to the authentication step is the entire HTTP request; however, it typically examines the headers and/or client certificate.
Authentication modules include client certificates, password, and plain tokens, bootstrap tokens, and JSON Web Tokens (used for service accounts).
Multiple authentication modules can be specified, in which case each one is tried in sequence, until one of them succeeds.
If the request cannot be authenticated, it is rejected with HTTP status code 401.
Otherwise, the user is authenticated as a specific username, and the user name
is available to subsequent steps to use in their decisions. Some authenticators
also provide the group memberships of the user, while other authenticators
do not.
While Kubernetes uses usernames for access control decisions and in request logging,
it does not have a User object nor does it store usernames or other information about
users in its API.
Authorization
After the request is authenticated as coming from a specific user, the request must be authorized. This is shown as step 2 in the diagram.
A request must include the username of the requester, the requested action, and the object affected by the action. The request is authorized if an existing policy declares that the user has permissions to complete the requested action.
For example, if Bob has the policy below, then he can read pods only in the namespace projectCaribou:
{
"apiVersion": "abac.authorization.kubernetes.io/v1beta1",
"kind": "Policy",
"spec": {
"user": "bob",
"namespace": "projectCaribou",
"resource": "pods",
"readonly": true
}
}
If Bob makes the following request, the request is authorized because he is
allowed to read objects in the projectCaribou namespace:
{
"apiVersion": "authorization.k8s.io/v1beta1",
"kind": "SubjectAccessReview",
"spec": {
"resourceAttributes": {
"namespace": "projectCaribou",
"verb": "get",
"group": "unicorn.example.org",
"resource": "pods"
}
}
}
If Bob makes a request to write (create or update) to the objects in the
projectCaribou namespace, his authorization is denied. If Bob makes a request
to read (get) objects in a different namespace such as projectFish, then his authorization is denied.
Kubernetes authorization requires that you use common REST attributes to interact with existing organization-wide or cloud-provider-wide access control systems. It is important to use REST formatting because these control systems might interact with other APIs besides the Kubernetes API.
Kubernetes supports multiple authorization modules, such as ABAC mode, RBAC Mode, and Webhook mode. When an administrator creates a cluster, they configure the authorization modules that should be used in the API server. If more than one authorization modules are configured, Kubernetes checks each module, and if any module authorizes the request, then the request can proceed. If all of the modules deny the request, then the request is denied (HTTP status code 403).
To learn more about Kubernetes authorization, including details about creating policies using the supported authorization modules, see Authorization.
Admission control
Admission Control modules are software modules that can modify or reject requests. In addition to the attributes available to Authorization modules, Admission Control modules can access the contents of the object that is being created or modified.
Admission controllers act on requests that create, modify, delete, or connect to (proxy) an object. Admission controllers do not act on requests that merely read objects. When multiple admission controllers are configured, they are called in order.
This is shown as step 3 in the diagram.
Unlike Authentication and Authorization modules, if any admission controller module rejects, then the request is immediately rejected.
In addition to rejecting objects, admission controllers can also set complex defaults for fields.
The available Admission Control modules are described in Admission Controllers.
Once a request passes all admission controllers, it is validated using the validation routines for the corresponding API object, and then written to the object store (shown as step 4).
Auditing
Kubernetes auditing provides a security-relevant, chronological set of records documenting the sequence of actions in a cluster. The cluster audits the activities generated by users, by applications that use the Kubernetes API, and by the control plane itself.
For more information, see Auditing.
What's next
Read more documentation on authentication, authorization and API access control:
- Authenticating
- Admission Controllers
- Authorization
- Certificate Signing Requests
- including CSR approval and certificate signing
- Service accounts
You can learn about:
- how Pods can use Secrets to obtain API credentials.
8.9 - Role Based Access Control Good Practices
Principles and practices for good RBAC design for cluster operators.
Kubernetes RBAC is a key security control to ensure that cluster users and workloads have only the access to resources required to execute their roles. It is important to ensure that, when designing permissions for cluster users, the cluster administrator understands the areas where privilege escalation could occur, to reduce the risk of excessive access leading to security incidents.
The good practices laid out here should be read in conjunction with the general RBAC documentation.
General good practice
Least privilege
Ideally, minimal RBAC rights should be assigned to users and service accounts. Only permissions explicitly required for their operation should be used. While each cluster will be different, some general rules that can be applied are :
- Assign permissions at the namespace level where possible. Use RoleBindings as opposed to ClusterRoleBindings to give users rights only within a specific namespace.
- Avoid providing wildcard permissions when possible, especially to all resources. As Kubernetes is an extensible system, providing wildcard access gives rights not just to all object types that currently exist in the cluster, but also to all object types which are created in the future.
- Administrators should not use
cluster-adminaccounts except where specifically needed. Providing a low privileged account with impersonation rights can avoid accidental modification of cluster resources. - Avoid adding users to the
system:mastersgroup. Any user who is a member of this group bypasses all RBAC rights checks and will always have unrestricted superuser access, which cannot be revoked by removing RoleBindings or ClusterRoleBindings. As an aside, if a cluster is using an authorization webhook, membership of this group also bypasses that webhook (requests from users who are members of that group are never sent to the webhook)
Minimize distribution of privileged tokens
Ideally, pods shouldn't be assigned service accounts that have been granted powerful permissions (for example, any of the rights listed under privilege escalation risks). In cases where a workload requires powerful permissions, consider the following practices:
- Limit the number of nodes running powerful pods. Ensure that any DaemonSets you run are necessary and are run with least privilege to limit the blast radius of container escapes.
- Avoid running powerful pods alongside untrusted or publicly-exposed ones. Consider using Taints and Toleration, NodeAffinity, or PodAntiAffinity to ensure pods don't run alongside untrusted or less-trusted Pods. Pay special attention to situations where less-trustworthy Pods are not meeting the Restricted Pod Security Standard.
Hardening
Kubernetes defaults to providing access which may not be required in every cluster. Reviewing
the RBAC rights provided by default can provide opportunities for security hardening.
In general, changes should not be made to rights provided to system: accounts some options
to harden cluster rights exist:
- Review bindings for the
system:unauthenticatedgroup and remove them where possible, as this gives access to anyone who can contact the API server at a network level. - Avoid the default auto-mounting of service account tokens by setting
automountServiceAccountToken: false. For more details, see using default service account token. Setting this value for a Pod will overwrite the service account setting, workloads which require service account tokens can still mount them.
Periodic review
It is vital to periodically review the Kubernetes RBAC settings for redundant entries and possible privilege escalations. If an attacker is able to create a user account with the same name as a deleted user, they can automatically inherit all the rights of the deleted user, especially the rights assigned to that user.
Kubernetes RBAC - privilege escalation risks
Within Kubernetes RBAC there are a number of privileges which, if granted, can allow a user or a service account to escalate their privileges in the cluster or affect systems outside the cluster.
This section is intended to provide visibility of the areas where cluster operators should take care, to ensure that they do not inadvertently allow for more access to clusters than intended.
Listing secrets
It is generally clear that allowing get access on Secrets will allow a user to read their contents.
It is also important to note that list and watch access also effectively allow for users to reveal the Secret contents.
For example, when a List response is returned (for example, via kubectl get secrets -A -o yaml), the response
includes the contents of all Secrets.
Workload creation
Permission to create workloads (either Pods, or workload resources that manage Pods) in a namespace implicitly grants access to many other resources in that namespace, such as Secrets, ConfigMaps, and PersistentVolumes that can be mounted in Pods. Additionally, since Pods can run as any ServiceAccount, granting permission to create workloads also implicitly grants the API access levels of any service account in that namespace.
Users who can run privileged Pods can use that access to gain node access and potentially to further elevate their privileges. Where you do not fully trust a user or other principal with the ability to create suitably secure and isolated Pods, you should enforce either the Baseline or Restricted Pod Security Standard. You can use Pod Security admission or other (third party) mechanisms to implement that enforcement.
For these reasons, namespaces should be used to separate resources requiring different levels of trust or tenancy. It is still considered best practice to follow least privilege principles and assign the minimum set of permissions, but boundaries within a namespace should be considered weak.
Persistent volume creation
If someone - or some application - is allowed to create arbitrary PersistentVolumes, that access
includes the creation of hostPath volumes, which then means that a Pod would get access
to the underlying host filesystem(s) on the associated node. Granting that ability is a security risk.
There are many ways a container with unrestricted access to the host filesystem can escalate privileges, including reading data from other containers, and abusing the credentials of system services, such as Kubelet.
You should only allow access to create PersistentVolume objects for:
- Users (cluster operators) that need this access for their work, and who you trust.
- The Kubernetes control plane components which creates PersistentVolumes based on PersistentVolumeClaims that are configured for automatic provisioning. This is usually setup by the Kubernetes provider or by the operator when installing a CSI driver.
Where access to persistent storage is required trusted administrators should create PersistentVolumes, and constrained users should use PersistentVolumeClaims to access that storage.
Access to proxy subresource of Nodes
Users with access to the nodes/proxy sub-resource have rights to the Kubelet API,
which allows for command execution on every pod on the node(s) to which they have rights.
This access bypasses audit logging and admission control, so care should be taken before
granting any rights to this resource.
These APIs can be exercised via websocket HTTP GET requests, which only requires authorization of the get verb.
This means that get permission on nodes/proxy is not a read-only permission.
For example, permission to get nodes/proxy provides access to privileged kubelet
APIs that can retrieve container logs or execute and attach to pod processes,
even when a caller does not have the equivalent permissions through the
Kubernetes API.
See Kubelet authentication/authorization for more information.
Escalate verb
Generally, the RBAC system prevents users from creating clusterroles with more rights than the user possesses.
The exception to this is the escalate verb. As noted in the RBAC documentation,
users with this right can effectively escalate their privileges.
Bind verb
Similar to the escalate verb, granting users this right allows for the bypass of Kubernetes
in-built protections against privilege escalation, allowing users to create bindings to
roles with rights they do not already have.
Impersonate verb
This verb allows users to impersonate and gain the rights of other users in the cluster. Care should be taken when granting it, to ensure that excessive permissions cannot be gained via one of the impersonated accounts.
CSRs and certificate issuing
The CSR API allows for users with create rights to CSRs and update rights on certificatesigningrequests/approval
where the signer is kubernetes.io/kube-apiserver-client to create new client certificates
which allow users to authenticate to the cluster. Those client certificates can have arbitrary
names including duplicates of Kubernetes system components. This will effectively allow for privilege escalation.
Token request
Users with create rights on serviceaccounts/token can create TokenRequests to issue
tokens for existing service accounts.
Control admission webhooks
Users with control over validatingwebhookconfigurations or mutatingwebhookconfigurations
can control webhooks that can read any object admitted to the cluster, and in the case of
mutating webhooks, also mutate admitted objects.
Namespace modification
Users who can perform patch operations on Namespace objects (through a namespaced RoleBinding to a Role with that access) can modify labels on that namespace. In clusters where Pod Security Admission is used, this may allow a user to configure the namespace for a more permissive policy than intended by the administrators. For clusters where NetworkPolicy is used, users may be set labels that indirectly allow access to services that an administrator did not intend to allow.
Kubernetes RBAC - denial of service risks
Object creation denial-of-service
Users who have rights to create objects in a cluster may be able to create sufficient large objects to create a denial of service condition either based on the size or number of objects, as discussed in etcd used by Kubernetes is vulnerable to OOM attack. This may be specifically relevant in multi-tenant clusters if semi-trusted or untrusted users are allowed limited access to a system.
One option for mitigation of this issue would be to use resource quotas to limit the quantity of objects which can be created.
What's next
- To learn more about RBAC, see the RBAC documentation.
8.10 - Good practices for Kubernetes Secrets
Principles and practices for good Secret management for cluster administrators and application developers.
In Kubernetes, a Secret is an object that stores sensitive information, such as passwords, OAuth tokens, and SSH keys.
Secrets give you more control over how sensitive information is used and reduces the risk of accidental exposure. Secret values are encoded as base64 strings and are stored unencrypted by default, but can be configured to be encrypted at rest.
A Pod can reference the Secret in a variety of ways, such as in a volume mount or as an environment variable. Secrets are designed for confidential data and ConfigMaps are designed for non-confidential data.
The following good practices are intended for both cluster administrators and application developers. Use these guidelines to improve the security of your sensitive information in Secret objects, as well as to more effectively manage your Secrets.
Cluster administrators
This section provides good practices that cluster administrators can use to improve the security of confidential information in the cluster.
Configure encryption at rest
By default, Secret objects are stored unencrypted in etcd. You should configure encryption of your Secret
data in etcd. For instructions, refer to
Encrypt Secret Data at Rest.
Configure least-privilege access to Secrets
When planning your access control mechanism, such as Kubernetes
Role-based Access Control (RBAC),
consider the following guidelines for access to Secret objects. You should
also follow the other guidelines in
RBAC good practices.
- Components: Restrict
watchorlistaccess to only the most privileged, system-level components. Only grantgetaccess for Secrets if the component's normal behavior requires it. - Humans: Restrict
get,watch, orlistaccess to Secrets. Only allow cluster administrators to accessetcd. This includes read-only access. For more complex access control, such as restricting access to Secrets with specific annotations, consider using third-party authorization mechanisms.
Caution:
Grantinglist access to Secrets implicitly lets the subject fetch the
contents of the Secrets.A user who can create a Pod that uses a Secret can also see the value of that Secret. Even if cluster policies do not allow a user to read the Secret directly, the same user could have access to run a Pod that then exposes the Secret. You can detect or limit the impact caused by Secret data being exposed, either intentionally or unintentionally, by a user with this access. Some recommendations include:
- Use short-lived Secrets
- Implement audit rules that alert on specific events, such as concurrent reading of multiple Secrets by a single user
Restrict Access for Secrets
Use separate namespaces to isolate access to mounted secrets.
Improve etcd management policies
Consider wiping or shredding the durable storage used by etcd once it is
no longer in use.
If there are multiple etcd instances, configure encrypted SSL/TLS
communication between the instances to protect the Secret data in transit.
Configure access to external Secrets
Note: This section links to third party projects that provide functionality required by Kubernetes. The Kubernetes project authors aren't responsible for these projects, which are listed alphabetically. To add a project to this list, read the content guide before submitting a change. More information.
You can use third-party Secrets store providers to keep your confidential data outside your cluster and then configure Pods to access that information. The Kubernetes Secrets Store CSI Driver is a DaemonSet that lets the kubelet retrieve Secrets from external stores, and mount the Secrets as a volume into specific Pods that you authorize to access the data.
For a list of supported providers, refer to Providers for the Secret Store CSI Driver.
Good practices for using swap memory
For best practices for setting swap memory for Linux nodes, please refer to swap memory management.
Developers
This section provides good practices for developers to use to improve the security of confidential data when building and deploying Kubernetes resources.
Restrict Secret access to specific containers
If you are defining multiple containers in a Pod, and only one of those containers needs access to a Secret, define the volume mount or environment variable configuration so that the other containers do not have access to that Secret.
Protect Secret data after reading
Applications still need to protect the value of confidential information after reading it from an environment variable or volume. For example, your application must avoid logging the secret data in the clear or transmitting it to an untrusted party.
Avoid sharing Secret manifests
If you configure a Secret through a manifest, with the secret data encoded as base64, sharing this file or checking it in to a source repository means the secret is available to everyone who can read the manifest.
Caution:
Base64 encoding is not an encryption method, it provides no additional confidentiality over plain text.8.11 - Multi-tenancy
This page provides an overview of available configuration options and best practices for cluster multi-tenancy.
Sharing clusters saves costs and simplifies administration. However, sharing clusters also presents challenges such as security, fairness, and managing noisy neighbors.
Clusters can be shared in many ways. In some cases, different applications may run in the same cluster. In other cases, multiple instances of the same application may run in the same cluster, one for each end user. All these types of sharing are frequently described using the umbrella term multi-tenancy.
While Kubernetes does not have first-class concepts of end users or tenants, it provides several features to help manage different tenancy requirements. These are discussed below.
Use cases
The first step to determining how to share your cluster is understanding your use case, so you can evaluate the patterns and tools available. In general, multi-tenancy in Kubernetes clusters falls into two broad categories, though many variations and hybrids are also possible.
Multiple teams
A common form of multi-tenancy is to share a cluster between multiple teams within an organization, each of whom may operate one or more workloads. These workloads frequently need to communicate with each other, and with other workloads located on the same or different clusters.
In this scenario, members of the teams often have direct access to Kubernetes resources via tools
such as kubectl, or indirect access through GitOps controllers or other types of release
automation tools. There is often some level of trust between members of different teams, but
Kubernetes policies such as RBAC, quotas, and network policies are essential to safely and fairly
share clusters.
Multiple customers
The other major form of multi-tenancy frequently involves a Software-as-a-Service (SaaS) vendor running multiple instances of a workload for customers. This business model is so strongly associated with this deployment style that many people call it "SaaS tenancy." However, a better term might be "multi-customer tenancy," since SaaS vendors may also use other deployment models, and this deployment model can also be used outside of SaaS.
In this scenario, the customers do not have access to the cluster; Kubernetes is invisible from their perspective and is only used by the vendor to manage the workloads. Cost optimization is frequently a critical concern, and Kubernetes policies are used to ensure that the workloads are strongly isolated from each other.
Terminology
Tenants
When discussing multi-tenancy in Kubernetes, there is no single definition for a "tenant". Rather, the definition of a tenant will vary depending on whether multi-team or multi-customer tenancy is being discussed.
In multi-team usage, a tenant is typically a team, where each team typically deploys a small number of workloads that scales with the complexity of the service. However, the definition of "team" may itself be fuzzy, as teams may be organized into higher-level divisions or subdivided into smaller teams.
By contrast, if each team deploys dedicated workloads for each new client, they are using a multi-customer model of tenancy. In this case, a "tenant" is simply a group of users who share a single workload. This may be as large as an entire company, or as small as a single team at that company.
In many cases, the same organization may use both definitions of "tenants" in different contexts. For example, a platform team may offer shared services such as security tools and databases to multiple internal “customers” and a SaaS vendor may also have multiple teams sharing a development cluster. Finally, hybrid architectures are also possible, such as a SaaS provider using a combination of per-customer workloads for sensitive data, combined with multi-tenant shared services.
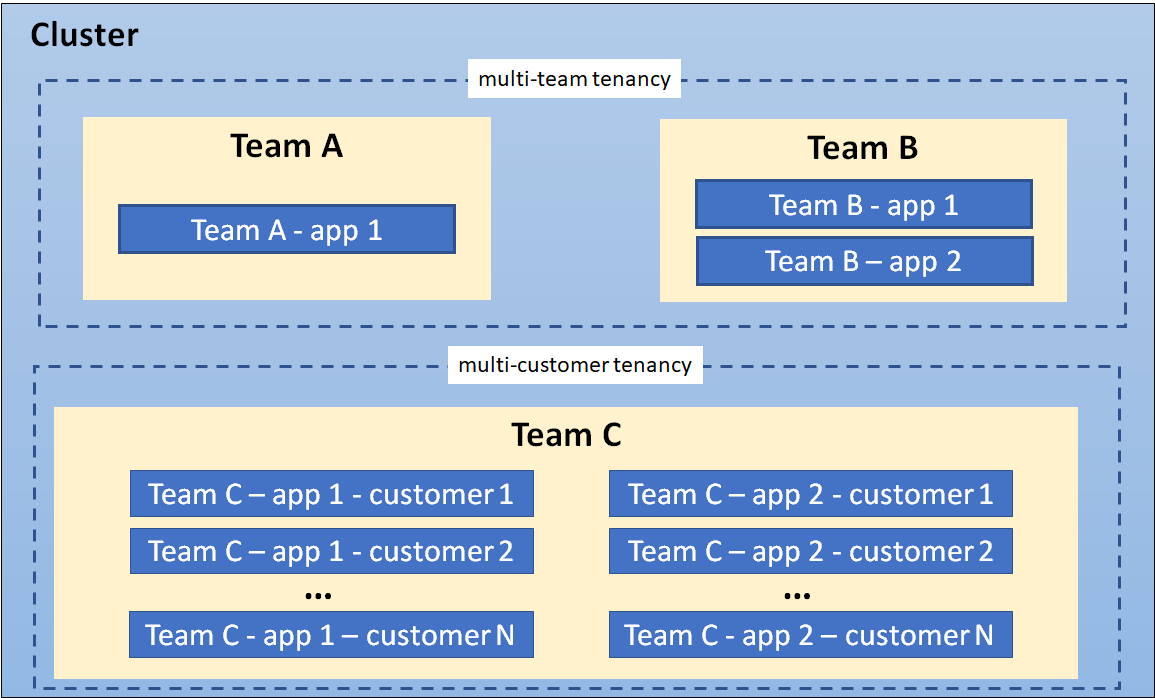
A cluster showing coexisting tenancy models
Isolation
There are several ways to design and build multi-tenant solutions with Kubernetes. Each of these methods comes with its own set of tradeoffs that impact the isolation level, implementation effort, operational complexity, and cost of service.
A Kubernetes cluster consists of a control plane which runs Kubernetes software, and a data plane consisting of worker nodes where tenant workloads are executed as pods. Tenant isolation can be applied in both the control plane and the data plane based on organizational requirements.
The level of isolation offered is sometimes described using terms like “hard” multi-tenancy, which implies strong isolation, and “soft” multi-tenancy, which implies weaker isolation. In particular, "hard" multi-tenancy is often used to describe cases where the tenants do not trust each other, often from security and resource sharing perspectives (e.g. guarding against attacks such as data exfiltration or DoS). Since data planes typically have much larger attack surfaces, "hard" multi-tenancy often requires extra attention to isolating the data-plane, though control plane isolation also remains critical.
However, the terms "hard" and "soft" can often be confusing, as there is no single definition that will apply to all users. Rather, "hardness" or "softness" is better understood as a broad spectrum, with many different techniques that can be used to maintain different types of isolation in your clusters, based on your requirements.
In more extreme cases, it may be easier or necessary to forgo any cluster-level sharing at all and assign each tenant their dedicated cluster, possibly even running on dedicated hardware if VMs are not considered an adequate security boundary. This may be easier with managed Kubernetes clusters, where the overhead of creating and operating clusters is at least somewhat taken on by a cloud provider. The benefit of stronger tenant isolation must be evaluated against the cost and complexity of managing multiple clusters. The Multi-cluster SIG is responsible for addressing these types of use cases.
The remainder of this page focuses on isolation techniques used for shared Kubernetes clusters. However, even if you are considering dedicated clusters, it may be valuable to review these recommendations, as it will give you the flexibility to shift to shared clusters in the future if your needs or capabilities change.
Control plane isolation
Control plane isolation ensures that different tenants cannot access or affect each others' Kubernetes API resources.
Namespaces
In Kubernetes, a Namespace provides a mechanism for isolating groups of API resources within a single cluster. This isolation has two key dimensions:
Object names within a namespace can overlap with names in other namespaces, similar to files in folders. This allows tenants to name their resources without having to consider what other tenants are doing.
Many Kubernetes security policies are scoped to namespaces. For example, RBAC Roles and Network Policies are namespace-scoped resources. Using RBAC, Users and Service Accounts can be restricted to a namespace.
In a multi-tenant environment, a Namespace helps segment a tenant's workload into a logical and distinct management unit. In fact, a common practice is to isolate every workload in its own namespace, even if multiple workloads are operated by the same tenant. This ensures that each workload has its own identity and can be configured with an appropriate security policy.
The namespace isolation model requires configuration of several other Kubernetes resources, networking plugins, and adherence to security best practices to properly isolate tenant workloads. These considerations are discussed below.
Access controls
The most important type of isolation for the control plane is authorization. If teams or their workloads can access or modify each others' API resources, they can change or disable all other types of policies thereby negating any protection those policies may offer. As a result, it is critical to ensure that each tenant has the appropriate access to only the namespaces they need, and no more. This is known as the "Principle of Least Privilege."
Role-based access control (RBAC) is commonly used to enforce authorization in the Kubernetes control plane, for both users and workloads (service accounts). Roles and RoleBindings are Kubernetes objects that are used at a namespace level to enforce access control in your application; similar objects exist for authorizing access to cluster-level objects, though these are less useful for multi-tenant clusters.
In a multi-team environment, RBAC must be used to restrict tenants' access to the appropriate namespaces, and ensure that cluster-wide resources can only be accessed or modified by privileged users such as cluster administrators.
If a policy ends up granting a user more permissions than they need, this is likely a signal that the namespace containing the affected resources should be refactored into finer-grained namespaces. Namespace management tools may simplify the management of these finer-grained namespaces by applying common RBAC policies to different namespaces, while still allowing fine-grained policies where necessary.
Quotas
Kubernetes workloads consume node resources, like CPU and memory. In a multi-tenant environment, you can use Resource Quotas to manage resource usage of tenant workloads. For the multiple teams use case, where tenants have access to the Kubernetes API, you can use resource quotas to limit the number of API resources (for example: the number of Pods, or the number of ConfigMaps) that a tenant can create. Limits on object count ensure fairness and aim to avoid noisy neighbor issues from affecting other tenants that share a control plane.
Resource quotas are namespaced objects. By mapping tenants to namespaces, cluster admins can use quotas to ensure that a tenant cannot monopolize a cluster's resources or overwhelm its control plane. Namespace management tools simplify the administration of quotas. In addition, while Kubernetes quotas only apply within a single namespace, some namespace management tools allow groups of namespaces to share quotas, giving administrators far more flexibility with less effort than built-in quotas.
Quotas prevent a single tenant from consuming greater than their allocated share of resources hence minimizing the “noisy neighbor” issue, where one tenant negatively impacts the performance of other tenants' workloads.
When you apply a quota to namespace, Kubernetes requires you to also specify resource requests and limits for each container. Limits are the upper bound for the amount of resources that a container can consume. Containers that attempt to consume resources that exceed the configured limits will either be throttled or killed, based on the resource type. When resource requests are set lower than limits, each container is guaranteed the requested amount but there may still be some potential for impact across workloads.
Quotas cannot protect against all kinds of resource sharing, such as network traffic. Node isolation (described below) may be a better solution for this problem.
Data Plane Isolation
Data plane isolation ensures that pods and workloads for different tenants are sufficiently isolated.
Network isolation
By default, all pods in a Kubernetes cluster are allowed to communicate with each other, and all network traffic is unencrypted. This can lead to security vulnerabilities where traffic is accidentally or maliciously sent to an unintended destination, or is intercepted by a workload on a compromised node.
Pod-to-pod communication can be controlled using Network Policies, which restrict communication between pods using namespace labels or IP address ranges. In a multi-tenant environment where strict network isolation between tenants is required, starting with a default policy that denies communication between pods is recommended with another rule that allows all pods to query the DNS server for name resolution. With such a default policy in place, you can begin adding more permissive rules that allow for communication within a namespace. It is also recommended not to use empty label selector '{}' for namespaceSelector field in network policy definition, in case traffic need to be allowed between namespaces. This scheme can be further refined as required. Note that this only applies to pods within a single control plane; pods that belong to different virtual control planes cannot talk to each other via Kubernetes networking.
Namespace management tools may simplify the creation of default or common network policies. In addition, some of these tools allow you to enforce a consistent set of namespace labels across your cluster, ensuring that they are a trusted basis for your policies.
Warning:
Network policies require a CNI plugin that supports the implementation of network policies. Otherwise, NetworkPolicy resources will be ignored.More advanced network isolation may be provided by service meshes, which provide OSI Layer 7 policies based on workload identity, in addition to namespaces. These higher-level policies can make it easier to manage namespace-based multi-tenancy, especially when multiple namespaces are dedicated to a single tenant. They frequently also offer encryption using mutual TLS, protecting your data even in the presence of a compromised node, and work across dedicated or virtual clusters. However, they can be significantly more complex to manage and may not be appropriate for all users.
Storage isolation
Kubernetes offers several types of volumes that can be used as persistent storage for workloads. For security and data-isolation, dynamic volume provisioning is recommended and volume types that use node resources should be avoided.
StorageClasses allow you to describe custom "classes" of storage offered by your cluster, based on quality-of-service levels, backup policies, or custom policies determined by the cluster administrators.
Pods can request storage using a PersistentVolumeClaim. A PersistentVolumeClaim is a namespaced resource, which enables isolating portions of the storage system and dedicating it to tenants within the shared Kubernetes cluster. However, it is important to note that a PersistentVolume is a cluster-wide resource and has a lifecycle independent of workloads and namespaces.
For example, you can configure a separate StorageClass for each tenant and use this to strengthen isolation.
If a StorageClass is shared, you should set a reclaim policy of Delete
to ensure that a PersistentVolume cannot be reused across different namespaces.
Sandboxing containers
Kubernetes pods are composed of one or more containers that execute on worker nodes. Containers utilize OS-level virtualization and hence offer a weaker isolation boundary than virtual machines that utilize hardware-based virtualization.
In a shared environment, unpatched vulnerabilities in the application and system layers can be exploited by attackers for container breakouts and remote code execution that allow access to host resources. In some applications, like a Content Management System (CMS), customers may be allowed the ability to upload and execute untrusted scripts or code. In either case, mechanisms to further isolate and protect workloads using strong isolation are desirable.
Sandboxing provides a way to isolate workloads running in a shared cluster. It typically involves
running each pod in a separate execution environment such as a virtual machine or a userspace
kernel. Sandboxing is often recommended when you are running untrusted code, where workloads are
assumed to be malicious. Part of the reason this type of isolation is necessary is because
containers are processes running on a shared kernel; they mount file systems like /sys and /proc
from the underlying host, making them less secure than an application that runs on a virtual
machine which has its own kernel. While controls such as seccomp, AppArmor, and SELinux can be
used to strengthen the security of containers, it is hard to apply a universal set of rules to all
workloads running in a shared cluster. Running workloads in a sandbox environment helps to
insulate the host from container escapes, where an attacker exploits a vulnerability to gain
access to the host system and all the processes/files running on that host.
Virtual machines and userspace kernels are two popular approaches to sandboxing.
Node Isolation
Node isolation is another technique that you can use to isolate tenant workloads from each other. With node isolation, a set of nodes is dedicated to running pods from a particular tenant and co-mingling of tenant pods is prohibited. This configuration reduces the noisy tenant issue, as all pods running on a node will belong to a single tenant. The risk of information disclosure is slightly lower with node isolation because an attacker that manages to escape from a container will only have access to the containers and volumes mounted to that node.
Although workloads from different tenants are running on different nodes, it is important to be aware that the kubelet and (unless using virtual control planes) the API service are still shared services. A skilled attacker could use the permissions assigned to the kubelet or other pods running on the node to move laterally within the cluster and gain access to tenant workloads running on other nodes. If this is a major concern, consider implementing compensating controls such as seccomp, AppArmor or SELinux or explore using sandboxed containers or creating separate clusters for each tenant.
Node isolation is a little easier to reason about from a billing standpoint than sandboxing containers since you can charge back per node rather than per pod. It also has fewer compatibility and performance issues and may be easier to implement than sandboxing containers. For example, nodes for each tenant can be configured with taints so that only pods with the corresponding toleration can run on them. A mutating webhook could then be used to automatically add tolerations and node affinities to pods deployed into tenant namespaces so that they run on a specific set of nodes designated for that tenant.
Node isolation can be implemented using pod node selectors.
Additional Considerations
This section discusses other Kubernetes constructs and patterns that are relevant for multi-tenancy.
API Priority and Fairness
API priority and fairness is a Kubernetes feature that allows you to assign a priority to certain pods running within the cluster. When an application calls the Kubernetes API, the API server evaluates the priority assigned to pod. Calls from pods with higher priority are fulfilled before those with a lower priority. When contention is high, lower priority calls can be queued until the server is less busy or you can reject the requests.
Using API priority and fairness will not be very common in SaaS environments unless you are allowing customers to run applications that interface with the Kubernetes API, for example, a controller.
Quality-of-Service (QoS)
When you’re running a SaaS application, you may want the ability to offer different Quality-of-Service (QoS) tiers of service to different tenants. For example, you may have freemium service that comes with fewer performance guarantees and features and a for-fee service tier with specific performance guarantees. Fortunately, there are several Kubernetes constructs that can help you accomplish this within a shared cluster, including network QoS, storage classes, and pod priority and preemption. The idea with each of these is to provide tenants with the quality of service that they paid for. Let’s start by looking at networking QoS.
Typically, all pods on a node share a network interface. Without network QoS, some pods may consume an unfair share of the available bandwidth at the expense of other pods. The Kubernetes bandwidth plugin creates an extended resource for networking that allows you to use Kubernetes resources constructs, i.e. requests/limits, to apply rate limits to pods by using Linux tc queues. Be aware that the plugin is considered experimental as per the Network Plugins documentation and should be thoroughly tested before use in production environments.
For storage QoS, you will likely want to create different storage classes or profiles with different performance characteristics. Each storage profile can be associated with a different tier of service that is optimized for different workloads such IO, redundancy, or throughput. Additional logic might be necessary to allow the tenant to associate the appropriate storage profile with their workload.
Finally, there’s pod priority and preemption where you can assign priority values to pods. When scheduling pods, the scheduler will try evicting pods with lower priority when there are insufficient resources to schedule pods that are assigned a higher priority. If you have a use case where tenants have different service tiers in a shared cluster e.g. free and paid, you may want to give higher priority to certain tiers using this feature.
DNS
Kubernetes clusters include a Domain Name System (DNS) service to provide translations from names to IP addresses, for all Services and Pods. By default, the Kubernetes DNS service allows lookups across all namespaces in the cluster.
In multi-tenant environments where tenants can access pods and other Kubernetes resources, or where stronger isolation is required, it may be necessary to prevent pods from looking up services in other Namespaces. You can restrict cross-namespace DNS lookups by configuring security rules for the DNS service. For example, CoreDNS (the default DNS service for Kubernetes) can leverage Kubernetes metadata to restrict queries to Pods and Services within a namespace. For more information, read an example of configuring this within the CoreDNS documentation.
When a Virtual Control Plane per tenant model is used, a DNS service must be configured per tenant or a multi-tenant DNS service must be used. Here is an example of a customized version of CoreDNS that supports multiple tenants.
Operators
Operators are Kubernetes controllers that manage applications. Operators can simplify the management of multiple instances of an application, like a database service, which makes them a common building block in the multi-consumer (SaaS) multi-tenancy use case.
Operators used in a multi-tenant environment should follow a stricter set of guidelines. Specifically, the Operator should:
- Support creating resources within different tenant namespaces, rather than just in the namespace in which the Operator is deployed.
- Ensure that the Pods are configured with resource requests and limits, to ensure scheduling and fairness.
- Support configuration of Pods for data-plane isolation techniques such as node isolation and sandboxed containers.
Implementations
There are two primary ways to share a Kubernetes cluster for multi-tenancy: using Namespaces (that is, a Namespace per tenant) or by virtualizing the control plane (that is, virtual control plane per tenant).
In both cases, data plane isolation, and management of additional considerations such as API Priority and Fairness, is also recommended.
Namespace isolation is well-supported by Kubernetes, has a negligible resource cost, and provides mechanisms to allow tenants to interact appropriately, such as by allowing service-to-service communication. However, it can be difficult to configure, and doesn't apply to Kubernetes resources that can't be namespaced, such as Custom Resource Definitions, Storage Classes, and Webhooks.
Control plane virtualization allows for isolation of non-namespaced resources at the cost of somewhat higher resource usage and more difficult cross-tenant sharing. It is a good option when namespace isolation is insufficient but dedicated clusters are undesirable, due to the high cost of maintaining them (especially on-prem) or due to their higher overhead and lack of resource sharing. However, even within a virtualized control plane, you will likely see benefits by using namespaces as well.
The two options are discussed in more detail in the following sections.
Namespace per tenant
As previously mentioned, you should consider isolating each workload in its own namespace, even if you are using dedicated clusters or virtualized control planes. This ensures that each workload only has access to its own resources, such as ConfigMaps and Secrets, and allows you to tailor dedicated security policies for each workload. In addition, it is a best practice to give each namespace names that are unique across your entire fleet (that is, even if they are in separate clusters), as this gives you the flexibility to switch between dedicated and shared clusters in the future, or to use multi-cluster tooling such as service meshes.
Conversely, there are also advantages to assigning namespaces at the tenant level, not just the workload level, since there are often policies that apply to all workloads owned by a single tenant. However, this raises its own problems. Firstly, this makes it difficult or impossible to customize policies to individual workloads, and secondly, it may be challenging to come up with a single level of "tenancy" that should be given a namespace. For example, an organization may have divisions, teams, and subteams - which should be assigned a namespace?
One possible approach is to organize your namespaces into hierarchies, and share certain policies and resources between them. This could include managing namespace labels, namespace lifecycles, delegated access, and shared resource quotas across related namespaces. These capabilities can be useful in both multi-team and multi-customer scenarios.
Virtual control plane per tenant
Another form of control-plane isolation is to use Kubernetes extensions to provide each tenant a virtual control-plane that enables segmentation of cluster-wide API resources. Data plane isolation techniques can be used with this model to securely manage worker nodes across tenants.
The virtual control plane based multi-tenancy model extends namespace-based multi-tenancy by providing each tenant with dedicated control plane components, and hence complete control over cluster-wide resources and add-on services. Worker nodes are shared across all tenants, and are managed by a Kubernetes cluster that is normally inaccessible to tenants. This cluster is often referred to as a super-cluster (or sometimes as a host-cluster). Since a tenant’s control-plane is not directly associated with underlying compute resources it is referred to as a virtual control plane.
A virtual control plane typically consists of the Kubernetes API server, the controller manager, and the etcd data store. It interacts with the super cluster via a metadata synchronization controller which coordinates changes across tenant control planes and the control plane of the super-cluster.
By using per-tenant dedicated control planes, most of the isolation problems due to sharing one API server among all tenants are solved. Examples include noisy neighbors in the control plane, uncontrollable blast radius of policy misconfigurations, and conflicts between cluster scope objects such as webhooks and CRDs. Hence, the virtual control plane model is particularly suitable for cases where each tenant requires access to a Kubernetes API server and expects the full cluster manageability.
The improved isolation comes at the cost of running and maintaining an individual virtual control plane per tenant. In addition, per-tenant control planes do not solve isolation problems in the data plane, such as node-level noisy neighbors or security threats. These must still be addressed separately.
8.12 - Hardening Guide - Authentication Mechanisms
Information on authentication options in Kubernetes and their security properties.
Selecting the appropriate authentication mechanism(s) is a crucial aspect of securing your cluster. Kubernetes provides several built-in mechanisms, each with its own strengths and weaknesses that should be carefully considered when choosing the best authentication mechanism for your cluster.
In general, it is recommended to enable as few authentication mechanisms as possible to simplify user management and prevent cases where users retain access to a cluster that is no longer required.
It is important to note that Kubernetes does not have an in-built user database within the cluster. Instead, it takes user information from the configured authentication system and uses that to make authorization decisions. Therefore, to audit user access, you need to review credentials from every configured authentication source.
For production clusters with multiple users directly accessing the Kubernetes API, it is recommended to use external authentication sources such as OIDC. The internal authentication mechanisms, such as client certificates and service account tokens, described below, are not suitable for this use case.
X.509 client certificate authentication
Kubernetes leverages X.509 client certificate authentication for system components, such as when the kubelet authenticates to the API Server. While this mechanism can also be used for user authentication, it might not be suitable for production use due to several restrictions:
- Client certificates cannot be individually revoked. Once compromised, a certificate can be used by an attacker until it expires. To mitigate this risk, it is recommended to configure short lifetimes for user authentication credentials created using client certificates.
- If a certificate needs to be invalidated, the certificate authority must be re-keyed, which can introduce availability risks to the cluster.
- There is no permanent record of client certificates created in the cluster. Therefore, all issued certificates must be recorded if you need to keep track of them.
- Private keys used for client certificate authentication cannot be password-protected. Anyone who can read the file containing the key will be able to make use of it.
- Using client certificate authentication requires a direct connection from the client to the API server without any intervening TLS termination points, which can complicate network architectures.
- Group data is embedded in the
Ovalue of the client certificate, which means the user's group memberships cannot be changed for the lifetime of the certificate.
Static token file
Although Kubernetes allows you to load credentials from a static token file located on the control plane node disks, this approach is not recommended for production servers due to several reasons:
- Credentials are stored in clear text on control plane node disks, which can be a security risk.
- Changing any credential requires a restart of the API server process to take effect, which can impact availability.
- There is no mechanism available to allow users to rotate their credentials. To rotate a credential, a cluster administrator must modify the token on disk and distribute it to the users.
- There is no lockout mechanism available to prevent brute-force attacks.
Bootstrap tokens
Bootstrap tokens are used for joining nodes to clusters and are not recommended for user authentication due to several reasons:
- They have hard-coded group memberships that are not suitable for general use, making them unsuitable for authentication purposes.
- Manually generating bootstrap tokens can lead to weak tokens that can be guessed by an attacker, which can be a security risk.
- There is no lockout mechanism available to prevent brute-force attacks, making it easier for attackers to guess or crack the token.
ServiceAccount secret tokens
Service account secrets are available as an option to allow workloads running in the cluster to authenticate to the API server. In Kubernetes < 1.23, these were the default option, however, they are being replaced with TokenRequest API tokens. While these secrets could be used for user authentication, they are generally unsuitable for a number of reasons:
- They cannot be set with an expiry and will remain valid until the associated service account is deleted.
- The authentication tokens are visible to any cluster user who can read secrets in the namespace that they are defined in.
- Service accounts cannot be added to arbitrary groups complicating RBAC management where they are used.
TokenRequest API tokens
The TokenRequest API is a useful tool for generating short-lived credentials for service authentication to the API server or third-party systems. However, it is not generally recommended for user authentication as there is no revocation method available, and distributing credentials to users in a secure manner can be challenging.
When using TokenRequest tokens for service authentication, it is recommended to implement a short lifespan to reduce the impact of compromised tokens.
OpenID Connect token authentication
Kubernetes supports integrating external authentication services with the Kubernetes API using OpenID Connect (OIDC). There is a wide variety of software that can be used to integrate Kubernetes with an identity provider. However, when using OIDC authentication in Kubernetes, it is important to consider the following hardening measures:
- The software installed in the cluster to support OIDC authentication should be isolated from general workloads as it will run with high privileges.
- Some Kubernetes managed services are limited in the OIDC providers that can be used.
- As with TokenRequest tokens, OIDC tokens should have a short lifespan to reduce the impact of compromised tokens.
Webhook token authentication
Webhook token authentication is another option for integrating external authentication providers into Kubernetes. This mechanism allows for an authentication service, either running inside the cluster or externally, to be contacted for an authentication decision over a webhook. It is important to note that the suitability of this mechanism will likely depend on the software used for the authentication service, and there are some Kubernetes-specific considerations to take into account.
To configure Webhook authentication, access to control plane server filesystems is required. This means that it will not be possible with Managed Kubernetes unless the provider specifically makes it available. Additionally, any software installed in the cluster to support this access should be isolated from general workloads, as it will run with high privileges.
Authenticating proxy
Another option for integrating external authentication systems into Kubernetes is to use an authenticating proxy. With this mechanism, Kubernetes expects to receive requests from the proxy with specific header values set, indicating the username and group memberships to assign for authorization purposes. It is important to note that there are specific considerations to take into account when using this mechanism.
Firstly, securely configured TLS must be used between the proxy and Kubernetes API server to mitigate the risk of traffic interception or sniffing attacks. This ensures that the communication between the proxy and Kubernetes API server is secure.
Secondly, it is important to be aware that an attacker who is able to modify the headers of the request may be able to gain unauthorized access to Kubernetes resources. As such, it is important to ensure that the headers are properly secured and cannot be tampered with.
What's next
8.13 - Hardening Guide - Dynamic Resource Allocation
Information about hardening Dynamic Resource Allocation (DRA) authorization and access patterns.
Dynamic Resource Allocation (DRA) adds powerful scheduling and device management
capabilities. Because DRA components update ResourceClaim status, cluster
administrators should configure authorization for those updates with explicit,
least-privilege RBAC.
FEATURE STATE:
Kubernetes v1.36 [beta](enabled by default)Starting in Kubernetes v1.36, DRA status updates use synthetic subresources and, in some cases, specialized node-aware verbs.
Harden DRA status update permissions
For DRA status updates,In addition to granting update permissions on the
resourceclaims/status subresource, cluster administrators must grant permissions on
specific "synthetic" subresources based on the exact fields a component needs to modify.
This enforces the principle of least privilege between the scheduler, custom controllers,
and DRA drivers.
The DRA authorization checks are divided into two synthetic subresources:
resourceclaims/binding- Required to modify
status.allocationandstatus.reservedFor. - Typically granted to the kube-scheduler and custom allocation controllers.
- Uses standard
updateandpatchverbs.
- Required to modify
resourceclaims/driver- Required to modify
status.devices. - This check is performed per-driver to drivers from tampering with devices on different nodes and/or from other drivers.
- Uses node-aware verbs for stricter scope.
- Required to modify
Node-aware DRA verbs
When authorizing updates to resourceclaims/driver, use the appropriate
specialized verb prefix:
associated-node:<verb>(for example,associated-node:update)- For node-local drivers.
- The API server verifies node association for the requesting driver.
arbitrary-node:<verb>(for example,arbitrary-node:patch)- For control-plane or multi-node controllers that may update claims from any node.
Example RBAC patterns
Scheduler and allocation controller permissions
apiVersion: rbac.authorization.k8s.io/v1
kind: ClusterRole
metadata:
name: dra-binding-updater
rules:
- apiGroups: ["resource.k8s.io"]
resources: ["resourceclaims/status"]
verbs: ["get", "patch", "update"]
- apiGroups: ["resource.k8s.io"]
resources: ["resourceclaims/binding"]
verbs: ["patch", "update"]
Node-local DRA driver permissions
apiVersion: rbac.authorization.k8s.io/v1
kind: ClusterRole
metadata:
name: dra-node-driver-status-updater
rules:
- apiGroups: ["resource.k8s.io"]
resources: ["resourceclaims/status"]
verbs: ["get", "patch", "update"]
- apiGroups: ["resource.k8s.io"]
resources: ["resourceclaims/driver"]
verbs: ["associated-node:patch", "associated-node:update"]
resourceNames: ["dra.example.com"]
Multi-node status controller permissions
apiVersion: rbac.authorization.k8s.io/v1
kind: ClusterRole
metadata:
name: dra-multinode-status-updater
rules:
- apiGroups: ["resource.k8s.io"]
resources: ["resourceclaims/status"]
verbs: ["get", "patch", "update"]
- apiGroups: ["resource.k8s.io"]
resources: ["resourceclaims/driver"]
verbs: ["arbitrary-node:patch", "arbitrary-node:update"]
resourceNames: ["dra.example.com"]
Related cluster administrator task
To apply these patterns in a running cluster, see Harden Dynamic Resource Allocation in Your Cluster.
What's next
8.14 - Hardening Guide - Scheduler Configuration
Information about how to make the Kubernetes scheduler more secure.
The Kubernetes scheduler is one of the critical components of the control plane.
This document covers how to improve the security posture of the Scheduler.
A misconfigured scheduler can have security implications. Such a scheduler can target specific nodes and evict the workloads or applications that are sharing the node and its resources. This can aid an attacker with a Yo-Yo attack: an attack on a vulnerable autoscaler.
kube-scheduler configuration
Scheduler authentication & authorization command line options
When setting up authentication configuration, it should be made sure that kube-scheduler's authentication remains consistent with kube-api-server's authentication. If any request has missing authentication headers, the authentication should happen through the kube-api-server allowing all authentication to be consistent in the cluster.
authentication-kubeconfig: Make sure to provide a proper kubeconfig so that the scheduler can retrieve authentication configuration options from the API Server. This kubeconfig file should be protected with strict file permissions.authentication-tolerate-lookup-failure: Set this tofalseto make sure the scheduler always looks up its authentication configuration from the API server.authentication-skip-lookup: Set this tofalseto make sure the scheduler always looks up its authentication configuration from the API server.authorization-always-allow-paths: These paths should respond with data that is appropriate for anonymous authorization. Defaults to/healthz,/readyz,/livez.profiling: Set tofalseto disable the profiling endpoints which are provide debugging information but which should not be enabled on production clusters as they present a risk of denial of service or information leakage. The--profilingargument is deprecated and can now be provided through the KubeScheduler DebuggingConfiguration. Profiling can be disabled through the kube-scheduler config by settingenableProfilingtofalse.requestheader-client-ca-file: Avoid passing this argument.
Scheduler networking command line options
bind-address: In most cases, the kube-scheduler does not need to be externally accessible. Setting the bind address tolocalhostis a secure practice.permit-address-sharing: Set this tofalseto disable connection sharing throughSO_REUSEADDR.SO_REUSEADDRcan lead to reuse of terminated connections that are inTIME_WAITstate.permit-port-sharing: Defaultfalse. Use the default unless you are confident you understand the security implications.
Scheduler TLS command line options
tls-cipher-suites: Always provide a list of preferred cipher suites. This ensures encryption never happens with insecure cipher suites.
Scheduling configurations for custom schedulers
When using custom schedulers based on the Kubernetes scheduling code, cluster administrators need to be careful with
plugins that use the queueSort, prefilter, filter, or permit extension points.
These extension points control various stages of a scheduling process,
and the wrong configuration can impact the kube-scheduler's behavior in your cluster.
Key considerations
- Exactly one plugin that uses the
queueSortextension point can be enabled at a time. Any plugins that usequeueSortshould be scrutinized. - Plugins that implement the
prefilterorfilterextension point can potentially mark all nodes as unschedulable. This can bring scheduling of new pods to a halt. - Plugins that implement the
permitextension point can prevent or delay the binding of a Pod. Such plugins should be thoroughly reviewed by the cluster administrator.
When using a plugin that is not one of the default plugins,
consider disabling the queueSort, filter and permit extension points as follows:
apiVersion: kubescheduler.config.k8s.io/v1
kind: KubeSchedulerConfiguration
profiles:
- schedulerName: my-scheduler
plugins:
# Disable specific plugins for different extension points
# You can disable all plugins for an extension point using "*"
queueSort:
disabled:
- name: "*" # Disable all queueSort plugins
# - name: "PrioritySort" # Disable specific queueSort plugin
filter:
disabled:
- name: "*" # Disable all filter plugins
# - name: "NodeResourcesFit" # Disable specific filter plugin
permit:
disabled:
- name: "*" # Disables all permit plugins
# - name: "TaintToleration" # Disable specific permit plugin
This creates a scheduler profile my-scheduler.
Whenever the .spec of a Pod does not have a value for .spec.schedulerName, the kube-scheduler runs for that Pod,
using its main configuration, and default plugins.
If you define a Pod with .spec.schedulerName set to my-scheduler, the kube-scheduler runs
but with a custom configuration; in that custom configuration,
the queueSort, filter and permit extension points are disabled.
If you use this KubeSchedulerConfiguration, and don't run any custom scheduler,
and you then define a Pod with .spec.schedulerName set to nonexistent-scheduler
(or any other scheduler name that doesn't exist in your cluster), no events would be generated for a pod.
Disallow labeling nodes
A cluster administrator should ensure that cluster users cannot label the nodes.
A malicious actor can use nodeSelector to schedule workloads on nodes where those workloads should not be present.
8.15 - Kubernetes API Server Bypass Risks
Security architecture information relating to the API server and other components
The Kubernetes API server is the main point of entry to a cluster for external parties (users and services) interacting with it.
As part of this role, the API server has several key built-in security controls, such as audit logging and admission controllers. However, there are ways to modify the configuration or content of the cluster that bypass these controls.
This page describes the ways in which the security controls built into the Kubernetes API server can be bypassed, so that cluster operators and security architects can ensure that these bypasses are appropriately restricted.
Static Pods
The kubelet on each node loads and directly manages any manifests that are stored in a named directory or fetched from a specific URL as static Pods in your cluster. The API server doesn't manage these static Pods. An attacker with write access to this location could modify the configuration of static pods loaded from that source, or could introduce new static Pods.
Static Pods are restricted from accessing other objects in the Kubernetes API. For example,
you can't configure a static Pod to mount a Secret from the cluster. However, these Pods can
take other security sensitive actions, such as using hostPath mounts from the underlying
node.
By default, the kubelet creates a mirror pod so that the static Pods are visible in the Kubernetes API. However, if the attacker uses an invalid namespace name when creating the Pod, it will not be visible in the Kubernetes API and can only be discovered by tooling that has access to the affected host(s).
If a static Pod fails admission control, the kubelet won't register the Pod with the API server. However, the Pod still runs on the node. For more information, refer to kubeadm issue #1541.
Mitigations
- Only enable the kubelet static Pod manifest functionality if required by the node.
- If a node uses the static Pod functionality, restrict filesystem access to the static Pod manifest directory or URL to users who need the access.
- Restrict access to kubelet configuration parameters and files to prevent an attacker setting a static Pod path or URL.
- Regularly audit and centrally report all access to directories or web storage locations that host static Pod manifests and kubelet configuration files.
The kubelet API
The kubelet provides an HTTP API that is typically exposed on TCP port 10250 on cluster worker nodes. The API might also be exposed on control plane nodes depending on the Kubernetes distribution in use. Direct access to the API allows for disclosure of information about the pods running on a node, the logs from those pods, and execution of commands in every container running on the node.
Some of these endpoints support Websocket protocols via HTTP GET requests, which are authorized with the get verb.
This means that get permission on nodes/proxy is not a read-only permission,
and authorizes access to endpoints which can be used to execute commands in any container running on the node.
When Kubernetes cluster users have RBAC access to Node object sub-resources, that access
serves as authorization to interact with the kubelet API. The exact access depends on
which sub-resource access has been granted, as detailed in
kubelet authorization.
Direct access to the kubelet API is not subject to admission control and is not logged by Kubernetes audit logging. An attacker with direct access to this API may be able to bypass controls that detect or prevent certain actions.
The kubelet API can be configured to authenticate requests in a number of ways.
By default, the kubelet configuration allows anonymous access. Most Kubernetes providers
change the default to use webhook and certificate authentication. This lets the control plane
ensure that the caller is authorized to access the nodes API resource or sub-resources.
The default anonymous access doesn't make this assertion with the control plane.
Mitigations
- Restrict access to sub-resources of the
nodesAPI object using mechanisms such as RBAC. Only grant this access when required, such as by monitoring services. - Avoid granting the
nodes/proxycatch-all permission, even with just the get verb. Instead, grant granular permissions. - Restrict access to the kubelet port. Only allow specified and trusted IP address ranges to access the port.
- Ensure that kubelet authentication. is set to webhook or certificate mode.
- Ensure that the unauthenticated "read-only" Kubelet port is not enabled on the cluster.
The etcd API
Kubernetes clusters use etcd as a datastore. The etcd service listens on TCP port 2379.
The only clients that need access are the Kubernetes API server and any backup tooling
that you use. Direct access to this API allows for disclosure or modification of any
data held in the cluster.
Access to the etcd API is typically managed by client certificate authentication. Any certificate issued by a certificate authority that etcd trusts allows full access to the data stored inside etcd.
Direct access to etcd is not subject to Kubernetes admission control and is not logged by Kubernetes audit logging. An attacker who has read access to the API server's etcd client certificate private key (or can create a new trusted client certificate) can gain cluster admin rights by accessing cluster secrets or modifying access rules. Even without elevating their Kubernetes RBAC privileges, an attacker who can modify etcd can retrieve any API object or create new workloads inside the cluster.
Many Kubernetes providers configure etcd to use mutual TLS (both client and server verify each other's certificate for authentication). There is no widely accepted implementation of authorization for the etcd API, although the feature exists. Since there is no authorization model, any certificate with client access to etcd can be used to gain full access to etcd. Typically, etcd client certificates that are only used for health checking can also grant full read and write access.
Mitigations
- Ensure that the certificate authority trusted by etcd is used only for the purposes of authentication to that service.
- Control access to the private key for the etcd server certificate, and to the API server's client certificate and key.
- Consider restricting access to the etcd port at a network level, to only allow access from specified and trusted IP address ranges.
Container runtime socket
On each node in a Kubernetes cluster, access to interact with containers is controlled by the container runtime (or runtimes, if you have configured more than one). Typically, the container runtime exposes a Unix socket that the kubelet can access. An attacker with access to this socket can launch new containers or interact with running containers.
At the cluster level, the impact of this access depends on whether the containers that run on the compromised node have access to Secrets or other confidential data that an attacker could use to escalate privileges to other worker nodes or to control plane components.
Mitigations
- Ensure that you tightly control filesystem access to container runtime sockets.
When possible, restrict this access to the
rootuser. - Isolate the kubelet from other components running on the node, using mechanisms such as Linux kernel namespaces.
- Ensure that you restrict or forbid the use of
hostPathmounts that include the container runtime socket, either directly or by mounting a parent directory. AlsohostPathmounts must be set as read-only to mitigate risks of attackers bypassing directory restrictions. - Restrict user access to nodes, and especially restrict superuser access to nodes.
8.16 - Linux kernel security constraints for Pods and containers
Overview of Linux kernel security modules and constraints that you can use to harden your Pods and containers.
This page describes some of the security features that are built into the Linux kernel that you can use in your Kubernetes workloads. To learn how to apply these features to your Pods and containers, refer to Configure a SecurityContext for a Pod or Container. You should already be familiar with Linux and with the basics of Kubernetes workloads.
Run workloads without root privileges
When you deploy a workload in Kubernetes, use the Pod specification to restrict
that workload from running as the root user on the node. You can use the Pod
securityContext to define the specific Linux user and group for the processes in
the Pod, and explicitly restrict containers from running as root users. Setting
these values in the Pod manifest takes precedence over similar values in the
container image, which is especially useful if you're running images that you
don't own.
Caution:
Ensure that the user or group that you assign to the workload has the permissions required for the application to function correctly. Changing the user or group to one that doesn't have the correct permissions could lead to file access issues or failed operations.Configuring the kernel security features on this page provides fine-grained control over the actions that processes in your cluster can take, but managing these configurations can be challenging at scale. Running containers as non-root, or in user namespaces if you need root privileges, helps to reduce the chance that you'll need to enforce your configured kernel security capabilities.
Security features in the Linux kernel
Kubernetes lets you configure and use Linux kernel features to improve isolation and harden your containerized workloads. Common features include the following:
- Secure computing mode (seccomp): Filter which system calls a process can make
- AppArmor: Restrict the access privileges of individual programs
- Security Enhanced Linux (SELinux): Assign security labels to objects for more manageable security policy enforcement
To configure settings for one of these features, the operating system that you choose for your nodes must enable the feature in the kernel. For example, Ubuntu 7.10 and later enable AppArmor by default. To learn whether your OS enables a specific feature, consult the OS documentation.
You use the securityContext field in your Pod specification to define the
constraints that apply to those processes. The securityContext field also
supports other security settings, such as specific Linux capabilities or file
access permissions using UIDs and GIDs. To learn more, refer to
Configure a SecurityContext for a Pod or Container.
seccomp
Some of your workloads might need privileges to perform specific actions as the root user on your node's host machine. Linux uses capabilities to divide the available privileges into categories, so that processes can get the privileges required to perform specific actions without being granted all privileges. Each capability has a set of system calls (syscalls) that a process can make. seccomp lets you restrict these individual syscalls. It can be used to sandbox the privileges of a process, restricting the calls it is able to make from userspace into the kernel.
In Kubernetes, you use a container runtime on each node to run your containers. Example runtimes include CRI-O, Docker, or containerd. Each runtime allows only a subset of Linux capabilities by default. You can further limit the allowed syscalls individually by using a seccomp profile. Container runtimes usually include a default seccomp profile. Kubernetes lets you automatically apply seccomp profiles loaded onto a node to your Pods and containers.
Note:
Kubernetes also has theallowPrivilegeEscalation setting for Pods and
containers. When set to false, this prevents processes from gaining new
capabilities and restricts unprivileged users from changing the applied seccomp
profile to a more permissive profile.To learn how to implement seccomp in Kubernetes, refer to Restrict a Container's Syscalls with seccomp or the Seccomp node reference
To learn more about seccomp, see Seccomp BPF in the Linux kernel documentation.
Considerations for seccomp
seccomp is a low-level security configuration that you should only configure yourself if you require fine-grained control over Linux syscalls. Using seccomp, especially at scale, has the following risks:
- Configurations might break during application updates
- Attackers can still use allowed syscalls to exploit vulnerabilities
- Profile management for individual applications becomes challenging at scale
Recommendation: Use the default seccomp profile that's bundled with your container runtime. If you need a more isolated environment, consider using a sandbox, such as gVisor. Sandboxes solve the preceding risks with custom seccomp profiles, but require more compute resources on your nodes and might have compatibility issues with GPUs and other specialized hardware.
AppArmor and SELinux: policy-based mandatory access control
You can use Linux policy-based mandatory access control (MAC) mechanisms, such as AppArmor and SELinux, to harden your Kubernetes workloads.
AppArmor
AppArmor is a Linux kernel security module that supplements the standard Linux user and group based permissions to confine programs to a limited set of resources. AppArmor can be configured for any application to reduce its potential attack surface and provide greater in-depth defense. It is configured through profiles tuned to allow the access needed by a specific program or container, such as Linux capabilities, network access, and file permissions. Each profile can be run in either enforcing mode, which blocks access to disallowed resources, or complain mode, which only reports violations.
AppArmor can help you to run a more secure deployment by restricting what containers are allowed to do, and/or provide better auditing through system logs. The container runtime that you use might ship with a default AppArmor profile, or you can use a custom profile.
To learn how to use AppArmor in Kubernetes, refer to Restrict a Container's Access to Resources with AppArmor.
SELinux
SELinux is a Linux kernel security module that lets you restrict the access that a specific subject, such as a process, has to the files on your system. You define security policies that apply to subjects that have specific SELinux labels. When a process that has an SELinux label attempts to access a file, the SELinux server checks whether that process' security policy allows the access and makes an authorization decision.
In Kubernetes, you can set an SELinux label in the securityContext field of
your manifest. The specified labels are assigned to those processes. If you
have configured security policies that affect those labels, the host OS kernel
enforces these policies.
To learn how to use SELinux in Kubernetes, refer to Assign SELinux labels to a container.
Differences between AppArmor and SELinux
The operating system on your Linux nodes usually includes one of either AppArmor or SELinux. Both mechanisms provide similar types of protection, but have differences such as the following:
- Configuration: AppArmor uses profiles to define access to resources. SELinux uses policies that apply to specific labels.
- Policy application: In AppArmor, you define resources using file paths. SELinux uses the index node (inode) of a resource to identify the resource.
Summary of features
The following table describes the use cases and scope of each security control. You can use all of these controls together to build a more hardened system.
| Security feature | Description | How to use | Example |
|---|---|---|---|
| seccomp | Restrict individual kernel calls in the userspace. Reduces the likelihood that a vulnerability that uses a restricted syscall would compromise the system. | Specify a loaded seccomp profile in the Pod or container specification to apply its constraints to the processes in the Pod. | Reject the unshare syscall, which was used in
CVE-2022-0185. |
| AppArmor | Restrict program access to specific resources. Reduces the attack surface of the program. Improves audit logging. | Specify a loaded AppArmor profile in the container specification. | Restrict a read-only program from writing to any file path in the system. |
| SELinux | Restrict access to resources such as files, applications, ports, and processes using labels and security policies. | Specify access restrictions for specific labels. Tag processes with those labels to enforce the access restrictions related to the label. | Restrict a container from accessing files outside its own filesystem. |
Note:
Mechanisms like AppArmor and SELinux can provide protection that extends beyond the container. For example, you can use SELinux to help mitigate CVE-2019-5736.Considerations for managing custom configurations
seccomp, AppArmor, and SELinux usually have a default configuration that offers basic protections. You can also create custom profiles and policies that meet the requirements of your workloads. Managing and distributing these custom configurations at scale might be challenging, especially if you use all three features together. To help you to manage these configurations at scale, use a tool like the Kubernetes Security Profiles Operator.
Kernel-level security features and privileged containers
Kubernetes lets you specify that some trusted containers can run in privileged mode. Any container in a Pod can run in privileged mode to use operating system administrative capabilities that would otherwise be inaccessible. This is available for both Windows and Linux.
Privileged containers explicitly override some of the Linux kernel constraints that you might use in your workloads, as follows:
- seccomp: Privileged containers run as the
Unconfinedseccomp profile, overriding any seccomp profile that you specified in your manifest. - AppArmor: Privileged containers ignore any applied AppArmor profiles.
- SELinux: Privileged containers run as the
unconfined_tdomain.
Privileged containers
Any container in a Pod can enable Privileged mode if you set the
privileged: true field in the
securityContext
field for the container. Privileged containers override or undo many other hardening settings such as the applied seccomp profile, AppArmor profile, or
SELinux constraints. Privileged containers are given all Linux capabilities,
including capabilities that they don't require. For example, a root user in a
privileged container might be able to use the CAP_SYS_ADMIN and
CAP_NET_ADMIN capabilities on the node, bypassing the runtime seccomp
configuration and other restrictions.
In most cases, you should avoid using privileged containers, and instead grant
the specific capabilities required by your container using the capabilities
field in the securityContext field. Only use privileged mode if you have a
capability that you can't grant with the securityContext. This is useful for
containers that want to use operating system administrative capabilities such
as manipulating the network stack or accessing hardware devices.
In Kubernetes version 1.26 and later, you can also run Windows containers in a
similarly privileged mode by setting the windowsOptions.hostProcess flag on
the security context of the Pod spec. For details and instructions, see
Create a Windows HostProcess Pod.
Recommendations and best practices
- Before configuring kernel-level security capabilities, you should consider implementing network-level isolation. For more information, read the Security Checklist.
- Unless necessary, run Linux workloads as non-root by setting specific user and
group IDs in your Pod manifest and by specifying
runAsNonRoot: true.
Additionally, you can run workloads in user namespaces by setting
hostUsers: false in your Pod manifest. This lets you run containers as root
users in the user namespace, but as non-root users in the host namespace on the
node. This is still in early stages of development and might not have the level
of support that you need. For instructions, refer to
Use a User Namespace With a Pod.
What's next
8.17 - Security Checklist
Baseline checklist for ensuring security in Kubernetes clusters.
This checklist aims at providing a basic list of guidance with links to more comprehensive documentation on each topic. It does not claim to be exhaustive and is meant to evolve.
On how to read and use this document:
- The order of topics does not reflect an order of priority.
- Some checklist items are detailed in the paragraph below the list of each section.
Caution:
Checklists are not sufficient for attaining a good security posture on their own. A good security posture requires constant attention and improvement, but a checklist can be the first step on the never-ending journey towards security preparedness. Some of the recommendations in this checklist may be too restrictive or too lax for your specific security needs. Since Kubernetes security is not "one size fits all", each category of checklist items should be evaluated on its merits.Authentication & Authorization
-
system:mastersgroup is not used for user or component authentication after bootstrapping. - The kube-controller-manager is running with
--use-service-account-credentialsenabled. - The root certificate is protected (either an offline CA, or a managed online CA with effective access controls).
- Intermediate and leaf certificates have an expiry date no more than 3 years in the future.
- A process exists for periodic access review, and reviews occur no more than 24 months apart.
- The Role Based Access Control Good Practices are followed for guidance related to authentication and authorization.
After bootstrapping, neither users nor components should authenticate to the
Kubernetes API as system:masters. Similarly, running all of
kube-controller-manager as system:masters should be avoided. In fact,
system:masters should only be used as a break-glass mechanism, as opposed to
an admin user.
Network security
- CNI plugins in use support network policies.
- Ingress and egress network policies are applied to all workloads in the cluster.
- Default network policies within each namespace, selecting all pods, denying everything, are in place.
- If appropriate, a service mesh is used to encrypt all communications inside of the cluster.
- The Kubernetes API, kubelet API and etcd are not exposed publicly on Internet.
- Access from the workloads to the cloud metadata API is filtered.
- Use of LoadBalancer and ExternalIPs is restricted.
A number of Container Network Interface (CNI) plugins plugins provide the functionality to restrict network resources that pods may communicate with. This is most commonly done through Network Policies which provide a namespaced resource to define rules. Default network policies that block all egress and ingress, in each namespace, selecting all pods, can be useful to adopt an allow list approach to ensure that no workloads are missed.
Not all CNI plugins provide encryption in transit. If the chosen plugin lacks this feature, an alternative solution could be to use a service mesh to provide that functionality.
The etcd datastore of the control plane should have controls to limit access and not be publicly exposed on the Internet. Furthermore, mutual TLS (mTLS) should be used to communicate securely with it. The certificate authority for this should be unique to etcd.
External Internet access to the Kubernetes API server should be restricted to not expose the API publicly. Be careful, as many managed Kubernetes distributions are publicly exposing the API server by default. You can then use a bastion host to access the server.
The kubelet API access
should be restricted and not exposed publicly, the default authentication and
authorization settings, when no configuration file specified with the --config
flag, are overly permissive.
If a cloud provider is used for hosting Kubernetes, the access from pods to the cloud
metadata API 169.254.169.254 should also be restricted or blocked if not needed
because it may leak information.
For restricted LoadBalancer and ExternalIPs use, see CVE-2020-8554: Man in the middle using LoadBalancer or ExternalIPs and the DenyServiceExternalIPs admission controller for further information.
Pod security
- RBAC rights to
create,update,patch,deleteworkloads is only granted if necessary. - Appropriate Pod Security Standards policy is applied for all namespaces and enforced.
- Memory limit is set for the workloads with a limit equal or inferior to the request.
- CPU limit might be set on sensitive workloads.
- For nodes that support it, Seccomp is enabled with appropriate syscalls profile for programs.
- For nodes that support it, AppArmor or SELinux is enabled with appropriate profile for programs.
RBAC authorization is crucial but
cannot be granular enough to have authorization on the Pods' resources
(or on any resource that manages Pods). The only granularity is the API verbs
on the resource itself, for example, create on Pods. Without
additional admission, the authorization to create these resources allows direct
unrestricted access to the schedulable nodes of a cluster.
The Pod Security Standards
define three different policies, privileged, baseline and restricted that limit
how fields can be set in the PodSpec regarding security.
These standards can be enforced at the namespace level with the new
Pod Security admission,
enabled by default, or by third-party admission webhook. Please note that,
contrary to the removed PodSecurityPolicy admission it replaces,
Pod Security
admission can be easily combined with admission webhooks and external services.
Pod Security admission restricted policy, the most restrictive policy of the
Pod Security Standards set,
can operate in several modes,
warn, audit or enforce to gradually apply the most appropriate
security context
according to security best practices. Nevertheless, pods'
security context
should be separately investigated to limit the privileges and access pods may
have on top of the predefined security standards, for specific use cases.
For a hands-on tutorial on Pod Security, see the blog post Kubernetes 1.23: Pod Security Graduates to Beta.
Memory and CPU limits should be set in order to restrict the memory and CPU resources a pod can consume on a node, and therefore prevent potential DoS attacks from malicious or breached workloads. Such policy can be enforced by an admission controller. Please note that CPU limits will throttle usage and thus can have unintended effects on auto-scaling features or efficiency i.e. running the process in best effort with the CPU resource available.
Caution:
Memory limit superior to request can expose the whole node to OOM issues.Enabling Seccomp
Seccomp stands for secure computing mode and has been a feature of the Linux kernel since version 2.6.12. It can be used to sandbox the privileges of a process, restricting the calls it is able to make from userspace into the kernel. Kubernetes lets you automatically apply seccomp profiles loaded onto a node to your Pods and containers.
Seccomp can improve the security of your workloads by reducing the Linux kernel syscall attack surface available inside containers. The seccomp filter mode leverages BPF to create an allow or deny list of specific syscalls, named profiles.
Since Kubernetes 1.27, you can enable the use of RuntimeDefault as the default seccomp profile
for all workloads. A security tutorial is available on this
topic. In addition, the
Kubernetes Security Profiles Operator
is a project that facilitates the management and use of seccomp in clusters.
Note:
Seccomp is only available on Linux nodes.Enabling AppArmor or SELinux
AppArmor
AppArmor is a Linux kernel security module that can provide an easy way to implement Mandatory Access Control (MAC) and better auditing through system logs. A default AppArmor profile is enforced on nodes that support it, or a custom profile can be configured. Like seccomp, AppArmor is also configured through profiles, where each profile is either running in enforcing mode, which blocks access to disallowed resources or complain mode, which only reports violations. AppArmor profiles are enforced on a per-container basis, with an annotation, allowing for processes to gain just the right privileges.
Note:
AppArmor is only available on Linux nodes, and enabled in some Linux distributions.SELinux
SELinux is also a
Linux kernel security module that can provide a mechanism for supporting access
control security policies, including Mandatory Access Controls (MAC). SELinux
labels can be assigned to containers or pods
via their securityContext section.
Note:
SELinux is only available on Linux nodes, and enabled in some Linux distributions.Logs and auditing
- Audit logs, if enabled, are protected from general access.
Pod placement
- Pod placement is done in accordance with the tiers of sensitivity of the application.
- Sensitive applications are running isolated on nodes or with specific sandboxed runtimes.
Pods that are on different tiers of sensitivity, for example, an application pod and the Kubernetes API server, should be deployed onto separate nodes. The purpose of node isolation is to prevent an application container breakout to directly providing access to applications with higher level of sensitivity to easily pivot within the cluster. This separation should be enforced to prevent pods accidentally being deployed onto the same node. This could be enforced with the following features:
- Node Selectors
- Key-value pairs, as part of the pod specification, that specify which nodes to deploy onto. These can be enforced at the namespace and cluster level with the PodNodeSelector admission controller.
- PodTolerationRestriction
- An admission controller that allows administrators to restrict permitted tolerations within a namespace. Pods within a namespace may only utilize the tolerations specified on the namespace object annotation keys that provide a set of default and allowed tolerations.
- RuntimeClass
- RuntimeClass is a feature for selecting the container runtime configuration. The container runtime configuration is used to run a Pod's containers and can provide more or less isolation from the host at the cost of performance overhead.
Secrets
- ConfigMaps are not used to hold confidential data.
- Encryption at rest is configured for the Secret API.
- If appropriate, a mechanism to inject secrets stored in third-party storage is deployed and available.
- Service account tokens are not mounted in pods that don't require them.
- Bound service account token volume is in-use instead of non-expiring tokens.
Secrets required for pods should be stored within Kubernetes Secrets as opposed to alternatives such as ConfigMap. Secret resources stored within etcd should be encrypted at rest.
Pods needing secrets should have these automatically mounted through volumes,
preferably stored in memory like with the emptyDir.medium option.
Mechanism can be used to also inject secrets from third-party storages as
volume, like the Secrets Store CSI Driver.
This should be done preferentially as compared to providing the pods service
account RBAC access to secrets. This would allow adding secrets into the pod as
environment variables or files. Please note that the environment variable method
might be more prone to leakage due to crash dumps in logs and the
non-confidential nature of environment variable in Linux, as opposed to the
permission mechanism on files.
Service account tokens should not be mounted into pods that do not require them. This can be configured by setting
automountServiceAccountToken
to false either within the service account to apply throughout the namespace
or specifically for a pod. For Kubernetes v1.22 and above, use
Bound Service Accounts
for time-bound service account credentials.
Images
- Minimize unnecessary content in container images.
- Container images are configured to be run as unprivileged user.
- References to container images are made by sha256 digests (rather than tags) or the provenance of the image is validated by verifying the image's digital signature at deploy time via admission control.
- Container images are regularly scanned during creation and in deployment, and known vulnerable software is patched.
Container image should contain the bare minimum to run the program they package. Preferably, only the program and its dependencies, building the image from the minimal possible base. In particular, image used in production should not contain shells or debugging utilities, as an ephemeral debug container can be used for troubleshooting.
Build images to directly start with an unprivileged user by using the
USER instruction in Dockerfile.
The Security Context
allows a container image to be started with a specific user and group with
runAsUser and runAsGroup, even if not specified in the image manifest.
However, the file permissions in the image layers might make it impossible to just
start the process with a new unprivileged user without image modification.
Avoid using image tags to reference an image, especially the latest tag, the
image behind a tag can be easily modified in a registry. Prefer using the
complete sha256 digest which is unique to the image manifest. This policy can be
enforced via an ImagePolicyWebhook.
Image signatures can also be automatically verified with an admission controller
at deploy time to validate their authenticity and integrity.
Scanning a container image can prevent critical vulnerabilities from being deployed to the cluster alongside the container image. Image scanning should be completed before deploying a container image to a cluster and is usually done as part of the deployment process in a CI/CD pipeline. The purpose of an image scan is to obtain information about possible vulnerabilities and their prevention in the container image, such as a Common Vulnerability Scoring System (CVSS) score. If the result of the image scans is combined with the pipeline compliance rules, only properly patched container images will end up in Production.
Admission controllers
- An appropriate selection of admission controllers is enabled.
- A pod security policy is enforced by the Pod Security Admission or/and a webhook admission controller.
- The admission chain plugins and webhooks are securely configured.
Admission controllers can help improve the security of the cluster. However, they can present risks themselves as they extend the API server and should be properly secured.
The following lists present a number of admission controllers that could be considered to enhance the security posture of your cluster and application. It includes controllers that may be referenced in other parts of this document.
This first group of admission controllers includes plugins enabled by default, consider to leave them enabled unless you know what you are doing:
CertificateApproval- Performs additional authorization checks to ensure the approving user has permission to approve certificate request.
CertificateSigning- Performs additional authorization checks to ensure the signing user has permission to sign certificate requests.
CertificateSubjectRestriction- Rejects any certificate request that specifies a 'group' (or 'organization
attribute') of
system:masters. LimitRanger- Enforces the LimitRange API constraints.
MutatingAdmissionWebhook- Allows the use of custom controllers through webhooks, these controllers may mutate requests that they review.
PodSecurity- Replacement for Pod Security Policy, restricts security contexts of deployed Pods.
ResourceQuota- Enforces resource quotas to prevent over-usage of resources.
ValidatingAdmissionWebhook- Allows the use of custom controllers through webhooks, these controllers do not mutate requests that it reviews.
The second group includes plugins that are not enabled by default but are in general availability state and are recommended to improve your security posture:
DenyServiceExternalIPs- Rejects all net-new usage of the
Service.spec.externalIPsfield. This is a mitigation for CVE-2020-8554: Man in the middle using LoadBalancer or ExternalIPs. NodeRestriction- Restricts kubelet's permissions to only modify the pods API resources they own
or the node API resource that represent themselves. It also prevents kubelet
from using the
node-restriction.kubernetes.io/annotation, which can be used by an attacker with access to the kubelet's credentials to influence pod placement to the controlled node.
The third group includes plugins that are not enabled by default but could be considered for certain use cases:
AlwaysPullImages- Enforces the usage of the latest version of a tagged image and ensures that the deployer has permissions to use the image.
ImagePolicyWebhook- Allows enforcing additional controls for images through webhooks.
What's next
- Privilege escalation via Pod creation
warns you about a specific access control risk; check how you're managing that
threat.
- If you use Kubernetes RBAC, read RBAC Good Practices for further information on authorization.
- Securing a Cluster for information on protecting a cluster from accidental or malicious access.
- Cluster Multi-tenancy guide for configuration options recommendations and best practices on multi-tenancy.
- Blog post "A Closer Look at NSA/CISA Kubernetes Hardening Guidance" for complementary resource on hardening Kubernetes clusters.
8.18 - Application Security Checklist
Baseline guidelines around ensuring application security on Kubernetes, aimed at application developers
This checklist aims to provide basic guidelines on securing applications running in Kubernetes from a developer's perspective. This list is not meant to be exhaustive and is intended to evolve over time.
On how to read and use this document:
- The order of topics does not reflect an order of priority.
- Some checklist items are detailed in the paragraph below the list of each section.
- This checklist assumes that a
developeris a Kubernetes cluster user who interacts with namespaced scope objects.
Caution:
Checklists are not sufficient for attaining a good security posture on their own. A good security posture requires constant attention and improvement, but a checklist can be the first step on the never-ending journey towards security preparedness. Some recommendations in this checklist may be too restrictive or too lax for your specific security needs. Since Kubernetes security is not "one size fits all", each category of checklist items should be evaluated on its merits.Base security hardening
The following checklist provides base security hardening recommendations that would apply to most applications deploying to Kubernetes.
Application design
- Follow the right security principles when designing applications.
- Application configured with appropriate QoS class
through resource request and limits.
- Memory limit is set for the workloads with a limit equal to or greater than the request.
- CPU limit might be set on sensitive workloads.
Service account
- Avoid using the
defaultServiceAccount. Instead, create ServiceAccounts for each workload or microservice. -
automountServiceAccountTokenshould be set tofalseunless the pod specifically requires access to the Kubernetes API to operate.
Pod-level securityContext recommendations
- Set
runAsNonRoot: true. - Configure the container to execute as a less privileged user
(for example, using
runAsUserandrunAsGroup), and configure appropriate permissions on files or directories inside the container image. - Optionally add a supplementary group with
fsGroupto access persistent volumes. - The application deploys into a namespace that enforces an appropriate Pod security standard. If you cannot control this enforcement for the cluster(s) where the application is deployed, take this into account either through documentation or additional defense in depth.
Container-level securityContext recommendations
- Disable privilege escalations using
allowPrivilegeEscalation: false. - Configure the root filesystem to be read-only with
readOnlyRootFilesystem: true. - Avoid running privileged containers (set
privileged: false). - Drop all capabilities from the containers and add back only specific ones that are needed for operation of the container.
Role Based Access Control (RBAC)
- Permissions such as create, patch, update and delete should be only granted if necessary.
- Avoid creating RBAC permissions to create or update roles which can lead to privilege escalation.
- Review bindings for the
system:unauthenticatedgroup and remove them where possible, as this gives access to anyone who can contact the API server at a network level.
The create, update and delete verbs should be permitted judiciously. The patch verb if allowed on a Namespace can allow users to update labels on the namespace or deployments which can increase the attack surface.
For sensitive workloads, consider providing a recommended ValidatingAdmissionPolicy that further restricts the permitted write actions.
Image security
- Using an image scanning tool to scan an image before deploying containers in the Kubernetes cluster.
- Use container signing to validate the container image signature before deploying to the Kubernetes cluster.
Network policies
- Configure NetworkPolicies to only allow expected ingress and egress traffic from the pods.
Make sure that your cluster provides and enforces NetworkPolicy. If you are writing an application that users will deploy to different clusters, consider whether you can assume that NetworkPolicy is available and enforced.
Advanced security hardening
This section of this guide covers some advanced security hardening points which might be valuable based on different Kubernetes environment setup.
Linux container security
Configure Security Context for the pod-container.
- Set the Seccomp Profile for a Container.
- Restrict a Container's Access to Resources with AppArmor.
- Assign SELinux Labels to a Container.
Runtime classes
- Configure appropriate runtime classes for containers.
Note: This section links to third party projects that provide functionality required by Kubernetes. The Kubernetes project authors aren't responsible for these projects, which are listed alphabetically. To add a project to this list, read the content guide before submitting a change. More information.
Some containers may require a different isolation level from what is provided by
the default runtime of the cluster. runtimeClassName can be used in a podspec
to define a different runtime class.
For sensitive workloads consider using kernel emulation tools like gVisor, or virtualized isolation using a mechanism such as kata-containers.
In high trust environments, consider using confidential virtual machines to improve cluster security even further.
9 - Policies
Manage security and best-practices with policies.
Kubernetes policies are configurations that manage other configurations or runtime behaviors. Kubernetes offers various forms of policies, described below:
Apply policies using API objects
Some API objects act as policies. Here are some examples:
- NetworkPolicies can be used to restrict ingress and egress traffic for a workload.
- LimitRanges manage resource allocation constraints across different object kinds.
- ResourceQuotas limit resource consumption for a namespace.
Apply policies using admission controllers
An admission controller
runs in the API server
and can validate or mutate API requests. Some admission controllers act to apply policies.
For example, the AlwaysPullImages admission controller modifies a new Pod to set the image pull policy to Always.
Kubernetes has several built-in admission controllers that are configurable via the API server --enable-admission-plugins flag.
Details on admission controllers, with the complete list of available admission controllers, are documented in a dedicated section:
Apply policies using ValidatingAdmissionPolicy
Validating admission policies allow configurable validation checks to be executed in the API server using the Common Expression Language (CEL). For example, a ValidatingAdmissionPolicy can be used to disallow use of the latest image tag.
A ValidatingAdmissionPolicy operates on an API request and can be used to block, audit, and warn users about non-compliant configurations.
Details on the ValidatingAdmissionPolicy API, with examples, are documented in a dedicated section:
Apply policies using dynamic admission control
Dynamic admission controllers (or admission webhooks) run outside the API server as separate applications that register to receive webhooks requests to perform validation or mutation of API requests.
Dynamic admission controllers can be used to apply policies on API requests and trigger other policy-based workflows. A dynamic admission controller can perform complex checks including those that require retrieval of other cluster resources and external data. For example, an image verification check can lookup data from OCI registries to validate the container image signatures and attestations.
Details on dynamic admission control are documented in a dedicated section:
Implementations
Note: This section links to third party projects that provide functionality required by Kubernetes. The Kubernetes project authors aren't responsible for these projects, which are listed alphabetically. To add a project to this list, read the content guide before submitting a change. More information.
Dynamic Admission Controllers that act as flexible policy engines are being developed in the Kubernetes ecosystem, such as:
Apply policies using Kubelet configurations
Kubernetes allows configuring the Kubelet on each worker node. Some Kubelet configurations act as policies:
- Process ID limits and reservations are used to limit and reserve allocatable PIDs.
- Node Resource Managers can manage compute, memory, and device resources for latency-critical and high-throughput workloads.
9.1 - Limit Ranges
By default, containers run with unbounded compute resources on a Kubernetes cluster. Using Kubernetes resource quotas, administrators (also termed cluster operators) can restrict consumption and creation of cluster resources (such as CPU time, memory, and persistent storage) within a specified namespace. Within a namespace, a Pod can consume as much CPU and memory as is allowed by the ResourceQuotas that apply to that namespace. As a cluster operator, or as a namespace-level administrator, you might also be concerned about making sure that a single object cannot monopolize all available resources within a namespace.
A LimitRange is a policy to constrain the resource allocations (limits and requests) that you can specify for each applicable object kind (such as Pod or PersistentVolumeClaim) in a namespace.
A LimitRange provides constraints that can:
- Enforce minimum and maximum compute resources usage per Pod or Container in a namespace.
- Enforce minimum and maximum storage request per PersistentVolumeClaim in a namespace.
- Enforce a ratio between request and limit for a resource in a namespace.
- Set default request/limit for compute resources in a namespace and automatically inject them to Containers at runtime.
Kubernetes constrains resource allocations to Pods in a particular namespace whenever there is at least one LimitRange object in that namespace.
The name of a LimitRange object must be a valid DNS subdomain name.
Constraints on resource limits and requests
- The administrator creates a LimitRange in a namespace.
- Users create (or try to create) objects in that namespace, such as Pods or PersistentVolumeClaims.
- First, the LimitRange admission controller applies default request and limit values for all Pods (and their containers) that do not set compute resource requirements.
- Second, the LimitRange tracks usage to ensure it does not exceed resource minimum, maximum and ratio defined in any LimitRange present in the namespace.
- If you attempt to create or update an object (Pod or PersistentVolumeClaim) that violates
a LimitRange constraint, your request to the API server will fail with an HTTP status
code
403 Forbiddenand a message explaining the constraint that has been violated. - If you add a LimitRange in a namespace that applies to compute-related resources
such as
cpuandmemory, you must specify requests or limits for those values. Otherwise, the system may reject Pod creation. - LimitRange validations occur only at Pod admission stage, not on running Pods. If you add or modify a LimitRange, the Pods that already exist in that namespace continue unchanged.
- If two or more LimitRange objects exist in the namespace, it is not deterministic which default value will be applied.
LimitRange and admission checks for Pods
A LimitRange does not check the consistency of the default values it applies. This means that a default value for the limit that is set by LimitRange may be less than the request value specified for the container in the spec that a client submits to the API server. If that happens, the final Pod will not be schedulable.
For example, you define a LimitRange with below manifest:
Note:
The following examples operate within the default namespace of your cluster, as the namespace parameter is undefined and the LimitRange scope is limited to the namespace level. This implies that any references or operations within these examples will interact with elements within the default namespace of your cluster. You can override the operating namespace by configuring namespace in themetadata.namespace field.apiVersion: v1
kind: LimitRange
metadata:
name: cpu-resource-constraint
spec:
limits:
- default: # this section defines default limits
cpu: 500m
defaultRequest: # this section defines default requests
cpu: 500m
max: # max and min define the limit range
cpu: "1"
min:
cpu: 100m
type: Container
along with a Pod that declares a CPU resource request of 700m, but not a limit:
apiVersion: v1
kind: Pod
metadata:
name: example-conflict-with-limitrange-cpu
spec:
containers:
- name: demo
image: registry.k8s.io/pause:3.8
resources:
requests:
cpu: 700m
then that Pod will not be scheduled, failing with an error similar to:
Pod "example-conflict-with-limitrange-cpu" is invalid: spec.containers[0].resources.requests: Invalid value: "700m": must be less than or equal to cpu limit
If you set both request and limit, then that new Pod will be scheduled successfully
even with the same LimitRange in place:
apiVersion: v1
kind: Pod
metadata:
name: example-no-conflict-with-limitrange-cpu
spec:
containers:
- name: demo
image: registry.k8s.io/pause:3.8
resources:
requests:
cpu: 700m
limits:
cpu: 700m
Example resource constraints
Examples of policies that could be created using LimitRange are:
- In a 2 node cluster with a capacity of 8 GiB RAM and 16 cores, constrain Pods in a namespace to request 100m of CPU with a max limit of 500m for CPU and request 200Mi for Memory with a max limit of 600Mi for Memory.
- Define default CPU limit and request to 150m and memory default request to 300Mi for Containers started with no cpu and memory requests in their specs.
In the case where the total limits of the namespace is less than the sum of the limits of the Pods/Containers, there may be contention for resources. In this case, the Containers or Pods will not be created.
Neither contention nor changes to a LimitRange will affect already created resources.
What's next
For examples on using limits, see:
- how to configure minimum and maximum CPU constraints per namespace.
- how to configure minimum and maximum Memory constraints per namespace.
- how to configure default CPU Requests and Limits per namespace.
- how to configure default Memory Requests and Limits per namespace.
- how to configure minimum and maximum Storage consumption per namespace.
- a detailed example on configuring quota per namespace.
Refer to the LimitRanger design document for context and historical information.
9.2 - Resource Quotas
When several users or teams share a cluster with a fixed number of nodes, there is a concern that one team could use more than its fair share of resources.
Resource quotas are a tool for administrators to address this concern.
A resource quota, defined by a ResourceQuota object, provides constraints that limit aggregate resource consumption per namespace. A ResourceQuota can also limit the quantity of objects that can be created in a namespace by API kind, as well as the total amount of infrastructure resources that may be consumed by API objects found in that namespace.
Caution:
Neither contention nor changes to quota will affect already created resources.How Kubernetes ResourceQuotas work
ResourceQuotas work like this:
Different teams work in different namespaces. This separation can be enforced with RBAC or any other authorization mechanism.
A cluster administrator creates at least one ResourceQuota for each namespace.
- To make sure the enforcement stays enforced, the cluster administrator should also restrict access to delete or update that ResourceQuota; for example, by defining a ValidatingAdmissionPolicy.
Users create resources (pods, services, etc.) in the namespace, and the quota system tracks usage to ensure it does not exceed hard resource limits defined in a ResourceQuota.
You can apply a scope to a ResourceQuota to limit where it applies,
If creating or updating a resource violates a quota constraint, the control plane rejects that request with HTTP status code
403 Forbidden. The error includes a message explaining the constraint that would have been violated.If quotas are enabled in a namespace for resource such as
cpuandmemory, users must specify requests or limits for those values when they define a Pod; otherwise, the quota system may reject pod creation.The resource quota walkthrough shows an example of how to avoid this problem.
Note:
- You can define a LimitRange to force defaults on pods that make no compute resource requirements (so that users don't have to remember to do that).
You often do not create Pods directly; for example, you more usually create a workload management
object such as a Deployment. If you create a Deployment that tries to use more
resources than are available, the creation of the Deployment (or other workload management object) succeeds, but
the Deployment may not be able to get all of the Pods it manages to exist. In that case you can check the status of
the Deployment, for example with kubectl describe, to see what has happened.
- For
cpuandmemoryresources, ResourceQuotas enforce that every (new) pod in that namespace sets a limit for that resource. If you enforce a resource quota in a namespace for eithercpuormemory, you and other clients, must specify eitherrequestsorlimitsfor that resource, for every new Pod you submit. If you don't, the control plane may reject admission for that Pod. - For other resources: ResourceQuota works and will ignore pods in the namespace without setting a limit or request for that resource. It means that you can create a new pod without limit/request for ephemeral storage if the resource quota limits the ephemeral storage of this namespace.
You can use a LimitRange to automatically set a default request for these resources.
The name of a ResourceQuota object must be a valid DNS subdomain name.
Examples of policies that could be created using namespaces and quotas are:
- In a cluster with a capacity of 32 GiB RAM, and 16 cores, let team A use 20 GiB and 10 cores, let B use 10GiB and 4 cores, and hold 2GiB and 2 cores in reserve for future allocation.
- Limit the "testing" namespace to using 1 core and 1GiB RAM. Let the "production" namespace use any amount.
In the case where the total capacity of the cluster is less than the sum of the quotas of the namespaces, there may be contention for resources. This is handled on a first-come-first-served basis.
Enabling Resource Quota
ResourceQuota support is enabled by default for many Kubernetes distributions. It is
enabled when the API server
--enable-admission-plugins= flag has ResourceQuota as
one of its arguments.
A resource quota is enforced in a particular namespace when there is a ResourceQuota in that namespace.
Types of resource quota
The ResourceQuota mechanism lets you enforce different kinds of limits. This section describes the types of limit that you can enforce.
Quota for infrastructure resources
You can limit the total sum of compute resources that can be requested in a given namespace.
The following resource types are supported:
| Resource Name | Description |
|---|---|
limits.cpu | Across all pods in a non-terminal state, the sum of CPU limits cannot exceed this value. |
limits.memory | Across all pods in a non-terminal state, the sum of memory limits cannot exceed this value. |
requests.cpu | Across all pods in a non-terminal state, the sum of CPU requests cannot exceed this value. |
requests.memory | Across all pods in a non-terminal state, the sum of memory requests cannot exceed this value. |
hugepages-<size> | Across all pods in a non-terminal state, the number of huge page requests of the specified size cannot exceed this value. |
cpu | Same as requests.cpu |
memory | Same as requests.memory |
Quota for extended resources
In addition to the resources mentioned above, in release 1.10, quota support for extended resources is added.
As overcommit is not allowed for extended resources, it makes no sense to specify both requests
and limits for the same extended resource in a quota. So for extended resources, only quota items
with prefix requests. are allowed.
Take the GPU resource as an example, if the resource name is nvidia.com/gpu, and you want to
limit the total number of GPUs requested in a namespace to 4, you can define a quota as follows:
requests.nvidia.com/gpu: 4
See Viewing and Setting Quotas for more details.
Quota for DRA resource claims
DRA (Dynamic Resource Allocation) resource claims can request DRA resources by device class. For an example
device class named examplegpu, you want to limit the total number of GPUs requested in a namespace to 4,
you can define a quota as follows:
examplegpu.deviceclass.resource.k8s.io/devices: 4
When Extended Resource allocation by DRA
is enabled, the same device class named examplegpu can be requested via extended resource either explicitly
when the device class's ExtendedResourceName field is given, say, example.com/gpu, then you can define a quota as follows:
requests.example.com/gpu: 4
or implicitly using the derived extended resource name from device class name examplegpu, you can define
a quota as follows:
requests.deviceclass.resource.kubernetes.io/examplegpu: 4
All devices requested from resource claims or extended resources are counted towards all three quotas
listed above. The extended resource quota e.g. requests.example.com/gpu: 4, also counts the devices provided
by device plugin.
See Viewing and Setting Quotas for more details.
Quota for storage
You can limit the total sum of storage for volumes that can be requested in a given namespace.
In addition, you can limit consumption of storage resources based on associated StorageClass.
| Resource Name | Description |
|---|---|
requests.storage | Across all persistent volume claims, the sum of storage requests cannot exceed this value. |
persistentvolumeclaims | The total number of PersistentVolumeClaims that can exist in the namespace. |
<storage-class-name>.storageclass.storage.k8s.io/requests.storage | Across all persistent volume claims associated with the <storage-class-name>, the sum of storage requests cannot exceed this value. |
<storage-class-name>.storageclass.storage.k8s.io/persistentvolumeclaims | Across all persistent volume claims associated with the <storage-class-name>, the total number of persistent volume claims that can exist in the namespace. |
For example, if you want to quota storage with gold StorageClass separate from
a bronze StorageClass, you can define a quota as follows:
gold.storageclass.storage.k8s.io/requests.storage: 500Gibronze.storageclass.storage.k8s.io/requests.storage: 100Gi
Quota for local ephemeral storage
FEATURE STATE:
Kubernetes v1.8 [alpha]| Resource Name | Description |
|---|---|
requests.ephemeral-storage | Across all pods in the namespace, the sum of local ephemeral storage requests cannot exceed this value. |
limits.ephemeral-storage | Across all pods in the namespace, the sum of local ephemeral storage limits cannot exceed this value. |
ephemeral-storage | Same as requests.ephemeral-storage. |
Note:
When using a CRI container runtime, container logs will count against the ephemeral storage quota. This can result in the unexpected eviction of pods that have exhausted their storage quotas.
Refer to Logging Architecture for details.
Quota on object count
You can set quota for the total number of one particular resource kind in the Kubernetes API, using the following syntax:
count/<resource>.<group>for resources from non-core API groupscount/<resource>for resources from the core API group
For example, the PodTemplate API is in the core API group and so if you want to limit the number of
PodTemplate objects in a namespace, you use count/podtemplates.
These types of quotas are useful to protect against exhaustion of control plane storage. For example, you may want to limit the number of Secrets in a server given their large size. Too many Secrets in a cluster can actually prevent servers and controllers from starting. You can set a quota for Jobs to protect against a poorly configured CronJob. CronJobs that create too many Jobs in a namespace can lead to a denial of service.
If you define a quota this way, it applies to Kubernetes' APIs that are part of the API server, and
to any custom resources backed by a CustomResourceDefinition.
For example, to create a quota on a widgets custom resource in the example.com API group,
use count/widgets.example.com.
If you use API aggregation to
add additional, custom APIs that are not defined as CustomResourceDefinitions, the core Kubernetes
control plane does not enforce quota for the aggregated API. The extension API server is expected to
provide quota enforcement if that's appropriate for the custom API.
Generic syntax
This is a list of common examples of object kinds that you may want to put under object count quota, listed by the configuration string that you would use.
count/podscount/persistentvolumeclaimscount/servicescount/secretscount/configmapscount/deployments.appscount/replicasets.appscount/statefulsets.appscount/jobs.batchcount/cronjobs.batch
Specialized syntax
There is another syntax only to set the same type of quota, that only works for certain API kinds. The following types are supported:
| Resource Name | Description |
|---|---|
configmaps | The total number of ConfigMaps that can exist in the namespace. |
persistentvolumeclaims | The total number of PersistentVolumeClaims that can exist in the namespace. |
pods | The total number of Pods in a non-terminal state that can exist in the namespace. A pod is in a terminal state if .status.phase in (Failed, Succeeded) is true. |
replicationcontrollers | The total number of ReplicationControllers that can exist in the namespace. |
resourcequotas | The total number of ResourceQuotas that can exist in the namespace. |
services | The total number of Services that can exist in the namespace. |
services.loadbalancers | The total number of Services of type LoadBalancer that can exist in the namespace. |
services.nodeports | The total number of NodePorts allocated to Services of type NodePort or LoadBalancer that can exist in the namespace. |
secrets | The total number of Secrets that can exist in the namespace. |
For example, pods quota counts and enforces a maximum on the number of pods
created in a single namespace that are not terminal. You might want to set a pods
quota on a namespace to avoid the case where a user creates many small pods and
exhausts the cluster's supply of Pod IPs.
You can find more examples on Viewing and Setting Quotas.
Viewing and Setting Quotas
kubectl supports creating, updating, and viewing quotas:
kubectl create namespace myspace
cat <<EOF > compute-resources.yaml
apiVersion: v1
kind: ResourceQuota
metadata:
name: compute-resources
spec:
hard:
requests.cpu: "1"
requests.memory: "1Gi"
limits.cpu: "2"
limits.memory: "2Gi"
requests.nvidia.com/gpu: 4
EOF
kubectl create -f ./compute-resources.yaml --namespace=myspace
cat <<EOF > object-counts.yaml
apiVersion: v1
kind: ResourceQuota
metadata:
name: object-counts
spec:
hard:
configmaps: "10"
persistentvolumeclaims: "4"
pods: "4"
replicationcontrollers: "20"
secrets: "10"
services: "10"
services.loadbalancers: "2"
EOF
kubectl create -f ./object-counts.yaml --namespace=myspace
kubectl get quota --namespace=myspace
NAME AGE
compute-resources 30s
object-counts 32s
kubectl describe quota compute-resources --namespace=myspace
Name: compute-resources
Namespace: myspace
Resource Used Hard
-------- ---- ----
limits.cpu 0 2
limits.memory 0 2Gi
requests.cpu 0 1
requests.memory 0 1Gi
requests.nvidia.com/gpu 0 4
kubectl describe quota object-counts --namespace=myspace
Name: object-counts
Namespace: myspace
Resource Used Hard
-------- ---- ----
configmaps 0 10
persistentvolumeclaims 0 4
pods 0 4
replicationcontrollers 0 20
secrets 1 10
services 0 10
services.loadbalancers 0 2
kubectl also supports object count quota for all standard namespaced resources
using the syntax count/<resource>.<group>:
kubectl create namespace myspace
kubectl create quota test --hard=count/deployments.apps=2,count/replicasets.apps=4,count/pods=3,count/secrets=4 --namespace=myspace
kubectl create deployment nginx --image=nginx --namespace=myspace --replicas=2
kubectl describe quota --namespace=myspace
Name: test
Namespace: myspace
Resource Used Hard
-------- ---- ----
count/deployments.apps 1 2
count/pods 2 3
count/replicasets.apps 1 4
count/secrets 1 4
Quota and Cluster Capacity
ResourceQuotas are independent of the cluster capacity. They are expressed in absolute units. So, if you add nodes to your cluster, this does not automatically give each namespace the ability to consume more resources.
Sometimes more complex policies may be desired, such as:
- Proportionally divide total cluster resources among several teams.
- Allow each tenant to grow resource usage as needed, but have a generous limit to prevent accidental resource exhaustion.
- Detect demand from one namespace, add nodes, and increase quota.
Such policies could be implemented using ResourceQuotas as building blocks, by
writing a "controller" that watches the quota usage and adjusts the quota
hard limits of each namespace according to other signals.
Note that resource quota divides up aggregate cluster resources, but it creates no restrictions around nodes: pods from several namespaces may run on the same node.
Quota scopes
Each quota can have an associated set of scopes. A quota will only measure usage for a resource if it matches
the intersection of enumerated scopes.
When a scope is added to the quota, it limits the number of resources it supports to those that pertain to the scope. Resources specified on the quota outside of the allowed set results in a validation error.
Kubernetes 1.36 supports the following scopes:
| Scope | Description |
|---|---|
BestEffort | Match pods that have best effort quality of service. |
CrossNamespacePodAffinity | Match pods that have cross-namespace pod (anti)affinity terms. |
NotBestEffort | Match pods that do not have best effort quality of service. |
NotTerminating | Match pods where .spec.activeDeadlineSeconds is nil |
PriorityClass | Match pods that references the specified priority class. |
Terminating | Match pods where .spec.activeDeadlineSeconds >= 0 |
VolumeAttributesClass | Match PersistentVolumeClaims that reference the specified volume attributes class. |
ResourceQuotas with a scope set can also have a optional scopeSelector field. You define one or more match expressions
that specify an operators and, if relevant, a set of values to match. For example:
scopeSelector:
matchExpressions:
- scopeName: BestEffort # Match pods that have best effort quality of service
operator: Exists # optional; "Exists" is implied for BestEffort scope
The scopeSelector supports the following values in the operator field:
InNotInExistsDoesNotExist
If the operator is In or NotIn, the values field must have at least
one value. For example:
scopeSelector:
matchExpressions:
- scopeName: PriorityClass
operator: In
values:
- middle
If the operator is Exists or DoesNotExist, the values field must NOT be
specified.
Best effort Pods scope
This scope only tracks quota consumed by Pods. It only matches pods that have the best effort QoS class.
The operator for a scopeSelector must be Exists.
Not-best-effort Pods scope
This scope only tracks quota consumed by Pods. It only matches pods that have the Guaranteed or Burstable QoS class.
The operator for a scopeSelector must be Exists.
Non-terminating Pods scope
This scope only tracks quota consumed by Pods that are not terminating. The operator for a scopeSelector
must be Exists.
A Pod is not terminating if the .spec.activeDeadlineSeconds field is unset.
You can use a ResourceQuota with this scope to manage the following resources:
count.podspodscpumemoryrequests.cpurequests.memorylimits.cpulimits.memory
Terminating Pods scope
This scope only tracks quota consumed by Pods that are terminating. The operator for a scopeSelector
must be Exists.
A Pod is considered as terminating if the .spec.activeDeadlineSeconds field is set to any number.
You can use a ResourceQuota with this scope to manage the following resources:
count.podspodscpumemoryrequests.cpurequests.memorylimits.cpulimits.memory
Cross-namespace pod affinity scope
FEATURE STATE:
Kubernetes v1.24 [stable]You can use CrossNamespacePodAffinity quota scope to limit which namespaces are allowed to
have pods with affinity terms that cross namespaces. Specifically, it controls which pods are allowed
to set namespaces or namespaceSelector fields in pod (anti)affinity terms.
Preventing users from using cross-namespace affinity terms might be desired since a pod with anti-affinity constraints can block pods from all other namespaces from getting scheduled in a failure domain.
Using this scope, you (as a cluster administrator) can prevent certain namespaces - such as foo-ns in the example below -
from having pods that use cross-namespace pod affinity. You configure this creating a ResourceQuota object in
that namespace with CrossNamespacePodAffinity scope and hard limit of 0:
apiVersion: v1
kind: ResourceQuota
metadata:
name: disable-cross-namespace-affinity
namespace: foo-ns
spec:
hard:
pods: "0"
scopeSelector:
matchExpressions:
- scopeName: CrossNamespacePodAffinity
operator: Exists
If you want to disallow using namespaces and namespaceSelector by default, and
only allow it for specific namespaces, you could configure CrossNamespacePodAffinity
as a limited resource by setting the kube-apiserver flag --admission-control-config-file
to the path of the following configuration file:
apiVersion: apiserver.config.k8s.io/v1
kind: AdmissionConfiguration
plugins:
- name: "ResourceQuota"
configuration:
apiVersion: apiserver.config.k8s.io/v1
kind: ResourceQuotaConfiguration
limitedResources:
- resource: pods
matchScopes:
- scopeName: CrossNamespacePodAffinity
operator: Exists
With the above configuration, pods can use namespaces and namespaceSelector in pod affinity only
if the namespace where they are created have a resource quota object with
CrossNamespacePodAffinity scope and a hard limit greater than or equal to the number of pods using those fields.
PriorityClass scope
FEATURE STATE:
Kubernetes v1.17 [stable]A ResourceQuota with a PriorityClass scope only matches Pods that have a particular
priority class, and only
if any scopeSelector in the quota spec selects a particular Pod.
Pods can be created at a specific priority.
You can control a pod's consumption of system resources based on a pod's priority, by using the scopeSelector
field in the quota spec.
When quota is scoped for PriorityClass using the scopeSelector field, the ResourceQuota
can only track (and limit) the following resources:
podscpumemoryephemeral-storagelimits.cpulimits.memorylimits.ephemeral-storagerequests.cpurequests.memoryrequests.ephemeral-storage
Example
This example creates a ResourceQuota matches it with pods at specific priorities. The example works as follows:
- Pods in the cluster have one of the three PriorityClasses, "low", "medium", "high".
- If you want to try this out, use a testing cluster and set up those three PriorityClasses before you continue.
- One quota object is created for each priority.
Inspect this set of ResourceQuotas:
apiVersion: v1
kind: ResourceQuota
metadata:
name: pods-high
spec:
hard:
cpu: "1000"
memory: "200Gi"
pods: "10"
scopeSelector:
matchExpressions:
- operator: In
scopeName: PriorityClass
values: ["high"]
---
apiVersion: v1
kind: ResourceQuota
metadata:
name: pods-medium
spec:
hard:
cpu: "10"
memory: "20Gi"
pods: "10"
scopeSelector:
matchExpressions:
- operator: In
scopeName: PriorityClass
values: ["medium"]
---
apiVersion: v1
kind: ResourceQuota
metadata:
name: pods-low
spec:
hard:
cpu: "5"
memory: "10Gi"
pods: "10"
scopeSelector:
matchExpressions:
- operator: In
scopeName: PriorityClass
values: ["low"]
Apply the YAML using kubectl create.
kubectl create -f https://k8s.io/examples/policy/quota.yaml
resourcequota/pods-high created
resourcequota/pods-medium created
resourcequota/pods-low created
Verify that Used quota is 0 using kubectl describe quota.
kubectl describe quota
Name: pods-high
Namespace: default
Resource Used Hard
-------- ---- ----
cpu 0 1k
memory 0 200Gi
pods 0 10
Name: pods-low
Namespace: default
Resource Used Hard
-------- ---- ----
cpu 0 5
memory 0 10Gi
pods 0 10
Name: pods-medium
Namespace: default
Resource Used Hard
-------- ---- ----
cpu 0 10
memory 0 20Gi
pods 0 10
Create a pod with priority "high".
apiVersion: v1
kind: Pod
metadata:
name: high-priority
spec:
containers:
- name: high-priority
image: ubuntu
command: ["/bin/sh"]
args: ["-c", "while true; do echo hello; sleep 10;done"]
resources:
requests:
memory: "10Gi"
cpu: "500m"
limits:
memory: "10Gi"
cpu: "500m"
priorityClassName: high
To create the Pod:
kubectl create -f https://k8s.io/examples/policy/high-priority-pod.yaml
Verify that "Used" stats for "high" priority quota, pods-high, has changed and that
the other two quotas are unchanged.
kubectl describe quota
Name: pods-high
Namespace: default
Resource Used Hard
-------- ---- ----
cpu 500m 1k
memory 10Gi 200Gi
pods 1 10
Name: pods-low
Namespace: default
Resource Used Hard
-------- ---- ----
cpu 0 5
memory 0 10Gi
pods 0 10
Name: pods-medium
Namespace: default
Resource Used Hard
-------- ---- ----
cpu 0 10
memory 0 20Gi
pods 0 10
Limiting PriorityClass consumption by default
It may be desired that pods at a particular priority, such as "cluster-services", should be allowed in a namespace, if and only if, a matching quota object exists.
With this mechanism, operators are able to restrict usage of certain high priority classes to a limited number of namespaces and not every namespace will be able to consume these priority classes by default.
To enforce this, kube-apiserver flag --admission-control-config-file should be
used to pass path to the following configuration file:
apiVersion: apiserver.config.k8s.io/v1
kind: AdmissionConfiguration
plugins:
- name: "ResourceQuota"
configuration:
apiVersion: apiserver.config.k8s.io/v1
kind: ResourceQuotaConfiguration
limitedResources:
- resource: pods
matchScopes:
- scopeName: PriorityClass
operator: In
values: ["cluster-services"]
Then, create a resource quota object in the kube-system namespace:
apiVersion: v1
kind: ResourceQuota
metadata:
name: pods-cluster-services
spec:
scopeSelector:
matchExpressions:
- operator : In
scopeName: PriorityClass
values: ["cluster-services"]kubectl apply -f https://k8s.io/examples/policy/priority-class-resourcequota.yaml -n kube-system
resourcequota/pods-cluster-services created
In this case, a pod creation will be allowed if:
- the Pod's
priorityClassNameis not specified. - the Pod's
priorityClassNameis specified to a value other thancluster-services. - the Pod's
priorityClassNameis set tocluster-services, it is to be created in thekube-systemnamespace, and it has passed the resource quota check.
A Pod creation request is rejected if its priorityClassName is set to cluster-services
and it is to be created in a namespace other than kube-system.
VolumeAttributesClass scope
FEATURE STATE:
Kubernetes v1.36 [stable](enabled by default)This scope only tracks quota consumed by PersistentVolumeClaims.
PersistentVolumeClaims can be created with a specific
VolumeAttributesClass, and might be modified after creation.
You can control a PVC's consumption of storage resources based on the associated
VolumeAttributesClasses, by using the scopeSelector field in the quota spec.
The PVC references the associated VolumeAttributesClass by the following fields:
spec.volumeAttributesClassNamestatus.currentVolumeAttributesClassNamestatus.modifyVolumeStatus.targetVolumeAttributesClassName
A relevant ResourceQuota is matched and consumed only if the ResourceQuota has a scopeSelector that selects the PVC.
When the quota is scoped for the volume attributes class using the scopeSelector field, the quota object is restricted to track only the following resources:
persistentvolumeclaimsrequests.storage
Read Limit Storage Consumption to learn more about this.
What's next
- See a detailed example for how to use resource quota.
- Read the ResourceQuota API reference
- Learn about LimitRanges
- You can read the historical ResourceQuota design document for more information.
- You can also read the Quota support for priority class design document.
9.3 - Process ID Limits And Reservations
FEATURE STATE:
Kubernetes v1.20 [stable]Kubernetes allow you to limit the number of process IDs (PIDs) that a Pod can use. You can also reserve a number of allocatable PIDs for each node for use by the operating system and daemons (rather than by Pods).
Process IDs (PIDs) are a fundamental resource on nodes. It is trivial to hit the task limit without hitting any other resource limits, which can then cause instability to a host machine.
Cluster administrators require mechanisms to ensure that Pods running in the cluster cannot induce PID exhaustion that prevents host daemons (such as the kubelet or kube-proxy, and potentially also the container runtime) from running. In addition, it is important to ensure that PIDs are limited among Pods in order to ensure they have limited impact on other workloads on the same node.
Note:
On certain Linux installations, the operating system sets the PIDs limit to a low default, such as32768. Consider raising the value of /proc/sys/kernel/pid_max.You can configure a kubelet to limit the number of PIDs a given Pod can consume.
For example, if your node's host OS is set to use a maximum of 262144 PIDs and
expect to host less than 250 Pods, one can give each Pod a budget of 1000
PIDs to prevent using up that node's overall number of available PIDs. If the
admin wants to overcommit PIDs similar to CPU or memory, they may do so as well
with some additional risks. Either way, a single Pod will not be able to bring
the whole machine down. This kind of resource limiting helps to prevent simple
fork bombs from affecting operation of an entire cluster.
Per-Pod PID limiting allows administrators to protect one Pod from another, but does not ensure that all Pods scheduled onto that host are unable to impact the node overall. Per-Pod limiting also does not protect the node agents themselves from PID exhaustion.
You can also reserve an amount of PIDs for node overhead, separate from the allocation to Pods. This is similar to how you can reserve CPU, memory, or other resources for use by the operating system and other facilities outside of Pods and their containers.
PID limiting is an important sibling to compute
resource requests
and limits. However, you specify it in a different way: rather than defining a
Pod's resource limit in the .spec for a Pod, you configure the limit as a
setting on the kubelet. Pod-defined PID limits are not currently supported.
Caution:
This means that the limit that applies to a Pod may be different depending on where the Pod is scheduled. To make things simple, it's easiest if all Nodes use the same PID resource limits and reservations.Node PID limits
Kubernetes allows you to reserve a number of process IDs for the system use. To
configure the reservation, use the parameter pid=<number> in the
--system-reserved and --kube-reserved command line options to the kubelet.
The value you specified declares that the specified number of process IDs will
be reserved for the system as a whole and for Kubernetes system daemons
respectively.
Pod PID limits
Kubernetes allows you to limit the number of processes running in a Pod. You
specify this limit at the node level, rather than configuring it as a resource
limit for a particular Pod. Each Node can have a different PID limit.
To configure the limit, you can specify the command line parameter --pod-max-pids
to the kubelet, or set PodPidsLimit in the kubelet
configuration file.
PID based eviction
You can configure kubelet to start terminating a Pod when it is misbehaving and consuming abnormal amount of resources.
This feature is called eviction. You can
Configure Out of Resource Handling
for various eviction signals.
Use pid.available eviction signal to configure the threshold for number of PIDs used by Pod.
You can set soft and hard eviction policies.
However, even with the hard eviction policy, if the number of PIDs growing very fast,
node can still get into unstable state by hitting the node PIDs limit.
Eviction signal value is calculated periodically and does NOT enforce the limit.
PID limiting - per Pod and per Node sets the hard limit. Once the limit is hit, workload will start experiencing failures when trying to get a new PID. It may or may not lead to rescheduling of a Pod, depending on how workload reacts on these failures and how liveness and readiness probes are configured for the Pod. However, if limits were set correctly, you can guarantee that other Pods workload and system processes will not run out of PIDs when one Pod is misbehaving.
What's next
- Refer to the PID Limiting enhancement document for more information.
- For historical context, read Process ID Limiting for Stability Improvements in Kubernetes 1.14.
- Read Managing Resources for Containers.
- Learn how to Configure Out of Resource Handling.
10 - Scheduling, Preemption and Eviction
In Kubernetes, scheduling refers to making sure that Pods are matched to Nodes so that the kubelet can run them. Preemption is the process of terminating Pods with lower Priority so that Pods with higher Priority can schedule on Nodes. Eviction is the process of terminating one or more Pods on Nodes.
Scheduling
- Kubernetes Scheduler
- Assigning Pods to Nodes
- Pod Overhead
- Pod Topology Spread Constraints
- Taints and Tolerations
- Scheduling Framework
- Dynamic Resource Allocation
- Scheduler Performance Tuning
- Resource Bin Packing for Extended Resources
- Pod Scheduling Readiness
- PodGroup Scheduling
- Gang Scheduling
- Topology-aware Scheduling
- Workload-Aware preemption
- Descheduler
- Node Declared Features
Pod Disruption
Pod disruption is the process by which Pods on Nodes are terminated either voluntarily or involuntarily.
Voluntary disruptions are started intentionally by application owners or cluster administrators. Involuntary disruptions are unintentional and can be triggered by unavoidable issues like Nodes running out of resources, or by accidental deletions.
10.1 - Kubernetes Scheduler
In Kubernetes, scheduling refers to making sure that Pods are matched to Nodes so that Kubelet can run them.
Scheduling overview
A scheduler watches for newly created Pods that have no Node assigned. For every Pod that the scheduler discovers, the scheduler becomes responsible for finding the best Node for that Pod to run on. The scheduler reaches this placement decision taking into account the scheduling principles described below.
If you want to understand why Pods are placed onto a particular Node, or if you're planning to implement a custom scheduler yourself, this page will help you learn about scheduling.
kube-scheduler
kube-scheduler is the default scheduler for Kubernetes and runs as part of the control plane. kube-scheduler is designed so that, if you want and need to, you can write your own scheduling component and use that instead.
Kube-scheduler selects an optimal node to run newly created or not yet scheduled (unscheduled) pods. Since containers in pods - and pods themselves - can have different requirements, the scheduler filters out any nodes that don't meet a Pod's specific scheduling needs. Alternatively, the API lets you specify a node for a Pod when you create it, but this is unusual and is only done in special cases.
In a cluster, Nodes that meet the scheduling requirements for a Pod are called feasible nodes. If none of the nodes are suitable, the pod remains unscheduled until the scheduler is able to place it.
The scheduler finds feasible Nodes for a Pod and then runs a set of functions to score the feasible Nodes and picks a Node with the highest score among the feasible ones to run the Pod. The scheduler then notifies the API server about this decision in a process called binding.
Factors that need to be taken into account for scheduling decisions include individual and collective resource requirements, hardware / software / policy constraints, affinity and anti-affinity specifications, data locality, inter-workload interference, and so on.
Node selection in kube-scheduler
kube-scheduler selects a node for the pod in a 2-step operation:
- Filtering
- Scoring
The filtering step finds the set of Nodes where it's feasible to schedule the Pod. For example, the PodFitsResources filter checks whether a candidate Node has enough available resources to meet a Pod's specific resource requests. After this step, the node list contains any suitable Nodes; often, there will be more than one. If the list is empty, that Pod isn't (yet) schedulable.
In the scoring step, the scheduler ranks the remaining nodes to choose the most suitable Pod placement. The scheduler assigns a score to each Node that survived filtering, basing this score on the active scoring rules.
Finally, kube-scheduler assigns the Pod to the Node with the highest ranking. If there is more than one node with equal scores, kube-scheduler selects one of these at random.
There are two supported ways to configure the filtering and scoring behavior of the scheduler:
- Scheduling Policies allow you to configure Predicates for filtering and Priorities for scoring.
- Scheduling Profiles allow you to configure Plugins that implement different scheduling stages, including:
QueueSort,Filter,Score,Bind,Reserve,Permit, and others. You can also configure the kube-scheduler to run different profiles.
What's next
- Read about scheduler performance tuning
- Read about Pod topology spread constraints
- Read the reference documentation for kube-scheduler
- Read the kube-scheduler config (v1) reference
- Learn about configuring multiple schedulers
- Learn about topology management policies
- Learn about Pod Overhead
- Learn about scheduling of Pods that use volumes in:
10.2 - Topology-Aware Workload Scheduling
FEATURE STATE:
Kubernetes v1.36 [alpha](disabled by default)Topology-Aware Scheduling (TAS) is a placement scheduling algorithm that allows to find the optimal placement for the considered PodGroup, guaranteeing that all pods will be collocated within the same topology domain. Users can accomodate TAS to their specific needs by changing TAS plugins configuration.
Scheduling framework: TAS plugins configuration
The scheduler includes new and extended in-tree plugins that implement the TAS extension points:
TopologyPlacement: Implements thePlacementGeneratePlugininterface. It generates candidate placements by grouping nodes based on the distinct values of the requested topologykey(defined in the PodGroup).NodeResourcesFit: Extended to implement thePlacementScorePlugininterface. Following similar logic to standard pod bin-packing, it scores placements based on the allocation ratio across all nodes within the placement. It uses theMostAllocatedstrategy to maximize resource utilization within a placement, and it inherits resource weights from the standard pod-by-pod plugin settings.PodGroupPodsCount: Implements thePlacementScorePlugininterface. It scores candidate placements based on the total number of pods in the PodGroup that you can successfully schedule.
Customizing plugin weights and bin-packing resource weights
By default, the NodeResourcesFit and PodGroupPodsCount plugins are configured with equal
weights (both default to 1) to maintain a good balance between bin-packing logic and scheduling as
many pods as possible.
You can adjust these weights, or the resource weights in the bin-packing strategy in your
KubeSchedulerConfiguration. Here is an example snippet showing how to change the weights for both
plugins, and how to override the NodeResourcesFit resource weights. The latter change will apply
both to pod-by-pod and placement scoring algorithms:
apiVersion: kubescheduler.config.k8s.io/v1
kind: KubeSchedulerConfiguration
profiles:
- schedulerName: default-scheduler
plugins:
placementScore:
enabled:
# 1) Change the default weights of the placement score plugins
- name: NodeResourcesFit
weight: 2
- name: PodGroupPodsCount
weight: 5
pluginConfig:
- name: NodeResourcesFit
args:
# 2) Changing the scoring resource weights for both pod-by-pod and placement scoring
# algorithms
scoringStrategy:
# The type will only be considered in pod-by-pod scheduling. Placement scoring always
# uses MostAllocated strategy
type: LeastAllocated
# Resource weights will be used in both pod-by-pod and placement scoring algorithms
resources:
- name: cpu
weight: 2
- name: memory
weight: 3
What's next
- Learn more about Topology-aware scheduling API.
- Read about pod group scheduling.
- Read about pod group policies.
10.3 - Assigning Pods to Nodes
You can constrain a Pod so that it is restricted to run on particular node(s), or to prefer to run on particular nodes. There are several ways to do this and the recommended approaches all use label selectors to facilitate the selection. Often, you do not need to set any such constraints; the scheduler will automatically do a reasonable placement (for example, spreading your Pods across nodes so as not place Pods on a node with insufficient free resources). However, there are some circumstances where you may want to control which node the Pod deploys to, for example, to ensure that a Pod ends up on a node with an SSD attached to it, or to co-locate Pods from two different services that communicate a lot into the same availability zone.
You can use any of the following methods to choose where Kubernetes schedules specific Pods:
- nodeSelector field matching against node labels
- Affinity and anti-affinity
- nodeName field
- Pod topology spread constraints
Node labels
Like many other Kubernetes objects, nodes have labels. You can attach labels manually. Kubernetes also populates a standard set of labels on all nodes in a cluster.
Note:
The value of these labels is cloud provider specific and is not guaranteed to be reliable. For example, the value ofkubernetes.io/hostname may be the same as the node name in some environments
and a different value in other environments.Node isolation/restriction
Adding labels to nodes allows you to target Pods for scheduling on specific nodes or groups of nodes. You can use this functionality to ensure that specific Pods only run on nodes with certain isolation, security, or regulatory properties.
If you use labels for node isolation, choose label keys that the kubelet cannot modify. This prevents a compromised node from setting those labels on itself so that the scheduler schedules workloads onto the compromised node.
The NodeRestriction admission plugin
prevents the kubelet from setting or modifying labels with a
node-restriction.kubernetes.io/ prefix.
To make use of that label prefix for node isolation:
- Ensure you are using the Node authorizer and have enabled the
NodeRestrictionadmission plugin. - Add labels with the
node-restriction.kubernetes.io/prefix to your nodes, and use those labels in your node selectors. For example,example.com.node-restriction.kubernetes.io/fips=trueorexample.com.node-restriction.kubernetes.io/pci-dss=true.
nodeSelector
nodeSelector is the simplest recommended form of node selection constraint.
You can add the nodeSelector field to your Pod specification and specify the
node labels you want the target node to have.
Kubernetes only schedules the Pod onto nodes that have each of the labels you
specify.
See Assign Pods to Nodes for more information.
Affinity and anti-affinity
nodeSelector is the simplest way to constrain Pods to nodes with specific
labels. Affinity and anti-affinity expand the types of constraints you can
define. Some of the benefits of affinity and anti-affinity include:
- The affinity/anti-affinity language is more expressive.
nodeSelectoronly selects nodes with all the specified labels. Affinity/anti-affinity gives you more control over the selection logic. - You can indicate that a rule is soft or preferred, so that the scheduler still schedules the Pod even if it can't find a matching node.
- You can constrain a Pod using labels on other Pods running on the node (or other topological domain), instead of just node labels, which allows you to define rules for which Pods can be co-located on a node.
The affinity feature consists of two types of affinity:
- Node affinity functions like the
nodeSelectorfield but is more expressive and allows you to specify soft rules. - Inter-pod affinity/anti-affinity allows you to constrain Pods against labels on other Pods.
Node affinity
Node affinity is conceptually similar to nodeSelector, allowing you to constrain which nodes your
Pod can be scheduled on based on node labels. There are two types of node
affinity:
requiredDuringSchedulingIgnoredDuringExecution: The scheduler can't schedule the Pod unless the rule is met. This functions likenodeSelector, but with a more expressive syntax.preferredDuringSchedulingIgnoredDuringExecution: The scheduler tries to find a node that meets the rule. If a matching node is not available, the scheduler still schedules the Pod.
Note:
In the preceding types,IgnoredDuringExecution means that if the node labels
change after Kubernetes schedules the Pod, the Pod continues to run.You can specify node affinities using the .spec.affinity.nodeAffinity field in
your Pod spec.
For example, consider the following Pod spec:
apiVersion: v1
kind: Pod
metadata:
name: with-node-affinity
spec:
affinity:
nodeAffinity:
requiredDuringSchedulingIgnoredDuringExecution:
nodeSelectorTerms:
- matchExpressions:
- key: topology.kubernetes.io/zone
operator: In
values:
- antarctica-east1
- antarctica-west1
preferredDuringSchedulingIgnoredDuringExecution:
- weight: 1
preference:
matchExpressions:
- key: another-node-label-key
operator: In
values:
- another-node-label-value
containers:
- name: with-node-affinity
image: registry.k8s.io/pause:3.8In this example, the following rules apply:
- The node must have a label with the key
topology.kubernetes.io/zoneand the value of that label must be eitherantarctica-east1orantarctica-west1. - The node preferably has a label with the key
another-node-label-keyand the valueanother-node-label-value.
You can use the operator field to specify a logical operator for Kubernetes to use when
interpreting the rules. You can use In, NotIn, Exists, DoesNotExist,
Gt and Lt.
Read Operators to learn more about how these work.
NotIn and DoesNotExist allow you to define node anti-affinity behavior.
Alternatively, you can use node taints
to repel Pods from specific nodes.
Note:
If you specify both nodeSelector and nodeAffinity, both must be satisfied
for the Pod to be scheduled onto a node.
If you specify multiple terms in nodeSelectorTerms associated with nodeAffinity
types, then the Pod can be scheduled onto a node if one of the specified terms
can be satisfied (terms are ORed).
If you specify multiple expressions in a single matchExpressions field associated with a
term in nodeSelectorTerms, then the Pod can be scheduled onto a node only
if all the expressions are satisfied (expressions are ANDed).
See Assign Pods to Nodes using Node Affinity for more information.
Node affinity weight
You can specify a weight between 1 and 100 for each instance of the
preferredDuringSchedulingIgnoredDuringExecution affinity type. When the
scheduler finds nodes that meet all the other scheduling requirements of the Pod, the
scheduler iterates through every preferred rule that the node satisfies and adds the
value of the weight for that expression to a sum.
The final sum is added to the score of other priority functions for the node. Nodes with the highest total score are prioritized when the scheduler makes a scheduling decision for the Pod.
For example, consider the following Pod spec:
apiVersion: v1
kind: Pod
metadata:
name: with-affinity-preferred-weight
spec:
affinity:
nodeAffinity:
requiredDuringSchedulingIgnoredDuringExecution:
nodeSelectorTerms:
- matchExpressions:
- key: kubernetes.io/os
operator: In
values:
- linux
preferredDuringSchedulingIgnoredDuringExecution:
- weight: 1
preference:
matchExpressions:
- key: label-1
operator: In
values:
- key-1
- weight: 50
preference:
matchExpressions:
- key: label-2
operator: In
values:
- key-2
containers:
- name: with-node-affinity
image: registry.k8s.io/pause:3.8
If there are two possible nodes that match the
preferredDuringSchedulingIgnoredDuringExecution rule, one with the
label-1:key-1 label and another with the label-2:key-2 label, the scheduler
considers the weight of each node and adds the weight to the other scores for
that node, and schedules the Pod onto the node with the highest final score.
Note:
If you want Kubernetes to successfully schedule the Pods in this example, you must have existing nodes with thekubernetes.io/os=linux label.Node affinity per scheduling profile
FEATURE STATE:
Kubernetes v1.20 [beta]When configuring multiple scheduling profiles, you can associate
a profile with a node affinity, which is useful if a profile only applies to a specific set of nodes.
To do so, add an addedAffinity to the args field of the NodeAffinity plugin
in the scheduler configuration. For example:
apiVersion: kubescheduler.config.k8s.io/v1
kind: KubeSchedulerConfiguration
profiles:
- schedulerName: default-scheduler
- schedulerName: foo-scheduler
pluginConfig:
- name: NodeAffinity
args:
addedAffinity:
requiredDuringSchedulingIgnoredDuringExecution:
nodeSelectorTerms:
- matchExpressions:
- key: scheduler-profile
operator: In
values:
- foo
The addedAffinity is applied to all Pods that set .spec.schedulerName to foo-scheduler, in addition to the
NodeAffinity specified in the PodSpec.
That is, in order to match the Pod, nodes need to satisfy addedAffinity and
the Pod's .spec.NodeAffinity.
Since the addedAffinity is not visible to end users, its behavior might be
unexpected to them. Use node labels that have a clear correlation to the
scheduler profile name.
Note:
The DaemonSet controller, which creates Pods for DaemonSets, does not support scheduling profiles. When the DaemonSet controller creates Pods, the default Kubernetes scheduler places those Pods and honors anynodeAffinity rules in the DaemonSet controller.Inter-pod affinity and anti-affinity
Inter-pod affinity and anti-affinity allow you to constrain which nodes your Pods can be scheduled on based on the labels of Pods already running on that node, instead of the node labels.
Types of Inter-pod Affinity and Anti-affinity
Inter-pod affinity and anti-affinity take the form "this Pod should (or, in the case of anti-affinity, should not) run in an X if that X is already running one or more Pods that meet rule Y", where X is a topology domain like node, rack, cloud provider zone or region, or similar and Y is the rule Kubernetes tries to satisfy.
You express these rules (Y) as label selectors with an optional associated list of namespaces. Pods are namespaced objects in Kubernetes, so Pod labels also implicitly have namespaces. Any label selectors for Pod labels should specify the namespaces in which Kubernetes should look for those labels.
You express the topology domain (X) using a topologyKey, which is the key for
the node label that the system uses to denote the domain. For examples, see
Well-Known Labels, Annotations and Taints.
Note:
Inter-pod affinity and anti-affinity require substantial amounts of processing which can slow down scheduling in large clusters significantly. We do not recommend using them in clusters larger than several hundred nodes.Note:
Pod anti-affinity requires nodes to be consistently labeled, in other words, every node in the cluster must have an appropriate label matchingtopologyKey.
If some or all nodes are missing the specified topologyKey label, it can lead
to unintended behavior.Similar to node affinity are two types of Pod affinity and anti-affinity as follows:
requiredDuringSchedulingIgnoredDuringExecutionpreferredDuringSchedulingIgnoredDuringExecution
For example, you could use
requiredDuringSchedulingIgnoredDuringExecution affinity to tell the scheduler to
co-locate Pods of two services in the same cloud provider zone because they
communicate with each other a lot. Similarly, you could use
preferredDuringSchedulingIgnoredDuringExecution anti-affinity to spread Pods
from a service across multiple cloud provider zones.
To use inter-pod affinity, use the affinity.podAffinity field in the Pod spec.
For inter-pod anti-affinity, use the affinity.podAntiAffinity field in the Pod
spec.
Scheduling Behavior
When scheduling a new Pod, the Kubernetes scheduler evaluates the Pod's affinity/anti-affinity rules in the context of the current cluster state:
Hard Constraints (Node Filtering):
podAffinity.requiredDuringSchedulingIgnoredDuringExecutionandpodAntiAffinity.requiredDuringSchedulingIgnoredDuringExecution:- The scheduler ensures the new Pod is assigned to nodes that satisfy these required affinity and anti-affinity rules based on existing Pods.
Soft Constraints (Scoring):
podAffinity.preferredDuringSchedulingIgnoredDuringExecutionandpodAntiAffinity.preferredDuringSchedulingIgnoredDuringExecution:- The scheduler scores nodes based on how well they meet these preferred affinity and anti-affinity rules to optimize Pod placement.
Ignored Fields:
- Existing Pods'
podAffinity.preferredDuringSchedulingIgnoredDuringExecution:- These preferred affinity rules are not considered during the scheduling decision for new Pods.
- Existing Pods'
podAntiAffinity.preferredDuringSchedulingIgnoredDuringExecution:- Similarly, preferred anti-affinity rules of existing Pods are ignored during scheduling.
- Existing Pods'
Scheduling a Group of Pods with Inter-pod Affinity to Themselves
If the current Pod being scheduled is the first in a series that have affinity to themselves, it is allowed to be scheduled if it passes all other affinity checks. This is determined by verifying that no other Pod in the cluster matches the namespace and selector of this Pod, that the Pod matches its own terms, and the chosen node matches all requested topologies. This ensures that there will not be a deadlock even if all the Pods have inter-pod affinity specified.
Pod Affinity Example
Consider the following Pod spec:
apiVersion: v1
kind: Pod
metadata:
name: with-pod-affinity
spec:
affinity:
podAffinity:
requiredDuringSchedulingIgnoredDuringExecution:
- labelSelector:
matchExpressions:
- key: security
operator: In
values:
- S1
topologyKey: topology.kubernetes.io/zone
podAntiAffinity:
preferredDuringSchedulingIgnoredDuringExecution:
- weight: 100
podAffinityTerm:
labelSelector:
matchExpressions:
- key: security
operator: In
values:
- S2
topologyKey: topology.kubernetes.io/zone
containers:
- name: with-pod-affinity
image: registry.k8s.io/pause:3.8
This example defines one Pod affinity rule and one Pod anti-affinity rule. The
Pod affinity rule uses the "hard"
requiredDuringSchedulingIgnoredDuringExecution, while the anti-affinity rule
uses the "soft" preferredDuringSchedulingIgnoredDuringExecution.
The affinity rule specifies that the scheduler is allowed to place the example Pod
on a node only if that node belongs to a specific zone
where other Pods have been labeled with security=S1.
For instance, if we have a cluster with a designated zone, let's call it "Zone V,"
consisting of nodes labeled with topology.kubernetes.io/zone=V, the scheduler can
assign the Pod to any node within Zone V, as long as there is at least one Pod within
Zone V already labeled with security=S1. Conversely, if there are no Pods with security=S1
labels in Zone V, the scheduler will not assign the example Pod to any node in that zone.
The anti-affinity rule specifies that the scheduler should try to avoid scheduling the Pod
on a node if that node belongs to a specific zone
where other Pods have been labeled with security=S2.
For instance, if we have a cluster with a designated zone, let's call it "Zone R,"
consisting of nodes labeled with topology.kubernetes.io/zone=R, the scheduler should avoid
assigning the Pod to any node within Zone R, as long as there is at least one Pod within
Zone R already labeled with security=S2. Conversely, the anti-affinity rule does not impact
scheduling into Zone R if there are no Pods with security=S2 labels.
To get yourself more familiar with the examples of Pod affinity and anti-affinity, refer to the design proposal.
You can use the In, NotIn, Exists and DoesNotExist values in the
operator field for Pod affinity and anti-affinity.
Read Operators to learn more about how these work.
In principle, the topologyKey can be any allowed label key with the following
exceptions for performance and security reasons:
- For Pod affinity and anti-affinity, an empty
topologyKeyfield is not allowed in bothrequiredDuringSchedulingIgnoredDuringExecutionandpreferredDuringSchedulingIgnoredDuringExecution. - For
requiredDuringSchedulingIgnoredDuringExecutionPod anti-affinity rules, the admission controllerLimitPodHardAntiAffinityTopologylimitstopologyKeytokubernetes.io/hostname. You can modify or disable the admission controller if you want to allow custom topologies.
In addition to labelSelector and topologyKey, you can optionally specify a list
of namespaces which the labelSelector should match against using the
namespaces field at the same level as labelSelector and topologyKey.
If omitted or empty, namespaces defaults to the namespace of the Pod where the
affinity/anti-affinity definition appears.
Namespace Selector
FEATURE STATE:
Kubernetes v1.24 [stable]You can also select matching namespaces using namespaceSelector, which is a label query over the set of namespaces.
The affinity term is applied to namespaces selected by both namespaceSelector and the namespaces field.
Note that an empty namespaceSelector ({}) matches all namespaces, while a null or empty namespaces list and
null namespaceSelector matches the namespace of the Pod where the rule is defined.
matchLabelKeys
FEATURE STATE:
Kubernetes v1.33 [stable](enabled by default)Note:
The matchLabelKeys field is a beta-level field and is enabled by default in
Kubernetes 1.36.
When you want to disable it, you have to disable it explicitly via the
MatchLabelKeysInPodAffinity feature gate.
Kubernetes includes an optional matchLabelKeys field for Pod affinity
or anti-affinity. The field specifies keys for the labels that should match with the incoming Pod's labels,
when satisfying the Pod (anti)affinity.
The keys are used to look up values from the Pod labels; those key-value labels are combined
(using AND) with the match restrictions defined using the labelSelector field. The combined
filtering selects the set of existing Pods that will be taken into Pod (anti)affinity calculation.
Caution:
It's not recommended to usematchLabelKeys with labels that might be updated directly on pods.
Even if you edit the pod's label that is specified at matchLabelKeys directly, (that is, not via a deployment),
kube-apiserver doesn't reflect the label update onto the merged labelSelector.A common use case is to use matchLabelKeys with pod-template-hash (set on Pods
managed as part of a Deployment, where the value is unique for each revision).
Using pod-template-hash in matchLabelKeys allows you to target the Pods that belong
to the same revision as the incoming Pod, so that a rolling upgrade won't break affinity.
apiVersion: apps/v1
kind: Deployment
metadata:
name: application-server
...
spec:
template:
spec:
affinity:
podAffinity:
requiredDuringSchedulingIgnoredDuringExecution:
- labelSelector:
matchExpressions:
- key: app
operator: In
values:
- database
topologyKey: topology.kubernetes.io/zone
# Only Pods from a given rollout are taken into consideration when calculating pod affinity.
# If you update the Deployment, the replacement Pods follow their own affinity rules
# (if there are any defined in the new Pod template)
matchLabelKeys:
- pod-template-hash
mismatchLabelKeys
FEATURE STATE:
Kubernetes v1.33 [stable](enabled by default)Note:
The mismatchLabelKeys field is a beta-level field and is enabled by default in
Kubernetes 1.36.
When you want to disable it, you have to disable it explicitly via the
MatchLabelKeysInPodAffinity feature gate.
Kubernetes includes an optional mismatchLabelKeys field for Pod affinity
or anti-affinity. The field specifies keys for the labels that should not match with the incoming Pod's labels,
when satisfying the Pod (anti)affinity.
Caution:
It's not recommended to usemismatchLabelKeys with labels that might be updated directly on pods.
Even if you edit the pod's label that is specified at mismatchLabelKeys directly, (that is, not via a deployment),
kube-apiserver doesn't reflect the label update onto the merged labelSelector.One example use case is to ensure Pods go to the topology domain (node, zone, etc) where only Pods from the same tenant or team are scheduled in. In other words, you want to avoid running Pods from two different tenants on the same topology domain at the same time.
apiVersion: v1
kind: Pod
metadata:
labels:
# Assume that all relevant Pods have a "tenant" label set
tenant: tenant-a
...
spec:
affinity:
podAffinity:
requiredDuringSchedulingIgnoredDuringExecution:
# ensure that Pods associated with this tenant land on the correct node pool
- matchLabelKeys:
- tenant
labelSelector: {}
topologyKey: node-pool
podAntiAffinity:
requiredDuringSchedulingIgnoredDuringExecution:
# ensure that Pods associated with this tenant can't schedule to nodes used for another tenant
- mismatchLabelKeys:
- tenant # whatever the value of the "tenant" label for this Pod, prevent
# scheduling to nodes in any pool where any Pod from a different
# tenant is running.
labelSelector:
# We have to have the labelSelector which selects only Pods with the tenant label,
# otherwise this Pod would have anti-affinity against Pods from daemonsets as well, for example,
# which aren't supposed to have the tenant label.
matchExpressions:
- key: tenant
operator: Exists
topologyKey: node-pool
More practical use-cases
Inter-pod affinity and anti-affinity can be even more useful when they are used with higher level collections such as ReplicaSets, StatefulSets, Deployments, etc. These rules allow you to configure that a set of workloads should be co-located in the same defined topology; for example, preferring to place two related Pods onto the same node.
For example: imagine a three-node cluster. You use the cluster to run a web application and also an in-memory cache (such as Redis). For this example, also assume that latency between the web application and the memory cache should be as low as is practical. You could use inter-pod affinity and anti-affinity to co-locate the web servers with the cache as much as possible.
In the following example Deployment for the Redis cache, the replicas get the label app=store. The
podAntiAffinity rule tells the scheduler to avoid placing multiple replicas
with the app=store label on a single node. This creates each cache in a
separate node.
apiVersion: apps/v1
kind: Deployment
metadata:
name: redis-cache
spec:
selector:
matchLabels:
app: store
replicas: 3
template:
metadata:
labels:
app: store
spec:
affinity:
podAntiAffinity:
requiredDuringSchedulingIgnoredDuringExecution:
- labelSelector:
matchExpressions:
- key: app
operator: In
values:
- store
topologyKey: "kubernetes.io/hostname"
containers:
- name: redis-server
image: redis:3.2-alpine
The following example Deployment for the web servers creates replicas with the label app=web-store.
The Pod affinity rule tells the scheduler to place each replica on a node that has a Pod
with the label app=store. The Pod anti-affinity rule tells the scheduler never to place
multiple app=web-store servers on a single node.
apiVersion: apps/v1
kind: Deployment
metadata:
name: web-server
spec:
selector:
matchLabels:
app: web-store
replicas: 3
template:
metadata:
labels:
app: web-store
spec:
affinity:
podAntiAffinity:
requiredDuringSchedulingIgnoredDuringExecution:
- labelSelector:
matchExpressions:
- key: app
operator: In
values:
- web-store
topologyKey: "kubernetes.io/hostname"
podAffinity:
requiredDuringSchedulingIgnoredDuringExecution:
- labelSelector:
matchExpressions:
- key: app
operator: In
values:
- store
topologyKey: "kubernetes.io/hostname"
containers:
- name: web-app
image: nginx:1.16-alpine
Creating the two preceding Deployments results in the following cluster layout, where each web server is co-located with a cache, on three separate nodes.
| node-1 | node-2 | node-3 |
|---|---|---|
| webserver-1 | webserver-2 | webserver-3 |
| cache-1 | cache-2 | cache-3 |
The overall effect is that each cache instance is likely to be accessed by a single client that is running on the same node. This approach aims to minimize both skew (imbalanced load) and latency.
You might have other reasons to use Pod anti-affinity. See the ZooKeeper tutorial for an example of a StatefulSet configured with anti-affinity for high availability, using the same technique as this example.
nodeName
nodeName is a more direct form of node selection than affinity or
nodeSelector. nodeName is a field in the Pod spec. If the nodeName field
is not empty, the scheduler ignores the Pod and the kubelet on the named node
tries to place the Pod on that node. Using nodeName overrules using
nodeSelector or affinity and anti-affinity rules.
Some of the limitations of using nodeName to select nodes are:
- If the named node does not exist, the Pod will not run, and in some cases may be automatically deleted.
- If the named node does not have the resources to accommodate the Pod, the Pod will fail and its reason will indicate why, for example OutOfmemory or OutOfcpu.
- Node names in cloud environments are not always predictable or stable.
Warning:
nodeName is intended for use by custom schedulers or advanced use cases where
you need to bypass any configured schedulers. Bypassing the schedulers might lead to
failed Pods if the assigned Nodes get oversubscribed. You can use node affinity
or the nodeSelector field to assign a Pod to a specific Node without bypassing the schedulers.Here is an example of a Pod spec using the nodeName field:
apiVersion: v1
kind: Pod
metadata:
name: nginx
spec:
containers:
- name: nginx
image: nginx
nodeName: kube-01
The above Pod will only run on the node kube-01.
nominatedNodeName
FEATURE STATE:
Kubernetes v1.35 [beta](enabled by default)nominatedNodeName can be used for external components to nominate node for a pending pod.
This nomination is best effort: it might be ignored if the scheduler determines the pod cannot go to a nominated node.
Also, this field can be (over)written by the scheduler:
- If the scheduler finds a node to nominate via the preemption.
- If the scheduler decides where the pod is going, and move it to the binding cycle.
- Note that, in this case,
nominatedNodeNameis put only when the pod has to go throughWaitOnPermitorPreBindextension points.
- Note that, in this case,
Here is an example of a Pod status using the nominatedNodeName field:
apiVersion: v1
kind: Pod
metadata:
name: nginx
...
status:
nominatedNodeName: kube-01
Pod topology spread constraints
You can use topology spread constraints to control how Pods are spread across your cluster among failure-domains such as regions, zones, nodes, or among any other topology domains that you define. You might do this to improve performance, expected availability, or overall utilization.
Read Pod topology spread constraints to learn more about how these work.
Pod topology labels
FEATURE STATE:
Kubernetes v1.35 [beta](enabled by default)Pods inherit the topology labels (topology.kubernetes.io/zone and topology.kubernetes.io/region) from their assigned Node if those labels are present. These labels can then be utilized via the Downward API to provide the workload with node topology awareness.
Here is an example of a Pod using downward API for it's zone and region:
apiVersion: v1
kind: Pod
metadata:
name: pod-with-topology-labels
spec:
containers:
- name: app
image: alpine
command: ["sh", "-c", "env"]
env:
- name: MY_ZONE
valueFrom:
fieldRef:
fieldPath: metadata.labels['topology.kubernetes.io/zone']
- name: MY_REGION
valueFrom:
fieldRef:
fieldPath: metadata.labels['topology.kubernetes.io/region']
Operators
The following are all the logical operators that you can use in the operator field for nodeAffinity and podAffinity mentioned above.
| Operator | Behavior |
|---|---|
In | The label value is present in the supplied set of strings |
NotIn | The label value is not contained in the supplied set of strings |
Exists | A label with this key exists on the object |
DoesNotExist | No label with this key exists on the object |
The following operators can only be used with nodeAffinity.
| Operator | Behavior |
|---|---|
Gt | The field value will be parsed as an integer, and the integer that results from parsing the value of a label named by this selector is greater than this integer |
Lt | The field value will be parsed as an integer, and the integer that results from parsing the value of a label named by this selector is less than this integer |
Note:
Gt and Lt operators will not work with non-integer values. If the given value
doesn't parse as an integer, the Pod will fail to get scheduled. Also, Gt and Lt
are not available for podAffinity.What's next
- Read more about taints and tolerations.
- Read the design docs for node affinity and for inter-pod affinity/anti-affinity.
- Learn about how the topology manager takes part in node-level resource allocation decisions.
- Learn how to use nodeSelector.
- Learn how to use affinity and anti-affinity.
10.4 - Pod Overhead
FEATURE STATE:
Kubernetes v1.24 [stable]When you run a Pod on a Node, the Pod itself takes an amount of system resources. These resources are additional to the resources needed to run the container(s) inside the Pod. In Kubernetes, Pod Overhead is a way to account for the resources consumed by the Pod infrastructure on top of the container requests & limits.
In Kubernetes, the Pod's overhead is set at admission time according to the overhead associated with the Pod's RuntimeClass.
A pod's overhead is considered in addition to the sum of container resource requests when scheduling a Pod. Similarly, the kubelet will include the Pod overhead when sizing the Pod cgroup, and when carrying out Pod eviction ranking.
Configuring Pod overhead
You need to make sure a RuntimeClass is utilized which defines the overhead field.
Usage example
To work with Pod overhead, you need a RuntimeClass that defines the overhead field. As
an example, you could use the following RuntimeClass definition with a virtualization container
runtime (in this example, Kata Containers combined with the Firecracker virtual machine monitor)
that uses around 120MiB per Pod for the virtual machine and the guest OS:
# You need to change this example to match the actual runtime name, and per-Pod
# resource overhead, that the container runtime is adding in your cluster.
apiVersion: node.k8s.io/v1
kind: RuntimeClass
metadata:
name: kata-fc
handler: kata-fc
overhead:
podFixed:
memory: "120Mi"
cpu: "250m"
Workloads which are created which specify the kata-fc RuntimeClass handler will take the memory and
cpu overheads into account for resource quota calculations, node scheduling, as well as Pod cgroup sizing.
Consider running the given example workload, test-pod:
apiVersion: v1
kind: Pod
metadata:
name: test-pod
spec:
runtimeClassName: kata-fc
containers:
- name: busybox-ctr
image: busybox:1.28
stdin: true
tty: true
resources:
limits:
cpu: 500m
memory: 100Mi
- name: nginx-ctr
image: nginx
resources:
limits:
cpu: 1500m
memory: 100Mi
Note:
If onlylimits are specified in the pod definition, kubelet will deduce requests from those limits and set them to be the same as the defined limits.At admission time the RuntimeClass admission controller
updates the workload's PodSpec to include the overhead as described in the RuntimeClass. If the PodSpec already has this field defined,
the Pod will be rejected. In the given example, since only the RuntimeClass name is specified, the admission controller mutates the Pod
to include an overhead.
After the RuntimeClass admission controller has made modifications, you can check the updated Pod overhead value:
kubectl get pod test-pod -o jsonpath='{.spec.overhead}'
The output is:
map[cpu:250m memory:120Mi]
If a ResourceQuota is defined, the sum of container requests as well as the
overhead field are counted.
When the kube-scheduler is deciding which node should run a new Pod, the scheduler considers that Pod's
overhead as well as the sum of container requests for that Pod. For this example, the scheduler adds the
requests and the overhead, then looks for a node that has 2.25 CPU and 320 MiB of memory available.
Once a Pod is scheduled to a node, the kubelet on that node creates a new cgroup for the Pod. It is within this pod that the underlying container runtime will create containers.
If the resource has a limit defined for each container (Guaranteed QoS or Burstable QoS with limits defined),
the kubelet will set an upper limit for the pod cgroup associated with that resource (cpu.cfs_quota_us for CPU
and memory.limit_in_bytes memory). This upper limit is based on the sum of the container limits plus the overhead
defined in the PodSpec.
For CPU, if the Pod is Guaranteed or Burstable QoS, the kubelet will set cpu.shares based on the
sum of container requests plus the overhead defined in the PodSpec.
Looking at our example, verify the container requests for the workload:
kubectl get pod test-pod -o jsonpath='{.spec.containers[*].resources.limits}'
The total container requests are 2000m CPU and 200MiB of memory:
map[cpu: 500m memory:100Mi] map[cpu:1500m memory:100Mi]
Check this against what is observed by the node:
kubectl describe node | grep test-pod -B2
The output shows requests for 2250m CPU, and for 320MiB of memory. The requests include Pod overhead:
Namespace Name CPU Requests CPU Limits Memory Requests Memory Limits AGE
--------- ---- ------------ ---------- --------------- ------------- ---
default test-pod 2250m (56%) 2250m (56%) 320Mi (1%) 320Mi (1%) 36m
Verify Pod cgroup limits
Check the Pod's memory cgroups on the node where the workload is running. In the following example,
crictl
is used on the node, which provides a CLI for CRI-compatible container runtimes. This is an
advanced example to show Pod overhead behavior, and it is not expected that users should need to check
cgroups directly on the node.
First, on the particular node, determine the Pod identifier:
# Run this on the node where the Pod is scheduled
POD_ID="$(sudo crictl pods --name test-pod -q)"
From this, you can determine the cgroup path for the Pod:
# Run this on the node where the Pod is scheduled
sudo crictl inspectp -o=json $POD_ID | grep cgroupsPath
The resulting cgroup path includes the Pod's pause container. The Pod level cgroup is one directory above.
"cgroupsPath": "/kubepods/podd7f4b509-cf94-4951-9417-d1087c92a5b2/7ccf55aee35dd16aca4189c952d83487297f3cd760f1bbf09620e206e7d0c27a"
In this specific case, the pod cgroup path is kubepods/podd7f4b509-cf94-4951-9417-d1087c92a5b2.
Verify the Pod level cgroup setting for memory:
# Run this on the node where the Pod is scheduled.
# Also, change the name of the cgroup to match the cgroup allocated for your pod.
cat /sys/fs/cgroup/memory/kubepods/podd7f4b509-cf94-4951-9417-d1087c92a5b2/memory.limit_in_bytes
This is 320 MiB, as expected:
335544320
Observability
Some kube_pod_overhead_* metrics are available in kube-state-metrics
to help identify when Pod overhead is being utilized and to help observe stability of workloads
running with a defined overhead.
What's next
- Learn more about RuntimeClass
- Read the PodOverhead Design enhancement proposal for extra context
10.5 - Pod Scheduling Readiness
FEATURE STATE:
Kubernetes v1.30 [stable]Pods were considered ready for scheduling once created. Kubernetes scheduler does its due diligence to find nodes to place all pending Pods. However, in a real-world case, some Pods may stay in a "miss-essential-resources" state for a long period. These Pods actually churn the scheduler (and downstream integrators like Cluster AutoScaler) in an unnecessary manner.
By specifying/removing a Pod's .spec.schedulingGates, you can control when a Pod is ready
to be considered for scheduling.
Configuring Pod schedulingGates
The schedulingGates field contains a list of strings, and each string literal is perceived as a
criteria that Pod should be satisfied before considered schedulable. This field can be initialized
only when a Pod is created (either by the client, or mutated during admission). After creation,
each schedulingGate can be removed in arbitrary order, but addition of a new scheduling gate is disallowed.

Figure. Pod SchedulingGates
Usage example
To mark a Pod not-ready for scheduling, you can create it with one or more scheduling gates like this:
apiVersion: v1
kind: Pod
metadata:
name: test-pod
spec:
schedulingGates:
- name: example.com/foo
- name: example.com/bar
containers:
- name: pause
image: registry.k8s.io/pause:3.6
After the Pod's creation, you can check its state using:
kubectl get pod test-pod
The output reveals it's in SchedulingGated state:
NAME READY STATUS RESTARTS AGE
test-pod 0/1 SchedulingGated 0 7s
You can also check its schedulingGates field by running:
kubectl get pod test-pod -o jsonpath='{.spec.schedulingGates}'
The output is:
[{"name":"example.com/foo"},{"name":"example.com/bar"}]
To inform scheduler this Pod is ready for scheduling, you can remove its schedulingGates entirely
by reapplying a modified manifest:
apiVersion: v1
kind: Pod
metadata:
name: test-pod
spec:
containers:
- name: pause
image: registry.k8s.io/pause:3.6
You can check if the schedulingGates is cleared by running:
kubectl get pod test-pod -o jsonpath='{.spec.schedulingGates}'
The output is expected to be empty. And you can check its latest status by running:
kubectl get pod test-pod -o wide
Given the test-pod doesn't request any CPU/memory resources, it's expected that this Pod's state get
transited from previous SchedulingGated to Running:
NAME READY STATUS RESTARTS AGE IP NODE
test-pod 1/1 Running 0 15s 10.0.0.4 node-2
Observability
The metric scheduler_pending_pods comes with a new label "gated" to distinguish whether a Pod
has been tried scheduling but claimed as unschedulable, or explicitly marked as not ready for
scheduling. You can use scheduler_pending_pods{queue="gated"} to check the metric result.
Mutable Pod scheduling directives
You can mutate scheduling directives of Pods while they have scheduling gates, with certain constraints. At a high level, you can only tighten the scheduling directives of a Pod. In other words, the updated directives would cause the Pods to only be able to be scheduled on a subset of the nodes that it would previously match. More concretely, the rules for updating a Pod's scheduling directives are as follows:
For
.spec.nodeSelector, only additions are allowed. If absent, it will be allowed to be set.For
spec.affinity.nodeAffinity, if nil, then setting anything is allowed.If
NodeSelectorTermswas empty, it will be allowed to be set. If not empty, then only additions ofNodeSelectorRequirementstomatchExpressionsorfieldExpressionsare allowed, and no changes to existingmatchExpressionsandfieldExpressionswill be allowed. This is because the terms in.requiredDuringSchedulingIgnoredDuringExecution.NodeSelectorTerms, are ORed while the expressions innodeSelectorTerms[].matchExpressionsandnodeSelectorTerms[].fieldExpressionsare ANDed.For
.preferredDuringSchedulingIgnoredDuringExecution, all updates are allowed. This is because preferred terms are not authoritative, and so policy controllers don't validate those terms.
What's next
- Read the PodSchedulingReadiness KEP for more details
10.6 - Pod Topology Spread Constraints
You can use topology spread constraints to control how Pods are spread across your cluster among failure-domains such as regions, zones, nodes, and other user-defined topology domains. This can help to achieve high availability as well as efficient resource utilization.
You can set cluster-level constraints as a default, or configure topology spread constraints for individual workloads.
Motivation
Imagine that you have a cluster of up to twenty nodes, and you want to run a workload that automatically scales how many replicas it uses. There could be as few as two Pods or as many as fifteen. When there are only two Pods, you'd prefer not to have both of those Pods run on the same node: you would run the risk that a single node failure takes your workload offline.
In addition to this basic usage, there are some advanced usage examples that enable your workloads to benefit on high availability and cluster utilization.
As you scale up and run more Pods, a different concern becomes important. Imagine that you have three nodes running five Pods each. The nodes have enough capacity to run that many replicas; however, the clients that interact with this workload are split across three different datacenters (or infrastructure zones). Now you have less concern about a single node failure, but you notice that latency is higher than you'd like, and you are paying for network costs associated with sending network traffic between the different zones.
You decide that under normal operation you'd prefer to have a similar number of replicas scheduled into each infrastructure zone, and you'd like the cluster to self-heal in the case that there is a problem.
Pod topology spread constraints offer you a declarative way to configure that.
topologySpreadConstraints field
The Pod API includes a field, spec.topologySpreadConstraints. The usage of this field looks like
the following:
---
apiVersion: v1
kind: Pod
metadata:
name: example-pod
spec:
# Configure a topology spread constraint
topologySpreadConstraints:
- maxSkew: <integer>
minDomains: <integer> # optional
topologyKey: <string>
whenUnsatisfiable: <string>
labelSelector: <object>
matchLabelKeys: <list> # optional; beta since v1.27
nodeAffinityPolicy: [Honor|Ignore] # optional; beta since v1.26
nodeTaintsPolicy: [Honor|Ignore] # optional; beta since v1.26
### other Pod fields go here
Note:
There can only be onetopologySpreadConstraint for a given topologyKey and whenUnsatisfiable value. For example, if you have defined a topologySpreadConstraint that uses the topologyKey "kubernetes.io/hostname" and whenUnsatisfiable value "DoNotSchedule", you can only add another topologySpreadConstraint for the topologyKey "kubernetes.io/hostname" if you use a different whenUnsatisfiable value.You can read more about this field by running kubectl explain Pod.spec.topologySpreadConstraints or
refer to the scheduling section of the API reference for Pod.
Spread constraint definition
You can define one or multiple topologySpreadConstraints entries to instruct the
kube-scheduler how to place each incoming Pod in relation to the existing Pods across
your cluster. Those fields are:
maxSkew describes the degree to which Pods may be unevenly distributed. You must specify this field and the number must be greater than zero. Its semantics differ according to the value of
whenUnsatisfiable:- if you select
whenUnsatisfiable: DoNotSchedule, thenmaxSkewdefines the maximum permitted difference between the number of matching pods in the target topology and the global minimum (the minimum number of matching pods in an eligible domain or zero if the number of eligible domains is less than MinDomains). For example, if you have 3 zones with 2, 2 and 1 matching pods respectively,MaxSkewis set to 1 then the global minimum is 1. - if you select
whenUnsatisfiable: ScheduleAnyway, the scheduler gives higher precedence to topologies that would help reduce the skew.
- if you select
minDomains indicates a minimum number of eligible domains. This field is optional. A domain is a particular instance of a topology. An eligible domain is a domain whose nodes match the node selector.
Note:
Before Kubernetes v1.30, theminDomainsfield was only available if theMinDomainsInPodTopologySpreadfeature gate was enabled (default since v1.28). In older Kubernetes clusters it might be explicitly disabled or the field might not be available.- The value of
minDomainsmust be greater than 0, when specified. You can only specifyminDomainsin conjunction withwhenUnsatisfiable: DoNotSchedule. - When the number of eligible domains with match topology keys is less than
minDomains, Pod topology spread treats global minimum as 0, and then the calculation ofskewis performed. The global minimum is the minimum number of matching Pods in an eligible domain, or zero if the number of eligible domains is less thanminDomains. - When the number of eligible domains with matching topology keys equals or is greater than
minDomains, this value has no effect on scheduling. - If you do not specify
minDomains, the constraint behaves as ifminDomainsis 1.
- The value of
topologyKey is the key of node labels. Nodes that have a label with this key and identical values are considered to be in the same topology. We call each instance of a topology (in other words, a <key, value> pair) a domain. The scheduler will try to put a balanced number of pods into each domain. Also, we define an eligible domain as a domain whose nodes meet the requirements of nodeAffinityPolicy and nodeTaintsPolicy.
whenUnsatisfiable indicates how to deal with a Pod if it doesn't satisfy the spread constraint:
DoNotSchedule(default) tells the scheduler not to schedule it.ScheduleAnywaytells the scheduler to still schedule it while prioritizing nodes that minimize the skew.
labelSelector is used to find matching Pods. Pods that match this label selector are counted to determine the number of Pods in their corresponding topology domain. See Label Selectors for more details.
matchLabelKeys is a list of pod label keys to select the group of pods over which the spreading skew will be calculated. At a pod creation, the kube-apiserver uses those keys to lookup values from the incoming pod labels, and those key-value labels will be merged with any existing
labelSelector. The same key is forbidden to exist in bothmatchLabelKeysandlabelSelector.matchLabelKeyscannot be set whenlabelSelectorisn't set. Keys that don't exist in the pod labels will be ignored. A null or empty list means only match against thelabelSelector.Caution:
It's not recommended to usematchLabelKeyswith labels that might be updated directly on pods. Even if you edit the pod's label that is specified atmatchLabelKeysdirectly, (that is, you edit the Pod and not a Deployment), kube-apiserver doesn't reflect the label update onto the mergedlabelSelector.With
matchLabelKeys, you don't need to update thepod.specbetween different revisions. The controller/operator just needs to set different values to the same label key for different revisions. For example, if you are configuring a Deployment, you can use the label keyed with pod-template-hash, which is added automatically by the Deployment controller, to distinguish between different revisions in a single Deployment.topologySpreadConstraints: - maxSkew: 1 topologyKey: kubernetes.io/hostname whenUnsatisfiable: DoNotSchedule labelSelector: matchLabels: app: foo matchLabelKeys: - pod-template-hashNote:
The
matchLabelKeysfield is a beta-level field and enabled by default in 1.27. You can disable it by disabling theMatchLabelKeysInPodTopologySpreadfeature gate.Before v1.34,
matchLabelKeyswas handled implicitly. Since v1.34, key-value labels corresponding tomatchLabelKeysare explicitly merged intolabelSelector. You can disable it and revert to the previous behavior by disabling theMatchLabelKeysInPodTopologySpreadSelectorMergefeature gate of kube-apiserver.nodeAffinityPolicy indicates how we will treat Pod's nodeAffinity/nodeSelector when calculating pod topology spread skew. Options are:
- Honor: only nodes matching nodeAffinity/nodeSelector are included in the calculations.
- Ignore: nodeAffinity/nodeSelector are ignored. All nodes are included in the calculations.
If this value is null, the behavior is equivalent to the Honor policy.
Note:
ThenodeAffinityPolicybecame beta in 1.26 and graduated to GA in 1.33. It's enabled by default in beta, you can disable it by disabling theNodeInclusionPolicyInPodTopologySpreadfeature gate.nodeTaintsPolicy indicates how we will treat node taints when calculating pod topology spread skew. Options are:
- Honor: nodes without taints, along with tainted nodes for which the incoming pod has a toleration, are included.
- Ignore: node taints are ignored. All nodes are included.
If this value is null, the behavior is equivalent to the Ignore policy.
Note:
ThenodeTaintsPolicybecame beta in 1.26 and graduated to GA in 1.33. It's enabled by default in beta, you can disable it by disabling theNodeInclusionPolicyInPodTopologySpreadfeature gate.
When a Pod defines more than one topologySpreadConstraint, those constraints are
combined using a logical AND operation: the kube-scheduler looks for a node for the incoming Pod
that satisfies all the configured constraints.
Node labels
Topology spread constraints rely on node labels to identify the topology domain(s) that each node is in. For example, a node might have labels:
region: us-east-1
zone: us-east-1a
Note:
For brevity, this example doesn't use the
well-known label keys
topology.kubernetes.io/zone and topology.kubernetes.io/region. However,
those registered label keys are nonetheless recommended rather than the private
(unqualified) label keys region and zone that are used here.
You can't make a reliable assumption about the meaning of a private label key between different contexts.
Suppose you have a 4-node cluster with the following labels:
NAME STATUS ROLES AGE VERSION LABELS
node1 Ready <none> 4m26s v1.16.0 node=node1,zone=zoneA
node2 Ready <none> 3m58s v1.16.0 node=node2,zone=zoneA
node3 Ready <none> 3m17s v1.16.0 node=node3,zone=zoneB
node4 Ready <none> 2m43s v1.16.0 node=node4,zone=zoneB
Then the cluster is logically viewed as below:
graph TB
subgraph "zoneB"
n3(Node3)
n4(Node4)
end
subgraph "zoneA"
n1(Node1)
n2(Node2)
end
classDef plain fill:#ddd,stroke:#fff,stroke-width:4px,color:#000;
classDef k8s fill:#326ce5,stroke:#fff,stroke-width:4px,color:#fff;
classDef cluster fill:#fff,stroke:#bbb,stroke-width:2px,color:#326ce5;
class n1,n2,n3,n4 k8s;
class zoneA,zoneB cluster;
Consistency
You should set the same Pod topology spread constraints on all pods in a group.
Usually, if you are using a workload controller such as a Deployment, the pod template takes care of this for you. If you mix different spread constraints then Kubernetes follows the API definition of the field; however, the behavior is more likely to become confusing and troubleshooting is less straightforward.
You need a mechanism to ensure that all the nodes in a topology domain (such as a
cloud provider region) are labeled consistently.
To avoid you needing to manually label nodes, most clusters automatically
populate well-known labels such as kubernetes.io/hostname. Check whether
your cluster supports this.
Topology spread constraint examples
Example: one topology spread constraint
Suppose you have a 4-node cluster where 3 Pods labeled foo: bar are located in
node1, node2 and node3 respectively:
graph BT
subgraph "zoneB"
p3(Pod) --> n3(Node3)
n4(Node4)
end
subgraph "zoneA"
p1(Pod) --> n1(Node1)
p2(Pod) --> n2(Node2)
end
classDef plain fill:#ddd,stroke:#fff,stroke-width:4px,color:#000;
classDef k8s fill:#326ce5,stroke:#fff,stroke-width:4px,color:#fff;
classDef cluster fill:#fff,stroke:#bbb,stroke-width:2px,color:#326ce5;
class n1,n2,n3,n4,p1,p2,p3 k8s;
class zoneA,zoneB cluster;
If you want an incoming Pod to be evenly spread with existing Pods across zones, you can use a manifest similar to:
kind: Pod
apiVersion: v1
metadata:
name: mypod
labels:
foo: bar
spec:
topologySpreadConstraints:
- maxSkew: 1
topologyKey: zone
whenUnsatisfiable: DoNotSchedule
labelSelector:
matchLabels:
foo: bar
containers:
- name: pause
image: registry.k8s.io/pause:3.1From that manifest, topologyKey: zone implies the even distribution will only be applied
to nodes that are labeled zone: <any value> (nodes that don't have a zone label
are skipped). The field whenUnsatisfiable: DoNotSchedule tells the scheduler to let the
incoming Pod stay pending if the scheduler can't find a way to satisfy the constraint.
If the scheduler placed this incoming Pod into zone A, the distribution of Pods would
become [3, 1]. That means the actual skew is then 2 (calculated as 3 - 1), which
violates maxSkew: 1. To satisfy the constraints and context for this example, the
incoming Pod can only be placed onto a node in zone B:
graph BT
subgraph "zoneB"
p3(Pod) --> n3(Node3)
p4(mypod) --> n4(Node4)
end
subgraph "zoneA"
p1(Pod) --> n1(Node1)
p2(Pod) --> n2(Node2)
end
classDef plain fill:#ddd,stroke:#fff,stroke-width:4px,color:#000;
classDef k8s fill:#326ce5,stroke:#fff,stroke-width:4px,color:#fff;
classDef cluster fill:#fff,stroke:#bbb,stroke-width:2px,color:#326ce5;
class n1,n2,n3,n4,p1,p2,p3 k8s;
class p4 plain;
class zoneA,zoneB cluster;
OR
graph BT
subgraph "zoneB"
p3(Pod) --> n3(Node3)
p4(mypod) --> n3
n4(Node4)
end
subgraph "zoneA"
p1(Pod) --> n1(Node1)
p2(Pod) --> n2(Node2)
end
classDef plain fill:#ddd,stroke:#fff,stroke-width:4px,color:#000;
classDef k8s fill:#326ce5,stroke:#fff,stroke-width:4px,color:#fff;
classDef cluster fill:#fff,stroke:#bbb,stroke-width:2px,color:#326ce5;
class n1,n2,n3,n4,p1,p2,p3 k8s;
class p4 plain;
class zoneA,zoneB cluster;
You can tweak the Pod spec to meet various kinds of requirements:
- Change
maxSkewto a bigger value - such as2- so that the incoming Pod can be placed into zoneAas well. - Change
topologyKeytonodeso as to distribute the Pods evenly across nodes instead of zones. In the above example, ifmaxSkewremains1, the incoming Pod can only be placed onto the nodenode4. - Change
whenUnsatisfiable: DoNotScheduletowhenUnsatisfiable: ScheduleAnywayto ensure the incoming Pod to be always schedulable (suppose other scheduling APIs are satisfied). However, it's preferred to be placed into the topology domain which has fewer matching Pods. (Be aware that this preference is jointly normalized with other internal scheduling priorities such as resource usage ratio).
Example: multiple topology spread constraints
This builds upon the previous example. Suppose you have a 4-node cluster where 3
existing Pods labeled foo: bar are located on node1, node2 and node3 respectively:
graph BT
subgraph "zoneB"
p3(Pod) --> n3(Node3)
n4(Node4)
end
subgraph "zoneA"
p1(Pod) --> n1(Node1)
p2(Pod) --> n2(Node2)
end
classDef plain fill:#ddd,stroke:#fff,stroke-width:4px,color:#000;
classDef k8s fill:#326ce5,stroke:#fff,stroke-width:4px,color:#fff;
classDef cluster fill:#fff,stroke:#bbb,stroke-width:2px,color:#326ce5;
class n1,n2,n3,n4,p1,p2,p3 k8s;
class p4 plain;
class zoneA,zoneB cluster;
You can combine two topology spread constraints to control the spread of Pods both by node and by zone:
kind: Pod
apiVersion: v1
metadata:
name: mypod
labels:
foo: bar
spec:
topologySpreadConstraints:
- maxSkew: 1
topologyKey: zone
whenUnsatisfiable: DoNotSchedule
labelSelector:
matchLabels:
foo: bar
- maxSkew: 1
topologyKey: node
whenUnsatisfiable: DoNotSchedule
labelSelector:
matchLabels:
foo: bar
containers:
- name: pause
image: registry.k8s.io/pause:3.1In this case, to match the first constraint, the incoming Pod can only be placed onto
nodes in zone B; while in terms of the second constraint, the incoming Pod can only be
scheduled to the node node4. The scheduler only considers options that satisfy all
defined constraints, so the only valid placement is onto node node4.
Example: conflicting topology spread constraints
Multiple constraints can lead to conflicts. Suppose you have a 3-node cluster across 2 zones:
graph BT
subgraph "zoneB"
p4(Pod) --> n3(Node3)
p5(Pod) --> n3
end
subgraph "zoneA"
p1(Pod) --> n1(Node1)
p2(Pod) --> n1
p3(Pod) --> n2(Node2)
end
classDef plain fill:#ddd,stroke:#fff,stroke-width:4px,color:#000;
classDef k8s fill:#326ce5,stroke:#fff,stroke-width:4px,color:#fff;
classDef cluster fill:#fff,stroke:#bbb,stroke-width:2px,color:#326ce5;
class n1,n2,n3,n4,p1,p2,p3,p4,p5 k8s;
class zoneA,zoneB cluster;
If you were to apply
two-constraints.yaml
(the manifest from the previous example)
to this cluster, you would see that the Pod mypod stays in the Pending state.
This happens because: to satisfy the first constraint, the Pod mypod can only
be placed into zone B; while in terms of the second constraint, the Pod mypod
can only schedule to node node2. The intersection of the two constraints returns
an empty set, and the scheduler cannot place the Pod.
To overcome this situation, you can either increase the value of maxSkew or modify
one of the constraints to use whenUnsatisfiable: ScheduleAnyway. Depending on
circumstances, you might also decide to delete an existing Pod manually - for example,
if you are troubleshooting why a bug-fix rollout is not making progress.
Interaction with node affinity and node selectors
The scheduler will skip the non-matching nodes from the skew calculations if the
incoming Pod has spec.nodeSelector or spec.affinity.nodeAffinity defined.
Example: topology spread constraints with node affinity
Suppose you have a 5-node cluster ranging across zones A to C:
graph BT
subgraph "zoneB"
p3(Pod) --> n3(Node3)
n4(Node4)
end
subgraph "zoneA"
p1(Pod) --> n1(Node1)
p2(Pod) --> n2(Node2)
end
classDef plain fill:#ddd,stroke:#fff,stroke-width:4px,color:#000;
classDef k8s fill:#326ce5,stroke:#fff,stroke-width:4px,color:#fff;
classDef cluster fill:#fff,stroke:#bbb,stroke-width:2px,color:#326ce5;
class n1,n2,n3,n4,p1,p2,p3 k8s;
class p4 plain;
class zoneA,zoneB cluster;
graph BT
subgraph "zoneC"
n5(Node5)
end
classDef plain fill:#ddd,stroke:#fff,stroke-width:4px,color:#000;
classDef k8s fill:#326ce5,stroke:#fff,stroke-width:4px,color:#fff;
classDef cluster fill:#fff,stroke:#bbb,stroke-width:2px,color:#326ce5;
class n5 k8s;
class zoneC cluster;
and you know that zone C must be excluded. In this case, you can compose a manifest
as below, so that Pod mypod will be placed into zone B instead of zone C.
Similarly, Kubernetes also respects spec.nodeSelector.
kind: Pod
apiVersion: v1
metadata:
name: mypod
labels:
foo: bar
spec:
topologySpreadConstraints:
- maxSkew: 1
topologyKey: zone
whenUnsatisfiable: DoNotSchedule
labelSelector:
matchLabels:
foo: bar
affinity:
nodeAffinity:
requiredDuringSchedulingIgnoredDuringExecution:
nodeSelectorTerms:
- matchExpressions:
- key: zone
operator: NotIn
values:
- zoneC
containers:
- name: pause
image: registry.k8s.io/pause:3.1Implicit conventions
There are some implicit conventions worth noting here:
Only the Pods holding the same namespace as the incoming Pod can be matching candidates.
The scheduler only considers nodes that have all
topologySpreadConstraints[*].topologyKeypresent at the same time. Nodes missing any of thesetopologyKeysare bypassed. This implies that:- any Pods located on those bypassed nodes do not impact
maxSkewcalculation - in the above example, suppose the nodenode1does not have a label "zone", then the 2 Pods will be disregarded, hence the incoming Pod will be scheduled into zoneA. - the incoming Pod has no chances to be scheduled onto this kind of nodes -
in the above example, suppose a node
node5has the mistyped labelzone-typo: zoneC(and nozonelabel set). After nodenode5joins the cluster, it will be bypassed and Pods for this workload aren't scheduled there.
- any Pods located on those bypassed nodes do not impact
Be aware of what will happen if the incoming Pod's
topologySpreadConstraints[*].labelSelectordoesn't match its own labels. In the above example, if you remove the incoming Pod's labels, it can still be placed onto nodes in zoneB, since the constraints are still satisfied. However, after that placement, the degree of imbalance of the cluster remains unchanged - it's still zoneAhaving 2 Pods labeled asfoo: bar, and zoneBhaving 1 Pod labeled asfoo: bar. If this is not what you expect, update the workload'stopologySpreadConstraints[*].labelSelectorto match the labels in the pod template.
Cluster-level default constraints
It is possible to set default topology spread constraints for a cluster. Default topology spread constraints are applied to a Pod if, and only if:
- It doesn't define any constraints in its
.spec.topologySpreadConstraints. - It belongs to a Service, ReplicaSet, StatefulSet or ReplicationController.
Default constraints can be set as part of the PodTopologySpread plugin
arguments in a scheduling profile.
The constraints are specified with the same API above, except that
labelSelector must be empty. The selectors are calculated from the Services,
ReplicaSets, StatefulSets or ReplicationControllers that the Pod belongs to.
An example configuration might look like follows:
apiVersion: kubescheduler.config.k8s.io/v1
kind: KubeSchedulerConfiguration
profiles:
- schedulerName: default-scheduler
pluginConfig:
- name: PodTopologySpread
args:
defaultConstraints:
- maxSkew: 1
topologyKey: topology.kubernetes.io/zone
whenUnsatisfiable: ScheduleAnyway
defaultingType: List
Built-in default constraints
FEATURE STATE:
Kubernetes v1.24 [stable]If you don't configure any cluster-level default constraints for pod topology spreading, then kube-scheduler acts as if you specified the following default topology constraints:
defaultConstraints:
- maxSkew: 3
topologyKey: "kubernetes.io/hostname"
whenUnsatisfiable: ScheduleAnyway
- maxSkew: 5
topologyKey: "topology.kubernetes.io/zone"
whenUnsatisfiable: ScheduleAnyway
Also, the legacy SelectorSpread plugin, which provides an equivalent behavior,
is disabled by default.
Note:
The PodTopologySpread plugin does not score the nodes that don't have
the topology keys specified in the spreading constraints. This might result
in a different default behavior compared to the legacy SelectorSpread plugin when
using the default topology constraints.
If your nodes are not expected to have both kubernetes.io/hostname and
topology.kubernetes.io/zone labels set, define your own constraints
instead of using the Kubernetes defaults.
If you don't want to use the default Pod spreading constraints for your cluster,
you can disable those defaults by setting defaultingType to List and leaving
empty defaultConstraints in the PodTopologySpread plugin configuration:
apiVersion: kubescheduler.config.k8s.io/v1
kind: KubeSchedulerConfiguration
profiles:
- schedulerName: default-scheduler
pluginConfig:
- name: PodTopologySpread
args:
defaultConstraints: []
defaultingType: List
Comparison with podAffinity and podAntiAffinity
In Kubernetes, inter-Pod affinity and anti-affinity control how Pods are scheduled in relation to one another - either more packed or more scattered.
podAffinity- attracts Pods; you can try to pack any number of Pods into qualifying topology domain(s).
podAntiAffinity- repels Pods. If you set this to
requiredDuringSchedulingIgnoredDuringExecutionmode then only a single Pod can be scheduled into a single topology domain; if you choosepreferredDuringSchedulingIgnoredDuringExecutionthen you lose the ability to enforce the constraint.
For finer control, you can specify topology spread constraints to distribute Pods across different topology domains - to achieve either high availability or cost-saving. This can also help on rolling update workloads and scaling out replicas smoothly.
For more context, see the Motivation section of the enhancement proposal about Pod topology spread constraints.
Known limitations
There's no guarantee that the constraints remain satisfied when Pods are removed. For example, scaling down a Deployment may result in imbalanced Pods distribution.
You can use a tool such as the Descheduler to rebalance the Pods distribution.
Pods matched on tainted nodes are respected. See Issue 80921.
The scheduler doesn't have prior knowledge of all the zones or other topology domains that a cluster has. They are determined from the existing nodes in the cluster. This could lead to a problem in autoscaled clusters, when a node pool (or node group) is scaled to zero nodes, and you're expecting the cluster to scale up, because, in this case, those topology domains won't be considered until there is at least one node in them.
You can work around this by using a Node autoscaler that is aware of Pod topology spread constraints and is also aware of the overall set of topology domains.
Pods that don't match their own labelSelector create "ghost pods". If a pod's labels don't match the
labelSelectorin its topology spread constraint, the pod won't count itself in spread calculations. This means:- Multiple such pods can just accumulate on the same topology (until matching pods are newly created/deleted) because those pod's schedule don't change a spreading calculation result.
- The spreading constraint works in an unintended way, most likely not matching your expectations
Ensure your pod's labels match the
labelSelectorin your spread constraints. Typically, a pod should match its own topology spread constraint selector.
What's next
- The blog article Introducing PodTopologySpread
explains
maxSkewin some detail, as well as covering some advanced usage examples. - Read the scheduling section of the API reference for Pod.
10.7 - Taints and Tolerations
Node affinity is a property of Pods that attracts them to a set of nodes (either as a preference or a hard requirement). Taints are the opposite -- they allow a node to repel a set of pods.
Tolerations are applied to pods. Tolerations allow the scheduler to schedule pods with matching taints. Tolerations allow scheduling but don't guarantee scheduling: the scheduler also evaluates other parameters as part of its function.
Taints and tolerations work together to ensure that pods are not scheduled onto inappropriate nodes. One or more taints are applied to a node; this marks that the node should not accept any pods that do not tolerate the taints.
Concepts
You add a taint to a node using kubectl taint. For example,
kubectl taint nodes node1 key1=value1:NoSchedule
places a taint on node node1. The taint has key key1, value value1, and taint effect NoSchedule.
This means that no pod will be able to schedule onto node1 unless it has a matching toleration.
To remove the taint added by the command above, you can run:
kubectl taint nodes node1 key1=value1:NoSchedule-
You specify a toleration for a pod in the PodSpec. Both of the following tolerations "match" the
taint created by the kubectl taint line above, and thus a pod with either toleration would be able
to schedule onto node1:
tolerations:
- key: "key1"
operator: "Equal"
value: "value1"
effect: "NoSchedule"
tolerations:
- key: "key1"
operator: "Exists"
effect: "NoSchedule"
The default Kubernetes scheduler takes taints and tolerations into account when
selecting a node to run a particular Pod. However, if you manually specify the
.spec.nodeName for a Pod, that action bypasses the scheduler; the Pod is then
bound onto the node where you assigned it, even if there are NoSchedule
taints on that node that you selected.
If this happens and the node also has a NoExecute taint set, the kubelet will
eject the Pod unless there is an appropriate tolerance set.
Here's an example of a pod that has some tolerations defined:
apiVersion: v1
kind: Pod
metadata:
name: nginx
labels:
env: test
spec:
containers:
- name: nginx
image: nginx
imagePullPolicy: IfNotPresent
tolerations:
- key: "example-key"
operator: "Exists"
effect: "NoSchedule"
The default value for operator is Equal.
A toleration "matches" a taint if the keys are the same and the effects are the same, and:
- the
operatorisExists(in which case novalueshould be specified), or - the
operatorisEqualand the values should be equal.
Note:
There are two special cases:
If the key is empty, then the operator must be Exists, which matches all keys and values.
Note that the effect still needs to be matched at the same time.
An empty effect matches all effects with key key1.
The above example used the effect of NoSchedule. Alternatively, you can use the effect of PreferNoSchedule.
The allowed values for the effect field are:
NoExecute- This affects pods that are already running on the node as follows:
- Pods that do not tolerate the taint are evicted immediately
- Pods that tolerate the taint without specifying
tolerationSecondsin their toleration specification remain bound forever - Pods that tolerate the taint with a specified
tolerationSecondsremain bound for the specified amount of time. After that time elapses, the node lifecycle controller evicts the Pods from the node.
NoSchedule- No new Pods will be scheduled on the tainted node unless they have a matching toleration. Pods currently running on the node are not evicted.
PreferNoSchedulePreferNoScheduleis a "preference" or "soft" version ofNoSchedule. The control plane will try to avoid placing a Pod that does not tolerate the taint on the node, but it is not guaranteed.
You can put multiple taints on the same node and multiple tolerations on the same pod. The way Kubernetes processes multiple taints and tolerations is like a filter: start with all of a node's taints, then ignore the ones for which the pod has a matching toleration; the remaining un-ignored taints have the indicated effects on the pod. In particular,
- if there is at least one un-ignored taint with effect
NoSchedulethen Kubernetes will not schedule the pod onto that node - if there is no un-ignored taint with effect
NoSchedulebut there is at least one un-ignored taint with effectPreferNoSchedulethen Kubernetes will try to not schedule the pod onto the node - if there is at least one un-ignored taint with effect
NoExecutethen the pod will be evicted from the node (if it is already running on the node), and will not be scheduled onto the node (if it is not yet running on the node).
For example, imagine you taint a node like this
kubectl taint nodes node1 key1=value1:NoSchedule
kubectl taint nodes node1 key1=value1:NoExecute
kubectl taint nodes node1 key2=value2:NoSchedule
And a pod has two tolerations:
tolerations:
- key: "key1"
operator: "Equal"
value: "value1"
effect: "NoSchedule"
- key: "key1"
operator: "Equal"
value: "value1"
effect: "NoExecute"
In this case, the pod will not be able to schedule onto the node, because there is no toleration matching the third taint. But it will be able to continue running if it is already running on the node when the taint is added, because the third taint is the only one of the three that is not tolerated by the pod.
Normally, if a taint with effect NoExecute is added to a node, then any pods that do
not tolerate the taint will be evicted immediately, and pods that do tolerate the
taint will never be evicted. However, a toleration with NoExecute effect can specify
an optional tolerationSeconds field that dictates how long the pod will stay bound
to the node after the taint is added. For example,
tolerations:
- key: "key1"
operator: "Equal"
value: "value1"
effect: "NoExecute"
tolerationSeconds: 3600
means that if this pod is running and a matching taint is added to the node, then the pod will stay bound to the node for 3600 seconds, and then be evicted. If the taint is removed before that time, the pod will not be evicted.
Numeric comparison operators
FEATURE STATE:
Kubernetes v1.35 [alpha](disabled by default)In addition to Equal and Exists, you can use numeric comparison operators
(Gt and Lt) to match taints with integer values. This is useful for threshold-based
scheduling, such as matching nodes by reliability level or SLA tier.
Gtmatches when the taint value is greater than the toleration value.Ltmatches when the taint value is less than the toleration value.
For numeric operators, both the toleration and taint values must be valid integers. If either value cannot be parsed as an integer, the toleration does not match.
Note:
When you create a Pod that usesGt or Lt tolerations operators, the API server validates that
the toleration values are valid integers. Taint values on nodes are not validated at node
registration time. If a node has a non-numeric taint value (for example,
servicelevel.organization.example/agreed-service-level=high:NoSchedule),
pods with numeric comparison operators will not match that taint and cannot schedule on that node.For example, if nodes are tainted with a value representing a service level agreement (SLA):
kubectl taint nodes node1 servicelevel.organization.example/agreed-service-level=950:NoSchedule
A pod can tolerate nodes with SLA greater than 900:
apiVersion: v1
kind: Pod
metadata:
name: nginx-numeric-toleration
labels:
env: test
spec:
containers:
- name: nginx
image: nginx
imagePullPolicy: IfNotPresent
tolerations:
- key: "servicelevel.organization.example/agreed-service-level"
operator: "Gt"
value: "900"
effect: "NoSchedule"
This toleration matches the taint on node1 because 950 > 900 (the taint value
is greater than the toleration value for the Gt operator).
Similarly, you can use the Lt operator to match taints where the taint value is
less than the toleration value:
tolerations:
- key: "servicelevel.organization.example/agreed-service-level"
operator: "Lt"
value: "1000"
effect: "NoSchedule"
Note:
When using numeric comparison operators:
- Both the toleration and taint values must be valid signed 64-bit integers (zero leading numbers (e.g., "0550") are not allowed).
- If a value cannot be parsed as an integer, the toleration does not match.
- Numeric operators work with all taint effects:
NoSchedule,PreferNoSchedule, andNoExecute. - For
PreferNoSchedulewith numeric operators: if a pod's toleration doesn't satisfy the numeric comparison (e.g., taint value < toleration value when usingGt), the scheduler gives the node a lower priority but may still schedule there if no better options exist.
Warning:
Before disabling the TaintTolerationComparisonOperators feature gate:
- You should identify all workloads using the
GtorLtoperators to avoid controller hot-loops. - Update all workload controller templates to use
EqualorExistsoperators instead - Delete any pending pods that use
GtorLtoperators - Monitor the
apiserver_request_totalmetric for spikes in validation errors
Example Use Cases
Taints and tolerations are a flexible way to steer pods away from nodes or evict pods that shouldn't be running. A few of the use cases are
Dedicated Nodes: If you want to dedicate a set of nodes for exclusive use by a particular set of users, you can add a taint to those nodes (say,
kubectl taint nodes nodename dedicated=groupName:NoSchedule) and then add a corresponding toleration to their pods (this would be done most easily by writing a custom admission controller). The pods with the tolerations will then be allowed to use the tainted (dedicated) nodes as well as any other nodes in the cluster. If you want to dedicate the nodes to them and ensure they only use the dedicated nodes, then you should additionally add a label similar to the taint to the same set of nodes (e.g.dedicated=groupName), and the admission controller should additionally add a node affinity to require that the pods can only schedule onto nodes labeled withdedicated=groupName.Nodes with Special Hardware: In a cluster where a small subset of nodes have specialized hardware (for example GPUs), it is desirable to keep pods that don't need the specialized hardware off of those nodes, thus leaving room for later-arriving pods that do need the specialized hardware. This can be done by tainting the nodes that have the specialized hardware (e.g.
kubectl taint nodes nodename special=true:NoScheduleorkubectl taint nodes nodename special=true:PreferNoSchedule) and adding a corresponding toleration to pods that use the special hardware. As in the dedicated nodes use case, it is probably easiest to apply the tolerations using a custom admission controller. For example, it is recommended to use Extended Resources to represent the special hardware, taint your special hardware nodes with the extended resource name and run the ExtendedResourceToleration admission controller. Now, because the nodes are tainted, no pods without the toleration will schedule on them. But when you submit a pod that requests the extended resource, theExtendedResourceTolerationadmission controller will automatically add the correct toleration to the pod and that pod will schedule on the special hardware nodes. This will make sure that these special hardware nodes are dedicated for pods requesting such hardware and you don't have to manually add tolerations to your pods.Taint based Evictions: A per-pod-configurable eviction behavior when there are node problems, which is described in the next section.
Taint based Evictions
FEATURE STATE:
Kubernetes v1.18 [stable]The node controller automatically taints a Node when certain conditions are true. The following taints are built in:
node.kubernetes.io/not-ready: Node is not ready. This corresponds to the NodeConditionReadybeing "False".node.kubernetes.io/unreachable: Node is unreachable from the node controller. This corresponds to the NodeConditionReadybeing "Unknown".node.kubernetes.io/memory-pressure: Node has memory pressure.node.kubernetes.io/disk-pressure: Node has disk pressure.node.kubernetes.io/pid-pressure: Node has PID pressure.node.kubernetes.io/network-unavailable: Node's network is unavailable.node.kubernetes.io/unschedulable: Node is unschedulable.node.cloudprovider.kubernetes.io/uninitialized: When the kubelet is started with an "external" cloud provider, this taint is set on a node to mark it as unusable. After a controller from the cloud-controller-manager initializes this node, the kubelet removes this taint.
In case a node is to be drained, the node controller or the kubelet adds relevant taints
with NoExecute effect. This effect is added by default for the
node.kubernetes.io/not-ready and node.kubernetes.io/unreachable taints.
If the fault condition returns to normal, the kubelet or node
controller can remove the relevant taint(s).
In some cases when the node is unreachable, the API server is unable to communicate with the kubelet on the node. The decision to delete the pods cannot be communicated to the kubelet until communication with the API server is re-established. In the meantime, the pods that are scheduled for deletion may continue to run on the partitioned node.
Note:
The control plane limits the rate of adding new taints to nodes. This rate limiting manages the number of evictions that are triggered when many nodes become unreachable at once (for example: if there is a network disruption).You can specify tolerationSeconds for a Pod to define how long that Pod stays bound
to a failing or unresponsive Node.
For example, you might want to keep an application with a lot of local state bound to node for a long time in the event of network partition, hoping that the partition will recover and thus the pod eviction can be avoided. The toleration you set for that Pod might look like:
tolerations:
- key: "node.kubernetes.io/unreachable"
operator: "Exists"
effect: "NoExecute"
tolerationSeconds: 6000
Note:
Kubernetes automatically adds a toleration for
node.kubernetes.io/not-ready and node.kubernetes.io/unreachable
with tolerationSeconds=300,
unless you, or a controller, set those tolerations explicitly.
These automatically-added tolerations mean that Pods remain bound to Nodes for 5 minutes after one of these problems is detected.
DaemonSet pods are created with
NoExecute tolerations for the following taints with no tolerationSeconds:
node.kubernetes.io/unreachablenode.kubernetes.io/not-ready
This ensures that DaemonSet pods are never evicted due to these problems.
Note:
The node controller was responsible for adding taints to nodes and evicting pods. But after 1.29, the taint-based eviction implementation has been moved out of node controller into a separate, and independent component called taint-eviction-controller. Users can optionally disable taint-based eviction by setting--controllers=-taint-eviction-controller in kube-controller-manager.Taint Nodes by Condition
The control plane, using the node controller,
automatically creates taints with a NoSchedule effect for
node conditions.
The scheduler checks taints, not node conditions, when it makes scheduling
decisions. This ensures that node conditions don't directly affect scheduling.
For example, if the DiskPressure node condition is active, the control plane
adds the node.kubernetes.io/disk-pressure taint and does not schedule new pods
onto the affected node. If the MemoryPressure node condition is active, the
control plane adds the node.kubernetes.io/memory-pressure taint.
You can ignore node conditions for newly created pods by adding the corresponding
Pod tolerations. The control plane also adds the node.kubernetes.io/memory-pressure
toleration on pods that have a QoS class
other than BestEffort. This is because Kubernetes treats pods in the Guaranteed
or Burstable QoS classes (even pods with no memory request set) as if they are
able to cope with memory pressure, while new BestEffort pods are not scheduled
onto the affected node.
The DaemonSet controller automatically adds the following NoSchedule
tolerations to all daemons, to prevent DaemonSets from breaking.
node.kubernetes.io/memory-pressurenode.kubernetes.io/disk-pressurenode.kubernetes.io/pid-pressure(1.14 or later)node.kubernetes.io/unschedulable(1.10 or later)node.kubernetes.io/network-unavailable(host network only)
Adding these tolerations ensures backward compatibility. You can also add arbitrary tolerations to DaemonSets.
Device taints and tolerations
Instead of tainting entire nodes, administrators can also taint individual devices when the cluster uses dynamic resource allocation to manage special hardware. The advantage is that tainting can be targeted towards exactly the hardware that is faulty or needs maintenance. Tolerations are also supported and can be specified when requesting devices. Like taints they apply to all pods which share the same allocated device.
What's next
- Read about Node-pressure Eviction and how you can configure it
- Read about Pod Priority
- Read about device taints and tolerations
10.8 - Scheduling Framework
FEATURE STATE:
Kubernetes v1.19 [stable]The scheduling framework is a pluggable architecture for the Kubernetes scheduler. It consists of a set of "plugin" APIs that are compiled directly into the scheduler. These APIs allow most scheduling features to be implemented as plugins, while keeping the scheduling "core" lightweight and maintainable. Refer to the design proposal of the scheduling framework for more technical information on the design of the framework.
Framework workflow
The Scheduling Framework defines a few extension points. Scheduler plugins register to be invoked at one or more extension points. Some of these plugins can change the scheduling decisions and some are informational only.
Each attempt to schedule one Pod is split into two phases, the scheduling cycle and the binding cycle.
Scheduling cycle & binding cycle
The scheduling cycle selects a node for the Pod, and the binding cycle applies that decision to the cluster. Together, a scheduling cycle and binding cycle are referred to as a "scheduling context".
Scheduling cycles are run serially, while binding cycles may run concurrently.
A scheduling or binding cycle can be aborted if the Pod is determined to be unschedulable or if there is an internal error. The Pod will be returned to the queue and retried.
Interfaces
The following picture shows the scheduling context of a Pod and the interfaces that the scheduling framework exposes.
One plugin may implement multiple interfaces to perform more complex or stateful tasks.
Some interfaces match the scheduler extension points which can be configured through Scheduler Configuration.
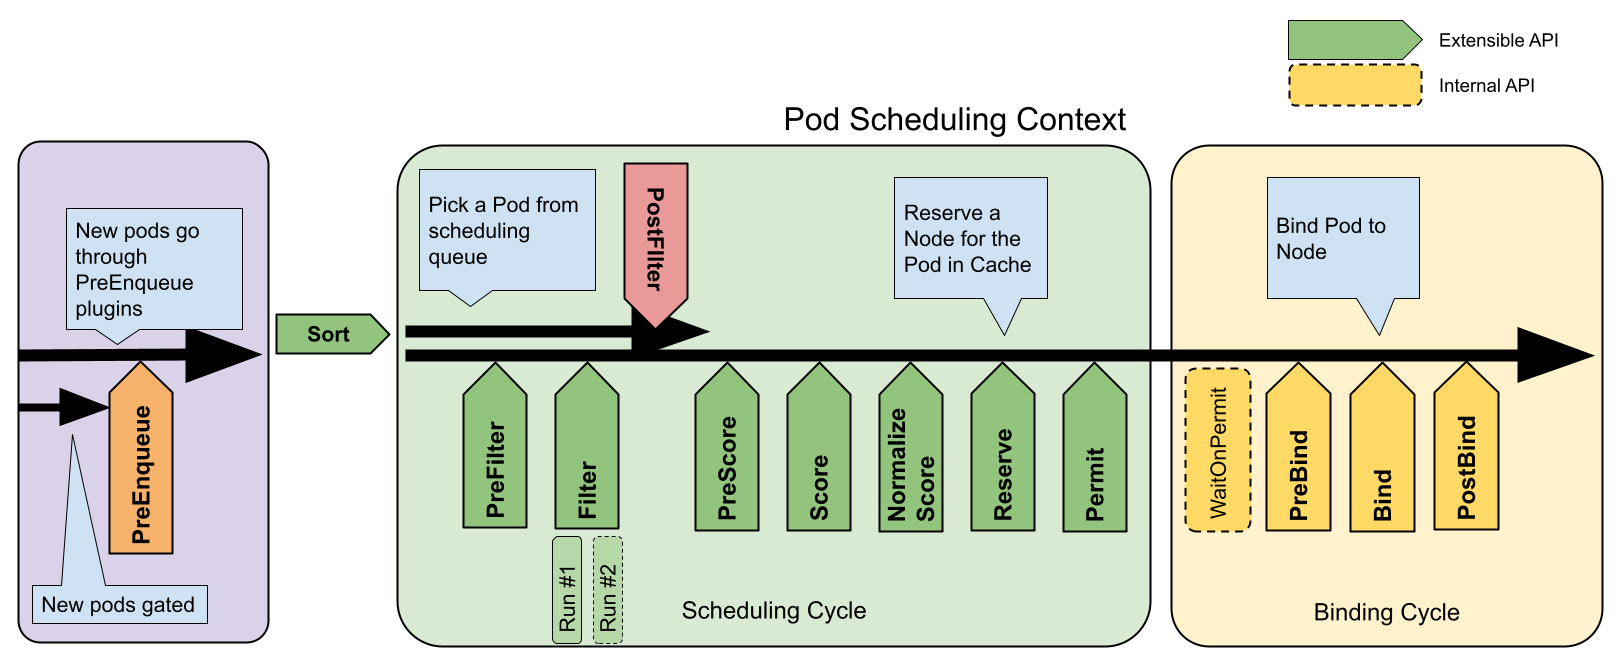
Scheduling framework extension points
PreEnqueue
These plugins are called prior to adding Pods to the internal active queue, where Pods are marked as ready for scheduling.
Only when all PreEnqueue plugins return Success, the Pod is allowed to enter the active queue.
Otherwise, it's placed in the internal unschedulable Pods list, and doesn't get an Unschedulable condition.
For more details about how internal scheduler queues work, read Scheduling queue in kube-scheduler.
EnqueueExtension
EnqueueExtension is the interface where the plugin can control whether to retry scheduling of Pods rejected by this plugin, based on changes in the cluster. Plugins that implement PreEnqueue, PreFilter, Filter, Reserve or Permit should implement this interface.
QueueingHint
FEATURE STATE:
Kubernetes v1.34 [stable](enabled by default)QueueingHint is a callback function for deciding whether a Pod can be requeued to the active queue or backoff queue. It's executed every time a certain kind of event or change happens in the cluster. When the QueueingHint finds that the event might make the Pod schedulable, the Pod is put into the active queue or the backoff queue so that the scheduler will retry the scheduling of the Pod.
QueueSort
These plugins are used to sort Pods in the scheduling queue. A queue sort plugin
essentially provides a Less(Pod1, Pod2) function. Only one queue sort
plugin may be enabled at a time.
PreFilter
These plugins are used to pre-process info about the Pod, or to check certain conditions that the cluster or the Pod must meet. If a PreFilter plugin returns an error, the scheduling cycle is aborted.
Filter
These plugins are used to filter out nodes that cannot run the Pod. For each node, the scheduler will call filter plugins in their configured order. If any filter plugin marks the node as infeasible, the remaining plugins will not be called for that node. Nodes may be evaluated concurrently.
PostFilter
These plugins are called after the Filter phase, but only when no feasible nodes
were found for the pod. Plugins are called in their configured order. If
any postFilter plugin marks the node as Schedulable, the remaining plugins
will not be called. A typical PostFilter implementation is preemption, which
tries to make the pod schedulable by preempting other Pods.
PreScore
These plugins are used to perform "pre-scoring" work, which generates a sharable state for Score plugins to use. If a PreScore plugin returns an error, the scheduling cycle is aborted.
Score
These plugins are used to rank nodes that have passed the filtering phase. The scheduler will call each scoring plugin for each node. There will be a well defined range of integers representing the minimum and maximum scores. After the NormalizeScore phase, the scheduler will combine node scores from all plugins according to the configured plugin weights.
Capacity scoring
FEATURE STATE:
Kubernetes v1.33 [alpha](disabled by default)The feature gate VolumeCapacityPriority was used in v1.32 to support storage that are
statically provisioned. Starting from v1.33, the new feature gate StorageCapacityScoring
replaces the old VolumeCapacityPriority gate with added support to dynamically provisioned storage.
When StorageCapacityScoring is enabled, the VolumeBinding plugin in the kube-scheduler is extended
to score Nodes based on the storage capacity on each of them.
This feature is applicable to CSI volumes that supported Storage Capacity,
including local storage backed by a CSI driver.
NormalizeScore
These plugins are used to modify scores before the scheduler computes a final ranking of Nodes. A plugin that registers for this extension point will be called with the Score results from the same plugin. This is called once per plugin per scheduling cycle.
For example, suppose a plugin BlinkingLightScorer ranks Nodes based on how
many blinking lights they have.
func ScoreNode(_ *v1.pod, n *v1.Node) (int, error) {
return getBlinkingLightCount(n)
}
However, the maximum count of blinking lights may be small compared to
NodeScoreMax. To fix this, BlinkingLightScorer should also register for this
extension point.
func NormalizeScores(scores map[string]int) {
highest := 0
for _, score := range scores {
highest = max(highest, score)
}
for node, score := range scores {
scores[node] = score*NodeScoreMax/highest
}
}
If any NormalizeScore plugin returns an error, the scheduling cycle is aborted.
Note:
Plugins wishing to perform "pre-reserve" work should use the NormalizeScore extension point.Reserve
A plugin that implements the Reserve interface has two methods, namely Reserve
and Unreserve, that back two informational scheduling phases called Reserve
and Unreserve, respectively. Plugins which maintain runtime state (aka "stateful
plugins") should use these phases to be notified by the scheduler when resources
on a node are being reserved and unreserved for a given Pod.
The Reserve phase happens before the scheduler actually binds a Pod to its
designated node. It exists to prevent race conditions while the scheduler waits
for the bind to succeed. The Reserve method of each Reserve plugin may succeed
or fail; if one Reserve method call fails, subsequent plugins are not executed
and the Reserve phase is considered to have failed. If the Reserve method of
all plugins succeed, the Reserve phase is considered to be successful and the
rest of the scheduling cycle and the binding cycle are executed.
The Unreserve phase is triggered if the Reserve phase or a later phase fails.
When this happens, the Unreserve method of all Reserve plugins will be
executed in the reverse order of Reserve method calls. This phase exists to
clean up the state associated with the reserved Pod.
Caution:
The implementation of theUnreserve method in Reserve plugins must be
idempotent and may not fail.Permit
Permit plugins are invoked at the end of the scheduling cycle for each Pod, to prevent or delay the binding to the candidate node. A permit plugin can do one of the three things:
approve
Once all Permit plugins approve a Pod, it is sent for binding.deny
If any Permit plugin denies a Pod, it is returned to the scheduling queue. This will trigger the Unreserve phase in Reserve plugins.wait (with a timeout)
If a Permit plugin returns "wait", then the Pod is kept in an internal "waiting" Pods list, and the binding cycle of this Pod starts but directly blocks until it gets approved. If a timeout occurs, wait becomes deny and the Pod is returned to the scheduling queue, triggering the Unreserve phase in Reserve plugins.
Note:
While any plugin can access the list of "waiting" Pods and approve them (seeFrameworkHandle),
we expect only the permit plugins to approve binding of reserved Pods that are in "waiting" state.
Once a Pod is approved, it is sent to the PreBind phase.PreBind
These plugins are used to perform any work required before a Pod is bound. For example, a pre-bind plugin may provision a network volume and mount it on the target node before allowing the Pod to run there.
If any PreBind plugin returns an error, the Pod is rejected and returned to the scheduling queue.
Bind
These plugins are used to bind a Pod to a Node. Bind plugins will not be called until all PreBind plugins have completed. Each bind plugin is called in the configured order. A bind plugin may choose whether or not to handle the given Pod. If a bind plugin chooses to handle a Pod, the remaining bind plugins are skipped.
PostBind
This is an informational interface. Post-bind plugins are called after a Pod is successfully bound. This is the end of a binding cycle, and can be used to clean up associated resources.
Plugin API
There are two steps to the plugin API. First, plugins must register and get configured, then they use the extension point interfaces. Extension point interfaces have the following form.
type Plugin interface {
Name() string
}
type QueueSortPlugin interface {
Plugin
Less(*v1.pod, *v1.pod) bool
}
type PreFilterPlugin interface {
Plugin
PreFilter(context.Context, *framework.CycleState, *v1.pod) error
}
// ...
Plugin configuration
You can enable or disable plugins in the scheduler configuration. If you are using Kubernetes v1.18 or later, most scheduling plugins are in use and enabled by default.
In addition to default plugins, you can also implement your own scheduling plugins and get them configured along with default plugins. You can visit scheduler-plugins for more details.
If you are using Kubernetes v1.18 or later, you can configure a set of plugins as a scheduler profile and then define multiple profiles to fit various kinds of workload. Learn more at multiple profiles.
10.9 - Dynamic Resource Allocation
FEATURE STATE:
Kubernetes v1.35 [stable](enabled by default)This page describes dynamic resource allocation (DRA) in Kubernetes.
About DRA
DRA is a Kubernetes feature that lets you request and share resources among Pods. These resources are often attached devices like hardware accelerators.
With DRA, device drivers and cluster admins define device classes that are available to claim in workloads. Kubernetes allocates matching devices to specific claims and places the corresponding Pods on nodes that can access the allocated devices.
Allocating resources with DRA is a similar experience to dynamic volume provisioning, in which you use PersistentVolumeClaims to claim storage capacity from storage classes and request the claimed capacity in your Pods.
Benefits of DRA
DRA provides a flexible way to categorize, request, and use devices in your cluster. Using DRA provides benefits like the following:
- Flexible device filtering: use common expression language (CEL) to perform fine-grained filtering for specific device attributes.
- Device sharing: share the same resource with multiple containers or Pods by referencing the corresponding resource claim.
- Centralized device categorization: device drivers and cluster admins can use device classes to provide app operators with hardware categories that are optimized for various use cases. For example, you can create a cost-optimized device class for general-purpose workloads, and a high-performance device class for critical jobs.
- Simplified Pod requests: with DRA, app operators don't need to specify device quantities in Pod resource requests. Instead, the Pod references a resource claim, and the device configuration in that claim applies to the Pod.
These benefits provide significant improvements in the device allocation workflow when compared to device plugins, which require per-container device requests, don't support device sharing, and don't support expression-based device filtering.
Types of DRA users
The workflow of using DRA to allocate devices involves the following types of users:
Device owner: responsible for devices. Device owners might be commercial vendors, the cluster operator, or another entity. To use DRA, devices must have DRA-compatible drivers that do the following:
- Create ResourceSlices that provide Kubernetes with information about nodes and resources.
- Update ResourceSlices when resource capacity in the cluster changes.
- Optionally, create DeviceClasses that workload operators can use to claim devices.
Cluster admin: responsible for configuring clusters and nodes, attaching devices, installing drivers, and similar tasks. To use DRA, cluster admins do the following:
- Attach devices to nodes.
- Install device drivers that support DRA.
- Optionally, create DeviceClasses that workload operators can use to claim devices.
Workload operator: responsible for deploying and managing workloads in the cluster. To use DRA to allocate devices to Pods, workload operators do the following:
- Create ResourceClaims or ResourceClaimTemplates to request specific configurations within DeviceClasses.
- Deploy workloads that use specific ResourceClaims or ResourceClaimTemplates.
DRA terminology
DRA uses the following Kubernetes API kinds to provide the core allocation
functionality. All of these API kinds are included in the resource.k8s.io/v1
API group.
- DeviceClass
- Defines a category of devices that can be claimed and how to select specific device attributes in claims. The DeviceClass parameters can match zero or more devices in ResourceSlices. To claim devices from a DeviceClass, ResourceClaims select specific device attributes.
- ResourceClaim
- Describes a request for access to attached resources, such as devices, in the cluster. ResourceClaims provide Pods with access to a specific resource. ResourceClaims can be created by workload operators or generated by Kubernetes based on a ResourceClaimTemplate.
- ResourceClaimTemplate
- Defines a template that Kubernetes uses to create per-Pod ResourceClaims for a workload. ResourceClaimTemplates provide Pods with access to separate, similar resources. Each ResourceClaim that Kubernetes generates from the template is bound to a specific Pod. When the Pod terminates, Kubernetes deletes the corresponding ResourceClaim.
- ResourceSlice
- Represents one or more resources that are attached to nodes, such as devices. Drivers create and manage ResourceSlices in the cluster. When a ResourceClaim is created and used in a Pod, Kubernetes uses ResourceSlices to find nodes that have access to the claimed resources. Kubernetes allocates resources to the ResourceClaim and schedules the Pod onto a node that can access the resources.
DeviceClass
A DeviceClass lets cluster admins or device drivers define categories of devices in the cluster. DeviceClasses tell operators what devices they can request and how they can request those devices. You can use common expression language (CEL) to select devices based on specific attributes. A ResourceClaim that references the DeviceClass can then request specific configurations within the DeviceClass.
To create a DeviceClass, see Set Up DRA in a Cluster.
ResourceClaims and ResourceClaimTemplates
A ResourceClaim defines the resources that a workload needs. Every ResourceClaim has requests that reference a DeviceClass and select devices from that DeviceClass. ResourceClaims can also use selectors to filter for devices that meet specific requirements, and can use constraints to limit the devices that can satisfy a request. ResourceClaims can be created by workload operators or can be generated by Kubernetes based on a ResourceClaimTemplate. A ResourceClaimTemplate defines a template that Kubernetes can use to auto-generate ResourceClaims for Pods.
Use cases for ResourceClaims and ResourceClaimTemplates
The method that you use depends on your requirements, as follows:
- ResourceClaim: you want multiple Pods to share access to specific devices. You manually manage the lifecycle of ResourceClaims that you create.
- ResourceClaimTemplate: you want Pods to have independent access to separate, similarly-configured devices. Kubernetes generates ResourceClaims from the specification in the ResourceClaimTemplate. The lifetime of each generated ResourceClaim is bound to the lifetime of the corresponding Pod.
- PodGroup ResourceClaimTemplate: you want
PodGroups to have
independent access to separate, similarly-configured devices that can be
shared by their Pods. Kubernetes generates one ResourceClaim for the PodGroup
from the specification in the ResourceClaimTemplate. The lifetime of each
generated ResourceClaim is bound to the lifetime of the corresponding
PodGroup. This requires the
DRAWorkloadResourceClaimsfeature to be enabled.
When you define a workload, you can use Common Expression Language (CEL) to filter for specific device attributes or capacity. The available parameters for filtering depend on the device and the drivers.
If you directly reference a specific ResourceClaim in a Pod, that ResourceClaim must already exist in the same namespace as the Pod. If the ResourceClaim doesn't exist in the namespace, the Pod won't schedule. This behavior is similar to how a PersistentVolumeClaim must exist in the same namespace as a Pod that references it.
You can reference an auto-generated ResourceClaim in a Pod, but this isn't recommended because auto-generated ResourceClaims are bound to the lifetime of the Pod or PodGroup that triggered the generation.
To learn how to claim resources using one of these methods, see Allocate Devices to Workloads with DRA.
Prioritized list
FEATURE STATE:
Kubernetes v1.36 [stable](enabled by default)You can provide a prioritized list of subrequests for requests in a ResourceClaim or ResourceClaimTemplate. The scheduler will then select the first subrequest that can be allocated. This allows users to specify alternative devices that can be used by the workload if the primary choice is not available.
In the example below, the ResourceClaimTemplate requested a device with the color black and the size large. If a device with those attributes is not available, the pod cannot be scheduled. With the prioritized list feature, a second alternative can be specified, which requests two devices with the color white and size small. The large black device will be allocated if it is available. If it is not, but two small white devices are available, the pod will still be able to run.
apiVersion: resource.k8s.io/v1
kind: ResourceClaimTemplate
metadata:
name: prioritized-list-claim-template
spec:
spec:
devices:
requests:
- name: req-0
firstAvailable:
- name: large-black
deviceClassName: resource.example.com
selectors:
- cel:
expression: |-
device.attributes["resource-driver.example.com"].color == "black" &&
device.attributes["resource-driver.example.com"].size == "large"
- name: small-white
deviceClassName: resource.example.com
selectors:
- cel:
expression: |-
device.attributes["resource-driver.example.com"].color == "white" &&
device.attributes["resource-driver.example.com"].size == "small"
count: 2
If the pod is eligible for multiple nodes in the cluster, the scheduler will use the index of chosen subrequests from any prioritized lists as one of the inputs when it scores each node. So nodes that can allocate devices requested in a higher ranked subrequest are more likely to be chosen than nodes that can only allocate devices for lower ranked subrequests.
The decision is made on a per-Pod basis, so if the Pod is a member of a ReplicaSet or similar grouping, you cannot rely on all the members of the group having the same subrequest chosen. Your workload must be able to accommodate this.
Workload ResourceClaims
FEATURE STATE:
Kubernetes v1.36 [alpha](disabled by default)When you organize Pods with the Workload API, you can reserve ResourceClaims for entire PodGroups instead of individual Pods and generate ResourceClaimTemplates for a PodGroup instead of a single Pod, allowing the Pods within a PodGroup to share access to devices allocated to the generated ResourceClaim.
This feature targets two problems:
- The ResourceClaim API's
status.reservedForlist can only contain 256 items. Since kube-scheduler only records individual Pods in that list, only 256 Pods can share a ResourceClaim. By allowing PodGroups to be recorded instatus.reservedFor, many more than 256 Pods can share a ResourceClaim. - Pods can only share a ResourceClaim when its exact name is known. For complex workloads that replicate groups of Pods, ResourceClaims shared by the Pods in each group need to be created and deleted explicitly when the set of groups scales up and down. By generating ResourceClaims for each PodGroup, a single ResourceClaimTemplate can form the basis for ResourceClaims that are both replicated automatically and shareable among the Pods in a PodGroup.
The PodGroup API defines a spec.resourceClaims field with the same structure
and similar meaning as the spec.resourceClaims field in the Pod API:
apiVersion: scheduling.k8s.io/v1alpha2
kind: PodGroup
metadata:
name: training-group
namespace: some-ns
spec:
...
resourceClaims:
- name: pg-claim
resourceClaimName: my-pg-claim
- name: pg-claim-template
resourceClaimTemplateName: my-pg-template
Like claims made by Pods, claims for PodGroups defining a resourceClaimName
refer to a ResourceClaim by name. Claims defining a resourceClaimTemplateName
refer to a ResourceClaimTemplate which replicates into one ResourceClaim for the
entire PodGroup that can be shared amongst its Pods.
When a Pod defines a claim with a name, resourceClaimName, and
resourceClaimTemplateName that all match one of its PodGroup's
spec.resourceClaims, then kube-scheduler reserves the ResourceClaim for the
PodGroup instead of the Pod. If the Pod's claim does not match one made by its
PodGroup, then kube-scheduler reserves the ResourceClaim for the Pod. In either
case, reservation is recorded in the ResourceClaim's status.reservedFor.
PodGroup reservations and the corresponding resource allocation persist in the
ResourceClaim until the PodGroup is deleted, even if the group no longer has any
Pods.
When a Pod claim matching a PodGroup claim defines a
resourceClaimTemplateName, then one ResourceClaim is generated for the
PodGroup. Other Pods in the group defining the same claim will share that
generated ResourceClaim instead of prompting a new ResourceClaim to be generated
for each Pod. Whether or not a resourceClaimTemplateName claim matches a
PodGroup claim, the name of the generated ResourceClaim is recorded in the Pod's
status.resourceClaimStatuses.
ResourceClaims generated from a ResourceClaimTemplate for a PodGroup follow the lifecycle of the PodGroup. The ResourceClaim is first created when both the PodGroup and its ResourceClaimTemplate exist. The ResourceClaim is deleted after the PodGroup has been deleted and the ResourceClaim is no longer reserved.
Consider the following example:
apiVersion: scheduling.k8s.io/v1alpha2
kind: PodGroup
metadata:
name: training-group
namespace: some-ns
spec:
...
resourceClaims:
- name: pg-claim
resourceClaimName: my-pg-claim
- name: pg-claim-template
resourceClaimTemplateName: my-pg-template
---
apiVersion: v1
kind: Pod
metadata:
name: training-group-pod-1
namespace: some-ns
spec:
...
schedulingGroup:
podGroupName: training-group
resourceClaims:
- name: pod-claim
resourceClaimName: my-pod-claim
- name: pod-claim-template
resourceClaimTemplateName: my-pod-template
- name: pg-claim
resourceClaimName: my-pg-claim
- name: pg-claim-template
resourceClaimTemplateName: my-pg-template
In this example, the training-group PodGroup has one Pod named training-group-pod-1.
The Pod's pod-claim and pod-claim-template claims do not match
any claim made by the PodGroup, so those claims are not affected by the
PodGroup: ResourceClaim my-pod-claim becomes reserved for the Pod and a
ResourceClaim is generated from ResourceClaimTemplate my-pod-template and also
becomes reserved for the Pod. The pg-claim and pg-claim-template do match
claims made by the PodGroup. ResourceClaim my-pg-claim becomes reserved for
the PodGroup and a ResourceClaim is generated from ResourceClaimTemplate
my-pg-template and also becomes reserved for the PodGroup.
Associating ResourceClaims with Workload API resources is an alpha feature and
only enabled when the DRAWorkloadResourceClaims feature gate
is enabled in the kube-apiserver, kube-controller-manager, kube-scheduler, and kubelet.
ResourceSlice
Each ResourceSlice represents one or more devices in a pool. The pool is managed by a device driver, which creates and manages ResourceSlices. The resources in a pool might be represented by a single ResourceSlice or span multiple ResourceSlices.
ResourceSlices provide useful information to device users and to the scheduler, and are crucial for dynamic resource allocation. Every ResourceSlice must include the following information:
- Resource pool: a group of one or more resources that the driver manages. The pool can span more than one ResourceSlice. Changes to the resources in a pool must be propagated across all of the ResourceSlices in that pool. The device driver that manages the pool is responsible for ensuring that this propagation happens.
- Devices: devices in the managed pool. A ResourceSlice can list every device in a pool or a subset of the devices in a pool. The ResourceSlice defines device information like attributes, versions, and capacity. Device users can select devices for allocation by filtering for device information in ResourceClaims or in DeviceClasses.
- Nodes: the nodes that can access the resources. Drivers can choose which nodes can access the resources, whether that's all of the nodes in the cluster, a single named node, or nodes that have specific node labels.
Drivers use a controller to reconcile ResourceSlices in the cluster with the information that the driver has to publish. This controller overwrites any manual changes, such as cluster users creating or modifying ResourceSlices.
Consider the following example ResourceSlice:
apiVersion: resource.k8s.io/v1
kind: ResourceSlice
metadata:
name: cat-slice
spec:
driver: "resource-driver.example.com"
pool:
generation: 1
name: "black-cat-pool"
resourceSliceCount: 1
# The allNodes field defines whether any node in the cluster can access the device.
allNodes: true
devices:
- name: "large-black-cat"
attributes:
color:
string: "black"
size:
string: "large"
cat:
bool: true
This ResourceSlice is managed by the resource-driver.example.com driver in the
black-cat-pool pool. The allNodes: true field indicates that any node in the
cluster can access the devices. There's one device in the ResourceSlice, named
large-black-cat, with the following attributes:
color:blacksize:largecat:true
A DeviceClass could select this ResourceSlice by using these attributes, and a ResourceClaim could filter for specific devices in that DeviceClass.
Naming and prioritization
The order in which the Kubernetes scheduler evaluates devices for allocation is determined by the lexicographical sorting of ResourceSlice and resource pool names. The scheduler uses a first-fit strategy, meaning it selects the first available device that satisfies the claim's requirements.
This allows the priority of resource allocation to be influenced by the names assigned to pools and ResourceSlices. Note that pools without binding conditions are always evaluated before those with binding conditions, regardless of their names.
For drivers built using the k8s.io/dynamic-resources/kubeletplugin Go package or
the ResourceSlice controller from that module, these components automatically handle
ResourceSlice naming to ensure they are evaluated in the order specified by the driver.
How resource allocation with DRA works
The following sections describe the workflow for the various types of DRA users and for the Kubernetes system during dynamic resource allocation.
Workflow for users
- Driver creation: device owners or third-party entities create drivers that can create and manage ResourceSlices in the cluster. These drivers optionally also create DeviceClasses that define a category of devices and how to request them.
- Cluster configuration: cluster admins create clusters, attach devices to nodes, and install the DRA device drivers. Cluster admins optionally create DeviceClasses that define categories of devices and how to request them.
- Resource claims: workload operators create ResourceClaimTemplates or ResourceClaims that request specific device configurations within a DeviceClass. In the same step, workload operators modify their Kubernetes manifests to request those ResourceClaimTemplates or ResourceClaims.
Workflow for Kubernetes
ResourceSlice creation: drivers in the cluster create ResourceSlices that represent one or more devices in a managed pool of similar devices.
Workload creation: the cluster control plane checks new workloads for references to ResourceClaimTemplates or to specific ResourceClaims.
- If the workload uses a ResourceClaimTemplate, a controller named the
resourceclaim-controllergenerates ResourceClaims for the workload. - If the workload uses a specific ResourceClaim, Kubernetes checks whether that ResourceClaim exists in the cluster. If the ResourceClaim doesn't exist, the Pods won't deploy.
- If the workload uses a ResourceClaimTemplate, a controller named the
ResourceSlice filtering: for every Pod, Kubernetes checks the ResourceSlices in the cluster to find a device that satisfies all of the following criteria:
- The nodes that can access the resources are eligible to run the Pod.
- The ResourceSlice has unallocated resources that match the requirements of the Pod's ResourceClaim.
Resource allocation: after finding an eligible ResourceSlice for a Pod's ResourceClaim, the Kubernetes scheduler updates the ResourceClaim with the allocation details. The scheduler uses a first-fit strategy and evaluates pools and ResourceSlices in lexicographical order by their names. Drivers can prioritize specific slices or pools by naming them appropriately. For details, see Naming and prioritization.
Pod scheduling: when resource allocation is complete, the scheduler places the Pod on a node that can access the allocated resource. The device driver and the kubelet on that node configure the device and the Pod's access to the device.
Observability of dynamic resources
You can check the status of dynamically allocated resources by using any of the following methods:
kubelet device metrics
The PodResourcesLister kubelet gRPC service lets you monitor in-use devices.
The DynamicResource message provides information that's specific to dynamic
resource allocation, such as the device name and the claim name. For details,
see
Monitoring device plugin resources.
ResourceClaim device status
FEATURE STATE:
Kubernetes v1.33 [beta](enabled by default)DRA drivers can report driver-specific
device status
data for each allocated device in the status.devices field of a ResourceClaim.
For example, the driver might list the IP addresses that are assigned to a
network interface device. Updating this field requires specific synthetic RBAC permissions,
see
Hardening Guide - Dynamic Resource Allocation
and
Harden Dynamic Resource Allocation in Your Cluster.
The accuracy of the information that a driver adds to a ResourceClaim
status.devices field depends on the driver. Evaluate drivers to decide whether
you can rely on this field as the only source of device information.
If you disable the
DRAResourceClaimDeviceStatus feature gate, the
status.devices field automatically gets cleared when storing the ResourceClaim.
A ResourceClaim device status is supported when it is possible, from a DRA
driver, to update an existing ResourceClaim where the status.devices field is
set.
For details about the status.devices field, see the
ResourceClaim API reference.
Device Health Monitoring
FEATURE STATE:
Kubernetes v1.36 [beta](enabled by default)Kubernetes provides a mechanism for monitoring and reporting the health of dynamically allocated infrastructure resources. For stateful applications running on specialized hardware, it is critical to know when a device has failed or become unhealthy. It is also helpful to find out if the device recovers.
To use this functionality, the ResourceHealthStatus feature gate must be enabled (beta and enabled by default since v1.36), and the DRA driver must implement the DRAResourceHealth gRPC service.
When a DRA driver detects that an allocated device has become unhealthy, it reports this status back to the kubelet. This health information is then exposed directly in the Pod's status. The kubelet populates the allocatedResourcesStatus field in the status of each container, detailing the health of each device assigned to that container. Each resource health entry can include an optional message field with additional human-readable context about the health status, such as error details or failure reasons.
If the kubelet does not receive a health update from a DRA driver within a timeout period, the device's health status is marked as "Unknown". DRA drivers can configure this timeout on a per-device basis by setting the health_check_timeout_seconds field in the DeviceHealth gRPC message. If not specified, the kubelet uses a default timeout of 30 seconds. This allows different hardware types (for example, GPUs, FPGAs, or storage devices) to use appropriate timeout values based on their health-reporting characteristics.
This provides crucial visibility for users and controllers to react to hardware failures. For a Pod that is failing, you can inspect this status to determine if the failure was related to an unhealthy device.
Note:
Device health status is not updated in the Pod status after a Pod has terminated (for example, in Failed state).Pre-scheduled Pods
When you - or another API client - create a Pod with spec.nodeName already set, the scheduler gets bypassed.
If some ResourceClaim needed by that Pod does not exist yet, is not allocated
or not reserved for the Pod, then the kubelet will fail to run the Pod and
re-check periodically because those requirements might still get fulfilled later.
Such a situation can also arise when support for dynamic resource allocation was not enabled in the scheduler at the time when the Pod got scheduled (version skew, configuration, feature gate, etc.). kube-controller-manager detects this and tries to make the Pod runnable by reserving the required ResourceClaims. However, this only works if those were allocated by the scheduler for some other pod.
It is better to avoid bypassing the scheduler because a Pod that is assigned to a node blocks normal resources (RAM, CPU) that then cannot be used for other Pods while the Pod is stuck. To make a Pod run on a specific node while still going through the normal scheduling flow, create the Pod with a node selector that exactly matches the desired node:
apiVersion: v1
kind: Pod
metadata:
name: pod-with-cats
spec:
nodeSelector:
kubernetes.io/hostname: name-of-the-intended-node
...
You may also be able to mutate the incoming Pod, at admission time, to unset
the .spec.nodeName field and to use a node selector instead.
Limitations
- The Kubernetes scheduler doesn't support preemption for DRA resources. This means that an existing Pod that's running on a node and is using DRA resources can't be preempted by a higher-priority Pod that also needs DRA resources. The high-priority Pod will remain in a pending state until the device becomes available, which happens when the conflicting Pod terminates or is manually deleted.
DRA beta features
The following sections describe DRA features that support advanced use cases. Usage of them is optional and may only be relevant with DRA drivers that support them.
Some of them are available in the Alpha or Beta feature stage. Those depend on feature gates and may depend on additional API groups. For more information, see Set up DRA in the cluster.
Admin access
FEATURE STATE:
Kubernetes v1.36 [stable](enabled by default)You can mark a request in a ResourceClaim or ResourceClaimTemplate as having privileged features for maintenance and troubleshooting tasks. A request with admin access grants access to in-use devices and may enable additional permissions when making the device available in a container:
apiVersion: resource.k8s.io/v1
kind: ResourceClaimTemplate
metadata:
name: large-black-cat-claim-template
spec:
spec:
devices:
requests:
- name: req-0
exactly:
deviceClassName: resource.example.com
allocationMode: All
adminAccess: true
Admin access is a privileged mode and should not be granted to regular users in
multi-tenant clusters. Only users authorized to
create ResourceClaim or ResourceClaimTemplate objects in namespaces labeled with
resource.kubernetes.io/admin-access: "true" (case-sensitive) can use the
adminAccess field. This ensures that non-admin users cannot misuse the
feature.
Admin access is a beta feature and is enabled by default with the
DRAAdminAccess feature gate
in the kube-apiserver, kube-scheduler, and kubelet.
Granular status authorization
FEATURE STATE:
Kubernetes v1.36 [beta](enabled by default)Starting in Kubernetes v1.36, DRA enforces fine-grained authorization checks for updates
to ResourceClaim status by using synthetic subresources and node-aware verbs.
For security hardening guidance, including RBAC examples for scheduler and DRA drivers, see Hardening Guide - Dynamic Resource Allocation.
For a step-by-step cluster administrator procedure, see Harden Dynamic Resource Allocation in Your Cluster.
DRA alpha features
The following sections describe DRA features that are available in the Alpha feature stage. They depend on enabling feature gates and may depend on additional API groups. For more information, see Set up DRA in the cluster.
Extended resource allocation by DRA
FEATURE STATE:
Kubernetes v1.36 [beta](enabled by default)You can provide an extended resource name for a DeviceClass. The scheduler will then select the devices matching the class for the extended resource requests. This allows users to continue using extended resource requests in a pod to request either extended resources provided by device plugin, or DRA devices. The same extended resource can be provided either by device plugin, or DRA on one single cluster node. The same extended resource can be provided by device plugin on some nodes, and DRA on other nodes in the same cluster.
In the example below, the DeviceClass is given an extendedResourceName example.com/gpu.
If a pod requested for the extended resource example.com/gpu: 2, it can be scheduled to
a node with two or more devices matching the DeviceClass.
apiVersion: resource.k8s.io/v1
kind: DeviceClass
metadata:
name: gpu.example.com
spec:
selectors:
- cel:
expression: device.driver == 'gpu.example.com' && device.attributes['gpu.example.com'].type
== 'gpu'
extendedResourceName: example.com/gpu
In addition, users can use a special extended resource to allocate devices without
having to explicitly create a ResourceClaim. Using the extended resource name
prefix deviceclass.resource.kubernetes.io/ and the DeviceClass name.
This works for any DeviceClass, even if it does not specify an extended resource name.
The resulting ResourceClaim will contain a request for an ExactCount of the
specified number of devices of that DeviceClass.
Extended resource allocation by DRA is a beta feature and is enabled by default with the
DRAExtendedResource feature gate
in the kube-apiserver, kube-scheduler, kube-controller-manager, and kubelet.
Partitionable devices
FEATURE STATE:
Kubernetes v1.36 [beta](enabled by default)Devices represented in DRA don't necessarily have to be a single unit connected to a single machine, but can also be a logical device comprised of multiple devices connected to multiple machines. These devices might consume overlapping resources of the underlying phyical devices, meaning that when one logical device is allocated other devices will no longer be available.
In the ResourceSlice API, this is represented as a list of named CounterSets, each of which contains a set of named counters. The counters represent the resources available on the physical device that are used by the logical devices advertised through DRA.
Logical devices can specify the ConsumesCounters list. Each entry contains a reference to a CounterSet and a set of named counters with the amounts they will consume. So for a device to be allocatable, the referenced counter sets must have sufficient quantity for the counters referenced by the device.
CounterSets must be specified in separate ResourceSlices from devices. Devices can consume counters from any CounterSet defined in the same resource pool as the device.
Here is an example of two devices, each consuming 6Gi of memory from a shared counter with 8Gi of memory. Thus, only one of the devices can be allocated at any point in time. The scheduler handles this and it is transparent to the consumer as the ResourceClaim API is not affected.
apiVersion: resource.k8s.io/v1
kind: ResourceSlice
metadata:
name: resourceslice-with-countersets
spec:
nodeName: worker-1
pool:
name: pool
generation: 1
resourceSliceCount: 2
driver: dra.example.com
sharedCounters:
- name: gpu-1-counters
counters:
memory:
value: 8Gi
---
apiVersion: resource.k8s.io/v1
kind: ResourceSlice
metadata:
name: resourceslice-with-devices
spec:
nodeName: worker-1
pool:
name: pool
generation: 1
resourceSliceCount: 2
driver: dra.example.com
devices:
- name: device-1
consumesCounters:
- counterSet: gpu-1-counters
counters:
memory:
value: 6Gi
- name: device-2
consumesCounters:
- counterSet: gpu-1-counters
counters:
memory:
value: 6Gi
Partitionable devices is a beta feature and enabled when the
DRAPartitionableDevices feature gate
is kept enabled in the kube-apiserver and kube-scheduler.
Consumable capacity
FEATURE STATE:
Kubernetes v1.36 [beta](enabled by default)The consumable capacity feature allows the same devices to be consumed by multiple independent ResourceClaims, with the Kubernetes scheduler managing how much of the device's capacity is used up by each claim. This is analogous to how Pods can share the resources on a Node; ResourceClaims can share the resources on a Device.
The device driver can set allowMultipleAllocations field added in .spec.devices of ResourceSlice
to allow allocating that device to multiple independent ResourceClaims or to multiple requests within a ResourceClaim.
Users can set capacity field added in spec.devices.requests of ResourceClaim to specify the device resource requirements for each allocation.
For the device that allows multiple allocations, the requested capacity is drawn from — or consumed from — its total capacity,
a concept known as consumable capacity.
Then, the scheduler ensures that the aggregate consumed capacity across all claims does not exceed the device’s overall capacity.
Furthermore, driver authors can use the requestPolicy constraints on individual device capacities to control
how those capacities are consumed.
For example, the driver author can specify that a given capacity is only consumed in increments of 1Gi.
Here is an example of a network device which allows multiple allocations and contains a consumable bandwidth capacity.
kind: ResourceSlice
apiVersion: resource.k8s.io/v1
metadata:
name: resourceslice
spec:
nodeName: worker-1
pool:
name: pool
generation: 1
resourceSliceCount: 1
driver: dra.example.com
devices:
- name: eth1
allowMultipleAllocations: true
attributes:
name:
string: "eth1"
capacity:
bandwidth:
requestPolicy:
default: "1M"
validRange:
min: "1M"
step: "8"
value: "10G"
The consumable capacity can be requested as shown in the below example.
apiVersion: resource.k8s.io/v1
kind: ResourceClaimTemplate
metadata:
name: bandwidth-claim-template
spec:
spec:
devices:
requests:
- name: req-0
exactly:
deviceClassName: resource.example.com
capacity:
requests:
bandwidth: 1G
The allocation result will include the consumed capacity and the identifier of the share.
apiVersion: resource.k8s.io/v1
kind: ResourceClaim
...
status:
allocation:
devices:
results:
- consumedCapacity:
bandwidth: 1G
device: eth1
shareID: "a671734a-e8e5-11e4-8fde-42010af09327"
In this example, a multiply-allocatable device was chosen. However, any resource.example.com device
with at least the requested 1G bandwidth could have met the requirement.
If a non-multiply-allocatable device were chosen, the allocation would have resulted in the entire device.
To force the use of a only multiply-allocatable devices, you can use the CEL criteria device.allowMultipleAllocations == true.
DistinctAttribute constraint
When requesting multiple devices in a ResourceClaim, you can use the DistinctAttribute constraint to ensure that each allocated device has a different value for a specified attribute. This constraint was introduced with the consumable capacity feature.
The DistinctAttribute constraint is particularly useful when working with multiply-allocatable devices. It prevents the scheduler from allocating the same device multiple times within a single ResourceClaim, even when that device allows multiple allocations.
Beyond preventing duplicate allocations, this constraint helps optimize performance by ensuring devices are distributed based on their attributes. For example, you can use it to distribute devices across different NUMA nodes to optimize memory bandwidth and reduce contention.
Device taints and tolerations
FEATURE STATE:
Kubernetes v1.36 [beta](enabled by default)Device taints are similar to node taints: a taint has a string key, a string value, and an effect. The effect is applied to the ResourceClaim which is using a tainted device and to all Pods referencing that ResourceClaim. The "NoSchedule" effect prevents scheduling those Pods. Tainted devices are ignored when trying to allocate a ResourceClaim because using them would prevent scheduling of Pods.
The "NoExecute" effect implies "NoSchedule" and in addition causes eviction of all Pods which have been scheduled already. This eviction is implemented in the device taint eviction controller in kube-controller-manager by deleting affected Pods.
The "None" effect is ignored by the scheduler and eviction controller. DRA drivers can use it to communicate exceptions to admins or other controllers, like for example degraded health of a device. Admins can also use it to do dry-runs of pod eviction in DeviceTaintRules (more on that below).
ResourceClaims can tolerate taints. If a taint is tolerated, its effect does not apply. An empty toleration matches all taints. A toleration can be limited to certain effects and/or match certain key/value pairs. A toleration can check that a certain key exists, regardless which value it has, or it can check for specific values of a key. For more information on this matching see the node taint concepts.
Eviction can be delayed by tolerating a taint for a certain duration. That delay starts at the time when a taint gets added to a device, which is recorded in a field of the taint.
Taints apply as described above also to ResourceClaims allocating "all" devices on a node. All devices must be untainted or all of their taints must be tolerated. Allocating a device with admin access (described above) is not exempt either. An admin using that mode must explicitly tolerate all taints to access tainted devices.
Device taints and tolerations is a beta feature and enabled when the
DRADeviceTaints feature gate
is kept enabled in the kube-apiserver, kube-controller-manager and kube-scheduler.
To use DeviceTaintRules, the resource.k8s.io/v1beta2 API version must be
enabled together with the DRADeviceTaintRules feature gate.
In contrast to DRADeviceTaints, DRADeviceTaintRules is off by default because of this dependency
on the beta API group, which has to be off by default.
You can add taints to devices in the following ways, by using the DeviceTaintRule API kind.
Taints set by the driver
A DRA driver can add taints to the device information that it publishes in ResourceSlices. Consult the documentation of a DRA driver to learn whether the driver uses taints and what their keys and values are.
Taints set by an admin
FEATURE STATE:
Kubernetes v1.36 [beta](disabled by default)An admin or a control plane component can taint devices without having to tell the DRA driver to include taints in its device information in ResourceSlices. They do that by creating DeviceTaintRules. Each DeviceTaintRule adds one taint to devices which match the device selector. Without such a selector, no devices are tainted. This makes it harder to accidentally evict all pods using ResourceClaims when leaving out the selector by mistake.
Devices can be selected by giving the name of a DeviceClass, driver, pool, and/or device. The DeviceClass selects all devices that are selected by the selectors in that DeviceClass. With just the driver name, an admin can taint all devices managed by that driver, for example while doing some kind of maintenance of that driver across the entire cluster. Adding a pool name can limit the taint to a single node, if the driver manages node-local devices.
Finally, adding the device name can select one specific device. The device name and pool name can also be used alone, if desired. For example, drivers for node-local devices are encouraged to use the node name as their pool name. Then tainting with that pool name automatically taints all devices on a node.
Drivers might use stable names like "gpu-0" that hide which specific device is currently assigned to that name. To support tainting a specific hardware instance, CEL selectors can be used in a DeviceTaintRule to match a vendor-specific unique ID attribute, if the driver supports one for its hardware.
The taint applies as long as the DeviceTaintRule exists. It can be modified and and removed at any time. Here is one example of a DeviceTaintRule for a fictional DRA driver:
apiVersion: resource.k8s.io/v1beta2
kind: DeviceTaintRule
metadata:
name: example
spec:
# The entire hardware installation for this
# particular driver is broken.
# Evict all pods and don't schedule new ones.
deviceSelector:
driver: dra.example.com
taint:
key: dra.example.com/unhealthy
value: Broken
effect: NoExecute
The kube-apiserver automatically tracks when this taint was created by setting the
timeAdded field in the spec. The toleration period starts at that time
stamp. During updates which change the effect (see simulated eviction flow
below), the kube-apiserver automatically updates the time stamp. Users can control
the time stamp explicitly by setting the field when creating a DeviceTaintRule and
by changing it to some different value when updating.
The status contains a condition added by the eviction controller:
kubectl describe devicetaintrules
Name: example
...
Spec:
Device Selector:
Driver: dra.example.com
Taint:
Effect: NoExecute
Key: dra.example.com/unhealthy
Time Added: 2025-11-05T18:15:37Z
Value: Broken
Status:
Conditions:
Last Transition Time: 2025-11-05T18:15:37Z
Message: 1 pod evicted since starting the controller.
Observed Generation: 1
Reason: Completed
Status: False
Type: EvictionInProgress
Events: <none>
Pods get evicted by deleting them. Usually this happens very quickly, except when a toleration for the taint delays it for a certain period or when there are very many pods which need to be evicted. When it takes longer, the message provides information about the current status:
2 pods need to be evicted in 2 different namespaces. 1 pod evicted since starting the controller.
The condition can be used to check whether an eviction is currently active:
kubectl wait --for=condition=EvictionInProgress=false DeviceTaintRule/example
Beware of the potential race between scheduler and controller observing the new
taint at different times, which can lead to pods still being scheduled at a
time when the controller thinks that there are none which need to be evicted
and thus sets this condition to False. In practice, this race is made very
unlikely by updating the status only after an intentional delay of a few
seconds.
For effect: None, the message provides information about the number of
affected devices, how many of those are allocated, and how many pods would be
evicted if the effect was NoExecute. This can be used to do a dry-run before
actually triggering eviction:
Create a DeviceTaintRule with the desired selectors and
effect: None.Review the message:
3 published devices selected. 1 allocated device selected. 1 pod would be evicted in 1 namespace if the effect was NoExecute. This information will not be updated again. Recreate the DeviceTaintRule to trigger an update.Published devices are those listed in ResourceSlices. Tainting them prevents allocation for new pods. Only allocated devices cause eviction of the pods using them.
Edit the DeviceTaintRule and change the effect into
NoExecute.
Resource pool status
FEATURE STATE:
Kubernetes v1.36 [alpha](disabled by default)You can query the availability of devices in resource pools using the ResourcePoolStatusRequest API. This provides visibility into how many devices are available, allocated, or unavailable across your cluster's DRA resource pools.
To check resource pool status:
Create a ResourcePoolStatusRequest specifying the driver name (required) and optionally a limit on the number of pools returned. You can also limit it to a single pool by specifying a pool name:
apiVersion: resource.k8s.io/v1beta2 kind: ResourcePoolStatusRequest metadata: name: check-gpus spec: driver: example.com/gpu # Optional: filter to a specific pool # poolName: my-pool # Optional: limit number of pools returned (default: 100, max: 1000) # limit: 10Wait for the controller to process the request:
kubectl wait --for=condition=Complete resourcepoolstatusrequest/check-gpus --timeout=30sRead the status to see pool availability:
kubectl get resourcepoolstatusrequest/check-gpus -o yamlThe status includes:
poolCount: total number of pools matching the filter (may exceed the number of pools listed if truncated by the limit).pools: a list of pool details, each containing:driverandpoolName: identify the pool.generation: the latest pool generation observed across ResourceSlices.resourceSliceCount: the number of ResourceSlices making up the pool.totalDevices: total devices in the pool.allocatedDevices: devices currently allocated to claims.availableDevices: devices available for allocation (totalDevices - allocatedDevices - unavailableDevices).unavailableDevices: devices not available due to taints or other conditions.nodeName: the node associated with the pool, if any.validationError: set when the pool's data could not be fully validated (for example, during a generation rollout). When set, device count fields may be unset.
conditions: includesComplete(success) orFailed(error) condition types.
Delete the request when done:
kubectl delete resourcepoolstatusrequest/check-gpus
ResourcePoolStatusRequest objects are processed once by a controller in kube-controller-manager. The spec is immutable once created, and the entire object becomes immutable once the status is populated. To get updated availability data, delete and recreate the request. Completed requests are automatically cleaned up after 1 hour.
This feature requires explicit RBAC permissions on the ResourcePoolStatusRequest resource. No default ClusterRoles include this permission.
Resource pool status is an alpha feature and only enabled when the
DRAResourcePoolStatus feature gate
is enabled in the kube-apiserver and kube-controller-manager.
Device binding conditions
FEATURE STATE:
Kubernetes v1.36 [beta](enabled by default)Device Binding Conditions allow the Kubernetes scheduler to delay Pod binding until external resources, such as fabric-attached GPUs or reprogrammable FPGAs, are confirmed to be ready.
This waiting behavior is implemented in the PreBind phase of the scheduling framework. During this phase, the scheduler checks whether all required device conditions are satisfied before proceeding with binding.
This improves scheduling reliability by avoiding premature binding and enables coordination with external device controllers.
To use this feature, device drivers (typically managed by driver owners) must publish the
following fields in the Device section of a ResourceSlice. Cluster administrators
must enable the DRADeviceBindingConditions and DRAResourceClaimDeviceStatus feature
gates for the scheduler to honor these fields.
bindingConditions- A list of condition types that must be set to True (in the
.status.conditionsfield of the associated ResourceClaim) before the Pod can be bound. These conditions typically represent readiness signals, such as DeviceAttached or DeviceInitialized. bindingFailureConditions- A list of condition types that, if set to True in status.conditions field of the associated ResourceClaim, indicate a failure state. If any of these conditions are True, the scheduler will abort binding and reschedule the Pod.
bindsToNode- if set to
true, the scheduler records the selected node name in thestatus.allocation.nodeSelectorfield of the ResourceClaim. This does not affect the Pod'sspec.nodeSelector. Instead, it sets a node selector inside the ResourceClaim, which external controllers can use to perform node-specific operations such as device attachment or preparation.
All condition types listed in bindingConditions and bindingFailureConditions are evaluated
from the status.conditions field of the ResourceClaim.
External controllers are responsible for updating these conditions using standard Kubernetes
condition semantics (type, status, reason, message, lastTransitionTime).
The scheduler waits up to 600 seconds (default) for all bindingConditions to become True.
If the timeout is reached or any bindingFailureConditions are True, the scheduler
clears the allocation and reschedules the Pod.
A cluster administration can configure this timeout duration by editing the kube-scheduler configuration file.
An example of configuring this timeout in KubeSchedulerConfiguration is given below:
apiVersion: kubescheduler.config.k8s.io/v1
kind: KubeSchedulerConfiguration
profiles:
- schedulerName: default-scheduler
pluginConfig:
- name: DynamicResources
args:
apiVersion: kubescheduler.config.k8s.io/v1
kind: DynamicResourcesArgs
bindingTimeout: 60s
Example
Here is an example of a ResourceSlice that you might see in a cluster where there's a DRA driver in use, and that driver supports binding conditions:
apiVersion: resource.k8s.io/v1
kind: ResourceSlice
metadata:
name: gpu-slice-1
spec:
driver: dra.example.com
nodeSelector:
nodeSelectorTerms:
- matchExpressions:
- key: accelerator-type
operator: In
values:
- "high-performance"
pool:
name: gpu-pool
generation: 1
resourceSliceCount: 1
devices:
- name: gpu-1
attributes:
vendor:
string: "example"
model:
string: "example-gpu"
bindsToNode: true
bindingConditions:
- dra.example.com/is-prepared
bindingFailureConditions:
- dra.example.com/preparing-failed
This example ResourceSlice has the following properties:
- The ResourceSlice targets nodes labeled with
accelerator-type=high-performance, so that the scheduler uses only a specific set of eligible nodes. - The scheduler selects one node from the selected group (for example,
node-3) and sets thestatus.allocation.nodeSelectorfield in the ResourceClaim to that node name. - The
dra.example.com/is-preparedbinding condition indicates that the devicegpu-1must be prepared (theis-preparedcondition has a status ofTrue) before binding. - If the
gpu-1device preparation fails (thepreparing-failedcondition has a status ofTrue), the scheduler aborts binding. - The scheduler waits up to 600 seconds (default) for the device to become ready.
- External controllers can use the node selector in the ResourceClaim to perform node-specific setup on the selected node.
Device binding conditions is a beta feature and is enabled by default, controlled by the
DRADeviceBindingConditions feature gate
in the kube-apiserver and kube-scheduler.
Node allocatable resources
FEATURE STATE:
Kubernetes v1.36 [alpha](disabled by default)Devices managed by DRA can have an underlying footprint composed of node-allocatable
resources, such as cpu, memory, hugepages, or ephemeral-storage.
This feature integrates these DRA-based requests into the scheduler's standard
accounting alongside regular Pod spec requests for these resources.
Users (PodSpec authors) can use a mixture of Pod-level resources, container-level resources, and resource claims with associated node-allocatable resources. These devices represent resources like CPUs or memory directly, or they could be accelerators, network interface cards, or other devices that require some host resources when allocated. The DRA driver will populate information in the ResourceSlice that tells the scheduler how to calculate the node allocatable resources when the device is allocated to a ResourceClaim. PodSpec authors do not need to make that calculation themselves.
When authoring a PodSpec using claims for these types of devices, there are a few things to be aware of:
- When Pod-level resources are used, the sum of all container and claim resources must not exceed the Pod-level resources; otherwise, the Pod will fail to schedule.
- A container's total resource requirement is the sum of its container-level resources and any node-allocatable resources from its associated resource claims.
- Claims that consume node allocatable resources cannot be shared between Pods.
Details for DRA Driver Authors
DRA drivers declare this node allocatable resource footprint using the
nodeAllocatableResourceMappings field on devices within a ResourceSlice.
This mapping translates the requested DRA device or capacity into standard
resources that are tracked in the node's status.allocatable (note that extended
resources are not supported for this mapping). This is useful both for drivers that directly
expose native resources (like a CPU or Memory DRA driver) and for devices that
require auxiliary node dependencies (like an accelerator that needs host memory).
This mapping defines the translation of the requested DRA device or capacity units to the corresponding quantity of the node-allocatable resource. The scheduler calculates the exact quantity using:
- Device-based scaling: If
capacityKeyis not set, theallocationMultipliermultiplies the device count allocated to the claim. TheallocationMultiplierdefaults to 1 if not specified. - Capacity-based scaling: If
capacityKeyis set, it references a capacity name defined in the device'scapacitymap. The scheduler looks up the amount of that capacity consumed by the claim and multiplies it by theallocationMultiplier.
Example: CPU DRA Driver (Capacity-based scaling)
Here is an example where a CPU DRA driver exposes a CPU socket as a pool of 128
CPUs using DRA consumable capacity. The capacityKey links the consumed
cpu.example.com/cpu capacity directly to the node's standard cpu
allocatable resource:
apiVersion: resource.k8s.io/v1
kind: ResourceSlice
metadata:
name: my-node-cpus
spec:
driver: cpu.example.com
nodeName: my-node
pool:
name: socket-cpus
generation: 1
resourceSliceCount: 1
devices:
- name: socket0cpus
allowMultipleAllocations: true
capacity:
"cpu.example.com/cpu": "128"
nodeAllocatableResourceMappings:
cpu:
capacityKey: "cpu.example.com/cpu"
# allocationMultiplier defaults to 1 if omitted
- name: socket1cpus
allowMultipleAllocations: true
capacity:
"cpu.example.com/cpu": "128"
nodeAllocatableResourceMappings:
cpu:
capacityKey: "cpu.example.com/cpu"
# allocationMultiplier defaults to 1 if omitted
Example: Accelerator with Auxiliary Resources (Device-based scaling)
Here is an example of a resource slice where an accelerator requires an additional 8Gi of memory per device instance to function:
apiVersion: resource.k8s.io/v1
kind: ResourceSlice
metadata:
name: my-node-xpus
spec:
driver: xpu.example.com
nodeName: my-node
pool:
name: xpu-pool
generation: 1
resourceSliceCount: 1
devices:
- name: xpu-model-x-001
attributes:
example.com/model:
string: "model-x"
nodeAllocatableResourceMappings:
memory:
allocationMultiplier: "8Gi"
After a Pod is successfully bound to the node, the exact quantities of
node-allocatable resources allocated via DRA are included in the Pod's
status.nodeAllocatableResourceClaimStatuses field.
Node-allocatable resources is an alpha feature and is enabled when the
DRANodeAllocatableResources feature gate is enabled in the kube-apiserver,
kube-scheduler, and kubelet. In the alpha phase, the kubelet does not account
for these resources when determining QoS classes, configuring cgroups, or making
eviction decisions.
DRA device metadata in containers
FEATURE STATE:
Kubernetes v1.36 [alpha]DRA drivers can expose device metadata such as device attributes (PCI bus addresses or mdevUUID for mediated devices) or network configuration directly to containers as JSON files. This lets applications inside the container discover information about allocated devices without querying the Kubernetes API or building custom controllers.
KEP-5304 defines a device metadata protocol that drivers must follow so applications inside the container see a consistent layout across drivers and clusters. The DRA kubelet plugin library implements this protocol for you; the rest of this section describes how to use it.
Device metadata follows the same rules as device access: it is available inside a container only when that container requests the device in its container specification, and not otherwise. For how to request DRA devices in Pods and containers, see Request devices in workloads using DRA.
Device metadata protocol
The protocol consists of four rules:
File paths. Metadata files live inside containers under
/var/run/kubernetes.io/dra-device-attributes. For a directly referenced ResourceClaim the path isresourceclaims/<claimName>/<requestName>/<driverName>-metadata.json; for a claim created from a ResourceClaimTemplate the path isresourceclaimtemplates/<podClaimName>/<requestName>/<driverName>-metadata.json(wherepodClaimNameispod.spec.resourceClaims[].name).In cases where the ResourceClaim request uses the prioritized list feature, only the top-level request name is used for the
<requestName>segment in the file path (that is, the/<subrequest>portion is dropped). Inside the JSON file, therequests[].namefield carries the full<request>/<subrequest>reference (for example,gpu/high-memory) so that consumers can identify which alternative was allocated.The path constants are defined in
k8s.io/dynamic-resource-allocation/api/metadata.JSON API. Each file is a stream of one or more
DeviceMetadataobjects serialized as versioned JSON withapiVersionandkind, following Kubernetes API conventions. The same metadata is encoded once per supported API version (newest first). All objects in the stream are semantically equivalent; consumers should use the first object they can decode.Generation. When a driver updates a metadata file the embedded
metadata.generationfield must increase so consumers can detect changes.Container exposure. Files are typically exposed via CDI bind-mounts, but other mechanisms are permitted as long as the file appears at the correct path and is read-only inside the container.
How device metadata works
Device metadata is a driver-side feature that does not require any Kubernetes
API changes or feature gates. Using the DRA kubelet plugin library is a common
way to implement a driver, but drivers can be built in other ways as well.
Drivers that use the kubelet plugin enable this feature by passing the
EnableDeviceMetadata and MetadataVersions
options
when starting the plugin. MetadataVersions specifies which API versions are
serialized into the metadata file and must be set explicitly by the driver.
Check the documentation of your DRA driver to learn whether device metadata is
supported and how to enable it.
When device metadata is enabled, the driver generates metadata files and CDI bind-mount specifications while preparing the allocated devices for the pod, before the consuming containers start. The metadata appears inside containers at the well-known paths as defined above.
When a single request allocates devices from multiple DRA drivers, each driver
writes its own metadata file. Containers enumerate *-metadata.json files in
the request directory to discover all devices.
The Go package
k8s.io/dynamic-resource-allocation/devicemetadata
provides utilities for reading and decoding these metadata files by applications
inside the container.
Metadata schema
Each metadata file conforms to the
DeviceMetadata
API (metadata.resource.k8s.io/v1alpha1).
The following example shows a metadata file for a GPU device allocated through
a ResourceClaimTemplate:
{
"kind": "DeviceMetadata",
"apiVersion": "metadata.resource.k8s.io/v1alpha1",
"metadata": {
"name": "pod0-gpu-2kqrd",
"namespace": "gpu-test1",
"uid": "c7e7b22e-239b-4498-b27c-7f1344481e14",
"generation": 1
},
"podClaimName": "gpu",
"requests": [
{
"name": "gpu",
"devices": [
{
"driver": "gpu.example.com",
"pool": "worker-0",
"name": "gpu-0",
"attributes": {
"driverVersion": {
"version": "1.0.0"
},
"index": {
"int": 0
},
"model": {
"string": "LATEST-GPU-MODEL"
},
"uuid": {
"string": "gpu-18db0e85-99e9-c746-8531-ffeb86328b39"
}
}
}
]
}
]
}
Immediate and deferred metadata
Drivers provide metadata in one of two ways:
- Immediate
- The driver populates metadata while preparing the claim on the node and writes the metadata file before the container starts. This is typical for GPU drivers where device information is known at preparation time.
- Deferred
- In some cases, for example a network driver, the device information is
not available during device allocation time but becomes available after the
pod sandbox is created. In those cases the driver creates the CDI mount with
an empty metadata file and writes the actual metadata later via an NRI hook
that runs before the container starts. This ensures applications never see a
missing or partially written file. Each update must increment
metadata.generationso consumers can detect changes. TheMetadataUpdaterAPI in the DRA kubelet plugin library handles generation bookkeeping automatically for driver authors.
In both cases, metadata remains available to each consuming container for the lifetime of that container. Metadata files are cleaned up after all containers in the Pod have terminated.
To learn how to use device metadata in your workloads, see Access DRA device metadata.
Custom drivers
Custom, hand-crafted drivers that do not use the DRA kubelet plugin library
must implement the device metadata protocol
themselves. That means writing DeviceMetadata JSON at the correct file paths,
incrementing metadata.generation on every update, and exposing the files
read-only inside the container through CDI or an equivalent mechanism.
List type attributes
FEATURE STATE:
Kubernetes v1.36 [alpha](disabled by default)This feature improves the ResourceSlice API, allowing DRA drivers to specify list values for device attributes instead of only scalars. This is useful for modeling more complex internal node topologies, for example when a CPU has adjacency to multiple PCIe roots.
For ResourceClaim authors (end users), this means that the matchAttribute and distinctAttribute work better for these cases.
matchAttribute— the two attributes must have a non-empty list intersection, rather than be identical (scalar values are treated as single-item lists). This just means that if one driver publishes a single value for, say, the PCIe root, and another driver publishes a list, the constraint is met as long as the single value appears somewhere in the list.distinctAttribute— the attribute values must be pairwise-disjoint (no value shared between any two devices)
To help ResourceClaim authors use attributes that may be lists inside CEL expressions, this feature also introduces an includes() CEL function.
# Scalar attribute (backward compatible)
# assume: device.attributes["dra.example.com"].model = "model-a"
device.attributes["dra.example.com"].model.includes("model-a") # true
device.attributes["dra.example.com"].model.includes("model-b") # false
# List-type attribute (requires DRAListTypeAttributes)
# assume: device.attributes["dra.example.com"].supported-models= ["model-a", "model-b"]
device.attributes["dra.example.com"].supported-models.includes("model-a") # true
device.attributes["dra.example.com"].supported-models.includes("model-c") # false
Details for DRA Driver Authors
By default, each DeviceAttribute holds exactly one scalar value: a boolean, an integer,
a string, or a semantic version string. The DRAListTypeAttributes feature gate extends
DeviceAttribute with four list-type fields, allowing a device to advertise multiple
values for a single attribute:
bools— a list of boolean valuesints— a list of 64-bit integer valuesstrings— a list of strings (each at most 64 characters)versions— a list of semantic version strings per semver.org spec 2.0.0 (each at most 64 characters)
The total number of individual attribute values per device (scalar fields plus all list elements combined) is limited to 48. When any device in a ResourceSlice uses this feature or other advanced features such as taints, the ResourceSlice will be limited to at most 64 devices. use list-type attributes or other advanced features such as taints.
Here is an example of a device advertising multiple supported models using a list-type string attribute:
kind: ResourceSlice
apiVersion: resource.k8s.io/v1
metadata:
name: example-resourceslice
spec:
nodeName: worker-1
pool:
name: pool
generation: 1
resourceSliceCount: 1
driver: dra.example.com
devices:
- name: gpu-0
attributes:
dra.example.com/supported-models:
strings:
- model-a
- model-b
List type attributes is an alpha feature and only enabled when the
DRAListTypeAttributes feature gate
is enabled in the kube-apiserver and kube-scheduler.
What's next
- Set Up DRA in a Cluster
- Allocate devices to workloads using DRA
- Access DRA device metadata
- For more information on the design, see the Dynamic Resource Allocation with Structured Parameters KEP.
10.10 - Gang Scheduling
FEATURE STATE:
Kubernetes v1.35 [alpha](disabled by default)Gang scheduling ensures that a group of Pods are scheduled on an "all-or-nothing" basis. If the cluster cannot accommodate the entire group (or a defined minimum number of Pods), none of the Pods are bound to a node.
This feature depends on the PodGroup API.
Ensure the GenericWorkload
feature gate and the scheduling.k8s.io/v1alpha2
API group are enabled in the cluster.
How it works
When the GangScheduling plugin is enabled, the scheduler alters the lifecycle for Pods belonging
to a PodGroup that has a gang
scheduling policy.
The process follows these steps for each PodGroup:
The scheduler holds Pods in the
PreEnqueuephase until:- The referenced PodGroup object exists.
- The number of
Podscreated for thePodGroupis at least equal tominCount.
Podsdo not enter the active scheduling queue until both conditions are met.Once the quorum is met, the scheduler attempts to find placements for all Pods in the group. It utilizes the PodGroup scheduling cycle to make a single, atomic scheduling decision.
GangSchedulingplugin implements aPermitextension point that is evaluated for each schedulable Pod during the cycle. This is used to determine whether theminCountconstraint is satisfied, by comparing the number of successfully placed pods against theminCountvalue.If the scheduler finds valid placements for at least the
minCountnumber of Pods, it allows those successfully placed Pods to be bound to their assigned nodes. If it cannot find enough placements to satisfy theminCountrequirement, none of the Pods are scheduled. Instead, they are moved to the unschedulable queue to wait for cluster resources to free up, allowing other workloads to be scheduled in the meantime.
What's next
- Learn about the PodGroup API and its lifecycle.
- Read about PodGroup scheduling policies.
- Read about PodGroup scheduling.
10.11 - Scheduler Performance Tuning
FEATURE STATE:
Kubernetes v1.14 [beta]kube-scheduler is the Kubernetes default scheduler. It is responsible for placement of Pods on Nodes in a cluster.
Nodes in a cluster that meet the scheduling requirements of a Pod are called feasible Nodes for the Pod. The scheduler finds feasible Nodes for a Pod and then runs a set of functions to score the feasible Nodes, picking a Node with the highest score among the feasible ones to run the Pod. The scheduler then notifies the API server about this decision in a process called Binding.
This page explains performance tuning optimizations that are relevant for large Kubernetes clusters.
In large clusters, you can tune the scheduler's behaviour balancing scheduling outcomes between latency (new Pods are placed quickly) and accuracy (the scheduler rarely makes poor placement decisions).
You configure this tuning setting via kube-scheduler setting
percentageOfNodesToScore. This KubeSchedulerConfiguration setting determines
a threshold for scheduling nodes in your cluster.
Setting the threshold
The percentageOfNodesToScore option accepts whole numeric values between 0
and 100. The value 0 is a special number which indicates that the kube-scheduler
should use its compiled-in default.
If you set percentageOfNodesToScore above 100, kube-scheduler acts as if you
had set a value of 100.
To change the value, edit the
kube-scheduler configuration file
and then restart the scheduler.
In many cases, the configuration file can be found at /etc/kubernetes/config/kube-scheduler.yaml.
After you have made this change, you can run
kubectl get pods -n kube-system | grep kube-scheduler
to verify that the kube-scheduler component is healthy.
Node scoring threshold
To improve scheduling performance, the kube-scheduler can stop looking for feasible nodes once it has found enough of them. In large clusters, this saves time compared to a naive approach that would consider every node.
You specify a threshold for how many nodes are enough, as a whole number percentage of all the nodes in your cluster. The kube-scheduler converts this into an integer number of nodes. During scheduling, if the kube-scheduler has identified enough feasible nodes to exceed the configured percentage, the kube-scheduler stops searching for more feasible nodes and moves on to the scoring phase.
How the scheduler iterates over Nodes describes the process in detail.
Default threshold
If you don't specify a threshold, Kubernetes calculates a figure using a linear formula that yields 50% for a 100-node cluster and yields 10% for a 5000-node cluster. The lower bound for the automatic value is 5%.
This means that the kube-scheduler always scores at least 5% of your cluster no
matter how large the cluster is, unless you have explicitly set
percentageOfNodesToScore to be smaller than 5.
If you want the scheduler to score all nodes in your cluster, set
percentageOfNodesToScore to 100.
Example
Below is an example configuration that sets percentageOfNodesToScore to 50%.
apiVersion: kubescheduler.config.k8s.io/v1alpha1
kind: KubeSchedulerConfiguration
algorithmSource:
provider: DefaultProvider
...
percentageOfNodesToScore: 50
Tuning percentageOfNodesToScore
percentageOfNodesToScore must be a value between 1 and 100 with the default
value being calculated based on the cluster size. There is also a hardcoded
minimum value of 100 nodes.
Note:
In clusters with less than 100 feasible nodes, the scheduler still checks all the nodes because there are not enough feasible nodes to stop the scheduler's search early.
In a small cluster, if you set a low value for percentageOfNodesToScore, your
change will have no or little effect, for a similar reason.
If your cluster has several hundred Nodes or fewer, leave this configuration option at its default value. Making changes is unlikely to improve the scheduler's performance significantly.
An important detail to consider when setting this value is that when a smaller number of nodes in a cluster are checked for feasibility, some nodes are not sent to be scored for a given Pod. As a result, a Node which could possibly score a higher value for running the given Pod might not even be passed to the scoring phase. This would result in a less than ideal placement of the Pod.
You should avoid setting percentageOfNodesToScore very low so that kube-scheduler
does not make frequent, poor Pod placement decisions. Avoid setting the
percentage to anything below 10%, unless the scheduler's throughput is critical
for your application and the score of nodes is not important. In other words, you
prefer to run the Pod on any Node as long as it is feasible.
How the scheduler iterates over Nodes
This section is intended for those who want to understand the internal details of this feature.
In order to give all the Nodes in a cluster a fair chance of being considered
for running Pods, the scheduler iterates over the nodes in a round robin
fashion. You can imagine that Nodes are in an array. The scheduler starts from
the start of the array and checks feasibility of the nodes until it finds enough
Nodes as specified by percentageOfNodesToScore. For the next Pod, the
scheduler continues from the point in the Node array that it stopped at when
checking feasibility of Nodes for the previous Pod.
If Nodes are in multiple zones, the scheduler iterates over Nodes in various zones to ensure that Nodes from different zones are considered in the feasibility checks. As an example, consider six nodes in two zones:
Zone 1: Node 1, Node 2, Node 3, Node 4
Zone 2: Node 5, Node 6
The Scheduler evaluates feasibility of the nodes in this order:
Node 1, Node 5, Node 2, Node 6, Node 3, Node 4
After going over all the Nodes, it goes back to Node 1.
Enabling Opportunistic Batching
FEATURE STATE:
Kubernetes v1.35 [beta](enabled by default)When scheduling large workloads, pod definitions are typically identical and require the scheduler to perform the same operations over and over again. The Opportunistic Batching feature allows the scheduler to reuse the filtering and scoring results between scheduling cycles which greatly speeds up the scheduling process.
Basically, this feature works like:
- The scheduler schedules pod-1 and caches the scheduling result.
- The scheduler schedules pod-2, 3, ... with the cached results.
- The cache expires after 0.5 second. The scheduler schedules the next pod which builds a new cache.
Pods with equivalent scheduling constraints have to come to the scheduling cycle back to back. When the scheduler schedules a pod with different constraints, the cache is not used, but replaced with a new one.
We apply this batching scheduling to specific pods that:
- Don't have inter pod affinity/anti-affinity
- Don't have topology spread constraints
- Don't have DRA (i.e., don't have any Resource Claims)
- Don't request extended resources that are backed by DRA
- Scheduled exclusively on nodes (i.e., placing more than one pod on one node invalidates the cache)
Also, to enable this feature, the scheduler configuration needs to:
- Disable default topology spread (set empty)
- Set
IgnorePreferredTermsOfExistingPodsof InterPodAffinityArgs totrueto make the batching more efficient
Note that whenever:
- Existing pods use pod affinity constraints that match any of the scheduled pods' labels, the feature may bring no benefit
- Custom plugins are used, they need to implement the Signature extension point
The restrictions and conditions are expected to evolve in future releases.
What's next
10.12 - PodGroup Scheduling
FEATURE STATE:
Kubernetes v1.35 [alpha](disabled by default)The standard Kubernetes scheduler evaluates Pods sequentially. When multiple workloads, such as machine learning training jobs, are submitted concurrently, this sequential evaluation can lead to resource deadlocks. For example, two competing workloads might each schedule a subset of their Pods, consuming cluster capacity but leaving neither workload with enough resources to fully start.
The PodGroup scheduling cycle evaluates a group of Pods as a single unit. The scheduler attempts to find placements for all Pods in the group simultaneously. If it cannot find sufficient resources to satisfy the entire group's requirements, none of the Pods are bound.
Additionally, treating the group as a unified entity establishes a foundational architecture that simplifies the implementation of other group-based scheduling features.
This feature depends on the Workload API.
Ensure the GenericWorkload
feature gate and the scheduling.k8s.io/v1alpha1
API group are enabled in the cluster.
PodGroup scheduling cycle
To support scheduling a group of Pods together, the kube-scheduler uses the PodGroup scheduling cycle.
Instead of processing Pods individually and holding them at a WaitOnPermit gate,
the scheduler evaluates the entire group of pending Pods belonging to a specific PodGroup collectively.
Rather than executing separate scheduling cycles for each Pod,
it evaluates feasibility for the entire group and moves directly to the binding phase afterwards.
When the scheduler pops a Pod belonging to a PodGroup, it retrieves all other queued Pods in that group. It then sorts them deterministically based on priority and the time they were initially observed by the scheduler, and initiates the PodGroup scheduling cycle as follows:
Snapshotting the cluster state: When the scheduler begins evaluating a PodGroup, it takes a single snapshot of the cluster state that lasts for the entire duration of the cycle. This ensures the evaluation remains consistent for the whole group and prevents race conditions with other events.
Finding feasible placements: The scheduler runs the PodGroup scheduling algorithm to find valid Node placements for the Pods in the group.
Atomic decision: Depending on the algorithm's outcome, the scheduling decision is applied atomically for the entire PodGroup.
Success: If the scheduler finds sufficient resources and valid placements for the Pods (e.g., satisfying the
minCountconstraint for gang scheduling), those Pods proceed directly to the binding cycle with their selected nodes. Any remaining unschedulable Pods are returned to the scheduling queue to wait for available resources so they can join the already scheduled Pods.Furthermore, if new Pods are added to a PodGroup after others have already been scheduled, the cycle evaluates the new Pods while accounting for the existing ones.
Failure: If the scheduler cannot find enough resources to make the PodGroup feasible (e.g., failing to meet the
minCountconstraint), the entire PodGroup is considered unschedulable. No Pods are bound, but instead, all are returned to the scheduling queue. Standard scheduling backoff logic applies, allowing the PodGroup to be retried later.
By using this single-cycle approach, the scheduler avoids inefficient bottlenecks where partially scheduled groups reserve cluster capacity while waiting indefinitely for the rest of their group to fit.
PodGroup scheduling algorithm
The default PodGroup scheduling algorithm relies heavily on the baseline Pod-based scheduling algorithm. It iterates over the Pods and performs the following for each:
Finds a feasible node using the standard per-Pod filtering and scoring phases.
- If the Pod fits, it is temporarily assumed and reserved on the selected node until the end of the scheduling algorithm.
- If the Pod cannot fit, the scheduler attempts preemption by running the
PostFilterextension point.
Checks whether the schedulable Pods meet the group's scheduling criteria (e.g., the
minCountfor gang scheduling) using thePermitextension point. If it returns aSuccessstatus for any Pod, the PodGroup is deemed feasible. If the algorithm processes all Pods without achieving aSuccessstatus, the PodGroup is considered unschedulable.
Placement scheduling algorithm
FEATURE STATE:
Kubernetes v1.36 [alpha](disabled by default)Placement scheduling algorithm is an alternative PodGroup scheduling algorithm, which uses scheduling plugins to find the optimal placement for the considered PodGroup. Users can accommodate the algorithm to their specific needs by using and configuring plugins.
The algorithm proceeds in three main phases for a given PodGroup:
Phase 1: Candidate placement generation
Generates candidate placements (subsets of nodes, that are theoretically feasible for PodGroup assignment), for example based on the PodGroup's scheduling constraints (which can be defined in the PodGroup object).
This phase executes as extension point: PlacementGeneratePlugin.
Phase 2: Pod-level filtering and feasibility check
Validates each proposed placement, by running a default PodGroup scheduling algorithm, to see if the required number of Pods from the PodGroup can fit. If they can, the placement is marked as feasible.
Phase 3: Placement scoring and selection
Scores all feasible placements to select the optimal domain for the PodGroup.
This phase executes as extension point: PlacementScorePlugin.
Limitations
The PodGroup scheduling algorithm relies on specific Pod sorting and may fail to find a valid placement that could have been discovered by processing the group's Pods in a different order. In particular:
For basic homogeneous Pod groups (i.e., those where all Pods have identical scheduling requirements and lack inter-Pod dependencies like affinity, anti-affinity, or topology spread constraints), the algorithm is expected to find a placement if one exists.
For heterogeneous Pod groups, finding a valid placement is not guaranteed.
For Pod groups with inter-Pod dependencies, finding a valid placement is not guaranteed.
In addition to the above, for cases involving intra-group dependencies (e.g., when the schedulability of one Pod depends on another group member via inter-Pod affinity), this algorithm may fail to find a placement regardless of cluster state due to its deterministic processing order.
For consistent behavior throughout the entire cycle, the algorithm requires that all Pods belonging to a single PodGroup
share the same .spec.schedulerName. This requirement is validated before the cycle starts,
and the PodGroup is rejected if the constraint is not met.
PodGroup conditions
After a PodGroup scheduling cycle completes, the scheduler updates conditions on the
PodGroup's status.conditions:
PodGroupScheduled: reports whether the PodGroup has been successfully scheduled.DisruptionTarget: indicates the PodGroup is about to be terminated due to a disruption such as preemption.
PodGroupScheduled
When the scheduling cycle succeeds, the condition is set to True with reason
Scheduled. For gang policy PodGroups, this means at least minCount Pods were
placed.
When scheduling fails, the condition is set to False with one of the following
reasons:
Unschedulable— the group could not be placed due to resource constraints, affinity or anti-affinity rules, or insufficient capacity for the gang.SchedulerError— scheduling failed because of an internal scheduler error (for example, while parsing scheduling constraints such asnodeAffinity).
DisruptionTarget
When the scheduler preempts a PodGroup to make room for higher-priority PodGroups or
Pods, it sets this condition to True with reason PreemptionByScheduler.
You can check conditions with:
kubectl get podgroup <name> -o jsonpath='{.status.conditions}'
What's next
- Learn about the Workload API.
- See how to reference a Workload in a Pod.
- Read about gang scheduling.
10.13 - Resource Bin Packing
Note:
This article applies to resource bin packing in context of scheduling of a single pod. For bin packing when scheduling pod groups, please read the article about Topology-aware Scheduling.In the scheduling-plugin NodeResourcesFit of kube-scheduler, there are two
scoring strategies that support the bin packing of resources: MostAllocated and RequestedToCapacityRatio.
Enabling bin packing using MostAllocated strategy
The MostAllocated strategy scores the nodes based on the utilization of resources, favoring the ones with higher allocation.
For each resource type, you can set a weight to modify its influence in the node score.
To set the MostAllocated strategy for the NodeResourcesFit plugin, use a
scheduler configuration similar to the following:
apiVersion: kubescheduler.config.k8s.io/v1
kind: KubeSchedulerConfiguration
profiles:
- pluginConfig:
- args:
scoringStrategy:
resources:
- name: cpu
weight: 1
- name: memory
weight: 1
- name: intel.com/foo
weight: 3
- name: intel.com/bar
weight: 3
type: MostAllocated
name: NodeResourcesFit
With this configuration, nodes are scored using a weighted average of utilization across all four
resources. Because intel.com/foo and intel.com/bar each carry a weight of 3 versus 1 for
CPU and memory, the utilization of those extended resources has three times more influence on the
final node score. The scheduler selects the highest-scoring node, aiming to schedule pods on
highly utilized nodes. This helps prepare for scale-down of the least utilized nodes.
To learn more about other parameters and their default configuration, see the API documentation for
NodeResourcesFitArgs.
Enabling bin packing using RequestedToCapacityRatio
The RequestedToCapacityRatio strategy allows the users to specify the resources along with weights for
each resource to score nodes based on the request to capacity ratio. This
allows users to bin pack extended resources by using appropriate parameters
to improve the utilization of scarce resources in large clusters. It favors nodes according to a
configured function of the allocated resources. The behavior of the RequestedToCapacityRatio in
the NodeResourcesFit score function can be controlled by the
scoringStrategy field.
Within the scoringStrategy field, you can configure two parameters: requestedToCapacityRatio and
resources. The shape in the requestedToCapacityRatio
parameter allows the user to tune the function as least requested or most
requested based on utilization and score values. The resources parameter
comprises both the name of the resource to be considered during scoring and
its corresponding weight, which specifies the weight of each resource.
Below is an example configuration that sets
the bin packing behavior for extended resources intel.com/foo and intel.com/bar
using the requestedToCapacityRatio field.
apiVersion: kubescheduler.config.k8s.io/v1
kind: KubeSchedulerConfiguration
profiles:
- pluginConfig:
- args:
scoringStrategy:
resources:
- name: intel.com/foo
weight: 3
- name: intel.com/bar
weight: 3
requestedToCapacityRatio:
shape:
- utilization: 0
score: 0
- utilization: 100
score: 10
type: RequestedToCapacityRatio
name: NodeResourcesFit
In this example, only the extended resources intel.com/foo and intel.com/bar are listed in
resources. The NodeResourcesFit plugin therefore scores nodes based solely on the utilization
of those two resources; CPU and memory do not contribute to the score from this plugin. Because the
configured shape assigns a higher score as utilization increases (score: 0 at utilization: 0
rising to score: 10 at utilization: 100), the scheduler prefers nodes where more of these
extended resources are already in use, bin-packing requests for them onto as few nodes as possible.
To include CPU and memory in this scoring strategy, add them to the resources list. Note that all
resources in the list share the same shape function, so doing so will apply the same bin-packing
curve to those resources as well.
Referencing the KubeSchedulerConfiguration file with the kube-scheduler
flag --config=/path/to/config/file will pass the configuration to the
scheduler.
To learn more about other parameters and their default configuration, see the API documentation for
NodeResourcesFitArgs.
Tuning the score function
shape is used to specify the behavior of the RequestedToCapacityRatio function.
shape:
- utilization: 0
score: 0
- utilization: 100
score: 10
The above arguments give the node a score of 0 if utilization is 0% and 10 for
utilization 100%, thus enabling bin packing behavior. To enable least
requested the score value must be reversed as follows.
shape:
- utilization: 0
score: 10
- utilization: 100
score: 0
resources is an optional parameter which defaults to:
resources:
- name: cpu
weight: 1
- name: memory
weight: 1
It can be used to add extended resources as follows:
resources:
- name: intel.com/foo
weight: 5
- name: cpu
weight: 3
- name: memory
weight: 1
The weight parameter is optional and is set to 1 if not specified. Also, the
weight cannot be set to a negative value.
Node scoring for capacity allocation
This section is intended for those who want to understand the internal details of this feature. Below is an example of how the node score is calculated for a given set of values.
Requested resources:
intel.com/foo : 2
memory: 256MB
cpu: 2
Resource weights:
intel.com/foo : 5
memory: 1
cpu: 3
FunctionShapePoint {{0, 0}, {100, 10}}
Node 1 spec:
Available:
intel.com/foo: 4
memory: 1 GB
cpu: 8
Used:
intel.com/foo: 1
memory: 256MB
cpu: 1
Node score:
intel.com/foo = resourceScoringFunction((2+1),4)
= (100 - ((4-3)*100/4))
= (100 - 25)
= 75 # requested + used = 75% * available
= rawScoringFunction(75)
= 7 # floor(75/10)
memory = resourceScoringFunction((256+256),1024)
= (100 -((1024-512)*100/1024))
= 50 # requested + used = 50% * available
= rawScoringFunction(50)
= 5 # floor(50/10)
cpu = resourceScoringFunction((2+1),8)
= (100 -((8-3)*100/8))
= 37.5 # requested + used = 37.5% * available
= rawScoringFunction(37.5)
= 3 # floor(37.5/10)
NodeScore = ((7 * 5) + (5 * 1) + (3 * 3)) / (5 + 1 + 3)
= 5
Node 2 spec:
Available:
intel.com/foo: 8
memory: 1GB
cpu: 8
Used:
intel.com/foo: 2
memory: 512MB
cpu: 6
Node score:
intel.com/foo = resourceScoringFunction((2+2),8)
= (100 - ((8-4)*100/8)
= (100 - 50)
= 50
= rawScoringFunction(50)
= 5
memory = resourceScoringFunction((256+512),1024)
= (100 -((1024-768)*100/1024))
= 75
= rawScoringFunction(75)
= 7
cpu = resourceScoringFunction((2+6),8)
= (100 -((8-8)*100/8))
= 100
= rawScoringFunction(100)
= 10
NodeScore = ((5 * 5) + (7 * 1) + (10 * 3)) / (5 + 1 + 3)
= 7
What's next
- Read more about the scheduling framework
- Read more about scheduler configuration
10.14 - Workload-Aware Preemption
FEATURE STATE:
Kubernetes v1.36 [alpha](disabled by default)Workload-aware preemption introduces a preemption mechanism specifically designed for PodGroups. When a PodGroup cannot be scheduled, the scheduler utilizes a preemption logic that tries to make scheduling of this PodGroup possible. This approach is used exclusively during PodGroup scheduling and replaces the default preemption mechanism for pods from a given PodGroup.
When this feature is enabled, the scheduler treats the PodGroup as a single preemptor unit, rather than evaluating individual pods from a PodGroup in isolation. To make room for the pending pods in the group, it searches for victims across the entire cluster, and knows how to treat and preempt other PodGroups as victims according to their disruption modes.
This feature depends on the Gang Scheduling
and the Workload API.
Ensure the GenericWorkload
and GangScheduling feature gates
and the scheduling.k8s.io/v1alpha2 API group are enabled in the cluster.
How it works
The workload-aware preemption process follows the same principles as default preemption with a few differences:
Cluster-wide domain: Instead of evaluating preemption node by node, the scheduler evaluates the entire cluster as a single domain. It selects a set of victims across multiple nodes that can be removed to make enough room for the preemptor PodGroup to be scheduled.
Victim importance hierarchy: The scheduler decides which preemption units (individual pods or PodGroups) are more critical and should be spared from preemption using a strict hierarchy:
- Priority: Higher priority units are always more important.
- Workload type: PodGroups are considered more important than individual Pods of the same priority.
- Group size (PodGroups): If both units are PodGroups, the one with more members (larger size) is considered more important.
- Start time: Units that started earlier are more important.
Pod group priority and disruption: The scheduler considers the specific priority and disruption mode of a PodGroup to evaluate if and how its pods can be preempted during preemption events.
Note:
When scheduling a single Pod, the default pod preemption applies. As of 1.36, when the scheduler performs a default preemption for a single Pod and it attempts to preempt a Pod belonging to a PodGroup, it does not respect thepriority or disruptionMode fields of that PodGroup.What's next
- Learn more about PodGroup Priority and Disruption.
- Learn about the Workload API.
- Read more about Gang scheduling.
10.15 - Pod Priority and Preemption
FEATURE STATE:
Kubernetes v1.14 [stable]Pods can have priority. Priority indicates the importance of a Pod relative to other Pods. If a Pod cannot be scheduled, the scheduler tries to preempt (evict) lower priority Pods to make scheduling of the pending Pod possible.
Warning:
In a cluster where not all users are trusted, a malicious user could create Pods at the highest possible priorities, causing other Pods to be evicted/not get scheduled. An administrator can use ResourceQuota to prevent users from creating pods at high priorities.
See limit Priority Class consumption by default for details.
How to use priority and preemption
To use priority and preemption:
Add one or more PriorityClasses.
Create Pods with
priorityClassNameset to one of the added PriorityClasses. Of course you do not need to create the Pods directly; normally you would addpriorityClassNameto the Pod template of a collection object like a Deployment.
Keep reading for more information about these steps.
Note:
Kubernetes already ships with two PriorityClasses:system-cluster-critical and system-node-critical.
These are common classes and are used to ensure that critical components are always scheduled first.PriorityClass
A PriorityClass is a non-namespaced object that defines a mapping from a
priority class name to the integer value of the priority. The name is specified
in the name field of the PriorityClass object's metadata. The value is
specified in the required value field. The higher the value, the higher the
priority.
The name of a PriorityClass object must be a valid
DNS subdomain name,
and it cannot be prefixed with system-.
A PriorityClass object can have any 32-bit integer value smaller than or equal to 1 billion. This means that the range of values for a PriorityClass object is from -2147483648 to 1000000000 inclusive. Larger numbers are reserved for built-in PriorityClasses that represent critical system Pods. A cluster admin should create one PriorityClass object for each such mapping that they want.
PriorityClass also has two optional fields: globalDefault and description.
The globalDefault field indicates that the value of this PriorityClass should
be used for Pods without a priorityClassName. Only one PriorityClass with
globalDefault set to true can exist in the system. If there is no
PriorityClass with globalDefault set, the priority of Pods with no
priorityClassName is zero.
The description field is an arbitrary string. It is meant to tell users of the
cluster when they should use this PriorityClass.
Notes about PodPriority and existing clusters
If you upgrade an existing cluster without this feature, the priority of your existing Pods is effectively zero.
Addition of a PriorityClass with
globalDefaultset totruedoes not change the priorities of existing Pods. The value of such a PriorityClass is used only for Pods created after the PriorityClass is added.If you delete a PriorityClass, existing Pods that use the name of the deleted PriorityClass remain unchanged, but you cannot create more Pods that use the name of the deleted PriorityClass.
Example PriorityClass
apiVersion: scheduling.k8s.io/v1
kind: PriorityClass
metadata:
name: high-priority
value: 1000000
globalDefault: false
description: "This priority class should be used for XYZ service pods only."
Non-preempting PriorityClass
FEATURE STATE:
Kubernetes v1.24 [stable]Pods with preemptionPolicy: Never will be placed in the scheduling queue
ahead of lower-priority pods,
but they cannot preempt other pods.
A non-preempting pod waiting to be scheduled will stay in the scheduling queue,
until sufficient resources are free,
and it can be scheduled.
Non-preempting pods,
like other pods,
are subject to scheduler back-off.
This means that if the scheduler tries these pods and they cannot be scheduled,
they will be retried with lower frequency,
allowing other pods with lower priority to be scheduled before them.
Non-preempting pods may still be preempted by other, high-priority pods.
preemptionPolicy defaults to PreemptLowerPriority,
which will allow pods of that PriorityClass to preempt lower-priority pods
(as is existing default behavior).
If preemptionPolicy is set to Never,
pods in that PriorityClass will be non-preempting.
An example use case is for data science workloads.
A user may submit a job that they want to be prioritized above other workloads,
but do not wish to discard existing work by preempting running pods.
The high priority job with preemptionPolicy: Never will be scheduled
ahead of other queued pods,
as soon as sufficient cluster resources "naturally" become free.
Example Non-preempting PriorityClass
apiVersion: scheduling.k8s.io/v1
kind: PriorityClass
metadata:
name: high-priority-nonpreempting
value: 1000000
preemptionPolicy: Never
globalDefault: false
description: "This priority class will not cause other pods to be preempted."
Pod priority
After you have one or more PriorityClasses, you can create Pods that specify one
of those PriorityClass names in their specifications. The priority admission
controller uses the priorityClassName field and populates the integer value of
the priority. If the priority class is not found, the Pod is rejected.
The following YAML is an example of a Pod configuration that uses the PriorityClass created in the preceding example. The priority admission controller checks the specification and resolves the priority of the Pod to 1000000.
apiVersion: v1
kind: Pod
metadata:
name: nginx
labels:
env: test
spec:
containers:
- name: nginx
image: nginx
imagePullPolicy: IfNotPresent
priorityClassName: high-priority
Effect of Pod priority on scheduling order
When Pod priority is enabled, the scheduler orders pending Pods by their priority and a pending Pod is placed ahead of other pending Pods with lower priority in the scheduling queue. As a result, the higher priority Pod may be scheduled sooner than Pods with lower priority if its scheduling requirements are met. If such Pod cannot be scheduled, the scheduler will continue and try to schedule other lower priority Pods.
Preemption
When Pods are created, they go to a queue and wait to be scheduled. The scheduler picks a Pod from the queue and tries to schedule it on a Node. If no Node is found that satisfies all the specified requirements of the Pod, preemption logic is triggered for the pending Pod. Let's call the pending Pod P. Preemption logic tries to find a Node where removal of one or more Pods with lower priority than P would enable P to be scheduled on that Node. If such a Node is found, one or more lower priority Pods get evicted from the Node. After the Pods are gone, P can be scheduled on the Node.
User exposed information
When Pod P preempts one or more Pods on Node N, nominatedNodeName field of Pod
P's status is set to the name of Node N. This field helps the scheduler track
resources reserved for Pod P and also gives users information about preemptions
in their clusters.
Please note that Pod P is not necessarily scheduled to the "nominated Node".
The scheduler always tries the "nominated Node" before iterating over any other nodes.
After victim Pods are preempted, they get their graceful termination period. If
another node becomes available while scheduler is waiting for the victim Pods to
terminate, scheduler may use the other node to schedule Pod P. As a result
nominatedNodeName and nodeName of Pod spec are not always the same. Also, if
the scheduler preempts Pods on Node N, but then a higher priority Pod than Pod P
arrives, the scheduler may give Node N to the new higher priority Pod. In such a
case, scheduler clears nominatedNodeName of Pod P. By doing this, scheduler
makes Pod P eligible to preempt Pods on another Node.
Limitations of preemption
Graceful termination of preemption victims
When Pods are preempted, the victims get their graceful termination period. They have that much time to finish their work and exit. If they don't, they are killed. This graceful termination period creates a time gap between the point that the scheduler preempts Pods and the time when the pending Pod (P) can be scheduled on the Node (N). In the meantime, the scheduler keeps scheduling other pending Pods. As victims exit or get terminated, the scheduler tries to schedule Pods in the pending queue. Therefore, there is usually a time gap between the point that scheduler preempts victims and the time that Pod P is scheduled. In order to minimize this gap, one can set graceful termination period of lower priority Pods to zero or a small number.
PodDisruptionBudget is supported, but not guaranteed
A PodDisruptionBudget (PDB) allows application owners to limit the number of Pods of a replicated application that are down simultaneously from voluntary disruptions. Kubernetes supports PDB when preempting Pods, but respecting PDB is best effort. The scheduler tries to find victims whose PDB are not violated by preemption, but if no such victims are found, preemption will still happen, and lower priority Pods will be removed despite their PDBs being violated.
Inter-Pod affinity on lower-priority Pods
A Node is considered for preemption only when the answer to this question is yes: "If all the Pods with lower priority than the pending Pod are removed from the Node, can the pending Pod be scheduled on the Node?"
Note:
Preemption does not necessarily remove all lower-priority Pods. If the pending Pod can be scheduled by removing fewer than all lower-priority Pods, then only a portion of the lower-priority Pods are removed. Even so, the answer to the preceding question must be yes. If the answer is no, the Node is not considered for preemption.If a pending Pod has inter-pod affinity to one or more of the lower-priority Pods on the Node, the inter-Pod affinity rule cannot be satisfied in the absence of those lower-priority Pods. In this case, the scheduler does not preempt any Pods on the Node. Instead, it looks for another Node. The scheduler might find a suitable Node or it might not. There is no guarantee that the pending Pod can be scheduled.
Our recommended solution for this problem is to create inter-Pod affinity only towards equal or higher priority Pods.
Cross node preemption
Suppose a Node N is being considered for preemption so that a pending Pod P can be scheduled on N. P might become feasible on N only if a Pod on another Node is preempted. Here's an example:
- Pod P is being considered for Node N.
- Pod Q is running on another Node in the same Zone as Node N.
- Pod P has Zone-wide anti-affinity with Pod Q (
topologyKey: topology.kubernetes.io/zone). - There are no other cases of anti-affinity between Pod P and other Pods in the Zone.
- In order to schedule Pod P on Node N, Pod Q can be preempted, but scheduler does not perform cross-node preemption. So, Pod P will be deemed unschedulable on Node N.
If Pod Q were removed from its Node, the Pod anti-affinity violation would be gone, and Pod P could possibly be scheduled on Node N.
We may consider adding cross Node preemption in future versions if there is enough demand and if we find an algorithm with reasonable performance.
Troubleshooting
Pod priority and preemption can have unwanted side effects. Here are some examples of potential problems and ways to deal with them.
Pods are preempted unnecessarily
Preemption removes existing Pods from a cluster under resource pressure to make
room for higher priority pending Pods. If you give high priorities to
certain Pods by mistake, these unintentionally high priority Pods may cause
preemption in your cluster. Pod priority is specified by setting the
priorityClassName field in the Pod's specification. The integer value for
priority is then resolved and populated to the priority field of podSpec.
To address the problem, you can change the priorityClassName for those Pods
to use lower priority classes, or leave that field empty. An empty
priorityClassName is resolved to zero by default.
When a Pod is preempted, there will be events recorded for the preempted Pod. Preemption should happen only when a cluster does not have enough resources for a Pod. In such cases, preemption happens only when the priority of the pending Pod (preemptor) is higher than the victim Pods. Preemption must not happen when there is no pending Pod, or when the pending Pods have equal or lower priority than the victims. If preemption happens in such scenarios, please file an issue.
Pods are preempted, but the preemptor is not scheduled
When pods are preempted, they receive their requested graceful termination period, which is by default 30 seconds. If the victim Pods do not terminate within this period, they are forcibly terminated. Once all the victims go away, the preemptor Pod can be scheduled.
While the preemptor Pod is waiting for the victims to go away, a higher priority Pod may be created that fits on the same Node. In this case, the scheduler will schedule the higher priority Pod instead of the preemptor.
This is expected behavior: the Pod with the higher priority should take the place of a Pod with a lower priority.
Higher priority Pods are preempted before lower priority pods
The scheduler tries to find nodes that can run a pending Pod. If no node is found, the scheduler tries to remove Pods with lower priority from an arbitrary node in order to make room for the pending pod. If a node with low priority Pods is not feasible to run the pending Pod, the scheduler may choose another node with higher priority Pods (compared to the Pods on the other node) for preemption. The victims must still have lower priority than the preemptor Pod.
When there are multiple nodes available for preemption, the scheduler tries to choose the node with a set of Pods with lowest priority. However, if such Pods have PodDisruptionBudget that would be violated if they are preempted then the scheduler may choose another node with higher priority Pods.
When multiple nodes exist for preemption and none of the above scenarios apply, the scheduler chooses a node with the lowest priority.
Interactions between Pod priority and quality of service
Pod priority and QoS class
are two orthogonal features with few interactions and no default restrictions on
setting the priority of a Pod based on its QoS classes. The scheduler's
preemption logic does not consider QoS when choosing preemption targets.
Preemption considers Pod priority and attempts to choose a set of targets with
the lowest priority. Higher-priority Pods are considered for preemption only if
the removal of the lowest priority Pods is not sufficient to allow the scheduler
to schedule the preemptor Pod, or if the lowest priority Pods are protected by
PodDisruptionBudget.
The kubelet uses Priority to determine pod order for node-pressure eviction. You can use the QoS class to estimate the order in which pods are most likely to get evicted. The kubelet ranks pods for eviction based on the following factors:
- Whether the starved resource usage exceeds requests
- Pod Priority
- Amount of resource usage relative to requests
See Pod selection for kubelet eviction for more details.
kubelet node-pressure eviction does not evict Pods when their usage does not exceed their requests. If a Pod with lower priority is not exceeding its requests, it won't be evicted. Another Pod with higher priority that exceeds its requests may be evicted.
What's next
- Read about using ResourceQuotas in connection with PriorityClasses: limit Priority Class consumption by default
- Learn about Pod Disruption
- Learn about API-initiated Eviction
- Learn about Node-pressure Eviction
10.16 - Node-pressure Eviction
Node-pressure eviction is the process by which the kubelet proactively terminates pods to reclaim resource on nodes.
The kubelet monitors resources like memory, disk space, and filesystem inodes on your cluster's nodes. When one or more of these resources reach specific consumption levels, the kubelet can proactively fail one or more pods on the node to reclaim resources and prevent starvation.
During a node-pressure eviction, the kubelet sets the phase for the
selected pods to Failed, and terminates the Pod.
Node-pressure eviction is not the same as API-initiated eviction.
The kubelet does not respect your configured PodDisruptionBudget
or the pod's
terminationGracePeriodSeconds. If you use soft eviction thresholds,
the kubelet respects your configured eviction-max-pod-grace-period. If you use
hard eviction thresholds, the kubelet uses a 0s grace period (immediate shutdown) for termination.
Self healing behavior
The kubelet attempts to reclaim node-level resources before it terminates end-user pods. For example, it removes unused container images when disk resources are starved.
If the pods are managed by a workload
management object (such as StatefulSet
or Deployment) that
replaces failed pods, the control plane (kube-controller-manager) creates new
pods in place of the evicted pods.
Self healing for static pods
If you are running a static pod on a node that is under resource pressure, the kubelet may evict that static Pod. The kubelet then tries to create a replacement, because static Pods always represent an intent to run a Pod on that node.
The kubelet takes the priority of the static pod into account when creating a replacement. If the static pod manifest specifies a low priority, and there are higher-priority Pods defined within the cluster's control plane, and the node is under resource pressure, the kubelet may not be able to make room for that static pod. The kubelet continues to attempt to run all static pods even when there is resource pressure on a node.
Eviction signals and thresholds
The kubelet uses various parameters to make eviction decisions, like the following:
- Eviction signals
- Eviction thresholds
- Monitoring intervals
Eviction signals
Eviction signals are the current state of a particular resource at a specific point in time. The kubelet uses eviction signals to make eviction decisions by comparing the signals to eviction thresholds, which are the minimum amount of the resource that should be available on the node.
The kubelet uses the following eviction signals:
| Eviction Signal | Description | Linux Only |
|---|---|---|
memory.available | memory.available := node.status.capacity[memory] - node.stats.memory.workingSet | |
nodefs.available | nodefs.available := node.stats.fs.available | |
nodefs.inodesFree | nodefs.inodesFree := node.stats.fs.inodesFree | • |
imagefs.available | imagefs.available := node.stats.runtime.imagefs.available | |
imagefs.inodesFree | imagefs.inodesFree := node.stats.runtime.imagefs.inodesFree | • |
containerfs.available | containerfs.available := node.stats.runtime.containerfs.available | |
containerfs.inodesFree | containerfs.inodesFree := node.stats.runtime.containerfs.inodesFree | • |
pid.available | pid.available := node.stats.rlimit.maxpid - node.stats.rlimit.curproc | • |
In this table, the Description column shows how kubelet gets the value of the signal. Each signal supports either a percentage or a literal value. The kubelet calculates the percentage value relative to the total capacity associated with the signal.
Memory signals
On Linux nodes, the value for memory.available is derived from the cgroupfs instead of tools
like free -m. This is important because free -m does not work in a
container, and if users use the node allocatable
feature, out of resource decisions
are made local to the end user Pod part of the cgroup hierarchy as well as the
root node. This script or
cgroupv2 script
reproduces the same set of steps that the kubelet performs to calculate
memory.available. The kubelet excludes inactive_file (the number of bytes of
file-backed memory on the inactive LRU list) from its calculation, as it assumes that
memory is reclaimable under pressure.
On Windows nodes, the value for memory.available is derived from the node's global
memory commit levels (queried through the GetPerformanceInfo()
system call) by subtracting the node's global CommitTotal from the node's CommitLimit. Please note that CommitLimit can change if the node's page-file size changes!
Filesystem signals
The kubelet recognizes three specific filesystem identifiers that can be used with
eviction signals (<identifier>.inodesFree or <identifier>.available):
nodefs: The node's main filesystem, used for local disk volumes, emptyDir volumes not backed by memory, log storage, ephemeral storage, and more. For example,nodefscontains/var/lib/kubelet.imagefs: An optional filesystem that container runtimes can use to store container images (which are the read-only layers). If there is no separatecontainerfs, the image filesystem also stores container writable layers.containerfs: An optional filesystem that container runtimes can use to store container writable layers. Whencontainerfsis used, theimagefsfilesystem can be split to only store images (read-only layers) and nothing else.
These identifiers describe the filesystems as the kubelet observes them. They do not always mean three different mount points: in common layouts, two or all three identifiers can refer to the same underlying filesystem.
Note:
FEATURE STATE:
Kubernetes v1.31 [beta](enabled by default)The split image filesystem feature adds new eviction signals, thresholds, and
metrics for containerfs. To use containerfs, the Kubernetes release
v1.36 requires the KubeletSeparateDiskGC
feature gate to
be enabled. For Kubernetes v1.36, only CRI-O (v1.29 or
higher) offers containerfs filesystem support.
The kubelet supports three common layouts for container filesystems:
Everything is on the single
nodefs, also referred to as "rootfs" or simply "root". In this layout,nodefs,imagefs, andcontainerfsall refer to the same underlying filesystem.Container runtime storage is on a dedicated disk, separate from the root filesystem. In this layout,
imagefsandcontainerfsrefer to the same underlying filesystem, which stores both image layers and container writable layers. This is often referred to as "split disk" (or "separate disk") filesystem.Container writable layers are on
nodefs, and the container images (read-only layers) are stored on a separateimagefs. In this layout,containerfsandnodefsrefer to the same underlying filesystem. This is often referred to as a "split image" filesystem.
The kubelet will attempt to auto-discover these filesystems with their current configuration directly from the underlying container runtime and will ignore other local node filesystems.
The kubelet does not support other container filesystems or storage configurations, and it does not currently support multiple filesystems for images and containers.
Deprecated kubelet garbage collection features
Some kubelet garbage collection features are deprecated in favor of eviction:
| Existing Flag | Rationale |
|---|---|
--maximum-dead-containers | deprecated once old logs are stored outside of container's context |
--maximum-dead-containers-per-container | deprecated once old logs are stored outside of container's context |
--minimum-container-ttl-duration | deprecated once old logs are stored outside of container's context |
Eviction thresholds
You can specify custom eviction thresholds for the kubelet to use when it makes eviction decisions. You can configure soft and hard eviction thresholds.
Eviction thresholds have the form [eviction-signal][operator][quantity], where:
eviction-signalis the eviction signal to use.operatoris the relational operator you want, such as<(less than).quantityis the eviction threshold amount, such as1Gi. The value ofquantitymust match the quantity representation used by Kubernetes. You can use either literal values or percentages (%).
For example, if a node has 10GiB of total memory and you want trigger eviction if
the available memory falls below 1GiB, you can define the eviction threshold as
either memory.available<10% or memory.available<1Gi (you cannot use both).
Soft eviction thresholds
A soft eviction threshold pairs an eviction threshold with a required administrator-specified grace period. The kubelet does not evict pods until the grace period is exceeded. The kubelet returns an error on startup if you do not specify a grace period.
You can specify both a soft eviction threshold grace period and a maximum allowed pod termination grace period for kubelet to use during evictions. If you specify a maximum allowed grace period and the soft eviction threshold is met, the kubelet uses the lesser of the two grace periods. If you do not specify a maximum allowed grace period, the kubelet kills evicted pods immediately without graceful termination.
You can use the following flags to configure soft eviction thresholds:
eviction-soft: A set of eviction thresholds likememory.available<1.5Githat can trigger pod eviction if held over the specified grace period.eviction-soft-grace-period: A set of eviction grace periods likememory.available=1m30sthat define how long a soft eviction threshold must hold before triggering a Pod eviction.eviction-max-pod-grace-period: The maximum allowed grace period (in seconds) to use when terminating pods in response to a soft eviction threshold being met.
Hard eviction thresholds
A hard eviction threshold has no grace period. When a hard eviction threshold is met, the kubelet kills pods immediately without graceful termination to reclaim the starved resource.
You can use the eviction-hard flag to configure a set of hard eviction
thresholds like memory.available<1Gi.
The kubelet has the following default hard eviction thresholds:
memory.available<100Mi(Linux nodes)memory.available<500Mi(Windows nodes)nodefs.available<10%imagefs.available<15%nodefs.inodesFree<5%(Linux nodes)imagefs.inodesFree<5%(Linux nodes)
These default values of hard eviction thresholds will only be set if none of the parameters is changed. If you change the value of any parameter, then the values of other parameters will not be inherited as the default values and will be set to zero. In order to provide custom values, you should provide all the thresholds respectively. You can also set the kubelet config MergeDefaultEvictionSettings to true in the kubelet configuration file. If set to true and any parameter is changed, then the other parameters will inherit their default values instead of 0.
The containerfs.available and containerfs.inodesFree (Linux nodes) default
eviction thresholds will be set as follows:
If
containerfsandnodefsrefer to the same underlying filesystem, thencontainerfsthresholds are set the same asnodefs.If
containerfsandimagefsrefer to the same underlying filesystem, thencontainerfsthresholds are set the same asimagefs.
Setting custom overrides for thresholds related to containerfs is not
supported, and a warning will be issued if an attempt to do so is made; any
provided custom values will be ignored.
Eviction monitoring interval
The kubelet evaluates eviction thresholds based on its configured housekeeping-interval,
which defaults to 10s.
Node conditions
The kubelet reports node conditions to reflect that the node is under pressure because hard or soft eviction threshold is met, independent of configured grace periods.
The kubelet maps eviction signals to node conditions as follows:
| Node Condition | Eviction Signal | Description |
|---|---|---|
MemoryPressure | memory.available | Available memory on the node has satisfied an eviction threshold |
DiskPressure | nodefs.available, nodefs.inodesFree, imagefs.available, imagefs.inodesFree, containerfs.available, or containerfs.inodesFree | Available disk space and inodes on either the node's root filesystem, image filesystem, or container filesystem has satisfied an eviction threshold |
PIDPressure | pid.available | Available processes identifiers on the (Linux) node has fallen below an eviction threshold |
The control plane also maps these node conditions to taints.
The kubelet updates the node conditions based on the configured
--node-status-update-frequency, which defaults to 10s.
Node condition oscillation
In some cases, nodes oscillate above and below soft eviction thresholds without
holding for the defined grace periods. This causes the reported node condition
to constantly switch between true and false, leading to bad eviction decisions.
To protect against oscillation, you can use the eviction-pressure-transition-period
flag, which controls how long the kubelet must wait before transitioning a node
condition to a different state. The transition period has a default value of 5m.
Reclaiming node level resources
The kubelet tries to reclaim node-level resources before it evicts end-user pods.
When a DiskPressure node condition is reported, the kubelet reclaims node-level
resources based on the filesystems on the node.
Without imagefs or containerfs
If the node only has a nodefs filesystem that meets eviction thresholds,
the kubelet frees up disk space in the following order:
- Garbage collect dead pods and containers.
- Delete unused images.
With imagefs
If the node has a dedicated imagefs filesystem for container runtimes to use,
the kubelet does the following:
If the
nodefsfilesystem meets the eviction thresholds, the kubelet garbage collects dead pods and containers.If the
imagefsfilesystem meets the eviction thresholds, the kubelet deletes all unused images.
With imagefs and containerfs
If the node has a dedicated containerfs alongside the imagefs filesystem
configured for the container runtimes to use, then kubelet will attempt to
reclaim resources as follows:
If the
containerfsfilesystem meets the eviction thresholds, the kubelet garbage collects dead pods and containers.If the
imagefsfilesystem meets the eviction thresholds, the kubelet deletes all unused images.
Pod selection for kubelet eviction
If the kubelet's attempts to reclaim node-level resources don't bring the eviction signal below the threshold, the kubelet begins to evict end-user pods.
The kubelet uses the following parameters to determine the pod eviction order:
- Whether the pod's resource usage exceeds requests
- Pod Priority
- The pod's resource usage relative to requests
As a result, kubelet ranks and evicts pods in the following order:
BestEffortorBurstablepods where the usage exceeds requests. These pods are evicted based on their Priority and then by how much their usage level exceeds the request.Guaranteedpods andBurstablepods where the usage is less than requests are evicted last, based on their Priority.
Note:
The kubelet does not use the pod's QoS class to determine the eviction order. You can use the QoS class to estimate the most likely pod eviction order when reclaiming resources like memory. QoS classification does not apply to EphemeralStorage requests, so the above scenario will not apply if the node is, for example, underDiskPressure.Guaranteed pods are guaranteed only when requests and limits are specified for
all the containers and they are equal. These pods will never be evicted because
of another pod's resource consumption. If a system daemon (such as kubelet
and journald) is consuming more resources than were reserved via
system-reserved or kube-reserved allocations, and the node only has
Guaranteed or Burstable pods using less resources than requests left on it,
then the kubelet must choose to evict one of these pods to preserve node stability
and to limit the impact of resource starvation on other pods. In this case, it
will choose to evict pods of lowest Priority first.
If you are running a static pod
and want to avoid having it evicted under resource pressure, set the
priority field for that Pod directly. Static pods do not support the
priorityClassName field.
When the kubelet evicts pods in response to inode or process ID starvation, it uses the Pods' relative priority to determine the eviction order, because inodes and PIDs have no requests.
The kubelet sorts pods differently based on whether the node has a dedicated
imagefs or containerfs filesystem:
Without imagefs or containerfs (nodefs and imagefs use the same filesystem)
- If
nodefstriggers evictions, the kubelet sorts pods based on their total disk usage (local volumes + logs and a writable layer of all containers).
With imagefs (nodefs and imagefs filesystems are separate)
If
nodefstriggers evictions, the kubelet sorts pods based onnodefsusage (local volumes + logs of all containers).If
imagefstriggers evictions, the kubelet sorts pods based on the writable layer usage of all containers.
With imagefs and containerfs (imagefs and containerfs have been split)
If
containerfstriggers evictions, the kubelet sorts pods based oncontainerfsusage (local volumes + logs and a writable layer of all containers).If
imagefstriggers evictions, the kubelet sorts pods based on thestorage of imagesrank, which represents the disk usage of a given image.
Minimum eviction reclaim
Note:
As of Kubernetes v1.36, you cannot set a custom value for thecontainerfs.available metric. The configuration for this specific
metric will be set automatically to reflect values set for either the nodefs
or imagefs, depending on the configuration.In some cases, pod eviction only reclaims a small amount of the starved resource. This can lead to the kubelet repeatedly hitting the configured eviction thresholds and triggering multiple evictions.
You can use the --eviction-minimum-reclaim flag or a kubelet config file
to configure a minimum reclaim amount for each resource. When the kubelet notices
that a resource is starved, it continues to reclaim that resource until it
reclaims the quantity you specify.
For example, the following configuration sets minimum reclaim amounts:
apiVersion: kubelet.config.k8s.io/v1beta1
kind: KubeletConfiguration
evictionHard:
memory.available: "500Mi"
nodefs.available: "1Gi"
imagefs.available: "100Gi"
evictionMinimumReclaim:
memory.available: "0Mi"
nodefs.available: "500Mi"
imagefs.available: "2Gi"
In this example, if the nodefs.available signal meets the eviction threshold,
the kubelet reclaims the resource until the signal reaches the threshold of 1GiB,
and then continues to reclaim the minimum amount of 500MiB, until the available
nodefs storage value reaches 1.5GiB.
Similarly, the kubelet tries to reclaim the imagefs resource until the imagefs.available
value reaches 102Gi, representing 102 GiB of available container image storage. If the amount
of storage that the kubelet could reclaim is less than 2GiB, the kubelet doesn't reclaim anything.
The default eviction-minimum-reclaim is 0 for all resources.
Node out of memory behavior
If the node experiences an out of memory (OOM) event prior to the kubelet being able to reclaim memory, the node depends on the oom_killer to respond.
The kubelet sets an oom_score_adj value for each container based on the QoS for the pod.
| Quality of Service | oom_score_adj |
|---|---|
Guaranteed | -997 |
BestEffort | 1000 |
Burstable | min(max(2, 1000 - (1000 × memoryRequestBytes) / machineMemoryCapacityBytes), 999) |
Note:
The kubelet also sets anoom_score_adj value of -997 for any containers in Pods that have
system-node-critical Priority.If the kubelet can't reclaim memory before a node experiences OOM, the
oom_killer calculates an oom_score based on the percentage of memory it's
using on the node, and then adds the oom_score_adj to get an effective oom_score
for each container. It then kills the container with the highest score.
This means that containers in low QoS pods that consume a large amount of memory relative to their scheduling requests are killed first.
Unlike pod eviction, if a container is OOM killed, the kubelet can restart it
based on its restartPolicy.
Good practices
The following sections describe good practice for eviction configuration.
Schedulable resources and eviction policies
When you configure the kubelet with an eviction policy, you should make sure that the scheduler will not schedule pods if they will trigger eviction because they immediately induce memory pressure.
Consider the following scenario:
- Node memory capacity: 10GiB
- Operator wants to reserve 10% of memory capacity for system daemons (kernel,
kubelet, etc.) - Operator wants to evict Pods at 95% memory utilization to reduce incidence of system OOM.
For this to work, the kubelet is launched as follows:
--eviction-hard=memory.available<500Mi
--system-reserved=memory=1.5Gi
In this configuration, the --system-reserved flag reserves 1.5GiB of memory
for the system, which is 10% of the total memory + the eviction threshold amount.
The node can reach the eviction threshold if a pod is using more than its request,
or if the system is using more than 1GiB of memory, which makes the memory.available
signal fall below 500MiB and triggers the threshold.
DaemonSets and node-pressure eviction
Pod priority is a major factor in making eviction decisions. If you do not want
the kubelet to evict pods that belong to a DaemonSet, give those pods a high
enough priority by specifying a suitable priorityClassName in the pod spec.
You can also use a lower priority, or the default, to only allow pods from that
DaemonSet to run when there are enough resources.
Known issues
The following sections describe known issues related to out of resource handling.
kubelet may not observe memory pressure right away
By default, the kubelet polls cAdvisor to collect memory usage stats at a
regular interval. If memory usage increases within that window rapidly, the
kubelet may not observe MemoryPressure fast enough, and the OOM killer
will still be invoked.
You can use the --kernel-memcg-notification flag to enable the memcg
notification API on the kubelet to get notified immediately when a threshold
is crossed.
If you are not trying to achieve extreme utilization, but a sensible measure of
overcommit, a viable workaround for this issue is to use the --kube-reserved
and --system-reserved flags to allocate memory for the system.
active_file memory is not considered as available memory
On Linux, the kernel tracks the number of bytes of file-backed memory on active
least recently used (LRU) list as the active_file statistic. The kubelet treats active_file memory
areas as not reclaimable. For workloads that make intensive use of block-backed
local storage, including ephemeral local storage, kernel-level caches of file
and block data means that many recently accessed cache pages are likely to be
counted as active_file. If enough of these kernel block buffers are on the
active LRU list, the kubelet is liable to observe this as high resource use and
taint the node as experiencing memory pressure - triggering pod eviction.
For more details, see https://github.com/kubernetes/kubernetes/issues/43916
You can work around that behavior by setting the memory limit and memory request the same for containers likely to perform intensive I/O activity. You will need to estimate or measure an optimal memory limit value for that container.
What's next
- Learn about API-initiated Eviction
- Learn about Pod Priority and Preemption
- Learn about PodDisruptionBudgets
- Learn about Quality of Service (QoS)
- Check out the Eviction API
10.17 - API-initiated Eviction
API-initiated eviction is the process by which you use the Eviction API
to create an Eviction object that triggers graceful pod termination.
You can request eviction by calling the Eviction API directly, or programmatically
using a client of the API server, like the kubectl drain command. This
creates an Eviction object, which causes the API server to terminate the Pod.
API-initiated evictions respect your configured PodDisruptionBudgets
and terminationGracePeriodSeconds.
Using the API to create an Eviction object for a Pod is like performing a
policy-controlled DELETE operation
on the Pod.
Calling the Eviction API
You can use a Kubernetes language client
to access the Kubernetes API and create an Eviction object. To do this, you
POST the attempted operation, similar to the following example:
Note:
policy/v1 Eviction is available in v1.22+. Use policy/v1beta1 with prior releases.{
"apiVersion": "policy/v1",
"kind": "Eviction",
"metadata": {
"name": "quux",
"namespace": "default"
}
}
Note:
Deprecated in v1.22 in favor ofpolicy/v1{
"apiVersion": "policy/v1beta1",
"kind": "Eviction",
"metadata": {
"name": "quux",
"namespace": "default"
}
}
Alternatively, you can attempt an eviction operation by accessing the API using
curl or wget, similar to the following example:
curl -v -H 'Content-type: application/json' https://your-cluster-api-endpoint.example/api/v1/namespaces/default/pods/quux/eviction -d @eviction.json
How API-initiated eviction works
When you request an eviction using the API, the API server performs admission checks and responds in one of the following ways:
200 OK: the eviction is allowed, theEvictionsubresource is created, and the Pod is deleted, similar to sending aDELETErequest to the Pod URL.429 Too Many Requests: the eviction is not currently allowed because of the configured PodDisruptionBudget. You may be able to attempt the eviction again later. You might also see this response because of API rate limiting.500 Internal Server Error: the eviction is not allowed because there is a misconfiguration, like if multiple PodDisruptionBudgets reference the same Pod.
If the Pod you want to evict isn't part of a workload that has a
PodDisruptionBudget, the API server always returns 200 OK and allows the
eviction.
If the API server allows the eviction, the Pod is deleted as follows:
- The
Podresource in the API server is updated with a deletion timestamp, after which the API server considers thePodresource to be terminated. ThePodresource is also marked with the configured grace period. - The kubelet on the node where the local Pod is running notices that the
Podresource is marked for termination and starts to gracefully shut down the local Pod. - While the kubelet is shutting the Pod down, the control plane removes the Pod from EndpointSlice objects. As a result, controllers no longer consider the Pod as a valid object.
- After the grace period for the Pod expires, the kubelet forcefully terminates the local Pod.
- The kubelet tells the API server to remove the
Podresource. - The API server deletes the
Podresource.
Troubleshooting stuck evictions
In some cases, your applications may enter a broken state, where the Eviction
API will only return 429 or 500 responses until you intervene. This can
happen if, for example, a ReplicaSet creates pods for your application but new
pods do not enter a Ready state. You may also notice this behavior in cases
where the last evicted Pod had a long termination grace period.
If you notice stuck evictions, try one of the following solutions:
- Abort or pause the automated operation causing the issue. Investigate the stuck application before you restart the operation.
- Wait a while, then directly delete the Pod from your cluster control plane instead of using the Eviction API.
What's next
- Learn how to protect your applications with a Pod Disruption Budget.
- Learn about Node-pressure Eviction.
- Learn about Pod Priority and Preemption.
10.18 - Node Declared Features
FEATURE STATE:
Kubernetes v1.36 [beta](enabled by default)Kubernetes nodes use declared features to report the availability of specific
features that are new or feature-gated. Control plane components
utilize this information to make better decisions. The kube-scheduler, via the
NodeDeclaredFeatures plugin, ensures pods are only placed on nodes that
explicitly support the features the pod requires. Additionally, the
NodeDeclaredFeatureValidator admission controller validates pod updates
against a node's declared features.
This mechanism helps manage version skew and improve cluster stability, especially during cluster upgrades or in mixed-version environments where nodes might not all have the same features enabled. This is intended for Kubernetes feature developers introducing new node-level features and works in the background; application developers deploying Pods do not need to interact with this framework directly.
How it Works
- Kubelet Feature Reporting: At startup, the kubelet on each node detects
which managed Kubernetes features are currently enabled and reports them
in the
.status.declaredFeaturesfield of the Node. Only features under active development are included in this field. - Scheduler Filtering: The default kube-scheduler uses the
NodeDeclaredFeaturesplugin. This plugin:- In the
PreFilterstage, checks thePodSpecto infer the set of node features required by the pod. - In the
Filterstage, checks if the features listed in the node's.status.declaredFeaturessatisfy the requirements inferred for the Pod. Pods will not be scheduled on nodes lacking the required features. Custom schedulers can also utilize the.status.declaredFeaturesfield to enforce similar constraints.
- In the
- Admission Control: The
nodedeclaredfeaturevalidatoradmission controller can reject Pods that require features not declared by the node they are bound to, preventing issues during pod updates.
Enabling node declared features
To use Node Declared Features, the NodeDeclaredFeatures
feature gate
must be enabled on the kube-apiserver, kube-scheduler, and kubelet
components.
What's next
- Read the KEP for more details: KEP-5328: Node Declared Features
- Read about the
NodeDeclaredFeatureValidatoradmission controller.
11 - Cluster Administration
Lower-level detail relevant to creating or administering a Kubernetes cluster.
The cluster administration overview is for anyone creating or administering a Kubernetes cluster. It assumes some familiarity with core Kubernetes concepts.
Planning a cluster
See the guides in Setup for examples of how to plan, set up, and configure Kubernetes clusters. The solutions listed in this article are called distros.
Note:
Not all distros are actively maintained. Choose distros which have been tested with a recent version of Kubernetes.Before choosing a guide, here are some considerations:
- Do you want to try out Kubernetes on your computer, or do you want to build a high-availability, multi-node cluster? Choose distros best suited for your needs.
- Will you be using a hosted Kubernetes cluster, such as Google Kubernetes Engine, or hosting your own cluster?
- Will your cluster be on-premises, or in the cloud (IaaS)? Kubernetes does not directly support hybrid clusters. Instead, you can set up multiple clusters.
- If you are configuring Kubernetes on-premises, consider which networking model fits best.
- Will you be running Kubernetes on "bare metal" hardware or on virtual machines (VMs)?
- Do you want to run a cluster, or do you expect to do active development of Kubernetes project code? If the latter, choose an actively-developed distro. Some distros only use binary releases, but offer a greater variety of choices.
- Familiarize yourself with the components needed to run a cluster.
Managing a cluster
Learn how to manage nodes.
- Read about Node autoscaling.
Learn how to set up and manage the resource quota for shared clusters.
Securing a cluster
Generate Certificates describes the steps to generate certificates using different tool chains.
Kubernetes Container Environment describes the environment for Kubelet managed containers on a Kubernetes node.
Controlling Access to the Kubernetes API describes how Kubernetes implements access control for its own API.
Authenticating explains authentication in Kubernetes, including the various authentication options.
Authorization is separate from authentication, and controls how HTTP calls are handled.
Using Admission Controllers explains plug-ins which intercepts requests to the Kubernetes API server after authentication and authorization.
Admission Webhook Good Practices provides good practices and considerations when designing mutating admission webhooks and validating admission webhooks.
Using Sysctls in a Kubernetes Cluster describes to an administrator how to use the
sysctlcommand-line tool to set kernel parameters .Auditing describes how to interact with Kubernetes' audit logs.
Securing the kubelet
Optional Cluster Services
DNS Integration describes how to resolve a DNS name directly to a Kubernetes service.
Logging and Monitoring Cluster Activity explains how logging in Kubernetes works and how to implement it.
11.1 - Node Shutdowns
In a Kubernetes cluster, a node can be shut down in a planned graceful way or unexpectedly because of reasons such as a power outage or something else external. A node shutdown could lead to workload failure if the node is not drained before the shutdown. A node shutdown can be either graceful or non-graceful.
Caution:
The unattended-upgrades package from Debian conflicts with node graceful shutdown in
its normal configuration.
If you use the default configuration of unattended-upgrades, which customizes the server shutdown
grace period, then the kubelet fails to obtain the necessary lock to handle shutdown events properly.
This happens if the shutdownGracePeriod value is greater than 30 seconds.
To avoid this, you can suppress part of the unattended-upgrades configuration,
by making /etc/systemd/logind.conf.d/unattended-upgrades-logind-maxdelay.conf be a symbolic link
to /dev/null.
For more details, refer to the
logind.conf documentation.
Graceful node shutdown
The kubelet attempts to detect node system shutdown and terminates pods running on the node.
Kubelet ensures that pods follow the normal pod termination process during the node shutdown. During node shutdown, the kubelet does not accept new Pods (even if those Pods are already bound to the node).
Enabling graceful node shutdown
FEATURE STATE:
Kubernetes v1.21 [beta](enabled by default)On Linux, the graceful node shutdown feature is controlled with the GracefulNodeShutdown
feature gate which is
enabled by default in 1.21.
Note:
The graceful node shutdown feature depends on systemd since it takes advantage of systemd inhibitor locks to delay the node shutdown with a given duration.FEATURE STATE:
Kubernetes v1.34 [beta](enabled by default)On Windows, the graceful node shutdown feature is controlled with the WindowsGracefulNodeShutdown
feature gate
which is introduced in 1.32 as an alpha feature. In Kubernetes 1.34 the feature is Beta
and is enabled by default.
Note:
The Windows graceful node shutdown feature depends on kubelet running as a Windows service, it will then have a registered service control handler to delay the preshutdown event with a given duration.Windows graceful node shutdown can not be cancelled.
If kubelet is not running as a Windows service, it will not be able to set and monitor the Preshutdown event, the node will have to go through the Non-Graceful Node Shutdown procedure mentioned above.
In the case where the Windows graceful node shutdown feature is enabled, but the kubelet is not running as a Windows service, the kubelet will continue running instead of failing. However, it will log an error indicating that it needs to be run as a Windows service.
Configuring graceful node shutdown
Note that by default, both configuration options described below,
shutdownGracePeriod and shutdownGracePeriodCriticalPods, are set to zero,
thus not activating the graceful node shutdown functionality.
To activate the feature, both options should be configured appropriately and
set to non-zero values.
Once the kubelet is notified of a node shutdown, it sets a NotReady condition on
the Node, with the reason set to "node is shutting down". The kube-scheduler honors this condition
and does not schedule any Pods onto the affected node; other third-party schedulers are
expected to follow the same logic. This means that new Pods won't be scheduled onto that node
and therefore none will start.
The kubelet also rejects Pods during the PodAdmission phase if an ongoing
node shutdown has been detected, so that even Pods with a
toleration for
node.kubernetes.io/not-ready:NoSchedule do not start there.
When kubelet is setting that condition on its Node via the API, the kubelet also begins terminating any Pods that are running locally.
During a graceful shutdown, kubelet terminates pods in two phases:
- Terminate regular pods running on the node.
- Terminate critical pods running on the node.
The graceful node shutdown feature is configured with two
KubeletConfiguration options:
shutdownGracePeriod:Specifies the total duration that the node should delay the shutdown by. This is the total grace period for pod termination for both regular and critical pods.
shutdownGracePeriodCriticalPods:Specifies the duration used to terminate critical pods during a node shutdown. This value should be less than
shutdownGracePeriod.
Note:
There are cases when Node termination was cancelled by the system (or perhaps manually by an administrator). In either of those situations the Node will return to theReady state.
However, Pods which already started the process of termination will not be restored by kubelet
and will need to be re-scheduled.For example, if shutdownGracePeriod=30s, and
shutdownGracePeriodCriticalPods=10s, kubelet will delay the node shutdown by
30 seconds. During the shutdown, the first 20 (30-10) seconds would be reserved
for gracefully terminating normal pods, and the last 10 seconds would be
reserved for terminating critical pods.
Note:
When pods were evicted during the graceful node shutdown, they are marked as shutdown.
Running kubectl get pods shows the status of the evicted pods as Terminated.
And kubectl describe pod indicates that the pod was evicted because of node shutdown:
Reason: Terminated
Message: Pod was terminated in response to imminent node shutdown.
Pod Priority based graceful node shutdown
FEATURE STATE:
Kubernetes v1.24 [beta](enabled by default)To provide more flexibility during graceful node shutdown around the ordering of pods during shutdown, graceful node shutdown honors the PriorityClass for Pods, provided that you enabled this feature in your cluster. The feature allows cluster administrators to explicitly define the ordering of pods during graceful node shutdown based on priority classes.
The Graceful Node Shutdown feature, as described above, shuts down pods in two phases, non-critical pods, followed by critical pods. If additional flexibility is needed to explicitly define the ordering of pods during shutdown in a more granular way, pod priority based graceful shutdown can be used.
When graceful node shutdown honors pod priorities, this makes it possible to do graceful node shutdown in multiple phases, each phase shutting down a particular priority class of pods. The kubelet can be configured with the exact phases and shutdown time per phase.
Assuming the following custom pod priority classes in a cluster,
| Pod priority class name | Pod priority class value |
|---|---|
custom-class-a | 100000 |
custom-class-b | 10000 |
custom-class-c | 1000 |
regular/unset | 0 |
Within the kubelet configuration
the settings for shutdownGracePeriodByPodPriority could look like:
| Pod priority class value | Shutdown period |
|---|---|
| 100000 | 10 seconds |
| 10000 | 180 seconds |
| 1000 | 120 seconds |
| 0 | 60 seconds |
The corresponding kubelet config YAML configuration would be:
shutdownGracePeriodByPodPriority:
- priority: 100000
shutdownGracePeriodSeconds: 10
- priority: 10000
shutdownGracePeriodSeconds: 180
- priority: 1000
shutdownGracePeriodSeconds: 120
- priority: 0
shutdownGracePeriodSeconds: 60
The above table implies that any pod with priority value >= 100000 will get
just 10 seconds to shut down, any pod with value >= 10000 and < 100000 will get 180
seconds to shut down, any pod with value >= 1000 and < 10000 will get 120 seconds to shut down.
Finally, all other pods will get 60 seconds to shut down.
One doesn't have to specify values corresponding to all of the classes. For example, you could instead use these settings:
| Pod priority class value | Shutdown period |
|---|---|
| 100000 | 300 seconds |
| 1000 | 120 seconds |
| 0 | 60 seconds |
In the above case, the pods with custom-class-b will go into the same bucket
as custom-class-c for shutdown.
If there are no pods in a particular range, then the kubelet does not wait for pods in that priority range. Instead, the kubelet immediately skips to the next priority class value range.
If this feature is enabled and no configuration is provided, then no ordering action will be taken.
Using this feature requires enabling the GracefulNodeShutdownBasedOnPodPriority
feature gate,
and setting ShutdownGracePeriodByPodPriority in the
kubelet config
to the desired configuration containing the pod priority class values and
their respective shutdown periods.
Note:
The ability to take Pod priority into account during graceful node shutdown was introduced as an Alpha feature in Kubernetes v1.23. In Kubernetes 1.36 the feature is Beta and is enabled by default.Metrics graceful_shutdown_start_time_seconds and graceful_shutdown_end_time_seconds
are emitted under the kubelet subsystem to monitor node shutdowns.
Non-graceful node shutdown handling
FEATURE STATE:
Kubernetes v1.28 [stable](enabled by default)A node shutdown action may not be detected by kubelet's Node Shutdown Manager, either because the command does not trigger the inhibitor locks mechanism used by kubelet or because of a user error, i.e., the ShutdownGracePeriod and ShutdownGracePeriodCriticalPods are not configured properly. Please refer to above section Graceful Node Shutdown for more details.
When a node is shutdown but not detected by kubelet's Node Shutdown Manager, the pods that are part of a StatefulSet will be stuck in terminating status on the shutdown node and cannot move to a new running node. This is because kubelet on the shutdown node is not available to delete the pods so the StatefulSet cannot create a new pod with the same name. If there are volumes used by the pods, the VolumeAttachments will not be deleted from the original shutdown node so the volumes used by these pods cannot be attached to a new running node. As a result, the application running on the StatefulSet cannot function properly. If the original shutdown node comes up, the pods will be deleted by kubelet and new pods will be created on a different running node. If the original shutdown node does not come up, these pods will be stuck in terminating status on the shutdown node forever.
To mitigate the above situation, a user can manually add the taint node.kubernetes.io/out-of-service
with either NoExecute or NoSchedule effect to a Node marking it out-of-service.
If a Node is marked out-of-service with this taint, the pods on the node will be forcefully deleted
if there are no matching tolerations on it and volume detach operations for the pods terminating on
the node will happen immediately. This allows the Pods on the out-of-service node to recover quickly
on a different node.
During a non-graceful shutdown, Pods are terminated in the two phases:
- Force delete the Pods that do not have matching
out-of-servicetolerations. - Immediately perform detach volume operation for such pods.
Note:
- Before adding the taint
node.kubernetes.io/out-of-service, it should be verified that the node is already in shutdown or power off state (not in the middle of restarting). - The user is required to manually remove the out-of-service taint after the pods are moved to a new node and the user has checked that the shutdown node has been recovered since the user was the one who originally added the taint.
Forced storage detach on timeout
In any situation where a pod deletion has not succeeded for 6 minutes, kubernetes will
force detach volumes being unmounted if the node is unhealthy at that instant. Any
workload still running on the node that uses a force-detached volume will cause a
violation of the
CSI specification,
which states that ControllerUnpublishVolume "must be called after all
NodeUnstageVolume and NodeUnpublishVolume on the volume are called and succeed".
In such circumstances, volumes on the node in question might encounter data corruption.
The forced storage detach behaviour is optional; users might opt to use the "Non-graceful node shutdown" feature instead.
Force storage detach on timeout can be disabled by setting the disable-force-detach-on-timeout
config field in kube-controller-manager. Disabling the force detach on timeout feature means
that a volume that is hosted on a node that is unhealthy for more than 6 minutes will not have
its associated
VolumeAttachment
deleted.
After this setting has been applied, unhealthy pods still attached to volumes must be recovered via the Non-Graceful Node Shutdown procedure mentioned above.
Note:
- Caution must be taken while using the Non-Graceful Node Shutdown procedure.
- Deviation from the steps documented above can result in data corruption.
What's next
Learn more about the following:
- Blog: Non-Graceful Node Shutdown.
- Cluster Architecture: Nodes.
11.2 - Swap memory management
Kubernetes can be configured to use swap memory on a node, allowing the kernel to free up physical memory by swapping out pages to backing storage. This is useful for multiple use-cases. For example, nodes running workloads that can benefit from using swap, such as those that have large memory footprints but only access a portion of that memory at any given time. It also helps prevent Pods from being terminated during memory pressure spikes, shields nodes from system-level memory spikes that might compromise its stability, allows for more flexible memory management on the node, and much more.
To learn about configuring swap in your cluster, read Configuring swap memory on Kubernetes nodes.
Operating system support
- Linux nodes support swap; you need to configure each node to enable it. By default, the kubelet will not start on a Linux node that has swap enabled.
- Windows nodes require swap space. By default, the kubelet does not start on a Windows node that has swap disabled.
How does it work?
There are a number of possible ways that one could envision swap use on a node. If kubelet is already running on a node, it would need to be restarted after swap is provisioned in order to identify it.
When kubelet starts on a node in which swap is provisioned and available
(with the failSwapOn: false configuration), kubelet will:
- Be able to start on this swap-enabled node.
- Direct the Container Runtime Interface (CRI) implementation, often referred to as the container runtime, to allocate zero swap memory to Kubernetes workloads by default.
Swap configuration on a node is exposed to a cluster admin via the
memorySwap in the KubeletConfiguration.
As a cluster administrator, you can specify the node's behaviour in the
presence of swap memory by setting memorySwap.swapBehavior.
Swap behaviors
You need to pick a swap behavior to use. Different nodes in your cluster can use different swap behaviors.
The swap behaviors you can choose for Linux nodes are:
NoSwap(default)- Workloads running as Pods on this node do not and cannot use swap.
LimitedSwap- Kubernetes workloads can utilize swap memory.
Note:
If you choose the NoSwap behavior, and you configure the kubelet to tolerate
swap space (failSwapOn: false), then your workloads don't use any swap.
However, processes outside of Kubernetes-managed containers, such as systemd services (and even the kubelet itself!) can utilize swap.
You can read configuring swap memory on Kubernetes nodes to learn about enabling swap for your cluster.
Container runtime integration
The kubelet uses the container runtime API, and directs the container runtime to
apply specific configuration (for example, in the cgroup v2 case, memory.swap.max) in a manner that will
enable the desired swap configuration for a container. For runtimes that use control groups, or cgroups,
the container runtime is then responsible for writing these settings to the container-level cgroup.
Observability for swap use
Node and container level metric statistics
Kubelet now collects node and container level metric statistics,
which can be accessed at the /metrics/resource (which is used mainly by monitoring
tools like Prometheus) and /stats/summary (which is used mainly by Autoscalers) kubelet HTTP endpoints.
This allows clients who can directly request the kubelet to
monitor swap usage and remaining swap memory when using LimitedSwap.
Additionally, a machine_swap_bytes metric has been added to cadvisor to show
the total physical swap capacity of the machine.
See this page for more info.
For example, these /metrics/resource are supported:
node_swap_usage_bytes: Current swap usage of the node in bytes.container_swap_usage_bytes: Current amount of the container swap usage in bytes.container_swap_limit_bytes: Current amount of the container swap limit in bytes.
Using kubectl top --show-swap
Querying metrics is valuable, but somewhat cumbersome, as these metrics
are designed to be used by software rather than humans.
In order to consume this data in a more user-friendly way,
the kubectl top command has been extended to support swap metrics, using the --show-swap flag.
In order to receive information about swap usage on nodes, kubectl top nodes --show-swap can be used:
kubectl top nodes --show-swap
This will result in an output similar to:
NAME CPU(cores) CPU(%) MEMORY(bytes) MEMORY(%) SWAP(bytes) SWAP(%)
node1 1m 10% 2Mi 10% 1Mi 0%
node2 5m 10% 6Mi 10% 2Mi 0%
node3 3m 10% 4Mi 10% <unknown> <unknown>
In order to receive information about swap usage by pods, kubectl top pods --show-swap can be used:
kubectl top pod -n kube-system --show-swap
This will result in an output similar to:
NAME CPU(cores) MEMORY(bytes) SWAP(bytes)
coredns-58d5bc5cdb-5nbk4 2m 19Mi 0Mi
coredns-58d5bc5cdb-jsh26 3m 37Mi 0Mi
etcd-node01 51m 143Mi 5Mi
kube-apiserver-node01 98m 824Mi 16Mi
kube-controller-manager-node01 20m 135Mi 9Mi
kube-proxy-ffgs2 1m 24Mi 0Mi
kube-proxy-fhvwx 1m 39Mi 0Mi
kube-scheduler-node01 13m 69Mi 0Mi
metrics-server-8598789fdb-d2kcj 5m 26Mi 0Mi
Nodes to report swap capacity as part of node status
A new node status field is now added, node.status.nodeInfo.swap.capacity, to report the swap capacity of a node.
As an example, the following command can be used to retrieve the swap capacity of the nodes in a cluster:
kubectl get nodes -o go-template='{{range .items}}{{.metadata.name}}: {{if .status.nodeInfo.swap.capacity}}{{.status.nodeInfo.swap.capacity}}{{else}}<unknown>{{end}}{{"\n"}}{{end}}'
This will result in an output similar to:
node1: 21474836480
node2: 42949664768
node3: <unknown>
Note:
The<unknown> value indicates that the .status.nodeInfo.swap.capacity field is not set for that Node.
This probably means that the node does not have swap provisioned, or less likely,
that the kubelet is not able to determine the swap capacity of the node.Swap discovery using Node Feature Discovery (NFD)
Node Feature Discovery is a Kubernetes addon for detecting hardware features and configuration. It can be utilized to discover which nodes are provisioned with swap.
As an example, to figure out which nodes are provisioned with swap, use the following command:
kubectl get nodes -o jsonpath='{range .items[?(@.metadata.labels.feature\.node\.kubernetes\.io/memory-swap)]}{.metadata.name}{"\t"}{.metadata.labels.feature\.node\.kubernetes\.io/memory-swap}{"\n"}{end}'
This will result in an output similar to:
k8s-worker1: true
k8s-worker2: true
k8s-worker3: false
In this example, swap is provisioned on nodes k8s-worker1 and k8s-worker2, but not on k8s-worker3.
Risks and caveats
Caution:
It is deeply encouraged to encrypt the swap space. See Memory-backed volumes memory-backed volumes for more info.Having swap available on a system reduces predictability. While swap can enhance performance by making more RAM available, swapping data back to memory is a heavy operation, sometimes slower by many orders of magnitude, which can cause unexpected performance regressions. Furthermore, swap changes a system's behaviour under memory pressure. Enabling swap increases the risk of noisy neighbors, where Pods that frequently use their RAM may cause other Pods to swap. In addition, since swap allows for greater memory usage for workloads in Kubernetes that cannot be predictably accounted for, and due to unexpected packing configurations, the scheduler currently does not account for swap memory usage. This heightens the risk of noisy neighbors.
The performance of a node with swap memory enabled depends on the underlying physical storage. When swap memory is in use, performance will be significantly worse in an I/O operations per second (IOPS) constrained environment, such as a cloud VM with I/O throttling, when compared to faster storage mediums like solid-state drives or NVMe. As swap might cause IO pressure, it is recommended to give a higher IO latency priority to system critical daemons. See the relevant section in the recommended practices section below.
Memory-backed volumes
On Linux nodes, memory-backed volumes (such as secret
volume mounts, or emptyDir with medium: Memory)
are implemented with a tmpfs filesystem.
The contents of such volumes should remain in memory at all times, hence should
not be swapped to disk.
To ensure the contents of such volumes remain in memory, the noswap tmpfs option
is being used.
The Linux kernel officially supports the noswap option from version 6.3 (more info
can be found in Linux Kernel Version Requirements).
However, the different distributions often choose to backport this mount option to older
Linux versions as well.
In order to verify whether the node supports the noswap option, the kubelet will do the following:
- If the kernel's version is above 6.3 then the
noswapoption will be assumed to be supported. - Otherwise, kubelet would try to mount a dummy tmpfs with the
noswapoption at startup. If kubelet fails with an error indicating of an unknown option,noswapwill be assumed to not be supported, hence will not be used. A kubelet log entry will be emitted to warn the user about memory-backed volumes might swap to disk. If kubelet succeeds, the dummy tmpfs will be deleted and thenoswapoption will be used.- If the
noswapoption is not supported, kubelet will emit a warning log entry, then continue its execution.
- If the
See the section above with an example for setting unencrypted swap. However, handling encrypted swap is not within the scope of kubelet; rather, it is a general OS configuration concern and should be addressed at that level. It is the administrator's responsibility to provision encrypted swap to mitigate this risk.
Evictions
Configuring memory eviction thresholds for swap-enabled nodes can be tricky.
With swap being disabled, it is reasonable to configure kubelet's eviction thresholds to be a bit lower than the node's memory capacity. The rationale is that we want Kubernetes to start evicting Pods before the node runs out of memory and invokes the Out Of Memory (OOM) killer, since the OOM killer is not Kubernetes-aware, therefore does not consider things like QoS, pod priority, or other Kubernetes-specific factors.
With swap enabled, the situation is more complex.
In Linux, the vm.min_free_kbytes parameter defines the memory threshold for the kernel
to start aggressively reclaiming memory, which includes swapping out pages.
If the kubelet's eviction thresholds are set in a way that eviction would take place
before the kernel starts reclaiming memory, it could lead to workloads never
being able to swap out during node memory pressure.
However, setting the eviction thresholds too high could result in the node running out of memory
and invoking the OOM killer, which is not ideal either.
To address this, it is recommended to set the kubelet's eviction thresholds
to be slightly lower than the vm.min_free_kbytes value.
This way, the node can start swapping before kubelet would start evicting Pods,
allowing workloads to swap out unused data and preventing evictions from happening.
On the other hand, since it is just slightly lower, kubelet is likely to start evicting Pods
before the node runs out of memory, thus avoiding the OOM killer.
The value of vm.min_free_kbytes can be determined by running the following command on the node:
cat /proc/sys/vm/min_free_kbytes
Unutilized swap space
Under the LimitedSwap behavior, the amount of swap available to a Pod is determined automatically,
based on the proportion of the memory requested relative to the node's total memory
(For more details, see the section below).
This design means that usually there would be some portion of swap that will remain restricted for Kubernetes workloads. For example, since Kubernetes 1.36 does not permit swap use for Pods in the Guaranteed QoS class, the amount of swap that's proportional to the memory request for Guaranteed pods would remain unused by Kubernetes workloads.
This behavior carries some risk in a situation where many pods are not eligible for swapping. On the other hand, it effectively keeps some system-reserved amount of swap memory that can be used by processes outside of Kubernetes' scope, such as system daemons and even kubelet itself.
Good practice for using swap in a Kubernetes cluster
Disable swap for system-critical daemons
During the testing phase and based on user feedback, it was observed that the performance
of system-critical daemons and services might degrade.
This implies that system daemons, including the kubelet, could operate slower than usual.
If this issue is encountered, it is advisable to configure the cgroup of the system slice
to prevent swapping (i.e., set memory.swap.max=0).
Protect system-critical daemons for I/O latency
Swap can increase the I/O load on a node. When memory pressure causes the kernel to rapidly swap pages in and out, system-critical daemons and services that rely on I/O operations may experience performance degradation.
To mitigate this, it is recommended for systemd users to prioritize the system slice in terms of I/O latency.
For non-systemd users,
setting up a dedicated cgroup for system daemons and processes and prioritizing I/O latency in the same way is advised.
This can be achieved by setting io.latency for the system slice,
thereby granting it higher I/O priority.
See cgroup's documentation for more info.
Swap and control plane nodes
The Kubernetes project recommends running control plane nodes without any swap space configured. The control plane primarily hosts Guaranteed QoS Pods, so swap can generally be disabled. The main concern is that swapping critical services on the control plane could negatively impact performance.
Use of a dedicated disk for swap
The Kubernetes project recommends using encrypted swap, whenever you run nodes with swap enabled. If swap resides on a partition or the root filesystem, workloads may interfere with system processes that need to write to disk. When they share the same disk, processes can overwhelm swap, disrupting the I/O of kubelet, container runtime, and systemd, which would impact other workloads. Since swap space is located on a disk, it is crucial to ensure the disk is fast enough for the intended use cases. Alternatively, one can configure I/O priorities between different mapped areas of a single backing device.
Swap-aware scheduling
Kubernetes 1.36 does not support allocating Pods to nodes in a way that accounts
for swap memory usage. The scheduler typically uses requests for infrastructure resources
to guide Pod placement, and Pods do not request swap space; they just request memory.
This means that the scheduler does not consider swap memory when making scheduling decisions.
While this is something we are actively working on, it is not yet implemented.
In order for administrators to ensure that Pods are not scheduled on nodes with swap memory unless they are specifically intended to use it, Administrators can taint nodes with swap available to protect against this problem. Taints will ensure that workloads which tolerate swap will not spill onto nodes without swap under load.
Selecting storage for optimal performance
The storage device designated for swap space is critical to maintaining system responsiveness during high memory usage. Rotational hard disk drives (HDDs) are ill-suited for this task as their mechanical nature introduces significant latency, leading to severe performance degradation and system thrashing. For modern performance needs, a device such as a Solid State Drive (SSD) is probably the appropriate choice for swap, as its low-latency electronic access minimizes the slowdown.
Swap behavior details
How is the swap limit being determined with LimitedSwap?
The configuration of swap memory, including its limitations, presents a significant challenge. Not only is it prone to misconfiguration, but as a system-level property, any misconfiguration could potentially compromise the entire node rather than just a specific workload. To mitigate this risk and ensure the health of the node, we have implemented Swap with automatic configuration of limitations.
With LimitedSwap, Pods that do not fall under the Burstable QoS classification (i.e.
BestEffort/Guaranteed QoS Pods) are prohibited from utilizing swap memory.
BestEffort QoS Pods exhibit unpredictable memory consumption patterns and lack
information regarding their memory usage, making it difficult to determine a safe
allocation of swap memory.
Conversely, Guaranteed QoS Pods are typically employed for applications that rely on the
precise allocation of resources specified by the workload, with memory being immediately available.
To maintain the aforementioned security and node health guarantees,
these Pods are not permitted to use swap memory when LimitedSwap is in effect.
In addition, high-priority pods are not permitted to use swap in order to ensure the memory
they consume always resides in RAM, hence ready to use.
Prior to detailing the calculation of the swap limit, it is necessary to define the following terms:
nodeTotalMemory: The total amount of physical memory available on the node.totalPodsSwapAvailable: The total amount of swap memory on the node that is available for use by Pods (some swap memory may be reserved for system use).containerMemoryRequest: The container's memory request.
Swap limitation is configured as:
( containerMemoryRequest / nodeTotalMemory ) × totalPodsSwapAvailable
In other words, the amount of swap that a container is able to use is proportionate to its memory request, the node's total physical memory and the total amount of swap memory on the node that is available for use by Pods.
It is important to note that, for containers within Burstable QoS Pods, it is possible to opt-out of swap usage by specifying memory requests that are equal to memory limits. Containers configured in this manner will not have access to swap memory.
What's next
- To learn about managing swap on Linux nodes, read configuring swap memory on Kubernetes nodes.
- You can check out a blog post about Kubernetes and swap
- For background information, please see the original KEP, KEP-2400, and its design.
11.3 - Node Autoscaling
Automatically provision and consolidate the Nodes in your cluster to adapt to demand and optimize cost.
In order to run workloads in your cluster, you need Nodes. Nodes in your cluster can be autoscaled - dynamically provisioned, or consolidated to provide needed capacity while optimizing cost. Autoscaling is performed by Node autoscalers.
Node provisioning
If there are Pods in a cluster that can't be scheduled on existing Nodes, new Nodes can be automatically added to the cluster—provisioned—to accommodate the Pods. This is especially useful if the number of Pods changes over time, for example as a result of combining horizontal workload with Node autoscaling.
Autoscalers provision the Nodes by creating and deleting cloud provider resources backing them. Most commonly, the resources backing the Nodes are Virtual Machines.
The main goal of provisioning is to make all Pods schedulable. This goal is not always attainable because of various limitations, including reaching configured provisioning limits, provisioning configuration not being compatible with a particular set of pods, or the lack of cloud provider capacity. While provisioning, Node autoscalers often try to achieve additional goals (for example minimizing the cost of the provisioned Nodes or balancing the number of Nodes between failure domains).
There are two main inputs to a Node autoscaler when determining Nodes to provision—Pod scheduling constraints, and Node constraints imposed by autoscaler configuration.
Autoscaler configuration may also include other Node provisioning triggers (for example the number of Nodes falling below a configured minimum limit).
Note:
Provisioning was formerly known as scale-up in Cluster Autoscaler.Pod scheduling constraints
Pods can express scheduling constraints to impose limitations on the kind of Nodes they can be scheduled on. Node autoscalers take these constraints into account to ensure that the pending Pods can be scheduled on the provisioned Nodes.
The most common kind of scheduling constraints are the resource requests specified by Pod containers. Autoscalers will make sure that the provisioned Nodes have enough resources to satisfy the requests. However, they don't directly take into account the real resource usage of the Pods after they start running. In order to autoscale Nodes based on actual workload resource usage, you can combine horizontal workload autoscaling with Node autoscaling.
Other common Pod scheduling constraints include Node affinity, inter-Pod affinity, or a requirement for a particular storage volume.
Node constraints imposed by autoscaler configuration
The specifics of the provisioned Nodes (for example the amount of resources, the presence of a given label) depend on autoscaler configuration. Autoscalers can either choose them from a pre-defined set of Node configurations, or use auto-provisioning.
Auto-provisioning
Node auto-provisioning is a mode of provisioning in which a user doesn't have to fully configure the specifics of the Nodes that can be provisioned. Instead, the autoscaler dynamically chooses the Node configuration based on the pending Pods it's reacting to, as well as pre-configured constraints (for example, the minimum amount of resources or the need for a given label).
Node consolidation
The main consideration when running a cluster is ensuring that all schedulable pods are running, whilst keeping the cost of the cluster as low as possible. To achieve this, the Pods' resource requests should utilize as much of the Nodes' resources as possible. From this perspective, the overall Node utilization in a cluster can be used as a proxy for how cost-effective the cluster is.
Note:
Correctly setting the resource requests of your Pods is as important to the overall cost-effectiveness of a cluster as optimizing Node utilization. Combining Node autoscaling with vertical workload autoscaling can help you achieve this.Nodes in your cluster can be automatically consolidated in order to improve the overall Node utilization, and in turn the cost-effectiveness of the cluster. Consolidation happens through removing a set of underutilized Nodes from the cluster. Optionally, a different set of Nodes can be provisioned to replace them.
Consolidation, like provisioning, only considers Pod resource requests and not real resource usage when making decisions.
For the purpose of consolidation, a Node is considered empty if it only has DaemonSet and static Pods running on it. Removing empty Nodes during consolidation is more straightforward than non-empty ones, and autoscalers often have optimizations designed specifically for consolidating empty Nodes.
Removing non-empty Nodes during consolidation is disruptive—the Pods running on them are terminated, and possibly have to be recreated (for example by a Deployment). However, all such recreated Pods should be able to schedule on existing Nodes in the cluster, or the replacement Nodes provisioned as part of consolidation. No Pods should normally become pending as a result of consolidation.
Note:
Autoscalers predict how a recreated Pod will likely be scheduled after a Node is provisioned or consolidated, but they don't control the actual scheduling. Because of this, some Pods might become pending as a result of consolidation - if for example a completely new Pod appears while consolidation is being performed.Autoscaler configuration may also enable triggering consolidation by other conditions (for example, the time elapsed since a Node was created), in order to optimize different properties (for example, the maximum lifespan of Nodes in a cluster).
The details of how consolidation is performed depend on the configuration of a given autoscaler.
Note:
Consolidation was formerly known as scale-down in Cluster Autoscaler.Autoscalers
The functionalities described in previous sections are provided by Node autoscalers. In addition to the Kubernetes API, autoscalers also need to interact with cloud provider APIs to provision and consolidate Nodes. This means that they need to be explicitly integrated with each supported cloud provider. The performance and feature set of a given autoscaler can differ between cloud provider integrations.
graph TD
na[Node autoscaler]
k8s[Kubernetes]
cp[Cloud Provider]
k8s --> |get Pods/Nodes|na
na --> |drain Nodes|k8s
na --> |create/remove resources backing Nodes|cp
cp --> |get resources backing Nodes|na
classDef white_on_blue fill:#326ce5,stroke:#fff,stroke-width:4px,color:#fff;
classDef blue_on_white fill:#fff,stroke:#bbb,stroke-width:2px,color:#326ce5;
class na blue_on_white;
class k8s,cp white_on_blue;
Autoscaler implementations
Cluster Autoscaler and Karpenter are the two Node autoscalers currently sponsored by SIG Autoscaling.
From the perspective of a cluster user, both autoscalers should provide a similar Node autoscaling experience. Both will provision new Nodes for unschedulable Pods, and both will consolidate the Nodes that are no longer optimally utilized.
Different autoscalers may also provide features outside the Node autoscaling scope described on this page, and those additional features may differ between them.
Consult the sections below, and the linked documentation for the individual autoscalers to decide which autoscaler fits your use case better.
Cluster Autoscaler
Cluster Autoscaler adds or removes Nodes to pre-configured Node groups. Node groups generally map to some sort of cloud provider resource group (most commonly a Virtual Machine group). A single instance of Cluster Autoscaler can simultaneously manage multiple Node groups. When provisioning, Cluster Autoscaler will add Nodes to the group that best fits the requests of pending Pods. When consolidating, Cluster Autoscaler always selects specific Nodes to remove, as opposed to just resizing the underlying cloud provider resource group.
Additional context:
Karpenter
Karpenter auto-provisions Nodes based on NodePool configurations provided by the cluster operator. Karpenter handles all aspects of node lifecycle, not just autoscaling. This includes automatically refreshing Nodes once they reach a certain lifetime, and auto-upgrading Nodes when new worker Node images are released. It works directly with individual cloud provider resources (most commonly individual Virtual Machines), and doesn't rely on cloud provider resource groups.
Additional context:
Implementation comparison
Main differences between Cluster Autoscaler and Karpenter:
- Cluster Autoscaler provides features related to just Node autoscaling. Karpenter has a wider scope, and also provides features intended for managing Node lifecycle altogether (for example, utilizing disruption to auto-recreate Nodes once they reach a certain lifetime, or auto-upgrade them to new versions).
- Cluster Autoscaler doesn't support auto-provisioning, the Node groups it can provision from have to be pre-configured. Karpenter supports auto-provisioning, so the user only has to configure a set of constraints for the provisioned Nodes, instead of fully configuring homogeneous groups.
- Cluster Autoscaler provides cloud provider integrations directly, which means that they're a part of the Kubernetes project. For Karpenter, the Kubernetes project publishes Karpenter as a library that cloud providers can integrate with to build a Node autoscaler.
- Cluster Autoscaler provides integrations with numerous cloud providers, including smaller and less popular providers. There are fewer cloud providers that integrate with Karpenter, including AWS, and Azure.
Combine workload and Node autoscaling
Horizontal workload autoscaling
Node autoscaling usually works in response to Pods—it provisions new Nodes to accommodate unschedulable Pods, and then consolidates the Nodes once they're no longer needed.
Horizontal workload autoscaling automatically scales the number of workload replicas to maintain a desired average resource utilization across the replicas. In other words, it automatically creates new Pods in response to application load, and then removes the Pods once the load decreases.
You can use Node autoscaling together with horizontal workload autoscaling to autoscale the Nodes in your cluster based on the average real resource utilization of your Pods.
If the application load increases, the average utilization of its Pods should also increase, prompting workload autoscaling to create new Pods. Node autoscaling should then provision new Nodes to accommodate the new Pods.
Once the application load decreases, workload autoscaling should remove unnecessary Pods. Node autoscaling should, in turn, consolidate the Nodes that are no longer needed.
If configured correctly, this pattern ensures that your application always has the Node capacity to handle load spikes if needed, but you don't have to pay for the capacity when it's not needed.
Vertical workload autoscaling
When using Node autoscaling, it's important to set Pod resource requests correctly. If the requests of a given Pod are too low, provisioning a new Node for it might not help the Pod actually run. If the requests of a given Pod are too high, it might incorrectly prevent consolidating its Node.
Vertical workload autoscaling automatically adjusts the resource requests of your Pods based on their historical resource usage.
You can use Node autoscaling together with vertical workload autoscaling in order to adjust the resource requests of your Pods while preserving Node autoscaling capabilities in your cluster.
Caution:
When using Node autoscaling, it's not recommended to set up vertical workload autoscaling for DaemonSet Pods. Autoscalers have to predict what DaemonSet Pods on a new Node will look like in order to predict available Node resources. Vertical workload autoscaling might make these predictions unreliable, leading to incorrect scaling decisions.Related components
This section describes components providing functionality related to Node autoscaling.
Descheduler
The descheduler is a component providing Node consolidation functionality based on custom policies, as well as other features related to optimizing Nodes and Pods (for example deleting frequently restarting Pods).
Workload autoscalers based on cluster size
Cluster Proportional Autoscaler and Cluster Proportional Vertical Autoscaler provide horizontal, and vertical workload autoscaling based on the number of Nodes in the cluster. You can read more in autoscaling based on cluster size.
What's next
- Read about workload-level autoscaling
11.4 - Certificates
To learn how to generate certificates for your cluster, see Certificates.
11.5 - Cluster Networking
Networking is a central part of Kubernetes, but it can be challenging to understand exactly how it is expected to work. There are 4 distinct networking problems to address:
- Highly-coupled container-to-container communications: this is solved by
Pods and
localhostcommunications. - Pod-to-Pod communications: this is the primary focus of this document.
- Pod-to-Service communications: this is covered by Services.
- External-to-Service communications: this is also covered by Services.
Kubernetes is all about sharing machines among applications. Typically, sharing machines requires ensuring that two applications do not try to use the same ports. Coordinating ports across multiple developers is very difficult to do at scale and exposes users to cluster-level issues outside of their control.
Dynamic port allocation brings a lot of complications to the system - every application has to take ports as flags, the API servers have to know how to insert dynamic port numbers into configuration blocks, services have to know how to find each other, etc. Rather than deal with this, Kubernetes takes a different approach.
To learn about the Kubernetes networking model, see here.
Kubernetes IP address ranges
Kubernetes clusters require to allocate non-overlapping IP addresses for Pods, Services and Nodes, from a range of available addresses configured in the following components:
- The network plugin is configured to assign IP addresses to Pods.
- The kube-apiserver is configured to assign IP addresses to Services.
- The kubelet or the cloud-controller-manager is configured to assign IP addresses to Nodes.

Cluster networking types
Kubernetes clusters, attending to the IP families configured, can be categorized into:
- IPv4 only: The network plugin, kube-apiserver and kubelet/cloud-controller-manager are configured to assign only IPv4 addresses.
- IPv6 only: The network plugin, kube-apiserver and kubelet/cloud-controller-manager are configured to assign only IPv6 addresses.
- IPv4/IPv6 or IPv6/IPv4 dual-stack:
- The network plugin is configured to assign IPv4 and IPv6 addresses.
- The kube-apiserver is configured to assign IPv4 and IPv6 addresses.
- The kubelet or cloud-controller-manager is configured to assign IPv4 and IPv6 address.
- All components must agree on the configured primary IP family.
Kubernetes clusters only consider the IP families present on the Pods, Services and Nodes objects,
independently of the existing IPs of the represented objects. For example, a server or a pod can have multiple
IP addresses assigned to its interfaces, but only the IP addresses in node.status.addresses or pod.status.ips are
considered when implementing the Kubernetes network model and defining the cluster type.
How to implement the Kubernetes network model
The network model is implemented by the container runtime on each node. The most common container runtimes use Container Network Interface (CNI) plugins to manage their network and security capabilities. Many different CNI plugins exist from many different vendors. Some of these provide only basic features of adding and removing network interfaces, while others provide more sophisticated solutions, such as integration with other container orchestration systems, running multiple CNI plugins, advanced IPAM features etc.
See this page for a non-exhaustive list of networking addons supported by Kubernetes.
What's next
The early design of the networking model and its rationale are described in more detail in the networking design document. For future plans and some on-going efforts that aim to improve Kubernetes networking, please refer to the SIG-Network KEPs.
11.6 - Observability
Understand how to gain end-to-end visibility of a Kubernetes cluster through the collection of metrics, logs, and traces.
In Kubernetes, observability is the process of collecting and analyzing metrics, logs, and traces—often referred to as the three pillars of observability—in order to obtain a better understanding of the internal state, performance, and health of the cluster.
Kubernetes control plane components, as well as many add-ons, generate and emit these signals. By aggregating and correlating them, you can gain a unified picture of the control plane, add-ons, and applications across the cluster.
Figure 1 outlines how cluster components emit the three primary signal types.
flowchart LR
A[Cluster components] --> M[Metrics pipeline]
A --> L[Log pipeline]
A --> T[Trace pipeline]
M --> S[(Storage and analysis)]
L --> S
T --> S
S --> O[Operators and automation]
Figure 1. High-level signals emitted by cluster components and their consumers.
Metrics
Kubernetes components emit metrics in Prometheus format from their /metrics endpoints, including:
- kube-controller-manager
- kube-proxy
- kube-apiserver
- kube-scheduler
- kubelet
The kubelet also exposes metrics at /metrics/cadvisor, /metrics/resource, and /metrics/probes, and add-ons such as kube-state-metrics enrich those control plane signals with Kubernetes object status.
A typical Kubernetes metrics pipeline periodically scrapes these endpoints and stores the samples in a time series database (for example with Prometheus).
See the system metrics guide for details and configuration options.
Figure 2 outlines a common Kubernetes metrics pipeline.
flowchart LR
C[Cluster components] --> P[Prometheus scraper]
P --> TS[(Time series storage)]
TS --> D[Dashboards and alerts]
TS --> A[Automated actions]
Figure 2. Components of a typical Kubernetes metrics pipeline.
For multi-cluster or multi-cloud visibility, distributed time series databases (for example Thanos or Cortex) can complement Prometheus.
See Common observability tools - metrics tools for metrics scrapers and time series databases.
See Also
- System metrics for Kubernetes components
- Resource usage monitoring with metrics-server
- kube-state-metrics concept
- Resource metrics pipeline overview
Logs
Logs provide a chronological record of events inside applications, Kubernetes system components, and security-related activities such as audit logging.
Container runtimes capture a containerized application’s output from standard output (stdout) and standard error (stderr) streams. While runtimes implement this differently, the integration with the kubelet is standardized through the CRI logging format, and the kubelet makes these logs available through kubectl logs.
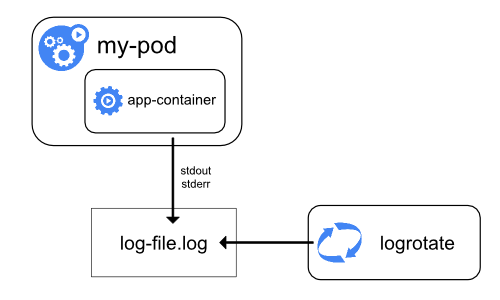
Figure 3a. Node-level logging architecture.
System component logs capture events from the cluster and are often useful for debugging and troubleshooting. These components are classified in two different ways: those that run in a container and those that do not. For example, the kube-scheduler and kube-proxy usually run in containers, whereas the kubelet and the container runtime run directly on the host.
- On machines with
systemd, the kubelet and container runtime write to journald. Otherwise, they write to.logfiles in the/var/logdirectory. - System components that run inside containers always write to
.logfiles in/var/log, bypassing the default container logging mechanism.
System component and container logs stored under /var/log require log rotation to prevent uncontrolled growth. Some cluster provisioning scripts install log rotation by default; verify your environment and adjust as needed. See the system logs reference for details on locations, formats, and configuration options.
Most clusters run a node-level logging agent (for example, Fluent Bit or Fluentd) that tails these files and forwards entries to a central log store. The logging architecture guidance explains how to design such pipelines, apply retention, and log flows to backends.
Figure 3 outlines a common log aggregation pipeline.
flowchart LR
subgraph Sources
A[Application stdout / stderr]
B[Control plane logs]
C[Audit records]
end
A --> N[Node log agent]
B --> N
C --> N
N --> L[Central log store]
L --> Q[Dashboards, alerting, SIEM]
Figure 3. Components of a typical Kubernetes logs pipeline.
See Common observability tools - logging tools for logging agents and central log stores.
See Also
Traces
Traces capture how requests moves across Kubernetes components and applications, linking latency, timing and relationships between operations.By collecting traces, you can visualize end-to-end request flow, diagnose performance issues, and identify bottlenecks or unexpected interactions in the control plane, add-ons, or applications.
Kubernetes 1.36 can export spans over the OpenTelemetry Protocol (OTLP), either directly via built-in gRPC exporters or by forwarding them through an OpenTelemetry Collector.
The OpenTelemetry Collector receives spans from components and applications, processes them (for example by applying sampling or redaction), and forwards them to a tracing backend for storage and analysis.
Figure 4 outlines a typical distributed tracing pipeline.
flowchart LR
subgraph Sources
A[Control plane spans]
B[Application spans]
end
A --> X[OTLP exporter]
B --> X
X --> COL[OpenTelemetry Collector]
COL --> TS[(Tracing backend)]
TS --> V[Visualization and analysis]
Figure 4. Components of a typical Kubernetes traces pipeline.
See Common observability tools - tracing tools for tracing collectors and backends.
See Also
- System traces for Kubernetes components
- OpenTelemetry Collector getting started guide
- Monitoring and tracing tasks
Common observability tools
Note: This section links to third party projects that provide functionality required by Kubernetes. The Kubernetes project authors aren't responsible for these projects, which are listed alphabetically. To add a project to this list, read the content guide before submitting a change. More information.
Note: This section links to third-party projects that provide observability capabilities required by Kubernetes. The Kubernetes project authors aren't responsible for these projects, which are listed alphabetically. To add a project to this list, read the content guide before submitting a change.
Metrics tools
- Cortex offers horizontally scalable, long-term Prometheus storage.
- Grafana Mimir is a Grafana Labs project that provides multi-tenant, horizontally scalable Prometheus-compatible storage.
- Prometheus is the monitoring system that scrapes and stores metrics from Kubernetes components.
- Thanos extends Prometheus with global querying, downsampling, and object storage support.
Logging tools
- Elasticsearch delivers distributed log indexing and search.
- Fluent Bit collects and forwards container and node logs with a low resource footprint.
- Fluentd routes and transforms logs to multiple destinations.
- Grafana Loki stores logs in a Prometheus-inspired, label-based format.
- OpenSearch provides open source log indexing and search compatible with Elasticsearch APIs.
Tracing tools
- Grafana Tempo offers scalable, low-cost distributed tracing storage.
- Jaeger captures and visualizes distributed traces for microservices.
- OpenTelemetry Collector receives, processes, and exports telemetry data including traces.
- Zipkin provides distributed tracing collection and visualization.
What's next
- Learn how to collect resource usage metrics with metrics-server
- Explore logging tasks and tutorials
- Follow the monitoring and tracing task guides
- Review the system metrics guide for component endpoints and stability
- Review the common observability tools section for vetted third-party options
11.7 - Admission Webhook Good Practices
Recommendations for designing and deploying admission webhooks in Kubernetes.
This page provides good practices and considerations when designing admission webhooks in Kubernetes. This information is intended for cluster operators who run admission webhook servers or third-party applications that modify or validate your API requests.
Before reading this page, ensure that you're familiar with the following concepts:
Importance of good webhook design
Admission control occurs when any create, update, or delete request is sent to the Kubernetes API. Admission controllers intercept requests that match specific criteria that you define. These requests are then sent to mutating admission webhooks or validating admission webhooks. These webhooks are often written to ensure that specific fields in object specifications exist or have specific allowed values.
Webhooks are a powerful mechanism to extend the Kubernetes API. Badly-designed webhooks often result in workload disruptions because of how much control the webhooks have over objects in the cluster. Like other API extension mechanisms, webhooks are challenging to test at scale for compatibility with all of your workloads, other webhooks, add-ons, and plugins.
Additionally, with every release, Kubernetes adds or modifies the API with new
features, feature promotions to beta or stable status, and deprecations. Even
stable Kubernetes APIs are likely to change. For example, the Pod API changed
in v1.29 to add the
Sidecar containers feature.
While it's rare for a Kubernetes object to enter a broken state because of a new
Kubernetes API, webhooks that worked as expected with earlier versions of an API
might not be able to reconcile more recent changes to that API. This can result
in unexpected behavior after you upgrade your clusters to newer versions.
This page describes common webhook failure scenarios and how to avoid them by cautiously and thoughtfully designing and implementing your webhooks.
Identify whether you use admission webhooks
Even if you don't run your own admission webhooks, some third-party applications that you run in your clusters might use mutating or validating admission webhooks.
To check whether your cluster has any mutating admission webhooks, run the following command:
kubectl get mutatingwebhookconfigurations
The output lists any mutating admission controllers in the cluster.
To check whether your cluster has any validating admission webhooks, run the following command:
kubectl get validatingwebhookconfigurations
The output lists any validating admission controllers in the cluster.
Choose an admission control mechanism
Kubernetes includes multiple admission control and policy enforcement options. Knowing when to use a specific option can help you to improve latency and performance, reduce management overhead, and avoid issues during version upgrades. The following table describes the mechanisms that let you mutate or validate resources during admission:
| Mechanism | Description | Use cases |
|---|---|---|
| Mutating admission webhook | Intercept API requests before admission and modify as needed using custom logic. |
|
| Mutating admission policy | Intercept API requests before admission and modify as needed using Common Expression Language (CEL) expressions. |
|
| Validating admission webhook | Intercept API requests before admission and validate against complex policy declarations. |
|
| Validating admission policy | Intercept API requests before admission and validate against CEL expressions. |
|
In general, use webhook admission control when you want an extensible way to declare or configure the logic. Use built-in CEL-based admission control when you want to declare simpler logic without the overhead of running a webhook server. The Kubernetes project recommends that you use CEL-based admission control when possible.
Use built-in validation and defaulting for CustomResourceDefinitions
If you use CustomResourceDefinitions, don't use admission webhooks to validate values in CustomResource specifications or to set default values for fields. Kubernetes lets you define validation rules and default field values when you create CustomResourceDefinitions.
To learn more, see the following resources:
Performance and latency
This section describes recommendations for improving performance and reducing latency. In summary, these are as follows:
- Consolidate webhooks and limit the number of API calls per webhook.
- Use audit logs to check for webhooks that repeatedly do the same action.
- Use load balancing for webhook availability.
- Set a small timeout value for each webhook.
- Consider cluster availability needs during webhook design.
Design admission webhooks for low latency
Mutating admission webhooks are called in sequence. Depending on the mutating webhook setup, some webhooks might be called multiple times. Every mutating webhook call adds latency to the admission process. This is unlike validating webhooks, which get called in parallel.
When designing your mutating webhooks, consider your latency requirements and tolerance. The more mutating webhooks there are in your cluster, the greater the chance of latency increases.
Consider the following to reduce latency:
- Consolidate webhooks that perform a similar mutation on different objects.
- Reduce the number of API calls made in the mutating webhook server logic.
- Limit the match conditions of each mutating webhook to reduce how many webhooks are triggered by a specific API request.
- Consolidate small webhooks into one server and configuration to help with ordering and organization.
Prevent loops caused by competing controllers
Consider any other components that run in your cluster that might conflict with the mutations that your webhook makes. For example, if your webhook adds a label that a different controller removes, your webhook gets called again. This leads to a loop.
To detect these loops, try the following:
Update your cluster audit policy to log audit events. Use the following parameters:
level:RequestResponseverbs:["patch"]omitStages:RequestReceived
Set the audit rule to create events for the specific resources that your webhook mutates.
Check your audit events for webhooks being reinvoked multiple times with the same patch being applied to the same object, or for an object having a field updated and reverted multiple times.
Set a small timeout value
Admission webhooks should evaluate as quickly as possible (typically in milliseconds), since they add to API request latency. Use a small timeout for webhooks.
For details, see Timeouts.
Use a load balancer to ensure webhook availability
Admission webhooks should leverage some form of load-balancing to provide high
availability and performance benefits. If a webhook is running within the
cluster, you can run multiple webhook backends behind a Service of type
ClusterIP.
Use a high-availability deployment model
Consider your cluster's availability requirements when designing your webhook.
For example, during node downtime or zonal outages, Kubernetes marks Pods as
NotReady to allow load balancers to reroute traffic to available zones and
nodes. These updates to Pods might trigger your mutating webhooks. Depending on
the number of affected Pods, the mutating webhook server has a risk of timing
out or causing delays in Pod processing. As a result, traffic won't get
rerouted as quickly as you need.
Consider situations like the preceding example when writing your webhooks. Exclude operations that are a result of Kubernetes responding to unavoidable incidents.
Request filtering
This section provides recommendations for filtering which requests trigger specific webhooks. In summary, these are as follows:
- Limit the webhook scope to avoid system components and read-only requests.
- Limit webhooks to specific namespaces.
- Use match conditions to perform fine-grained request filtering.
- Match all versions of an object.
Limit the scope of each webhook
Admission webhooks are only called when an API request matches the corresponding webhook configuration. Limit the scope of each webhook to reduce unnecessary calls to the webhook server. Consider the following scope limitations:
- Avoid matching objects in the
kube-systemnamespace. If you run your own Pods in thekube-systemnamespace, use anobjectSelectorto avoid mutating a critical workload. - Don't mutate node leases, which exist as Lease objects in the
kube-node-leasesystem namespace. Mutating node leases might result in failed node upgrades. Only apply validation controls to Lease objects in this namespace if you're confident that the controls won't put your cluster at risk. - Don't mutate TokenReview or SubjectAccessReview objects. These are always read-only requests. Modifying these objects might break your cluster.
- Limit each webhook to a specific namespace by using a
namespaceSelector.
Filter for specific requests by using match conditions
Admission controllers support multiple fields that you can use to match requests
that meet specific criteria. For example, you can use a namespaceSelector to
filter for requests that target a specific namespace.
For more fine-grained request filtering, use the matchConditions field in your
webhook configuration. This field lets you write multiple CEL expressions that
must evaluate to true for a request to trigger your admission webhook. Using
matchConditions might significantly reduce the number of calls to your webhook
server.
For details, see
Matching requests: matchConditions.
Match all versions of an API
By default, admission webhooks run on any API versions that affect a specified
resource. The matchPolicy field in the webhook configuration controls this
behavior. Specify a value of Equivalent in the matchPolicy field or omit
the field to allow the webhook to run on any API version.
For details, see
Matching requests: matchPolicy.
Mutation scope and field considerations
This section provides recommendations for the scope of mutations and any special considerations for object fields. In summary, these are as follows:
- Patch only the fields that you need to patch.
- Don't overwrite array values.
- Avoid side effects in mutations when possible.
- Avoid self-mutations.
- Fail open and validate the final state.
- Plan for future field updates in later versions.
- Prevent webhooks from self-triggering.
- Don't change immutable objects.
Patch only required fields
Admission webhook servers send HTTP responses to indicate what to do with a
specific Kubernetes API request. This response is an AdmissionReview object.
A mutating webhook can add specific fields to mutate before allowing admission
by using the patchType field and the patch field in the response. Ensure
that you only modify the fields that require a change.
For example, consider a mutating webhook that's configured to ensure that
web-server Deployments have at least three replicas. When a request to
create a Deployment object matches your webhook configuration, the webhook
should only update the value in the spec.replicas field.
Don't overwrite array values
Fields in Kubernetes object specifications might include arrays. Some arrays
contain key:value pairs (like the envVar field in a container specification),
while other arrays are unkeyed (like the readinessGates field in a Pod
specification). The order of values in an array field might matter in some
situations. For example, the order of arguments in the args field of a
container specification might affect the container.
Consider the following when modifying arrays:
- Whenever possible, use the
addJSONPatch operation instead ofreplaceto avoid accidentally replacing a required value. - Treat arrays that don't use key:value pairs as sets.
- Ensure that the values in the field that you modify aren't required to be in a specific order.
- Don't overwrite existing key:value pairs unless absolutely necessary.
- Use caution when modifying label fields. An accidental modification might cause label selectors to break, resulting in unintended behavior.
Avoid side effects
Ensure that your webhooks operate only on the content of the AdmissionReview
that's sent to them, and do not make out-of-band changes. These additional
changes, called side effects, might cause conflicts during admission if they
aren't reconciled properly. The .webhooks[].sideEffects field should
be set to None if a webhook doesn't have any side effect.
If side effects are required during the admission evaluation, they must be
suppressed when processing an AdmissionReview object with dryRun set to
true, and the .webhooks[].sideEffects field should be set to NoneOnDryRun.
For details, see Side effects.
Avoid self-mutations
A webhook running inside the cluster might cause deadlocks for its own deployment if it is configured to intercept resources required to start its own Pods.
For example, a mutating admission webhook is configured to admit create Pod
requests only if a certain label is set in the Pod (such as env: prod).
The webhook server runs in a Deployment that doesn't set the env label.
When a node that runs the webhook server Pods becomes unhealthy, the webhook
Deployment tries to reschedule the Pods to another node. However, the existing
webhook server rejects the requests since the env label is unset. As a
result, the migration cannot happen.
Exclude the namespace where your webhook is running with a
namespaceSelector.
Avoid dependency loops
Dependency loops can occur in scenarios like the following:
- Two webhooks check each other's Pods. If both webhooks become unavailable at the same time, neither webhook can start.
- Your webhook intercepts cluster add-on components, such as networking plugins or storage plugins, that your webhook depends on. If both the webhook and the dependent add-on become unavailable, neither component can function.
To avoid these dependency loops, try the following:
- Use ValidatingAdmissionPolicies to avoid introducing dependencies.
- Prevent webhooks from validating or mutating other webhooks. Consider excluding specific namespaces from triggering your webhook.
- Prevent your webhooks from acting on dependent add-ons by using an
objectSelector.
Fail open and validate the final state
Mutating admission webhooks support the failurePolicy configuration field.
This field indicates whether the API server should admit or reject the request
if the webhook fails. Webhook failures might occur because of timeouts or errors
in the server logic.
By default, admission webhooks set the failurePolicy field to Fail. The API
server rejects a request if the webhook fails. However, rejecting requests by
default might result in compliant requests being rejected during webhook
downtime.
Let your mutating webhooks "fail open" by setting the failurePolicy field to
Ignore. Use a validating controller to check the state of requests to ensure
that they comply with your policies.
This approach has the following benefits:
- Mutating webhook downtime doesn't affect compliant resources from deploying.
- Policy enforcement occurs during validating admission control.
- Mutating webhooks don't interfere with other controllers in the cluster.
Plan for future updates to fields
In general, design your webhooks under the assumption that Kubernetes APIs might
change in a later version. Don't write a server that takes the stability of an
API for granted. For example, the release of sidecar containers in Kubernetes
added a restartPolicy field to the Pod API.
Prevent your webhook from triggering itself
Mutating webhooks that respond to a broad range of API requests might unintentionally trigger themselves. For example, consider a webhook that responds to all requests in the cluster. If you configure the webhook to create Event objects for every mutation, it'll respond to its own Event object creation requests.
To avoid this, consider setting a unique label in any resources that your webhook creates. Exclude this label from your webhook match conditions.
Don't change immutable objects
Some Kubernetes objects in the API server can't change. For example, when you deploy a static Pod, the kubelet on the node creates a mirror Pod in the API server to track the static Pod. However, changes to the mirror Pod don't propagate to the static Pod.
Don't attempt to mutate these objects during admission. All mirror Pods have the
kubernetes.io/config.mirror annotation. To exclude mirror Pods while reducing
the security risk of ignoring an annotation, allow static Pods to only run in
specific namespaces.
Mutating webhook ordering and idempotence
This section provides recommendations for webhook order and designing idempotent webhooks. In summary, these are as follows:
- Don't rely on a specific order of execution.
- Validate mutations before admission.
- Check for mutations being overwritten by other controllers.
- Ensure that the set of mutating webhooks is idempotent, not just the individual webhooks.
Don't rely on mutating webhook invocation order
Mutating admission webhooks don't run in a consistent order. Various factors might change when a specific webhook is called. Don't rely on your webhook running at a specific point in the admission process. Other webhooks could still mutate your modified object.
The following recommendations might help to minimize the risk of unintended changes:
- Validate mutations before admission
- Use a reinvocation policy to observe changes to an object by other plugins and re-run the webhook as needed. For details, see Reinvocation policy.
Ensure that the mutating webhooks in your cluster are idempotent
Every mutating admission webhook should be idempotent. The webhook should be able to run on an object that it already modified without making additional changes beyond the original change.
Additionally, all of the mutating webhooks in your cluster should, as a collection, be idempotent. After the mutation phase of admission control ends, every individual mutating webhook should be able to run on an object without making additional changes to the object.
Depending on your environment, ensuring idempotence at scale might be challenging. The following recommendations might help:
- Use validating admission controllers to verify the final state of critical workloads.
- Test your deployments in a staging cluster to see if any objects get modified multiple times by the same webhook.
- Ensure that the scope of each mutating webhook is specific and limited.
The following examples show idempotent mutation logic:
For a create Pod request, set the field
.spec.securityContext.runAsNonRootof the Pod to true.For a create Pod request, if the field
.spec.containers[].resources.limitsof a container is not set, set default resource limits.For a create Pod request, inject a sidecar container with name
foo-sidecarif no container with the namefoo-sidecaralready exists.
In these cases, the webhook can be safely reinvoked, or admit an object that already has the fields set.
The following examples show non-idempotent mutation logic:
For a create Pod request, inject a sidecar container with name
foo-sidecarsuffixed with the current timestamp (such asfoo-sidecar-19700101-000000).Reinvoking the webhook can result in the same sidecar being injected multiple times to a Pod, each time with a different container name. Similarly, the webhook can inject duplicated containers if the sidecar already exists in a user-provided pod.
For a create/update Pod request, reject if the Pod has label
envset, otherwise add anenv: prodlabel to the Pod.Reinvoking the webhook will result in the webhook failing on its own output.
For a create Pod request, append a sidecar container named
foo-sidecarwithout checking whether afoo-sidecarcontainer exists.Reinvoking the webhook will result in duplicated containers in the Pod, which makes the request invalid and rejected by the API server.
Mutation testing and validation
This section provides recommendations for testing your mutating webhooks and validating mutated objects. In summary, these are as follows:
- Test webhooks in staging environments.
- Avoid mutations that violate validations.
- Test minor version upgrades for regressions and conflicts.
- Validate mutated objects before admission.
Test webhooks in staging environments
Robust testing should be a core part of your release cycle for new or updated webhooks. If possible, test any changes to your cluster webhooks in a staging environment that closely resembles your production clusters. At the very least, consider using a tool like minikube or kind to create a small test cluster for webhook changes.
Ensure that mutations don't violate validations
Your mutating webhooks shouldn't break any of the validations that apply to an object before admission. For example, consider a mutating webhook that sets the default CPU request of a Pod to a specific value. If the CPU limit of that Pod is set to a lower value than the mutated request, the Pod fails admission.
Test every mutating webhook against the validations that run in your cluster.
Test minor version upgrades to ensure consistent behavior
Before upgrading your production clusters to a new minor version, test your webhooks and workloads in a staging environment. Compare the results to ensure that your webhooks continue to function as expected after the upgrade.
Additionally, use the following resources to stay informed about API changes:
Validate mutations before admission
Mutating webhooks run to completion before any validating webhooks run. There is no stable order in which mutations are applied to objects. As a result, your mutations could get overwritten by a mutating webhook that runs at a later time.
Add a validating admission controller like a ValidatingAdmissionWebhook or a
ValidatingAdmissionPolicy to your cluster to ensure that your mutations
are still present. For example, consider a mutating webhook that inserts the
restartPolicy: Always field to specific init containers to make them run as
sidecar containers. You could run a validating webhook to ensure that those
init containers retained the restartPolicy: Always configuration after all
mutations were completed.
For details, see the following resources:
Mutating webhook deployment
This section provides recommendations for deploying your mutating admission webhooks. In summary, these are as follows:
- Gradually roll out the webhook configuration and monitor for issues by namespace.
- Limit access to edit the webhook configuration resources.
- Limit access to the namespace that runs the webhook server, if the server is in-cluster.
Install and enable a mutating webhook
When you're ready to deploy your mutating webhook to a cluster, use the following order of operations:
- Install the webhook server and start it.
- Set the
failurePolicyfield in the MutatingWebhookConfiguration manifest to Ignore. This lets you avoid disruptions caused by misconfigured webhooks. - Set the
namespaceSelectorfield in the MutatingWebhookConfiguration manifest to a test namespace. - Deploy the MutatingWebhookConfiguration to your cluster.
Monitor the webhook in the test namespace to check for any issues, then roll the webhook out to other namespaces. If the webhook intercepts an API request that it wasn't meant to intercept, pause the rollout and adjust the scope of the webhook configuration.
Limit edit access to mutating webhooks
Mutating webhooks are powerful Kubernetes controllers. Use RBAC or another authorization mechanism to limit access to your webhook configurations and servers. For RBAC, ensure that the following access is only available to trusted entities:
- Verbs: create, update, patch, delete, deletecollection
- API group:
admissionregistration.k8s.io/v1 - API kind: MutatingWebhookConfigurations
If your mutating webhook server runs in the cluster, limit access to create or modify any resources in that namespace.
Examples of good implementations
Note: This section links to third party projects that provide functionality required by Kubernetes. The Kubernetes project authors aren't responsible for these projects, which are listed alphabetically. To add a project to this list, read the content guide before submitting a change. More information.
The following projects are examples of "good" custom webhook server implementations. You can use them as a starting point when designing your own webhooks. Don't use these examples as-is; use them as a starting point and design your webhooks to run well in your specific environment.
What's next
11.8 - Good practices for Dynamic Resource Allocation as a Cluster Admin
This page describes good practices when configuring a Kubernetes cluster utilizing Dynamic Resource Allocation (DRA). These instructions are for cluster administrators.
Separate permissions to DRA related APIs
DRA is orchestrated through a number of different APIs. Use authorization tools (like RBAC, or another solution) to control access to the right APIs depending on the persona of your user.
In general, DeviceClasses and ResourceSlices should be restricted to admins and the DRA drivers. Cluster operators that will be deploying Pods with claims will need access to ResourceClaim and ResourceClaimTemplate APIs; both of these APIs are namespace scoped.
DRA driver deployment and maintenance
DRA drivers are third-party applications that run on each node of your cluster to interface with the hardware of that node and Kubernetes' native DRA components. The installation procedure depends on the driver you choose, but is likely deployed as a DaemonSet to all or a selection of the nodes (using node selectors or similar mechanisms) in your cluster.
Use drivers with seamless upgrade if available
DRA drivers implement the kubeletplugin package
interface.
Your driver may support seamless upgrades by implementing a property of this
interface that allows two versions of the same DRA driver to coexist for a short
time. This is only available for kubelet versions 1.33 and above and may not be
supported by your driver for heterogeneous clusters with attached nodes running
older versions of Kubernetes - check your driver's documentation to be sure.
If seamless upgrades are available for your situation, consider using it to minimize scheduling delays when your driver updates.
If you cannot use seamless upgrades, during driver downtime for upgrades you may observe that:
- Pods cannot start unless the claims they depend on were already prepared for use.
- Cleanup after the last pod which used a claim gets delayed until the driver is available again. The pod is not marked as terminated. This prevents reusing the resources used by the pod for other pods.
- Running pods will continue to run.
Confirm your DRA driver exposes a liveness probe and utilize it
Your DRA driver likely implements a gRPC socket for healthchecks as part of DRA driver good practices. The easiest way to utilize this grpc socket is to configure it as a liveness probe for the DaemonSet deploying your DRA driver. Your driver's documentation or deployment tooling may already include this, but if you are building your configuration separately or not running your DRA driver as a Kubernetes pod, be sure that your orchestration tooling restarts the DRA driver on failed healthchecks to this grpc socket. Doing so will minimize any accidental downtime of the DRA driver and give it more opportunities to self heal, reducing scheduling delays or troubleshooting time.
When draining a node, drain the DRA driver as late as possible
The DRA driver is responsible for unpreparing any devices that were allocated to Pods, and if the DRA driver is drained before Pods with claims have been deleted, it will not be able to finalize its cleanup. If you implement custom drain logic for nodes, consider checking that there are no allocated/reserved ResourceClaim or ResourceClaimTemplates before terminating the DRA driver itself.
Monitor and tune components for higher load, especially in high scale environments
Control plane component kube-scheduler and the internal ResourceClaim controller orchestrated by the component kube-controller-manager do the heavy lifting during scheduling of Pods with claims based on metadata stored in the DRA APIs. Compared to non-DRA scheduled Pods, the number of API server calls, memory, and CPU utilization needed by these components is increased for Pods using DRA claims. In addition, node local components like the DRA driver and kubelet utilize DRA APIs to allocated the hardware request at Pod sandbox creation time. Especially in high scale environments where clusters have many nodes, and/or deploy many workloads that heavily utilize DRA defined resource claims, the cluster administrator should configure the relevant components to anticipate the increased load.
The effects of mistuned components can have direct or snowballing affects
causing different symptoms during the Pod lifecycle. If the kube-scheduler
component's QPS and burst configurations are too low, the scheduler might
quickly identify a suitable node for a Pod but take longer to bind the Pod to
that node. With DRA, during Pod scheduling, the QPS and Burst parameters in the
client-go configuration within kube-controller-manager are critical.
The specific values to tune your cluster to depend on a variety of factors like
number of nodes/pods, rate of pod creation, churn, even in non-DRA environments;
see the SIG Scalability README on Kubernetes scalability
thresholds
for more information. In scale tests performed against a DRA enabled cluster
with 100 nodes, involving 720 long-lived pods (90% saturation) and 80 churn pods
(10% churn, 10 times), with a job creation QPS of 10, kube-controller-manager
QPS could be set to as low as 75 and Burst to 150 to meet equivalent metric
targets for non-DRA deployments. At this lower bound, it was observed that the
client side rate limiter was triggered enough to protect the API server from
explosive burst but was high enough that pod startup SLOs were not impacted.
While this is a good starting point, you can get a better idea of how to tune
the different components that have the biggest effect on DRA performance for
your deployment by monitoring the following metrics. For more information on all
the stable metrics in Kubernetes, see the Kubernetes Metrics
Reference.
kube-controller-manager metrics
The following metrics look closely at the internal ResourceClaim controller
managed by the kube-controller-manager component.
- Workqueue Add Rate: Monitor
sum(rate(workqueue_adds_total{name="resource_claim"}[5m]))to gauge how quickly items are added to the ResourceClaim controller. - Workqueue Depth: Track
sum(workqueue_depth{endpoint="kube-controller-manager", name="resource_claim"})to identify any backlogs in the ResourceClaim controller. - Workqueue Work Duration: Observe
histogram_quantile(0.99, sum(rate(workqueue_work_duration_seconds_bucket{name="resource_claim"}[5m])) by (le))to understand the speed at which the ResourceClaim controller processes work.
If you are experiencing low Workqueue Add Rate, high Workqueue Depth, and/or high Workqueue Work Duration, this suggests the controller isn't performing optimally. Consider tuning parameters like QPS, burst, and CPU/memory configurations.
If you are experiencing high Workequeue Add Rate, high Workqueue Depth, but reasonable Workqueue Work Duration, this indicates the controller is processing work, but concurrency might be insufficient. Concurrency is hardcoded in the controller, so as a cluster administrator, you can tune for this by reducing the pod creation QPS, so the add rate to the resource claim workqueue is more manageable.
kube-scheduler metrics
The following scheduler metrics are high level metrics aggregating performance
across all Pods scheduled, not just those using DRA. It is important to note
that the end-to-end metrics are ultimately influenced by the
kube-controller-manager's performance in creating ResourceClaims from
ResourceClainTemplates in deployments that heavily use ResourceClainTemplates.
- Scheduler End-to-End Duration: Monitor
histogram_quantile(0.99, sum(increase(scheduler_pod_scheduling_sli_duration_seconds_bucket[5m])) by (le)). - Scheduler Algorithm Latency: Track
histogram_quantile(0.99, sum(increase(scheduler_scheduling_algorithm_duration_seconds_bucket[5m])) by (le)).
kubelet metrics
When a Pod bound to a node must have a ResourceClaim satisfied, kubelet calls
the NodePrepareResources and NodeUnprepareResources methods of the DRA
driver. You can observe this behavior from the kubelet's point of view with the
following metrics.
- Kubelet NodePrepareResources: Monitor
histogram_quantile(0.99, sum(rate(dra_operations_duration_seconds_bucket{operation_name="PrepareResources"}[5m])) by (le)). - Kubelet NodeUnprepareResources: Track
histogram_quantile(0.99, sum(rate(dra_operations_duration_seconds_bucket{operation_name="UnprepareResources"}[5m])) by (le)).
DRA kubeletplugin operations
DRA drivers implement the kubeletplugin package
interface
which surfaces its own metric for the underlying gRPC operation
NodePrepareResources and NodeUnprepareResources. You can observe this
behavior from the point of view of the internal kubeletplugin with the following
metrics.
- DRA kubeletplugin gRPC NodePrepareResources operation: Observe
histogram_quantile(0.99, sum(rate(dra_grpc_operations_duration_seconds_bucket{method_name=~".*NodePrepareResources"}[5m])) by (le)). - DRA kubeletplugin gRPC NodeUnprepareResources operation: Observe
histogram_quantile(0.99, sum(rate(dra_grpc_operations_duration_seconds_bucket{method_name=~".*NodeUnprepareResources"}[5m])) by (le)).
What's next
11.9 - Logging Architecture
Application logs can help you understand what is happening inside your application. The logs are particularly useful for debugging problems and monitoring cluster activity. Most modern applications have some kind of logging mechanism. Likewise, container engines are designed to support logging. The easiest and most adopted logging method for containerized applications is writing to standard output and standard error streams.
However, the native functionality provided by a container engine or runtime is usually not enough for a complete logging solution.
For example, you may want to access your application's logs if a container crashes, a pod gets evicted, or a node dies.
In a cluster, logs should have a separate storage and lifecycle independent of nodes, pods, or containers. This concept is called cluster-level logging.
Cluster-level logging architectures require a separate backend to store, analyze, and query logs. Kubernetes does not provide a native storage solution for log data. Instead, there are many logging solutions that integrate with Kubernetes. The following sections describe how to handle and store logs on nodes.
Pod and container logs
Kubernetes captures logs from each container in a running Pod.
This example uses a manifest for a Pod with a container
that writes text to the standard output stream, once per second.
apiVersion: v1
kind: Pod
metadata:
name: counter
spec:
containers:
- name: count
image: busybox:1.28
args: [/bin/sh, -c,
'i=0; while true; do echo "$i: $(date)"; i=$((i+1)); sleep 1; done']
To run this pod, use the following command:
kubectl apply -f https://k8s.io/examples/debug/counter-pod.yaml
The output is:
pod/counter created
To fetch the logs, use the kubectl logs command, as follows:
kubectl logs counter
The output is similar to:
0: Fri Apr 1 11:42:23 UTC 2022
1: Fri Apr 1 11:42:24 UTC 2022
2: Fri Apr 1 11:42:25 UTC 2022
You can use kubectl logs --previous to retrieve logs from a previous instantiation of a container.
If your pod has multiple containers, specify which container's logs you want to access by
appending a container name to the command, with a -c flag, like so:
kubectl logs counter -c count
Container log streams
FEATURE STATE:
Kubernetes v1.32 [alpha](disabled by default)As an alpha feature, the kubelet can split out the logs from the two standard streams produced
by a container: standard output
and standard error.
To use this behavior, you must enable the PodLogsQuerySplitStreams
feature gate.
With that feature gate enabled, Kubernetes 1.36 allows access to these
log streams directly via the Pod API. You can fetch a specific stream by specifying the stream name (either Stdout or Stderr),
using the stream query string. You must have access to read the log subresource of that Pod.
To demonstrate this feature, you can create a Pod that periodically writes text to both the standard output and error stream.
apiVersion: v1
kind: Pod
metadata:
name: counter-err
spec:
containers:
- name: count
image: busybox:1.28
args: [/bin/sh, -c,
'i=0; while true; do echo "$i: $(date)"; echo "$i: err" >&2 ; i=$((i+1)); sleep 1; done']
To run this pod, use the following command:
kubectl apply -f https://k8s.io/examples/debug/counter-pod-err.yaml
To fetch only the stderr log stream, you can run:
kubectl get --raw "/api/v1/namespaces/default/pods/counter-err/log?stream=Stderr"
See the kubectl logs documentation
for more details.
How nodes handle container logs
A container runtime handles and redirects any output generated to a containerized
application's stdout and stderr streams.
Different container runtimes implement this in different ways; however, the integration
with the kubelet is standardized as the CRI logging format.
By default, if a container restarts, the kubelet keeps one terminated container with its logs. If a pod is evicted from the node, all corresponding containers are also evicted, along with their logs.
The kubelet makes logs available to clients via a special feature of the Kubernetes API.
The usual way to access this is by running kubectl logs.
Log rotation
FEATURE STATE:
Kubernetes v1.21 [stable]The kubelet is responsible for rotating container logs and managing the logging directory structure. The kubelet sends this information to the container runtime (using CRI), and the runtime writes the container logs to the given location.
You can configure two kubelet configuration settings,
containerLogMaxSize (default 10Mi) and containerLogMaxFiles (default 5),
using the kubelet configuration file.
These settings let you configure the maximum size for each log file and the maximum number of
files allowed for each container respectively.
In order to perform an efficient log rotation in clusters where the volume of the logs generated by
the workload is large, kubelet also provides a mechanism to tune how the logs are rotated in
terms of how many concurrent log rotations can be performed and the interval at which the logs are
monitored and rotated as required.
You can configure two kubelet configuration settings,
containerLogMaxWorkers and containerLogMonitorInterval using the
kubelet configuration file.
When you run kubectl logs as in
the basic logging example, the kubelet on the node handles the request and
reads directly from the log file. The kubelet returns the content of the log file.
Note:
Only the contents of the latest log file are available through kubectl logs.
For example, if a Pod writes 40 MiB of logs and the kubelet rotates logs
after 10 MiB, running kubectl logs returns at most 10MiB of data.
System component logs
There are two types of system components: those that typically run in a container, and those components directly involved in running containers. For example:
- The kubelet and container runtime do not run in containers. The kubelet runs your containers (grouped together in pods)
- The Kubernetes scheduler, controller manager, and API server run within pods
(usually static Pods).
The etcd component runs in the control plane, and most commonly also as a static pod.
If your cluster uses kube-proxy, you typically run this as a
DaemonSet.
Log locations
The way that the kubelet and container runtime write logs depends on the operating system that the node uses:
On Linux nodes that use systemd, the kubelet and container runtime write to journald
by default. You use journalctl to read the systemd journal; for example:
journalctl -u kubelet.
If systemd is not present, the kubelet and container runtime write to .log files in the
/var/log directory. If you want to have logs written elsewhere, you can indirectly
run the kubelet via a helper tool, kube-log-runner, and use that tool to redirect
kubelet logs to a directory that you choose.
By default, kubelet directs your container runtime to write logs into directories within
/var/log/pods.
For more information on kube-log-runner, read System Logs.
By default, the kubelet writes logs to files within the directory C:\var\logs
(notice that this is not C:\var\log).
Although C:\var\log is the Kubernetes default location for these logs, several
cluster deployment tools set up Windows nodes to log to C:\var\log\kubelet instead.
If you want to have logs written elsewhere, you can indirectly
run the kubelet via a helper tool, kube-log-runner, and use that tool to redirect
kubelet logs to a directory that you choose.
However, by default, kubelet directs your container runtime to write logs within the
directory C:\var\log\pods.
For more information on kube-log-runner, read System Logs.
For Kubernetes cluster components that run in pods, these write to files inside
the /var/log directory, bypassing the default logging mechanism (the components
do not write to the systemd journal). You can use Kubernetes' storage mechanisms
to map persistent storage into the container that runs the component.
Kubelet allows changing the pod logs directory from default /var/log/pods
to a custom path. This adjustment can be made by configuring the podLogsDir
parameter in the kubelet's configuration file.
Caution:
It's important to note that the default location /var/log/pods has been in use for
an extended period and certain processes might implicitly assume this path.
Therefore, altering this parameter must be approached with caution and at your own risk.
Another caveat to keep in mind is that the kubelet supports the location being on the same
disk as /var. Otherwise, if the logs are on a separate filesystem from /var,
then the kubelet will not track that filesystem's usage, potentially leading to issues if
it fills up.
For details about etcd and its logs, view the etcd documentation. Again, you can use Kubernetes' storage mechanisms to map persistent storage into the container that runs the component.
Note:
If you deploy Kubernetes cluster components (such as the scheduler) to log to a volume shared from the parent node, you need to consider and ensure that those logs are rotated. Kubernetes does not manage that log rotation.
Your operating system may automatically implement some log rotation - for example,
if you share the directory /var/log into a static Pod for a component, node-level
log rotation treats a file in that directory the same as a file written by any component
outside Kubernetes.
Some deploy tools account for that log rotation and automate it; others leave this as your responsibility.
Cluster-level logging architectures
While Kubernetes does not provide a native solution for cluster-level logging, there are several common approaches you can consider. Here are some options:
- Use a node-level logging agent that runs on every node.
- Include a dedicated sidecar container for logging in an application pod.
- Push logs directly to a backend from within an application.
Using a node logging agent
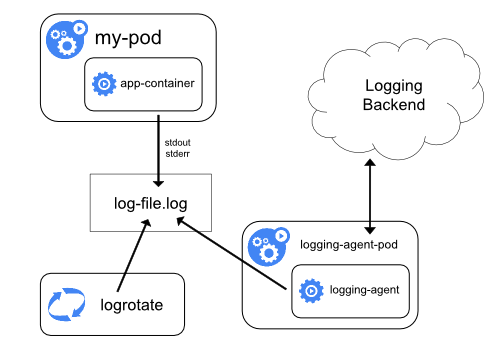
You can implement cluster-level logging by including a node-level logging agent on each node. The logging agent is a dedicated tool that exposes logs or pushes logs to a backend. Commonly, the logging agent is a container that has access to a directory with log files from all of the application containers on that node.
Because the logging agent must run on every node, it is recommended to run the agent
as a DaemonSet.
Node-level logging creates only one agent per node and doesn't require any changes to the applications running on the node.
Containers write to stdout and stderr, but with no agreed format. A node-level agent collects these logs and forwards them for aggregation.
Using a sidecar container with the logging agent
You can use a sidecar container in one of the following ways:
- The sidecar container streams application logs to its own
stdout. - The sidecar container runs a logging agent, which is configured to pick up logs from an application container.
Streaming sidecar container
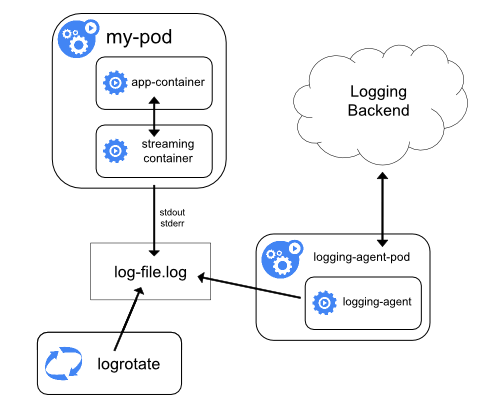
By having your sidecar containers write to their own stdout and stderr
streams, you can take advantage of the kubelet and the logging agent that
already run on each node. The sidecar containers read logs from a file, a socket,
or journald. Each sidecar container prints a log to its own stdout or stderr stream.
This approach allows you to separate several log streams from different
parts of your application, some of which can lack support
for writing to stdout or stderr. The logic behind redirecting logs
is minimal, so it's not a significant overhead. Additionally, because
stdout and stderr are handled by the kubelet, you can use built-in tools
like kubectl logs.
For example, a pod runs a single container, and the container writes to two different log files using two different formats. Here's a manifest for the Pod:
apiVersion: v1
kind: Pod
metadata:
name: counter
spec:
containers:
- name: count
image: busybox:1.28
args:
- /bin/sh
- -c
- >
i=0;
while true;
do
echo "$i: $(date)" >> /var/log/1.log;
echo "$(date) INFO $i" >> /var/log/2.log;
i=$((i+1));
sleep 1;
done
volumeMounts:
- name: varlog
mountPath: /var/log
volumes:
- name: varlog
emptyDir: {}
It is not recommended to write log entries with different formats to the same log
stream, even if you managed to redirect both components to the stdout stream of
the container. Instead, you can create two sidecar containers. Each sidecar
container could tail a particular log file from a shared volume and then redirect
the logs to its own stdout stream.
Here's a manifest for a pod that has two sidecar containers:
apiVersion: v1
kind: Pod
metadata:
name: counter
spec:
containers:
- name: count
image: busybox:1.28
args:
- /bin/sh
- -c
- >
i=0;
while true;
do
echo "$i: $(date)" >> /var/log/1.log;
echo "$(date) INFO $i" >> /var/log/2.log;
i=$((i+1));
sleep 1;
done
volumeMounts:
- name: varlog
mountPath: /var/log
- name: count-log-1
image: busybox:1.28
args: [/bin/sh, -c, 'tail -n+1 -F /var/log/1.log']
volumeMounts:
- name: varlog
mountPath: /var/log
- name: count-log-2
image: busybox:1.28
args: [/bin/sh, -c, 'tail -n+1 -F /var/log/2.log']
volumeMounts:
- name: varlog
mountPath: /var/log
volumes:
- name: varlog
emptyDir: {}
Now when you run this pod, you can access each log stream separately by running the following commands:
kubectl logs counter count-log-1
The output is similar to:
0: Fri Apr 1 11:42:26 UTC 2022
1: Fri Apr 1 11:42:27 UTC 2022
2: Fri Apr 1 11:42:28 UTC 2022
...
kubectl logs counter count-log-2
The output is similar to:
Fri Apr 1 11:42:29 UTC 2022 INFO 0
Fri Apr 1 11:42:30 UTC 2022 INFO 0
Fri Apr 1 11:42:31 UTC 2022 INFO 0
...
If you installed a node-level agent in your cluster, that agent picks up those log streams automatically without any further configuration. If you like, you can configure the agent to parse log lines depending on the source container.
Even for Pods that only have low CPU and memory usage (order of a couple of millicores
for cpu and order of several megabytes for memory), writing logs to a file and
then streaming them to stdout can double how much storage you need on the node.
If you have an application that writes to a single file, it's recommended to set
/dev/stdout as the destination rather than implement the streaming sidecar
container approach.
Sidecar containers can also be used to rotate log files that cannot be rotated by
the application itself. An example of this approach is a small container running
logrotate periodically.
However, it's more straightforward to use stdout and stderr directly, and
leave rotation and retention policies to the kubelet.
Sidecar container with a logging agent
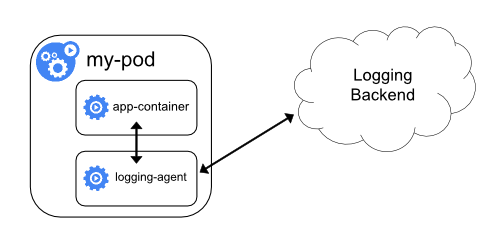
If the node-level logging agent is not flexible enough for your situation, you can create a sidecar container with a separate logging agent that you have configured specifically to run with your application.
Note:
Using a logging agent in a sidecar container can lead to significant resource consumption. Moreover, you won't be able to access those logs usingkubectl logs because they are not controlled
by the kubelet.Here are two example manifests that you can use to implement a sidecar container with a logging agent.
The first manifest contains a ConfigMap
to configure fluentd.
apiVersion: v1
kind: ConfigMap
metadata:
name: fluentd-config
data:
fluentd.conf: |
<source>
type tail
format none
path /var/log/1.log
pos_file /var/log/1.log.pos
tag count.format1
</source>
<source>
type tail
format none
path /var/log/2.log
pos_file /var/log/2.log.pos
tag count.format2
</source>
<match **>
type google_cloud
</match>
Note:
In the sample configurations, you can replace fluentd with any logging agent, reading from any source inside an application container.The second manifest describes a pod that has a sidecar container running fluentd. The pod mounts a volume where fluentd can pick up its configuration data.
apiVersion: v1
kind: Pod
metadata:
name: counter
spec:
containers:
- name: count
image: busybox:1.28
args:
- /bin/sh
- -c
- >
i=0;
while true;
do
echo "$i: $(date)" >> /var/log/1.log;
echo "$(date) INFO $i" >> /var/log/2.log;
i=$((i+1));
sleep 1;
done
volumeMounts:
- name: varlog
mountPath: /var/log
- name: count-agent
image: registry.k8s.io/fluentd-gcp:1.30
env:
- name: FLUENTD_ARGS
value: -c /etc/fluentd-config/fluentd.conf
volumeMounts:
- name: varlog
mountPath: /var/log
- name: config-volume
mountPath: /etc/fluentd-config
volumes:
- name: varlog
emptyDir: {}
- name: config-volume
configMap:
name: fluentd-config
Exposing logs directly from the application
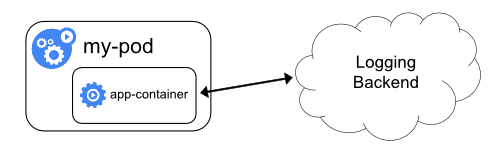
Cluster-logging that exposes or pushes logs directly from every application is outside the scope of Kubernetes.
What's next
- Read about Kubernetes system logs
- Learn about Traces For Kubernetes System Components
- Learn how to customise the termination message that Kubernetes records when a Pod fails
11.10 - Compatibility Version For Kubernetes Control Plane Components
Since release v1.32, we introduced configurable version compatibility and emulation options to Kubernetes control plane components to make upgrades safer by providing more control and increasing the granularity of steps available to cluster administrators.
Emulated Version
The emulation option is set by the --emulated-version flag of control plane components. It allows the component to emulate the behavior (APIs, features, ...) of an earlier version of Kubernetes.
When used, the capabilities available will match the emulated version:
- Any capabilities present in the binary version that were introduced after the emulation version will be unavailable.
- Any capabilities removed after the emulation version will be available.
This enables a binary from a particular Kubernetes release to emulate the behavior of a previous version with sufficient fidelity that interoperability with other system components can be defined in terms of the emulated version.
The --emulated-version must be <= binaryVersion. See the help message of the --emulated-version flag for supported range of emulated versions.
11.11 - Metrics For Kubernetes System Components
System component metrics can give a better look into what is happening inside them. Metrics are particularly useful for building dashboards and alerts.
Kubernetes components emit metrics in Prometheus format. This format is structured plain text, designed so that people and machines can both read it.
Metrics in Kubernetes
In most cases metrics are available on /metrics endpoint of the HTTP server. For components that
don't expose endpoint by default, it can be enabled using --bind-address flag.
Examples of those components:
In a production environment you may want to configure Prometheus Server or some other metrics scraper to periodically gather these metrics and make them available in some kind of time series database.
Note that kubelet also exposes metrics in
/metrics/cadvisor, /metrics/resource and /metrics/probes endpoints. Those metrics do not
have the same lifecycle.
If your cluster uses RBAC, reading metrics requires
authorization via a user, group or ServiceAccount with a ClusterRole that allows accessing
/metrics. For example:
apiVersion: rbac.authorization.k8s.io/v1
kind: ClusterRole
metadata:
name: prometheus
rules:
- nonResourceURLs:
- "/metrics"
verbs:
- get
Metric lifecycle
Alpha metric → Beta metric → Stable metric → Deprecated metric → Hidden metric → Deleted metric
Alpha metrics have no stability guarantees. These metrics can be modified or deleted at any time.
Beta metrics observe a looser API contract than its stable counterparts. No labels can be removed from beta metrics during their lifetime, however, labels can be added while the metric is in the beta stage.
Stable metrics are guaranteed to not change. This means:
- A stable metric without a deprecated signature will not be deleted or renamed
- A stable metric's type will not be modified
Deprecated metrics are slated for deletion, but are still available for use. These metrics include an annotation about the version in which they became deprecated.
For example:
Before deprecation
# HELP some_counter this counts things # TYPE some_counter counter some_counter 0After deprecation
# HELP some_counter (Deprecated since 1.15.0) this counts things # TYPE some_counter counter some_counter 0
Hidden metrics are no longer published for scraping, but are still available for use. A deprecated metric becomes a hidden metric after a period of time, based on its stability level:
- STABLE metrics become hidden after a minimum of 3 releases or 9 months, whichever is longer.
- BETA metrics become hidden after a minimum of 1 release or 4 months, whichever is longer.
- ALPHA metrics can be hidden or removed in the same release in which they are deprecated.
To use a hidden metric, you must enable it. For more details, refer to the Show hidden metrics section.
Deleted metrics are no longer published and cannot be used.
Show hidden metrics
As described above, admins can enable hidden metrics through a command-line flag on a specific binary. This intends to be used as an escape hatch for admins if they missed the migration of the metrics deprecated in the last release.
The flag show-hidden-metrics-for-version takes a version for which you want to show metrics
deprecated in that release. The version is expressed as x.y, where x is the major version, y is
the minor version. The patch version is not needed even though a metrics can be deprecated in a
patch release, the reason for that is the metrics deprecation policy runs against the minor release.
The flag can only take the previous minor version as its value. If you want to show all metrics hidden in the previous release, you can set the show-hidden-metrics-for-version flag to the previous version. Using a version that is too old is not allowed because it violates the metrics deprecation policy.
For example, let's assume metric A is deprecated in 1.29. The version in which metric A becomes hidden depends on its stability level:
- If metric
Ais ALPHA, it could be hidden in1.29. - If metric
Ais BETA, it will be hidden in1.30at the earliest. If you are upgrading to1.30and still needA, you must use the command-line flag--show-hidden-metrics-for-version=1.29. - If metric
Ais STABLE, it will be hidden in1.32at the earliest. If you are upgrading to1.32and still needA, you must use the command-line flag--show-hidden-metrics-for-version=1.31.
Component metrics
kube-controller-manager metrics
Controller manager metrics provide important insight into the performance and health of the controller manager. These metrics include common Go language runtime metrics such as go_routine count and controller specific metrics such as etcd request latencies or Cloudprovider (AWS, GCE, OpenStack) API latencies that can be used to gauge the health of a cluster.
Starting from Kubernetes 1.7, detailed Cloudprovider metrics are available for storage operations for GCE, AWS, Vsphere and OpenStack. These metrics can be used to monitor health of persistent volume operations.
For example, for GCE these metrics are called:
cloudprovider_gce_api_request_duration_seconds { request = "instance_list"}
cloudprovider_gce_api_request_duration_seconds { request = "disk_insert"}
cloudprovider_gce_api_request_duration_seconds { request = "disk_delete"}
cloudprovider_gce_api_request_duration_seconds { request = "attach_disk"}
cloudprovider_gce_api_request_duration_seconds { request = "detach_disk"}
cloudprovider_gce_api_request_duration_seconds { request = "list_disk"}
kube-scheduler metrics
FEATURE STATE:
Kubernetes v1.21 [beta]The scheduler exposes optional metrics that reports the requested resources and the desired limits of all running pods. These metrics can be used to build capacity planning dashboards, assess current or historical scheduling limits, quickly identify workloads that cannot schedule due to lack of resources, and compare actual usage to the pod's request.
The kube-scheduler identifies the resource requests and limits configured for each Pod; when either a request or limit is non-zero, the kube-scheduler reports a metrics timeseries. The time series is labelled by:
- namespace
- pod name
- the node where the pod is scheduled or an empty string if not yet scheduled
- priority
- the assigned scheduler for that pod
- the name of the resource (for example,
cpu) - the unit of the resource if known (for example,
cores)
Once a pod reaches completion (has a restartPolicy of Never or OnFailure and is in the
Succeeded or Failed pod phase, or has been deleted and all containers have a terminated state)
the series is no longer reported since the scheduler is now free to schedule other pods to run.
The two metrics are called kube_pod_resource_request and kube_pod_resource_limit.
The metrics are exposed at the HTTP endpoint /metrics/resources. They require
authorization for the /metrics/resources endpoint, usually granted by a
ClusterRole with the get verb for the /metrics/resources non-resource URL.
On Kubernetes 1.21 you must use the --show-hidden-metrics-for-version=1.20
flag to expose these alpha stability metrics.
kubelet Pressure Stall Information (PSI) metrics
FEATURE STATE:
Kubernetes v1.36 [stable](enabled by default)When the kernel has PSI enabled (version 4.20 or later), the kubelet collects Pressure Stall Information (PSI) for CPU, memory and I/O usage. The information is collected at node, pod and container level.
Prometheus Metrics: Exposed at the /metrics/cadvisor endpoint as cumulative counters (totals) representing the total stall time in seconds. The metrics are exposed at this endpoint with the following names:
container_pressure_cpu_stalled_seconds_total
container_pressure_cpu_waiting_seconds_total
container_pressure_memory_stalled_seconds_total
container_pressure_memory_waiting_seconds_total
container_pressure_io_stalled_seconds_total
container_pressure_io_waiting_seconds_total
Summary API: Exposed at the /stats/summary endpoint, providing both the cumulative totals and the moving averages (avg10, avg60, avg300) in a JSON format. These averages represent the percentage of time that tasks were stalled on a resource over the respective 10-second, 60-second, and 5-minute intervals.
These metrics are also natively exported through the node's respective file in /proc/pressure/ -- cpu, memory, and io in the following format:
some avg10=0.00 avg60=0.00 avg300=0.00 total=0
full avg10=0.00 avg60=0.00 avg300=0.00 total=0
How can these metrics be interpreted together? Take for example the following query from the Summary API:kubectl get --raw "/api/v1/nodes/$(kubectl get nodes -o jsonpath='{.items[0].metadata.name}')/proxy/stats/summary" | jq '.pods[].containers[] | select(.name=="<CONTAINER_NAME>") | {name, cpu: .cpu.psi, memory: .memory.psi, io: .io.psi}'.
This returns the information in a json format as such.
{
"name": "<CONTAINER_NAME>",
"cpu": {
"full": {
"total": 0,
"avg10": 0,
"avg60": 0,
"avg300": 0
},
"some": {
"total": 35232438,
"avg10": 0.74,
"avg60": 0.52,
"avg300": 0.21,
},
},
"memory": {
"full": {
"total": 539105,
"avg10": 0,
"avg60": 0,
"avg300": 0
},
"some": {
"total": 658164,
"avg10": 0.01,
"avg60": 0.01,
"avg300": 0.00,
},
}
},
"io": {
"full": {
"total": 33190987,
"avg10": 0.31,
"avg60": 0.22,
"avg300": 0.05,
},
"some": {
"total": 40809937,
"avg10": 0.52,
"avg60": 0.45,
"avg300": 0.12,
}
}
}
Here is a simple spike scenario. The cpu.some avg10 value of 0.74 indicates that in the last 10 seconds, at least one task in this container was stalled on the CPU for 0.74% of the time (0.0074 seconds or 74 milliseconds). Because avg10 (0.74) is significantly higher than avg300 (0.21) on the same resource, this suggests a recent surge in resource contention rather than a sustained long-term bottleneck. If monitored continuously and the avg300 metrics increase as well, we can diagnose a more serious, lasting issue!
Additionally, notice how in this example cpu.some shows pressure, while cpu.full remains at 0.00. This tells us that while some processes were delayed waiting for CPU time, the container as a whole was still making progress. A non-zero full value would indicate that all non-idle tasks were stalled simultaneously, a much bigger problem.
Although not as human-readable, the total value of 35232438 represents the cumulative stall time in microseconds, that allow latency spike detection that otherwise may not show in the averages. They are also useful for monitoring systems, like Prometheus, to calculate precise rates of increase over specific time windows.
As a final note, when observing high I/O Pressure alongside low Memory Pressure, it can indicate that the application is waiting on disk throughput rather than failing due to a lack of available RAM. The node is not over-committed on memory, and a different diagnosis for disk consumption can be investigated.
PSI metrics unlock a more robust way to monitor realitime resource contention at all levels for every cgroup, opening up the opportunity to dynamically handle workloads across the system. You can read more about the PSI metrics in Understand PSI Metrics.
Requirements
Pressure Stall Information requires:
Disabling metrics
You can explicitly turn off metrics via command line flag --disabled-metrics. This may be
desired if, for example, a metric is causing a performance problem. The input is a list of
disabled metrics (i.e. --disabled-metrics=metric1,metric2).
Metric cardinality enforcement
Metrics with unbounded dimensions could cause memory issues in the components they instrument. To
limit resource use, you can use the --allow-metric-labels command line option to dynamically
configure an allow-list of label values for a metric.
In alpha stage, the flag can only take in a series of mappings as metric label allow-list.
Each mapping is of the format <metric_name>,<label_name>=<allowed_labels> where
<allowed_labels> is a comma-separated list of acceptable label names.
The overall format looks like:
--allow-metric-labels <metric_name>,<label_name>='<allow_value1>, <allow_value2>...', <metric_name2>,<label_name>='<allow_value1>, <allow_value2>...', ...
Here is an example:
--allow-metric-labels number_count_metric,odd_number='1,3,5', number_count_metric,even_number='2,4,6', date_gauge_metric,weekend='Saturday,Sunday'
In addition to specifying this from the CLI, this can also be done within a configuration file. You
can specify the path to that configuration file using the --allow-metric-labels-manifest command
line argument to a component. Here's an example of the contents of that configuration file:
"metric1,label2": "v1,v2,v3"
"metric2,label1": "v1,v2,v3"
Additionally, the cardinality_enforcement_unexpected_categorizations_total meta-metric records the
count of unexpected categorizations during cardinality enforcement, that is, whenever a label value
is encountered that is not allowed with respect to the allow-list constraints.
What's next
- Read about the Prometheus text format for metrics
- See the list of stable Kubernetes metrics
- Read about the Kubernetes deprecation policy
11.12 - Metrics for Kubernetes Object States
kube-state-metrics, an add-on agent to generate and expose cluster-level metrics.
The state of Kubernetes objects in the Kubernetes API can be exposed as metrics.
An add-on agent called kube-state-metrics can connect to the Kubernetes API server and expose a HTTP endpoint with metrics generated from the state of individual objects in the cluster.
It exposes various information about the state of objects like labels and annotations, startup and termination times, status or the phase the object currently is in.
For example, containers running in pods create a kube_pod_container_info metric.
This includes the name of the container, the name of the pod it is part of, the namespace the pod is running in, the name of the container image, the ID of the image, the image name from the spec of the container, the ID of the running container and the ID of the pod as labels.
🛇 This item links to a third party project or product that is not part of Kubernetes itself. More information
An external component that is able and capable to scrape the endpoint of kube-state-metrics (for example via Prometheus) can now be used to enable the following use cases.
Example: using metrics from kube-state-metrics to query the cluster state
Metric series generated by kube-state-metrics are helpful to gather further insights into the cluster, as they can be used for querying.
If you use Prometheus or another tool that uses the same query language, the following PromQL query returns the number of pods that are not ready:
count(kube_pod_status_ready{condition="false"}) by (namespace, pod)
Example: alerting based on from kube-state-metrics
Metrics generated from kube-state-metrics also allow for alerting on issues in the cluster.
If you use Prometheus or a similar tool that uses the same alert rule language, the following alert will fire if there are pods that have been in a Terminating state for more than 5 minutes:
groups:
- name: Pod state
rules:
- alert: PodsBlockedInTerminatingState
expr: count(kube_pod_deletion_timestamp) by (namespace, pod) * count(kube_pod_status_reason{reason="NodeLost"} == 0) by (namespace, pod) > 0
for: 5m
labels:
severity: page
annotations:
summary: Pod {{$labels.namespace}}/{{$labels.pod}} blocked in Terminating state.
11.13 - System Logs
System component logs record events happening in cluster, which can be very useful for debugging. You can configure log verbosity to see more or less detail. Logs can be as coarse-grained as showing errors within a component, or as fine-grained as showing step-by-step traces of events (like HTTP access logs, pod state changes, controller actions, or scheduler decisions).
Warning:
In contrast to the command line flags described here, the log output itself does not fall under the Kubernetes API stability guarantees: individual log entries and their formatting may change from one release to the next!Klog
klog is the Kubernetes logging library. klog generates log messages for the Kubernetes system components.
Kubernetes is in the process of simplifying logging in its components. The following klog command line flags are deprecated starting with Kubernetes v1.23 and removed in Kubernetes v1.26:
--add-dir-header--alsologtostderr--log-backtrace-at--log-dir--log-file--log-file-max-size--logtostderr--one-output--skip-headers--skip-log-headers--stderrthreshold
Output will always be written to stderr, regardless of the output format. Output redirection is expected to be handled by the component which invokes a Kubernetes component. This can be a POSIX shell or a tool like systemd.
In some cases, for example a distroless container or a Windows system service, those options are
not available. Then the
kube-log-runner
binary can be used as wrapper around a Kubernetes component to redirect
output. A prebuilt binary is included in several Kubernetes base images under
its traditional name as /go-runner and as kube-log-runner in server and
node release archives.
This table shows how kube-log-runner invocations correspond to shell redirection:
| Usage | POSIX shell (such as bash) | kube-log-runner <options> <cmd> |
|---|---|---|
| Merge stderr and stdout, write to stdout | 2>&1 | kube-log-runner (default behavior) |
| Redirect both into log file | 1>>/tmp/log 2>&1 | kube-log-runner -log-file=/tmp/log |
| Copy into log file and to stdout | 2>&1 | tee -a /tmp/log | kube-log-runner -log-file=/tmp/log -also-stdout |
| Redirect only stdout into log file | >/tmp/log | kube-log-runner -log-file=/tmp/log -redirect-stderr=false |
Klog output
An example of the traditional klog native format:
I1025 00:15:15.525108 1 httplog.go:79] GET /api/v1/namespaces/kube-system/pods/metrics-server-v0.3.1-57c75779f-9p8wg: (1.512ms) 200 [pod_nanny/v0.0.0 (linux/amd64) kubernetes/$Format 10.56.1.19:51756]
The message string may contain line breaks:
I1025 00:15:15.525108 1 example.go:79] This is a message
which has a line break.
Structured Logging
FEATURE STATE:
Kubernetes v1.23 [beta]Warning:
Migration to structured log messages is an ongoing process. Not all log messages are structured in this version. When parsing log files, you must also handle unstructured log messages.
Log formatting and value serialization are subject to change.
Structured logging introduces a uniform structure in log messages allowing for programmatic extraction of information. You can store and process structured logs with less effort and cost. The code which generates a log message determines whether it uses the traditional unstructured klog output or structured logging.
The default formatting of structured log messages is as text, with a format that is backward compatible with traditional klog:
<klog header> "<message>" <key1>="<value1>" <key2>="<value2>" ...
Example:
I1025 00:15:15.525108 1 controller_utils.go:116] "Pod status updated" pod="kube-system/kubedns" status="ready"
Strings are quoted. Other values are formatted with
%+v, which may cause log messages to
continue on the next line depending on the data.
I1025 00:15:15.525108 1 example.go:116] "Example" data="This is text with a line break\nand \"quotation marks\"." someInt=1 someFloat=0.1 someStruct={StringField: First line,
second line.}
Contextual Logging
FEATURE STATE:
Kubernetes v1.30 [beta]Contextual logging builds on top of structured logging. It is primarily about how developers use logging calls: code based on that concept is more flexible and supports additional use cases as described in the Contextual Logging KEP.
If developers use additional functions like WithValues or WithName in
their components, then log entries contain additional information that gets
passed into functions by their caller.
For Kubernetes 1.36, this is gated behind the ContextualLogging
feature gate and is
enabled by default. The infrastructure for this was added in 1.24 without
modifying components. The
component-base/logs/example
command demonstrates how to use the new logging calls and how a component
behaves that supports contextual logging.
$ cd $GOPATH/src/k8s.io/kubernetes/staging/src/k8s.io/component-base/logs/example/cmd/
$ go run . --help
...
--feature-gates mapStringBool A set of key=value pairs that describe feature gates for alpha/experimental features. Options are:
AllAlpha=true|false (ALPHA - default=false)
AllBeta=true|false (BETA - default=false)
ContextualLogging=true|false (BETA - default=true)
$ go run . --feature-gates ContextualLogging=true
...
I0222 15:13:31.645988 197901 example.go:54] "runtime" logger="example.myname" foo="bar" duration="1m0s"
I0222 15:13:31.646007 197901 example.go:55] "another runtime" logger="example" foo="bar" duration="1h0m0s" duration="1m0s"
The logger key and foo="bar" were added by the caller of the function
which logs the runtime message and duration="1m0s" value, without having to
modify that function.
With contextual logging disable, WithValues and WithName do nothing and log
calls go through the global klog logger. Therefore this additional information
is not in the log output anymore:
$ go run . --feature-gates ContextualLogging=false
...
I0222 15:14:40.497333 198174 example.go:54] "runtime" duration="1m0s"
I0222 15:14:40.497346 198174 example.go:55] "another runtime" duration="1h0m0s" duration="1m0s"
JSON log format
FEATURE STATE:
Kubernetes v1.19 [alpha]Warning:
JSON output does not support many standard klog flags. For list of unsupported klog flags, see the Command line tool reference.
Not all logs are guaranteed to be written in JSON format (for example, during process start). If you intend to parse logs, make sure you can handle log lines that are not JSON as well.
Field names and JSON serialization are subject to change.
The --logging-format=json flag changes the format of logs from klog native format to JSON format.
Example of JSON log format (pretty printed):
{
"ts": 1580306777.04728,
"v": 4,
"msg": "Pod status updated",
"pod":{
"name": "nginx-1",
"namespace": "default"
},
"status": "ready"
}
Keys with special meaning:
ts- timestamp as Unix time (required, float)v- verbosity (only for info and not for error messages, int)err- error string (optional, string)msg- message (required, string)
List of components currently supporting JSON format:
Log verbosity level
The -v flag controls log verbosity. Increasing the value increases the number of logged events.
Decreasing the value decreases the number of logged events. Increasing verbosity settings logs
increasingly less severe events. A verbosity setting of 0 logs only critical events.
Log location
There are two types of system components: those that run in a container and those that do not run in a container. For example:
- The Kubernetes scheduler and kube-proxy run in a container.
- The kubelet and container runtime do not run in containers.
On machines with systemd, the kubelet and container runtime write to journald.
Otherwise, they write to .log files in the /var/log directory.
System components inside containers always write to .log files in the /var/log directory,
bypassing the default logging mechanism.
Similar to the container logs, you should rotate system component logs in the /var/log directory.
In Kubernetes clusters created by the kube-up.sh script, log rotation is configured by the logrotate tool.
The logrotate tool rotates logs daily, or once the log size is greater than 100MB.
Log query
FEATURE STATE:
Kubernetes v1.36 [stable](enabled by default)The Log Query feature can help debugging issues in both Linux and Windows
nodes. Introduced in Kubernetes v1.27, the feature allows viewing logs of
services running on the node. To use the feature, ensure that the kubelet
configuration options enableSystemLogHandler and enableSystemLogQuery
are both set to true for the target node.
In Kubernetes v1.36 this feature graduated to stable and the NodeLogQueryfeature gate
is now locked to true, hence the feature gate is enabled by default, leaving
enableSystemLogHandler as the only option required to enable or disable the
Log Query feature.
enableSystemLogHandler defaults to false and is recommended to be left
disabled unless actively debugging.
Warning:
Granting permissions tonodes/proxy (even just get permission) also
authorizes access to powerful kubelet APIs that can be used to execute commands
in any container running on the node, so be careful about how you manage them.
See Kubelet authentication/authorization
for more information.On Linux, the assumption is that service logs are available via journald. On
Windows the assumption is that service logs are available in the application log
provider. On both operating systems, logs are also available by reading files
within /var/log/.
Provided you are authorized to interact with node objects, you can try out this feature on all your nodes or just a subset. Here is an example to retrieve the kubelet service logs from a node:
# Fetch kubelet logs from a node named node-1.example
kubectl get --raw "/api/v1/nodes/node-1.example/proxy/logs/?query=kubelet"
You can also fetch files, provided that the files are in a directory that the kubelet allows for log
fetches. For example, you can fetch a log from /var/log on a Linux node:
kubectl get --raw "/api/v1/nodes/<insert-node-name-here>/proxy/logs/?query=/<insert-log-file-name-here>"
The kubelet uses heuristics to retrieve logs. This helps if you are not aware whether a given system service is
writing logs to the operating system's native logger like journald or to a log file in /var/log/. The heuristics
first checks the native logger and if that is not available attempts to retrieve the first logs from
/var/log/<servicename> or /var/log/<servicename>.log or /var/log/<servicename>/<servicename>.log.
The complete list of options that can be used are:
| Option | Description |
|---|---|
boot | boot show messages from a specific system boot |
pattern | pattern filters log entries by the provided PERL-compatible regular expression |
query | query specifies services(s) or files from which to return logs (required) |
sinceTime | an RFC3339 timestamp from which to show logs (inclusive) |
untilTime | an RFC3339 timestamp until which to show logs (inclusive) |
tailLines | specify how many lines from the end of the log to retrieve; the default is to fetch the whole log |
Example of a more complex query:
# Fetch kubelet logs from a node named node-1.example that have the word "error"
kubectl get --raw "/api/v1/nodes/node-1.example/proxy/logs/?query=kubelet&pattern=error"
What's next
- Read about the Kubernetes Logging Architecture
- Read about Structured Logging
- Read about Contextual Logging
- Read about deprecation of klog flags
- Read about the Conventions for logging severity
- Read about Log Query
11.14 - Traces For Kubernetes System Components
FEATURE STATE:
Kubernetes v1.27 [beta]System component traces record the latency of and relationships between operations in the cluster.
Kubernetes components emit traces using the OpenTelemetry Protocol with the gRPC exporter and can be collected and routed to tracing backends using an OpenTelemetry Collector.
Trace Collection
Kubernetes components have built-in gRPC exporters for OTLP to export traces, either with an OpenTelemetry Collector, or without an OpenTelemetry Collector.
For a complete guide to collecting traces and using the collector, see Getting Started with the OpenTelemetry Collector. However, there are a few things to note that are specific to Kubernetes components.
By default, Kubernetes components export traces using the grpc exporter for OTLP on the IANA OpenTelemetry port, 4317. As an example, if the collector is running as a sidecar to a Kubernetes component, the following receiver configuration will collect spans and log them to standard output:
receivers:
otlp:
protocols:
grpc:
exporters:
# Replace this exporter with the exporter for your backend
exporters:
debug:
verbosity: detailed
service:
pipelines:
traces:
receivers: [otlp]
exporters: [debug]
To directly emit traces to a backend without utilizing a collector, specify the endpoint field in the Kubernetes tracing configuration file with the desired trace backend address. This method negates the need for a collector and simplifies the overall structure.
For trace backend header configuration, including authentication details, environment variables can be used with OTEL_EXPORTER_OTLP_HEADERS,
see OTLP Exporter Configuration.
Additionally, for trace resource attribute configuration such as Kubernetes cluster name, namespace, Pod name, etc.,
environment variables can also be used with OTEL_RESOURCE_ATTRIBUTES, see OTLP Kubernetes Resource.
Component traces
kube-apiserver traces
The kube-apiserver generates spans for incoming HTTP requests, and for outgoing requests to webhooks, etcd, and re-entrant requests. It propagates the W3C Trace Context with outgoing requests but does not make use of the trace context attached to incoming requests, as the kube-apiserver is often a public endpoint.
Enabling tracing in the kube-apiserver
To enable tracing, provide the kube-apiserver with a tracing configuration file
with --tracing-config-file=<path-to-config>. This is an example config that records
spans for 1 in 10000 requests, and uses the default OpenTelemetry endpoint:
apiVersion: apiserver.config.k8s.io/v1
kind: TracingConfiguration
# default value
#endpoint: localhost:4317
samplingRatePerMillion: 100
For more information about the TracingConfiguration struct, see
API server config API (v1).
kubelet traces
FEATURE STATE:
Kubernetes v1.34 [stable](enabled by default)The kubelet CRI interface and authenticated http servers are instrumented to generate trace spans. As with the apiserver, the endpoint and sampling rate are configurable. Trace context propagation is also configured. A parent span's sampling decision is always respected. A provided tracing configuration sampling rate will apply to spans without a parent. Enabled without a configured endpoint, the default OpenTelemetry Collector receiver address of "localhost:4317" is set.
Enabling tracing in the kubelet
To enable tracing, apply the tracing configuration. This is an example snippet of a kubelet config that records spans for 1 in 10000 requests, and uses the default OpenTelemetry endpoint:
apiVersion: kubelet.config.k8s.io/v1beta1
kind: KubeletConfiguration
tracing:
# default value
#endpoint: localhost:4317
samplingRatePerMillion: 100
If the samplingRatePerMillion is set to one million (1000000), then every
span will be sent to the exporter.
The kubelet in Kubernetes v1.36 collects spans from the garbage collection, pod synchronization routine as well as every gRPC method. The kubelet propagates trace context with gRPC requests so that container runtimes with trace instrumentation, such as CRI-O and containerd, can associate their exported spans with the trace context from the kubelet. The resulting traces will have parent-child links between kubelet and container runtime spans, providing helpful context when debugging node issues.
Please note that exporting spans always comes with a small performance overhead
on the networking and CPU side, depending on the overall configuration of the
system. If there is any issue like that in a cluster which is running with
tracing enabled, then mitigate the problem by either reducing the
samplingRatePerMillion or disabling tracing completely by removing the
configuration.
Stability
Tracing instrumentation is still under active development, and may change in a variety of ways. This includes span names, attached attributes, instrumented endpoints, etc. Until this feature graduates to stable, there are no guarantees of backwards compatibility for tracing instrumentation.
What's next
- Read about Getting Started with the OpenTelemetry Collector
- Read about OTLP Exporter Configuration
11.15 - Proxies in Kubernetes
This page explains proxies used with Kubernetes.
Proxies
There are several different proxies you may encounter when using Kubernetes:
The kubectl proxy:
- runs on a user's desktop or in a pod
- proxies from a localhost address to the Kubernetes apiserver
- client to proxy uses HTTP
- proxy to apiserver uses HTTPS
- locates apiserver
- adds authentication headers
The apiserver proxy:
- is a bastion built into the apiserver
- connects a user outside of the cluster to cluster IPs which otherwise might not be reachable
- runs in the apiserver processes
- client to proxy uses HTTPS (or http if apiserver so configured)
- proxy to target may use HTTP or HTTPS as chosen by proxy using available information
- can be used to reach a Node, Pod, or Service
- does load balancing when used to reach a Service
The kube proxy:
- runs on each node
- proxies UDP, TCP and SCTP
- does not understand HTTP
- provides load balancing
- is only used to reach services
A Proxy/Load-balancer in front of apiserver(s):
- existence and implementation varies from cluster to cluster (e.g. nginx)
- sits between all clients and one or more apiservers
- acts as load balancer if there are several apiservers.
Cloud Load Balancers on external services:
- are provided by some cloud providers (e.g. AWS ELB, Google Cloud Load Balancer)
- are created automatically when the Kubernetes service has type
LoadBalancer - usually supports UDP/TCP only
- SCTP support is up to the load balancer implementation of the cloud provider
- implementation varies by cloud provider.
Kubernetes users will typically not need to worry about anything other than the first two types. The cluster admin will typically ensure that the latter types are set up correctly.
Requesting redirects
Proxies have replaced redirect capabilities. Redirects have been deprecated.
11.16 - API Priority and Fairness
FEATURE STATE:
Kubernetes v1.29 [stable]Controlling the behavior of the Kubernetes API server in an overload situation
is a key task for cluster administrators. The kube-apiserver has some controls available
(i.e. the --max-requests-inflight and --max-mutating-requests-inflight
command-line flags) to limit the amount of outstanding work that will be
accepted, preventing a flood of inbound requests from overloading and
potentially crashing the API server, but these flags are not enough to ensure
that the most important requests get through in a period of high traffic.
The API Priority and Fairness feature (APF) is an alternative that improves upon aforementioned max-inflight limitations. APF classifies and isolates requests in a more fine-grained way. It also introduces a limited amount of queuing, so that no requests are rejected in cases of very brief bursts. Requests are dispatched from queues using a fair queuing technique so that, for example, a poorly-behaved controller need not starve others (even at the same priority level).
This feature is designed to work well with standard controllers, which use informers and react to failures of API requests with exponential back-off, and other clients that also work this way.
Caution:
Some requests classified as "long-running"—such as remote command execution or log tailing—are not subject to the API Priority and Fairness filter. This is also true for the--max-requests-inflight flag without the API Priority and Fairness
feature enabled. API Priority and Fairness does apply to watch
requests. When API Priority and Fairness is disabled, watch requests
are not subject to the --max-requests-inflight limit.Enabling/Disabling API Priority and Fairness
The API Priority and Fairness feature is controlled by a command-line flag
and is enabled by default. See
Options
for a general explanation of the available kube-apiserver command-line
options and how to enable and disable them. The name of the
command-line option for APF is "--enable-priority-and-fairness". This feature
also involves an API Group
with: (a) a stable v1 version, introduced in 1.29, and
enabled by default (b) a v1beta3 version, enabled by default, and
deprecated in v1.29. You can
disable the API group beta version v1beta3 by adding the
following command-line flags to your kube-apiserver invocation:
kube-apiserver \
--runtime-config=flowcontrol.apiserver.k8s.io/v1beta3=false \
# …and other flags as usual
The command-line flag --enable-priority-and-fairness=false will disable the
API Priority and Fairness feature.
Recursive server scenarios
API Priority and Fairness must be used carefully in recursive server scenarios. These are scenarios in which some server A, while serving a request, issues a subsidiary request to some server B. Perhaps server B might even make a further subsidiary call back to server A. In situations where Priority and Fairness control is applied to both the original request and some subsidiary ones(s), no matter how deep in the recursion, there is a danger of priority inversions and/or deadlocks.
One example of recursion is when the kube-apiserver issues an
admission webhook call to server B, and while serving that call,
server B makes a further subsidiary request back to the
kube-apiserver. Another example of recursion is when an APIService
object directs the kube-apiserver to delegate requests about a
certain API group to a custom external server B (this is one of the
things called "aggregation").
When the original request is known to belong to a certain priority
level, and the subsidiary controlled requests are classified to higher
priority levels, this is one possible solution. When the original
requests can belong to any priority level, the subsidiary controlled
requests have to be exempt from Priority and Fairness limitation. One
way to do that is with the objects that configure classification and
handling, discussed below. Another way is to disable Priority and
Fairness on server B entirely, using the techniques discussed above. A
third way, which is the simplest to use when server B is not
kube-apiserver, is to build server B with Priority and Fairness
disabled in the code.
Concepts
There are several distinct features involved in the API Priority and Fairness feature. Incoming requests are classified by attributes of the request using FlowSchemas, and assigned to priority levels. Priority levels add a degree of isolation by maintaining separate concurrency limits, so that requests assigned to different priority levels cannot starve each other. Within a priority level, a fair-queuing algorithm prevents requests from different flows from starving each other, and allows for requests to be queued to prevent bursty traffic from causing failed requests when the average load is acceptably low.
Priority Levels
Without APF enabled, overall concurrency in the API server is limited by the
kube-apiserver flags --max-requests-inflight and
--max-mutating-requests-inflight. With APF enabled, the concurrency limits
defined by these flags are summed and then the sum is divided up among a
configurable set of priority levels. Each incoming request is assigned to a
single priority level, and each priority level will only dispatch as many
concurrent requests as its particular limit allows.
The default configuration, for example, includes separate priority levels for leader-election requests, requests from built-in controllers, and requests from Pods. This means that an ill-behaved Pod that floods the API server with requests cannot prevent leader election or actions by the built-in controllers from succeeding.
The concurrency limits of the priority levels are periodically adjusted, allowing under-utilized priority levels to temporarily lend concurrency to heavily-utilized levels. These limits are based on nominal limits and bounds on how much concurrency a priority level may lend and how much it may borrow, all derived from the configuration objects mentioned below.
Seats Occupied by a Request
The above description of concurrency management is the baseline story. Requests have different durations but are counted equally at any given moment when comparing against a priority level's concurrency limit. In the baseline story, each request occupies one unit of concurrency. The word "seat" is used to mean one unit of concurrency, inspired by the way each passenger on a train or aircraft takes up one of the fixed supply of seats.
But some requests take up more than one seat. Some of these are list requests that the server estimates will return a large number of objects. These have been found to put an exceptionally heavy burden on the server. For this reason, the server estimates the number of objects that will be returned and considers the request to take a number of seats that is proportional to that estimated number.
Execution time tweaks for watch requests
API Priority and Fairness manages watch requests, but this involves a couple more excursions from the baseline behavior. The first concerns how long a watch request is considered to occupy its seat. Depending on request parameters, the response to a watch request may or may not begin with create notifications for all the relevant pre-existing objects. API Priority and Fairness considers a watch request to be done with its seat once that initial burst of notifications, if any, is over.
The normal notifications are sent in a concurrent burst to all relevant watch response streams whenever the server is notified of an object create/update/delete. To account for this work, API Priority and Fairness considers every write request to spend some additional time occupying seats after the actual writing is done. The server estimates the number of notifications to be sent and adjusts the write request's number of seats and seat occupancy time to include this extra work.
Queuing
Even within a priority level there may be a large number of distinct sources of traffic. In an overload situation, it is valuable to prevent one stream of requests from starving others (in particular, in the relatively common case of a single buggy client flooding the kube-apiserver with requests, that buggy client would ideally not have much measurable impact on other clients at all). This is handled by use of a fair-queuing algorithm to process requests that are assigned the same priority level. Each request is assigned to a flow, identified by the name of the matching FlowSchema plus a flow distinguisher — which is either the requesting user, the target resource's namespace, or nothing — and the system attempts to give approximately equal weight to requests in different flows of the same priority level. To enable distinct handling of distinct instances, controllers that have many instances should authenticate with distinct usernames
After classifying a request into a flow, the API Priority and Fairness feature then may assign the request to a queue. This assignment uses a technique known as shuffle sharding, which makes relatively efficient use of queues to insulate low-intensity flows from high-intensity flows.
The details of the queuing algorithm are tunable for each priority level, and allow administrators to trade off memory use, fairness (the property that independent flows will all make progress when total traffic exceeds capacity), tolerance for bursty traffic, and the added latency induced by queuing.
Exempt requests
Some requests are considered sufficiently important that they are not subject to any of the limitations imposed by this feature. These exemptions prevent an improperly-configured flow control configuration from totally disabling an API server.
Resources
The flow control API involves two kinds of resources. PriorityLevelConfigurations define the available priority levels, the share of the available concurrency budget that each can handle, and allow for fine-tuning queuing behavior. FlowSchemas are used to classify individual inbound requests, matching each to a single PriorityLevelConfiguration.
PriorityLevelConfiguration
A PriorityLevelConfiguration represents a single priority level. Each PriorityLevelConfiguration has an independent limit on the number of outstanding requests, and limitations on the number of queued requests.
The nominal concurrency limit for a PriorityLevelConfiguration is not
specified in an absolute number of seats, but rather in "nominal
concurrency shares." The total concurrency limit for the API Server is
distributed among the existing PriorityLevelConfigurations in
proportion to these shares, to give each level its nominal limit in
terms of seats. This allows a cluster administrator to scale up or
down the total amount of traffic to a server by restarting
kube-apiserver with a different value for --max-requests-inflight
(or --max-mutating-requests-inflight), and all
PriorityLevelConfigurations will see their maximum allowed concurrency
go up (or down) by the same fraction.
Caution:
In the versions beforev1beta3 the relevant
PriorityLevelConfiguration field is named "assured concurrency shares"
rather than "nominal concurrency shares". Also, in Kubernetes release
1.25 and earlier there were no periodic adjustments: the
nominal/assured limits were always applied without adjustment.The bounds on how much concurrency a priority level may lend and how much it may borrow are expressed in the PriorityLevelConfiguration as percentages of the level's nominal limit. These are resolved to absolute numbers of seats by multiplying with the nominal limit / 100.0 and rounding. The dynamically adjusted concurrency limit of a priority level is constrained to lie between (a) a lower bound of its nominal limit minus its lendable seats and (b) an upper bound of its nominal limit plus the seats it may borrow. At each adjustment the dynamic limits are derived by each priority level reclaiming any lent seats for which demand recently appeared and then jointly fairly responding to the recent seat demand on the priority levels, within the bounds just described.
Caution:
With the Priority and Fairness feature enabled, the total concurrency limit for the server is set to the sum of--max-requests-inflight and
--max-mutating-requests-inflight. There is no longer any distinction made
between mutating and non-mutating requests; if you want to treat them
separately for a given resource, make separate FlowSchemas that match the
mutating and non-mutating verbs respectively.When the volume of inbound requests assigned to a single
PriorityLevelConfiguration is more than its permitted concurrency level, the
type field of its specification determines what will happen to extra requests.
A type of Reject means that excess traffic will immediately be rejected with
an HTTP 429 (Too Many Requests) error. A type of Queue means that requests
above the threshold will be queued, with the shuffle sharding and fair queuing techniques used
to balance progress between request flows.
The queuing configuration allows tuning the fair queuing algorithm for a priority level. Details of the algorithm can be read in the enhancement proposal, but in short:
Increasing
queuesreduces the rate of collisions between different flows, at the cost of increased memory usage. A value of 1 here effectively disables the fair-queuing logic, but still allows requests to be queued.Increasing
queueLengthLimitallows larger bursts of traffic to be sustained without dropping any requests, at the cost of increased latency and memory usage.Changing
handSizeallows you to adjust the probability of collisions between different flows and the overall concurrency available to a single flow in an overload situation.Note:
A largerhandSizemakes it less likely for two individual flows to collide (and therefore for one to be able to starve the other), but more likely that a small number of flows can dominate the apiserver. A largerhandSizealso potentially increases the amount of latency that a single high-traffic flow can cause. The maximum number of queued requests possible from a single flow ishandSize * queueLengthLimit.
Following is a table showing an interesting collection of shuffle sharding configurations, showing for each the probability that a given mouse (low-intensity flow) is squished by the elephants (high-intensity flows) for an illustrative collection of numbers of elephants. See https://play.golang.org/p/Gi0PLgVHiUg , which computes this table.
| HandSize | Queues | 1 elephant | 4 elephants | 16 elephants |
|---|---|---|---|---|
| 12 | 32 | 4.428838398950118e-09 | 0.11431348830099144 | 0.9935089607656024 |
| 10 | 32 | 1.550093439632541e-08 | 0.0626479840223545 | 0.9753101519027554 |
| 10 | 64 | 6.601827268370426e-12 | 0.00045571320990370776 | 0.49999929150089345 |
| 9 | 64 | 3.6310049976037345e-11 | 0.00045501212304112273 | 0.4282314876454858 |
| 8 | 64 | 2.25929199850899e-10 | 0.0004886697053040446 | 0.35935114681123076 |
| 8 | 128 | 6.994461389026097e-13 | 3.4055790161620863e-06 | 0.02746173137155063 |
| 7 | 128 | 1.0579122850901972e-11 | 6.960839379258192e-06 | 0.02406157386340147 |
| 7 | 256 | 7.597695465552631e-14 | 6.728547142019406e-08 | 0.0006709661542533682 |
| 6 | 256 | 2.7134626662687968e-12 | 2.9516464018476436e-07 | 0.0008895654642000348 |
| 6 | 512 | 4.116062922897309e-14 | 4.982983350480894e-09 | 2.26025764343413e-05 |
| 6 | 1024 | 6.337324016514285e-16 | 8.09060164312957e-11 | 4.517408062903668e-07 |
FlowSchema
A FlowSchema matches some inbound requests and assigns them to a
priority level. Every inbound request is tested against FlowSchemas,
starting with those with the numerically lowest matchingPrecedence and
working upward. The first match wins.
Caution:
Only the first matching FlowSchema for a given request matters. If multiple FlowSchemas match a single inbound request, it will be assigned based on the one with the highestmatchingPrecedence. If multiple FlowSchemas with equal
matchingPrecedence match the same request, the one with lexicographically
smaller name will win, but it's better not to rely on this, and instead to
ensure that no two FlowSchemas have the same matchingPrecedence.A FlowSchema matches a given request if at least one of its rules
matches. A rule matches if at least one of its subjects and at least
one of its resourceRules or nonResourceRules (depending on whether the
incoming request is for a resource or non-resource URL) match the request.
For the name field in subjects, and the verbs, apiGroups, resources,
namespaces, and nonResourceURLs fields of resource and non-resource rules,
the wildcard * may be specified to match all values for the given field,
effectively removing it from consideration.
A FlowSchema's distinguisherMethod.type determines how requests matching that
schema will be separated into flows. It may be ByUser, in which one requesting
user will not be able to starve other users of capacity; ByNamespace, in which
requests for resources in one namespace will not be able to starve requests for
resources in other namespaces of capacity; or blank (or distinguisherMethod may be
omitted entirely), in which all requests matched by this FlowSchema will be
considered part of a single flow. The correct choice for a given FlowSchema
depends on the resource and your particular environment.
Defaults
Each kube-apiserver maintains two sorts of APF configuration objects: mandatory and suggested.
Mandatory Configuration Objects
The four mandatory configuration objects reflect fixed built-in guardrail behavior. This is behavior that the servers have before those objects exist, and when those objects exist their specs reflect this behavior. The four mandatory objects are as follows.
The mandatory
exemptpriority level is used for requests that are not subject to flow control at all: they will always be dispatched immediately. The mandatoryexemptFlowSchema classifies all requests from thesystem:mastersgroup into this priority level. You may define other FlowSchemas that direct other requests to this priority level, if appropriate.The mandatory
catch-allpriority level is used in combination with the mandatorycatch-allFlowSchema to make sure that every request gets some kind of classification. Typically you should not rely on this catch-all configuration, and should create your own catch-all FlowSchema and PriorityLevelConfiguration (or use the suggestedglobal-defaultpriority level that is installed by default) as appropriate. Because it is not expected to be used normally, the mandatorycatch-allpriority level has a very small concurrency share and does not queue requests.
Suggested Configuration Objects
The suggested FlowSchemas and PriorityLevelConfigurations constitute a reasonable default configuration. You can modify these and/or create additional configuration objects if you want. If your cluster is likely to experience heavy load then you should consider what configuration will work best.
The suggested configuration groups requests into six priority levels:
The
node-highpriority level is for health updates from nodes.The
systempriority level is for non-health requests from thesystem:nodesgroup, i.e. Kubelets, which must be able to contact the API server in order for workloads to be able to schedule on them.The
leader-electionpriority level is for leader election requests from built-in controllers (in particular, requests forendpoints,configmaps, orleasescoming from thesystem:kube-controller-managerorsystem:kube-schedulerusers and service accounts in thekube-systemnamespace). These are important to isolate from other traffic because failures in leader election cause their controllers to fail and restart, which in turn causes more expensive traffic as the new controllers sync their informers.The
workload-highpriority level is for other requests from built-in controllers.The
workload-lowpriority level is for requests from any other service account, which will typically include all requests from controllers running in Pods.The
global-defaultpriority level handles all other traffic, e.g. interactivekubectlcommands run by nonprivileged users.
The suggested FlowSchemas serve to steer requests into the above priority levels, and are not enumerated here.
Maintenance of the Mandatory and Suggested Configuration Objects
Each kube-apiserver independently maintains the mandatory and
suggested configuration objects, using initial and periodic behavior.
Thus, in a situation with a mixture of servers of different versions
there may be thrashing as long as different servers have different
opinions of the proper content of these objects.
Each kube-apiserver makes an initial maintenance pass over the
mandatory and suggested configuration objects, and after that does
periodic maintenance (once per minute) of those objects.
For the mandatory configuration objects, maintenance consists of ensuring that the object exists and, if it does, has the proper spec. The server refuses to allow a creation or update with a spec that is inconsistent with the server's guardrail behavior.
Maintenance of suggested configuration objects is designed to allow
their specs to be overridden. Deletion, on the other hand, is not
respected: maintenance will restore the object. If you do not want a
suggested configuration object then you need to keep it around but set
its spec to have minimal consequences. Maintenance of suggested
objects is also designed to support automatic migration when a new
version of the kube-apiserver is rolled out, albeit potentially with
thrashing while there is a mixed population of servers.
Maintenance of a suggested configuration object consists of creating
it --- with the server's suggested spec --- if the object does not
exist. OTOH, if the object already exists, maintenance behavior
depends on whether the kube-apiservers or the users control the
object. In the former case, the server ensures that the object's spec
is what the server suggests; in the latter case, the spec is left
alone.
The question of who controls the object is answered by first looking
for an annotation with key apf.kubernetes.io/autoupdate-spec. If
there is such an annotation and its value is true then the
kube-apiservers control the object. If there is such an annotation
and its value is false then the users control the object. If
neither of those conditions holds then the metadata.generation of the
object is consulted. If that is 1 then the kube-apiservers control
the object. Otherwise the users control the object. These rules were
introduced in release 1.22 and their consideration of
metadata.generation is for the sake of migration from the simpler
earlier behavior. Users who wish to control a suggested configuration
object should set its apf.kubernetes.io/autoupdate-spec annotation
to false.
Maintenance of a mandatory or suggested configuration object also
includes ensuring that it has an apf.kubernetes.io/autoupdate-spec
annotation that accurately reflects whether the kube-apiservers
control the object.
Maintenance also includes deleting objects that are neither mandatory
nor suggested but are annotated
apf.kubernetes.io/autoupdate-spec=true.
Health check concurrency exemption
The suggested configuration gives no special treatment to the health
check requests on kube-apiservers from their local kubelets --- which
tend to use the secured port but supply no credentials. With the
suggested config, these requests get assigned to the global-default
FlowSchema and the corresponding global-default priority level,
where other traffic can crowd them out.
If you add the following additional FlowSchema, this exempts those requests from rate limiting.
Caution:
Making this change also allows any hostile party to then send health-check requests that match this FlowSchema, at any volume they like. If you have a web traffic filter or similar external security mechanism to protect your cluster's API server from general internet traffic, you can configure rules to block any health check requests that originate from outside your cluster.apiVersion: flowcontrol.apiserver.k8s.io/v1
kind: FlowSchema
metadata:
name: health-for-strangers
spec:
matchingPrecedence: 1000
priorityLevelConfiguration:
name: exempt
rules:
- nonResourceRules:
- nonResourceURLs:
- "/healthz"
- "/livez"
- "/readyz"
verbs:
- "*"
subjects:
- kind: Group
group:
name: "system:unauthenticated"
Observability
Metrics
Note:
In versions of Kubernetes before v1.20, the labelsflow_schema and
priority_level were inconsistently named flowSchema and priorityLevel,
respectively. If you're running Kubernetes versions v1.19 and earlier, you
should refer to the documentation for your version.When you enable the API Priority and Fairness feature, the kube-apiserver exports additional metrics. Monitoring these can help you determine whether your configuration is inappropriately throttling important traffic, or find poorly-behaved workloads that may be harming system health.
Maturity level BETA
apiserver_flowcontrol_rejected_requests_totalis a counter vector (cumulative since server start) of requests that were rejected, broken down by the labelsflow_schema(indicating the one that matched the request),priority_level(indicating the one to which the request was assigned), andreason. Thereasonlabel will be one of the following values:queue-full, indicating that too many requests were already queued.concurrency-limit, indicating that the PriorityLevelConfiguration is configured to reject rather than queue excess requests.time-out, indicating that the request was still in the queue when its queuing time limit expired.cancelled, indicating that the request is not purge locked and has been ejected from the queue.
apiserver_flowcontrol_dispatched_requests_totalis a counter vector (cumulative since server start) of requests that began executing, broken down byflow_schemaandpriority_level.apiserver_flowcontrol_current_inqueue_requestsis a gauge vector holding the instantaneous number of queued (not executing) requests, broken down bypriority_levelandflow_schema.apiserver_flowcontrol_current_executing_requestsis a gauge vector holding the instantaneous number of executing (not waiting in a queue) requests, broken down bypriority_levelandflow_schema.apiserver_flowcontrol_current_executing_seatsis a gauge vector holding the instantaneous number of occupied seats, broken down bypriority_levelandflow_schema.apiserver_flowcontrol_request_wait_duration_secondsis a histogram vector of how long requests spent queued, broken down by the labelsflow_schema,priority_level, andexecute. Theexecutelabel indicates whether the request has started executing.Note:
Since each FlowSchema always assigns requests to a single PriorityLevelConfiguration, you can add the histograms for all the FlowSchemas for one priority level to get the effective histogram for requests assigned to that priority level.apiserver_flowcontrol_nominal_limit_seatsis a gauge vector holding each priority level's nominal concurrency limit, computed from the API server's total concurrency limit and the priority level's configured nominal concurrency shares.
Maturity level ALPHA
apiserver_current_inqueue_requestsis a gauge vector of recent high water marks of the number of queued requests, grouped by a label namedrequest_kindwhose value ismutatingorreadOnly. These high water marks describe the largest number seen in the one second window most recently completed. These complement the olderapiserver_current_inflight_requestsgauge vector that holds the last window's high water mark of number of requests actively being served.apiserver_current_inqueue_seatsis a gauge vector of the sum over queued requests of the largest number of seats each will occupy, grouped by labels namedflow_schemaandpriority_level.apiserver_flowcontrol_read_vs_write_current_requestsis a histogram vector of observations, made at the end of every nanosecond, of the number of requests broken down by the labelsphase(which takes on the valueswaitingandexecuting) andrequest_kind(which takes on the valuesmutatingandreadOnly). Each observed value is a ratio, between 0 and 1, of the number of requests divided by the corresponding limit on the number of requests (queue volume limit for waiting and concurrency limit for executing).apiserver_flowcontrol_request_concurrency_in_useis a gauge vector holding the instantaneous number of occupied seats, broken down bypriority_levelandflow_schema.apiserver_flowcontrol_priority_level_request_utilizationis a histogram vector of observations, made at the end of each nanosecond, of the number of requests broken down by the labelsphase(which takes on the valueswaitingandexecuting) andpriority_level. Each observed value is a ratio, between 0 and 1, of a number of requests divided by the corresponding limit on the number of requests (queue volume limit for waiting and concurrency limit for executing).apiserver_flowcontrol_priority_level_seat_utilizationis a histogram vector of observations, made at the end of each nanosecond, of the utilization of a priority level's concurrency limit, broken down bypriority_level. This utilization is the fraction (number of seats occupied) / (concurrency limit). This metric considers all stages of execution (both normal and the extra delay at the end of a write to cover for the corresponding notification work) of all requests except WATCHes; for those it considers only the initial stage that delivers notifications of pre-existing objects. Each histogram in the vector is also labeled withphase: executing(there is no seat limit for the waiting phase).apiserver_flowcontrol_request_queue_length_after_enqueueis a histogram vector of queue lengths for the queues, broken down bypriority_levelandflow_schema, as sampled by the enqueued requests. Each request that gets queued contributes one sample to its histogram, reporting the length of the queue immediately after the request was added. Note that this produces different statistics than an unbiased survey would.Note:
An outlier value in a histogram here means it is likely that a single flow (i.e., requests by one user or for one namespace, depending on configuration) is flooding the API server, and being throttled. By contrast, if one priority level's histogram shows that all queues for that priority level are longer than those for other priority levels, it may be appropriate to increase that PriorityLevelConfiguration's concurrency shares.apiserver_flowcontrol_request_concurrency_limitis the same asapiserver_flowcontrol_nominal_limit_seats. Before the introduction of concurrency borrowing between priority levels, this was always equal toapiserver_flowcontrol_current_limit_seats(which did not exist as a distinct metric).apiserver_flowcontrol_lower_limit_seatsis a gauge vector holding the lower bound on each priority level's dynamic concurrency limit.apiserver_flowcontrol_upper_limit_seatsis a gauge vector holding the upper bound on each priority level's dynamic concurrency limit.apiserver_flowcontrol_demand_seatsis a histogram vector counting observations, at the end of every nanosecond, of each priority level's ratio of (seat demand) / (nominal concurrency limit). A priority level's seat demand is the sum, over both queued requests and those in the initial phase of execution, of the maximum of the number of seats occupied in the request's initial and final execution phases.apiserver_flowcontrol_demand_seats_high_watermarkis a gauge vector holding, for each priority level, the maximum seat demand seen during the last concurrency borrowing adjustment period.apiserver_flowcontrol_demand_seats_averageis a gauge vector holding, for each priority level, the time-weighted average seat demand seen during the last concurrency borrowing adjustment period.apiserver_flowcontrol_demand_seats_stdevis a gauge vector holding, for each priority level, the time-weighted population standard deviation of seat demand seen during the last concurrency borrowing adjustment period.apiserver_flowcontrol_demand_seats_smoothedis a gauge vector holding, for each priority level, the smoothed enveloped seat demand determined at the last concurrency adjustment.apiserver_flowcontrol_target_seatsis a gauge vector holding, for each priority level, the concurrency target going into the borrowing allocation problem.apiserver_flowcontrol_seat_fair_fracis a gauge holding the fair allocation fraction determined in the last borrowing adjustment.apiserver_flowcontrol_current_limit_seatsis a gauge vector holding, for each priority level, the dynamic concurrency limit derived in the last adjustment.apiserver_flowcontrol_request_execution_secondsis a histogram vector of how long requests took to actually execute, broken down byflow_schemaandpriority_level.apiserver_flowcontrol_watch_count_samplesis a histogram vector of the number of active WATCH requests relevant to a given write, broken down byflow_schemaandpriority_level.apiserver_flowcontrol_work_estimated_seatsis a histogram vector of the number of estimated seats (maximum of initial and final stage of execution) associated with requests, broken down byflow_schemaandpriority_level.apiserver_flowcontrol_request_dispatch_no_accommodation_totalis a counter vector of the number of events that in principle could have led to a request being dispatched but did not, due to lack of available concurrency, broken down byflow_schemaandpriority_level.apiserver_flowcontrol_epoch_advance_totalis a counter vector of the number of attempts to jump a priority level's progress meter backward to avoid numeric overflow, grouped bypriority_levelandsuccess.
Good practices for using API Priority and Fairness
When a given priority level exceeds its permitted concurrency, requests can experience increased latency or be dropped with an HTTP 429 (Too Many Requests) error. To prevent these side effects of APF, you can modify your workload or tweak your APF settings to ensure there are sufficient seats available to serve your requests.
To detect whether requests are being rejected due to APF, check the following metrics:
- apiserver_flowcontrol_rejected_requests_total: the total number of requests rejected per FlowSchema and PriorityLevelConfiguration.
- apiserver_flowcontrol_current_inqueue_requests: the current number of requests queued per FlowSchema and PriorityLevelConfiguration.
- apiserver_flowcontrol_request_wait_duration_seconds: the latency added to requests waiting in queues.
- apiserver_flowcontrol_priority_level_seat_utilization: the seat utilization per PriorityLevelConfiguration.
Workload modifications
To prevent requests from queuing and adding latency or being dropped due to APF, you can optimize your requests by:
- Reducing the rate at which requests are executed. A fewer number of requests over a fixed period will result in a fewer number of seats being needed at a given time.
- Avoid issuing a large number of expensive requests concurrently. Requests can be optimized to use fewer seats or have lower latency so that these requests hold those seats for a shorter duration. List requests can occupy more than 1 seat depending on the number of objects fetched during the request. Restricting the number of objects retrieved in a list request, for example by using pagination, will use less total seats over a shorter period. Furthermore, replacing list requests with watch requests will require lower total concurrency shares as watch requests only occupy 1 seat during its initial burst of notifications. If using streaming lists in versions 1.27 and later, watch requests will occupy the same number of seats as a list request for its initial burst of notifications because the entire state of the collection has to be streamed. Note that in both cases, a watch request will not hold any seats after this initial phase.
Keep in mind that queuing or rejected requests from APF could be induced by either an increase in the number of requests or an increase in latency for existing requests. For example, if requests that normally take 1s to execute start taking 60s, it is possible that APF will start rejecting requests because requests are occupying seats for a longer duration than normal due to this increase in latency. If APF starts rejecting requests across multiple priority levels without a significant change in workload, it is possible there is an underlying issue with control plane performance rather than the workload or APF settings.
Priority and fairness settings
You can also modify the default FlowSchema and PriorityLevelConfiguration objects or create new objects of these types to better accommodate your workload.
APF settings can be modified to:
- Give more seats to high priority requests.
- Isolate non-essential or expensive requests that would starve a concurrency level if it was shared with other flows.
Give more seats to high priority requests
- If possible, the number of seats available across all priority levels for a
particular
kube-apiservercan be increased by increasing the values for themax-requests-inflightandmax-mutating-requests-inflightflags. Alternatively, horizontally scaling the number ofkube-apiserverinstances will increase the total concurrency per priority level across the cluster assuming there is sufficient load balancing of requests. - You can create a new FlowSchema which references a PriorityLevelConfiguration
with a larger concurrency level. This new PriorityLevelConfiguration could be an
existing level or a new level with its own set of nominal concurrency shares.
For example, a new FlowSchema could be introduced to change the
PriorityLevelConfiguration for your requests from global-default to workload-low
to increase the number of seats available to your user. Creating a new
PriorityLevelConfiguration will reduce the number of seats designated for
existing levels. Recall that editing a default FlowSchema or
PriorityLevelConfiguration will require setting the
apf.kubernetes.io/autoupdate-specannotation to false. - You can also increase the NominalConcurrencyShares for the PriorityLevelConfiguration which is serving your high priority requests. Alternatively, for versions 1.26 and later, you can increase the LendablePercent for competing priority levels so that the given priority level has a higher pool of seats it can borrow.
Isolate non-essential requests from starving other flows
For request isolation, you can create a FlowSchema whose subject matches the user making these requests or create a FlowSchema that matches what the request is (corresponding to the resourceRules). Next, you can map this FlowSchema to a PriorityLevelConfiguration with a low share of seats.
For example, suppose list event requests from Pods running in the default namespace are using 10 seats each and execute for 1 minute. To prevent these expensive requests from impacting requests from other Pods using the existing service-accounts FlowSchema, you can apply the following FlowSchema to isolate these list calls from other requests.
Example FlowSchema object to isolate list event requests:
apiVersion: flowcontrol.apiserver.k8s.io/v1
kind: FlowSchema
metadata:
name: list-events-default-service-account
spec:
distinguisherMethod:
type: ByUser
matchingPrecedence: 8000
priorityLevelConfiguration:
name: catch-all
rules:
- resourceRules:
- apiGroups:
- '*'
namespaces:
- default
resources:
- events
verbs:
- list
subjects:
- kind: ServiceAccount
serviceAccount:
name: default
namespace: default- This FlowSchema captures all list event calls made by the default service account in the default namespace. The matching precedence 8000 is lower than the value of 9000 used by the existing service-accounts FlowSchema so these list event calls will match list-events-default-service-account rather than service-accounts.
- The catch-all PriorityLevelConfiguration is used to isolate these requests. The catch-all priority level has a very small concurrency share and does not queue requests.
What's next
- You can visit flow control reference doc to learn more about troubleshooting.
- For background information on design details for API priority and fairness, see the enhancement proposal.
- You can make suggestions and feature requests via SIG API Machinery or the feature's slack channel.
11.17 - Installing Addons
Note: This section links to third party projects that provide functionality required by Kubernetes. The Kubernetes project authors aren't responsible for these projects, which are listed alphabetically. To add a project to this list, read the content guide before submitting a change. More information.
Add-ons extend the functionality of Kubernetes.
This page lists some of the available add-ons and links to their respective installation instructions. The list does not try to be exhaustive.
Networking and Network Policy
- ACI provides integrated container networking and network security with Cisco ACI.
- Antrea operates at Layer 3/4 to provide networking and security services for Kubernetes, leveraging Open vSwitch as the networking data plane. Antrea is a CNCF project at the Sandbox level.
- Calico is a networking and network policy provider. Calico supports a flexible set of networking options so you can choose the most efficient option for your situation, including non-overlay and overlay networks, with or without BGP. Calico uses the same engine to enforce network policy for hosts, pods, and (if using Istio & Envoy) applications at the service mesh layer.
- Canal unites Flannel and Calico, providing networking and network policy.
- Cilium is a networking, observability, and security solution with an eBPF-based data plane. Cilium provides a simple flat Layer 3 network with the ability to span multiple clusters in either a native routing or overlay/encapsulation mode, and can enforce network policies on L3-L7 using an identity-based security model that is decoupled from network addressing. Cilium can act as a replacement for kube-proxy; it also offers additional, opt-in observability and security features. Cilium is a CNCF project at the Graduated level.
- CNI-Genie enables Kubernetes to seamlessly connect to a choice of CNI plugins, such as Calico, Canal, Flannel, or Weave. CNI-Genie is a CNCF project at the Sandbox level.
- Contiv provides configurable networking (native L3 using BGP, overlay using vxlan, classic L2, and Cisco-SDN/ACI) for various use cases and a rich policy framework. Contiv project is fully open sourced. The installer provides both kubeadm and non-kubeadm based installation options.
- Contrail, based on Tungsten Fabric, is an open source, multi-cloud network virtualization and policy management platform. Contrail and Tungsten Fabric are integrated with orchestration systems such as Kubernetes, OpenShift, OpenStack and Mesos, and provide isolation modes for virtual machines, containers/pods and bare metal workloads.
- Flannel is an overlay network provider that can be used with Kubernetes.
- Gateway API is an open source project managed by the SIG Network community and provides an expressive, extensible, and role-oriented API for modeling service networking.
- Knitter is a plugin to support multiple network interfaces in a Kubernetes pod.
- kube-router is an open source turnkey solution for Kubernetes networking with the aim to provide operational simplicity and high performance. It leverages the Kubernetes API, BGP, and Golang for the control path and Linux networking primitives (IPVS, nftables, etc.) for the data path. It provides a low overhead alternative and is used in both k0s and k3s.
- Multus is a Multi plugin for multiple network support in Kubernetes to support all CNI plugins (e.g. Calico, Cilium, Contiv, Flannel), in addition to SRIOV, DPDK, OVS-DPDK and VPP based workloads in Kubernetes.
- OVN-Kubernetes is a networking provider for Kubernetes based on OVN (Open Virtual Network), a virtual networking implementation that came out of the Open vSwitch (OVS) project. OVN-Kubernetes provides an overlay based networking implementation for Kubernetes, including an OVS based implementation of load balancing and network policy.
- Nodus is an OVN based CNI controller plugin to provide cloud native based Service function chaining(SFC).
- NSX-T Container Plug-in (NCP) provides integration between VMware NSX-T and container orchestrators such as Kubernetes, as well as integration between NSX-T and container-based CaaS/PaaS platforms such as Pivotal Container Service (PKS) and OpenShift.
- Nuage is an SDN platform that provides policy-based networking between Kubernetes Pods and non-Kubernetes environments with visibility and security monitoring.
- Romana is a Layer 3 networking solution for pod networks that also supports the NetworkPolicy API.
- Spiderpool is an underlay and RDMA networking solution for Kubernetes. Spiderpool is supported on bare metal, virtual machines, and public cloud environments.
- Terway is a suite of CNI plugins based on AlibabaCloud's VPC and ECS network products. It provides native VPC networking and network policies in AlibabaCloud environments.
- Weave Net provides networking and network policy, will carry on working on both sides of a network partition, and does not require an external database.
Service Discovery
Visualization & Control
- Dashboard is a dashboard web interface for Kubernetes.
- Headlamp is an extensible Kubernetes UI that can be deployed in-cluster or used as a desktop application.
Infrastructure
- KubeVirt is an add-on to run virtual machines on Kubernetes. Usually run on bare-metal clusters.
- The node problem detector runs on Linux nodes and reports system issues as either Events or Node conditions.
Instrumentation
Legacy Add-ons
There are several other add-ons documented in the deprecated cluster/addons directory.
Well-maintained ones should be linked to here. PRs welcome!
11.18 - Coordinated Leader Election
FEATURE STATE:
Kubernetes v1.33 [beta](disabled by default)Kubernetes 1.36 includes a beta feature that allows control plane components to
deterministically select a leader via coordinated leader election.
This is useful to satisfy Kubernetes version skew constraints during cluster upgrades.
Currently, the only builtin selection strategy is OldestEmulationVersion,
preferring the leader with the lowest emulation version, followed by binary
version, followed by creation timestamp.
Enabling coordinated leader election
Ensure that CoordinatedLeaderElection feature
gate is enabled
when you start the API Server: and that the coordination.k8s.io/v1beta1 API group is
enabled.
This can be done by setting flags --feature-gates="CoordinatedLeaderElection=true" and
--runtime-config="coordination.k8s.io/v1beta1=true".
Component configuration
Provided that you have enabled the CoordinatedLeaderElection feature gate and
have the coordination.k8s.io/v1beta1 API group enabled, compatible control plane
components automatically use the LeaseCandidate and Lease APIs to elect a leader
as needed.
For Kubernetes 1.36, two control plane components
(kube-controller-manager and kube-scheduler) automatically use coordinated
leader election when the feature gate and API group are enabled.
Leader selection for Kubernetes components
Kubernetes uses the Lease API to perform leader election among multiple instances of the same control-plane component in a high-availability cluster, such as kube-controller-manager or kube-scheduler.
A Lease acts as a lightweight distributed lock. stored by the Kubernetes API server. All running instances of a component watch or periodically read the relevant Lease object to determine which instance is currently acting as the leader.
The Lease API defines fields such as:
holderIdentity- the identity (for example: pod name or hostname-based string) of the current leader.
acquireTime- timestamp when leadership was acquired.
renewTime- timestamp of the most recent renewal by the leader.
leaseDurationSeconds- the validity period of the lease (candidates should wait this long plus a small grace period before attempting to acquire an expired lease).
leaseTransitions- counter of how many times leadership has changed hands.
These fields indicate which instance holds leadership and how long that leadership remains valid.
When the Lease does not exist or has expired (current time > renewTime + leaseDurationSeconds), candidate instances attempt to update the Lease with their identity. Kubernetes relies on optimistic concurrency control via the object's resourceVersion: only one update succeeds due to version mismatch on concurrent attempts. The instance whose update is accepted becomes the leader.
Kubernetes uses the LeaseCandidate
API to manage leader elections. Control plane components such as kube-controller-manager and kube-scheduler register their role as a candidate by creating LeaseCandidate objects, which track all instances competing for leadership and carry metadata including the candidate's identity, binary version, and emulation version.
During an election, candidates coordinate through a shared Lease. The Kubernetes control plane guarantees that only one candidate successfully acquires the Lease and assumes the role of leader, while all others remain as followers. If the current leader fails to renew the Lease within the selected timeout period, the remaining candidates compete to acquire leadership and elect a new leader.
Once elected, the leader periodically renews its Lease by updating the renewTime field
(for example, performing renewal every leaseDurationSeconds ÷ 2, in order to avoid conflicts when the Lease is about to expire).
As long as renewals occur before the lease expires, the current leader instance retains leadership.
If the leader crashes, becomes unreachable, or stops renewing the Lease, that Lease expires. Other healthy instances detect the expired Lease and attempt a new election.
This mechanism ensures that even though multiple replicas of a component may be running for stability and recovery, only one instance actively performs control tasks at a time, while the others remain on standby, watching the Lease and ready to take over quickly if needed.
12 - Windows in Kubernetes
Kubernetes supports nodes that run Microsoft Windows.
Kubernetes supports worker nodes running either Linux or Microsoft Windows.
🛇 This item links to a third party project or product that is not part of Kubernetes itself. More information
The CNCF and its parent the Linux Foundation take a vendor-neutral approach towards compatibility. It is possible to join your Windows server as a worker node to a Kubernetes cluster.
You can install and set up kubectl on Windows no matter what operating system you use within your cluster.
If you are using Windows nodes, you can read:
- Networking On Windows
- Windows Storage In Kubernetes
- Resource Management for Windows Nodes
- Configure RunAsUserName for Windows Pods and Containers
- Create A Windows HostProcess Pod
- Configure Group Managed Service Accounts for Windows Pods and Containers
- Security For Windows Nodes
- Windows Debugging Tips
- Guide for Scheduling Windows Containers in Kubernetes
or, for an overview, read:
12.1 - Windows containers in Kubernetes
Windows applications constitute a large portion of the services and applications that run in many organizations. Windows containers provide a way to encapsulate processes and package dependencies, making it easier to use DevOps practices and follow cloud native patterns for Windows applications.
Organizations with investments in Windows-based applications and Linux-based applications don't have to look for separate orchestrators to manage their workloads, leading to increased operational efficiencies across their deployments, regardless of operating system.
Windows nodes in Kubernetes
To enable the orchestration of Windows containers in Kubernetes, include Windows nodes in your existing Linux cluster. Scheduling Windows containers in Pods on Kubernetes is similar to scheduling Linux-based containers.
In order to run Windows containers, your Kubernetes cluster must include multiple operating systems. While you can only run the control plane on Linux, you can deploy worker nodes running either Windows or Linux.
Windows nodes are supported provided that the operating system is Windows Server 2022 or Windows Server 2025.
This document uses the term Windows containers to mean Windows containers with process isolation. Kubernetes does not support running Windows containers with Hyper-V isolation.
Compatibility and limitations
Some node features are only available if you use a specific container runtime; others are not available on Windows nodes, including:
- HugePages: not supported for Windows containers
- Privileged containers: not supported for Windows containers. HostProcess Containers offer similar functionality.
- TerminationGracePeriod: requires containerD
Not all features of shared namespaces are supported. See API compatibility for more details.
See Windows OS version compatibility for details on the Windows versions that Kubernetes is tested against.
From an API and kubectl perspective, Windows containers behave in much the same way as Linux-based containers. However, there are some notable differences in key functionality which are outlined in this section.
Comparison with Linux
Key Kubernetes elements work the same way in Windows as they do in Linux. This section refers to several key workload abstractions and how they map to Windows.
A Pod is the basic building block of Kubernetes–the smallest and simplest unit in the Kubernetes object model that you create or deploy. You may not deploy Windows and Linux containers in the same Pod. All containers in a Pod are scheduled onto a single Node where each Node represents a specific platform and architecture. The following Pod capabilities, properties and events are supported with Windows containers:
Single or multiple containers per Pod with process isolation and volume sharing
Pod
statusfieldsReadiness, liveness, and startup probes
postStart & preStop container lifecycle hooks
ConfigMap, Secrets: as environment variables or volumes
emptyDirvolumesNamed pipe host mounts
Resource limits
OS field:
The
.spec.os.namefield should be set towindowsto indicate that the current Pod uses Windows containers.If you set the
.spec.os.namefield towindows, you must not set the following fields in the.specof that Pod:spec.hostPIDspec.hostIPCspec.securityContext.seLinuxOptionsspec.securityContext.seccompProfilespec.securityContext.fsGroupspec.securityContext.fsGroupChangePolicyspec.securityContext.sysctlsspec.shareProcessNamespacespec.securityContext.runAsUserspec.securityContext.runAsGroupspec.securityContext.supplementalGroupsspec.containers[*].securityContext.seLinuxOptionsspec.containers[*].securityContext.seccompProfilespec.containers[*].securityContext.capabilitiesspec.containers[*].securityContext.readOnlyRootFilesystemspec.containers[*].securityContext.privilegedspec.containers[*].securityContext.allowPrivilegeEscalationspec.containers[*].securityContext.procMountspec.containers[*].securityContext.runAsUserspec.containers[*].securityContext.runAsGroup
In the above list, wildcards (
*) indicate all elements in a list. For example,spec.containers[*].securityContextrefers to the SecurityContext object for all containers. If any of these fields is specified, the Pod will not be admitted by the API server.
Workload resources including:
- ReplicaSet
- Deployment
- StatefulSet
- DaemonSet
- Job
- CronJob
- ReplicationController
Services See Load balancing and Services for more details.
Pods, workload resources, and Services are critical elements to managing Windows workloads on Kubernetes. However, on their own they are not enough to enable the proper lifecycle management of Windows workloads in a dynamic cloud native environment.
kubectl exec- Pod and container metrics
- Horizontal pod autoscaling
- Resource quotas
- Scheduler preemption
Command line options for the kubelet
Some kubelet command line options behave differently on Windows, as described below:
- The
--windows-priorityclasslets you set the scheduling priority of the kubelet process (see CPU resource management) - The
--kube-reserved,--system-reserved, and--eviction-hardflags update NodeAllocatable - Eviction by using
--enforce-node-allocableis not implemented - When running on a Windows node the kubelet does not have memory or CPU
restrictions.
--kube-reservedand--system-reservedonly subtract fromNodeAllocatableand do not guarantee resource provided for workloads. See Resource Management for Windows nodes for more information. - The
PIDPressureCondition is not implemented - The kubelet does not take OOM eviction actions
API compatibility
There are subtle differences in the way the Kubernetes APIs work for Windows due to the OS and container runtime. Some workload properties were designed for Linux, and fail to run on Windows.
At a high level, these OS concepts are different:
- Identity - Linux uses userID (UID) and groupID (GID) which
are represented as integer types. User and group names
are not canonical - they are just an alias in
/etc/groupsor/etc/passwdback to UID+GID. Windows uses a larger binary security identifier (SID) which is stored in the Windows Security Access Manager (SAM) database. This database is not shared between the host and containers, or between containers. - File permissions - Windows uses an access control list based on (SIDs), whereas POSIX systems such as Linux use a bitmask based on object permissions and UID+GID, plus optional access control lists.
- File paths - the convention on Windows is to use
\instead of/. The Go IO libraries typically accept both and just make it work, but when you're setting a path or command line that's interpreted inside a container,\may be needed. - Signals - Windows interactive apps handle termination differently, and can
implement one or more of these:
- A UI thread handles well-defined messages including
WM_CLOSE. - Console apps handle Ctrl-C or Ctrl-break using a Control Handler.
- Services register a Service Control Handler function that can accept
SERVICE_CONTROL_STOPcontrol codes.
- A UI thread handles well-defined messages including
Container exit codes follow the same convention where 0 is success, and nonzero is failure. The specific error codes may differ across Windows and Linux. However, exit codes passed from the Kubernetes components (kubelet, kube-proxy) are unchanged.
Field compatibility for container specifications
The following list documents differences between how Pod container specifications work between Windows and Linux:
- Huge pages are not implemented in the Windows container runtime, and are not available. They require asserting a user privilege that's not configurable for containers.
requests.cpuandrequests.memory- requests are subtracted from node available resources, so they can be used to avoid overprovisioning a node. However, they cannot be used to guarantee resources in an overprovisioned node. They should be applied to all containers as a best practice if the operator wants to avoid overprovisioning entirely.securityContext.allowPrivilegeEscalation- not possible on Windows; none of the capabilities are hooked upsecurityContext.capabilities- POSIX capabilities are not implemented on WindowssecurityContext.privileged- Windows doesn't support privileged containers, use HostProcess Containers insteadsecurityContext.procMount- Windows doesn't have a/procfilesystemsecurityContext.readOnlyRootFilesystem- not possible on Windows; write access is required for registry & system processes to run inside the containersecurityContext.runAsGroup- not possible on Windows as there is no GID supportsecurityContext.runAsNonRoot- this setting will prevent containers from running asContainerAdministratorwhich is the closest equivalent to a root user on Windows.securityContext.runAsUser- userunAsUserNameinsteadsecurityContext.seLinuxOptions- not possible on Windows as SELinux is Linux-specificterminationMessagePath- this has some limitations in that Windows doesn't support mapping single files. The default value is/dev/termination-log, which does work because it does not exist on Windows by default.
Field compatibility for Pod specifications
The following list documents differences between how Pod specifications work between Windows and Linux:
hostIPCandhostpid- host namespace sharing is not possible on WindowshostNetwork- host networking is not possible on WindowsdnsPolicy- setting the PoddnsPolicytoClusterFirstWithHostNetis not supported on Windows because host networking is not provided. Pods always run with a container network.podSecurityContextsee belowshareProcessNamespace- this is a beta feature, and depends on Linux namespaces which are not implemented on Windows. Windows cannot share process namespaces or the container's root filesystem. Only the network can be shared.terminationGracePeriodSeconds- this is not fully implemented in Docker on Windows, see the GitHub issue. The behavior today is that the ENTRYPOINT process is sent CTRL_SHUTDOWN_EVENT, then Windows waits 5 seconds by default, and finally shuts down all processes using the normal Windows shutdown behavior. The 5 second default is actually in the Windows registry inside the container, so it can be overridden when the container is built.volumeDevices- this is a beta feature, and is not implemented on Windows. Windows cannot attach raw block devices to pods.volumes- If you define an
emptyDirvolume, you cannot set its volume source tomemory.
- If you define an
- You cannot enable
mountPropagationfor volume mounts as this is not supported on Windows.
Host network access
Kubernetes v1.26 to v1.32 included alpha support for running Windows Pods in the host's network namespace.
Kubernetes v1.36 does not include the WindowsHostNetwork feature gate
or support for running Windows Pods in the host's network namespace.
Field compatibility for Pod security context
Only the securityContext.runAsNonRoot and securityContext.windowsOptions from the Pod
securityContext fields work on Windows.
Node problem detector
The node problem detector (see Monitor Node Health) has preliminary support for Windows. For more information, visit the project's GitHub page.
Pause container
In a Kubernetes Pod, an infrastructure or “pause” container is first created to host the container. In Linux, the cgroups and namespaces that make up a pod need a process to maintain their continued existence; the pause process provides this. Containers that belong to the same pod, including infrastructure and worker containers, share a common network endpoint (same IPv4 and / or IPv6 address, same network port spaces). Kubernetes uses pause containers to allow for worker containers crashing or restarting without losing any of the networking configuration.
Kubernetes maintains a multi-architecture image that includes support for Windows.
For Kubernetes v1.36.0 the recommended pause image is registry.k8s.io/pause:3.6.
The source code
is available on GitHub.
Microsoft maintains a different multi-architecture image, with Linux and Windows
amd64 support, that you can find as mcr.microsoft.com/oss/kubernetes/pause:3.6.
This image is built from the same source as the Kubernetes maintained image but
all of the Windows binaries are authenticode signed by Microsoft.
The Kubernetes project recommends using the Microsoft maintained image if you are
deploying to a production or production-like environment that requires signed
binaries.
Container runtimes
You need to install a container runtime into each node in the cluster so that Pods can run there.
The following container runtimes work with Windows:
Note: This section links to third party projects that provide functionality required by Kubernetes. The Kubernetes project authors aren't responsible for these projects, which are listed alphabetically. To add a project to this list, read the content guide before submitting a change. More information.
ContainerD
FEATURE STATE:
Kubernetes v1.20 [stable]You can use ContainerD 1.4.0+ as the container runtime for Kubernetes nodes that run Windows.
Learn how to install ContainerD on a Windows node.
Note:
There is a known limitation when using GMSA with containerd to access Windows network shares, which requires a kernel patch.Mirantis Container Runtime
Mirantis Container Runtime (MCR) is available as a container runtime for all Windows Server 2019 and later versions.
See Install MCR on Windows Servers for more information.
Windows OS version compatibility
On Windows nodes, strict compatibility rules apply where the host OS version must match the container base image OS version.
For Kubernetes v1.36, operating system compatibility for Windows nodes (and Pods) is as follows:
- Windows Server LTSC release
- Windows Server 2022
- Windows Server 2025
The Kubernetes version-skew policy also applies.
Hardware recommendations and considerations
Note: This section links to third party projects that provide functionality required by Kubernetes. The Kubernetes project authors aren't responsible for these projects, which are listed alphabetically. To add a project to this list, read the content guide before submitting a change. More information.
Note:
The following hardware specifications outlined here should be regarded as sensible default values. They are not intended to represent minimum requirements or specific recommendations for production environments. Depending on the requirements for your workload these values may need to be adjusted.- 64-bit processor 4 CPU cores or more, capable of supporting virtualization
- 8GB or more of RAM
- 50GB or more of free disk space
Refer to Hardware requirements for Windows Server Microsoft documentation for the most up-to-date information on minimum hardware requirements. For guidance on deciding on resources for production worker nodes refer to Production worker nodes Kubernetes documentation.
To optimize system resources, if a graphical user interface is not required, it may be preferable to use a Windows Server OS installation that excludes the Windows Desktop Experience installation option, as this configuration typically frees up more system resources.
In assessing disk space for Windows worker nodes, take note that Windows container images are typically larger than
Linux container images, with container image sizes ranging
from 300MB to over 10GB
for a single image. Additionally, take note that the C: drive in Windows containers represents a virtual free size of
20GB by default, which is not the actual consumed space, but rather the disk size for which a single container can grow
to occupy when using local storage on the host.
See Containers on Windows - Container Storage Documentation
for more detail.
Getting help and troubleshooting
Your main source of help for troubleshooting your Kubernetes cluster should start with the Troubleshooting page.
Some additional, Windows-specific troubleshooting help is included in this section. Logs are an important element of troubleshooting issues in Kubernetes. Make sure to include them any time you seek troubleshooting assistance from other contributors. Follow the instructions in the SIG Windows contributing guide on gathering logs.
Reporting issues and feature requests
If you have what looks like a bug, or you would like to make a feature request, please follow the SIG Windows contributing guide to create a new issue. You should first search the list of issues in case it was reported previously and comment with your experience on the issue and add additional logs. SIG Windows channel on the Kubernetes Slack is also a great avenue to get some initial support and troubleshooting ideas prior to creating a ticket.
Validating the Windows cluster operability
The Kubernetes project provides a Windows Operational Readiness specification, accompanied by a structured test suite. This suite is split into two sets of tests, core and extended, each containing categories aimed at testing specific areas. It can be used to validate all the functionalities of a Windows and hybrid system (mixed with Linux nodes) with full coverage.
To set up the project on a newly created cluster, refer to the instructions in the project guide.
Deployment tools
The kubeadm tool helps you to deploy a Kubernetes cluster, providing the control plane to manage the cluster it, and nodes to run your workloads.
The Kubernetes cluster API project also provides means to automate deployment of Windows nodes.
Windows distribution channels
For a detailed explanation of Windows distribution channels see the Microsoft documentation.
Information on the different Windows Server servicing channels including their support models can be found at Windows Server servicing channels.
12.2 - Guide for Running Windows Containers in Kubernetes
This page provides a walkthrough for some steps you can follow to run Windows containers using Kubernetes. The page also highlights some Windows specific functionality within Kubernetes.
It is important to note that creating and deploying services and workloads on Kubernetes behaves in much the same way for Linux and Windows containers. The kubectl commands to interface with the cluster are identical. The examples in this page are provided to jumpstart your experience with Windows containers.
Objectives
Configure an example deployment to run Windows containers on a Windows node.
Before you begin
You should already have access to a Kubernetes cluster that includes a worker node running Windows Server.
Getting Started: Deploying a Windows workload
The example YAML file below deploys a simple webserver application running inside a Windows container.
Create a manifest named win-webserver.yaml with the contents below:
---
apiVersion: v1
kind: Service
metadata:
name: win-webserver
labels:
app: win-webserver
spec:
ports:
# the port that this service should serve on
- port: 80
targetPort: 80
selector:
app: win-webserver
type: NodePort
---
apiVersion: apps/v1
kind: Deployment
metadata:
labels:
app: win-webserver
name: win-webserver
spec:
replicas: 2
selector:
matchLabels:
app: win-webserver
template:
metadata:
labels:
app: win-webserver
name: win-webserver
spec:
containers:
- name: windowswebserver
image: mcr.microsoft.com/windows/servercore:ltsc2019
command:
- powershell.exe
- -command
- "<#code used from https://gist.github.com/19WAS85/5424431#> ; $$listener = New-Object System.Net.HttpListener ; $$listener.Prefixes.Add('http://*:80/') ; $$listener.Start() ; $$callerCounts = @{} ; Write-Host('Listening at http://*:80/') ; while ($$listener.IsListening) { ;$$context = $$listener.GetContext() ;$$requestUrl = $$context.Request.Url ;$$clientIP = $$context.Request.RemoteEndPoint.Address ;$$response = $$context.Response ;Write-Host '' ;Write-Host('> {0}' -f $$requestUrl) ; ;$$count = 1 ;$$k=$$callerCounts.Get_Item($$clientIP) ;if ($$k -ne $$null) { $$count += $$k } ;$$callerCounts.Set_Item($$clientIP, $$count) ;$$ip=(Get-NetAdapter | Get-NetIpAddress); $$header='<html><body><H1>Windows Container Web Server</H1>' ;$$callerCountsString='' ;$$callerCounts.Keys | % { $$callerCountsString+='<p>IP {0} callerCount {1} ' -f $$ip[1].IPAddress,$$callerCounts.Item($$_) } ;$$footer='</body></html>' ;$$content='{0}{1}{2}' -f $$header,$$callerCountsString,$$footer ;Write-Output $$content ;$$buffer = [System.Text.Encoding]::UTF8.GetBytes($$content) ;$$response.ContentLength64 = $$buffer.Length ;$$response.OutputStream.Write($$buffer, 0, $$buffer.Length) ;$$response.Close() ;$$responseStatus = $$response.StatusCode ;Write-Host('< {0}' -f $$responseStatus) } ; "
nodeSelector:
kubernetes.io/os: windows
Note:
Port mapping is also supported, but for simplicity this example exposes port 80 of the container directly to the Service.Check that all nodes are healthy:
kubectl get nodesDeploy the service and watch for pod updates:
kubectl apply -f win-webserver.yaml kubectl get pods -o wide -wWhen the service is deployed correctly both Pods are marked as Ready. To exit the watch command, press Ctrl+C.
Check that the deployment succeeded. To verify:
- Several pods listed from the Linux control plane node, use
kubectl get pods - Node-to-pod communication across the network,
curlport 80 of your pod IPs from the Linux control plane node to check for a web server response - Pod-to-pod communication, ping between pods (and across hosts, if you have more than one Windows node)
using
kubectl exec - Service-to-pod communication,
curlthe virtual service IP (seen underkubectl get services) from the Linux control plane node and from individual pods - Service discovery,
curlthe service name with the Kubernetes default DNS suffix - Inbound connectivity,
curlthe NodePort from the Linux control plane node or machines outside of the cluster - Outbound connectivity,
curlexternal IPs from inside the pod usingkubectl exec
- Several pods listed from the Linux control plane node, use
Note:
Windows container hosts are not able to access the IP of services scheduled on them due to current platform limitations of the Windows networking stack. Only Windows pods are able to access service IPs.Observability
Capturing logs from workloads
Logs are an important element of observability; they enable users to gain insights
into the operational aspect of workloads and are a key ingredient to troubleshooting issues.
Because Windows containers and workloads inside Windows containers behave differently from Linux containers,
users had a hard time collecting logs, limiting operational visibility.
Windows workloads for example are usually configured to log to ETW (Event Tracing for Windows)
or push entries to the application event log.
LogMonitor, an open source tool by Microsoft,
is the recommended way to monitor configured log sources inside a Windows container.
LogMonitor supports monitoring event logs, ETW providers, and custom application logs,
piping them to STDOUT for consumption by kubectl logs <pod>.
Follow the instructions in the LogMonitor GitHub page to copy its binaries and configuration files to all your containers and add the necessary entrypoints for LogMonitor to push your logs to STDOUT.
Configuring container user
Using configurable Container usernames
Windows containers can be configured to run their entrypoints and processes with different usernames than the image defaults. Learn more about it here.
Managing Workload Identity with Group Managed Service Accounts
Windows container workloads can be configured to use Group Managed Service Accounts (GMSA). Group Managed Service Accounts are a specific type of Active Directory account that provide automatic password management, simplified service principal name (SPN) management, and the ability to delegate the management to other administrators across multiple servers. Containers configured with a GMSA can access external Active Directory Domain resources while carrying the identity configured with the GMSA. Learn more about configuring and using GMSA for Windows containers here.
Taints and tolerations
Users need to use some combination of taint and node selectors in order to schedule Linux and Windows workloads to their respective OS-specific nodes. The recommended approach is outlined below, with one of its main goals being that this approach should not break compatibility for existing Linux workloads.
You can (and should) set .spec.os.name for each Pod, to indicate the operating system
that the containers in that Pod are designed for. For Pods that run Linux containers, set
.spec.os.name to linux. For Pods that run Windows containers, set .spec.os.name
to windows.
Note:
If you are running a version of Kubernetes older than 1.24, you may need to enable theIdentifyPodOS feature gate
to be able to set a value for .spec.pod.os.The scheduler does not use the value of .spec.os.name when assigning Pods to nodes. You should
use normal Kubernetes mechanisms for
assigning pods to nodes
to ensure that the control plane for your cluster places pods onto nodes that are running the
appropriate operating system.
The .spec.os.name value has no effect on the scheduling of the Windows pods,
so taints and tolerations (or node selectors) are still required
to ensure that the Windows pods land onto appropriate Windows nodes.
Ensuring OS-specific workloads land on the appropriate container host
Users can ensure Windows containers can be scheduled on the appropriate host using taints and tolerations. All Kubernetes nodes running Kubernetes 1.36 have the following default labels:
- kubernetes.io/os = [windows|linux]
- kubernetes.io/arch = [amd64|arm64|...]
If a Pod specification does not specify a nodeSelector such as "kubernetes.io/os": windows,
it is possible the Pod can be scheduled on any host, Windows or Linux.
This can be problematic since a Windows container can only run on Windows and a Linux container can only run on Linux.
The best practice for Kubernetes 1.36 is to use a nodeSelector.
However, in many cases users have a pre-existing large number of deployments for Linux containers,
as well as an ecosystem of off-the-shelf configurations, such as community Helm charts, and programmatic Pod generation cases, such as with operators.
In those situations, you may be hesitant to make the configuration change to add nodeSelector fields to all Pods and Pod templates.
The alternative is to use taints. Because the kubelet can set taints during registration,
it could easily be modified to automatically add a taint when running on Windows only.
For example: --register-with-taints='os=windows:NoSchedule'
By adding a taint to all Windows nodes, nothing will be scheduled on them (that includes existing Linux Pods).
In order for a Windows Pod to be scheduled on a Windows node,
it would need both the nodeSelector and the appropriate matching toleration to choose Windows.
nodeSelector:
kubernetes.io/os: windows
node.kubernetes.io/windows-build: '10.0.20348'
tolerations:
- key: "os"
operator: "Equal"
value: "windows"
effect: "NoSchedule"
Handling multiple Windows versions in the same cluster
The Windows Server version used by each pod must match that of the node. If you want to use multiple Windows
Server versions in the same cluster, then you should set additional node labels and nodeSelector fields.
Kubernetes automatically adds a label,
node.kubernetes.io/windows-build
to simplify this.
This label reflects the Windows major, minor, and build number that need to match for compatibility. Here are values used for each Windows Server version:
| Product Name | Version |
|---|---|
| Windows Server 2022 | 10.0.20348 |
| Windows Server 2025 | 10.0.26100 |
Simplifying with RuntimeClass
RuntimeClass can be used to simplify the process of using taints and tolerations.
A cluster administrator can create a RuntimeClass object which is used to encapsulate these taints and tolerations.
Save this file to
runtimeClasses.yml. It includes the appropriatenodeSelectorfor the Windows OS, architecture, and version.--- apiVersion: node.k8s.io/v1 kind: RuntimeClass metadata: name: windows-2019 handler: example-container-runtime-handler scheduling: nodeSelector: kubernetes.io/os: 'windows' kubernetes.io/arch: 'amd64' node.kubernetes.io/windows-build: '10.0.20348' tolerations: - effect: NoSchedule key: os operator: Equal value: "windows"Run
kubectl create -f runtimeClasses.ymlusing as a cluster administratorAdd
runtimeClassName: windows-2019as appropriate to Pod specsFor example:
--- apiVersion: apps/v1 kind: Deployment metadata: name: iis-2019 labels: app: iis-2019 spec: replicas: 1 template: metadata: name: iis-2019 labels: app: iis-2019 spec: runtimeClassName: windows-2019 containers: - name: iis image: mcr.microsoft.com/windows/servercore/iis:windowsservercore-ltsc2019 resources: limits: cpu: 1 memory: 800Mi requests: cpu: .1 memory: 300Mi ports: - containerPort: 80 selector: matchLabels: app: iis-2019 --- apiVersion: v1 kind: Service metadata: name: iis spec: type: LoadBalancer ports: - protocol: TCP port: 80 selector: app: iis-2019
13 - Extending Kubernetes
Different ways to change the behavior of your Kubernetes cluster.
Kubernetes is highly configurable and extensible. As a result, there is rarely a need to fork or submit patches to the Kubernetes project code.
This guide describes the options for customizing a Kubernetes cluster. It is aimed at cluster operators who want to understand how to adapt their Kubernetes cluster to the needs of their work environment. Developers who are prospective Platform Developers or Kubernetes Project Contributors will also find it useful as an introduction to what extension points and patterns exist, and their trade-offs and limitations.
Customization approaches can be broadly divided into configuration, which only involves changing command line arguments, local configuration files, or API resources; and extensions, which involve running additional programs, additional network services, or both. This document is primarily about extensions.
Configuration
Configuration files and command arguments are documented in the Reference section of the online documentation, with a page for each binary:
Command arguments and configuration files may not always be changeable in a hosted Kubernetes service or a distribution with managed installation. When they are changeable, they are usually only changeable by the cluster operator. Also, they are subject to change in future Kubernetes versions, and setting them may require restarting processes. For those reasons, they should be used only when there are no other options.
Built-in policy APIs, such as ResourceQuota, NetworkPolicy and Role-based Access Control (RBAC), are built-in Kubernetes APIs that provide declaratively configured policy settings. APIs are typically usable even with hosted Kubernetes services and with managed Kubernetes installations. The built-in policy APIs follow the same conventions as other Kubernetes resources such as Pods. When you use a policy APIs that is stable, you benefit from a defined support policy like other Kubernetes APIs. For these reasons, policy APIs are recommended over configuration files and command arguments where suitable.
Extensions
Extensions are software components that extend and deeply integrate with Kubernetes. They adapt it to support new types and new kinds of hardware.
Many cluster administrators use a hosted or distribution instance of Kubernetes. These clusters come with extensions pre-installed. As a result, most Kubernetes users will not need to install extensions and even fewer users will need to author new ones.
Extension patterns
Kubernetes is designed to be automated by writing client programs. Any program that reads and/or writes to the Kubernetes API can provide useful automation. Automation can run on the cluster or off it. By following the guidance in this doc you can write highly available and robust automation. Automation generally works with any Kubernetes cluster, including hosted clusters and managed installations.
There is a specific pattern for writing client programs that work well with
Kubernetes called the controller
pattern. Controllers typically read an object's .spec, possibly do things, and then
update the object's .status.
A controller is a client of the Kubernetes API. When Kubernetes is the client and calls out to a remote service, Kubernetes calls this a webhook. The remote service is called a webhook backend. As with custom controllers, webhooks do add a point of failure.
Note:
Outside of Kubernetes, the term “webhook” typically refers to a mechanism for asynchronous notifications, where the webhook call serves as a one-way notification to another system or component. In the Kubernetes ecosystem, even synchronous HTTP callouts are often described as “webhooks”.In the webhook model, Kubernetes makes a network request to a remote service. With the alternative binary Plugin model, Kubernetes executes a binary (program). Binary plugins are used by the kubelet (for example, CSI storage plugins and CNI network plugins), and by kubectl (see Extend kubectl with plugins).
Extension points
This diagram shows the extension points in a Kubernetes cluster and the clients that access it.

Kubernetes extension points
Key to the figure
Users often interact with the Kubernetes API using
kubectl. Plugins customise the behaviour of clients. There are generic extensions that can apply to different clients, as well as specific ways to extendkubectl.The API server handles all requests. Several types of extension points in the API server allow authenticating requests, or blocking them based on their content, editing content, and handling deletion. These are described in the API Access Extensions section.
The API server serves various kinds of resources. Built-in resource kinds, such as
pods, are defined by the Kubernetes project and can't be changed. Read API extensions to learn about extending the Kubernetes API.The Kubernetes scheduler decides which nodes to place pods on. There are several ways to extend scheduling, which are described in the Scheduling extensions section.
Much of the behavior of Kubernetes is implemented by programs called controllers, that are clients of the API server. Controllers are often used in conjunction with custom resources. Read combining new APIs with automation and Changing built-in resources to learn more.
The kubelet runs on servers (nodes), and helps pods appear like virtual servers with their own IPs on the cluster network. Network Plugins allow for different implementations of pod networking.
You can use Device Plugins to integrate custom hardware or other special node-local facilities, and make these available to Pods running in your cluster. The kubelet includes support for working with device plugins.
The kubelet also mounts and unmounts volume for pods and their containers. You can use Storage Plugins to add support for new kinds of storage and other volume types.
Extension point choice flowchart
If you are unsure where to start, this flowchart can help. Note that some solutions may involve several types of extensions.

Flowchart guide to select an extension approach
Client extensions
Plugins for kubectl are separate binaries that add or replace the behavior of specific subcommands.
The kubectl tool can also integrate with credential plugins
These extensions only affect a individual user's local environment, and so cannot enforce site-wide policies.
If you want to extend the kubectl tool, read Extend kubectl with plugins.
API extensions
Custom resource definitions
Consider adding a Custom Resource to Kubernetes if you want to define new controllers, application
configuration objects or other declarative APIs, and to manage them using Kubernetes tools, such
as kubectl.
For more about Custom Resources, see the Custom Resources concept guide.
API aggregation layer
You can use Kubernetes' API Aggregation Layer to integrate the Kubernetes API with additional services such as for metrics.
Combining new APIs with automation
A combination of a custom resource API and a control loop is called the controllers pattern. If your controller takes the place of a human operator deploying infrastructure based on a desired state, then the controller may also be following the operator pattern. The Operator pattern is used to manage specific applications; usually, these are applications that maintain state and require care in how they are managed.
You can also make your own custom APIs and control loops that manage other resources, such as storage, or to define policies (such as an access control restriction).
Changing built-in resources
When you extend the Kubernetes API by adding custom resources, the added resources always fall into a new API Groups. You cannot replace or change existing API groups. Adding an API does not directly let you affect the behavior of existing APIs (such as Pods), whereas API Access Extensions do.
API access extensions
When a request reaches the Kubernetes API Server, it is first authenticated, then authorized, and is then subject to various types of admission control (some requests are in fact not authenticated, and get special treatment). See Controlling Access to the Kubernetes API for more on this flow.
Each of the steps in the Kubernetes authentication / authorization flow offers extension points.
Authentication
Authentication maps headers or certificates in all requests to a username for the client making the request.
Kubernetes has several built-in authentication methods that it supports. It can also sit behind an
authenticating proxy, and it can send a token from an Authorization: header to a remote service for
verification (an authentication webhook)
if those don't meet your needs.
Authorization
Authorization determines whether specific users can read, write, and do other operations on API resources. It works at the level of whole resources -- it doesn't discriminate based on arbitrary object fields.
If the built-in authorization options don't meet your needs, an authorization webhook allows calling out to custom code that makes an authorization decision.
Dynamic admission control
After a request is authorized, if it is a write operation, it also goes through Admission Control steps. In addition to the built-in steps, there are several extensions:
- The Image Policy webhook restricts what images can be run in containers.
- To make arbitrary admission control decisions, a general Admission webhook can be used. Admission webhooks can reject creations or updates. Some admission webhooks modify the incoming request data before it is handled further by Kubernetes.
Infrastructure extensions
Device plugins
Device plugins allow a node to discover new Node resources (in addition to the builtin ones like cpu and memory) via a Device Plugin.
Storage plugins
Container Storage Interface (CSI) plugins provide a way to extend Kubernetes with supports for new kinds of volumes. The volumes can be backed by durable external storage, or provide ephemeral storage, or they might offer a read-only interface to information using a filesystem paradigm.
Kubernetes also includes support for FlexVolume plugins, which are deprecated since Kubernetes v1.23 (in favour of CSI).
FlexVolume plugins allow users to mount volume types that aren't natively supported by Kubernetes. When you run a Pod that relies on FlexVolume storage, the kubelet calls a binary plugin to mount the volume. The archived FlexVolume design proposal has more detail on this approach.
The Kubernetes Volume Plugin FAQ for Storage Vendors includes general information on storage plugins.
Network plugins
Your Kubernetes cluster needs a network plugin in order to have a working Pod network and to support other aspects of the Kubernetes network model.
Network Plugins allow Kubernetes to work with different networking topologies and technologies.
Kubelet image credential provider plugins
FEATURE STATE:
Kubelet image credential providers are plugins for the kubelet to dynamically retrieve image registry
credentials. The credentials are then used when pulling images from container image registries that
match the configuration.Kubernetes v1.26 [stable]The plugins can communicate with external services or use local files to obtain credentials. This way, the kubelet does not need to have static credentials for each registry, and can support various authentication methods and protocols.
For plugin configuration details, see Configure a kubelet image credential provider.
Scheduling extensions
The scheduler is a special type of controller that watches pods, and assigns pods to nodes. The default scheduler can be replaced entirely, while continuing to use other Kubernetes components, or multiple schedulers can run at the same time.
This is a significant undertaking, and almost all Kubernetes users find they do not need to modify the scheduler.
You can control which scheduling plugins are active, or associate sets of plugins with different named scheduler profiles. You can also write your own plugin that integrates with one or more of the kube-scheduler's extension points.
Finally, the built in kube-scheduler component supports a
webhook
that permits a remote HTTP backend (scheduler extension) to filter and / or prioritize
the nodes that the kube-scheduler chooses for a pod.
Note:
You can only affect node filtering and node prioritization with a scheduler extender webhook; other extension points are not available through the webhook integration.What's next
- Learn more about infrastructure extensions
- Learn about kubectl plugins
- Learn more about Custom Resources
- Learn more about Extension API Servers
- Learn about Dynamic admission control
- Learn about the Operator pattern
13.1 - Compute, Storage, and Networking Extensions
This section covers extensions to your cluster that do not come as part as Kubernetes itself. You can use these extensions to enhance the nodes in your cluster, or to provide the network fabric that links Pods together.
CSI and FlexVolume storage plugins
Container Storage Interface (CSI) plugins provide a way to extend Kubernetes with supports for new kinds of volumes. The volumes can be backed by durable external storage, or provide ephemeral storage, or they might offer a read-only interface to information using a filesystem paradigm.
Kubernetes also includes support for FlexVolume plugins, which are deprecated since Kubernetes v1.23 (in favour of CSI).
FlexVolume plugins allow users to mount volume types that aren't natively supported by Kubernetes. When you run a Pod that relies on FlexVolume storage, the kubelet calls a binary plugin to mount the volume. The archived FlexVolume design proposal has more detail on this approach.
The Kubernetes Volume Plugin FAQ for Storage Vendors includes general information on storage plugins.
Device plugins allow a node to discover new Node facilities (in addition to the built-in node resources such as
cpuandmemory), and provide these custom node-local facilities to Pods that request them.Network plugins allow Kubernetes to work with different networking topologies and technologies. Your Kubernetes cluster needs a network plugin in order to have a working Pod network and to support other aspects of the Kubernetes network model.
Kubernetes 1.36 is compatible with CNI network plugins.
13.1.1 - Network Plugins
Kubernetes (version 1.3 through to the latest 1.36, and likely onwards) lets you use Container Network Interface (CNI) plugins for cluster networking. You must use a CNI plugin that is compatible with your cluster and that suits your needs. Different plugins are available (both open- and closed- source) in the wider Kubernetes ecosystem.
A CNI plugin is required to implement the Kubernetes network model.
You must use a CNI plugin that is compatible with the v0.4.0 or later releases of the CNI specification. The Kubernetes project recommends using a plugin that is compatible with the v1.0.0 CNI specification (plugins can be compatible with multiple spec versions).
Installation
A Container Runtime, in the networking context, is a daemon on a node configured to provide CRI Services for kubelet. In particular, the Container Runtime must be configured to load the CNI plugins required to implement the Kubernetes network model.
Note:
Prior to Kubernetes 1.24, the CNI plugins could also be managed by the kubelet using the
cni-bin-dir and network-plugin command-line parameters.
These command-line parameters were removed in Kubernetes 1.24, with management of the CNI no
longer in scope for kubelet.
See Troubleshooting CNI plugin-related errors if you are facing issues following the removal of dockershim.
For specific information about how a Container Runtime manages the CNI plugins, see the documentation for that Container Runtime, for example:
For specific information about how to install and manage a CNI plugin, see the documentation for that plugin or networking provider.
Network Plugin Requirements
Loopback CNI
In addition to the CNI plugin installed on the nodes for implementing the Kubernetes network
model, Kubernetes also requires the container runtimes to provide a loopback interface lo, which
is used for each sandbox (pod sandboxes, vm sandboxes, ...).
Implementing the loopback interface can be accomplished by re-using the
CNI loopback plugin.
or by developing your own code to achieve this (see
this example from CRI-O).
Support hostPort
The CNI networking plugin supports hostPort. You can use the official
portmap
plugin offered by the CNI plugin team or use your own plugin with portMapping functionality.
If you want to enable hostPort support, you must specify portMappings capability in your
cni-conf-dir. For example:
{
"name": "k8s-pod-network",
"cniVersion": "0.4.0",
"plugins": [
{
"type": "calico",
"log_level": "info",
"datastore_type": "kubernetes",
"nodename": "127.0.0.1",
"ipam": {
"type": "host-local",
"subnet": "usePodCidr"
},
"policy": {
"type": "k8s"
},
"kubernetes": {
"kubeconfig": "/etc/cni/net.d/calico-kubeconfig"
}
},
{
"type": "portmap",
"capabilities": {"portMappings": true},
"externalSetMarkChain": "KUBE-MARK-MASQ"
}
]
}
Support traffic shaping
Experimental Feature
The CNI networking plugin also supports pod ingress and egress traffic shaping. You can use the official bandwidth plugin offered by the CNI plugin team or use your own plugin with bandwidth control functionality.
If you want to enable traffic shaping support, you must add the bandwidth plugin to your CNI
configuration file (default /etc/cni/net.d) and ensure that the binary is included in your CNI
bin dir (default /opt/cni/bin).
{
"name": "k8s-pod-network",
"cniVersion": "0.4.0",
"plugins": [
{
"type": "calico",
"log_level": "info",
"datastore_type": "kubernetes",
"nodename": "127.0.0.1",
"ipam": {
"type": "host-local",
"subnet": "usePodCidr"
},
"policy": {
"type": "k8s"
},
"kubernetes": {
"kubeconfig": "/etc/cni/net.d/calico-kubeconfig"
}
},
{
"type": "bandwidth",
"capabilities": {"bandwidth": true}
}
]
}
Now you can add the kubernetes.io/ingress-bandwidth and kubernetes.io/egress-bandwidth
annotations to your Pod. For example:
apiVersion: v1
kind: Pod
metadata:
annotations:
kubernetes.io/ingress-bandwidth: 1M
kubernetes.io/egress-bandwidth: 1M
...
What's next
- Learn more about Cluster Networking
- Learn more about Network Policies
- Learn about the Troubleshooting CNI plugin-related errors
13.1.2 - Device Plugins
Device plugins let you configure your cluster with support for devices or resources that require vendor-specific setup, such as GPUs, NICs, FPGAs, or non-volatile main memory.
FEATURE STATE:
Kubernetes v1.26 [stable]Kubernetes provides a device plugin framework that you can use to advertise system hardware resources to the Kubelet.
Instead of customizing the code for Kubernetes itself, vendors can implement a device plugin that you deploy either manually or as a DaemonSet. The targeted devices include GPUs, high-performance NICs, FPGAs, InfiniBand adapters, and other similar computing resources that may require vendor specific initialization and setup.
Device plugin registration
The kubelet exports a Registration gRPC service:
service Registration {
rpc Register(RegisterRequest) returns (Empty) {}
}
A device plugin can register itself with the kubelet through this gRPC service. During the registration, the device plugin needs to send:
- The name of its Unix socket.
- The Device Plugin API version against which it was built.
- The
ResourceNameit wants to advertise. HereResourceNameneeds to follow the extended resource naming scheme asvendor-domain/resourcetype. (For example, an NVIDIA GPU is advertised asnvidia.com/gpu.)
Following a successful registration, the device plugin sends the kubelet the
list of devices it manages, and the kubelet is then in charge of advertising those
resources to the API server as part of the kubelet node status update.
For example, after a device plugin registers hardware-vendor.example/foo with the kubelet
and reports two healthy devices on a node, the node status is updated
to advertise that the node has 2 "Foo" devices installed and available.
Then, users can request devices as part of a Pod specification
(see container).
Requesting extended resources is similar to how you manage requests and limits for
other resources, with the following differences:
- Extended resources are only supported as integer resources and cannot be overcommitted.
- Devices cannot be shared between containers.
Example
Suppose a Kubernetes cluster is running a device plugin that advertises resource hardware-vendor.example/foo
on certain nodes. Here is an example of a pod requesting this resource to run a demo workload:
---
apiVersion: v1
kind: Pod
metadata:
name: demo-pod
spec:
containers:
- name: demo-container-1
image: registry.k8s.io/pause:3.8
resources:
limits:
hardware-vendor.example/foo: 2
#
# This Pod needs 2 of the hardware-vendor.example/foo devices
# and can only schedule onto a Node that's able to satisfy
# that need.
#
# If the Node has more than 2 of those devices available, the
# remainder would be available for other Pods to use.
Device plugin implementation
The general workflow of a device plugin includes the following steps:
Initialization. During this phase, the device plugin performs vendor-specific initialization and setup to make sure the devices are in a ready state.
The plugin starts a gRPC service, with a Unix socket under the host path
/var/lib/kubelet/device-plugins/(this path is hardcoded and is not affected by the kubelet's--root-diror any other configuration), that implements the following interfaces:service DevicePlugin { // GetDevicePluginOptions returns options to be communicated with Device Manager. rpc GetDevicePluginOptions(Empty) returns (DevicePluginOptions) {} // ListAndWatch returns a stream of List of Devices // Whenever a Device state change or a Device disappears, ListAndWatch // returns the new list rpc ListAndWatch(Empty) returns (stream ListAndWatchResponse) {} // Allocate is called during container creation so that the Device // Plugin can run device specific operations and instruct Kubelet // of the steps to make the Device available in the container rpc Allocate(AllocateRequest) returns (AllocateResponse) {} // GetPreferredAllocation returns a preferred set of devices to allocate // from a list of available ones. The resulting preferred allocation is not // guaranteed to be the allocation ultimately performed by the // devicemanager. It is only designed to help the devicemanager make a more // informed allocation decision when possible. rpc GetPreferredAllocation(PreferredAllocationRequest) returns (PreferredAllocationResponse) {} // PreStartContainer is called, if indicated by Device Plugin during registration phase, // before each container start. Device plugin can run device specific operations // such as resetting the device before making devices available to the container. rpc PreStartContainer(PreStartContainerRequest) returns (PreStartContainerResponse) {} }Note:
Plugins are not required to provide useful implementations forGetPreferredAllocation()orPreStartContainer(). Flags indicating the availability of these calls, if any, should be set in theDevicePluginOptionsmessage sent back by a call toGetDevicePluginOptions(). Thekubeletwill always callGetDevicePluginOptions()to see which optional functions are available, before calling any of them directly.The plugin registers itself with the kubelet through the Unix socket at host path
/var/lib/kubelet/device-plugins/kubelet.sock.Note:
The ordering of the workflow is important. A plugin MUST start serving gRPC service before registering itself with kubelet for successful registration.After successfully registering itself, the device plugin runs in serving mode, during which it keeps monitoring device health and reports back to the kubelet upon any device state changes. It is also responsible for serving
AllocategRPC requests. DuringAllocate, the device plugin may do device-specific preparation; for example, GPU cleanup or QRNG initialization. If the operations succeed, the device plugin returns anAllocateResponsethat contains container runtime configurations for accessing the allocated devices. The kubelet passes this information to the container runtime.An
AllocateResponsecontains zero or moreContainerAllocateResponseobjects. In these, the device plugin defines modifications that must be made to a container's definition to provide access to the device. These modifications include:- Annotations
- device nodes
- environment variables
- mounts
- fully-qualified CDI device names
Note:
The processing of the fully-qualified CDI device names by the Device Manager requires that theDevicePluginCDIDevicesfeature gate is enabled for both the kubelet and the kube-apiserver. This was added as an alpha feature in Kubernetes v1.28, graduated to beta in v1.29 and to GA in v1.31.
Handling kubelet restarts
A device plugin is expected to detect kubelet restarts and re-register itself with the new
kubelet instance. A new kubelet instance deletes all the existing Unix sockets under
/var/lib/kubelet/device-plugins (the hardcoded path for device plugins) when it starts. A device plugin can monitor the deletion
of its Unix socket and re-register itself upon such an event.
Device plugin and unhealthy devices
There are cases when devices fail or are shut down. The responsibility of the Device Plugin
in this case is to notify the kubelet about the situation using the ListAndWatchResponse API.
Once a device is marked as unhealthy, the kubelet will decrease the allocatable count for this resource on the Node to reflect how many devices can be used for scheduling new pods. Capacity count for the resource will not change.
Pods that were assigned to the failed devices will continue be assigned to this device.
It is typical that code relying on the device will start failing and Pod may get
into Failed phase if restartPolicy for the Pod was not Always or enter the crash loop
otherwise.
Before Kubernetes v1.31, the way to know whether or not a Pod is associated with the failed device is to use the PodResources API.
FEATURE STATE:
Kubernetes v1.36 [beta](enabled by default)When the feature gate ResourceHealthStatus is enabled (beta and enabled by default since v1.36),
the field allocatedResourcesStatus
is added to each container status, within the .status for each Pod. The allocatedResourcesStatus
field reports health information for each device assigned to the container.
Each resource health entry can include an optional message field with additional
human readable context about the health status, such as error details or failure reasons.
For a failed Pod, or where you suspect a fault, you can use this status to understand whether
the Pod behavior may be associated with device failure. For example, if an accelerator is reporting
an over-temperature event, the allocatedResourcesStatus field may report this.
Device plugin deployment
You can deploy a device plugin as a DaemonSet, as a package for your node's operating system, or manually.
The canonical directory /var/lib/kubelet/device-plugins (which is hardcoded on the kubelet) requires privileged access,
so a device plugin must run in a privileged security context.
If you're deploying a device plugin as a DaemonSet, /var/lib/kubelet/device-plugins
must be mounted as a Volume
in the plugin's PodSpec.
If you choose the DaemonSet approach you can rely on Kubernetes to: place the device plugin's Pod onto Nodes, to restart the daemon Pod after failure, and to help automate upgrades.
API compatibility
Previously, the versioning scheme required the Device Plugin's API version to match exactly the Kubelet's version. Since the graduation of this feature to Beta in v1.12 this is no longer a hard requirement. The API is versioned and has been stable since Beta graduation of this feature. Because of this, kubelet upgrades should be seamless but there still may be changes in the API before stabilization making upgrades not guaranteed to be non-breaking.
Note:
Although the Device Manager component of Kubernetes is a generally available feature, the device plugin API is not stable. For information on the device plugin API and version compatibility, read Device Plugin API versions.As a project, Kubernetes recommends that device plugin developers:
- Watch for Device Plugin API changes in the future releases.
- Support multiple versions of the device plugin API for backward/forward compatibility.
To run device plugins on nodes that need to be upgraded to a Kubernetes release with a newer device plugin API version, upgrade your device plugins to support both versions before upgrading these nodes. Taking that approach will ensure the continuous functioning of the device allocations during the upgrade.
Monitoring device plugin resources
FEATURE STATE:
Kubernetes v1.28 [stable]In order to monitor resources provided by device plugins, monitoring agents need to be able to
discover the set of devices that are in-use on the node and obtain metadata to describe which
container the metric should be associated with. Prometheus metrics
exposed by device monitoring agents should follow the
Kubernetes Instrumentation Guidelines,
identifying containers using pod, namespace, and container prometheus labels.
The kubelet provides a gRPC service to enable discovery of in-use devices, and to provide metadata for these devices:
// PodResourcesLister is a service provided by the kubelet that provides information about the
// node resources consumed by pods and containers on the node
service PodResourcesLister {
rpc List(ListPodResourcesRequest) returns (ListPodResourcesResponse) {}
rpc GetAllocatableResources(AllocatableResourcesRequest) returns (AllocatableResourcesResponse) {}
rpc Get(GetPodResourcesRequest) returns (GetPodResourcesResponse) {}
}
List gRPC endpoint
The List endpoint provides information on resources of running pods, with details such as the
id of exclusively allocated CPUs, device id as it was reported by device plugins and id of
the NUMA node where these devices are allocated. Also, for NUMA-based machines, it contains the
information about memory and hugepages reserved for a container.
Starting from Kubernetes v1.27, the List endpoint can provide information on resources
of running pods allocated in ResourceClaims by the DynamicResourceAllocation API.
Starting from Kubernetes v1.34, this feature is enabled by default.
// ListPodResourcesResponse is the response returned by List function
message ListPodResourcesResponse {
repeated PodResources pod_resources = 1;
}
// PodResources contains information about the node resources assigned to a pod
message PodResources {
string name = 1;
string namespace = 2;
repeated ContainerResources containers = 3;
}
// ContainerResources contains information about the resources assigned to a container
message ContainerResources {
string name = 1;
repeated ContainerDevices devices = 2;
repeated int64 cpu_ids = 3;
repeated ContainerMemory memory = 4;
repeated DynamicResource dynamic_resources = 5;
}
// ContainerMemory contains information about memory and hugepages assigned to a container
message ContainerMemory {
string memory_type = 1;
uint64 size = 2;
TopologyInfo topology = 3;
}
// Topology describes hardware topology of the resource
message TopologyInfo {
repeated NUMANode nodes = 1;
}
// NUMA representation of NUMA node
message NUMANode {
int64 ID = 1;
}
// ContainerDevices contains information about the devices assigned to a container
message ContainerDevices {
string resource_name = 1;
repeated string device_ids = 2;
TopologyInfo topology = 3;
}
// DynamicResource contains information about the devices assigned to a container by Dynamic Resource Allocation
message DynamicResource {
string class_name = 1;
string claim_name = 2;
string claim_namespace = 3;
repeated ClaimResource claim_resources = 4;
}
// ClaimResource contains per-plugin resource information
message ClaimResource {
repeated CDIDevice cdi_devices = 1 [(gogoproto.customname) = "CDIDevices"];
}
// CDIDevice specifies a CDI device information
message CDIDevice {
// Fully qualified CDI device name
// for example: vendor.com/gpu=gpudevice1
// see more details in the CDI specification:
// https://github.com/container-orchestrated-devices/container-device-interface/blob/main/SPEC.md
string name = 1;
}
Note:
cpu_ids in the ContainerResources in the List endpoint correspond to exclusive CPUs allocated
to a particular container. If the goal is to evaluate CPUs that belong to the shared pool, the List
endpoint needs to be used in conjunction with the GetAllocatableResources endpoint as explained
below:
- Call
GetAllocatableResourcesto get a list of all the allocatable CPUs - Call
GetCpuIdson allContainerResourcesin the system - Subtract out all of the CPUs from the
GetCpuIdscalls from theGetAllocatableResourcescall
GetAllocatableResources gRPC endpoint
FEATURE STATE:
Kubernetes v1.28 [stable]GetAllocatableResources provides information on resources initially available on the worker node. It provides more information than kubelet exports to APIServer.
Note:
GetAllocatableResources should only be used to evaluate allocatable
resources on a node. If the goal is to evaluate free/unallocated resources it should be used in
conjunction with the List() endpoint. The result obtained by GetAllocatableResources would remain
the same unless the underlying resources exposed to kubelet change. This happens rarely but when
it does (for example: hotplug/hotunplug, device health changes), client is expected to call
GetAllocatableResources endpoint.
However, calling GetAllocatableResources endpoint is not sufficient in case of cpu and/or memory
update and Kubelet needs to be restarted to reflect the correct resource capacity and allocatable.
// AllocatableResourcesResponses contains information about all the devices known by the kubelet
message AllocatableResourcesResponse {
repeated ContainerDevices devices = 1;
repeated int64 cpu_ids = 2;
repeated ContainerMemory memory = 3;
}
ContainerDevices do expose the topology information declaring to which NUMA cells the device is
affine. The NUMA cells are identified using a opaque integer ID, which value is consistent to
what device plugins report
when they register themselves to the kubelet.
The gRPC service is served over a unix socket at pod-resources/kubelet.sock within the
kubelet's root directory (typically /var/lib/kubelet/pod-resources/kubelet.sock).
Monitoring agents for device plugin resources can be deployed as a daemon, or as a DaemonSet.
The canonical directory pod-resources within the kubelet root directory (typically
/var/lib/kubelet/pod-resources) requires privileged access, so monitoring
agents must run in a privileged security context. If a device monitoring agent is running as a
DaemonSet, the pod-resources directory must be mounted as a
Volume in the device monitoring agent's
PodSpec.
Note:
When accessing the pod-resources/kubelet.sock from DaemonSet
or any other app deployed as a container on the host, which is mounting socket as
a volume, it is a good practice to mount the pod-resources directory
instead of the socket file itself. This will ensure
that after kubelet restart, the container will be able to re-connect to this socket.
On a typical Linux node, this means mounting /var/lib/kubelet/pod-resources/
instead of /var/lib/kubelet/pod-resources/kubelet.sock.
Container mounts are managed by inode referencing the socket or directory, depending on what was mounted. When kubelet restarts, the socket is deleted and a new socket is created, while the directory stays untouched. So the original inode for the socket becomes unusable. The inode to the directory will continue working.
Get gRPC endpoint
FEATURE STATE:
Kubernetes v1.34 [beta]The Get endpoint provides information on resources of a running Pod. It exposes information
similar to those described in the List endpoint. The Get endpoint requires PodName
and PodNamespace of the running Pod.
// GetPodResourcesRequest contains information about the pod
message GetPodResourcesRequest {
string pod_name = 1;
string pod_namespace = 2;
}
The Get endpoint can provide Pod information related to dynamic resources
allocated by the dynamic resource allocation API.
Starting from Kubernetes v1.34, this feature is enabled by default.
Device plugin integration with the Topology Manager
FEATURE STATE:
Kubernetes v1.27 [stable]The Topology Manager is a Kubelet component that allows resources to be co-ordinated in a Topology
aligned manner. In order to do this, the Device Plugin API was extended to include a
TopologyInfo struct.
message TopologyInfo {
repeated NUMANode nodes = 1;
}
message NUMANode {
int64 ID = 1;
}
Device Plugins that wish to leverage the Topology Manager can send back a populated TopologyInfo struct as part of the device registration, along with the device IDs and the health of the device. The device manager will then use this information to consult with the Topology Manager and make resource assignment decisions.
TopologyInfo supports setting a nodes field to either nil or a list of NUMA nodes. This
allows the Device Plugin to advertise a device that spans multiple NUMA nodes.
Setting TopologyInfo to nil or providing an empty list of NUMA nodes for a given device
indicates that the Device Plugin does not have a NUMA affinity preference for that device.
An example TopologyInfo struct populated for a device by a Device Plugin:
pluginapi.Device{ID: "25102017", Health: pluginapi.Healthy, Topology:&pluginapi.TopologyInfo{Nodes: []*pluginapi.NUMANode{&pluginapi.NUMANode{ID: 0,},}}}
Device plugin examples
Note: This section links to third party projects that provide functionality required by Kubernetes. The Kubernetes project authors aren't responsible for these projects, which are listed alphabetically. To add a project to this list, read the content guide before submitting a change. More information.
Here are some examples of device plugin implementations:
- Akri, which lets you easily expose heterogeneous leaf devices (such as IP cameras and USB devices).
- The AMD GPU device plugin
- The generic device plugin for generic Linux devices and USB devices
- The HAMi for heterogeneous AI computing virtualization middleware (for example, NVIDIA, Cambricon, Hygon, Iluvatar, MThreads, Ascend, Metax)
- The Intel device plugins for Intel GPU, FPGA, QAT, VPU, SGX, DSA, DLB and IAA devices
- The KubeVirt device plugins for hardware-assisted virtualization
- The NVIDIA GPU device plugin, NVIDIA's official device plugin to expose NVIDIA GPUs and monitor GPU health
- The NVIDIA GPU device plugin for Container-Optimized OS
- The RDMA device plugin
- The SocketCAN device plugin
- The Solarflare device plugin
- The SR-IOV Network device plugin
- The Xilinx FPGA device plugins for Xilinx FPGA devices
What's next
- Learn about scheduling GPU resources using device plugins
- Learn about advertising extended resources on a node
- Learn about the Topology Manager
- Read about using hardware acceleration for TLS ingress with Kubernetes
- Read more about Extended Resource allocation by DRA
13.2 - Extending the Kubernetes API
Custom resources are extensions of the Kubernetes API. Kubernetes provides two ways to add custom resources to your cluster:
- The CustomResourceDefinition (CRD) mechanism allows you to declaratively define a new custom API with an API group, kind, and schema that you specify. The Kubernetes control plane serves and handles the storage of your custom resource. CRDs allow you to create new types of resources for your cluster without writing and running a custom API server.
- The aggregation layer sits behind the primary API server, which acts as a proxy. This arrangement is called API Aggregation (AA), which allows you to provide specialized implementations for your custom resources by writing and deploying your own API server. The main API server delegates requests to your API server for the custom APIs that you specify, making them available to all of its clients.
13.2.1 - Custom Resources
Custom resources are extensions of the Kubernetes API. This page discusses when to add a custom resource to your Kubernetes cluster and when to use a standalone service. It describes the two methods for adding custom resources and how to choose between them.
Custom resources
A resource is an endpoint in the Kubernetes API that stores a collection of API objects of a certain kind; for example, the built-in pods resource contains a collection of Pod objects.
A custom resource is an extension of the Kubernetes API that is not necessarily available in a default Kubernetes installation. It represents a customization of a particular Kubernetes installation. However, many core Kubernetes functions are now built using custom resources, making Kubernetes more modular.
Custom resources can appear and disappear in a running cluster through dynamic registration, and cluster admins can update custom resources independently of the cluster itself. Once a custom resource is installed, users can create and access its objects using kubectl, just as they do for built-in resources like Pods.
Custom controllers
On their own, custom resources let you store and retrieve structured data. When you combine a custom resource with a custom controller, custom resources provide a true declarative API.
The Kubernetes declarative API enforces a separation of responsibilities. You declare the desired state of your resource. The Kubernetes controller keeps the current state of Kubernetes objects in sync with your declared desired state. This is in contrast to an imperative API, where you instruct a server what to do.
You can deploy and update a custom controller on a running cluster, independently of the cluster's lifecycle. Custom controllers can work with any kind of resource, but they are especially effective when combined with custom resources. The Operator pattern combines custom resources and custom controllers. You can use custom controllers to encode domain knowledge for specific applications into an extension of the Kubernetes API.
Should I add a custom resource to my Kubernetes cluster?
When creating a new API, consider whether to aggregate your API with the Kubernetes cluster APIs or let your API stand alone.
| Consider API aggregation if: | Prefer a stand-alone API if: |
|---|---|
| Your API is Declarative. | Your API does not fit the Declarative model. |
You want your new types to be readable and writable using kubectl. | kubectl support is not required |
| You want to view your new types in a Kubernetes UI, such as dashboard, alongside built-in types. | Kubernetes UI support is not required. |
| You are developing a new API. | You already have a program that serves your API and works well. |
| You are willing to accept the format restriction that Kubernetes puts on REST resource paths, such as API Groups and Namespaces. (See the API Overview.) | You need to have specific REST paths to be compatible with an already defined REST API. |
| Your resources are naturally scoped to a cluster or namespaces of a cluster. | Cluster or namespace scoped resources are a poor fit; you need control over the specifics of resource paths. |
| You want to reuse Kubernetes API support features. | You don't need those features. |
Declarative APIs
In a Declarative API, typically:
- Your API consists of a relatively small number of relatively small objects (resources).
- The objects define configuration of applications or infrastructure.
- The objects are updated relatively infrequently.
- Humans often need to read and write the objects.
- The main operations on the objects are CRUD-y (creating, reading, updating and deleting).
- Transactions across objects are not required: the API represents a desired state, not an exact state.
Imperative APIs are not declarative. Signs that your API might not be declarative include:
- The client says "do this", and then gets a synchronous response back when it is done.
- The client says "do this", and then gets an operation ID back, and has to check a separate Operation object to determine completion of the request.
- You talk about Remote Procedure Calls (RPCs).
- Directly storing large amounts of data; for example, > a few kB per object, or > 1000s of objects.
- High bandwidth access (10s of requests per second sustained) needed.
- Store end-user data (such as images, PII, etc.) or other large-scale data processed by applications.
- The natural operations on the objects are not CRUD-y.
- The API is not easily modeled as objects.
- You chose to represent pending operations with an operation ID or an operation object.
Should I use a ConfigMap or a custom resource?
Use a ConfigMap if any of the following apply:
- There is an existing, well-documented configuration file format, such as a
mysql.cnforpom.xml. - You want to put the entire configuration into one key of a ConfigMap.
- The main use of the configuration file is for a program running in a Pod on your cluster to consume the file to configure itself.
- Consumers of the file prefer to consume via file in a Pod or environment variable in a pod, rather than the Kubernetes API.
- You want to perform rolling updates via Deployment, etc., when the file is updated.
Note:
Use a Secret for sensitive data, which is similar to a ConfigMap but more secure.Use a custom resource (CRD or Aggregated API) if most of the following apply:
- You want to use Kubernetes client libraries and CLIs to create and update the new resource.
- You want top-level support from
kubectl; for example,kubectl get my-object object-name. - You want to build new automation that watches for updates on the new object, and then CRUD other objects, or vice versa.
- You want to write automation that handles updates to the object.
- You want to use Kubernetes API conventions like
.spec,.status, and.metadata. - You want the object to be an abstraction over a collection of controlled resources, or a summarization of other resources.
Adding custom resources
Kubernetes provides two ways to add custom resources to your cluster:
- CRDs are simple and can be created without any programming.
- API Aggregation requires programming, but allows more control over API behaviors like how data is stored and conversion between API versions.
Kubernetes provides these two options to meet the needs of different users, so that neither ease of use nor flexibility is compromised.
Aggregated APIs are subordinate API servers that sit behind the primary API server, which acts as a proxy. This arrangement is called API Aggregation(AA). To users, the Kubernetes API appears extended.
CRDs allow users to create new types of resources without adding another API server. You do not need to understand API Aggregation to use CRDs.
Regardless of how they are installed, the new resources are referred to as Custom Resources to distinguish them from built-in Kubernetes resources (like pods).
Note:
Avoid using a Custom Resource as data storage for application, end user, or monitoring data: architecture designs that store application data within the Kubernetes API typically represent a design that is too closely coupled.
Architecturally, cloud native application architectures favor loose coupling between components. If part of your workload requires a backing service for its routine operation, run that backing service as a component or consume it as an external service. This way, your workload does not rely on the Kubernetes API for its normal operation.
CustomResourceDefinitions
The CustomResourceDefinition API resource allows you to define custom resources. Defining a CRD object creates a new custom resource with a name and schema that you specify. The Kubernetes API serves and handles the storage of your custom resource. The name of the CRD object itself must be a valid DNS subdomain name derived from the defined resource name and its API group; see how to create a CRD for more details. Further, the name of an object whose kind/resource is defined by a CRD must also be a valid DNS subdomain name.
This frees you from writing your own API server to handle the custom resource, but the generic nature of the implementation means you have less flexibility than with API server aggregation.
Refer to the custom controller example for an example of how to register a new custom resource, work with instances of your new resource type, and use a controller to handle events.
API server aggregation
Usually, each resource in the Kubernetes API requires code that handles REST requests and manages persistent storage of objects. The main Kubernetes API server handles built-in resources like pods and services, and can also generically handle custom resources through CRDs.
The aggregation layer allows you to provide specialized implementations for your custom resources by writing and deploying your own API server. The main API server delegates requests to your API server for the custom resources that you handle, making them available to all of its clients.
Choosing a method for adding custom resources
CRDs are easier to use. Aggregated APIs are more flexible. Choose the method that best meets your needs.
Typically, CRDs are a good fit if:
- You have a handful of fields
- You are using the resource within your company, or as part of a small open-source project (as opposed to a commercial product)
Comparing ease of use
CRDs are easier to create than Aggregated APIs.
| CRDs | Aggregated API |
|---|---|
| Do not require programming. Users can choose any language for a CRD controller. | Requires programming and building binary and image. |
| No additional service to run; CRDs are handled by API server. | An additional service to create and that could fail. |
| No ongoing support once the CRD is created. Any bug fixes are picked up as part of normal Kubernetes Master upgrades. | May need to periodically pickup bug fixes from upstream and rebuild and update the Aggregated API server. |
| No need to handle multiple versions of your API; for example, when you control the client for this resource, you can upgrade it in sync with the API. | You need to handle multiple versions of your API; for example, when developing an extension to share with the world. |
Advanced features and flexibility
Aggregated APIs offer more advanced API features and customization of other features; for example, the storage layer.
| Feature | Description | CRDs | Aggregated API |
|---|---|---|---|
| Validation | Help users prevent errors and allow you to evolve your API independently of your clients. These features are most useful when there are many clients who can't all update at the same time. | Yes. Most validation can be specified in the CRD using OpenAPI v3.0 validation. CRDValidationRatcheting feature gate allows failing validations specified using OpenAPI also can be ignored if the failing part of the resource was unchanged. Any other validations supported by addition of a Validating Webhook. | Yes, arbitrary validation checks |
| Defaulting | See above | Yes, either via OpenAPI v3.0 validation default keyword (GA in 1.17), or via a Mutating Webhook (though this will not be run when reading from etcd for old objects). | Yes |
| Multi-versioning | Allows serving the same object through two API versions. Can help ease API changes like renaming fields. Less important if you control your client versions. | Yes | Yes |
| Custom Storage | If you need storage with a different performance mode (for example, a time-series database instead of key-value store) or isolation for security (for example, encryption of sensitive information, etc.) | No | Yes |
| Custom Business Logic | Perform arbitrary checks or actions when creating, reading, updating or deleting an object | Yes, using Webhooks. | Yes |
| Scale Subresource | Allows systems like HorizontalPodAutoscaler and PodDisruptionBudget interact with your new resource | Yes | Yes |
| Status Subresource | Allows fine-grained access control where user writes the spec section and the controller writes the status section. Allows incrementing object Generation on custom resource data mutation (requires separate spec and status sections in the resource) | Yes | Yes |
| Other Subresources | Add operations other than CRUD, such as "logs" or "exec". | No | Yes |
| strategic-merge-patch | The new endpoints support PATCH with Content-Type: application/strategic-merge-patch+json. Useful for updating objects that may be modified both locally, and by the server. For more information, see "Update API Objects in Place Using kubectl patch" | No | Yes |
| Protocol Buffers | The new resource supports clients that want to use Protocol Buffers | No | Yes |
| OpenAPI Schema | Is there an OpenAPI (swagger) schema for the types that can be dynamically fetched from the server? Is the user protected from misspelling field names by ensuring only allowed fields are set? Are types enforced (in other words, don't put an int in a string field?) | Yes, based on the OpenAPI v3.0 validation schema (GA in 1.16). | Yes |
| Instance Name | Does this extension mechanism impose any constraints on the names of objects whose kind/resource is defined this way? | Yes, such an object's name must be a valid DNS subdomain name. | No |
Common Features
When you create a custom resource, either via a CRD or an AA, you get many features for your API, compared to implementing it outside the Kubernetes platform:
| Feature | What it does |
|---|---|
| CRUD | The new endpoints support CRUD basic operations via HTTP and kubectl |
| Watch | The new endpoints support Kubernetes Watch operations via HTTP |
| Discovery | Clients like kubectl and dashboard automatically offer list, display, and field edit operations on your resources |
| json-patch | The new endpoints support PATCH with Content-Type: application/json-patch+json |
| merge-patch | The new endpoints support PATCH with Content-Type: application/merge-patch+json |
| HTTPS | The new endpoints uses HTTPS |
| Built-in Authentication | Access to the extension uses the core API server (aggregation layer) for authentication |
| Built-in Authorization | Access to the extension can reuse the authorization used by the core API server; for example, RBAC. |
| Finalizers | Block deletion of extension resources until external cleanup happens. |
| Admission Webhooks | Set default values and validate extension resources during any create/update/delete operation. |
| UI/CLI Display | Kubectl, dashboard can display extension resources. |
| Unset versus Empty | Clients can distinguish unset fields from zero-valued fields. |
| Client Libraries Generation | Kubernetes provides generic client libraries, as well as tools to generate type-specific client libraries. |
| Labels and annotations | Common metadata across objects that tools know how to edit for core and custom resources. |
Preparing to install a custom resource
There are several points to be aware of before adding a custom resource to your cluster.
Third party code and new points of failure
While creating a CRD does not automatically add any new points of failure (for example, by causing third party code to run on your API server), packages (for example, Charts) or other installation bundles often include CRDs as well as a Deployment of third-party code that implements the business logic for a new custom resource.
Installing an Aggregated API server always involves running a new Deployment.
Storage
Custom resources consume storage space in the same way that ConfigMaps do. Creating too many custom resources may overload your API server's storage space.
Custom resources are placed into storage based upon the the current storage version of the resource, defined in the CRD spec. Any update to a custom resource will use the currently defined storage version to store the resource. All other versions either need to have all the fields of that version or define conversions to work properly.
Aggregated API servers may use the same storage as the main API server, in which case the same warning applies.
Authentication, authorization, and auditing
CRDs always use the same authentication, authorization, and audit logging as the built-in resources of your API server.
If you use RBAC for authorization, most RBAC roles will not grant access to the new resources (except the cluster-admin role or any role created with wildcard rules). You'll need to explicitly grant access to the new resources. CRDs and Aggregated APIs often come bundled with new role definitions for the types they add.
Aggregated API servers may or may not use the same authentication, authorization, and auditing as the primary API server.
Accessing a custom resource
Kubernetes client libraries can be used to access custom resources. Not all client libraries support custom resources. The Go and Python client libraries do.
When you add a custom resource, you can access it using:
kubectl- The Kubernetes dynamic client.
- A REST client that you write.
- A client generated using Kubernetes client generation tools (generating one is an advanced undertaking, but some projects may provide a client along with the CRD or AA).
Custom resource field selectors
Field Selectors let clients select custom resources based on the value of one or more resource fields.
All custom resources support the metadata.name and metadata.namespace field
selectors.
Fields declared in a CustomResourceDefinition
may also be used with field selectors when included in the spec.versions[*].selectableFields field of the
CustomResourceDefinition.
Selectable fields for custom resources
FEATURE STATE:
Kubernetes v1.32 [stable](enabled by default)The spec.versions[*].selectableFields field of a CustomResourceDefinition may be used to
declare which other fields in a custom resource may be used in field selectors.
The following example adds the .spec.color and .spec.size fields as
selectable fields.
apiVersion: apiextensions.k8s.io/v1
kind: CustomResourceDefinition
metadata:
name: shirts.stable.example.com
spec:
group: stable.example.com
scope: Namespaced
names:
plural: shirts
singular: shirt
kind: Shirt
versions:
- name: v1
served: true
storage: true
schema:
openAPIV3Schema:
type: object
properties:
spec:
type: object
properties:
color:
type: string
size:
type: string
selectableFields:
- jsonPath: .spec.color
- jsonPath: .spec.size
additionalPrinterColumns:
- jsonPath: .spec.color
name: Color
type: string
- jsonPath: .spec.size
name: Size
type: string
Field selectors can then be used to get only resources with a color of blue:
kubectl get shirts.stable.example.com --field-selector spec.color=blue
The output should be:
NAME COLOR SIZE
example1 blue S
example2 blue M
What's next
- Learn how to Extend the Kubernetes API with the aggregation layer.
- Learn how to Extend the Kubernetes API with CustomResourceDefinition.
13.2.2 - Kubernetes API Aggregation Layer
The aggregation layer allows Kubernetes to be extended with additional APIs, beyond what is offered by the core Kubernetes APIs. The additional APIs can either be ready-made solutions such as a metrics server, or APIs that you develop yourself.
The aggregation layer is different from Custom Resource Definitions, which are a way to make the kube-apiserver recognise new kinds of object.
Aggregation layer
The aggregation layer runs in-process with the kube-apiserver. Until an extension resource is
registered, the aggregation layer will do nothing. To register an API, you add an APIService
object, which "claims" the URL path in the Kubernetes API. At that point, the aggregation layer
will proxy anything sent to that API path (e.g. /apis/myextension.mycompany.io/v1/…) to the
registered APIService.
The most common way to implement the APIService is to run an extension API server in Pod(s) that run in your cluster. If you're using the extension API server to manage resources in your cluster, the extension API server (also written as "extension-apiserver") is typically paired with one or more controllers. The apiserver-builder library provides a skeleton for both extension API servers and the associated controller(s).
Response latency
Extension API servers should have low latency networking to and from the kube-apiserver. Discovery requests are required to round-trip from the kube-apiserver in five seconds or less.
If your extension API server cannot achieve that latency requirement, consider making changes that let you meet it.
What's next
- To get the aggregator working in your environment, configure the aggregation layer.
- Then, setup an extension api-server to work with the aggregation layer.
- Read about APIService in the API reference
- Learn about Declarative Validation Concepts, an internal mechanism for defining validation rules that in the future will help support validation for extension API server development.
Alternatively: learn how to extend the Kubernetes API using Custom Resource Definitions.
13.3 - Operator pattern
Operators are software extensions to Kubernetes that make use of custom resources to manage applications and their components. Operators follow Kubernetes principles, notably the control loop.
Motivation
The operator pattern aims to capture the key aim of a human operator who is managing a service or set of services. Human operators who look after specific applications and services have deep knowledge of how the system ought to behave, how to deploy it, and how to react if there are problems.
People who run workloads on Kubernetes often like to use automation to take care of repeatable tasks. The operator pattern captures how you can write code to automate a task beyond what Kubernetes itself provides.
Operators in Kubernetes
Kubernetes is designed for automation. Out of the box, you get lots of built-in automation from the core of Kubernetes. You can use Kubernetes to automate deploying and running workloads, and you can automate how Kubernetes does that.
Kubernetes' operator pattern concept lets you extend the cluster's behaviour without modifying the code of Kubernetes itself by linking controllers to one or more custom resources. Operators are clients of the Kubernetes API that act as controllers for a Custom Resource.
An example operator
Some of the things that you can use an operator to automate include:
- deploying an application on demand
- taking and restoring backups of that application's state
- handling upgrades of the application code alongside related changes such as database schemas or extra configuration settings
- publishing a Service to applications that don't support Kubernetes APIs to discover them
- simulating failure in all or part of your cluster to test its resilience
- choosing a leader for a distributed application without an internal member election process
What might an operator look like in more detail? Here's an example:
- A custom resource named SampleDB, that you can configure into the cluster.
- A Deployment that makes sure a Pod is running that contains the controller part of the operator.
- A container image of the operator code.
- Controller code that queries the control plane to find out what SampleDB resources are configured.
- The core of the operator is code to tell the API server how to make
reality match the configured resources.
- If you add a new SampleDB, the operator sets up PersistentVolumeClaims to provide durable database storage, a StatefulSet to run SampleDB and a Job to handle initial configuration.
- If you delete it, the operator takes a snapshot, then makes sure that the StatefulSet and Volumes are also removed.
- The operator also manages regular database backups. For each SampleDB resource, the operator determines when to create a Pod that can connect to the database and take backups. These Pods would rely on a ConfigMap and / or a Secret that has database connection details and credentials.
- Because the operator aims to provide robust automation for the resource it manages, there would be additional supporting code. For this example, code checks to see if the database is running an old version and, if so, creates Job objects that upgrade it for you.
Deploying operators
The most common way to deploy an operator is to add the Custom Resource Definition and its associated Controller to your cluster. The Controller will normally run outside of the control plane, much as you would run any containerized application. For example, you can run the controller in your cluster as a Deployment.
Using an operator
Once you have an operator deployed, you'd use it by adding, modifying or deleting the kind of resource that the operator uses. Following the above example, you would set up a Deployment for the operator itself, and then:
kubectl get SampleDB # find configured databases
kubectl edit SampleDB/example-database # manually change some settings
…and that's it! The operator will take care of applying the changes as well as keeping the existing service in good shape.
Writing your own operator
If there isn't an operator in the ecosystem that implements the behavior you want, you can code your own.
You also implement an operator (that is, a Controller) using any language / runtime that can act as a client for the Kubernetes API.
Following are a few libraries and tools you can use to write your own cloud native operator.
Note: This section links to third party projects that provide functionality required by Kubernetes. The Kubernetes project authors aren't responsible for these projects, which are listed alphabetically. To add a project to this list, read the content guide before submitting a change. More information.
- Charmed Operator Framework
- Java Operator SDK
- Kopf (Kubernetes Operator Pythonic Framework)
- kube-rs (Rust)
- kubebuilder
- KubeOps (.NET operator SDK)
- Mast
- Metacontroller along with WebHooks that you implement yourself
- Operator Framework
- shell-operator
What's next
- Read the CNCF Operator White Paper.
- Learn more about Custom Resources
- Find ready-made operators on OperatorHub.io to suit your use case
- Publish your operator for other people to use
- Read CoreOS' original article that introduced the operator pattern (this is an archived version of the original article).
- Read an article from Google Cloud about best practices for building operators