In Kubernetes, scheduling refers to making sure that Pods
are matched to Nodes so that the
kubelet can run them. Preemption
is the process of terminating Pods with lower Priority
so that Pods with higher Priority can schedule on Nodes. Eviction is the process
of terminating one or more Pods on Nodes.
Pod disruption is the process by which
Pods on Nodes are terminated either voluntarily or involuntarily.
Voluntary disruptions are started intentionally by application owners or cluster
administrators. Involuntary disruptions are unintentional and can be triggered by
unavoidable issues like Nodes running out of resources,
or by accidental deletions.
In Kubernetes, scheduling refers to making sure that Pods
are matched to Nodes so that
Kubelet can run them.
Scheduling overview
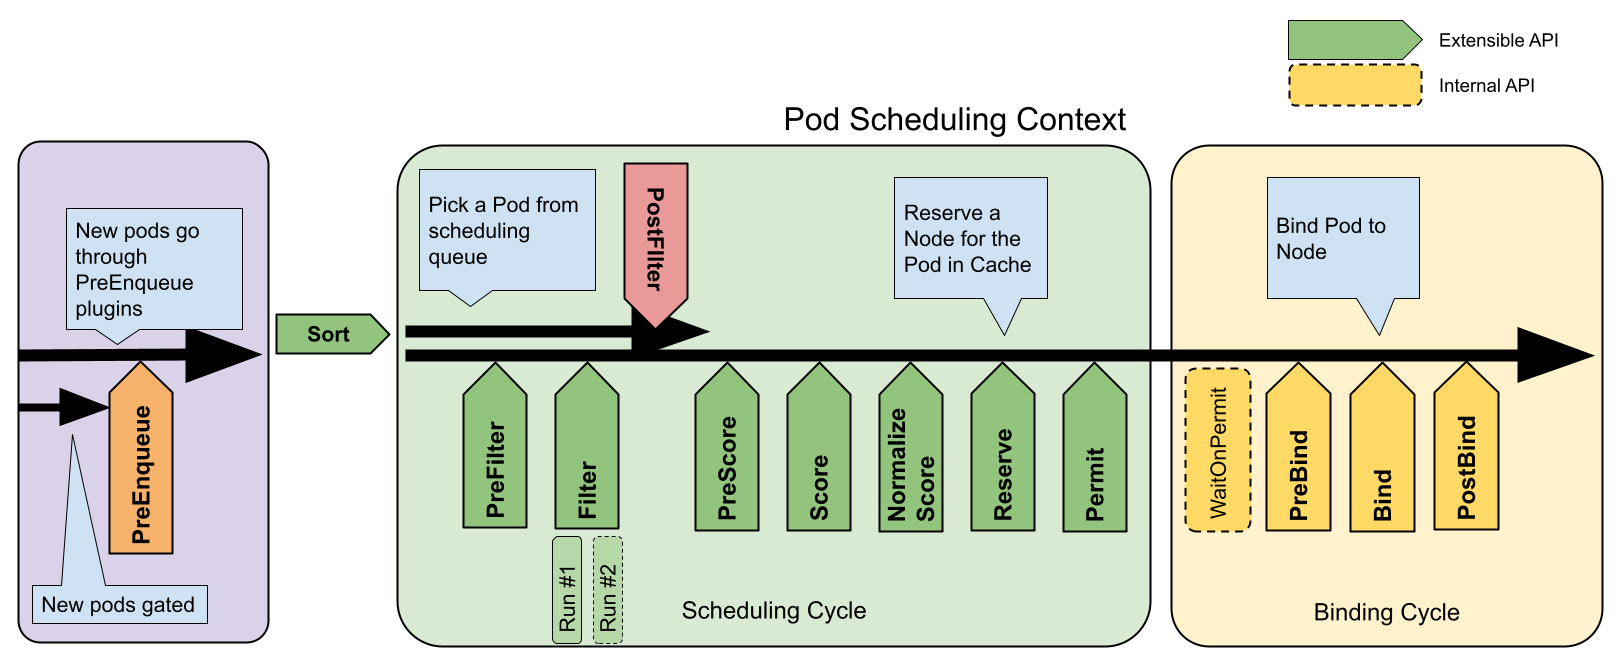
A scheduler watches for newly created Pods that have no Node assigned. For
every Pod that the scheduler discovers, the scheduler becomes responsible
for finding the best Node for that Pod to run on. The scheduler reaches
this placement decision taking into account the scheduling principles
described below.
If you want to understand why Pods are placed onto a particular Node,
or if you're planning to implement a custom scheduler yourself, this
page will help you learn about scheduling.
kube-scheduler
kube-scheduler
is the default scheduler for Kubernetes and runs as part of the
control plane.
kube-scheduler is designed so that, if you want and need to, you can
write your own scheduling component and use that instead.
Kube-scheduler selects an optimal node to run newly created or not yet
scheduled (unscheduled) pods. Since containers in pods - and pods themselves -
can have different requirements, the scheduler filters out any nodes that
don't meet a Pod's specific scheduling needs. Alternatively, the API lets
you specify a node for a Pod when you create it, but this is unusual
and is only done in special cases.
In a cluster, Nodes that meet the scheduling requirements for a Pod
are called feasible nodes. If none of the nodes are suitable, the pod
remains unscheduled until the scheduler is able to place it.
The scheduler finds feasible Nodes for a Pod and then runs a set of
functions to score the feasible Nodes and picks a Node with the highest
score among the feasible ones to run the Pod. The scheduler then notifies
the API server about this decision in a process called binding.
Factors that need to be taken into account for scheduling decisions include
individual and collective resource requirements, hardware / software /
policy constraints, affinity and anti-affinity specifications, data
locality, inter-workload interference, and so on.
Node selection in kube-scheduler
kube-scheduler selects a node for the pod in a 2-step operation:
Filtering
Scoring
The filtering step finds the set of Nodes where it's feasible to
schedule the Pod. For example, the PodFitsResources filter checks whether a
candidate Node has enough available resources to meet a Pod's specific
resource requests. After this step, the node list contains any suitable
Nodes; often, there will be more than one. If the list is empty, that
Pod isn't (yet) schedulable.
In the scoring step, the scheduler ranks the remaining nodes to choose
the most suitable Pod placement. The scheduler assigns a score to each Node
that survived filtering, basing this score on the active scoring rules.
Finally, kube-scheduler assigns the Pod to the Node with the highest ranking.
If there is more than one node with equal scores, kube-scheduler selects
one of these at random.
There are two supported ways to configure the filtering and scoring behavior
of the scheduler:
Scheduling Policies allow you to configure Predicates for filtering and Priorities for scoring.
Scheduling Profiles allow you to configure Plugins that implement different scheduling stages, including: QueueSort, Filter, Score, Bind, Reserve, Permit, and others. You can also configure the kube-scheduler to run different profiles.
FEATURE STATE:Kubernetes v1.36 [alpha](disabled by default)
Topology-Aware Scheduling (TAS) is a placement scheduling algorithm
that allows to find the optimal placement for the considered PodGroup, guaranteeing that all pods
will be collocated within the same topology domain. Users can accomodate TAS to their specific
needs by changing TAS plugins configuration.
Scheduling framework: TAS plugins configuration
The scheduler includes new and extended in-tree plugins that implement the TAS extension points:
TopologyPlacement: Implements the PlacementGeneratePlugin interface. It generates candidate
placements by grouping nodes based on the distinct values of the requested topology key (defined
in the PodGroup).
NodeResourcesFit: Extended to implement the PlacementScorePlugin interface. Following
similar logic to standard pod bin-packing, it scores placements based on the allocation ratio
across all nodes within the placement. It uses the MostAllocated strategy to maximize resource
utilization within a placement, and it inherits resource weights from the standard pod-by-pod
plugin settings.
PodGroupPodsCount: Implements the PlacementScorePlugin interface. It scores candidate
placements based on the total number of pods in the PodGroup that you can successfully schedule.
Customizing plugin weights and bin-packing resource weights
By default, the NodeResourcesFit and PodGroupPodsCount plugins are configured with equal
weights (both default to 1) to maintain a good balance between bin-packing logic and scheduling as
many pods as possible.
You can adjust these weights, or the resource weights in the bin-packing strategy in your
KubeSchedulerConfiguration. Here is an example snippet showing how to change the weights for both
plugins, and how to override the NodeResourcesFit resource weights. The latter change will apply
both to pod-by-pod and placement scoring algorithms:
apiVersion:kubescheduler.config.k8s.io/v1kind:KubeSchedulerConfigurationprofiles:- schedulerName:default-schedulerplugins:placementScore:enabled:# 1) Change the default weights of the placement score plugins- name:NodeResourcesFitweight:2- name:PodGroupPodsCountweight:5pluginConfig:- name:NodeResourcesFitargs:# 2) Changing the scoring resource weights for both pod-by-pod and placement scoring# algorithmsscoringStrategy:# The type will only be considered in pod-by-pod scheduling. Placement scoring always# uses MostAllocated strategytype:LeastAllocated# Resource weights will be used in both pod-by-pod and placement scoring algorithmsresources:- name:cpuweight:2- name:memoryweight:3
You can constrain a Pod so that it is
restricted to run on particular node(s),
or to prefer to run on particular nodes.
There are several ways to do this and the recommended approaches all use
label selectors to facilitate the selection.
Often, you do not need to set any such constraints; the
scheduler will automatically do a reasonable placement
(for example, spreading your Pods across nodes so as not place Pods on a node with insufficient free resources).
However, there are some circumstances where you may want to control which node
the Pod deploys to, for example, to ensure that a Pod ends up on a node with an SSD attached to it,
or to co-locate Pods from two different services that communicate a lot into the same availability zone.
You can use any of the following methods to choose where Kubernetes schedules
specific Pods:
The value of these labels is cloud provider specific and is not guaranteed to be reliable.
For example, the value of kubernetes.io/hostname may be the same as the node name in some environments
and a different value in other environments.
Node isolation/restriction
Adding labels to nodes allows you to target Pods for scheduling on specific
nodes or groups of nodes. You can use this functionality to ensure that specific
Pods only run on nodes with certain isolation, security, or regulatory
properties.
If you use labels for node isolation, choose label keys that the kubelet
cannot modify. This prevents a compromised node from setting those labels on
itself so that the scheduler schedules workloads onto the compromised node.
The NodeRestriction admission plugin
prevents the kubelet from setting or modifying labels with a
node-restriction.kubernetes.io/ prefix.
To make use of that label prefix for node isolation:
Ensure you are using the Node authorizer and have enabled the NodeRestriction admission plugin.
Add labels with the node-restriction.kubernetes.io/ prefix to your nodes, and use those labels in your node selectors.
For example, example.com.node-restriction.kubernetes.io/fips=true or example.com.node-restriction.kubernetes.io/pci-dss=true.
nodeSelector
nodeSelector is the simplest recommended form of node selection constraint.
You can add the nodeSelector field to your Pod specification and specify the
node labels you want the target node to have.
Kubernetes only schedules the Pod onto nodes that have each of the labels you
specify.
nodeSelector is the simplest way to constrain Pods to nodes with specific
labels. Affinity and anti-affinity expand the types of constraints you can
define. Some of the benefits of affinity and anti-affinity include:
The affinity/anti-affinity language is more expressive. nodeSelector only
selects nodes with all the specified labels. Affinity/anti-affinity gives you
more control over the selection logic.
You can indicate that a rule is soft or preferred, so that the scheduler
still schedules the Pod even if it can't find a matching node.
You can constrain a Pod using labels on other Pods running on the node (or other topological domain),
instead of just node labels, which allows you to define rules for which Pods
can be co-located on a node.
The affinity feature consists of two types of affinity:
Node affinity functions like the nodeSelector field but is more expressive and
allows you to specify soft rules.
Inter-pod affinity/anti-affinity allows you to constrain Pods against labels
on other Pods.
Node affinity
Node affinity is conceptually similar to nodeSelector, allowing you to constrain which nodes your
Pod can be scheduled on based on node labels. There are two types of node
affinity:
requiredDuringSchedulingIgnoredDuringExecution: The scheduler can't
schedule the Pod unless the rule is met. This functions like nodeSelector,
but with a more expressive syntax.
preferredDuringSchedulingIgnoredDuringExecution: The scheduler tries to
find a node that meets the rule. If a matching node is not available, the
scheduler still schedules the Pod.
Note:
In the preceding types, IgnoredDuringExecution means that if the node labels
change after Kubernetes schedules the Pod, the Pod continues to run.
You can specify node affinities using the .spec.affinity.nodeAffinity field in
your Pod spec.
The node must have a label with the key topology.kubernetes.io/zone and
the value of that label must be either antarctica-east1 or antarctica-west1.
The node preferably has a label with the key another-node-label-key and
the value another-node-label-value.
You can use the operator field to specify a logical operator for Kubernetes to use when
interpreting the rules. You can use In, NotIn, Exists, DoesNotExist,
Gt and Lt.
Read Operators
to learn more about how these work.
NotIn and DoesNotExist allow you to define node anti-affinity behavior.
Alternatively, you can use node taints
to repel Pods from specific nodes.
Note:
If you specify both nodeSelector and nodeAffinity, both must be satisfied
for the Pod to be scheduled onto a node.
If you specify multiple terms in nodeSelectorTerms associated with nodeAffinity
types, then the Pod can be scheduled onto a node if one of the specified terms
can be satisfied (terms are ORed).
If you specify multiple expressions in a single matchExpressions field associated with a
term in nodeSelectorTerms, then the Pod can be scheduled onto a node only
if all the expressions are satisfied (expressions are ANDed).
You can specify a weight between 1 and 100 for each instance of the
preferredDuringSchedulingIgnoredDuringExecution affinity type. When the
scheduler finds nodes that meet all the other scheduling requirements of the Pod, the
scheduler iterates through every preferred rule that the node satisfies and adds the
value of the weight for that expression to a sum.
The final sum is added to the score of other priority functions for the node.
Nodes with the highest total score are prioritized when the scheduler makes a
scheduling decision for the Pod.
If there are two possible nodes that match the
preferredDuringSchedulingIgnoredDuringExecution rule, one with the
label-1:key-1 label and another with the label-2:key-2 label, the scheduler
considers the weight of each node and adds the weight to the other scores for
that node, and schedules the Pod onto the node with the highest final score.
Note:
If you want Kubernetes to successfully schedule the Pods in this example, you
must have existing nodes with the kubernetes.io/os=linux label.
Node affinity per scheduling profile
FEATURE STATE:Kubernetes v1.20 [beta]
When configuring multiple scheduling profiles, you can associate
a profile with a node affinity, which is useful if a profile only applies to a specific set of nodes.
To do so, add an addedAffinity to the args field of the NodeAffinity plugin
in the scheduler configuration. For example:
The addedAffinity is applied to all Pods that set .spec.schedulerName to foo-scheduler, in addition to the
NodeAffinity specified in the PodSpec.
That is, in order to match the Pod, nodes need to satisfy addedAffinity and
the Pod's .spec.NodeAffinity.
Since the addedAffinity is not visible to end users, its behavior might be
unexpected to them. Use node labels that have a clear correlation to the
scheduler profile name.
Note:
The DaemonSet controller, which creates Pods for DaemonSets,
does not support scheduling profiles. When the DaemonSet controller creates
Pods, the default Kubernetes scheduler places those Pods and honors any
nodeAffinity rules in the DaemonSet controller.
Inter-pod affinity and anti-affinity
Inter-pod affinity and anti-affinity allow you to constrain which nodes your
Pods can be scheduled on based on the labels of Pods already running on that
node, instead of the node labels.
Types of Inter-pod Affinity and Anti-affinity
Inter-pod affinity and anti-affinity take the form "this
Pod should (or, in the case of anti-affinity, should not) run in an X if that X
is already running one or more Pods that meet rule Y", where X is a topology
domain like node, rack, cloud provider zone or region, or similar and Y is the
rule Kubernetes tries to satisfy.
You express these rules (Y) as label selectors
with an optional associated list of namespaces. Pods are namespaced objects in
Kubernetes, so Pod labels also implicitly have namespaces. Any label selectors
for Pod labels should specify the namespaces in which Kubernetes should look for those
labels.
You express the topology domain (X) using a topologyKey, which is the key for
the node label that the system uses to denote the domain. For examples, see
Well-Known Labels, Annotations and Taints.
Note:
Inter-pod affinity and anti-affinity require substantial amounts of
processing which can slow down scheduling in large clusters significantly. We do
not recommend using them in clusters larger than several hundred nodes.
Note:
Pod anti-affinity requires nodes to be consistently labeled, in other words,
every node in the cluster must have an appropriate label matching topologyKey.
If some or all nodes are missing the specified topologyKey label, it can lead
to unintended behavior.
Similar to node affinity are two types of Pod affinity and
anti-affinity as follows:
requiredDuringSchedulingIgnoredDuringExecution
preferredDuringSchedulingIgnoredDuringExecution
For example, you could use
requiredDuringSchedulingIgnoredDuringExecution affinity to tell the scheduler to
co-locate Pods of two services in the same cloud provider zone because they
communicate with each other a lot. Similarly, you could use
preferredDuringSchedulingIgnoredDuringExecution anti-affinity to spread Pods
from a service across multiple cloud provider zones.
To use inter-pod affinity, use the affinity.podAffinity field in the Pod spec.
For inter-pod anti-affinity, use the affinity.podAntiAffinity field in the Pod
spec.
Scheduling Behavior
When scheduling a new Pod, the Kubernetes scheduler evaluates the Pod's affinity/anti-affinity rules in the context of the current cluster state:
Hard Constraints (Node Filtering):
podAffinity.requiredDuringSchedulingIgnoredDuringExecution and podAntiAffinity.requiredDuringSchedulingIgnoredDuringExecution:
The scheduler ensures the new Pod is assigned to nodes that satisfy these required affinity and anti-affinity rules based on existing Pods.
Soft Constraints (Scoring):
podAffinity.preferredDuringSchedulingIgnoredDuringExecution and podAntiAffinity.preferredDuringSchedulingIgnoredDuringExecution:
The scheduler scores nodes based on how well they meet these preferred affinity and anti-affinity rules to optimize Pod placement.
Similarly, preferred anti-affinity rules of existing Pods are ignored during scheduling.
Scheduling a Group of Pods with Inter-pod Affinity to Themselves
If the current Pod being scheduled is the first in a series that have affinity to themselves,
it is allowed to be scheduled if it passes all other affinity checks. This is determined by
verifying that no other Pod in the cluster matches the namespace and selector of this Pod,
that the Pod matches its own terms, and the chosen node matches all requested topologies.
This ensures that there will not be a deadlock even if all the Pods have inter-pod affinity
specified.
This example defines one Pod affinity rule and one Pod anti-affinity rule. The
Pod affinity rule uses the "hard"
requiredDuringSchedulingIgnoredDuringExecution, while the anti-affinity rule
uses the "soft" preferredDuringSchedulingIgnoredDuringExecution.
The affinity rule specifies that the scheduler is allowed to place the example Pod
on a node only if that node belongs to a specific zone
where other Pods have been labeled with security=S1.
For instance, if we have a cluster with a designated zone, let's call it "Zone V,"
consisting of nodes labeled with topology.kubernetes.io/zone=V, the scheduler can
assign the Pod to any node within Zone V, as long as there is at least one Pod within
Zone V already labeled with security=S1. Conversely, if there are no Pods with security=S1
labels in Zone V, the scheduler will not assign the example Pod to any node in that zone.
The anti-affinity rule specifies that the scheduler should try to avoid scheduling the Pod
on a node if that node belongs to a specific zone
where other Pods have been labeled with security=S2.
For instance, if we have a cluster with a designated zone, let's call it "Zone R,"
consisting of nodes labeled with topology.kubernetes.io/zone=R, the scheduler should avoid
assigning the Pod to any node within Zone R, as long as there is at least one Pod within
Zone R already labeled with security=S2. Conversely, the anti-affinity rule does not impact
scheduling into Zone R if there are no Pods with security=S2 labels.
To get yourself more familiar with the examples of Pod affinity and anti-affinity,
refer to the design proposal.
You can use the In, NotIn, Exists and DoesNotExist values in the
operator field for Pod affinity and anti-affinity.
Read Operators
to learn more about how these work.
In principle, the topologyKey can be any allowed label key with the following
exceptions for performance and security reasons:
For Pod affinity and anti-affinity, an empty topologyKey field is not allowed in both
requiredDuringSchedulingIgnoredDuringExecution
and preferredDuringSchedulingIgnoredDuringExecution.
For requiredDuringSchedulingIgnoredDuringExecution Pod anti-affinity rules,
the admission controller LimitPodHardAntiAffinityTopology limits
topologyKey to kubernetes.io/hostname. You can modify or disable the
admission controller if you want to allow custom topologies.
In addition to labelSelector and topologyKey, you can optionally specify a list
of namespaces which the labelSelector should match against using the
namespaces field at the same level as labelSelector and topologyKey.
If omitted or empty, namespaces defaults to the namespace of the Pod where the
affinity/anti-affinity definition appears.
Namespace Selector
FEATURE STATE:Kubernetes v1.24 [stable]
You can also select matching namespaces using namespaceSelector, which is a label query over the set of namespaces.
The affinity term is applied to namespaces selected by both namespaceSelector and the namespaces field.
Note that an empty namespaceSelector ({}) matches all namespaces, while a null or empty namespaces list and
null namespaceSelector matches the namespace of the Pod where the rule is defined.
matchLabelKeys
FEATURE STATE:Kubernetes v1.33 [stable](enabled by default)
Note:
The matchLabelKeys field is a beta-level field and is enabled by default in
Kubernetes 1.36.
When you want to disable it, you have to disable it explicitly via the
MatchLabelKeysInPodAffinityfeature gate.
Kubernetes includes an optional matchLabelKeys field for Pod affinity
or anti-affinity. The field specifies keys for the labels that should match with the incoming Pod's labels,
when satisfying the Pod (anti)affinity.
The keys are used to look up values from the Pod labels; those key-value labels are combined
(using AND) with the match restrictions defined using the labelSelector field. The combined
filtering selects the set of existing Pods that will be taken into Pod (anti)affinity calculation.
Caution:
It's not recommended to use matchLabelKeys with labels that might be updated directly on pods.
Even if you edit the pod's label that is specified at matchLabelKeysdirectly, (that is, not via a deployment),
kube-apiserver doesn't reflect the label update onto the merged labelSelector.
A common use case is to use matchLabelKeys with pod-template-hash (set on Pods
managed as part of a Deployment, where the value is unique for each revision).
Using pod-template-hash in matchLabelKeys allows you to target the Pods that belong
to the same revision as the incoming Pod, so that a rolling upgrade won't break affinity.
apiVersion:apps/v1kind:Deploymentmetadata:name:application-server...spec:template:spec:affinity:podAffinity:requiredDuringSchedulingIgnoredDuringExecution:- labelSelector:matchExpressions:- key:appoperator:Invalues:- databasetopologyKey:topology.kubernetes.io/zone# Only Pods from a given rollout are taken into consideration when calculating pod affinity.# If you update the Deployment, the replacement Pods follow their own affinity rules# (if there are any defined in the new Pod template)matchLabelKeys:- pod-template-hash
mismatchLabelKeys
FEATURE STATE:Kubernetes v1.33 [stable](enabled by default)
Note:
The mismatchLabelKeys field is a beta-level field and is enabled by default in
Kubernetes 1.36.
When you want to disable it, you have to disable it explicitly via the
MatchLabelKeysInPodAffinityfeature gate.
Kubernetes includes an optional mismatchLabelKeys field for Pod affinity
or anti-affinity. The field specifies keys for the labels that should not match with the incoming Pod's labels,
when satisfying the Pod (anti)affinity.
Caution:
It's not recommended to use mismatchLabelKeys with labels that might be updated directly on pods.
Even if you edit the pod's label that is specified at mismatchLabelKeysdirectly, (that is, not via a deployment),
kube-apiserver doesn't reflect the label update onto the merged labelSelector.
One example use case is to ensure Pods go to the topology domain (node, zone, etc) where only Pods from the same tenant or team are scheduled in.
In other words, you want to avoid running Pods from two different tenants on the same topology domain at the same time.
apiVersion:v1kind:Podmetadata:labels:# Assume that all relevant Pods have a "tenant" label settenant:tenant-a...spec:affinity:podAffinity:requiredDuringSchedulingIgnoredDuringExecution:# ensure that Pods associated with this tenant land on the correct node pool- matchLabelKeys:- tenantlabelSelector:{}topologyKey:node-poolpodAntiAffinity:requiredDuringSchedulingIgnoredDuringExecution:# ensure that Pods associated with this tenant can't schedule to nodes used for another tenant- mismatchLabelKeys:- tenant# whatever the value of the "tenant" label for this Pod, prevent# scheduling to nodes in any pool where any Pod from a different# tenant is running.labelSelector:# We have to have the labelSelector which selects only Pods with the tenant label,# otherwise this Pod would have anti-affinity against Pods from daemonsets as well, for example,# which aren't supposed to have the tenant label.matchExpressions:- key:tenantoperator:ExiststopologyKey:node-pool
More practical use-cases
Inter-pod affinity and anti-affinity can be even more useful when they are used with higher
level collections such as ReplicaSets, StatefulSets, Deployments, etc. These
rules allow you to configure that a set of workloads should
be co-located in the same defined topology; for example, preferring to place two related
Pods onto the same node.
For example: imagine a three-node cluster. You use the cluster to run a web application
and also an in-memory cache (such as Redis). For this example, also assume that latency between
the web application and the memory cache should be as low as is practical. You could use inter-pod
affinity and anti-affinity to co-locate the web servers with the cache as much as possible.
In the following example Deployment for the Redis cache, the replicas get the label app=store. The
podAntiAffinity rule tells the scheduler to avoid placing multiple replicas
with the app=store label on a single node. This creates each cache in a
separate node.
The following example Deployment for the web servers creates replicas with the label app=web-store.
The Pod affinity rule tells the scheduler to place each replica on a node that has a Pod
with the label app=store. The Pod anti-affinity rule tells the scheduler never to place
multiple app=web-store servers on a single node.
Creating the two preceding Deployments results in the following cluster layout,
where each web server is co-located with a cache, on three separate nodes.
node-1
node-2
node-3
webserver-1
webserver-2
webserver-3
cache-1
cache-2
cache-3
The overall effect is that each cache instance is likely to be accessed by a single client that
is running on the same node. This approach aims to minimize both skew (imbalanced load) and latency.
You might have other reasons to use Pod anti-affinity.
See the ZooKeeper tutorial
for an example of a StatefulSet configured with anti-affinity for high
availability, using the same technique as this example.
nodeName
nodeName is a more direct form of node selection than affinity or
nodeSelector. nodeName is a field in the Pod spec. If the nodeName field
is not empty, the scheduler ignores the Pod and the kubelet on the named node
tries to place the Pod on that node. Using nodeName overrules using
nodeSelector or affinity and anti-affinity rules.
Some of the limitations of using nodeName to select nodes are:
If the named node does not exist, the Pod will not run, and in
some cases may be automatically deleted.
If the named node does not have the resources to accommodate the
Pod, the Pod will fail and its reason will indicate why,
for example OutOfmemory or OutOfcpu.
Node names in cloud environments are not always predictable or stable.
Warning:
nodeName is intended for use by custom schedulers or advanced use cases where
you need to bypass any configured schedulers. Bypassing the schedulers might lead to
failed Pods if the assigned Nodes get oversubscribed. You can use node affinity
or the nodeSelector field to assign a Pod to a specific Node without bypassing the schedulers.
Here is an example of a Pod spec using the nodeName field:
FEATURE STATE:Kubernetes v1.35 [beta](enabled by default)
nominatedNodeName can be used for external components to nominate node for a pending pod.
This nomination is best effort: it might be ignored if the scheduler determines the pod cannot go to a nominated node.
Also, this field can be (over)written by the scheduler:
If the scheduler finds a node to nominate via the preemption.
If the scheduler decides where the pod is going, and move it to the binding cycle.
Note that, in this case, nominatedNodeName is put only when the pod has to go through WaitOnPermit or PreBind extension points.
Here is an example of a Pod status using the nominatedNodeName field:
You can use topology spread constraints to control how Pods
are spread across your cluster among failure-domains such as regions, zones, nodes, or among any other
topology domains that you define. You might do this to improve performance, expected availability, or
overall utilization.
FEATURE STATE:Kubernetes v1.35 [beta](enabled by default)
Pods inherit the topology labels (topology.kubernetes.io/zone and topology.kubernetes.io/region) from their assigned Node if those labels are present. These labels can then be utilized via the Downward API to provide the workload with node topology awareness.
Here is an example of a Pod using downward API for it's zone and region:
The following are all the logical operators that you can use in the operator field for nodeAffinity and podAffinity mentioned above.
Operator
Behavior
In
The label value is present in the supplied set of strings
NotIn
The label value is not contained in the supplied set of strings
Exists
A label with this key exists on the object
DoesNotExist
No label with this key exists on the object
The following operators can only be used with nodeAffinity.
Operator
Behavior
Gt
The field value will be parsed as an integer, and the integer that results from parsing the value of a label named by this selector is greater than this integer
Lt
The field value will be parsed as an integer, and the integer that results from parsing the value of a label named by this selector is less than this integer
Note:
Gt and Lt operators will not work with non-integer values. If the given value
doesn't parse as an integer, the Pod will fail to get scheduled. Also, Gt and Lt
are not available for podAffinity.
When you run a Pod on a Node, the Pod itself takes an amount of system resources. These
resources are additional to the resources needed to run the container(s) inside the Pod.
In Kubernetes, Pod Overhead is a way to account for the resources consumed by the Pod
infrastructure on top of the container requests & limits.
In Kubernetes, the Pod's overhead is set at
admission
time according to the overhead associated with the Pod's
RuntimeClass.
A pod's overhead is considered in addition to the sum of container resource requests when
scheduling a Pod. Similarly, the kubelet will include the Pod overhead when sizing the Pod cgroup,
and when carrying out Pod eviction ranking.
Configuring Pod overhead
You need to make sure a RuntimeClass is utilized which defines the overhead field.
Usage example
To work with Pod overhead, you need a RuntimeClass that defines the overhead field. As
an example, you could use the following RuntimeClass definition with a virtualization container
runtime (in this example, Kata Containers combined with the Firecracker virtual machine monitor)
that uses around 120MiB per Pod for the virtual machine and the guest OS:
# You need to change this example to match the actual runtime name, and per-Pod# resource overhead, that the container runtime is adding in your cluster.apiVersion:node.k8s.io/v1kind:RuntimeClassmetadata:name:kata-fchandler:kata-fcoverhead:podFixed:memory:"120Mi"cpu:"250m"
Workloads which are created which specify the kata-fc RuntimeClass handler will take the memory and
cpu overheads into account for resource quota calculations, node scheduling, as well as Pod cgroup sizing.
Consider running the given example workload, test-pod:
If only limits are specified in the pod definition, kubelet will deduce requests from those limits and set them to be the same as the defined limits.
At admission time the RuntimeClass admission controller
updates the workload's PodSpec to include the overhead as described in the RuntimeClass. If the PodSpec already has this field defined,
the Pod will be rejected. In the given example, since only the RuntimeClass name is specified, the admission controller mutates the Pod
to include an overhead.
After the RuntimeClass admission controller has made modifications, you can check the updated
Pod overhead value:
kubectl get pod test-pod -o jsonpath='{.spec.overhead}'
The output is:
map[cpu:250m memory:120Mi]
If a ResourceQuota is defined, the sum of container requests as well as the
overhead field are counted.
When the kube-scheduler is deciding which node should run a new Pod, the scheduler considers that Pod's
overhead as well as the sum of container requests for that Pod. For this example, the scheduler adds the
requests and the overhead, then looks for a node that has 2.25 CPU and 320 MiB of memory available.
Once a Pod is scheduled to a node, the kubelet on that node creates a new cgroup for the Pod. It is within this pod that the underlying
container runtime will create containers.
If the resource has a limit defined for each container (Guaranteed QoS or Burstable QoS with limits defined),
the kubelet will set an upper limit for the pod cgroup associated with that resource (cpu.cfs_quota_us for CPU
and memory.limit_in_bytes memory). This upper limit is based on the sum of the container limits plus the overhead
defined in the PodSpec.
For CPU, if the Pod is Guaranteed or Burstable QoS, the kubelet will set cpu.shares based on the
sum of container requests plus the overhead defined in the PodSpec.
Looking at our example, verify the container requests for the workload:
kubectl get pod test-pod -o jsonpath='{.spec.containers[*].resources.limits}'
The total container requests are 2000m CPU and 200MiB of memory:
The output shows requests for 2250m CPU, and for 320MiB of memory. The requests include Pod overhead:
  Namespace    Name       CPU Requests  CPU Limits   Memory Requests  Memory Limits  AGE
  ---------    ----       ------------  ----------   ---------------  -------------  ---
  default      test-pod   2250m (56%)   2250m (56%)  320Mi (1%)       320Mi (1%)     36m
Verify Pod cgroup limits
Check the Pod's memory cgroups on the node where the workload is running. In the following example,
crictl
is used on the node, which provides a CLI for CRI-compatible container runtimes. This is an
advanced example to show Pod overhead behavior, and it is not expected that users should need to check
cgroups directly on the node.
First, on the particular node, determine the Pod identifier:
# Run this on the node where the Pod is scheduledPOD_ID="$(sudo crictl pods --name test-pod -q)"
From this, you can determine the cgroup path for the Pod:
# Run this on the node where the Pod is scheduledsudo crictl inspectp -o=json $POD_ID| grep cgroupsPath
The resulting cgroup path includes the Pod's pause container. The Pod level cgroup is one directory above.
In this specific case, the pod cgroup path is kubepods/podd7f4b509-cf94-4951-9417-d1087c92a5b2.
Verify the Pod level cgroup setting for memory:
# Run this on the node where the Pod is scheduled.# Also, change the name of the cgroup to match the cgroup allocated for your pod. cat /sys/fs/cgroup/memory/kubepods/podd7f4b509-cf94-4951-9417-d1087c92a5b2/memory.limit_in_bytes
This is 320 MiB, as expected:
335544320
Observability
Some kube_pod_overhead_* metrics are available in kube-state-metrics
to help identify when Pod overhead is being utilized and to help observe stability of workloads
running with a defined overhead.
Pods were considered ready for scheduling once created. Kubernetes scheduler
does its due diligence to find nodes to place all pending Pods. However, in a
real-world case, some Pods may stay in a "miss-essential-resources" state for a long period.
These Pods actually churn the scheduler (and downstream integrators like Cluster AutoScaler)
in an unnecessary manner.
By specifying/removing a Pod's .spec.schedulingGates, you can control when a Pod is ready
to be considered for scheduling.
Configuring Pod schedulingGates
The schedulingGates field contains a list of strings, and each string literal is perceived as a
criteria that Pod should be satisfied before considered schedulable. This field can be initialized
only when a Pod is created (either by the client, or mutated during admission). After creation,
each schedulingGate can be removed in arbitrary order, but addition of a new scheduling gate is disallowed.
Figure. Pod SchedulingGates
Usage example
To mark a Pod not-ready for scheduling, you can create it with one or more scheduling gates like this:
You can check if the schedulingGates is cleared by running:
kubectl get pod test-pod -o jsonpath='{.spec.schedulingGates}'
The output is expected to be empty. And you can check its latest status by running:
kubectl get pod test-pod -o wide
Given the test-pod doesn't request any CPU/memory resources, it's expected that this Pod's state get
transited from previous SchedulingGated to Running:
NAME       READY   STATUS    RESTARTS   AGE   IP         NODE
test-pod   1/1     Running   0          15s   10.0.0.4   node-2
Observability
The metric scheduler_pending_pods comes with a new label "gated" to distinguish whether a Pod
has been tried scheduling but claimed as unschedulable, or explicitly marked as not ready for
scheduling. You can use scheduler_pending_pods{queue="gated"} to check the metric result.
Mutable Pod scheduling directives
You can mutate scheduling directives of Pods while they have scheduling gates, with certain constraints.
At a high level, you can only tighten the scheduling directives of a Pod. In other words, the updated
directives would cause the Pods to only be able to be scheduled on a subset of the nodes that it would
previously match. More concretely, the rules for updating a Pod's scheduling directives are as follows:
For .spec.nodeSelector, only additions are allowed. If absent, it will be allowed to be set.
For spec.affinity.nodeAffinity, if nil, then setting anything is allowed.
If NodeSelectorTerms was empty, it will be allowed to be set.
If not empty, then only additions of NodeSelectorRequirements to matchExpressions
or fieldExpressions are allowed, and no changes to existing matchExpressions
and fieldExpressions will be allowed. This is because the terms in
.requiredDuringSchedulingIgnoredDuringExecution.NodeSelectorTerms, are ORed
while the expressions in nodeSelectorTerms[].matchExpressions and
nodeSelectorTerms[].fieldExpressions are ANDed.
For .preferredDuringSchedulingIgnoredDuringExecution, all updates are allowed.
This is because preferred terms are not authoritative, and so policy controllers
don't validate those terms.
You can use topology spread constraints to control how
Pods are spread across your cluster
among failure-domains such as regions, zones, nodes, and other user-defined topology
domains. This can help to achieve high availability as well as efficient resource
utilization.
You can set cluster-level constraints as a default,
or configure topology spread constraints for individual workloads.
Motivation
Imagine that you have a cluster of up to twenty nodes, and you want to run a
workload
that automatically scales how many replicas it uses. There could be as few as
two Pods or as many as fifteen.
When there are only two Pods, you'd prefer not to have both of those Pods run on the
same node: you would run the risk that a single node failure takes your workload
offline.
In addition to this basic usage, there are some advanced usage examples that
enable your workloads to benefit on high availability and cluster utilization.
As you scale up and run more Pods, a different concern becomes important. Imagine
that you have three nodes running five Pods each. The nodes have enough capacity
to run that many replicas; however, the clients that interact with this workload
are split across three different datacenters (or infrastructure zones). Now you
have less concern about a single node failure, but you notice that latency is
higher than you'd like, and you are paying for network costs associated with
sending network traffic between the different zones.
You decide that under normal operation you'd prefer to have a similar number of replicas
scheduled into each infrastructure zone,
and you'd like the cluster to self-heal in the case that there is a problem.
Pod topology spread constraints offer you a declarative way to configure that.
topologySpreadConstraints field
The Pod API includes a field, spec.topologySpreadConstraints. The usage of this field looks like
the following:
---apiVersion:v1kind:Podmetadata:name:example-podspec:# Configure a topology spread constrainttopologySpreadConstraints:- maxSkew:<integer>minDomains:<integer># optionaltopologyKey:<string>whenUnsatisfiable:<string>labelSelector:<object>matchLabelKeys:<list># optional; beta since v1.27nodeAffinityPolicy:[Honor|Ignore]# optional; beta since v1.26nodeTaintsPolicy:[Honor|Ignore]# optional; beta since v1.26### other Pod fields go here
Note:
There can only be one topologySpreadConstraint for a given topologyKey and whenUnsatisfiable value. For example, if you have defined a topologySpreadConstraint that uses the topologyKey "kubernetes.io/hostname" and whenUnsatisfiable value "DoNotSchedule", you can only add another topologySpreadConstraint for the topologyKey "kubernetes.io/hostname" if you use a different whenUnsatisfiable value.
You can read more about this field by running kubectl explain Pod.spec.topologySpreadConstraints or
refer to the scheduling section of the API reference for Pod.
Spread constraint definition
You can define one or multiple topologySpreadConstraints entries to instruct the
kube-scheduler how to place each incoming Pod in relation to the existing Pods across
your cluster. Those fields are:
maxSkew describes the degree to which Pods may be unevenly distributed. You must
specify this field and the number must be greater than zero. Its semantics differ
according to the value of whenUnsatisfiable:
if you select whenUnsatisfiable: DoNotSchedule, then maxSkew defines the
maximum permitted difference between the number of matching pods in the target
topology and the global minimum
(the minimum number of matching pods in an eligible domain or zero if the number of eligible domains is less than MinDomains).
For example, if you have 3 zones with 2, 2 and 1 matching pods respectively,
MaxSkew is set to 1 then the global minimum is 1.
if you select whenUnsatisfiable: ScheduleAnyway, the scheduler gives higher
precedence to topologies that would help reduce the skew.
minDomains indicates a minimum number of eligible domains. This field is optional.
A domain is a particular instance of a topology. An eligible domain is a domain whose
nodes match the node selector.
Note:
Before Kubernetes v1.30, the minDomains field was only available if the
MinDomainsInPodTopologySpreadfeature gate
was enabled (default since v1.28). In older Kubernetes clusters it might be explicitly
disabled or the field might not be available.
The value of minDomains must be greater than 0, when specified.
You can only specify minDomains in conjunction with whenUnsatisfiable: DoNotSchedule.
When the number of eligible domains with match topology keys is less than minDomains,
Pod topology spread treats global minimum as 0, and then the calculation of skew is performed.
The global minimum is the minimum number of matching Pods in an eligible domain,
or zero if the number of eligible domains is less than minDomains.
When the number of eligible domains with matching topology keys equals or is greater than
minDomains, this value has no effect on scheduling.
If you do not specify minDomains, the constraint behaves as if minDomains is 1.
topologyKey is the key of node labels. Nodes that have a label with this key
and identical values are considered to be in the same topology.
We call each instance of a topology (in other words, a <key, value> pair) a domain. The scheduler
will try to put a balanced number of pods into each domain.
Also, we define an eligible domain as a domain whose nodes meet the requirements of
nodeAffinityPolicy and nodeTaintsPolicy.
whenUnsatisfiable indicates how to deal with a Pod if it doesn't satisfy the spread constraint:
DoNotSchedule (default) tells the scheduler not to schedule it.
ScheduleAnyway tells the scheduler to still schedule it while prioritizing nodes that minimize the skew.
labelSelector is used to find matching Pods. Pods
that match this label selector are counted to determine the
number of Pods in their corresponding topology domain.
See Label Selectors
for more details.
matchLabelKeys is a list of pod label keys to select the group of pods over which
the spreading skew will be calculated. At a pod creation,
the kube-apiserver uses those keys to lookup values from the incoming pod labels,
and those key-value labels will be merged with any existing labelSelector.
The same key is forbidden to exist in both matchLabelKeys and labelSelector.
matchLabelKeys cannot be set when labelSelector isn't set.
Keys that don't exist in the pod labels will be ignored.
A null or empty list means only match against the labelSelector.
Caution:
It's not recommended to use matchLabelKeys with labels that might be updated directly on pods.
Even if you edit the pod's label that is specified at matchLabelKeysdirectly,
(that is, you edit the Pod and not a Deployment),
kube-apiserver doesn't reflect the label update onto the merged labelSelector.
With matchLabelKeys, you don't need to update the pod.spec between different revisions.
The controller/operator just needs to set different values to the same label key for different
revisions. For example, if you are configuring a Deployment, you can use the label keyed with
pod-template-hash, which
is added automatically by the Deployment controller, to distinguish between different revisions
in a single Deployment.
The matchLabelKeys field is a beta-level field and enabled by default in 1.27. You can disable it by disabling the
MatchLabelKeysInPodTopologySpreadfeature gate.
Before v1.34, matchLabelKeys was handled implicitly.
Since v1.34, key-value labels corresponding to matchLabelKeys are explicitly merged into labelSelector.
You can disable it and revert to the previous behavior by disabling the MatchLabelKeysInPodTopologySpreadSelectorMergefeature gate of kube-apiserver.
nodeAffinityPolicy indicates how we will treat Pod's nodeAffinity/nodeSelector
when calculating pod topology spread skew. Options are:
Honor: only nodes matching nodeAffinity/nodeSelector are included in the calculations.
Ignore: nodeAffinity/nodeSelector are ignored. All nodes are included in the calculations.
If this value is null, the behavior is equivalent to the Honor policy.
Note:
The nodeAffinityPolicy became beta in 1.26 and graduated to GA in 1.33.
It's enabled by default in beta, you can disable it by disabling the
NodeInclusionPolicyInPodTopologySpreadfeature gate.
nodeTaintsPolicy indicates how we will treat node taints when calculating
pod topology spread skew. Options are:
Honor: nodes without taints, along with tainted nodes for which the incoming pod
has a toleration, are included.
Ignore: node taints are ignored. All nodes are included.
If this value is null, the behavior is equivalent to the Ignore policy.
Note:
The nodeTaintsPolicy became beta in 1.26 and graduated to GA in 1.33.
It's enabled by default in beta, you can disable it by disabling the
NodeInclusionPolicyInPodTopologySpreadfeature gate.
When a Pod defines more than one topologySpreadConstraint, those constraints are
combined using a logical AND operation: the kube-scheduler looks for a node for the incoming Pod
that satisfies all the configured constraints.
Node labels
Topology spread constraints rely on node labels to identify the topology
domain(s) that each node is in.
For example, a node might have labels:
region:us-east-1zone:us-east-1a
Note:
For brevity, this example doesn't use the
well-known label keys
topology.kubernetes.io/zone and topology.kubernetes.io/region. However,
those registered label keys are nonetheless recommended rather than the private
(unqualified) label keys region and zone that are used here.
You can't make a reliable assumption about the meaning of a private label key
between different contexts.
Suppose you have a 4-node cluster with the following labels:
NAME    STATUS   ROLES    AGE     VERSION   LABELS
node1   Ready    <none>   4m26s   v1.16.0   node=node1,zone=zoneA
node2   Ready    <none>   3m58s   v1.16.0   node=node2,zone=zoneA
node3   Ready    <none>   3m17s   v1.16.0   node=node3,zone=zoneB
node4   Ready    <none>   2m43s   v1.16.0   node=node4,zone=zoneB
Then the cluster is logically viewed as below:
graph TB
    subgraph "zoneB"
        n3(Node3)
        n4(Node4)
    end
    subgraph "zoneA"
        n1(Node1)
        n2(Node2)
    end

    classDef plain fill:#ddd,stroke:#fff,stroke-width:4px,color:#000;
    classDef k8s fill:#326ce5,stroke:#fff,stroke-width:4px,color:#fff;
    classDef cluster fill:#fff,stroke:#bbb,stroke-width:2px,color:#326ce5;
    class n1,n2,n3,n4 k8s;
    class zoneA,zoneB cluster;
Consistency
You should set the same Pod topology spread constraints on all pods in a group.
Usually, if you are using a workload controller such as a Deployment, the pod template
takes care of this for you. If you mix different spread constraints then Kubernetes
follows the API definition of the field; however, the behavior is more likely to become
confusing and troubleshooting is less straightforward.
You need a mechanism to ensure that all the nodes in a topology domain (such as a
cloud provider region) are labeled consistently.
To avoid you needing to manually label nodes, most clusters automatically
populate well-known labels such as kubernetes.io/hostname. Check whether
your cluster supports this.
Topology spread constraint examples
Example: one topology spread constraint
Suppose you have a 4-node cluster where 3 Pods labeled foo: bar are located in
node1, node2 and node3 respectively:
graph BT
    subgraph "zoneB"
        p3(Pod) --> n3(Node3)
        n4(Node4)
    end
    subgraph "zoneA"
        p1(Pod) --> n1(Node1)
        p2(Pod) --> n2(Node2)
    end

    classDef plain fill:#ddd,stroke:#fff,stroke-width:4px,color:#000;
    classDef k8s fill:#326ce5,stroke:#fff,stroke-width:4px,color:#fff;
    classDef cluster fill:#fff,stroke:#bbb,stroke-width:2px,color:#326ce5;
    class n1,n2,n3,n4,p1,p2,p3 k8s;
    class zoneA,zoneB cluster;
If you want an incoming Pod to be evenly spread with existing Pods across zones, you
can use a manifest similar to:
From that manifest, topologyKey: zone implies the even distribution will only be applied
to nodes that are labeled zone: <any value> (nodes that don't have a zone label
are skipped). The field whenUnsatisfiable: DoNotSchedule tells the scheduler to let the
incoming Pod stay pending if the scheduler can't find a way to satisfy the constraint.
If the scheduler placed this incoming Pod into zone A, the distribution of Pods would
become [3, 1]. That means the actual skew is then 2 (calculated as 3 - 1), which
violates maxSkew: 1. To satisfy the constraints and context for this example, the
incoming Pod can only be placed onto a node in zone B:
graph BT
    subgraph "zoneB"
        p3(Pod) --> n3(Node3)
        p4(mypod) --> n4(Node4)
    end
    subgraph "zoneA"
        p1(Pod) --> n1(Node1)
        p2(Pod) --> n2(Node2)
    end

    classDef plain fill:#ddd,stroke:#fff,stroke-width:4px,color:#000;
    classDef k8s fill:#326ce5,stroke:#fff,stroke-width:4px,color:#fff;
    classDef cluster fill:#fff,stroke:#bbb,stroke-width:2px,color:#326ce5;
    class n1,n2,n3,n4,p1,p2,p3 k8s;
    class p4 plain;
    class zoneA,zoneB cluster;
OR
graph BT
    subgraph "zoneB"
        p3(Pod) --> n3(Node3)
        p4(mypod) --> n3
        n4(Node4)
    end
    subgraph "zoneA"
        p1(Pod) --> n1(Node1)
        p2(Pod) --> n2(Node2)
    end

    classDef plain fill:#ddd,stroke:#fff,stroke-width:4px,color:#000;
    classDef k8s fill:#326ce5,stroke:#fff,stroke-width:4px,color:#fff;
    classDef cluster fill:#fff,stroke:#bbb,stroke-width:2px,color:#326ce5;
    class n1,n2,n3,n4,p1,p2,p3 k8s;
    class p4 plain;
    class zoneA,zoneB cluster;
You can tweak the Pod spec to meet various kinds of requirements:
Change maxSkew to a bigger value - such as 2 - so that the incoming Pod can
be placed into zone A as well.
Change topologyKey to node so as to distribute the Pods evenly across nodes
instead of zones. In the above example, if maxSkew remains 1, the incoming
Pod can only be placed onto the node node4.
Change whenUnsatisfiable: DoNotSchedule to whenUnsatisfiable: ScheduleAnyway
to ensure the incoming Pod to be always schedulable (suppose other scheduling APIs
are satisfied). However, it's preferred to be placed into the topology domain which
has fewer matching Pods. (Be aware that this preference is jointly normalized
with other internal scheduling priorities such as resource usage ratio).
Example: multiple topology spread constraints
This builds upon the previous example. Suppose you have a 4-node cluster where 3
existing Pods labeled foo: bar are located on node1, node2 and node3 respectively:
graph BT
    subgraph "zoneB"
        p3(Pod) --> n3(Node3)
        n4(Node4)
    end
    subgraph "zoneA"
        p1(Pod) --> n1(Node1)
        p2(Pod) --> n2(Node2)
    end

    classDef plain fill:#ddd,stroke:#fff,stroke-width:4px,color:#000;
    classDef k8s fill:#326ce5,stroke:#fff,stroke-width:4px,color:#fff;
    classDef cluster fill:#fff,stroke:#bbb,stroke-width:2px,color:#326ce5;
    class n1,n2,n3,n4,p1,p2,p3 k8s;
    class p4 plain;
    class zoneA,zoneB cluster;
You can combine two topology spread constraints to control the spread of Pods both
by node and by zone:
In this case, to match the first constraint, the incoming Pod can only be placed onto
nodes in zone B; while in terms of the second constraint, the incoming Pod can only be
scheduled to the node node4. The scheduler only considers options that satisfy all
defined constraints, so the only valid placement is onto node node4.
Example: conflicting topology spread constraints
Multiple constraints can lead to conflicts. Suppose you have a 3-node cluster across 2 zones:
graph BT
    subgraph "zoneB"
        p4(Pod) --> n3(Node3)
        p5(Pod) --> n3
    end
    subgraph "zoneA"
        p1(Pod) --> n1(Node1)
        p2(Pod) --> n1
        p3(Pod) --> n2(Node2)
    end

    classDef plain fill:#ddd,stroke:#fff,stroke-width:4px,color:#000;
    classDef k8s fill:#326ce5,stroke:#fff,stroke-width:4px,color:#fff;
    classDef cluster fill:#fff,stroke:#bbb,stroke-width:2px,color:#326ce5;
    class n1,n2,n3,n4,p1,p2,p3,p4,p5 k8s;
    class zoneA,zoneB cluster;
If you were to apply
two-constraints.yaml
(the manifest from the previous example)
to this cluster, you would see that the Pod mypod stays in the Pending state.
This happens because: to satisfy the first constraint, the Pod mypod can only
be placed into zone B; while in terms of the second constraint, the Pod mypod
can only schedule to node node2. The intersection of the two constraints returns
an empty set, and the scheduler cannot place the Pod.
To overcome this situation, you can either increase the value of maxSkew or modify
one of the constraints to use whenUnsatisfiable: ScheduleAnyway. Depending on
circumstances, you might also decide to delete an existing Pod manually - for example,
if you are troubleshooting why a bug-fix rollout is not making progress.
Interaction with node affinity and node selectors
The scheduler will skip the non-matching nodes from the skew calculations if the
incoming Pod has spec.nodeSelector or spec.affinity.nodeAffinity defined.
Example: topology spread constraints with node affinity
Suppose you have a 5-node cluster ranging across zones A to C:
graph BT
    subgraph "zoneB"
        p3(Pod) --> n3(Node3)
        n4(Node4)
    end
    subgraph "zoneA"
        p1(Pod) --> n1(Node1)
        p2(Pod) --> n2(Node2)
    end

classDef plain fill:#ddd,stroke:#fff,stroke-width:4px,color:#000;
classDef k8s fill:#326ce5,stroke:#fff,stroke-width:4px,color:#fff;
classDef cluster fill:#fff,stroke:#bbb,stroke-width:2px,color:#326ce5;
class n1,n2,n3,n4,p1,p2,p3 k8s;
class p4 plain;
class zoneA,zoneB cluster;
graph BT
    subgraph "zoneC"
        n5(Node5)
    end

classDef plain fill:#ddd,stroke:#fff,stroke-width:4px,color:#000;
classDef k8s fill:#326ce5,stroke:#fff,stroke-width:4px,color:#fff;
classDef cluster fill:#fff,stroke:#bbb,stroke-width:2px,color:#326ce5;
class n5 k8s;
class zoneC cluster;
and you know that zone C must be excluded. In this case, you can compose a manifest
as below, so that Pod mypod will be placed into zone B instead of zone C.
Similarly, Kubernetes also respects spec.nodeSelector.
There are some implicit conventions worth noting here:
Only the Pods holding the same namespace as the incoming Pod can be matching candidates.
The scheduler only considers nodes that have all topologySpreadConstraints[*].topologyKey present at the same time.
Nodes missing any of these topologyKeys are bypassed. This implies that:
any Pods located on those bypassed nodes do not impact maxSkew calculation - in the
above example, suppose the node node1
does not have a label "zone", then the 2 Pods will
be disregarded, hence the incoming Pod will be scheduled into zone A.
the incoming Pod has no chances to be scheduled onto this kind of nodes -
in the above example, suppose a node node5 has the mistyped label zone-typo: zoneC
(and no zone label set). After node node5 joins the cluster, it will be bypassed and
Pods for this workload aren't scheduled there.
Be aware of what will happen if the incoming Pod's
topologySpreadConstraints[*].labelSelector doesn't match its own labels. In the
above example, if you remove the incoming Pod's labels, it can still be placed onto
nodes in zone B, since the constraints are still satisfied. However, after that
placement, the degree of imbalance of the cluster remains unchanged - it's still zone A
having 2 Pods labeled as foo: bar, and zone B having 1 Pod labeled as
foo: bar. If this is not what you expect, update the workload's
topologySpreadConstraints[*].labelSelector to match the labels in the pod template.
Cluster-level default constraints
It is possible to set default topology spread constraints for a cluster. Default
topology spread constraints are applied to a Pod if, and only if:
It doesn't define any constraints in its .spec.topologySpreadConstraints.
It belongs to a Service, ReplicaSet, StatefulSet or ReplicationController.
Default constraints can be set as part of the PodTopologySpread plugin
arguments in a scheduling profile.
The constraints are specified with the same API above, except that
labelSelector must be empty. The selectors are calculated from the Services,
ReplicaSets, StatefulSets or ReplicationControllers that the Pod belongs to.
If you don't configure any cluster-level default constraints for pod topology spreading,
then kube-scheduler acts as if you specified the following default topology constraints:
Also, the legacy SelectorSpread plugin, which provides an equivalent behavior,
is disabled by default.
Note:
The PodTopologySpread plugin does not score the nodes that don't have
the topology keys specified in the spreading constraints. This might result
in a different default behavior compared to the legacy SelectorSpread plugin when
using the default topology constraints.
If your nodes are not expected to have bothkubernetes.io/hostname and
topology.kubernetes.io/zone labels set, define your own constraints
instead of using the Kubernetes defaults.
If you don't want to use the default Pod spreading constraints for your cluster,
you can disable those defaults by setting defaultingType to List and leaving
empty defaultConstraints in the PodTopologySpread plugin configuration:
In Kubernetes, inter-Pod affinity and anti-affinity
control how Pods are scheduled in relation to one another - either more packed
or more scattered.
podAffinity
attracts Pods; you can try to pack any number of Pods into qualifying
topology domain(s).
podAntiAffinity
repels Pods. If you set this to requiredDuringSchedulingIgnoredDuringExecution mode then
only a single Pod can be scheduled into a single topology domain; if you choose
preferredDuringSchedulingIgnoredDuringExecution then you lose the ability to enforce the
constraint.
For finer control, you can specify topology spread constraints to distribute
Pods across different topology domains - to achieve either high availability or
cost-saving. This can also help on rolling update workloads and scaling out
replicas smoothly.
For more context, see the
Motivation
section of the enhancement proposal about Pod topology spread constraints.
Known limitations
There's no guarantee that the constraints remain satisfied when Pods are removed. For
example, scaling down a Deployment may result in imbalanced Pods distribution.
You can use a tool such as the Descheduler
to rebalance the Pods distribution.
Pods matched on tainted nodes are respected.
See Issue 80921.
The scheduler doesn't have prior knowledge of all the zones or other topology
domains that a cluster has. They are determined from the existing nodes in the
cluster. This could lead to a problem in autoscaled clusters, when a node pool (or
node group) is scaled to zero nodes, and you're expecting the cluster to scale up,
because, in this case, those topology domains won't be considered until there is
at least one node in them.
You can work around this by using a Node autoscaler that is aware of
Pod topology spread constraints and is also aware of the overall set of topology
domains.
Pods that don't match their own labelSelector create "ghost pods". If a pod's
labels don't match the labelSelector in its topology spread constraint, the pod
won't count itself in spread calculations. This means:
Multiple such pods can just accumulate on the same topology (until matching pods are newly created/deleted) because those pod's schedule don't change a spreading calculation result.
The spreading constraint works in an unintended way, most likely not matching your expectations
Ensure your pod's labels match the labelSelector in your spread constraints.
Typically, a pod should match its own topology spread constraint selector.
What's next
The blog article Introducing PodTopologySpread
explains maxSkew in some detail, as well as covering some advanced usage examples.
Read the scheduling section of
the API reference for Pod.
7 - Taints and Tolerations
Node affinity
is a property of Pods that attracts them to
a set of nodes (either as a preference or a
hard requirement). Taints are the opposite -- they allow a node to repel a set of pods.
Tolerations are applied to pods. Tolerations allow the scheduler to schedule pods with matching
taints. Tolerations allow scheduling but don't guarantee scheduling: the scheduler also
evaluates other parameters
as part of its function.
Taints and tolerations work together to ensure that pods are not scheduled
onto inappropriate nodes. One or more taints are applied to a node; this
marks that the node should not accept any pods that do not tolerate the taints.
Concepts
You add a taint to a node using kubectl taint.
For example,
kubectl taint nodes node1 key1=value1:NoSchedule
places a taint on node node1. The taint has key key1, value value1, and taint effect NoSchedule.
This means that no pod will be able to schedule onto node1 unless it has a matching toleration.
To remove the taint added by the command above, you can run:
kubectl taint nodes node1 key1=value1:NoSchedule-
You specify a toleration for a pod in the PodSpec. Both of the following tolerations "match" the
taint created by the kubectl taint line above, and thus a pod with either toleration would be able
to schedule onto node1:
The default Kubernetes scheduler takes taints and tolerations into account when
selecting a node to run a particular Pod. However, if you manually specify the
.spec.nodeName for a Pod, that action bypasses the scheduler; the Pod is then
bound onto the node where you assigned it, even if there are NoSchedule
taints on that node that you selected.
If this happens and the node also has a NoExecute taint set, the kubelet will
eject the Pod unless there is an appropriate tolerance set.
Here's an example of a pod that has some tolerations defined:
A toleration "matches" a taint if the keys are the same and the effects are the same, and:
the operator is Exists (in which case no value should be specified), or
the operator is Equal and the values should be equal.
Note:
There are two special cases:
If the key is empty, then the operator must be Exists, which matches all keys and values.
Note that the effect still needs to be matched at the same time.
An empty effect matches all effects with key key1.
The above example used the effect of NoSchedule. Alternatively, you can use the effect of PreferNoSchedule.
The allowed values for the effect field are:
NoExecute
This affects pods that are already running on the node as follows:
Pods that do not tolerate the taint are evicted immediately
Pods that tolerate the taint without specifying tolerationSeconds in
their toleration specification remain bound forever
Pods that tolerate the taint with a specified tolerationSeconds remain
bound for the specified amount of time. After that time elapses, the node
lifecycle controller evicts the Pods from the node.
NoSchedule
No new Pods will be scheduled on the tainted node unless they have a matching
toleration. Pods currently running on the node are not evicted.
PreferNoSchedule
PreferNoSchedule is a "preference" or "soft" version of NoSchedule.
The control plane will try to avoid placing a Pod that does not tolerate
the taint on the node, but it is not guaranteed.
You can put multiple taints on the same node and multiple tolerations on the same pod.
The way Kubernetes processes multiple taints and tolerations is like a filter: start
with all of a node's taints, then ignore the ones for which the pod has a matching toleration; the
remaining un-ignored taints have the indicated effects on the pod. In particular,
if there is at least one un-ignored taint with effect NoSchedule then Kubernetes will not schedule
the pod onto that node
if there is no un-ignored taint with effect NoSchedule but there is at least one un-ignored taint with
effect PreferNoSchedule then Kubernetes will try to not schedule the pod onto the node
if there is at least one un-ignored taint with effect NoExecute then the pod will be evicted from
the node (if it is already running on the node), and will not be
scheduled onto the node (if it is not yet running on the node).
In this case, the pod will not be able to schedule onto the node, because there is no
toleration matching the third taint. But it will be able to continue running if it is
already running on the node when the taint is added, because the third taint is the only
one of the three that is not tolerated by the pod.
Normally, if a taint with effect NoExecute is added to a node, then any pods that do
not tolerate the taint will be evicted immediately, and pods that do tolerate the
taint will never be evicted. However, a toleration with NoExecute effect can specify
an optional tolerationSeconds field that dictates how long the pod will stay bound
to the node after the taint is added. For example,
means that if this pod is running and a matching taint is added to the node, then
the pod will stay bound to the node for 3600 seconds, and then be evicted. If the
taint is removed before that time, the pod will not be evicted.
Numeric comparison operators
FEATURE STATE:Kubernetes v1.35 [alpha](disabled by default)
In addition to Equal and Exists, you can use numeric comparison operators
(Gt and Lt) to match taints with integer values. This is useful for threshold-based
scheduling, such as matching nodes by reliability level or SLA tier.
Gt matches when the taint value is greater than the toleration value.
Lt matches when the taint value is less than the toleration value.
For numeric operators, both the toleration and taint values must be valid integers.
If either value cannot be parsed as an integer, the toleration does not match.
Note:
When you create a Pod that uses Gt or Lt tolerations operators, the API server validates that
the toleration values are valid integers. Taint values on nodes are not validated at node
registration time. If a node has a non-numeric taint value (for example,
servicelevel.organization.example/agreed-service-level=high:NoSchedule),
pods with numeric comparison operators will not match that taint and cannot schedule on that node.
For example, if nodes are tainted with a value representing a service level agreement (SLA):
This toleration matches the taint on node1 because 950 > 900 (the taint value is greater than the toleration value for the Gt operator). Similarly, you can use the Lt operator to match taints where the taint value is less than the toleration value:
Both the toleration and taint values must be valid signed 64-bit integers
(zero leading numbers (e.g., "0550") are not allowed).
If a value cannot be parsed as an integer, the toleration does not match.
Numeric operators work with all taint effects: NoSchedule, PreferNoSchedule, and NoExecute.
For PreferNoSchedule with numeric operators: if a pod's toleration doesn't satisfy the numeric comparison
(e.g., taint value < toleration value when using Gt), the scheduler gives the node a lower priority
but may still schedule there if no better options exist.
Warning:
Before disabling the TaintTolerationComparisonOperators feature gate:
You should identify all workloads using the Gt or Lt operators to avoid controller hot-loops.
Update all workload controller templates to use Equal or Exists operators instead
Delete any pending pods that use Gt or Lt operators
Monitor the apiserver_request_total metric for spikes in validation errors
Example Use Cases
Taints and tolerations are a flexible way to steer pods away from nodes or evict
pods that shouldn't be running. A few of the use cases are
Dedicated Nodes: If you want to dedicate a set of nodes for exclusive use by
a particular set of users, you can add a taint to those nodes (say,
kubectl taint nodes nodename dedicated=groupName:NoSchedule) and then add a corresponding
toleration to their pods (this would be done most easily by writing a custom
admission controller).
The pods with the tolerations will then be allowed to use the tainted (dedicated) nodes as
well as any other nodes in the cluster. If you want to dedicate the nodes to them and
ensure they only use the dedicated nodes, then you should additionally add a label similar
to the taint to the same set of nodes (e.g. dedicated=groupName), and the admission
controller should additionally add a node affinity to require that the pods can only schedule
onto nodes labeled with dedicated=groupName.
Nodes with Special Hardware: In a cluster where a small subset of nodes have specialized
hardware (for example GPUs), it is desirable to keep pods that don't need the specialized
hardware off of those nodes, thus leaving room for later-arriving pods that do need the
specialized hardware. This can be done by tainting the nodes that have the specialized
hardware (e.g. kubectl taint nodes nodename special=true:NoSchedule or
kubectl taint nodes nodename special=true:PreferNoSchedule) and adding a corresponding
toleration to pods that use the special hardware. As in the dedicated nodes use case,
it is probably easiest to apply the tolerations using a custom
admission controller.
For example, it is recommended to use Extended
Resources
to represent the special hardware, taint your special hardware nodes with the
extended resource name and run the
ExtendedResourceToleration
admission controller. Now, because the nodes are tainted, no pods without the
toleration will schedule on them. But when you submit a pod that requests the
extended resource, the ExtendedResourceToleration admission controller will
automatically add the correct toleration to the pod and that pod will schedule
on the special hardware nodes. This will make sure that these special hardware
nodes are dedicated for pods requesting such hardware and you don't have to
manually add tolerations to your pods.
Taint based Evictions: A per-pod-configurable eviction behavior
when there are node problems, which is described in the next section.
Taint based Evictions
FEATURE STATE:Kubernetes v1.18 [stable]
The node controller automatically taints a Node when certain conditions
are true. The following taints are built in:
node.kubernetes.io/not-ready: Node is not ready. This corresponds to
the NodeCondition Ready being "False".
node.kubernetes.io/unreachable: Node is unreachable from the node
controller. This corresponds to the NodeCondition Ready being "Unknown".
node.kubernetes.io/memory-pressure: Node has memory pressure.
node.kubernetes.io/disk-pressure: Node has disk pressure.
node.kubernetes.io/pid-pressure: Node has PID pressure.
node.kubernetes.io/network-unavailable: Node's network is unavailable.
node.kubernetes.io/unschedulable: Node is unschedulable.
node.cloudprovider.kubernetes.io/uninitialized: When the kubelet is started
with an "external" cloud provider, this taint is set on a node to mark it
as unusable. After a controller from the cloud-controller-manager initializes
this node, the kubelet removes this taint.
In case a node is to be drained, the node controller or the kubelet adds relevant taints
with NoExecute effect. This effect is added by default for the
node.kubernetes.io/not-ready and node.kubernetes.io/unreachable taints.
If the fault condition returns to normal, the kubelet or node
controller can remove the relevant taint(s).
In some cases when the node is unreachable, the API server is unable to communicate
with the kubelet on the node. The decision to delete the pods cannot be communicated to
the kubelet until communication with the API server is re-established. In the meantime,
the pods that are scheduled for deletion may continue to run on the partitioned node.
Note:
The control plane limits the rate of adding new taints to nodes. This rate limiting
manages the number of evictions that are triggered when many nodes become unreachable at
once (for example: if there is a network disruption).
You can specify tolerationSeconds for a Pod to define how long that Pod stays bound
to a failing or unresponsive Node.
For example, you might want to keep an application with a lot of local state
bound to node for a long time in the event of network partition, hoping
that the partition will recover and thus the pod eviction can be avoided.
The toleration you set for that Pod might look like:
Kubernetes automatically adds a toleration for
node.kubernetes.io/not-ready and node.kubernetes.io/unreachable
with tolerationSeconds=300,
unless you, or a controller, set those tolerations explicitly.
These automatically-added tolerations mean that Pods remain bound to
Nodes for 5 minutes after one of these problems is detected.
DaemonSet pods are created with
NoExecute tolerations for the following taints with no tolerationSeconds:
node.kubernetes.io/unreachable
node.kubernetes.io/not-ready
This ensures that DaemonSet pods are never evicted due to these problems.
Note:
The node controller was responsible for adding taints to nodes and evicting pods. But after 1.29,
the taint-based eviction implementation has been moved out of node controller into a separate,
and independent component called taint-eviction-controller. Users can optionally disable taint-based
eviction by setting --controllers=-taint-eviction-controller in kube-controller-manager.
Taint Nodes by Condition
The control plane, using the node controller,
automatically creates taints with a NoSchedule effect for
node conditions.
The scheduler checks taints, not node conditions, when it makes scheduling
decisions. This ensures that node conditions don't directly affect scheduling.
For example, if the DiskPressure node condition is active, the control plane
adds the node.kubernetes.io/disk-pressure taint and does not schedule new pods
onto the affected node. If the MemoryPressure node condition is active, the
control plane adds the node.kubernetes.io/memory-pressure taint.
You can ignore node conditions for newly created pods by adding the corresponding
Pod tolerations. The control plane also adds the node.kubernetes.io/memory-pressure
toleration on pods that have a QoS class
other than BestEffort. This is because Kubernetes treats pods in the Guaranteed
or Burstable QoS classes (even pods with no memory request set) as if they are
able to cope with memory pressure, while new BestEffort pods are not scheduled
onto the affected node.
The DaemonSet controller automatically adds the following NoSchedule
tolerations to all daemons, to prevent DaemonSets from breaking.
Adding these tolerations ensures backward compatibility. You can also add
arbitrary tolerations to DaemonSets.
Device taints and tolerations
Instead of tainting entire nodes, administrators can also taint individual devices
when the cluster uses dynamic resource allocation
to manage special hardware. The advantage is that tainting can be targeted towards exactly the hardware that
is faulty or needs maintenance. Tolerations are also supported and can be specified when requesting
devices. Like taints they apply to all pods which share the same allocated device.
The scheduling framework is a pluggable architecture for the Kubernetes scheduler.
It consists of a set of "plugin" APIs that are compiled directly into the scheduler.
These APIs allow most scheduling features to be implemented as plugins,
while keeping the scheduling "core" lightweight and maintainable. Refer to the
design proposal of the scheduling framework for more technical information on
the design of the framework.
Framework workflow
The Scheduling Framework defines a few extension points. Scheduler plugins
register to be invoked at one or more extension points. Some of these plugins
can change the scheduling decisions and some are informational only.
Each attempt to schedule one Pod is split into two phases, the
scheduling cycle and the binding cycle.
Scheduling cycle & binding cycle
The scheduling cycle selects a node for the Pod, and the binding cycle applies
that decision to the cluster. Together, a scheduling cycle and binding cycle are
referred to as a "scheduling context".
Scheduling cycles are run serially, while binding cycles may run concurrently.
A scheduling or binding cycle can be aborted if the Pod is determined to
be unschedulable or if there is an internal error. The Pod will be returned to
the queue and retried.
Interfaces
The following picture shows the scheduling context of a Pod and the interfaces
that the scheduling framework exposes.
One plugin may implement multiple interfaces to perform more complex or
stateful tasks.
Some interfaces match the scheduler extension points which can be configured through
Scheduler Configuration.
Scheduling framework extension points
PreEnqueue
These plugins are called prior to adding Pods to the internal active queue, where Pods are marked as
ready for scheduling.
Only when all PreEnqueue plugins return Success, the Pod is allowed to enter the active queue.
Otherwise, it's placed in the internal unschedulable Pods list, and doesn't get an Unschedulable condition.
EnqueueExtension is the interface where the plugin can control
whether to retry scheduling of Pods rejected by this plugin, based on changes in the cluster.
Plugins that implement PreEnqueue, PreFilter, Filter, Reserve or Permit should implement this interface.
QueueingHint
FEATURE STATE:Kubernetes v1.34 [stable](enabled by default)
QueueingHint is a callback function for deciding whether a Pod can be requeued to the active queue or backoff queue.
It's executed every time a certain kind of event or change happens in the cluster.
When the QueueingHint finds that the event might make the Pod schedulable,
the Pod is put into the active queue or the backoff queue
so that the scheduler will retry the scheduling of the Pod.
QueueSort
These plugins are used to sort Pods in the scheduling queue. A queue sort plugin
essentially provides a Less(Pod1, Pod2) function. Only one queue sort
plugin may be enabled at a time.
PreFilter
These plugins are used to pre-process info about the Pod, or to check certain
conditions that the cluster or the Pod must meet. If a PreFilter plugin returns
an error, the scheduling cycle is aborted.
Filter
These plugins are used to filter out nodes that cannot run the Pod. For each
node, the scheduler will call filter plugins in their configured order. If any
filter plugin marks the node as infeasible, the remaining plugins will not be
called for that node. Nodes may be evaluated concurrently.
PostFilter
These plugins are called after the Filter phase, but only when no feasible nodes
were found for the pod. Plugins are called in their configured order. If
any postFilter plugin marks the node as Schedulable, the remaining plugins
will not be called. A typical PostFilter implementation is preemption, which
tries to make the pod schedulable by preempting other Pods.
PreScore
These plugins are used to perform "pre-scoring" work, which generates a sharable
state for Score plugins to use. If a PreScore plugin returns an error, the
scheduling cycle is aborted.
Score
These plugins are used to rank nodes that have passed the filtering phase. The
scheduler will call each scoring plugin for each node. There will be a well
defined range of integers representing the minimum and maximum scores. After the
NormalizeScore phase, the scheduler will combine node
scores from all plugins according to the configured plugin weights.
Capacity scoring
FEATURE STATE:Kubernetes v1.33 [alpha](disabled by default)
The feature gate VolumeCapacityPriority was used in v1.32 to support storage that are
statically provisioned. Starting from v1.33, the new feature gate StorageCapacityScoring
replaces the old VolumeCapacityPriority gate with added support to dynamically provisioned storage.
When StorageCapacityScoring is enabled, the VolumeBinding plugin in the kube-scheduler is extended
to score Nodes based on the storage capacity on each of them.
This feature is applicable to CSI volumes that supported Storage Capacity,
including local storage backed by a CSI driver.
NormalizeScore
These plugins are used to modify scores before the scheduler computes a final
ranking of Nodes. A plugin that registers for this extension point will be
called with the Score results from the same plugin. This is called
once per plugin per scheduling cycle.
For example, suppose a plugin BlinkingLightScorer ranks Nodes based on how
many blinking lights they have.
However, the maximum count of blinking lights may be small compared to
NodeScoreMax. To fix this, BlinkingLightScorer should also register for this
extension point.
If any NormalizeScore plugin returns an error, the scheduling cycle is
aborted.
Note:
Plugins wishing to perform "pre-reserve" work should use the
NormalizeScore extension point.
Reserve
A plugin that implements the Reserve interface has two methods, namely Reserve
and Unreserve, that back two informational scheduling phases called Reserve
and Unreserve, respectively. Plugins which maintain runtime state (aka "stateful
plugins") should use these phases to be notified by the scheduler when resources
on a node are being reserved and unreserved for a given Pod.
The Reserve phase happens before the scheduler actually binds a Pod to its
designated node. It exists to prevent race conditions while the scheduler waits
for the bind to succeed. The Reserve method of each Reserve plugin may succeed
or fail; if one Reserve method call fails, subsequent plugins are not executed
and the Reserve phase is considered to have failed. If the Reserve method of
all plugins succeed, the Reserve phase is considered to be successful and the
rest of the scheduling cycle and the binding cycle are executed.
The Unreserve phase is triggered if the Reserve phase or a later phase fails.
When this happens, the Unreserve method of all Reserve plugins will be
executed in the reverse order of Reserve method calls. This phase exists to
clean up the state associated with the reserved Pod.
Caution:
The implementation of the Unreserve method in Reserve plugins must be
idempotent and may not fail.
Permit
Permit plugins are invoked at the end of the scheduling cycle for each Pod, to
prevent or delay the binding to the candidate node. A permit plugin can do one of
the three things:
approve Once all Permit plugins approve a Pod, it is sent for binding.
deny If any Permit plugin denies a Pod, it is returned to the scheduling queue.
This will trigger the Unreserve phase in Reserve plugins.
wait (with a timeout) If a Permit plugin returns "wait", then the Pod is kept in an internal "waiting"
Pods list, and the binding cycle of this Pod starts but directly blocks until it
gets approved. If a timeout occurs, wait becomes deny
and the Pod is returned to the scheduling queue, triggering the
Unreserve phase in Reserve plugins.
Note:
While any plugin can access the list of "waiting" Pods and approve them
(see FrameworkHandle),
we expect only the permit plugins to approve binding of reserved Pods that are in "waiting" state.
Once a Pod is approved, it is sent to the PreBind phase.
PreBind
These plugins are used to perform any work required before a Pod is bound. For
example, a pre-bind plugin may provision a network volume and mount it on the
target node before allowing the Pod to run there.
If any PreBind plugin returns an error, the Pod is rejected and
returned to the scheduling queue.
Bind
These plugins are used to bind a Pod to a Node. Bind plugins will not be called
until all PreBind plugins have completed. Each bind plugin is called in the
configured order. A bind plugin may choose whether or not to handle the given
Pod. If a bind plugin chooses to handle a Pod, the remaining bind plugins are
skipped.
PostBind
This is an informational interface. Post-bind plugins are called after a
Pod is successfully bound. This is the end of a binding cycle, and can be used
to clean up associated resources.
Plugin API
There are two steps to the plugin API. First, plugins must register and get
configured, then they use the extension point interfaces. Extension point
interfaces have the following form.
You can enable or disable plugins in the scheduler configuration. If you are using
Kubernetes v1.18 or later, most scheduling
plugins are in use and
enabled by default.
In addition to default plugins, you can also implement your own scheduling
plugins and get them configured along with default plugins. You can visit
scheduler-plugins for more details.
If you are using Kubernetes v1.18 or later, you can configure a set of plugins as
a scheduler profile and then define multiple profiles to fit various kinds of workload.
Learn more at multiple profiles.
9 - Dynamic Resource Allocation
FEATURE STATE:Kubernetes v1.35 [stable](enabled by default)
This page describes dynamic resource allocation (DRA) in Kubernetes.
About DRA
DRA is a Kubernetes feature that lets you request and share resources among Pods.
These resources are often attached
devices like hardware
accelerators.
With DRA, device drivers and cluster admins define device classes that are
available to claim in workloads. Kubernetes allocates matching devices to
specific claims and places the corresponding Pods on nodes that can access the
allocated devices.
Allocating resources with DRA is a similar experience to
dynamic volume provisioning,
in which you use PersistentVolumeClaims to claim storage capacity from storage classes
and request the claimed capacity in your Pods.
Benefits of DRA
DRA provides a flexible way to categorize, request, and use devices in your cluster.
Using DRA provides benefits like the following:
Flexible device filtering: use common expression language (CEL) to perform
fine-grained filtering for specific device attributes.
Device sharing: share the same resource with multiple containers or Pods
by referencing the corresponding resource claim.
Centralized device categorization: device drivers and cluster admins can
use device classes to provide app operators with hardware categories that are
optimized for various use cases. For example, you can create a cost-optimized
device class for general-purpose workloads, and a high-performance device
class for critical jobs.
Simplified Pod requests: with DRA, app operators don't need to specify
device quantities in Pod resource requests. Instead, the Pod references a
resource claim, and the device configuration in that claim applies to the Pod.
These benefits provide significant improvements in the device allocation
workflow when compared to
device plugins,
which require per-container device requests, don't support device sharing, and
don't support expression-based device filtering.
Types of DRA users
The workflow of using DRA to allocate devices involves the following types of users:
Device owner: responsible for devices. Device owners might be commercial
vendors, the cluster operator, or another entity. To use DRA, devices must
have DRA-compatible drivers that do the following:
Create ResourceSlices that provide Kubernetes with information about
nodes and resources.
Update ResourceSlices when resource capacity in the cluster changes.
Optionally, create DeviceClasses that workload operators can use to
claim devices.
Cluster admin: responsible for configuring clusters and nodes,
attaching devices, installing drivers, and similar tasks. To use DRA,
cluster admins do the following:
Attach devices to nodes.
Install device drivers that support DRA.
Optionally, create DeviceClasses that workload operators can use to claim devices.
Workload operator: responsible for deploying and managing workloads in the
cluster. To use DRA to allocate devices to Pods, workload operators do the following:
Create ResourceClaims or ResourceClaimTemplates to request specific
configurations within DeviceClasses.
Deploy workloads that use specific ResourceClaims or ResourceClaimTemplates.
DRA terminology
DRA uses the following Kubernetes API kinds to provide the core allocation
functionality. All of these API kinds are included in the resource.k8s.io/v1API group.
DeviceClass
Defines a category of devices that can be claimed and how to select specific
device attributes in claims. The DeviceClass parameters can match zero or
more devices in ResourceSlices. To claim devices from a DeviceClass,
ResourceClaims select specific device attributes.
ResourceClaim
Describes a request for access to attached resources, such as
devices, in the cluster. ResourceClaims provide Pods with access to
a specific resource. ResourceClaims can be created by workload operators
or generated by Kubernetes based on a ResourceClaimTemplate.
ResourceClaimTemplate
Defines a template that Kubernetes uses to create per-Pod
ResourceClaims for a workload. ResourceClaimTemplates provide Pods with
access to separate, similar resources. Each ResourceClaim that Kubernetes
generates from the template is bound to a specific Pod. When the Pod
terminates, Kubernetes deletes the corresponding ResourceClaim.
ResourceSlice
Represents one or more resources that are attached to nodes, such as devices.
Drivers create and manage ResourceSlices in the cluster. When a ResourceClaim
is created and used in a Pod, Kubernetes uses ResourceSlices to find nodes
that have access to the claimed resources. Kubernetes allocates resources to
the ResourceClaim and schedules the Pod onto a node that can access the
resources.
DeviceClass
A DeviceClass lets cluster admins or device drivers define categories of devices
in the cluster. DeviceClasses tell operators what devices they can request and
how they can request those devices. You can use
common expression language (CEL) to select devices based on
specific attributes. A ResourceClaim that references the DeviceClass can then
request specific configurations within the DeviceClass.
A ResourceClaim defines the resources that a workload needs. Every ResourceClaim
has requests that reference a DeviceClass and select devices from that
DeviceClass. ResourceClaims can also use selectors to filter for devices that
meet specific requirements, and can use constraints to limit the devices that
can satisfy a request. ResourceClaims can be created by workload operators or
can be generated by Kubernetes based on a ResourceClaimTemplate. A
ResourceClaimTemplate defines a template that Kubernetes can use to
auto-generate ResourceClaims for Pods.
Use cases for ResourceClaims and ResourceClaimTemplates
The method that you use depends on your requirements, as follows:
ResourceClaim: you want multiple Pods to share access to specific
devices. You manually manage the lifecycle of ResourceClaims that you create.
ResourceClaimTemplate: you want Pods to have independent access to
separate, similarly-configured devices. Kubernetes generates ResourceClaims
from the specification in the ResourceClaimTemplate. The lifetime of each
generated ResourceClaim is bound to the lifetime of the corresponding Pod.
PodGroup ResourceClaimTemplate: you want
PodGroups to have
independent access to separate, similarly-configured devices that can be
shared by their Pods. Kubernetes generates one ResourceClaim for the PodGroup
from the specification in the ResourceClaimTemplate. The lifetime of each
generated ResourceClaim is bound to the lifetime of the corresponding
PodGroup. This requires the
DRAWorkloadResourceClaims
feature to be enabled.
When you define a workload, you can use
Common Expression Language (CEL)
to filter for specific device attributes or capacity. The available parameters
for filtering depend on the device and the drivers.
If you directly reference a specific ResourceClaim in a Pod, that ResourceClaim
must already exist in the same namespace as the Pod. If the ResourceClaim
doesn't exist in the namespace, the Pod won't schedule. This behavior is similar
to how a PersistentVolumeClaim must exist in the same namespace as a Pod that
references it.
You can reference an auto-generated ResourceClaim in a Pod, but this isn't
recommended because auto-generated ResourceClaims are bound to the lifetime of
the Pod or PodGroup that triggered the generation.
FEATURE STATE:Kubernetes v1.36 [stable](enabled by default)
You can provide a prioritized list of subrequests for requests in a ResourceClaim or
ResourceClaimTemplate. The scheduler will then select the first subrequest that can be allocated.
This allows users to specify alternative devices that can be used by the workload if the primary
choice is not available.
In the example below, the ResourceClaimTemplate requested a device with the color black
and the size large. If a device with those attributes is not available, the pod cannot
be scheduled. With the prioritized list feature, a second alternative can be specified, which
requests two devices with the color white and size small. The large black device will be
allocated if it is available. If it is not, but two small white devices are available,
the pod will still be able to run.
If the pod is eligible for multiple nodes in the cluster, the scheduler will use the
index of chosen subrequests from any prioritized lists as one of the inputs when it
scores each node. So nodes that can allocate devices requested in a higher ranked
subrequest are more likely to be chosen than nodes that can only allocate devices for
lower ranked subrequests.
The decision is made on a per-Pod basis, so if the Pod is a member of a ReplicaSet or
similar grouping, you cannot rely on all the members of the group having the same subrequest
chosen. Your workload must be able to accommodate this.
Workload ResourceClaims
FEATURE STATE:Kubernetes v1.36 [alpha](disabled by default)
When you organize Pods with the
Workload API,
you can reserve ResourceClaims for entire
PodGroups
instead of individual Pods and generate ResourceClaimTemplates for a
PodGroup instead of a single Pod, allowing the Pods within a PodGroup to share
access to devices allocated to the generated ResourceClaim.
This feature targets two problems:
The ResourceClaim API's status.reservedFor list can only contain 256 items.
Since kube-scheduler only records individual Pods in that list, only 256 Pods
can share a ResourceClaim. By allowing PodGroups to be recorded in
status.reservedFor, many more than 256 Pods can share a ResourceClaim.
Pods can only share a ResourceClaim when its exact name is known. For complex
workloads that replicate groups of Pods, ResourceClaims shared by the Pods
in each group need to be created and deleted explicitly when the set of
groups scales up and down. By generating ResourceClaims for each PodGroup, a
single ResourceClaimTemplate can form the basis for ResourceClaims that are
both replicated automatically and shareable among the Pods in a PodGroup.
The PodGroup API defines a spec.resourceClaims field with the same structure
and similar meaning as the spec.resourceClaims field in the Pod API:
Like claims made by Pods, claims for PodGroups defining a resourceClaimName
refer to a ResourceClaim by name. Claims defining a resourceClaimTemplateName
refer to a ResourceClaimTemplate which replicates into one ResourceClaim for the
entire PodGroup that can be shared amongst its Pods.
When a Pod defines a claim with a name, resourceClaimName, and
resourceClaimTemplateName that all match one of its PodGroup's
spec.resourceClaims, then kube-scheduler reserves the ResourceClaim for the
PodGroup instead of the Pod. If the Pod's claim does not match one made by its
PodGroup, then kube-scheduler reserves the ResourceClaim for the Pod. In either
case, reservation is recorded in the ResourceClaim's status.reservedFor.
PodGroup reservations and the corresponding resource allocation persist in the
ResourceClaim until the PodGroup is deleted, even if the group no longer has any
Pods.
When a Pod claim matching a PodGroup claim defines a
resourceClaimTemplateName, then one ResourceClaim is generated for the
PodGroup. Other Pods in the group defining the same claim will share that
generated ResourceClaim instead of prompting a new ResourceClaim to be generated
for each Pod. Whether or not a resourceClaimTemplateName claim matches a
PodGroup claim, the name of the generated ResourceClaim is recorded in the Pod's
status.resourceClaimStatuses.
ResourceClaims generated from a ResourceClaimTemplate for a
PodGroup follow the lifecycle of the PodGroup. The ResourceClaim is first
created when both the PodGroup and its ResourceClaimTemplate exist. The
ResourceClaim is deleted after the PodGroup has been deleted and the
ResourceClaim is no longer reserved.
In this example, the training-group PodGroup has one Pod named training-group-pod-1.
The Pod's pod-claim and pod-claim-template claims do not match
any claim made by the PodGroup, so those claims are not affected by the
PodGroup: ResourceClaim my-pod-claim becomes reserved for the Pod and a
ResourceClaim is generated from ResourceClaimTemplate my-pod-template and also
becomes reserved for the Pod. The pg-claim and pg-claim-template do match
claims made by the PodGroup. ResourceClaim my-pg-claim becomes reserved for
the PodGroup and a ResourceClaim is generated from ResourceClaimTemplate
my-pg-template and also becomes reserved for the PodGroup.
Associating ResourceClaims with Workload API resources is an alpha feature and
only enabled when the DRAWorkloadResourceClaims feature gate
is enabled in the kube-apiserver, kube-controller-manager, kube-scheduler, and kubelet.
ResourceSlice
Each ResourceSlice represents one or more
devices in a pool. The pool is
managed by a device driver, which creates and manages ResourceSlices. The
resources in a pool might be represented by a single ResourceSlice or span
multiple ResourceSlices.
ResourceSlices provide useful information to device users and to the scheduler,
and are crucial for dynamic resource allocation. Every ResourceSlice must include
the following information:
Resource pool: a group of one or more resources that the driver manages.
The pool can span more than one ResourceSlice. Changes to the resources in a
pool must be propagated across all of the ResourceSlices in that pool. The
device driver that manages the pool is responsible for ensuring that this
propagation happens.
Devices: devices in the managed pool. A ResourceSlice can list every
device in a pool or a subset of the devices in a pool. The ResourceSlice
defines device information like attributes, versions, and capacity. Device
users can select devices for allocation by filtering for device information
in ResourceClaims or in DeviceClasses.
Nodes: the nodes that can access the resources. Drivers can choose which
nodes can access the resources, whether that's all of the nodes in the
cluster, a single named node, or nodes that have specific node labels.
Drivers use a controller to
reconcile ResourceSlices in the cluster with the information that the driver has
to publish. This controller overwrites any manual changes, such as cluster users
creating or modifying ResourceSlices.
Consider the following example ResourceSlice:
apiVersion:resource.k8s.io/v1kind:ResourceSlicemetadata:name:cat-slicespec:driver:"resource-driver.example.com"pool:generation:1name:"black-cat-pool"resourceSliceCount:1# The allNodes field defines whether any node in the cluster can access the device.allNodes:truedevices:- name:"large-black-cat"attributes:color:string:"black"size:string:"large"cat:bool:true
This ResourceSlice is managed by the resource-driver.example.com driver in the
black-cat-pool pool. The allNodes: true field indicates that any node in the
cluster can access the devices. There's one device in the ResourceSlice, named
large-black-cat, with the following attributes:
color: black
size: large
cat: true
A DeviceClass could select this ResourceSlice by using these attributes, and a
ResourceClaim could filter for specific devices in that DeviceClass.
Naming and prioritization
The order in which the Kubernetes scheduler evaluates devices for allocation is
determined by the lexicographical sorting of ResourceSlice and resource pool names.
The scheduler uses a first-fit strategy, meaning it selects the first available device
that satisfies the claim's requirements.
This allows the priority of resource allocation to be influenced by the names
assigned to pools and ResourceSlices. Note that pools without
binding conditions are always evaluated before those
with binding conditions, regardless of their names.
For drivers built using the k8s.io/dynamic-resources/kubeletplugin Go package or
the ResourceSlice controller from that module, these components automatically handle
ResourceSlice naming to ensure they are evaluated in the order specified by the driver.
How resource allocation with DRA works
The following sections describe the workflow for the various
types of DRA users and for the Kubernetes system during
dynamic resource allocation.
Workflow for users
Driver creation: device owners or third-party entities create drivers
that can create and manage ResourceSlices in the cluster. These drivers
optionally also create DeviceClasses that define a category of devices and
how to request them.
Cluster configuration: cluster admins create clusters, attach devices to
nodes, and install the DRA device drivers. Cluster admins optionally create
DeviceClasses that define categories of devices and how to request them.
Resource claims: workload operators create ResourceClaimTemplates or
ResourceClaims that request specific device configurations within a
DeviceClass. In the same step, workload operators modify their Kubernetes
manifests to request those ResourceClaimTemplates or ResourceClaims.
Workflow for Kubernetes
ResourceSlice creation: drivers in the cluster create ResourceSlices that
represent one or more devices in a managed pool of similar devices.
Workload creation: the cluster control plane checks new workloads for
references to ResourceClaimTemplates or to specific ResourceClaims.
If the workload uses a ResourceClaimTemplate, a controller named the
resourceclaim-controller generates ResourceClaims for the workload.
If the workload uses a specific ResourceClaim, Kubernetes checks whether
that ResourceClaim exists in the cluster. If the ResourceClaim doesn't
exist, the Pods won't deploy.
ResourceSlice filtering: for every Pod, Kubernetes checks the
ResourceSlices in the cluster to find a device that satisfies all of the
following criteria:
The nodes that can access the resources are eligible to run the Pod.
The ResourceSlice has unallocated resources that match the requirements of
the Pod's ResourceClaim.
Resource allocation: after finding an eligible ResourceSlice for a
Pod's ResourceClaim, the Kubernetes scheduler updates the ResourceClaim
with the allocation details. The scheduler uses a first-fit strategy and
evaluates pools and ResourceSlices in lexicographical order by their names.
Drivers can prioritize specific slices or pools by naming them appropriately.
For details, see Naming and prioritization.
Pod scheduling: when resource allocation is complete, the scheduler
places the Pod on a node that can access the allocated resource. The device
driver and the kubelet on that node configure the device and the Pod's access
to the device.
Observability of dynamic resources
You can check the status of dynamically allocated resources by using any of the
following methods:
The PodResourcesLister kubelet gRPC service lets you monitor in-use devices.
The DynamicResource message provides information that's specific to dynamic
resource allocation, such as the device name and the claim name. For details,
see
Monitoring device plugin resources.
ResourceClaim device status
FEATURE STATE:Kubernetes v1.33 [beta](enabled by default)
The accuracy of the information that a driver adds to a ResourceClaim
status.devices field depends on the driver. Evaluate drivers to decide whether
you can rely on this field as the only source of device information.
If you disable the
DRAResourceClaimDeviceStatus feature gate, the
status.devices field automatically gets cleared when storing the ResourceClaim.
A ResourceClaim device status is supported when it is possible, from a DRA
driver, to update an existing ResourceClaim where the status.devices field is
set.
For details about the status.devices field, see the
ResourceClaim API reference.
Device Health Monitoring
FEATURE STATE:Kubernetes v1.36 [beta](enabled by default)
Kubernetes provides a mechanism for monitoring and reporting the health of dynamically allocated infrastructure resources.
For stateful applications running on specialized hardware, it is critical to know when a device has failed or become unhealthy. It is also helpful to find out if the device recovers.
To use this functionality, the ResourceHealthStatusfeature gate must be enabled (beta and enabled by default since v1.36), and the DRA driver must implement the DRAResourceHealth gRPC service.
When a DRA driver detects that an allocated device has become unhealthy, it reports this status back to the kubelet. This health information is then exposed directly in the Pod's status. The kubelet populates the allocatedResourcesStatus field in the status of each container, detailing the health of each device assigned to that container. Each resource health entry can include an optional message field with additional human-readable context about the health status, such as error details or failure reasons.
If the kubelet does not receive a health update from a DRA driver within a timeout period, the device's health status is marked as "Unknown". DRA drivers can configure this timeout on a per-device basis by setting the health_check_timeout_seconds field in the DeviceHealth gRPC message. If not specified, the kubelet uses a default timeout of 30 seconds. This allows different hardware types (for example, GPUs, FPGAs, or storage devices) to use appropriate timeout values based on their health-reporting characteristics.
This provides crucial visibility for users and controllers to react to hardware failures.
For a Pod that is failing, you can inspect this status to determine if the failure was related to an unhealthy device.
Note:
Device health status is not updated in the Pod status after a Pod has terminated (for example, in Failed state).
Pre-scheduled Pods
When you - or another API client - create a Pod with spec.nodeName already set, the scheduler gets bypassed.
If some ResourceClaim needed by that Pod does not exist yet, is not allocated
or not reserved for the Pod, then the kubelet will fail to run the Pod and
re-check periodically because those requirements might still get fulfilled later.
Such a situation can also arise when support for dynamic resource allocation
was not enabled in the scheduler at the time when the Pod got scheduled
(version skew, configuration, feature gate, etc.). kube-controller-manager
detects this and tries to make the Pod runnable by reserving the required
ResourceClaims. However, this only works if those were allocated by
the scheduler for some other pod.
It is better to avoid bypassing the scheduler because a Pod that is assigned to a node
blocks normal resources (RAM, CPU) that then cannot be used for other Pods
while the Pod is stuck. To make a Pod run on a specific node while still going
through the normal scheduling flow, create the Pod with a node selector that
exactly matches the desired node:
You may also be able to mutate the incoming Pod, at admission time, to unset
the .spec.nodeName field and to use a node selector instead.
Limitations
The Kubernetes scheduler doesn't support
preemption for
DRA resources. This means that an existing Pod that's running on a node and is
using DRA resources can't be preempted by a higher-priority Pod that also needs
DRA resources. The high-priority Pod will remain in a pending state until the device
becomes available, which happens when the conflicting Pod terminates or is
manually deleted.
DRA beta features
The following sections describe DRA features that support advanced use
cases. Usage of them is optional and may only be relevant with DRA
drivers that support them.
FEATURE STATE:Kubernetes v1.36 [stable](enabled by default)
You can mark a request in a ResourceClaim or ResourceClaimTemplate as having
privileged features for maintenance and troubleshooting tasks. A request with
admin access grants access to in-use devices and may enable additional
permissions when making the device available in a container:
Admin access is a privileged mode and should not be granted to regular users in
multi-tenant clusters. Only users authorized to
create ResourceClaim or ResourceClaimTemplate objects in namespaces labeled with
resource.kubernetes.io/admin-access: "true" (case-sensitive) can use the
adminAccess field. This ensures that non-admin users cannot misuse the
feature.
Admin access is a beta feature and is enabled by default with the
DRAAdminAccess feature gate
in the kube-apiserver, kube-scheduler, and kubelet.
Granular status authorization
FEATURE STATE:Kubernetes v1.36 [beta](enabled by default)
Starting in Kubernetes v1.36, DRA enforces fine-grained authorization checks for updates
to ResourceClaim status by using synthetic subresources and node-aware verbs.
The following sections describe DRA features that are available in the Alpha
feature stage.
They depend on enabling feature gates and may depend on additional
API groups.
For more information, see
Set up DRA in the cluster.
Extended resource allocation by DRA
FEATURE STATE:Kubernetes v1.36 [beta](enabled by default)
You can provide an extended resource name for a DeviceClass. The scheduler will then
select the devices matching the class for the extended resource requests.
This allows users to continue using extended resource requests in a pod to request
either extended resources provided by device plugin, or DRA devices.
The same extended resource can be provided either by device plugin, or DRA on one single cluster node.
The same extended resource can be provided by device plugin on some nodes, and DRA on other nodes in the same cluster.
In the example below, the DeviceClass is given an extendedResourceName example.com/gpu.
If a pod requested for the extended resource example.com/gpu: 2, it can be scheduled to
a node with two or more devices matching the DeviceClass.
In addition, users can use a special extended resource to allocate devices without
having to explicitly create a ResourceClaim. Using the extended resource name
prefix deviceclass.resource.kubernetes.io/ and the DeviceClass name.
This works for any DeviceClass, even if it does not specify an extended resource name.
The resulting ResourceClaim will contain a request for an ExactCount of the
specified number of devices of that DeviceClass.
Extended resource allocation by DRA is a beta feature and is enabled by default with the
DRAExtendedResource feature gate
in the kube-apiserver, kube-scheduler, kube-controller-manager, and kubelet.
Partitionable devices
FEATURE STATE:Kubernetes v1.36 [beta](enabled by default)
Devices represented in DRA don't necessarily have to be a single unit connected to a single machine,
but can also be a logical device comprised of multiple devices connected to multiple machines.
These devices might consume overlapping resources of the underlying phyical devices,
meaning that when one logical device is allocated other devices will no longer be available.
In the ResourceSlice API, this is represented as a list of named CounterSets, each of which
contains a set of named counters. The counters represent the resources available on the physical
device that are used by the logical devices advertised through DRA.
Logical devices can specify the ConsumesCounters list. Each entry contains a reference to a CounterSet
and a set of named counters with the amounts they will consume. So for a device to be allocatable,
the referenced counter sets must have sufficient quantity for the counters referenced by the device.
CounterSets must be specified in separate ResourceSlices from devices.
Devices can consume counters from any CounterSet defined in the same resource pool as the device.
Here is an example of two devices, each consuming 6Gi of memory from a shared counter with 8Gi of memory.
Thus, only one of the devices can be allocated at any point in time.
The scheduler handles this and it is transparent to the consumer as the ResourceClaim API is not affected.
Partitionable devices is a beta feature and enabled when the
DRAPartitionableDevices feature gate
is kept enabled in the kube-apiserver and kube-scheduler.
Consumable capacity
FEATURE STATE:Kubernetes v1.36 [beta](enabled by default)
The consumable capacity feature allows the same devices to be consumed by multiple independent ResourceClaims,
with the Kubernetes scheduler managing how much of the device's capacity is used up by each claim.
This is analogous to how Pods can share the resources on a Node; ResourceClaims can share the resources on a Device.
The device driver can set allowMultipleAllocations field added in .spec.devices of ResourceSlice
to allow allocating that device to multiple independent ResourceClaims or to multiple requests within a ResourceClaim.
Users can set capacity field added in spec.devices.requests of ResourceClaim to specify the device resource requirements for each allocation.
For the device that allows multiple allocations, the requested capacity is drawn from — or consumed from — its total capacity,
a concept known as consumable capacity.
Then, the scheduler ensures that the aggregate consumed capacity across all claims does not exceed the device’s overall capacity.
Furthermore, driver authors can use the requestPolicy constraints on individual device capacities to control
how those capacities are consumed.
For example, the driver author can specify that a given capacity is only consumed in increments of 1Gi.
Here is an example of a network device which allows multiple allocations and contains a consumable bandwidth capacity.
In this example, a multiply-allocatable device was chosen. However, any resource.example.com device
with at least the requested 1G bandwidth could have met the requirement.
If a non-multiply-allocatable device were chosen, the allocation would have resulted in the entire device.
To force the use of a only multiply-allocatable devices, you can use the CEL criteria device.allowMultipleAllocations == true.
DistinctAttribute constraint
When requesting multiple devices in a ResourceClaim, you can use the DistinctAttribute
constraint to ensure that each allocated device has a different value for a specified
attribute. This constraint was introduced with the consumable capacity feature.
The DistinctAttribute constraint is particularly useful when working with
multiply-allocatable devices. It prevents the scheduler from allocating the same
device multiple times within a single ResourceClaim, even when that device allows
multiple allocations.
Beyond preventing duplicate allocations, this constraint helps optimize performance
by ensuring devices are distributed based on their attributes. For example, you can
use it to distribute devices across different NUMA nodes to optimize memory bandwidth
and reduce contention.
Device taints and tolerations
FEATURE STATE:Kubernetes v1.36 [beta](enabled by default)
Device taints are similar to node taints: a taint has a string key, a string value, and an effect.
The effect is applied to the ResourceClaim which is using a tainted device and to all Pods referencing that ResourceClaim.
The "NoSchedule" effect prevents scheduling those Pods.
Tainted devices are ignored when trying to allocate a ResourceClaim because using them would prevent scheduling of Pods.
The "NoExecute" effect implies "NoSchedule" and in addition causes eviction of all Pods
which have been scheduled already.
This eviction is implemented in the device taint eviction controller in kube-controller-manager by deleting affected Pods.
The "None" effect is ignored by the scheduler and eviction controller.
DRA drivers can use it to communicate exceptions to admins or other controllers,
like for example degraded health of a device. Admins can also use it to
do dry-runs of pod eviction in DeviceTaintRules (more on that below).
ResourceClaims can tolerate taints. If a taint is tolerated, its effect does not apply.
An empty toleration matches all taints. A toleration can be limited to certain effects
and/or match certain key/value pairs.
A toleration can check that a certain key exists, regardless which value it has, or it can check
for specific values of a key.
For more information on this matching see the
node taint concepts.
Eviction can be delayed by tolerating a taint for a certain duration.
That delay starts at the time when a taint gets added to a device, which is recorded in a field of the taint.
Taints apply as described above also to ResourceClaims allocating "all" devices on a node.
All devices must be untainted or all of their taints must be tolerated.
Allocating a device with admin access (described above)
is not exempt either. An admin using that mode must explicitly tolerate all taints
to access tainted devices.
Device taints and tolerations is a beta feature and enabled when the
DRADeviceTaints feature gate
is kept enabled in the kube-apiserver, kube-controller-manager and kube-scheduler.
To use DeviceTaintRules, the resource.k8s.io/v1beta2 API version must be
enabled together with the DRADeviceTaintRules feature gate.
In contrast to DRADeviceTaints, DRADeviceTaintRules is off by default because of this dependency
on the beta API group, which has to be off by default.
You can add taints to devices in the following ways, by using the DeviceTaintRule API kind.
Taints set by the driver
A DRA driver can add taints to the device information that it publishes in ResourceSlices.
Consult the documentation of a DRA driver to learn whether the driver uses taints and what their keys and values are.
Taints set by an admin
FEATURE STATE:Kubernetes v1.36 [beta](disabled by default)
An admin or a control plane component can taint devices without having to tell
the DRA driver to include taints in its device information in ResourceSlices.
They do that by creating DeviceTaintRules.
Each DeviceTaintRule adds one taint to devices which match the device selector.
Without such a selector, no devices are tainted.
This makes it harder to accidentally evict all pods using ResourceClaims when leaving out the selector by mistake.
Devices can be selected by giving the name of a DeviceClass, driver, pool, and/or device.
The DeviceClass selects all devices that are selected by the selectors in that DeviceClass.
With just the driver name, an admin can taint all devices managed by that driver,
for example while doing some kind of maintenance of that driver across the entire cluster.
Adding a pool name can limit the taint to a single node, if the driver manages node-local devices.
Finally, adding the device name can select one specific device.
The device name and pool name can also be used alone, if desired.
For example, drivers for node-local devices are encouraged to use the node name as their pool name.
Then tainting with that pool name automatically taints all devices on a node.
Drivers might use stable names like "gpu-0" that hide which specific device is currently assigned to that name.
To support tainting a specific hardware instance, CEL selectors can be used in a DeviceTaintRule
to match a vendor-specific unique ID attribute, if the driver supports one for its hardware.
The taint applies as long as the DeviceTaintRule exists.
It can be modified and and removed at any time.
Here is one example of a DeviceTaintRule for a fictional DRA driver:
apiVersion:resource.k8s.io/v1beta2kind:DeviceTaintRulemetadata:name:examplespec:# The entire hardware installation for this# particular driver is broken.# Evict all pods and don't schedule new ones.deviceSelector:driver:dra.example.comtaint:key:dra.example.com/unhealthyvalue:Brokeneffect:NoExecute
The kube-apiserver automatically tracks when this taint was created by setting the
timeAdded field in the spec. The toleration period starts at that time
stamp. During updates which change the effect (see simulated eviction flow
below), the kube-apiserver automatically updates the time stamp. Users can control
the time stamp explicitly by setting the field when creating a DeviceTaintRule and
by changing it to some different value when updating.
The status contains a condition added by the eviction controller:
kubectl describe devicetaintrules
Name:         example
...
Spec:
  Device Selector:
    Driver:  dra.example.com
  Taint:
    Effect:      NoExecute
    Key:         dra.example.com/unhealthy
    Time Added:  2025-11-05T18:15:37Z
    Value:       Broken
Status:
  Conditions:
    Last Transition Time:  2025-11-05T18:15:37Z
    Message:               1 pod evicted since starting the controller.
    Observed Generation:   1
    Reason:                Completed
    Status:                False
    Type:                  EvictionInProgress
Events:                    <none>
Pods get evicted by deleting them. Usually this happens very quickly,
except when a toleration for the taint delays it for a certain period or
when there are very many pods which need to be evicted. When it takes
longer, the message provides information about the current status:
2 pods need to be evicted in 2 different namespaces. 1 pod evicted since starting the controller.
The condition can be used to check whether an eviction is currently active:
Beware of the potential race between scheduler and controller observing the new
taint at different times, which can lead to pods still being scheduled at a
time when the controller thinks that there are none which need to be evicted
and thus sets this condition to False. In practice, this race is made very
unlikely by updating the status only after an intentional delay of a few
seconds.
For effect: None, the message provides information about the number of
affected devices, how many of those are allocated, and how many pods would be
evicted if the effect was NoExecute. This can be used to do a dry-run before
actually triggering eviction:
Create a DeviceTaintRule with the desired selectors and effect: None.
Review the message:
3 published devices selected. 1 allocated device selected.
1 pod would be evicted in 1 namespace if the effect was NoExecute.
This information will not be updated again. Recreate the DeviceTaintRule to trigger an update.
Published devices are those listed in ResourceSlices. Tainting them
prevents allocation for new pods. Only allocated devices cause
eviction of the pods using them.
Edit the DeviceTaintRule and change the effect into NoExecute.
Resource pool status
FEATURE STATE:Kubernetes v1.36 [alpha](disabled by default)
You can query the availability of devices in resource pools using the
ResourcePoolStatusRequest API. This provides visibility into how many devices
are available, allocated, or unavailable across your cluster's DRA resource pools.
To check resource pool status:
Create a ResourcePoolStatusRequest specifying the driver name (required) and
optionally a limit on the number of pools returned. You can also limit it to a single pool by specifying a pool name:
apiVersion:resource.k8s.io/v1beta2kind:ResourcePoolStatusRequestmetadata:name:check-gpusspec:driver:example.com/gpu# Optional: filter to a specific pool# poolName: my-pool# Optional: limit number of pools returned (default: 100, max: 1000)# limit: 10
kubectl get resourcepoolstatusrequest/check-gpus -o yaml
The status includes:
poolCount: total number of pools matching the filter (may exceed the number
of pools listed if truncated by the limit).
pools: a list of pool details, each containing:
driver and poolName: identify the pool.
generation: the latest pool generation observed across ResourceSlices.
resourceSliceCount: the number of ResourceSlices making up the pool.
totalDevices: total devices in the pool.
allocatedDevices: devices currently allocated to claims.
availableDevices: devices available for allocation
(totalDevices - allocatedDevices - unavailableDevices).
unavailableDevices: devices not available due to taints or other conditions.
nodeName: the node associated with the pool, if any.
validationError: set when the pool's data could not be fully validated
(for example, during a generation rollout). When set, device count fields
may be unset.
conditions: includes Complete (success) or Failed (error) condition types.
ResourcePoolStatusRequest objects are processed once by a controller in
kube-controller-manager. The spec is immutable once created, and the entire
object becomes immutable once the status is populated. To get updated
availability data, delete and recreate the request. Completed requests are
automatically cleaned up after 1 hour.
This feature requires explicit RBAC permissions on the ResourcePoolStatusRequest
resource. No default ClusterRoles include this permission.
Resource pool status is an alpha feature and only enabled when the
DRAResourcePoolStatus feature gate
is enabled in the kube-apiserver and kube-controller-manager.
Device binding conditions
FEATURE STATE:Kubernetes v1.36 [beta](enabled by default)
Device Binding Conditions allow the Kubernetes scheduler to delay Pod binding until
external resources, such as fabric-attached GPUs or reprogrammable FPGAs, are confirmed
to be ready.
This waiting behavior is implemented in the
PreBind phase
of the scheduling framework.
During this phase, the scheduler checks whether all required device conditions are
satisfied before proceeding with binding.
This improves scheduling reliability by avoiding premature binding and enables coordination
with external device controllers.
To use this feature, device drivers (typically managed by driver owners) must publish the
following fields in the Device section of a ResourceSlice. Cluster administrators
must enable the DRADeviceBindingConditions and DRAResourceClaimDeviceStatus feature
gates for the scheduler to honor these fields.
bindingConditions
A list of condition types that must be set to True (in the .status.conditions field of the associated ResourceClaim) before the Pod can be bound. These conditions typically represent readiness signals, such as DeviceAttached or DeviceInitialized.
bindingFailureConditions
A list of condition types that, if set to True in
status.conditions field of the associated ResourceClaim, indicate a failure state.
If any of these conditions are True, the scheduler will abort binding and reschedule the Pod.
bindsToNode
if set to true, the scheduler records the selected node name in the
status.allocation.nodeSelector field of the ResourceClaim.
This does not affect the Pod's spec.nodeSelector. Instead, it sets a node selector
inside the ResourceClaim, which external controllers can use to perform node-specific
operations such as device attachment or preparation.
All condition types listed in bindingConditions and bindingFailureConditions are evaluated
from the status.conditions field of the ResourceClaim.
External controllers are responsible for updating these conditions using standard Kubernetes
condition semantics (type, status, reason, message, lastTransitionTime).
The scheduler waits up to 600 seconds (default) for all bindingConditions to become True.
If the timeout is reached or any bindingFailureConditions are True, the scheduler
clears the allocation and reschedules the Pod.
A cluster administration can configure this timeout duration by editing the kube-scheduler configuration file.
An example of configuring this timeout in KubeSchedulerConfiguration is given below:
This example ResourceSlice has the following properties:
The ResourceSlice targets nodes labeled with accelerator-type=high-performance,
so that the scheduler uses only a specific set of eligible nodes.
The scheduler selects one node from the selected group (for example, node-3) and sets
the status.allocation.nodeSelector field in the ResourceClaim to that node name.
The dra.example.com/is-prepared binding condition indicates that the device gpu-1
must be prepared (the is-prepared condition has a status of True) before binding.
If the gpu-1 device preparation fails (the preparing-failed condition has a status of True), the scheduler aborts binding.
The scheduler waits up to 600 seconds (default) for the device to become ready.
External controllers can use the node selector in the ResourceClaim to perform
node-specific setup on the selected node.
Device binding conditions is a beta feature and is enabled by default, controlled by the
DRADeviceBindingConditions feature gate
in the kube-apiserver and kube-scheduler.
Node allocatable resources
FEATURE STATE:Kubernetes v1.36 [alpha](disabled by default)
Devices managed by DRA can have an underlying footprint composed of node-allocatable
resources, such as cpu, memory, hugepages, or ephemeral-storage.
This feature integrates these DRA-based requests into the scheduler's standard
accounting alongside regular Pod spec requests for these resources.
Users (PodSpec authors) can use a mixture of Pod-level resources, container-level resources,
and resource claims with associated node-allocatable resources. These devices represent
resources like CPUs or memory directly, or they could be accelerators, network interface cards,
or other devices that require some host resources when allocated. The DRA driver will
populate information in the ResourceSlice that tells the scheduler how to calculate the
node allocatable resources when the device is allocated to a ResourceClaim.
PodSpec authors do not need to make that calculation themselves.
When authoring a PodSpec using claims for these types of devices, there are a few things to be aware of:
When Pod-level resources are used, the sum of all container and claim resources
must not exceed the Pod-level resources; otherwise, the Pod will fail to schedule.
A container's total resource requirement is the sum of its container-level resources
and any node-allocatable resources from its associated resource claims.
Claims that consume node allocatable resources cannot be shared between Pods.
Details for DRA Driver Authors
DRA drivers declare this node allocatable resource footprint using the
nodeAllocatableResourceMappings field on devices within a ResourceSlice.
This mapping translates the requested DRA device or capacity into standard
resources that are tracked in the node's status.allocatable (note that extended
resources are not supported for this mapping). This is useful both for drivers that directly
expose native resources (like a CPU or Memory DRA driver) and for devices that
require auxiliary node dependencies (like an accelerator that needs host memory).
This mapping defines the translation of the requested DRA device or capacity
units to the corresponding quantity of the node-allocatable resource. The
scheduler calculates the exact quantity using:
Device-based scaling: If capacityKey is not set, the
allocationMultiplier multiplies the device count allocated to the claim.
The allocationMultiplier defaults to 1 if not specified.
Capacity-based scaling: If capacityKey is set, it references a
capacity name defined in the device's capacity map. The scheduler looks
up the amount of that capacity consumed by the claim and multiplies it by
the allocationMultiplier.
Example: CPU DRA Driver (Capacity-based scaling)
Here is an example where a CPU DRA driver exposes a CPU socket as a pool of 128
CPUs using DRA consumable capacity. The capacityKey links the consumed
cpu.example.com/cpu capacity directly to the node's standard cpu
allocatable resource:
apiVersion:resource.k8s.io/v1kind:ResourceSlicemetadata:name:my-node-cpusspec:driver:cpu.example.comnodeName:my-nodepool:name:socket-cpusgeneration:1resourceSliceCount:1devices:- name:socket0cpusallowMultipleAllocations:truecapacity:"cpu.example.com/cpu": "128"nodeAllocatableResourceMappings:cpu:capacityKey:"cpu.example.com/cpu"# allocationMultiplier defaults to 1 if omitted- name:socket1cpusallowMultipleAllocations:truecapacity:"cpu.example.com/cpu": "128"nodeAllocatableResourceMappings:cpu:capacityKey:"cpu.example.com/cpu"# allocationMultiplier defaults to 1 if omitted
Example: Accelerator with Auxiliary Resources (Device-based scaling)
Here is an example of a resource slice where an accelerator requires an
additional 8Gi of memory per device instance to function:
After a Pod is successfully bound to the node, the exact quantities of
node-allocatable resources allocated via DRA are included in the Pod's
status.nodeAllocatableResourceClaimStatuses field.
Node-allocatable resources is an alpha feature and is enabled when the
DRANodeAllocatableResources feature gate is enabled in the kube-apiserver,
kube-scheduler, and kubelet. In the alpha phase, the kubelet does not account
for these resources when determining QoS classes, configuring cgroups, or making
eviction decisions.
DRA device metadata in containers
FEATURE STATE:Kubernetes v1.36 [alpha]
DRA drivers can expose device metadata such as device attributes (PCI bus
addresses or mdevUUID for mediated devices) or network configuration directly
to containers as JSON files.
This lets applications inside the container discover information about allocated
devices without querying the Kubernetes API or building custom controllers.
KEP-5304 defines a
device metadata protocol that drivers must
follow so applications inside the container see a consistent layout across
drivers and clusters. The
DRA kubelet plugin library
implements this protocol for you; the rest of this section describes how to
use it.
Device metadata follows the same rules as device access: it is available inside
a container only when that container requests the device in its container
specification, and not otherwise. For how to request DRA devices in Pods and
containers, see
Request devices in workloads using DRA.
Device metadata protocol
The protocol consists of four rules:
File paths. Metadata files live inside containers under
/var/run/kubernetes.io/dra-device-attributes. For a directly referenced
ResourceClaim the path is
resourceclaims/<claimName>/<requestName>/<driverName>-metadata.json; for a
claim created from a ResourceClaimTemplate the path is
resourceclaimtemplates/<podClaimName>/<requestName>/<driverName>-metadata.json
(where podClaimName is pod.spec.resourceClaims[].name).
In cases where the ResourceClaim request uses the
prioritized list feature, only the top-level request
name is used for the <requestName> segment in the file path (that is,
the /<subrequest> portion is dropped). Inside the
JSON file, the requests[].name field carries the full
<request>/<subrequest> reference (for example, gpu/high-memory) so
that consumers can identify which alternative was allocated.
JSON API. Each file is a stream of one or more
DeviceMetadata
objects serialized as versioned JSON with apiVersion and kind, following
Kubernetes API conventions. The same metadata is encoded once per supported
API version (newest first). All objects in the stream are semantically
equivalent; consumers should use the first object they can decode.
Generation. When a driver updates a metadata file the embedded
metadata.generation field must increase so consumers can detect changes.
Container exposure. Files are typically exposed via
CDI bind-mounts, but other
mechanisms are permitted as long as the file appears at the correct path and
is read-only inside the container.
How device metadata works
Device metadata is a driver-side feature that does not require any Kubernetes
API changes or feature gates. Using the DRA kubelet plugin library is a common
way to implement a driver, but drivers can be built in other ways as well.
Drivers that use the kubelet plugin enable this feature by passing the
EnableDeviceMetadata and MetadataVersionsoptions
when starting the plugin. MetadataVersions specifies which API versions are
serialized into the metadata file and must be set explicitly by the driver.
Check the documentation of your DRA driver to learn whether device metadata is
supported and how to enable it.
When device metadata is enabled, the driver generates metadata files and CDI
bind-mount specifications while preparing the allocated devices for the pod,
before the consuming containers start. The metadata appears inside containers at
the well-known paths as defined above.
When a single request allocates devices from multiple DRA drivers, each driver
writes its own metadata file. Containers enumerate *-metadata.json files in
the request directory to discover all devices.
Each metadata file conforms to the
DeviceMetadata
API (metadata.resource.k8s.io/v1alpha1).
The following example shows a metadata file for a GPU device allocated through
a ResourceClaimTemplate:
The driver populates metadata while preparing the claim on the
node and writes the metadata file before the container starts. This is
typical for GPU drivers where device information is known at preparation time.
Deferred
In some cases, for example a network driver, the device information is
not available during device allocation time but becomes available after the
pod sandbox is created. In those cases the driver creates the CDI mount with
an empty metadata file and writes the actual metadata later via an NRI hook
that runs before the container starts. This ensures applications never see a
missing or partially written file. Each update must increment
metadata.generation so consumers can detect changes. The MetadataUpdater
API in the DRA kubelet plugin library handles generation bookkeeping
automatically for driver authors.
In both cases, metadata remains available to each consuming container for the
lifetime of that container. Metadata files are cleaned up after all containers
in the Pod have terminated.
Custom, hand-crafted drivers that do not use the DRA kubelet plugin library
must implement the device metadata protocol
themselves. That means writing DeviceMetadata JSON at the correct file paths,
incrementing metadata.generation on every update, and exposing the files
read-only inside the container through CDI or an equivalent mechanism.
List type attributes
FEATURE STATE:Kubernetes v1.36 [alpha](disabled by default)
This feature improves the ResourceSlice API, allowing DRA drivers to specify list values for device attributes instead of only scalars.
This is useful for modeling more complex internal node topologies, for example when a CPU has adjacency to multiple PCIe roots.
For ResourceClaim authors (end users), this means that the matchAttribute and distinctAttribute work better for these cases.
matchAttribute — the two attributes must have a non-empty list intersection, rather than be identical (scalar values are treated as single-item lists).
This just means that if one driver publishes a single value for, say, the PCIe root, and another driver publishes a list, the constraint is met as long as
the single value appears somewhere in the list.
distinctAttribute — the attribute values must be pairwise-disjoint (no value shared between any two devices)
To help ResourceClaim authors use attributes that may be lists inside CEL expressions, this feature also introduces an includes() CEL function.
By default, each DeviceAttribute holds exactly one scalar value: a boolean, an integer,
a string, or a semantic version string. The DRAListTypeAttributes feature gate extends
DeviceAttribute with four list-type fields, allowing a device to advertise multiple
values for a single attribute:
bools — a list of boolean values
ints — a list of 64-bit integer values
strings — a list of strings (each at most 64 characters)
versions — a list of semantic version strings per semver.org spec 2.0.0
(each at most 64 characters)
The total number of individual attribute values per device (scalar fields plus all list
elements combined) is limited to 48. When any device in a ResourceSlice uses this feature or other advanced features such as taints,
the ResourceSlice will be limited to at most 64 devices.
use list-type attributes or other advanced features such as taints.
Here is an example of a device advertising multiple supported models using a list-type
string attribute:
List type attributes is an alpha feature and only enabled when the
DRAListTypeAttributesfeature gate
is enabled in the kube-apiserver and kube-scheduler.
FEATURE STATE:Kubernetes v1.35 [alpha](disabled by default)
Gang scheduling ensures that a group of Pods are scheduled on an "all-or-nothing" basis.
If the cluster cannot accommodate the entire group (or a defined minimum number of Pods),
none of the Pods are bound to a node.
This feature depends on the PodGroup API.
Ensure the GenericWorkload
feature gate and the scheduling.k8s.io/v1alpha2API group are enabled in the cluster.
How it works
When the GangScheduling plugin is enabled, the scheduler alters the lifecycle for Pods belonging
to a PodGroup that has a gangscheduling policy.
The process follows these steps for each PodGroup:
The scheduler holds Pods in the PreEnqueue phase until:
The referenced PodGroup object exists.
The number of Pods created for the PodGroup is at least equal to minCount.
Pods do not enter the active scheduling queue until both conditions are met.
Once the quorum is met, the scheduler attempts to find placements for all Pods in the group.
It utilizes the PodGroup scheduling cycle to make a single,
atomic scheduling decision. GangScheduling plugin implements a Permit extension point that is evaluated for each
schedulable Pod during the cycle. This is used to determine whether the minCount constraint is satisfied,
by comparing the number of successfully placed pods against the minCount value.
If the scheduler finds valid placements for at least the minCount number of Pods,
it allows those successfully placed Pods to be bound to their assigned nodes.
If it cannot find enough placements to satisfy the minCount requirement, none of the Pods are scheduled.
Instead, they are moved to the unschedulable queue to wait for cluster resources to free up,
allowing other workloads to be scheduled in the meantime.
kube-scheduler
is the Kubernetes default scheduler. It is responsible for placement of Pods
on Nodes in a cluster.
Nodes in a cluster that meet the scheduling requirements of a Pod are
called feasible Nodes for the Pod. The scheduler finds feasible Nodes
for a Pod and then runs a set of functions to score the feasible Nodes,
picking a Node with the highest score among the feasible ones to run
the Pod. The scheduler then notifies the API server about this decision
in a process called Binding.
This page explains performance tuning optimizations that are relevant for
large Kubernetes clusters.
In large clusters, you can tune the scheduler's behaviour balancing
scheduling outcomes between latency (new Pods are placed quickly) and
accuracy (the scheduler rarely makes poor placement decisions).
You configure this tuning setting via kube-scheduler setting
percentageOfNodesToScore. This KubeSchedulerConfiguration setting determines
a threshold for scheduling nodes in your cluster.
Setting the threshold
The percentageOfNodesToScore option accepts whole numeric values between 0
and 100. The value 0 is a special number which indicates that the kube-scheduler
should use its compiled-in default.
If you set percentageOfNodesToScore above 100, kube-scheduler acts as if you
had set a value of 100.
To change the value, edit the
kube-scheduler configuration file
and then restart the scheduler.
In many cases, the configuration file can be found at /etc/kubernetes/config/kube-scheduler.yaml.
After you have made this change, you can run
kubectl get pods -n kube-system | grep kube-scheduler
to verify that the kube-scheduler component is healthy.
Node scoring threshold
To improve scheduling performance, the kube-scheduler can stop looking for
feasible nodes once it has found enough of them. In large clusters, this saves
time compared to a naive approach that would consider every node.
You specify a threshold for how many nodes are enough, as a whole number percentage
of all the nodes in your cluster. The kube-scheduler converts this into an
integer number of nodes. During scheduling, if the kube-scheduler has identified
enough feasible nodes to exceed the configured percentage, the kube-scheduler
stops searching for more feasible nodes and moves on to the
scoring phase.
If you don't specify a threshold, Kubernetes calculates a figure using a
linear formula that yields 50% for a 100-node cluster and yields 10%
for a 5000-node cluster. The lower bound for the automatic value is 5%.
This means that the kube-scheduler always scores at least 5% of your cluster no
matter how large the cluster is, unless you have explicitly set
percentageOfNodesToScore to be smaller than 5.
If you want the scheduler to score all nodes in your cluster, set
percentageOfNodesToScore to 100.
Example
Below is an example configuration that sets percentageOfNodesToScore to 50%.
percentageOfNodesToScore must be a value between 1 and 100 with the default
value being calculated based on the cluster size. There is also a hardcoded
minimum value of 100 nodes.
Note:
In clusters with less than 100 feasible nodes, the scheduler still
checks all the nodes because there are not enough feasible nodes to stop
the scheduler's search early.
In a small cluster, if you set a low value for percentageOfNodesToScore, your
change will have no or little effect, for a similar reason.
If your cluster has several hundred Nodes or fewer, leave this configuration option
at its default value. Making changes is unlikely to improve the
scheduler's performance significantly.
An important detail to consider when setting this value is that when a smaller
number of nodes in a cluster are checked for feasibility, some nodes are not
sent to be scored for a given Pod. As a result, a Node which could possibly
score a higher value for running the given Pod might not even be passed to the
scoring phase. This would result in a less than ideal placement of the Pod.
You should avoid setting percentageOfNodesToScore very low so that kube-scheduler
does not make frequent, poor Pod placement decisions. Avoid setting the
percentage to anything below 10%, unless the scheduler's throughput is critical
for your application and the score of nodes is not important. In other words, you
prefer to run the Pod on any Node as long as it is feasible.
How the scheduler iterates over Nodes
This section is intended for those who want to understand the internal details
of this feature.
In order to give all the Nodes in a cluster a fair chance of being considered
for running Pods, the scheduler iterates over the nodes in a round robin
fashion. You can imagine that Nodes are in an array. The scheduler starts from
the start of the array and checks feasibility of the nodes until it finds enough
Nodes as specified by percentageOfNodesToScore. For the next Pod, the
scheduler continues from the point in the Node array that it stopped at when
checking feasibility of Nodes for the previous Pod.
If Nodes are in multiple zones, the scheduler iterates over Nodes in various
zones to ensure that Nodes from different zones are considered in the
feasibility checks. As an example, consider six nodes in two zones:
Zone 1: Node 1, Node 2, Node 3, Node 4
Zone 2: Node 5, Node 6
The Scheduler evaluates feasibility of the nodes in this order:
Node 1, Node 5, Node 2, Node 6, Node 3, Node 4
After going over all the Nodes, it goes back to Node 1.
Enabling Opportunistic Batching
FEATURE STATE:Kubernetes v1.35 [beta](enabled by default)
When scheduling large workloads, pod definitions are typically identical and require the scheduler
to perform the same operations over and over again. The Opportunistic Batching
feature allows the scheduler to reuse the filtering and scoring results between scheduling cycles
which greatly speeds up the scheduling process.
Basically, this feature works like:
The scheduler schedules pod-1 and caches the scheduling result.
The scheduler schedules pod-2, 3, ... with the cached results.
The cache expires after 0.5 second. The scheduler schedules the next pod which builds a new cache.
Pods with equivalent scheduling constraints have to come to the scheduling cycle back to back. When the scheduler schedules a pod with different constraints, the cache is not used, but replaced with a new one.
We apply this batching scheduling to specific pods that:
Don't have inter pod affinity/anti-affinity
Don't have topology spread constraints
Don't have DRA (i.e., don't have any Resource Claims)
Don't request extended resources that are backed by DRA
Scheduled exclusively on nodes (i.e., placing more than one pod on one node invalidates the cache)
Also, to enable this feature, the scheduler configuration needs to:
FEATURE STATE:Kubernetes v1.35 [alpha](disabled by default)
The standard Kubernetes scheduler evaluates Pods sequentially. When multiple workloads, such as machine learning training jobs,
are submitted concurrently, this sequential evaluation can lead to resource deadlocks.
For example, two competing workloads might each schedule a subset of their Pods,
consuming cluster capacity but leaving neither workload with enough resources to fully start.
The PodGroup scheduling cycle evaluates a group of Pods as a single unit.
The scheduler attempts to find placements for all Pods in the group simultaneously.
If it cannot find sufficient resources to satisfy the entire group's requirements, none of the Pods are bound.
Additionally, treating the group as a unified entity establishes a foundational architecture
that simplifies the implementation of other group-based scheduling features.
This feature depends on the Workload API.
Ensure the GenericWorkload
feature gate and the scheduling.k8s.io/v1alpha1API group are enabled in the cluster.
PodGroup scheduling cycle
To support scheduling a group of Pods together, the kube-scheduler uses the PodGroup scheduling cycle.
Instead of processing Pods individually and holding them at a WaitOnPermit gate,
the scheduler evaluates the entire group of pending Pods belonging to a specific PodGroup collectively.
Rather than executing separate scheduling cycles for each Pod,
it evaluates feasibility for the entire group and moves directly to the binding phase afterwards.
When the scheduler pops a Pod belonging to a PodGroup, it retrieves all other queued Pods in that group.
It then sorts them deterministically based on priority and the time they were initially observed by the scheduler,
and initiates the PodGroup scheduling cycle as follows:
Snapshotting the cluster state: When the scheduler begins evaluating a PodGroup,
it takes a single snapshot of the cluster state that lasts for the entire duration of the cycle.
This ensures the evaluation remains consistent for the whole group and prevents race conditions with other events.
Finding feasible placements: The scheduler runs the PodGroup scheduling algorithm
to find valid Node placements for the Pods in the group.
Atomic decision: Depending on the algorithm's outcome, the scheduling decision
is applied atomically for the entire PodGroup.
Success: If the scheduler finds sufficient resources and valid placements for the Pods
(e.g., satisfying the minCount constraint for gang scheduling),
those Pods proceed directly to the binding cycle with their selected nodes.
Any remaining unschedulable Pods are returned to the scheduling queue to wait for available resources
so they can join the already scheduled Pods.
Furthermore, if new Pods are added to a PodGroup after others have already been scheduled,
the cycle evaluates the new Pods while accounting for the existing ones.
Failure: If the scheduler cannot find enough resources to make the PodGroup feasible
(e.g., failing to meet the minCount constraint), the entire PodGroup is considered unschedulable.
No Pods are bound, but instead, all are returned to the scheduling queue.
Standard scheduling backoff logic applies, allowing the PodGroup to be retried later.
By using this single-cycle approach, the scheduler avoids inefficient bottlenecks
where partially scheduled groups reserve cluster capacity while waiting indefinitely for the rest of their group to fit.
PodGroup scheduling algorithm
The default PodGroup scheduling algorithm relies heavily on the baseline Pod-based scheduling algorithm.
It iterates over the Pods and performs the following for each:
Finds a feasible node using the standard per-Pod filtering and scoring phases.
If the Pod fits, it is temporarily assumed and reserved on the selected node until the end of the scheduling algorithm.
If the Pod cannot fit, the scheduler attempts preemption by running the PostFilter extension point.
Checks whether the schedulable Pods meet the group's scheduling criteria
(e.g., the minCount for gang scheduling) using the Permit extension point.
If it returns a Success status for any Pod, the PodGroup is deemed feasible.
If the algorithm processes all Pods without achieving a Success status, the PodGroup is considered unschedulable.
Placement scheduling algorithm
FEATURE STATE:Kubernetes v1.36 [alpha](disabled by default)
Placement scheduling algorithm is an alternative PodGroup scheduling algorithm, which uses
scheduling plugins to find the optimal
placement for the considered PodGroup. Users can accommodate the algorithm to their specific needs
by using and configuring plugins.
The algorithm proceeds in three main phases for a given PodGroup:
Phase 1: Candidate placement generation
Generates candidate placements (subsets of nodes, that are theoretically feasible for PodGroup
assignment), for example based on the PodGroup's scheduling constraints (which can be defined
in the PodGroup object).
This phase executes as extension point: PlacementGeneratePlugin.
Phase 2: Pod-level filtering and feasibility check
Validates each proposed placement, by running a default PodGroup scheduling algorithm, to see if
the required number of Pods from the PodGroup can fit. If they can, the placement is marked as feasible.
Phase 3: Placement scoring and selection
Scores all feasible placements to select the optimal domain for the PodGroup.
This phase executes as extension point: PlacementScorePlugin.
Limitations
The PodGroup scheduling algorithm relies on specific Pod sorting and may fail to find a valid placement
that could have been discovered by processing the group's Pods in a different order. In particular:
For basic homogeneous Pod groups (i.e., those where all Pods have identical scheduling requirements
and lack inter-Pod dependencies like affinity, anti-affinity, or topology spread constraints),
the algorithm is expected to find a placement if one exists.
For heterogeneous Pod groups, finding a valid placement is not guaranteed.
For Pod groups with inter-Pod dependencies, finding a valid placement is not guaranteed.
In addition to the above, for cases involving intra-group dependencies
(e.g., when the schedulability of one Pod depends on another group member via inter-Pod affinity),
this algorithm may fail to find a placement regardless of cluster state due to its deterministic processing order.
For consistent behavior throughout the entire cycle, the algorithm requires that all Pods belonging to a single PodGroup
share the same .spec.schedulerName. This requirement is validated before the cycle starts,
and the PodGroup is rejected if the constraint is not met.
PodGroup conditions
After a PodGroup scheduling cycle completes, the scheduler updates conditions on the
PodGroup's status.conditions:
PodGroupScheduled: reports whether the PodGroup has been successfully scheduled.
DisruptionTarget: indicates the PodGroup is about to be terminated due to a
disruption such as preemption.
PodGroupScheduled
When the scheduling cycle succeeds, the condition is set to True with reason
Scheduled. For gang policy PodGroups, this means at least minCount Pods were
placed.
When scheduling fails, the condition is set to False with one of the following
reasons:
Unschedulable — the group could not be placed due to resource constraints,
affinity or anti-affinity rules, or insufficient capacity for the gang.
SchedulerError — scheduling failed because of an internal scheduler error
(for example, while parsing scheduling constraints such as nodeAffinity).
DisruptionTarget
When the scheduler preempts a PodGroup to make room for higher-priority PodGroups or
Pods, it sets this condition to True with reason PreemptionByScheduler.
You can check conditions with:
kubectl get podgroup <name> -o jsonpath='{.status.conditions}'
This article applies to resource bin packing in context of scheduling of a single pod. For bin packing when scheduling pod groups, please read the article about Topology-aware Scheduling.
In the scheduling-pluginNodeResourcesFit of kube-scheduler, there are two
scoring strategies that support the bin packing of resources: MostAllocated and RequestedToCapacityRatio.
Enabling bin packing using MostAllocated strategy
The MostAllocated strategy scores the nodes based on the utilization of resources, favoring the ones with higher allocation.
For each resource type, you can set a weight to modify its influence in the node score.
To set the MostAllocated strategy for the NodeResourcesFit plugin, use a
scheduler configuration similar to the following:
With this configuration, nodes are scored using a weighted average of utilization across all four
resources. Because intel.com/foo and intel.com/bar each carry a weight of 3 versus 1 for
CPU and memory, the utilization of those extended resources has three times more influence on the
final node score. The scheduler selects the highest-scoring node, aiming to schedule pods on
highly utilized nodes. This helps prepare for scale-down of the least utilized nodes.
To learn more about other parameters and their default configuration, see the API documentation for
NodeResourcesFitArgs.
Enabling bin packing using RequestedToCapacityRatio
The RequestedToCapacityRatio strategy allows the users to specify the resources along with weights for
each resource to score nodes based on the request to capacity ratio. This
allows users to bin pack extended resources by using appropriate parameters
to improve the utilization of scarce resources in large clusters. It favors nodes according to a
configured function of the allocated resources. The behavior of the RequestedToCapacityRatio in
the NodeResourcesFit score function can be controlled by the
scoringStrategy field.
Within the scoringStrategy field, you can configure two parameters: requestedToCapacityRatio and
resources. The shape in the requestedToCapacityRatio
parameter allows the user to tune the function as least requested or most
requested based on utilization and score values. The resources parameter
comprises both the name of the resource to be considered during scoring and
its corresponding weight, which specifies the weight of each resource.
Below is an example configuration that sets
the bin packing behavior for extended resources intel.com/foo and intel.com/bar
using the requestedToCapacityRatio field.
In this example, only the extended resources intel.com/foo and intel.com/bar are listed in
resources. The NodeResourcesFit plugin therefore scores nodes based solely on the utilization
of those two resources; CPU and memory do not contribute to the score from this plugin. Because the
configured shape assigns a higher score as utilization increases (score: 0 at utilization: 0
rising to score: 10 at utilization: 100), the scheduler prefers nodes where more of these
extended resources are already in use, bin-packing requests for them onto as few nodes as possible.
To include CPU and memory in this scoring strategy, add them to the resources list. Note that all
resources in the list share the same shape function, so doing so will apply the same bin-packing
curve to those resources as well.
Referencing the KubeSchedulerConfiguration file with the kube-scheduler
flag --config=/path/to/config/file will pass the configuration to the
scheduler.
To learn more about other parameters and their default configuration, see the API documentation for
NodeResourcesFitArgs.
Tuning the score function
shape is used to specify the behavior of the RequestedToCapacityRatio function.
The above arguments give the node a score of 0 if utilization is 0% and 10 for
utilization 100%, thus enabling bin packing behavior. To enable least
requested the score value must be reversed as follows.
The weight parameter is optional and is set to 1 if not specified. Also, the
weight cannot be set to a negative value.
Node scoring for capacity allocation
This section is intended for those who want to understand the internal details
of this feature.
Below is an example of how the node score is calculated for a given set of values.
FEATURE STATE:Kubernetes v1.36 [alpha](disabled by default)
Workload-aware preemption introduces a preemption mechanism specifically designed for PodGroups.
When a PodGroup cannot be scheduled, the scheduler utilizes a preemption logic that tries to
make scheduling of this PodGroup possible. This approach is used exclusively during PodGroup scheduling
and replaces the default preemption mechanism for pods from a given PodGroup.
When this feature is enabled, the scheduler treats the PodGroup as a single preemptor unit,
rather than evaluating individual pods from a PodGroup in isolation. To make room for the pending pods in the group,
it searches for victims across the entire cluster,
and knows how to treat and preempt other PodGroups as victims according to their disruption modes.
The workload-aware preemption process follows the same principles
as default preemption
with a few differences:
Cluster-wide domain: Instead of evaluating preemption node by node,
the scheduler evaluates the entire cluster as a single domain.
It selects a set of victims across multiple nodes that can be removed
to make enough room for the preemptor PodGroup to be scheduled.
Victim importance hierarchy: The scheduler decides which preemption units
(individual pods or PodGroups) are more critical and should be spared from preemption
using a strict hierarchy:
Priority: Higher priority units are always more important.
Workload type: PodGroups are considered more important than individual Pods of the same priority.
Group size (PodGroups): If both units are PodGroups,
the one with more members (larger size) is considered more important.
Start time: Units that started earlier are more important.
Pod group priority and disruption: The scheduler considers the specific
priority and disruption mode of a PodGroup
to evaluate if and how its pods can be preempted during preemption events.
Note:
When scheduling a single Pod, the default pod preemption applies.
As of 1.36, when the scheduler performs a default preemption for a single Pod
and it attempts to preempt a Pod belonging to a PodGroup, it does not
respect the priority or disruptionMode fields of that PodGroup.
Pods can have priority. Priority indicates the
importance of a Pod relative to other Pods. If a Pod cannot be scheduled, the
scheduler tries to preempt (evict) lower priority Pods to make scheduling of the
pending Pod possible.
Warning:
In a cluster where not all users are trusted, a malicious user could create Pods
at the highest possible priorities, causing other Pods to be evicted/not get
scheduled.
An administrator can use ResourceQuota to prevent users from creating pods at
high priorities.
Create Pods withpriorityClassName set to one of the added
PriorityClasses. Of course you do not need to create the Pods directly;
normally you would add priorityClassName to the Pod template of a
collection object like a Deployment.
Keep reading for more information about these steps.
A PriorityClass is a non-namespaced object that defines a mapping from a
priority class name to the integer value of the priority. The name is specified
in the name field of the PriorityClass object's metadata. The value is
specified in the required value field. The higher the value, the higher the
priority.
The name of a PriorityClass object must be a valid
DNS subdomain name,
and it cannot be prefixed with system-.
A PriorityClass object can have any 32-bit integer value smaller than or equal
to 1 billion. This means that the range of values for a PriorityClass object is
from -2147483648 to 1000000000 inclusive. Larger numbers are reserved for
built-in PriorityClasses that represent critical system Pods. A cluster
admin should create one PriorityClass object for each such mapping that they want.
PriorityClass also has two optional fields: globalDefault and description.
The globalDefault field indicates that the value of this PriorityClass should
be used for Pods without a priorityClassName. Only one PriorityClass with
globalDefault set to true can exist in the system. If there is no
PriorityClass with globalDefault set, the priority of Pods with no
priorityClassName is zero.
The description field is an arbitrary string. It is meant to tell users of the
cluster when they should use this PriorityClass.
Notes about PodPriority and existing clusters
If you upgrade an existing cluster without this feature, the priority
of your existing Pods is effectively zero.
Addition of a PriorityClass with globalDefault set to true does not
change the priorities of existing Pods. The value of such a PriorityClass is
used only for Pods created after the PriorityClass is added.
If you delete a PriorityClass, existing Pods that use the name of the
deleted PriorityClass remain unchanged, but you cannot create more Pods that
use the name of the deleted PriorityClass.
Example PriorityClass
apiVersion:scheduling.k8s.io/v1kind:PriorityClassmetadata:name:high-priorityvalue:1000000globalDefault:falsedescription:"This priority class should be used for XYZ service pods only."
Non-preempting PriorityClass
FEATURE STATE:Kubernetes v1.24 [stable]
Pods with preemptionPolicy: Never will be placed in the scheduling queue
ahead of lower-priority pods,
but they cannot preempt other pods.
A non-preempting pod waiting to be scheduled will stay in the scheduling queue,
until sufficient resources are free,
and it can be scheduled.
Non-preempting pods,
like other pods,
are subject to scheduler back-off.
This means that if the scheduler tries these pods and they cannot be scheduled,
they will be retried with lower frequency,
allowing other pods with lower priority to be scheduled before them.
Non-preempting pods may still be preempted by other,
high-priority pods.
preemptionPolicy defaults to PreemptLowerPriority,
which will allow pods of that PriorityClass to preempt lower-priority pods
(as is existing default behavior).
If preemptionPolicy is set to Never,
pods in that PriorityClass will be non-preempting.
An example use case is for data science workloads.
A user may submit a job that they want to be prioritized above other workloads,
but do not wish to discard existing work by preempting running pods.
The high priority job with preemptionPolicy: Never will be scheduled
ahead of other queued pods,
as soon as sufficient cluster resources "naturally" become free.
Example Non-preempting PriorityClass
apiVersion:scheduling.k8s.io/v1kind:PriorityClassmetadata:name:high-priority-nonpreemptingvalue:1000000preemptionPolicy:NeverglobalDefault:falsedescription:"This priority class will not cause other pods to be preempted."
Pod priority
After you have one or more PriorityClasses, you can create Pods that specify one
of those PriorityClass names in their specifications. The priority admission
controller uses the priorityClassName field and populates the integer value of
the priority. If the priority class is not found, the Pod is rejected.
The following YAML is an example of a Pod configuration that uses the
PriorityClass created in the preceding example. The priority admission
controller checks the specification and resolves the priority of the Pod to
1000000.
When Pod priority is enabled, the scheduler orders pending Pods by
their priority and a pending Pod is placed ahead of other pending Pods
with lower priority in the scheduling queue. As a result, the higher
priority Pod may be scheduled sooner than Pods with lower priority if
its scheduling requirements are met. If such Pod cannot be scheduled, the
scheduler will continue and try to schedule other lower priority Pods.
Preemption
When Pods are created, they go to a queue and wait to be scheduled. The
scheduler picks a Pod from the queue and tries to schedule it on a Node. If no
Node is found that satisfies all the specified requirements of the Pod,
preemption logic is triggered for the pending Pod. Let's call the pending Pod P.
Preemption logic tries to find a Node where removal of one or more Pods with
lower priority than P would enable P to be scheduled on that Node. If such a
Node is found, one or more lower priority Pods get evicted from the Node. After
the Pods are gone, P can be scheduled on the Node.
User exposed information
When Pod P preempts one or more Pods on Node N, nominatedNodeName field of Pod
P's status is set to the name of Node N. This field helps the scheduler track
resources reserved for Pod P and also gives users information about preemptions
in their clusters.
Please note that Pod P is not necessarily scheduled to the "nominated Node".
The scheduler always tries the "nominated Node" before iterating over any other nodes.
After victim Pods are preempted, they get their graceful termination period. If
another node becomes available while scheduler is waiting for the victim Pods to
terminate, scheduler may use the other node to schedule Pod P. As a result
nominatedNodeName and nodeName of Pod spec are not always the same. Also, if
the scheduler preempts Pods on Node N, but then a higher priority Pod than Pod P
arrives, the scheduler may give Node N to the new higher priority Pod. In such a
case, scheduler clears nominatedNodeName of Pod P. By doing this, scheduler
makes Pod P eligible to preempt Pods on another Node.
Limitations of preemption
Graceful termination of preemption victims
When Pods are preempted, the victims get their
graceful termination period.
They have that much time to finish their work and exit. If they don't, they are
killed. This graceful termination period creates a time gap between the point
that the scheduler preempts Pods and the time when the pending Pod (P) can be
scheduled on the Node (N). In the meantime, the scheduler keeps scheduling other
pending Pods. As victims exit or get terminated, the scheduler tries to schedule
Pods in the pending queue. Therefore, there is usually a time gap between the
point that scheduler preempts victims and the time that Pod P is scheduled. In
order to minimize this gap, one can set graceful termination period of lower
priority Pods to zero or a small number.
PodDisruptionBudget is supported, but not guaranteed
A PodDisruptionBudget (PDB)
allows application owners to limit the number of Pods of a replicated application
that are down simultaneously from voluntary disruptions. Kubernetes supports
PDB when preempting Pods, but respecting PDB is best effort. The scheduler tries
to find victims whose PDB are not violated by preemption, but if no such victims
are found, preemption will still happen, and lower priority Pods will be removed
despite their PDBs being violated.
Inter-Pod affinity on lower-priority Pods
A Node is considered for preemption only when the answer to this question is
yes: "If all the Pods with lower priority than the pending Pod are removed from
the Node, can the pending Pod be scheduled on the Node?"
Note:
Preemption does not necessarily remove all lower-priority
Pods. If the pending Pod can be scheduled by removing fewer than all
lower-priority Pods, then only a portion of the lower-priority Pods are removed.
Even so, the answer to the preceding question must be yes. If the answer is no,
the Node is not considered for preemption.
If a pending Pod has inter-pod affinity
to one or more of the lower-priority Pods on the Node, the inter-Pod affinity
rule cannot be satisfied in the absence of those lower-priority Pods. In this case,
the scheduler does not preempt any Pods on the Node. Instead, it looks for another
Node. The scheduler might find a suitable Node or it might not. There is no
guarantee that the pending Pod can be scheduled.
Our recommended solution for this problem is to create inter-Pod affinity only
towards equal or higher priority Pods.
Cross node preemption
Suppose a Node N is being considered for preemption so that a pending Pod P can
be scheduled on N. P might become feasible on N only if a Pod on another Node is
preempted. Here's an example:
Pod P is being considered for Node N.
Pod Q is running on another Node in the same Zone as Node N.
Pod P has Zone-wide anti-affinity with Pod Q (topologyKey: topology.kubernetes.io/zone).
There are no other cases of anti-affinity between Pod P and other Pods in
the Zone.
In order to schedule Pod P on Node N, Pod Q can be preempted, but scheduler
does not perform cross-node preemption. So, Pod P will be deemed
unschedulable on Node N.
If Pod Q were removed from its Node, the Pod anti-affinity violation would be
gone, and Pod P could possibly be scheduled on Node N.
We may consider adding cross Node preemption in future versions if there is
enough demand and if we find an algorithm with reasonable performance.
Troubleshooting
Pod priority and preemption can have unwanted side effects. Here are some
examples of potential problems and ways to deal with them.
Pods are preempted unnecessarily
Preemption removes existing Pods from a cluster under resource pressure to make
room for higher priority pending Pods. If you give high priorities to
certain Pods by mistake, these unintentionally high priority Pods may cause
preemption in your cluster. Pod priority is specified by setting the
priorityClassName field in the Pod's specification. The integer value for
priority is then resolved and populated to the priority field of podSpec.
To address the problem, you can change the priorityClassName for those Pods
to use lower priority classes, or leave that field empty. An empty
priorityClassName is resolved to zero by default.
When a Pod is preempted, there will be events recorded for the preempted Pod.
Preemption should happen only when a cluster does not have enough resources for
a Pod. In such cases, preemption happens only when the priority of the pending
Pod (preemptor) is higher than the victim Pods. Preemption must not happen when
there is no pending Pod, or when the pending Pods have equal or lower priority
than the victims. If preemption happens in such scenarios, please file an issue.
Pods are preempted, but the preemptor is not scheduled
When pods are preempted, they receive their requested graceful termination
period, which is by default 30 seconds. If the victim Pods do not terminate within
this period, they are forcibly terminated. Once all the victims go away, the
preemptor Pod can be scheduled.
While the preemptor Pod is waiting for the victims to go away, a higher priority
Pod may be created that fits on the same Node. In this case, the scheduler will
schedule the higher priority Pod instead of the preemptor.
This is expected behavior: the Pod with the higher priority should take the place
of a Pod with a lower priority.
Higher priority Pods are preempted before lower priority pods
The scheduler tries to find nodes that can run a pending Pod. If no node is
found, the scheduler tries to remove Pods with lower priority from an arbitrary
node in order to make room for the pending pod.
If a node with low priority Pods is not feasible to run the pending Pod, the scheduler
may choose another node with higher priority Pods (compared to the Pods on the
other node) for preemption. The victims must still have lower priority than the
preemptor Pod.
When there are multiple nodes available for preemption, the scheduler tries to
choose the node with a set of Pods with lowest priority. However, if such Pods
have PodDisruptionBudget that would be violated if they are preempted then the
scheduler may choose another node with higher priority Pods.
When multiple nodes exist for preemption and none of the above scenarios apply,
the scheduler chooses a node with the lowest priority.
Interactions between Pod priority and quality of service
Pod priority and QoS class
are two orthogonal features with few interactions and no default restrictions on
setting the priority of a Pod based on its QoS classes. The scheduler's
preemption logic does not consider QoS when choosing preemption targets.
Preemption considers Pod priority and attempts to choose a set of targets with
the lowest priority. Higher-priority Pods are considered for preemption only if
the removal of the lowest priority Pods is not sufficient to allow the scheduler
to schedule the preemptor Pod, or if the lowest priority Pods are protected by
PodDisruptionBudget.
The kubelet uses Priority to determine pod order for node-pressure eviction.
You can use the QoS class to estimate the order in which pods are most likely
to get evicted. The kubelet ranks pods for eviction based on the following factors:
Whether the starved resource usage exceeds requests
kubelet node-pressure eviction does not evict Pods when their
usage does not exceed their requests. If a Pod with lower priority is not
exceeding its requests, it won't be evicted. Another Pod with higher priority
that exceeds its requests may be evicted.
Node-pressure eviction is the process by which the kubelet proactively terminates
pods to reclaim resource
on nodes.
The kubelet monitors resources
like memory, disk space, and filesystem inodes on your cluster's nodes.
When one or more of these resources reach specific consumption levels, the
kubelet can proactively fail one or more pods on the node to reclaim resources
and prevent starvation.
During a node-pressure eviction, the kubelet sets the phase for the
selected pods to Failed, and terminates the Pod.
The kubelet does not respect your configured PodDisruptionBudget
or the pod's
terminationGracePeriodSeconds. If you use soft eviction thresholds,
the kubelet respects your configured eviction-max-pod-grace-period. If you use
hard eviction thresholds, the kubelet uses a 0s grace period (immediate shutdown) for termination.
Self healing behavior
The kubelet attempts to reclaim node-level resources
before it terminates end-user pods. For example, it removes unused container
images when disk resources are starved.
If the pods are managed by a workload
management object (such as StatefulSet
or Deployment) that
replaces failed pods, the control plane (kube-controller-manager) creates new
pods in place of the evicted pods.
Self healing for static pods
If you are running a static pod
on a node that is under resource pressure, the kubelet may evict that static
Pod. The kubelet then tries to create a replacement, because static Pods always
represent an intent to run a Pod on that node.
The kubelet takes the priority of the static pod into account when creating
a replacement. If the static pod manifest specifies a low priority, and there
are higher-priority Pods defined within the cluster's control plane, and the
node is under resource pressure, the kubelet may not be able to make room for
that static pod. The kubelet continues to attempt to run all static pods even
when there is resource pressure on a node.
Eviction signals and thresholds
The kubelet uses various parameters to make eviction decisions, like the following:
Eviction signals
Eviction thresholds
Monitoring intervals
Eviction signals
Eviction signals are the current state of a particular resource at a specific
point in time. The kubelet uses eviction signals to make eviction decisions by
comparing the signals to eviction thresholds, which are the minimum amount of
the resource that should be available on the node.
In this table, the Description column shows how kubelet gets the value of the
signal. Each signal supports either a percentage or a literal value. The kubelet
calculates the percentage value relative to the total capacity associated with
the signal.
Memory signals
On Linux nodes, the value for memory.available is derived from the cgroupfs instead of tools
like free -m. This is important because free -m does not work in a
container, and if users use the node allocatable
feature, out of resource decisions
are made local to the end user Pod part of the cgroup hierarchy as well as the
root node. This script or
cgroupv2 script
reproduces the same set of steps that the kubelet performs to calculate
memory.available. The kubelet excludes inactive_file (the number of bytes of
file-backed memory on the inactive LRU list) from its calculation, as it assumes that
memory is reclaimable under pressure.
Note:
FEATURE STATE:Kubernetes v1.37 [beta](enabled by default)
On nodes with hugepages
configured, the kubelet subtracts the node's total hugepage capacity from
memory.available used by eviction manager.
Without this adjustment, hugepage-reserved RAM inflates
AvailableBytes because the memory cgroup controller does not track hugetlb
allocations in its working set. This can delay eviction and lead to OOM kills.
To restore the previous behavior temporarily while adopting your workloads, disable the HugepageAwareEvictionfeature gate.
On Windows nodes, the value for memory.available is derived from the node's global
memory commit levels (queried through the GetPerformanceInfo()
system call) by subtracting the node's global CommitTotal from the node's CommitLimit. Please note that CommitLimit can change if the node's page-file size changes!
Filesystem signals
The kubelet recognizes three specific filesystem identifiers that can be used with
eviction signals (<identifier>.inodesFree or <identifier>.available):
nodefs: The node's main filesystem, used for local disk volumes,
emptyDir volumes not backed by memory, log storage, ephemeral storage,
and more. For example, nodefs contains /var/lib/kubelet.
imagefs: An optional filesystem that container runtimes can use to store
container images (which are the read-only layers). If there is no separate
containerfs, the image filesystem also stores container writable layers.
containerfs: An optional filesystem that container runtimes can use to
store container writable layers. When containerfs is used, the imagefs
filesystem can be split to only store images (read-only layers) and nothing
else.
These identifiers describe the filesystems as the kubelet observes them. They do
not always mean three different mount points: in common layouts, two or all
three identifiers can refer to the same underlying filesystem.
Note:
FEATURE STATE:Kubernetes v1.31 [beta](enabled by default)
The split image filesystem feature adds new eviction signals, thresholds, and
metrics for containerfs. To use containerfs, the Kubernetes release
v1.36 requires the KubeletSeparateDiskGCfeature gate to
be enabled. For Kubernetes v1.36, only CRI-O (v1.29 or
higher) offers containerfs filesystem support.
The kubelet supports three common layouts for container filesystems:
Everything is on the single nodefs, also referred to as "rootfs" or
simply "root". In this layout, nodefs, imagefs, and containerfs
all refer to the same underlying filesystem.
Container runtime storage is on a dedicated disk, separate from the root
filesystem. In this layout, imagefs and containerfs refer to the same
underlying filesystem, which stores both image layers and container writable
layers. This is often referred to as "split disk" (or "separate disk")
filesystem.
Container writable layers are on nodefs, and the container images
(read-only layers) are stored on a separate imagefs. In this layout,
containerfs and nodefs refer to the same underlying filesystem. This is
often referred to as a "split image" filesystem.
The kubelet will attempt to auto-discover these filesystems with their current
configuration directly from the underlying container runtime and will ignore
other local node filesystems.
The kubelet does not support other container filesystems or storage configurations,
and it does not currently support multiple filesystems for images and containers.
Deprecated kubelet garbage collection features
Some kubelet garbage collection features are deprecated in favor of eviction:
Existing Flag
Rationale
--maximum-dead-containers
deprecated once old logs are stored outside of container's context
--maximum-dead-containers-per-container
deprecated once old logs are stored outside of container's context
--minimum-container-ttl-duration
deprecated once old logs are stored outside of container's context
Eviction thresholds
You can specify custom eviction thresholds for the kubelet to use when it makes
eviction decisions. You can configure soft and
hard eviction thresholds.
Eviction thresholds have the form [eviction-signal][operator][quantity], where:
quantity is the eviction threshold amount, such as 1Gi. The value of quantity
must match the quantity representation used by Kubernetes. You can use either
literal values or percentages (%).
For example, if a node has 10GiB of total memory and you want trigger eviction if
the available memory falls below 1GiB, you can define the eviction threshold as
either memory.available<10% or memory.available<1Gi (you cannot use both).
Soft eviction thresholds
A soft eviction threshold pairs an eviction threshold with a required
administrator-specified grace period. The kubelet does not evict pods until the
grace period is exceeded. The kubelet returns an error on startup if you do
not specify a grace period.
You can specify both a soft eviction threshold grace period and a maximum
allowed pod termination grace period for kubelet to use during evictions. If you
specify a maximum allowed grace period and the soft eviction threshold is met,
the kubelet uses the lesser of the two grace periods. If you do not specify a
maximum allowed grace period, the kubelet kills evicted pods immediately without
graceful termination.
You can use the following flags to configure soft eviction thresholds:
eviction-soft: A set of eviction thresholds like memory.available<1.5Gi
that can trigger pod eviction if held over the specified grace period.
eviction-soft-grace-period: A set of eviction grace periods like memory.available=1m30s
that define how long a soft eviction threshold must hold before triggering a Pod eviction.
eviction-max-pod-grace-period: The maximum allowed grace period (in seconds)
to use when terminating pods in response to a soft eviction threshold being met.
Hard eviction thresholds
A hard eviction threshold has no grace period. When a hard eviction threshold is
met, the kubelet kills pods immediately without graceful termination to reclaim
the starved resource.
You can use the eviction-hard flag to configure a set of hard eviction
thresholds like memory.available<1Gi.
The kubelet has the following default hard eviction thresholds:
memory.available<100Mi (Linux nodes)
memory.available<500Mi (Windows nodes)
nodefs.available<10%
imagefs.available<15%
nodefs.inodesFree<5% (Linux nodes)
imagefs.inodesFree<5% (Linux nodes)
These default values of hard eviction thresholds will only be set if none
of the parameters is changed. If you change the value of any parameter,
then the values of other parameters will not be inherited as the default
values and will be set to zero. In order to provide custom values, you
should provide all the thresholds respectively. You can also set the kubelet config
MergeDefaultEvictionSettings to true in the kubelet configuration file.
If set to true and any parameter is changed, then the other parameters will
inherit their default values instead of 0.
The containerfs.available and containerfs.inodesFree (Linux nodes) default
eviction thresholds will be set as follows:
If containerfs and nodefs refer to the same underlying filesystem, then
containerfs thresholds are set the same as nodefs.
If containerfs and imagefs refer to the same underlying filesystem, then
containerfs thresholds are set the same as imagefs.
Setting custom overrides for thresholds related to containerfs is not
supported, and a warning will be issued if an attempt to do so is made; any
provided custom values will be ignored.
Eviction monitoring interval
The kubelet evaluates eviction thresholds based on its configured housekeeping-interval,
which defaults to 10s.
Node conditions
The kubelet reports node conditions
to reflect that the node is under pressure because hard or soft eviction
threshold is met, independent of configured grace periods.
The kubelet maps eviction signals to node conditions as follows:
Node Condition
Eviction Signal
Description
MemoryPressure
memory.available
Available memory on the node has satisfied an eviction threshold
DiskPressure
nodefs.available, nodefs.inodesFree, imagefs.available, imagefs.inodesFree, containerfs.available, or containerfs.inodesFree
Available disk space and inodes on either the node's root filesystem, image filesystem, or container filesystem has satisfied an eviction threshold
PIDPressure
pid.available
Available processes identifiers on the (Linux) node has fallen below an eviction threshold
The control plane also maps
these node conditions to taints.
The kubelet updates the node conditions based on the configured
--node-status-update-frequency, which defaults to 10s.
Node condition oscillation
In some cases, nodes oscillate above and below soft eviction thresholds without
holding for the defined grace periods. This causes the reported node condition
to constantly switch between true and false, leading to bad eviction decisions.
To protect against oscillation, you can use the eviction-pressure-transition-period
flag, which controls how long the kubelet must wait before transitioning a node
condition to a different state. The transition period has a default value of 5m.
Reclaiming node level resources
The kubelet tries to reclaim node-level resources before it evicts end-user pods.
When a DiskPressure node condition is reported, the kubelet reclaims node-level
resources based on the filesystems on the node.
Without imagefs or containerfs
If the node only has a nodefs filesystem that meets eviction thresholds,
the kubelet frees up disk space in the following order:
Garbage collect dead pods and containers.
Delete unused images.
With imagefs
If the node has a dedicated imagefs filesystem for container runtimes to use,
the kubelet does the following:
If the nodefs filesystem meets the eviction thresholds, the kubelet garbage
collects dead pods and containers.
If the imagefs filesystem meets the eviction thresholds, the kubelet
deletes all unused images.
With imagefs and containerfs
If the node has a dedicated containerfs alongside the imagefs filesystem
configured for the container runtimes to use, then kubelet will attempt to
reclaim resources as follows:
If the containerfs filesystem meets the eviction thresholds, the kubelet
garbage collects dead pods and containers.
If the imagefs filesystem meets the eviction thresholds, the kubelet
deletes all unused images.
Pod selection for kubelet eviction
If the kubelet's attempts to reclaim node-level resources don't bring the eviction
signal below the threshold, the kubelet begins to evict end-user pods.
The kubelet uses the following parameters to determine the pod eviction order:
As a result, kubelet ranks and evicts pods in the following order:
BestEffort or Burstable pods where the usage exceeds requests. These pods
are evicted based on their Priority and then by how much their usage level
exceeds the request.
Guaranteed pods and Burstable pods where the usage is less than requests
are evicted last, based on their Priority.
Note:
The kubelet does not use the pod's QoS class to determine the eviction order.
You can use the QoS class to estimate the most likely pod eviction order when
reclaiming resources like memory. QoS classification does not apply to EphemeralStorage requests,
so the above scenario will not apply if the node is, for example, under DiskPressure.
Guaranteed pods are guaranteed only when requests and limits are specified for
all the containers and they are equal. These pods will never be evicted because
of another pod's resource consumption. If a system daemon (such as kubelet
and journald) is consuming more resources than were reserved via
system-reserved or kube-reserved allocations, and the node only has
Guaranteed or Burstable pods using less resources than requests left on it,
then the kubelet must choose to evict one of these pods to preserve node stability
and to limit the impact of resource starvation on other pods. In this case, it
will choose to evict pods of lowest Priority first.
If you are running a static pod
and want to avoid having it evicted under resource pressure, set the
priority field for that Pod directly. Static pods do not support the
priorityClassName field.
When the kubelet evicts pods in response to inode or process ID starvation, it uses
the Pods' relative priority to determine the eviction order, because inodes and PIDs have no
requests.
The kubelet sorts pods differently based on whether the node has a dedicated
imagefs or containerfs filesystem:
Without imagefs or containerfs (nodefs and imagefs use the same filesystem)
If nodefs triggers evictions, the kubelet sorts pods based on their
total disk usage (local volumes + logs and a writable layer of all containers).
With imagefs (nodefs and imagefs filesystems are separate)
If nodefs triggers evictions, the kubelet sorts pods based on nodefs
usage (local volumes + logs of all containers).
If imagefs triggers evictions, the kubelet sorts pods based on the
writable layer usage of all containers.
With imagefs and containerfs (imagefs and containerfs have been split)
If containerfs triggers evictions, the kubelet sorts pods based on
containerfs usage (local volumes + logs and a writable layer of all containers).
If imagefs triggers evictions, the kubelet sorts pods based on the
storage of images rank, which represents the disk usage of a given image.
Minimum eviction reclaim
Note:
As of Kubernetes v1.36, you cannot set a custom value
for the containerfs.available metric. The configuration for this specific
metric will be set automatically to reflect values set for either the nodefs
or imagefs, depending on the configuration.
In some cases, pod eviction only reclaims a small amount of the starved resource.
This can lead to the kubelet repeatedly hitting the configured eviction thresholds
and triggering multiple evictions.
You can use the --eviction-minimum-reclaim flag or a kubelet config file
to configure a minimum reclaim amount for each resource. When the kubelet notices
that a resource is starved, it continues to reclaim that resource until it
reclaims the quantity you specify.
For example, the following configuration sets minimum reclaim amounts:
In this example, if the nodefs.available signal meets the eviction threshold,
the kubelet reclaims the resource until the signal reaches the threshold of 1GiB,
and then continues to reclaim the minimum amount of 500MiB, until the available
nodefs storage value reaches 1.5GiB.
Similarly, the kubelet tries to reclaim the imagefs resource until the imagefs.available
value reaches 102Gi, representing 102 GiB of available container image storage. If the amount
of storage that the kubelet could reclaim is less than 2GiB, the kubelet doesn't reclaim anything.
The default eviction-minimum-reclaim is 0 for all resources.
Node out of memory behavior
If the node experiences an out of memory (OOM) event prior to the kubelet
being able to reclaim memory, the node depends on the oom_killer
to respond.
The kubelet sets an oom_score_adj value for each container based on the QoS for the pod.
The kubelet also sets an oom_score_adj value of -997 for any containers in Pods that have
system-node-criticalPriority.
If the kubelet can't reclaim memory before a node experiences OOM, the
oom_killer calculates an oom_score based on the percentage of memory it's
using on the node, and then adds the oom_score_adj to get an effective oom_score
for each container. It then kills the container with the highest score.
This means that containers in low QoS pods that consume a large amount of memory
relative to their scheduling requests are killed first.
Unlike pod eviction, if a container is OOM killed, the kubelet can restart it
based on its restartPolicy.
Good practices
The following sections describe good practice for eviction configuration.
Schedulable resources and eviction policies
When you configure the kubelet with an eviction policy, you should make sure that
the scheduler will not schedule pods if they will trigger eviction because they
immediately induce memory pressure.
Consider the following scenario:
Node memory capacity: 10GiB
Operator wants to reserve 10% of memory capacity for system daemons (kernel, kubelet, etc.)
Operator wants to evict Pods at 95% memory utilization to reduce incidence of system OOM.
For this to work, the kubelet is launched as follows:
In this configuration, the --system-reserved flag reserves 1.5GiB of memory
for the system, which is 10% of the total memory + the eviction threshold amount.
The node can reach the eviction threshold if a pod is using more than its request,
or if the system is using more than 1GiB of memory, which makes the memory.available
signal fall below 500MiB and triggers the threshold.
DaemonSets and node-pressure eviction
Pod priority is a major factor in making eviction decisions. If you do not want
the kubelet to evict pods that belong to a DaemonSet, give those pods a high
enough priority by specifying a suitable priorityClassName in the pod spec.
You can also use a lower priority, or the default, to only allow pods from that
DaemonSet to run when there are enough resources.
Known issues
The following sections describe known issues related to out of resource handling.
kubelet may not observe memory pressure right away
By default, the kubelet polls cAdvisor to collect memory usage stats at a
regular interval. If memory usage increases within that window rapidly, the
kubelet may not observe MemoryPressure fast enough, and the OOM killer
will still be invoked.
You can use the --kernel-memcg-notification flag to enable the memcg
notification API on the kubelet to get notified immediately when a threshold
is crossed.
If you are not trying to achieve extreme utilization, but a sensible measure of
overcommit, a viable workaround for this issue is to use the --kube-reserved
and --system-reserved flags to allocate memory for the system.
active_file memory is not considered as available memory
On Linux, the kernel tracks the number of bytes of file-backed memory on active
least recently used (LRU) list as the active_file statistic. The kubelet treats active_file memory
areas as not reclaimable. For workloads that make intensive use of block-backed
local storage, including ephemeral local storage, kernel-level caches of file
and block data means that many recently accessed cache pages are likely to be
counted as active_file. If enough of these kernel block buffers are on the
active LRU list, the kubelet is liable to observe this as high resource use and
taint the node as experiencing memory pressure - triggering pod eviction.
You can work around that behavior by setting the memory limit and memory request
the same for containers likely to perform intensive I/O activity. You will need
to estimate or measure an optimal memory limit value for that container.
API-initiated eviction is the process by which you use the Eviction API
to create an Eviction object that triggers graceful pod termination.
You can request eviction by calling the Eviction API directly, or programmatically
using a client of the API server, like the kubectl drain command. This
creates an Eviction object, which causes the API server to terminate the Pod.
Using the API to create an Eviction object for a Pod is like performing a
policy-controlled DELETE operation
on the Pod.
Calling the Eviction API
You can use a Kubernetes language client
to access the Kubernetes API and create an Eviction object. To do this, you
POST the attempted operation, similar to the following example:
Note:
policy/v1 Eviction is available in v1.22+. Use policy/v1beta1 with prior releases.
When you request an eviction using the API, the API server performs admission
checks and responds in one of the following ways:
200 OK: the eviction is allowed, the Eviction subresource is created, and
the Pod is deleted, similar to sending a DELETE request to the Pod URL.
429 Too Many Requests: the eviction is not currently allowed because of the
configured PodDisruptionBudget.
You may be able to attempt the eviction again later. You might also see this
response because of API rate limiting.
500 Internal Server Error: the eviction is not allowed because there is a
misconfiguration, like if multiple PodDisruptionBudgets reference the same Pod.
If the Pod you want to evict isn't part of a workload that has a
PodDisruptionBudget, the API server always returns 200 OK and allows the
eviction.
If the API server allows the eviction, the Pod is deleted as follows:
The Pod resource in the API server is updated with a deletion timestamp,
after which the API server considers the Pod resource to be terminated. The
Pod resource is also marked with the configured grace period.
The kubelet on the node where the local Pod is running notices that the Pod
resource is marked for termination and starts to gracefully shut down the
local Pod.
While the kubelet is shutting the Pod down, the control plane removes the Pod
from EndpointSlice
objects. As a result, controllers no longer consider the Pod as a valid object.
After the grace period for the Pod expires, the kubelet forcefully terminates
the local Pod.
The kubelet tells the API server to remove the Pod resource.
The API server deletes the Pod resource.
Troubleshooting stuck evictions
In some cases, your applications may enter a broken state, where the Eviction
API will only return 429 or 500 responses until you intervene. This can
happen if, for example, a ReplicaSet creates pods for your application but new
pods do not enter a Ready state. You may also notice this behavior in cases
where the last evicted Pod had a long termination grace period.
If you notice stuck evictions, try one of the following solutions:
Abort or pause the automated operation causing the issue. Investigate the stuck
application before you restart the operation.
Wait a while, then directly delete the Pod from your cluster control plane
instead of using the Eviction API.
FEATURE STATE:Kubernetes v1.36 [beta](enabled by default)
Kubernetes nodes use declared features to report the availability of specific
features that are new or feature-gated. Control plane components
utilize this information to make better decisions. The kube-scheduler, via the
NodeDeclaredFeatures plugin, ensures pods are only placed on nodes that
explicitly support the features the pod requires. Additionally, the
NodeDeclaredFeatureValidator admission controller validates pod updates
against a node's declared features.
This mechanism helps manage version skew and improve cluster stability,
especially during cluster upgrades or in mixed-version environments where nodes
might not all have the same features enabled. This is intended for Kubernetes
feature developers introducing new node-level features and works in the
background; application developers deploying Pods do not need to interact with
this framework directly.
How it Works
Kubelet Feature Reporting: At startup, the kubelet on each node detects
which managed Kubernetes features are currently enabled and reports them
in the .status.declaredFeatures field of the Node. Only features
under active development are included in this field.
Scheduler Filtering: The default kube-scheduler uses the
NodeDeclaredFeatures plugin. This plugin:
In the PreFilter stage, checks the PodSpec to infer the set of node
features required by the pod.
In the Filter stage, checks if the features listed in the node's
.status.declaredFeatures satisfy the requirements inferred for the Pod.
Pods will not be scheduled on nodes lacking the required features.
Custom schedulers can also utilize the
.status.declaredFeatures field to enforce similar constraints.
Admission Control: The nodedeclaredfeaturevalidator admission controller
can reject Pods that require features not declared by the node they are
bound to, preventing issues during pod updates.
Enabling node declared features
To use Node Declared Features, the NodeDeclaredFeaturesfeature gate
must be enabled on the kube-apiserver, kube-scheduler, and kubelet
components.