This section of the Kubernetes documentation aims to help you learn to run
workloads more securely, and about the essential aspects of keeping a
Kubernetes cluster secure.
Kubernetes is based on a cloud-native architecture, and draws on advice from the
CNCF about good practice for
cloud native information security.
Read Cloud Native Security and Kubernetes
for the broader context about how to secure your cluster and the applications that
you're running on it.
Kubernetes security mechanisms
Kubernetes includes several APIs and security controls, as well as ways to
define policies that can form part of how you manage information security.
Kubernetes expects you to configure and use TLS to provide
data encryption in transit
within the control plane, and between the control plane and its clients.
You can also enable encryption at rest
for the data stored within Kubernetes control plane; this is separate from using
encryption at rest for your own workloads' data, which might also be a good idea.
Secrets
The Secret API provides basic protection for
configuration values that require confidentiality.
Workload protection
Enforce Pod security standards to
ensure that Pods and their containers are isolated appropriately. You can also use
RuntimeClasses to define custom isolation
if you need it.
Network policies let you control
network traffic between Pods, or between Pods and the network outside your cluster.
You can deploy security controls from the wider ecosystem to implement preventative
or detective controls around Pods, their containers, and the images that run in them.
Admission control
Admission controllers
are plugins that intercept Kubernetes API requests and can validate or mutate
the requests based on specific fields in the request. Thoughtfully designing
these controllers helps to avoid unintended disruptions as Kubernetes APIs
change across version updates. For design considerations, see
Admission Webhook Good Practices.
Auditing
Kubernetes audit logging provides a
security-relevant, chronological set of records documenting the sequence of actions
in a cluster. The cluster audits the activities generated by users, by applications
that use the Kubernetes API, and by the control plane itself.
Cloud provider security
Note: Items on this page refer to vendors external to Kubernetes. The Kubernetes project authors aren't responsible for those third-party products or projects. To add a vendor, product or project to this list, read the content guide before submitting a change. More information.
If you are running a Kubernetes cluster on your own hardware or a different cloud provider,
consult your documentation for security best practices.
Here are links to some of the popular cloud providers' security documentation:
You can define security policies using Kubernetes-native mechanisms,
such as NetworkPolicy
(declarative control over network packet filtering) or
ValidatingAdmissionPolicy (declarative restrictions on what changes
someone can make using the Kubernetes API).
However, you can also rely on policy implementations from the wider
ecosystem around Kubernetes. Kubernetes provides extension mechanisms
to let those ecosystem projects implement their own policy controls
on source code review, container image approval, API access controls,
networking, and more.
For more information about policy mechanisms and Kubernetes,
read Policies.
Concepts for keeping your cloud native workload secure.
Kubernetes is based on a cloud native architecture and draws on advice from the
CNCF about good practices for
cloud native information security.
Read on for an overview of how Kubernetes is designed to help you deploy a
secure cloud native platform.
Cloud native information security
The CNCF white paper
on cloud native security defines security controls and practices that are
appropriate to different lifecycle phases.
Develop lifecycle phase
Ensure the integrity of development environments.
Design applications following good practices for information security,
appropriate for your context.
Consider end user security as part of solution design.
To achieve this, you can:
Adopt an architecture, such as zero trust,
that minimizes attack surfaces, even for internal threats.
Define a code review process that considers security concerns.
Build a threat model of your system or application that identifies
trust boundaries. Use that threat model to identify risks and determine
how to treat them.
Incorporate advanced security automation, such as fuzzing and
security chaos engineering,
where it's justified.
Distribute lifecycle phase
Ensure the security of the supply chain for container images you execute.
Ensure the security of the supply chain for the cluster and other components
that execute your application. For example, this might include an external
database that your cloud native application uses for persistence.
To achieve this, you can:
Scan container images and other artifacts for known vulnerabilities.
Ensure that software distribution uses encryption in transit, with
a chain of trust for the software source.
Adopt and follow processes to update dependencies when updates are
available, especially in response to security announcements.
Use validation mechanisms such as digital certificates for supply
chain assurance.
Subscribe to feeds and other mechanisms to alert you to security
risks.
Restrict access to artifacts. Place container images in a
private registry
that only allows authorized clients to pull images.
Deploy lifecycle phase
Ensure appropriate restrictions on what can be deployed, who can deploy it,
and where it can be deployed.
You can enforce measures from the distribute phase, such as verifying the
cryptographic identity of container image artifacts.
You can deploy different applications and cluster components into different
namespaces. Containers
and namespaces both provide isolation mechanisms that are relevant to
information security.
When you deploy Kubernetes, you also set the foundation for your
applications' runtime environment: a Kubernetes cluster (or
multiple clusters).
That infrastructure must provide the security guarantees that higher
layers expect.
The Kubernetes API is what makes your cluster work. Protecting this API is key
to providing effective cluster security.
Other pages in the Kubernetes documentation have more detail about how to set up
specific aspects of access control. The security checklist
provides suggested basic checks for your cluster.
Beyond that, securing your cluster means implementing effective
authentication and
authorization for API access. Use ServiceAccounts to
provide and manage security identities for workloads and cluster
components.
Kubernetes uses TLS to protect API traffic; make sure to deploy the cluster using
TLS (including for traffic between nodes and the control plane) and protect the
encryption keys. If you use Kubernetes' own API for
CertificateSigningRequests,
pay special attention to restricting misuse there.
Runtime protection: compute
Containers provide two
things: isolation between applications and a mechanism to combine
those isolated applications to run on the same host computer. Those two
aspects—isolation and aggregation—mean that runtime security involves
identifying trade-offs and finding an appropriate balance.
Kubernetes relies on a container runtime
to set up and run containers. The Kubernetes project does
not recommend a specific container runtime, and you should make sure that
the runtime(s) you choose meet your information security needs.
To protect your compute at runtime, you can:
Enforce Pod Security Standards
for applications to help ensure they run with only the necessary privileges.
Run a specialized operating system on your nodes that is designed specifically
for running containerized workloads. This is typically based on a read-only
operating system (immutable image) that provides only the services
essential for running containers.
Container-specific operating systems help isolate system components and
present a reduced attack surface in case of a container escape.
Define ResourceQuotas to
fairly allocate shared resources, and use
mechanisms such as LimitRanges
to ensure that Pods specify their resource requirements.
Partition workloads across different nodes to improve isolation.
Use node isolation
mechanisms, either from Kubernetes itself or from the ecosystem, to ensure that
Pods with different trust contexts run on separate sets of nodes.
Protect data durability using backups, and verify that you can restore them whenever needed.
Authenticate connections between cluster nodes and any network storage they rely
upon.
Implement data encryption within your own application.
For encryption keys, generating these within specialized hardware provides
the best protection against disclosure risks. A hardware security module
can let you perform cryptographic operations without allowing the security
key to be copied elsewhere.
Networking and security
You should also consider network security measures, such as
NetworkPolicy or a
service mesh.
Some network plugins for Kubernetes provide encryption for your
cluster network using technologies such as a virtual
private network (VPN) overlay.
By design, Kubernetes lets you use your own networking plugin for your
cluster. If you use managed Kubernetes, the provider may have already selected a
network plugin for you.
The network plugin you choose and the way you integrate it can have a
strong impact on the security of information in transit.
Observability and runtime security
Kubernetes lets you extend your cluster with extra tooling. You can set up third
party solutions to help you monitor or troubleshoot your applications and the
clusters they are running. You also get some basic observability features built
in to Kubernetes itself. Your code running in containers can generate logs,
publish metrics, or provide other observability data; at deploy time, you need to
make sure your cluster provides an appropriate level of protection there.
If you set up a metrics dashboard or something similar, review the chain of components
that populate data into that dashboard, as well as the dashboard itself. Make sure
that the whole chain is designed with enough resilience and integrity protection
that you can rely on it even during an incident where your cluster might be degraded.
Where appropriate, deploy security measures below the Kubernetes layer,
such as cryptographically measured boot or authenticated distribution
of time (which helps ensure the fidelity of logs and audit records).
For a high-assurance environment, deploy cryptographic protections to ensure that
logs are both tamper-proof and confidential.
A detailed look at the different policy levels defined in the Pod Security Standards.
The Pod Security Standards define three different policies to broadly cover the security
spectrum. These policies are cumulative and range from highly-permissive to highly-restrictive.
This guide outlines the requirements of each policy.
Profile
Description
Privileged
Unrestricted policy, providing the widest possible level of permissions. This policy allows for known privilege escalations.
Baseline
Minimally restrictive policy which prevents known privilege escalations. Allows the default (minimally specified) Pod configuration.
Restricted
Heavily restricted policy, following current Pod hardening best practices.
Profile Details
Privileged
The Privileged policy is purposely-open, and entirely unrestricted. This type of policy is
typically aimed at system- and infrastructure-level workloads managed by privileged, trusted users.
The Privileged policy is defined by an absence of restrictions. If you define a Pod where the Privileged
security policy applies, the Pod you define is able to bypass typical container isolation mechanisms.
For example, you can define a Pod that has access to the node's host network.
Baseline
The Baseline policy is aimed at ease of adoption for common containerized workloads while
preventing known privilege escalations. This policy is targeted at application operators and
developers of non-critical applications. The following listed controls should be
enforced/disallowed:
Note:
In this table, wildcards (*) indicate all elements in a list. For example,
spec.containers[*].securityContext refers to the Security Context object for all defined
containers. If any of the listed containers fails to meet the requirements, the entire pod will
fail validation.
Baseline policy specification
Control
Policy
HostProcess
Windows Pods offer the ability to run HostProcess containers which enables privileged access to the Windows host machine. Privileged access to the host is disallowed in the Baseline policy.
On supported hosts, the RuntimeDefault AppArmor profile is applied by default. The baseline policy should prevent overriding or disabling the default AppArmor profile, or restrict overrides to an allowed set of profiles.
Sysctls can disable security mechanisms or affect all containers on a host, and should be disallowed except for an allowed "safe" subset. A sysctl is considered safe if it is namespaced in the container or the Pod, and it is isolated from other Pods or processes on the same Node.
The Restricted policy is aimed at enforcing current Pod hardening best practices, at the
expense of some compatibility. It is targeted at operators and developers of security-critical
applications, as well as lower-trust users. The following listed controls should be
enforced/disallowed:
Note:
In this table, wildcards (*) indicate all elements in a list. For example,
spec.containers[*].securityContext refers to the Security Context object for all defined
containers. If any of the listed containers fails to meet the requirements, the entire pod will
fail validation.
Restricted policy specification
Control
Policy
Everything from the Baseline policy
Volume Types
The Restricted policy only permits the following volume types.
Restricted Fields
spec.volumes[*]
Allowed Values
Every item in the spec.volumes[*] list must set one of the following fields to a non-null value:
spec.volumes[*].configMap
spec.volumes[*].csi
spec.volumes[*].downwardAPI
spec.volumes[*].emptyDir
spec.volumes[*].ephemeral
spec.volumes[*].persistentVolumeClaim
spec.volumes[*].projected
spec.volumes[*].secret
Privilege Escalation (v1.8+)
Privilege escalation (such as via set-user-ID or set-group-ID file mode) should not be allowed. This is Linux only policy in v1.25+ (spec.os.name != windows)
Seccomp profile must be explicitly set to one of the allowed values. Both the Unconfined profile and the absence of a profile are prohibited. This is Linux only policy in v1.25+ (spec.os.name != windows)
The container fields may be undefined/nil if the pod-level
spec.securityContext.seccompProfile.type field is set appropriately.
Conversely, the pod-level field may be undefined/nil if _all_ container-
level fields are set.
Capabilities (v1.22+)
Containers must drop ALL capabilities, and are only permitted to add back
the NET_BIND_SERVICE capability. This is Linux only policy in v1.25+ (.spec.os.name != "windows")
Decoupling policy definition from policy instantiation allows for a common understanding and
consistent language of policies across clusters, independent of the underlying enforcement
mechanism.
As mechanisms mature, they will be defined below on a per-policy basis. The methods of enforcement
of individual policies are not defined here.
Note: This section links to third party projects that provide functionality required by Kubernetes. The Kubernetes project authors aren't responsible for these projects, which are listed alphabetically. To add a project to this list, read the content guide before submitting a change. More information.
Other alternatives for enforcing policies are being developed in the Kubernetes ecosystem, such as:
Kubernetes lets you use nodes that run either Linux or Windows. You can mix both kinds of
node in one cluster.
Windows in Kubernetes has some limitations and differentiators from Linux-based
workloads. Specifically, many of the Pod securityContext fields
have no effect on Windows.
Note:
Kubelets prior to v1.24 don't enforce the pod OS field, and if a cluster has nodes on versions earlier than v1.24 the Restricted policies should be pinned to a version prior to v1.25.
Restricted Pod Security Standard changes
Another important change, made in Kubernetes v1.25 is that the Restricted policy
has been updated to use the pod.spec.os.name field. Based on the OS name, certain policies that are specific
to a particular OS can be relaxed for the other OS.
OS-specific policy controls
Restrictions on the following controls are only required if .spec.os.name is not windows:
Privilege Escalation
Seccomp
Linux Capabilities
User namespaces
User Namespaces are a Linux-only feature to run workloads with increased
isolation. How they work together with Pod Security Standards is described in
the documentation for Pods that use user namespaces.
FAQ
Why isn't there a profile between Privileged and Baseline?
The three profiles defined here have a clear linear progression from most secure (Restricted) to least
secure (Privileged), and cover a broad set of workloads. Privileges required above the Baseline
policy are typically very application specific, so we do not offer a standard profile in this
niche. This is not to say that the privileged profile should always be used in this case, but that
policies in this space need to be defined on a case-by-case basis.
SIG Auth may reconsider this position in the future, should a clear need for other profiles arise.
What's the difference between a security profile and a security context?
Security Contexts configure Pods and
Containers at runtime. Security contexts are defined as part of the Pod and container specifications
in the Pod manifest, and represent parameters to the container runtime.
Security profiles are control plane mechanisms to enforce specific settings in the Security Context,
as well as other related parameters outside the Security Context. As of July 2021,
Pod Security Policies are deprecated in favor of the
built-in Pod Security Admission Controller.
What about sandboxed Pods?
There is currently no API standard that controls whether a Pod is considered sandboxed or
not. Sandbox Pods may be identified by the use of a sandboxed runtime (such as gVisor or Kata
Containers), but there is no standard definition of what a sandboxed runtime is.
The protections necessary for sandboxed workloads can differ from others. For example, the need to
restrict privileged permissions is lessened when the workload is isolated from the underlying
kernel. This allows for workloads requiring heightened permissions to still be isolated.
Additionally, the protection of sandboxed workloads is highly dependent on the method of
sandboxing. As such, no single recommended profile is recommended for all sandboxed workloads.
3 - Pod Security Admission
An overview of the Pod Security Admission Controller, which can enforce the Pod Security Standards.
FEATURE STATE:Kubernetes v1.25 [stable]
The Kubernetes Pod Security Standards define
different isolation levels for Pods. These standards let you define how you want to restrict the
behavior of pods in a clear, consistent fashion.
Kubernetes offers a built-in Pod Securityadmission controller to enforce the Pod Security Standards. Pod security restrictions
are applied at the namespace level when pods are
created.
Built-in Pod Security admission enforcement
This page is part of the documentation for Kubernetes v1.36.
If you are running a different version of Kubernetes, consult the documentation for that release.
Pod Security levels
Pod Security admission places requirements on a Pod's Security
Context and other related fields according
to the three levels defined by the Pod Security
Standards: privileged, baseline, and
restricted. Refer to the Pod Security Standards
page for an in-depth look at those requirements.
Pod Security Admission labels for namespaces
Once the feature is enabled or the webhook is installed, you can configure namespaces to define the admission
control mode you want to use for pod security in each namespace. Kubernetes defines a set of
labels that you can set to define which of the
predefined Pod Security Standard levels you want to use for a namespace. The label you select
defines what action the control plane
takes if a potential violation is detected:
Pod Security Admission modes
Mode
Description
enforce
Policy violations will cause the pod to be rejected.
audit
Policy violations will trigger the addition of an audit annotation to the event recorded in the audit log, but are otherwise allowed.
warn
Policy violations will trigger a user-facing warning, but are otherwise allowed.
A namespace can configure any or all modes, or even set a different level for different modes.
For each mode, there are two labels that determine the policy used:
# The per-mode level label indicates which policy level to apply for the mode.## MODE must be one of `enforce`, `audit`, or `warn`.# LEVEL must be one of `privileged`, `baseline`, or `restricted`.pod-security.kubernetes.io/<MODE>:<LEVEL># Optional: per-mode version label that can be used to pin the policy to the# version that shipped with a given Kubernetes minor version (for example v1.36).## MODE must be one of `enforce`, `audit`, or `warn`.# VERSION must be a valid Kubernetes minor version, or `latest`.pod-security.kubernetes.io/<MODE>-version:<VERSION>
Pods are often created indirectly, by creating a workload
object such as a Deployment or Job. The workload object defines a
Pod template and a controller for the
workload resource creates Pods based on that template. To help catch violations early, both the
audit and warning modes are applied to the workload resources. However, enforce mode is not
applied to workload resources, only to the resulting pod objects.
Exemptions
You can define exemptions from pod security enforcement in order to allow the creation of pods that
would have otherwise been prohibited due to the policy associated with a given namespace.
Exemptions can be statically configured in the
Admission Controller configuration.
Exemptions must be explicitly enumerated. Requests meeting exemption criteria are ignored by the
Admission Controller (all enforce, audit and warn behaviors are skipped). Exemption dimensions include:
Usernames: requests from users with an exempt authenticated (or impersonated) username are
ignored.
RuntimeClassNames: pods and workload resources specifying an exempt runtime class name are
ignored.
Namespaces: pods and workload resources in an exempt namespace are ignored.
Caution:
Most pods are created by a controller in response to a workload
resource, meaning that exempting an end user will only
exempt them from enforcement when creating pods directly, but not when creating a workload resource.
Controller service accounts (such as system:serviceaccount:kube-system:replicaset-controller)
should generally not be exempted, as doing so would implicitly exempt any user that can create the
corresponding workload resource.
Updates to the following pod fields are exempt from policy checks, meaning that if a pod update
request only changes these fields, it will not be denied even if the pod is in violation of the
current policy level:
Any metadata updates except changes to the seccomp or AppArmor annotations:
Here are the Prometheus metrics exposed by kube-apiserver:
pod_security_errors_total: This metric indicates the number of errors preventing normal evaluation.
Non-fatal errors may result in the latest restricted profile being used for enforcement.
pod_security_evaluations_total: This metric indicates the number of policy evaluations that have occurred,
not counting ignored or exempt requests during exporting.
pod_security_exemptions_total: This metric indicates the number of exempt requests, not counting ignored
or out of scope requests.
This page introduces the ServiceAccount object in Kubernetes, providing
information about how service accounts work, use cases, limitations,
alternatives, and links to resources for additional guidance.
What are service accounts?
A service account is a type of non-human account that, in Kubernetes, provides
a distinct identity in a Kubernetes cluster. Application Pods, system
components, and entities inside and outside the cluster can use a specific
ServiceAccount's credentials to identify as that ServiceAccount. This identity
is useful in various situations, including authenticating to the API server or
implementing identity-based security policies.
Service accounts exist as ServiceAccount objects in the API server. Service
accounts have the following properties:
Namespaced: Each service account is bound to a Kubernetes
namespace. Every namespace
gets a default ServiceAccount upon creation.
Lightweight: Service accounts exist in the cluster and are
defined in the Kubernetes API. You can quickly create service accounts to
enable specific tasks.
Portable: A configuration bundle for a complex containerized workload
might include service account definitions for the system's components. The
lightweight nature of service accounts and the namespaced identities make
the configurations portable.
Service accounts are different from user accounts, which are authenticated
human users in the cluster. By default, user accounts don't exist in the Kubernetes
API server; instead, the API server treats user identities as opaque
data. You can authenticate as a user account using multiple methods. Some
Kubernetes distributions might add custom extension APIs to represent user
accounts in the API server.
Kubernetes RBAC or other identity and access management mechanisms
Intended use
Workloads, automation
People
Default service accounts
When you create a cluster, Kubernetes automatically creates a ServiceAccount
object named default for every namespace in your cluster. The default
service accounts in each namespace get no permissions by default other than the
default API discovery permissions
that Kubernetes grants to all authenticated principals if role-based access control (RBAC) is enabled.
If you delete the default ServiceAccount object in a namespace, the
control plane
replaces it with a new one.
As a general guideline, you can use service accounts to provide identities in
the following scenarios:
Your Pods need to communicate with the Kubernetes API server, for example in
situations such as the following:
Providing read-only access to sensitive information stored in Secrets.
Granting cross-namespace access, such as allowing a
Pod in namespace example to read, list, and watch for Lease objects in
the kube-node-lease namespace.
Your Pods need to communicate with an external service. For example, a
workload Pod requires an identity for a commercially available cloud API,
and the commercial provider allows configuring a suitable trust relationship.
An external service needs to communicate with the Kubernetes API server. For
example, authenticating to the cluster as part of a CI/CD pipeline.
You use third-party security software in your cluster that relies on the
ServiceAccount identity of different Pods to group those Pods into different
contexts.
How to use service accounts
To use a Kubernetes service account, you do the following:
Create a ServiceAccount object using a Kubernetes
client like kubectl or a manifest that defines the object.
Grant permissions to the ServiceAccount object using an authorization
mechanism such as
RBAC.
Assign the ServiceAccount object to Pods during Pod creation.
You can use the built-in Kubernetes
role-based access control (RBAC)
mechanism to grant the minimum permissions required by each service account.
You create a role, which grants access, and then bind the role to your
ServiceAccount. RBAC lets you define a minimum set of permissions so that the
service account permissions follow the principle of least privilege. Pods that
use that service account don't get more permissions than are required to
function correctly.
You can use RBAC to allow service accounts in one namespace to perform actions
on resources in a different namespace in the cluster. For example, consider a
scenario where you have a service account and Pod in the dev namespace and
you want your Pod to see Jobs running in the maintenance namespace. You could
create a Role object that grants permissions to list Job objects. Then,
you'd create a RoleBinding object in the maintenance namespace to bind the
Role to the ServiceAccount object. Now, Pods in the dev namespace can list
Job objects in the maintenance namespace using that service account.
Assign a ServiceAccount to a Pod
To assign a ServiceAccount to a Pod, you set the spec.serviceAccountName
field in the Pod specification. Kubernetes then automatically provides the
credentials for that ServiceAccount to the Pod. In v1.22 and later, Kubernetes
gets a short-lived, automatically rotating token using the TokenRequest
API and mounts the token as a
projected volume.
By default, Kubernetes provides the Pod
with the credentials for an assigned ServiceAccount, whether that is the
default ServiceAccount or a custom ServiceAccount that you specify.
To prevent Kubernetes from automatically injecting
credentials for a specified ServiceAccount or the default ServiceAccount, set the
automountServiceAccountToken field in your Pod specification to false.
In versions earlier than 1.22, Kubernetes provides a long-lived, static token
to the Pod as a Secret.
Manually retrieve ServiceAccount credentials
If you need the credentials for a ServiceAccount to mount in a non-standard
location, or for an audience that isn't the API server, use one of the
following methods:
TokenRequest API
(recommended): Request a short-lived service account token from within
your own application code. The token expires automatically and can rotate
upon expiration.
If you have a legacy application that is not aware of Kubernetes, you
could use a sidecar container within the same pod to fetch these tokens
and make them available to the application workload.
Token Volume Projection
(also recommended): In Kubernetes v1.20 and later, use the Pod specification to
tell the kubelet to add the service account token to the Pod as a
projected volume. Projected tokens expire automatically, and the kubelet
rotates the token before it expires.
Service Account Token Secrets
(not recommended): You can mount service account tokens as Kubernetes
Secrets in Pods. These tokens don't expire and don't rotate. In versions prior to v1.24, a permanent token was automatically created for each service account.
This method is not recommended anymore, especially at scale, because of the risks associated
with static, long-lived credentials. The LegacyServiceAccountTokenNoAutoGeneration feature gate
(which was enabled by default from Kubernetes v1.24 to v1.26), prevented Kubernetes from automatically creating these tokens for
ServiceAccounts. The feature gate is removed in v1.27, because it was elevated to GA status; you can still create indefinite service account tokens manually, but should take into account the security implications.
Node audience restriction for service account tokens
FEATURE STATE:Kubernetes v1.33 [beta](enabled by default)
When the ServiceAccountNodeAudienceRestrictionfeature gate
is enabled, the NodeRestriction
admission plugin limits which audiences a kubelet can request when creating service
account tokens via the TokenRequest API. By default, the kubelet can only request
tokens for audiences already referenced by pods on that node (through projected service
account token volumes or CSI driver token requests). Administrators can grant
kubelets access to additional audiences using RBAC rules with the
request-serviceaccounts-token-audience verb.
This restriction applies only to kubelets (node identities) and does not affect other
callers of the TokenRequest API. For details and RBAC examples,
see Service account token audience restriction.
Note:
For applications running outside your Kubernetes cluster, you might be considering
creating a long-lived ServiceAccount token that is stored in a Secret. This allows authentication, but the Kubernetes project recommends you avoid this approach.
Long-lived bearer tokens represent a security risk as, once disclosed, the token
can be misused. Instead, consider using an alternative. For example, your external
application can authenticate using a well-protected private key and a certificate,
or using a custom mechanism such as an authentication webhook that you implement yourself.
You can also use TokenRequest to obtain short-lived tokens for your external application.
Restricting access to Secrets (deprecated)
FEATURE STATE:Kubernetes v1.32 [deprecated]
Note:
kubernetes.io/enforce-mountable-secrets is deprecated since Kubernetes v1.32. Use separate namespaces to isolate access to mounted secrets.
Kubernetes provides an annotation called kubernetes.io/enforce-mountable-secrets
that you can add to your ServiceAccounts. When this annotation is applied,
the ServiceAccount's secrets can only be mounted on specified types of resources,
enhancing the security posture of your cluster.
You can add the annotation to a ServiceAccount using a manifest:
When this annotation is set to "true", the Kubernetes control plane ensures that
the Secrets from this ServiceAccount are subject to certain mounting restrictions.
The name of each Secret that is mounted as a volume in a Pod must appear in the secrets field of the
Pod's ServiceAccount.
The name of each Secret referenced using envFrom in a Pod must also appear in the secrets
field of the Pod's ServiceAccount.
The name of each Secret referenced using imagePullSecrets in a Pod must also appear in the secrets
field of the Pod's ServiceAccount.
By understanding and enforcing these restrictions, cluster administrators can maintain a tighter security profile and ensure that secrets are accessed only by the appropriate resources.
Authenticating service account credentials
ServiceAccounts use signed
JSON Web Tokens (JWTs)
to authenticate to the Kubernetes API server, and to any other system where a
trust relationship exists. Depending on how the token was issued
(either time-limited using a TokenRequest or using a legacy mechanism with
a Secret), a ServiceAccount token might also have an expiry time, an audience,
and a time after which the token starts being valid. When a client that is
acting as a ServiceAccount tries to communicate with the Kubernetes API server,
the client includes an Authorization: Bearer <token> header with the HTTP
request. The API server checks the validity of that bearer token as follows:
Checks the token signature.
Checks whether the token has expired.
Checks whether object references in the token claims are currently valid.
Checks whether the token is currently valid.
Checks the audience claims.
The TokenRequest API produces bound tokens for a ServiceAccount. This
binding is linked to the lifetime of the client, such as a Pod, that is acting
as that ServiceAccount. See Token Volume Projection
for an example of a bound pod service account token's JWT schema and payload.
For tokens issued using the TokenRequest API, the API server also checks that
the specific object reference that is using the ServiceAccount still exists,
matching by the unique ID of that
object. For legacy tokens that are mounted as Secrets in Pods, the API server
checks the token against the Secret.
For more information about the authentication process, refer to
Authentication.
Authenticating service account credentials in your own code
If you have services of your own that need to validate Kubernetes service
account credentials, you can use the following methods:
The Kubernetes project recommends that you use the TokenReview API, because
this method invalidates tokens that are bound to API objects such as Secrets,
ServiceAccounts, Pods or Nodes when those objects are deleted. For example, if you
delete the Pod that contains a projected ServiceAccount token, the cluster
invalidates that token immediately and a TokenReview immediately fails.
If you use OIDC validation instead, your clients continue to treat the token
as valid until the token reaches its expiration timestamp.
Your application should always define the audience that it accepts, and should
check that the token's audiences match the audiences that the application
expects. This helps to minimize the scope of the token so that it can only be
used in your application and nowhere else.
Alternatives
Issue your own tokens using another mechanism, and then use
Webhook Token Authentication
to validate bearer tokens using your own validation service.
Use service accounts or user accounts created using an external Identity
and Access Management (IAM) service, such as from a cloud provider, to
authenticate to your cluster.
If you are not running Kubernetes v1.36, check the documentation for
your version of Kubernetes.
6 - Security For Linux Nodes
This page describes security considerations and best practices specific to the Linux operating system.
Protection for Secret data on nodes
On Linux nodes, memory-backed volumes (such as secret
volume mounts, or emptyDir with medium: Memory)
are implemented with a tmpfs filesystem.
If you have swap configured and use an older Linux kernel (or a current kernel and an unsupported configuration of Kubernetes),
memory backed volumes can have data written to persistent storage.
The Linux kernel officially supports the noswap option from version 6.3,
therefore it is recommended the used kernel version is 6.3 or later,
or supports the noswap option via a backport, if swap is enabled on the node.
This page describes security considerations and best practices specific to the Windows operating system.
Protection for Secret data on nodes
On Windows, data from Secrets are written out in clear text onto the node's local
storage (as compared to using tmpfs / in-memory filesystems on Linux). As a cluster
operator, you should take both of the following additional measures:
Use file ACLs to secure the Secrets' file location.
RunAsUsername
can be specified for Windows Pods or containers to execute the container
processes as specific user. This is roughly equivalent to
RunAsUser.
Windows containers offer two default user accounts, ContainerUser and ContainerAdministrator.
The differences between these two user accounts are covered in
When to use ContainerAdmin and ContainerUser user accounts
within Microsoft's Secure Windows containers documentation.
Local users can be added to container images during the container build process.
Note:
Nano Server based images run as
ContainerUser by default
Server Core based images run as
ContainerAdministrator by default
Linux-specific pod security context mechanisms (such as SELinux, AppArmor, Seccomp, or custom
POSIX capabilities) are not supported on Windows nodes.
Privileged containers are not supported
on Windows.
Instead HostProcess containers
can be used on Windows to perform many of the tasks performed by privileged containers on Linux.
8 - Controlling Access to the Kubernetes API
This page provides an overview of controlling access to the Kubernetes API.
Users access the Kubernetes API using kubectl,
client libraries, or by making REST requests. Both human users and
Kubernetes service accounts can be
authorized for API access.
When a request reaches the API, it goes through several stages, illustrated in the
following diagram:
Transport security
By default, the Kubernetes API server listens on port 6443 on the first non-localhost
network interface, protected by TLS. In a typical production Kubernetes cluster, the
API serves on port 443. The port can be changed with the --secure-port, and the
listening IP address with the --bind-address flag.
The API server presents a certificate. This certificate may be signed using
a private certificate authority (CA), or based on a public key infrastructure linked
to a generally recognized CA. The certificate and corresponding private key can be set
by using the --tls-cert-file and --tls-private-key-file flags.
If your cluster uses a private certificate authority, you need a copy of that CA
certificate configured into your ~/.kube/config on the client, so that you can
trust the connection and be confident it was not intercepted.
Your client can present a TLS client certificate at this stage.
Authentication
Once TLS is established, the HTTP request moves to the Authentication step.
This is shown as step 1 in the diagram.
The cluster creation script or cluster admin configures the API server to run
one or more Authenticator modules.
Authenticators are described in more detail in
Authentication.
The input to the authentication step is the entire HTTP request; however, it typically
examines the headers and/or client certificate.
Authentication modules include client certificates, password, and plain tokens,
bootstrap tokens, and JSON Web Tokens (used for service accounts).
Multiple authentication modules can be specified, in which case each one is tried in sequence,
until one of them succeeds.
If the request cannot be authenticated, it is rejected with HTTP status code 401.
Otherwise, the user is authenticated as a specific username, and the user name
is available to subsequent steps to use in their decisions. Some authenticators
also provide the group memberships of the user, while other authenticators
do not.
While Kubernetes uses usernames for access control decisions and in request logging,
it does not have a User object nor does it store usernames or other information about
users in its API.
Authorization
After the request is authenticated as coming from a specific user, the request must
be authorized. This is shown as step 2 in the diagram.
A request must include the username of the requester, the requested action, and
the object affected by the action. The request is authorized if an existing policy
declares that the user has permissions to complete the requested action.
For example, if Bob has the policy below, then he can read pods only in the namespace projectCaribou:
If Bob makes a request to write (create or update) to the objects in the
projectCaribou namespace, his authorization is denied. If Bob makes a request
to read (get) objects in a different namespace such as projectFish, then his authorization is denied.
Kubernetes authorization requires that you use common REST attributes to interact
with existing organization-wide or cloud-provider-wide access control systems.
It is important to use REST formatting because these control systems might
interact with other APIs besides the Kubernetes API.
Kubernetes supports multiple authorization modules, such as ABAC mode, RBAC Mode,
and Webhook mode. When an administrator creates a cluster, they configure the
authorization modules that should be used in the API server. If more than one
authorization modules are configured, Kubernetes checks each module, and if
any module authorizes the request, then the request can proceed. If all of
the modules deny the request, then the request is denied (HTTP status code 403).
To learn more about Kubernetes authorization, including details about creating
policies using the supported authorization modules, see Authorization.
Admission control
Admission Control modules are software modules that can modify or reject requests.
In addition to the attributes available to Authorization modules, Admission
Control modules can access the contents of the object that is being created or modified.
Admission controllers act on requests that create, modify, delete, or connect to (proxy) an object.
Admission controllers do not act on requests that merely read objects.
When multiple admission controllers are configured, they are called in order.
This is shown as step 3 in the diagram.
Unlike Authentication and Authorization modules, if any admission controller module
rejects, then the request is immediately rejected.
In addition to rejecting objects, admission controllers can also set complex defaults for
fields.
Once a request passes all admission controllers, it is validated using the validation routines
for the corresponding API object, and then written to the object store (shown as step 4).
Auditing
Kubernetes auditing provides a security-relevant, chronological set of records documenting the sequence of actions in a cluster.
The cluster audits the activities generated by users, by applications that use the Kubernetes API, and by the control plane itself.
how Pods can use
Secrets
to obtain API credentials.
9 - Role Based Access Control Good Practices
Principles and practices for good RBAC design for cluster operators.
Kubernetes RBAC is a key security control
to ensure that cluster users and workloads have only the access to resources required to
execute their roles. It is important to ensure that, when designing permissions for cluster
users, the cluster administrator understands the areas where privilege escalation could occur,
to reduce the risk of excessive access leading to security incidents.
The good practices laid out here should be read in conjunction with the general
RBAC documentation.
General good practice
Least privilege
Ideally, minimal RBAC rights should be assigned to users and service accounts. Only permissions
explicitly required for their operation should be used. While each cluster will be different,
some general rules that can be applied are :
Assign permissions at the namespace level where possible. Use RoleBindings as opposed to
ClusterRoleBindings to give users rights only within a specific namespace.
Avoid providing wildcard permissions when possible, especially to all resources.
As Kubernetes is an extensible system, providing wildcard access gives rights
not just to all object types that currently exist in the cluster, but also to all object types
which are created in the future.
Administrators should not use cluster-admin accounts except where specifically needed.
Providing a low privileged account with
impersonation rights
can avoid accidental modification of cluster resources.
Avoid adding users to the system:masters group. Any user who is a member of this group
bypasses all RBAC rights checks and will always have unrestricted superuser access, which cannot be
revoked by removing RoleBindings or ClusterRoleBindings. As an aside, if a cluster is
using an authorization webhook, membership of this group also bypasses that webhook (requests
from users who are members of that group are never sent to the webhook)
Minimize distribution of privileged tokens
Ideally, pods shouldn't be assigned service accounts that have been granted powerful permissions
(for example, any of the rights listed under privilege escalation risks).
In cases where a workload requires powerful permissions, consider the following practices:
Limit the number of nodes running powerful pods. Ensure that any DaemonSets you run
are necessary and are run with least privilege to limit the blast radius of container escapes.
Avoid running powerful pods alongside untrusted or publicly-exposed ones. Consider using
Taints and Toleration,
NodeAffinity, or
PodAntiAffinity
to ensure pods don't run alongside untrusted or less-trusted Pods. Pay special attention to
situations where less-trustworthy Pods are not meeting the Restricted Pod Security Standard.
Hardening
Kubernetes defaults to providing access which may not be required in every cluster. Reviewing
the RBAC rights provided by default can provide opportunities for security hardening.
In general, changes should not be made to rights provided to system: accounts some options
to harden cluster rights exist:
Review bindings for the system:unauthenticated group and remove them where possible, as this gives
access to anyone who can contact the API server at a network level.
Avoid the default auto-mounting of service account tokens by setting
automountServiceAccountToken: false. For more details, see
using default service account token.
Setting this value for a Pod will overwrite the service account setting, workloads
which require service account tokens can still mount them.
Periodic review
It is vital to periodically review the Kubernetes RBAC settings for redundant entries and
possible privilege escalations.
If an attacker is able to create a user account with the same name as a deleted user,
they can automatically inherit all the rights of the deleted user, especially the
rights assigned to that user.
Kubernetes RBAC - privilege escalation risks
Within Kubernetes RBAC there are a number of privileges which, if granted, can allow a user or a service account
to escalate their privileges in the cluster or affect systems outside the cluster.
This section is intended to provide visibility of the areas where cluster operators
should take care, to ensure that they do not inadvertently allow for more access to clusters than intended.
Listing secrets
It is generally clear that allowing get access on Secrets will allow a user to read their contents.
It is also important to note that list and watch access also effectively allow for users to reveal the Secret contents.
For example, when a List response is returned (for example, via kubectl get secrets -A -o yaml), the response
includes the contents of all Secrets.
Workload creation
Permission to create workloads (either Pods, or
workload resources that manage Pods) in a namespace
implicitly grants access to many other resources in that namespace, such as Secrets, ConfigMaps, and
PersistentVolumes that can be mounted in Pods. Additionally, since Pods can run as any
ServiceAccount, granting permission
to create workloads also implicitly grants the API access levels of any service account in that
namespace.
Users who can run privileged Pods can use that access to gain node access and potentially to
further elevate their privileges. Where you do not fully trust a user or other principal
with the ability to create suitably secure and isolated Pods, you should enforce either the
Baseline or Restricted Pod Security Standard.
You can use Pod Security admission
or other (third party) mechanisms to implement that enforcement.
For these reasons, namespaces should be used to separate resources requiring different levels of
trust or tenancy. It is still considered best practice to follow least privilege
principles and assign the minimum set of permissions, but boundaries within a namespace should be
considered weak.
Persistent volume creation
If someone - or some application - is allowed to create arbitrary PersistentVolumes, that access
includes the creation of hostPath volumes, which then means that a Pod would get access
to the underlying host filesystem(s) on the associated node. Granting that ability is a security risk.
There are many ways a container with unrestricted access to the host filesystem can escalate privileges, including
reading data from other containers, and abusing the credentials of system services, such as Kubelet.
You should only allow access to create PersistentVolume objects for:
Users (cluster operators) that need this access for their work, and who you trust.
The Kubernetes control plane components which creates PersistentVolumes based on PersistentVolumeClaims
that are configured for automatic provisioning.
This is usually setup by the Kubernetes provider or by the operator when installing a CSI driver.
Where access to persistent storage is required trusted administrators should create
PersistentVolumes, and constrained users should use PersistentVolumeClaims to access that storage.
Access to proxy subresource of Nodes
Users with access to the nodes/proxy sub-resource have rights to the Kubelet API,
which allows for command execution on every pod on the node(s) to which they have rights.
This access bypasses audit logging and admission control, so care should be taken before
granting any rights to this resource.
These APIs can be exercised via websocket HTTP GET requests, which only requires authorization of the get verb.
This means that get permission on nodes/proxy is not a read-only permission.
For example, permission to getnodes/proxy provides access to privileged kubelet
APIs that can retrieve container logs or execute and attach to pod processes,
even when a caller does not have the equivalent permissions through the
Kubernetes API.
Generally, the RBAC system prevents users from creating clusterroles with more rights than the user possesses.
The exception to this is the escalate verb. As noted in the RBAC documentation,
users with this right can effectively escalate their privileges.
Bind verb
Similar to the escalate verb, granting users this right allows for the bypass of Kubernetes
in-built protections against privilege escalation, allowing users to create bindings to
roles with rights they do not already have.
Impersonate verb
This verb allows users to impersonate and gain the rights of other users in the cluster.
Care should be taken when granting it, to ensure that excessive permissions cannot be gained
via one of the impersonated accounts.
CSRs and certificate issuing
The CSR API allows for users with create rights to CSRs and update rights on certificatesigningrequests/approval
where the signer is kubernetes.io/kube-apiserver-client to create new client certificates
which allow users to authenticate to the cluster. Those client certificates can have arbitrary
names including duplicates of Kubernetes system components. This will effectively allow for privilege escalation.
Token request
Users with create rights on serviceaccounts/token can create TokenRequests to issue
tokens for existing service accounts.
Control admission webhooks
Users with control over validatingwebhookconfigurations or mutatingwebhookconfigurations
can control webhooks that can read any object admitted to the cluster, and in the case of
mutating webhooks, also mutate admitted objects.
Namespace modification
Users who can perform patch operations on Namespace objects (through a namespaced RoleBinding to a Role with that access) can modify
labels on that namespace. In clusters where Pod Security Admission is used, this may allow a user to configure the namespace
for a more permissive policy than intended by the administrators.
For clusters where NetworkPolicy is used, users may be set labels that indirectly allow
access to services that an administrator did not intend to allow.
Kubernetes RBAC - denial of service risks
Object creation denial-of-service
Users who have rights to create objects in a cluster may be able to create sufficient large
objects to create a denial of service condition either based on the size or number of objects, as discussed in
etcd used by Kubernetes is vulnerable to OOM attack. This may be
specifically relevant in multi-tenant clusters if semi-trusted or untrusted users
are allowed limited access to a system.
One option for mitigation of this issue would be to use
resource quotas
to limit the quantity of objects which can be created.
Principles and practices for good Secret management for cluster administrators and application developers.
In Kubernetes, a Secret is an object that stores sensitive information, such as passwords, OAuth tokens, and SSH keys.
Secrets give you more control over how sensitive information is used and reduces
the risk of accidental exposure. Secret values are encoded as base64 strings and
are stored unencrypted by default, but can be configured to be
encrypted at rest.
A Pod can reference the Secret in
a variety of ways, such as in a volume mount or as an environment variable.
Secrets are designed for confidential data and
ConfigMaps are
designed for non-confidential data.
The following good practices are intended for both cluster administrators and
application developers. Use these guidelines to improve the security of your
sensitive information in Secret objects, as well as to more effectively manage
your Secrets.
Cluster administrators
This section provides good practices that cluster administrators can use to
improve the security of confidential information in the cluster.
Configure encryption at rest
By default, Secret objects are stored unencrypted in etcd. You should configure encryption of your Secret
data in etcd. For instructions, refer to
Encrypt Secret Data at Rest.
Configure least-privilege access to Secrets
When planning your access control mechanism, such as Kubernetes
Role-based Access Control(RBAC),
consider the following guidelines for access to Secret objects. You should
also follow the other guidelines in
RBAC good practices.
Components: Restrict watch or list access to only the most
privileged, system-level components. Only grant get access for Secrets if
the component's normal behavior requires it.
Humans: Restrict get, watch, or list access to Secrets. Only allow
cluster administrators to access etcd. This includes read-only access. For
more complex access control, such as restricting access to Secrets with
specific annotations, consider using third-party authorization mechanisms.
Caution:
Granting list access to Secrets implicitly lets the subject fetch the
contents of the Secrets.
A user who can create a Pod that uses a Secret can also see the value of that
Secret. Even if cluster policies do not allow a user to read the Secret
directly, the same user could have access to run a Pod that then exposes the
Secret. You can detect or limit the impact caused by Secret data being exposed,
either intentionally or unintentionally, by a user with this access. Some
recommendations include:
Use short-lived Secrets
Implement audit rules that alert on specific events, such as concurrent
reading of multiple Secrets by a single user
Restrict Access for Secrets
Use separate namespaces to isolate access to mounted secrets.
Improve etcd management policies
Consider wiping or shredding the durable storage used by etcd once it is
no longer in use.
If there are multiple etcd instances, configure encrypted SSL/TLS
communication between the instances to protect the Secret data in transit.
Configure access to external Secrets
Note: This section links to third party projects that provide functionality required by Kubernetes. The Kubernetes project authors aren't responsible for these projects, which are listed alphabetically. To add a project to this list, read the content guide before submitting a change. More information.
You can use third-party Secrets store providers to keep your confidential data
outside your cluster and then configure Pods to access that information.
The Kubernetes Secrets Store CSI Driver
is a DaemonSet that lets the kubelet retrieve Secrets from external stores, and
mount the Secrets as a volume into specific Pods that you authorize to access
the data.
For best practices for setting swap memory for Linux nodes, please refer to
swap memory management.
Developers
This section provides good practices for developers to use to improve the
security of confidential data when building and deploying Kubernetes resources.
Restrict Secret access to specific containers
If you are defining multiple containers in a Pod, and only one of those
containers needs access to a Secret, define the volume mount or environment
variable configuration so that the other containers do not have access to that
Secret.
Protect Secret data after reading
Applications still need to protect the value of confidential information after
reading it from an environment variable or volume. For example, your
application must avoid logging the secret data in the clear or transmitting it
to an untrusted party.
Avoid sharing Secret manifests
If you configure a Secret through a
manifest, with the secret
data encoded as base64, sharing this file or checking it in to a source
repository means the secret is available to everyone who can read the manifest.
Caution:
Base64 encoding is not an encryption method, it provides no additional
confidentiality over plain text.
11 - Multi-tenancy
This page provides an overview of available configuration options and best practices for cluster
multi-tenancy.
Sharing clusters saves costs and simplifies administration. However, sharing clusters also
presents challenges such as security, fairness, and managing noisy neighbors.
Clusters can be shared in many ways. In some cases, different applications may run in the same
cluster. In other cases, multiple instances of the same application may run in the same cluster,
one for each end user. All these types of sharing are frequently described using the umbrella term
multi-tenancy.
While Kubernetes does not have first-class concepts of end users or tenants, it provides several
features to help manage different tenancy requirements. These are discussed below.
Use cases
The first step to determining how to share your cluster is understanding your use case, so you can
evaluate the patterns and tools available. In general, multi-tenancy in Kubernetes clusters falls
into two broad categories, though many variations and hybrids are also possible.
Multiple teams
A common form of multi-tenancy is to share a cluster between multiple teams within an
organization, each of whom may operate one or more workloads. These workloads frequently need to
communicate with each other, and with other workloads located on the same or different clusters.
In this scenario, members of the teams often have direct access to Kubernetes resources via tools
such as kubectl, or indirect access through GitOps controllers or other types of release
automation tools. There is often some level of trust between members of different teams, but
Kubernetes policies such as RBAC, quotas, and network policies are essential to safely and fairly
share clusters.
Multiple customers
The other major form of multi-tenancy frequently involves a Software-as-a-Service (SaaS) vendor
running multiple instances of a workload for customers. This business model is so strongly
associated with this deployment style that many people call it "SaaS tenancy." However, a better
term might be "multi-customer tenancy," since SaaS vendors may also use other deployment models,
and this deployment model can also be used outside of SaaS.
In this scenario, the customers do not have access to the cluster; Kubernetes is invisible from
their perspective and is only used by the vendor to manage the workloads. Cost optimization is
frequently a critical concern, and Kubernetes policies are used to ensure that the workloads are
strongly isolated from each other.
Terminology
Tenants
When discussing multi-tenancy in Kubernetes, there is no single definition for a "tenant".
Rather, the definition of a tenant will vary depending on whether multi-team or multi-customer
tenancy is being discussed.
In multi-team usage, a tenant is typically a team, where each team typically deploys a small
number of workloads that scales with the complexity of the service. However, the definition of
"team" may itself be fuzzy, as teams may be organized into higher-level divisions or subdivided
into smaller teams.
By contrast, if each team deploys dedicated workloads for each new client, they are using a
multi-customer model of tenancy. In this case, a "tenant" is simply a group of users who share a
single workload. This may be as large as an entire company, or as small as a single team at that
company.
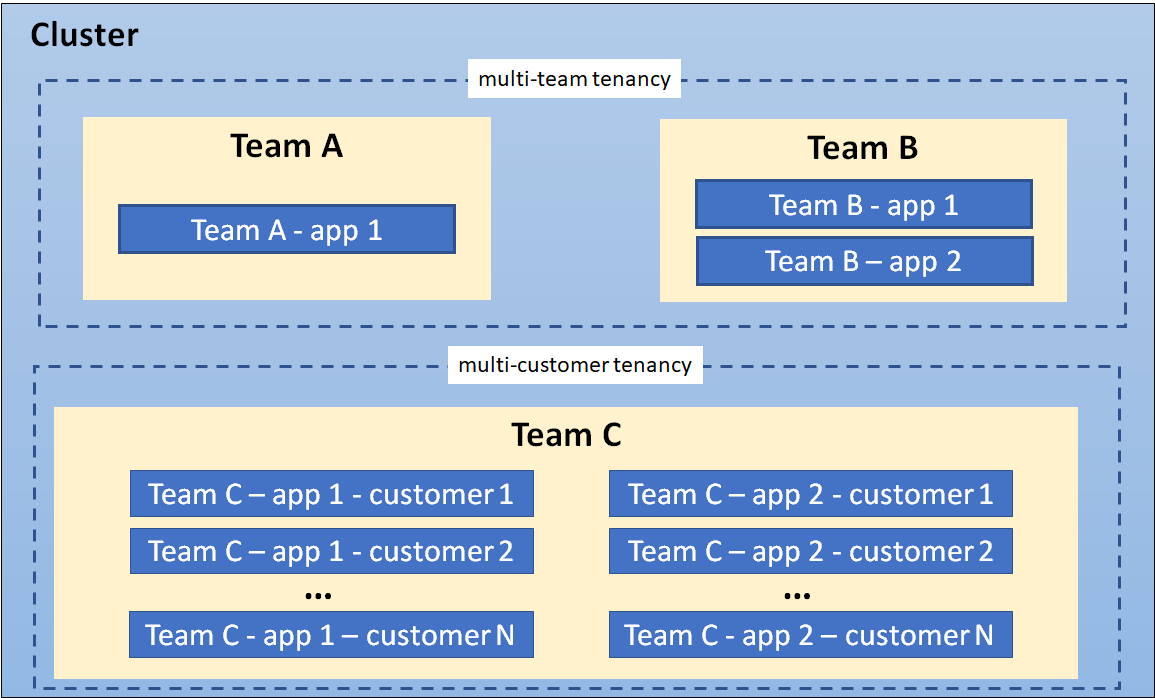
In many cases, the same organization may use both definitions of "tenants" in different contexts.
For example, a platform team may offer shared services such as security tools and databases to
multiple internal “customers” and a SaaS vendor may also have multiple teams sharing a development
cluster. Finally, hybrid architectures are also possible, such as a SaaS provider using a
combination of per-customer workloads for sensitive data, combined with multi-tenant shared
services.
A cluster showing coexisting tenancy models
Isolation
There are several ways to design and build multi-tenant solutions with Kubernetes. Each of these
methods comes with its own set of tradeoffs that impact the isolation level, implementation
effort, operational complexity, and cost of service.
A Kubernetes cluster consists of a control plane which runs Kubernetes software, and a data plane
consisting of worker nodes where tenant workloads are executed as pods. Tenant isolation can be
applied in both the control plane and the data plane based on organizational requirements.
The level of isolation offered is sometimes described using terms like “hard” multi-tenancy, which
implies strong isolation, and “soft” multi-tenancy, which implies weaker isolation. In particular,
"hard" multi-tenancy is often used to describe cases where the tenants do not trust each other,
often from security and resource sharing perspectives (e.g. guarding against attacks such as data
exfiltration or DoS). Since data planes typically have much larger attack surfaces, "hard"
multi-tenancy often requires extra attention to isolating the data-plane, though control plane
isolation also remains critical.
However, the terms "hard" and "soft" can often be confusing, as there is no single definition that
will apply to all users. Rather, "hardness" or "softness" is better understood as a broad
spectrum, with many different techniques that can be used to maintain different types of isolation
in your clusters, based on your requirements.
In more extreme cases, it may be easier or necessary to forgo any cluster-level sharing at all and
assign each tenant their dedicated cluster, possibly even running on dedicated hardware if VMs are
not considered an adequate security boundary. This may be easier with managed Kubernetes clusters,
where the overhead of creating and operating clusters is at least somewhat taken on by a cloud
provider. The benefit of stronger tenant isolation must be evaluated against the cost and
complexity of managing multiple clusters. The Multi-cluster SIG
is responsible for addressing these types of use cases.
The remainder of this page focuses on isolation techniques used for shared Kubernetes clusters.
However, even if you are considering dedicated clusters, it may be valuable to review these
recommendations, as it will give you the flexibility to shift to shared clusters in the future if
your needs or capabilities change.
Control plane isolation
Control plane isolation ensures that different tenants cannot access or affect each others'
Kubernetes API resources.
Namespaces
In Kubernetes, a Namespace provides a
mechanism for isolating groups of API resources within a single cluster. This isolation has two
key dimensions:
Object names within a namespace can overlap with names in other namespaces, similar to files in
folders. This allows tenants to name their resources without having to consider what other
tenants are doing.
Many Kubernetes security policies are scoped to namespaces. For example, RBAC Roles and Network
Policies are namespace-scoped resources. Using RBAC, Users and Service Accounts can be
restricted to a namespace.
In a multi-tenant environment, a Namespace helps segment a tenant's workload into a logical and
distinct management unit. In fact, a common practice is to isolate every workload in its own
namespace, even if multiple workloads are operated by the same tenant. This ensures that each
workload has its own identity and can be configured with an appropriate security policy.
The namespace isolation model requires configuration of several other Kubernetes resources,
networking plugins, and adherence to security best practices to properly isolate tenant workloads.
These considerations are discussed below.
Access controls
The most important type of isolation for the control plane is authorization. If teams or their
workloads can access or modify each others' API resources, they can change or disable all other
types of policies thereby negating any protection those policies may offer. As a result, it is
critical to ensure that each tenant has the appropriate access to only the namespaces they need,
and no more. This is known as the "Principle of Least Privilege."
Role-based access control (RBAC) is commonly used to enforce authorization in the Kubernetes
control plane, for both users and workloads (service accounts).
Roles and
RoleBindings are
Kubernetes objects that are used at a namespace level to enforce access control in your
application; similar objects exist for authorizing access to cluster-level objects, though these
are less useful for multi-tenant clusters.
In a multi-team environment, RBAC must be used to restrict tenants' access to the appropriate
namespaces, and ensure that cluster-wide resources can only be accessed or modified by privileged
users such as cluster administrators.
If a policy ends up granting a user more permissions than they need, this is likely a signal that
the namespace containing the affected resources should be refactored into finer-grained
namespaces. Namespace management tools may simplify the management of these finer-grained
namespaces by applying common RBAC policies to different namespaces, while still allowing
fine-grained policies where necessary.
Quotas
Kubernetes workloads consume node resources, like CPU and memory. In a multi-tenant environment,
you can use Resource Quotas to manage resource usage of
tenant workloads. For the multiple teams use case, where tenants have access to the Kubernetes
API, you can use resource quotas to limit the number of API resources (for example: the number of
Pods, or the number of ConfigMaps) that a tenant can create. Limits on object count ensure
fairness and aim to avoid noisy neighbor issues from affecting other tenants that share a
control plane.
Resource quotas are namespaced objects. By mapping tenants to namespaces, cluster admins can use
quotas to ensure that a tenant cannot monopolize a cluster's resources or overwhelm its control
plane. Namespace management tools simplify the administration of quotas. In addition, while
Kubernetes quotas only apply within a single namespace, some namespace management tools allow
groups of namespaces to share quotas, giving administrators far more flexibility with less effort
than built-in quotas.
Quotas prevent a single tenant from consuming greater than their allocated share of resources
hence minimizing the “noisy neighbor” issue, where one tenant negatively impacts the performance
of other tenants' workloads.
When you apply a quota to namespace, Kubernetes requires you to also specify resource requests and
limits for each container. Limits are the upper bound for the amount of resources that a container
can consume. Containers that attempt to consume resources that exceed the configured limits will
either be throttled or killed, based on the resource type. When resource requests are set lower
than limits, each container is guaranteed the requested amount but there may still be some
potential for impact across workloads.
Quotas cannot protect against all kinds of resource sharing, such as network traffic.
Node isolation (described below) may be a better solution for this problem.
Data Plane Isolation
Data plane isolation ensures that pods and workloads for different tenants are sufficiently
isolated.
Network isolation
By default, all pods in a Kubernetes cluster are allowed to communicate with each other, and all
network traffic is unencrypted. This can lead to security vulnerabilities where traffic is
accidentally or maliciously sent to an unintended destination, or is intercepted by a workload on
a compromised node.
Pod-to-pod communication can be controlled using Network Policies,
which restrict communication between pods using namespace labels or IP address ranges.
In a multi-tenant environment where strict network isolation between tenants is required, starting
with a default policy that denies communication between pods is recommended with another rule that
allows all pods to query the DNS server for name resolution. With such a default policy in place,
you can begin adding more permissive rules that allow for communication within a namespace.
It is also recommended not to use empty label selector '{}' for namespaceSelector field in network policy definition,
in case traffic need to be allowed between namespaces.
This scheme can be further refined as required. Note that this only applies to pods within a single
control plane; pods that belong to different virtual control planes cannot talk to each other via
Kubernetes networking.
Namespace management tools may simplify the creation of default or common network policies.
In addition, some of these tools allow you to enforce a consistent set of namespace labels across
your cluster, ensuring that they are a trusted basis for your policies.
Warning:
Network policies require a CNI plugin
that supports the implementation of network policies. Otherwise, NetworkPolicy resources will be ignored.
More advanced network isolation may be provided by service meshes, which provide OSI Layer 7
policies based on workload identity, in addition to namespaces. These higher-level policies can
make it easier to manage namespace-based multi-tenancy, especially when multiple namespaces are
dedicated to a single tenant. They frequently also offer encryption using mutual TLS, protecting
your data even in the presence of a compromised node, and work across dedicated or virtual clusters.
However, they can be significantly more complex to manage and may not be appropriate for all users.
Storage isolation
Kubernetes offers several types of volumes that can be used as persistent storage for workloads.
For security and data-isolation, dynamic volume provisioning
is recommended and volume types that use node resources should be avoided.
StorageClasses allow you to describe custom "classes"
of storage offered by your cluster, based on quality-of-service levels, backup policies, or custom
policies determined by the cluster administrators.
Pods can request storage using a PersistentVolumeClaim.
A PersistentVolumeClaim is a namespaced resource, which enables isolating portions of the storage
system and dedicating it to tenants within the shared Kubernetes cluster.
However, it is important to note that a PersistentVolume is a cluster-wide resource and has a
lifecycle independent of workloads and namespaces.
For example, you can configure a separate StorageClass for each tenant and use this to strengthen isolation.
If a StorageClass is shared, you should set a reclaim policy of Delete
to ensure that a PersistentVolume cannot be reused across different namespaces.
Sandboxing containers
Kubernetes pods are composed of one or more containers that execute on worker nodes.
Containers utilize OS-level virtualization and hence offer a weaker isolation boundary than
virtual machines that utilize hardware-based virtualization.
In a shared environment, unpatched vulnerabilities in the application and system layers can be
exploited by attackers for container breakouts and remote code execution that allow access to host
resources. In some applications, like a Content Management System (CMS), customers may be allowed
the ability to upload and execute untrusted scripts or code. In either case, mechanisms to further
isolate and protect workloads using strong isolation are desirable.
Sandboxing provides a way to isolate workloads running in a shared cluster. It typically involves
running each pod in a separate execution environment such as a virtual machine or a userspace
kernel. Sandboxing is often recommended when you are running untrusted code, where workloads are
assumed to be malicious. Part of the reason this type of isolation is necessary is because
containers are processes running on a shared kernel; they mount file systems like /sys and /proc
from the underlying host, making them less secure than an application that runs on a virtual
machine which has its own kernel. While controls such as seccomp, AppArmor, and SELinux can be
used to strengthen the security of containers, it is hard to apply a universal set of rules to all
workloads running in a shared cluster. Running workloads in a sandbox environment helps to
insulate the host from container escapes, where an attacker exploits a vulnerability to gain
access to the host system and all the processes/files running on that host.
Virtual machines and userspace kernels are two popular approaches to sandboxing.
Node Isolation
Node isolation is another technique that you can use to isolate tenant workloads from each other.
With node isolation, a set of nodes is dedicated to running pods from a particular tenant and
co-mingling of tenant pods is prohibited. This configuration reduces the noisy tenant issue, as
all pods running on a node will belong to a single tenant. The risk of information disclosure is
slightly lower with node isolation because an attacker that manages to escape from a container
will only have access to the containers and volumes mounted to that node.
Although workloads from different tenants are running on different nodes, it is important to be
aware that the kubelet and (unless using virtual control planes) the API service are still shared
services. A skilled attacker could use the permissions assigned to the kubelet or other pods
running on the node to move laterally within the cluster and gain access to tenant workloads
running on other nodes. If this is a major concern, consider implementing compensating controls
such as seccomp, AppArmor or SELinux or explore using sandboxed containers or creating separate
clusters for each tenant.
Node isolation is a little easier to reason about from a billing standpoint than sandboxing
containers since you can charge back per node rather than per pod. It also has fewer compatibility
and performance issues and may be easier to implement than sandboxing containers.
For example, nodes for each tenant can be configured with taints so that only pods with the
corresponding toleration can run on them. A mutating webhook could then be used to automatically
add tolerations and node affinities to pods deployed into tenant namespaces so that they run on a
specific set of nodes designated for that tenant.
This section discusses other Kubernetes constructs and patterns that are relevant for multi-tenancy.
API Priority and Fairness
API priority and fairness is a Kubernetes
feature that allows you to assign a priority to certain pods running within the cluster.
When an application calls the Kubernetes API, the API server evaluates the priority assigned to pod.
Calls from pods with higher priority are fulfilled before those with a lower priority.
When contention is high, lower priority calls can be queued until the server is less busy or you
can reject the requests.
Using API priority and fairness will not be very common in SaaS environments unless you are
allowing customers to run applications that interface with the Kubernetes API, for example,
a controller.
Quality-of-Service (QoS)
When you’re running a SaaS application, you may want the ability to offer different
Quality-of-Service (QoS) tiers of service to different tenants. For example, you may have freemium
service that comes with fewer performance guarantees and features and a for-fee service tier with
specific performance guarantees. Fortunately, there are several Kubernetes constructs that can
help you accomplish this within a shared cluster, including network QoS, storage classes, and pod
priority and preemption. The idea with each of these is to provide tenants with the quality of
service that they paid for. Let’s start by looking at networking QoS.
Typically, all pods on a node share a network interface. Without network QoS, some pods may
consume an unfair share of the available bandwidth at the expense of other pods.
The Kubernetes bandwidth plugin creates an
extended resource
for networking that allows you to use Kubernetes resources constructs, i.e. requests/limits, to
apply rate limits to pods by using Linux tc queues.
Be aware that the plugin is considered experimental as per the
Network Plugins
documentation and should be thoroughly tested before use in production environments.
For storage QoS, you will likely want to create different storage classes or profiles with
different performance characteristics. Each storage profile can be associated with a different
tier of service that is optimized for different workloads such IO, redundancy, or throughput.
Additional logic might be necessary to allow the tenant to associate the appropriate storage
profile with their workload.
Finally, there’s pod priority and preemption
where you can assign priority values to pods. When scheduling pods, the scheduler will try
evicting pods with lower priority when there are insufficient resources to schedule pods that are
assigned a higher priority. If you have a use case where tenants have different service tiers in a
shared cluster e.g. free and paid, you may want to give higher priority to certain tiers using
this feature.
DNS
Kubernetes clusters include a Domain Name System (DNS) service to provide translations from names
to IP addresses, for all Services and Pods. By default, the Kubernetes DNS service allows lookups
across all namespaces in the cluster.
In multi-tenant environments where tenants can access pods and other Kubernetes resources, or where
stronger isolation is required, it may be necessary to prevent pods from looking up services in other
Namespaces.
You can restrict cross-namespace DNS lookups by configuring security rules for the DNS service.
For example, CoreDNS (the default DNS service for Kubernetes) can leverage Kubernetes metadata
to restrict queries to Pods and Services within a namespace. For more information, read an
example of
configuring this within the CoreDNS documentation.
Operators are Kubernetes controllers that manage
applications. Operators can simplify the management of multiple instances of an application, like
a database service, which makes them a common building block in the multi-consumer (SaaS)
multi-tenancy use case.
Operators used in a multi-tenant environment should follow a stricter set of guidelines.
Specifically, the Operator should:
Support creating resources within different tenant namespaces, rather than just in the namespace
in which the Operator is deployed.
Ensure that the Pods are configured with resource requests and limits, to ensure scheduling and fairness.
Support configuration of Pods for data-plane isolation techniques such as node isolation and
sandboxed containers.
Implementations
There are two primary ways to share a Kubernetes cluster for multi-tenancy: using Namespaces
(that is, a Namespace per tenant) or by virtualizing the control plane (that is, virtual control
plane per tenant).
In both cases, data plane isolation, and management of additional considerations such as API
Priority and Fairness, is also recommended.
Namespace isolation is well-supported by Kubernetes, has a negligible resource cost, and provides
mechanisms to allow tenants to interact appropriately, such as by allowing service-to-service
communication. However, it can be difficult to configure, and doesn't apply to Kubernetes
resources that can't be namespaced, such as Custom Resource Definitions, Storage Classes, and Webhooks.
Control plane virtualization allows for isolation of non-namespaced resources at the cost of
somewhat higher resource usage and more difficult cross-tenant sharing. It is a good option when
namespace isolation is insufficient but dedicated clusters are undesirable, due to the high cost
of maintaining them (especially on-prem) or due to their higher overhead and lack of resource
sharing. However, even within a virtualized control plane, you will likely see benefits by using
namespaces as well.
The two options are discussed in more detail in the following sections.
Namespace per tenant
As previously mentioned, you should consider isolating each workload in its own namespace, even if
you are using dedicated clusters or virtualized control planes. This ensures that each workload
only has access to its own resources, such as ConfigMaps and Secrets, and allows you to tailor
dedicated security policies for each workload. In addition, it is a best practice to give each
namespace names that are unique across your entire fleet (that is, even if they are in separate
clusters), as this gives you the flexibility to switch between dedicated and shared clusters in
the future, or to use multi-cluster tooling such as service meshes.
Conversely, there are also advantages to assigning namespaces at the tenant level, not just the
workload level, since there are often policies that apply to all workloads owned by a single
tenant. However, this raises its own problems. Firstly, this makes it difficult or impossible to
customize policies to individual workloads, and secondly, it may be challenging to come up with a
single level of "tenancy" that should be given a namespace. For example, an organization may have
divisions, teams, and subteams - which should be assigned a namespace?
One possible approach is to organize your namespaces into hierarchies, and share certain policies and
resources between them. This could include managing namespace labels, namespace lifecycles,
delegated access, and shared resource quotas across related namespaces. These capabilities can
be useful in both multi-team and multi-customer scenarios.
Virtual control plane per tenant
Another form of control-plane isolation is to use Kubernetes extensions to provide each tenant a
virtual control-plane that enables segmentation of cluster-wide API resources.
Data plane isolation techniques can be used with this model to securely
manage worker nodes across tenants.
The virtual control plane based multi-tenancy model extends namespace-based multi-tenancy by
providing each tenant with dedicated control plane components, and hence complete control over
cluster-wide resources and add-on services. Worker nodes are shared across all tenants, and are
managed by a Kubernetes cluster that is normally inaccessible to tenants.
This cluster is often referred to as a super-cluster (or sometimes as a host-cluster).
Since a tenant’s control-plane is not directly associated with underlying compute resources it is
referred to as a virtual control plane.
A virtual control plane typically consists of the Kubernetes API server, the controller manager,
and the etcd data store. It interacts with the super cluster via a metadata synchronization
controller which coordinates changes across tenant control planes and the control plane of the
super-cluster.
By using per-tenant dedicated control planes, most of the isolation problems due to sharing one
API server among all tenants are solved. Examples include noisy neighbors in the control plane,
uncontrollable blast radius of policy misconfigurations, and conflicts between cluster scope
objects such as webhooks and CRDs. Hence, the virtual control plane model is particularly
suitable for cases where each tenant requires access to a Kubernetes API server and expects the
full cluster manageability.
The improved isolation comes at the cost of running and maintaining an individual virtual control
plane per tenant. In addition, per-tenant control planes do not solve isolation problems in the
data plane, such as node-level noisy neighbors or security threats. These must still be addressed
separately.
12 - Hardening Guide - Authentication Mechanisms
Information on authentication options in Kubernetes and their security properties.
Selecting the appropriate authentication mechanism(s) is a crucial aspect of securing your cluster.
Kubernetes provides several built-in mechanisms, each with its own strengths and weaknesses that
should be carefully considered when choosing the best authentication mechanism for your cluster.
In general, it is recommended to enable as few authentication mechanisms as possible to simplify
user management and prevent cases where users retain access to a cluster that is no longer required.
It is important to note that Kubernetes does not have an in-built user database within the cluster.
Instead, it takes user information from the configured authentication system and uses that to make
authorization decisions. Therefore, to audit user access, you need to review credentials from every
configured authentication source.
For production clusters with multiple users directly accessing the Kubernetes API, it is
recommended to use external authentication sources such as OIDC. The internal authentication
mechanisms, such as client certificates and service account tokens, described below, are not
suitable for this use case.
X.509 client certificate authentication
Kubernetes leverages X.509 client certificate
authentication for system components, such as when the kubelet authenticates to the API Server.
While this mechanism can also be used for user authentication, it might not be suitable for
production use due to several restrictions:
Client certificates cannot be individually revoked. Once compromised, a certificate can be used
by an attacker until it expires. To mitigate this risk, it is recommended to configure short
lifetimes for user authentication credentials created using client certificates.
If a certificate needs to be invalidated, the certificate authority must be re-keyed, which
can introduce availability risks to the cluster.
There is no permanent record of client certificates created in the cluster. Therefore, all
issued certificates must be recorded if you need to keep track of them.
Private keys used for client certificate authentication cannot be password-protected. Anyone
who can read the file containing the key will be able to make use of it.
Using client certificate authentication requires a direct connection from the client to the
API server without any intervening TLS termination points, which can complicate network architectures.
Group data is embedded in the O value of the client certificate, which means the user's group
memberships cannot be changed for the lifetime of the certificate.
Static token file
Although Kubernetes allows you to load credentials from a
static token file located
on the control plane node disks, this approach is not recommended for production servers due to
several reasons:
Credentials are stored in clear text on control plane node disks, which can be a security risk.
Changing any credential requires a restart of the API server process to take effect, which can
impact availability.
There is no mechanism available to allow users to rotate their credentials. To rotate a
credential, a cluster administrator must modify the token on disk and distribute it to the users.
There is no lockout mechanism available to prevent brute-force attacks.
Bootstrap tokens
Bootstrap tokens are used for joining
nodes to clusters and are not recommended for user authentication due to several reasons:
They have hard-coded group memberships that are not suitable for general use, making them
unsuitable for authentication purposes.
Manually generating bootstrap tokens can lead to weak tokens that can be guessed by an attacker,
which can be a security risk.
There is no lockout mechanism available to prevent brute-force attacks, making it easier for
attackers to guess or crack the token.
ServiceAccount secret tokens
Service account secrets
are available as an option to allow workloads running in the cluster to authenticate to the
API server. In Kubernetes < 1.23, these were the default option, however, they are being replaced
with TokenRequest API tokens. While these secrets could be used for user authentication, they are
generally unsuitable for a number of reasons:
They cannot be set with an expiry and will remain valid until the associated service account is deleted.
The authentication tokens are visible to any cluster user who can read secrets in the namespace
that they are defined in.
Service accounts cannot be added to arbitrary groups complicating RBAC management where they are used.
TokenRequest API tokens
The TokenRequest API is a useful tool for generating short-lived credentials for service
authentication to the API server or third-party systems. However, it is not generally recommended
for user authentication as there is no revocation method available, and distributing credentials
to users in a secure manner can be challenging.
When using TokenRequest tokens for service authentication, it is recommended to implement a short
lifespan to reduce the impact of compromised tokens.
OpenID Connect token authentication
Kubernetes supports integrating external authentication services with the Kubernetes API using
OpenID Connect (OIDC).
There is a wide variety of software that can be used to integrate Kubernetes with an identity
provider. However, when using OIDC authentication in Kubernetes, it is important to consider the
following hardening measures:
The software installed in the cluster to support OIDC authentication should be isolated from
general workloads as it will run with high privileges.
Some Kubernetes managed services are limited in the OIDC providers that can be used.
As with TokenRequest tokens, OIDC tokens should have a short lifespan to reduce the impact of
compromised tokens.
Webhook token authentication
Webhook token authentication
is another option for integrating external authentication providers into Kubernetes. This mechanism
allows for an authentication service, either running inside the cluster or externally, to be
contacted for an authentication decision over a webhook. It is important to note that the suitability
of this mechanism will likely depend on the software used for the authentication service, and there
are some Kubernetes-specific considerations to take into account.
To configure Webhook authentication, access to control plane server filesystems is required. This
means that it will not be possible with Managed Kubernetes unless the provider specifically makes it
available. Additionally, any software installed in the cluster to support this access should be
isolated from general workloads, as it will run with high privileges.
Authenticating proxy
Another option for integrating external authentication systems into Kubernetes is to use an
authenticating proxy.
With this mechanism, Kubernetes expects to receive requests from the proxy with specific header
values set, indicating the username and group memberships to assign for authorization purposes.
It is important to note that there are specific considerations to take into account when using
this mechanism.
Firstly, securely configured TLS must be used between the proxy and Kubernetes API server to
mitigate the risk of traffic interception or sniffing attacks. This ensures that the communication
between the proxy and Kubernetes API server is secure.
Secondly, it is important to be aware that an attacker who is able to modify the headers of the
request may be able to gain unauthorized access to Kubernetes resources. As such, it is important
to ensure that the headers are properly secured and cannot be tampered with.
Information about hardening Dynamic Resource Allocation (DRA) authorization and access patterns.
Dynamic Resource Allocation (DRA) adds powerful scheduling and device management
capabilities. Because DRA components update ResourceClaim status, cluster
administrators should configure authorization for those updates with explicit,
least-privilege RBAC.
FEATURE STATE:Kubernetes v1.36 [beta](enabled by default)
Starting in Kubernetes v1.36, DRA status updates use synthetic subresources and,
in some cases, specialized node-aware verbs.
Harden DRA status update permissions
For DRA status updates,In addition to granting update permissions on the
resourceclaims/status subresource, cluster administrators must grant permissions on
specific "synthetic" subresources based on the exact fields a component needs to modify.
This enforces the principle of least privilege between the scheduler, custom controllers,
and DRA drivers.
The DRA authorization checks are divided into two synthetic subresources:
resourceclaims/binding
Required to modify status.allocation and status.reservedFor.
Typically granted to the kube-scheduler and custom allocation controllers.
Uses standard update and patch verbs.
resourceclaims/driver
Required to modify status.devices.
This check is performed per-driver to drivers from tampering with devices on different
nodes and/or from other drivers.
Uses node-aware verbs for stricter scope.
Node-aware DRA verbs
When authorizing updates to resourceclaims/driver, use the appropriate
specialized verb prefix:
associated-node:<verb> (for example, associated-node:update)
For node-local drivers.
The API server verifies node association for the requesting driver.
arbitrary-node:<verb> (for example, arbitrary-node:patch)
For control-plane or multi-node controllers that may update claims from
any node.
This document covers how to improve the security posture of the Scheduler.
A misconfigured scheduler can have security implications.
Such a scheduler can target specific nodes and evict the workloads or applications that are sharing the node and its resources.
This can aid an attacker with a Yo-Yo attack: an attack on a vulnerable autoscaler.
kube-scheduler configuration
Scheduler authentication & authorization command line options
When setting up authentication configuration, it should be made sure that
kube-scheduler's authentication remains consistent with kube-api-server's authentication.
If any request has missing authentication headers, the authentication should happen through the kube-api-server
allowing all authentication to be consistent in the cluster.
authentication-kubeconfig: Make sure to provide a proper kubeconfig so that
the scheduler can retrieve authentication configuration options from the API Server.
This kubeconfig file should be protected with strict file permissions.
authentication-tolerate-lookup-failure: Set this to false to make sure
the scheduler always looks up its authentication configuration from the API server.
authentication-skip-lookup: Set this to false to make sure
the scheduler always looks up its authentication configuration from the API server.
authorization-always-allow-paths: These paths should respond with data that is appropriate
for anonymous authorization. Defaults to /healthz,/readyz,/livez.
profiling: Set to false to disable the profiling endpoints which are provide debugging information
but which should not be enabled on production clusters as they present a risk of denial of service
or information leakage. The --profiling argument is deprecated and can now be provided through the
KubeScheduler DebuggingConfiguration.
Profiling can be disabled through the kube-scheduler config by setting enableProfiling to false.
requestheader-client-ca-file: Avoid passing this argument.
Scheduler networking command line options
bind-address: In most cases, the kube-scheduler does not need to be externally accessible.
Setting the bind address to localhost is a secure practice.
permit-address-sharing: Set this to false to disable connection sharing through SO_REUSEADDR.
SO_REUSEADDR can lead to reuse of terminated connections that are in TIME_WAIT state.
permit-port-sharing: Default false. Use the default unless you are confident you understand the security implications.
Scheduler TLS command line options
tls-cipher-suites: Always provide a list of preferred cipher suites.
This ensures encryption never happens with insecure cipher suites.
Scheduling configurations for custom schedulers
When using custom schedulers based on the Kubernetes scheduling code, cluster administrators need to be careful with
plugins that use the queueSort, prefilter, filter, or permitextension points.
These extension points control various stages of a scheduling process,
and the wrong configuration can impact the kube-scheduler's behavior in your cluster.
Key considerations
Exactly one plugin that uses the queueSort extension point can be enabled at a time.
Any plugins that use queueSort should be scrutinized.
Plugins that implement the prefilter or filter extension point can potentially mark all nodes as unschedulable.
This can bring scheduling of new pods to a halt.
Plugins that implement the permit extension point can prevent or delay the binding of a Pod.
Such plugins should be thoroughly reviewed by the cluster administrator.
When using a plugin that is not one of the default plugins,
consider disabling the queueSort, filter and permit extension points as follows:
apiVersion:kubescheduler.config.k8s.io/v1kind:KubeSchedulerConfigurationprofiles:- schedulerName:my-schedulerplugins:# Disable specific plugins for different extension points# You can disable all plugins for an extension point using "*"queueSort:disabled:- name:"*"# Disable all queueSort plugins# - name: "PrioritySort" # Disable specific queueSort pluginfilter:disabled:- name:"*"# Disable all filter plugins# - name: "NodeResourcesFit" # Disable specific filter pluginpermit:disabled:- name:"*"# Disables all permit plugins# - name: "TaintToleration" # Disable specific permit plugin
This creates a scheduler profile my-scheduler.
Whenever the .spec of a Pod does not have a value for .spec.schedulerName, the kube-scheduler runs for that Pod,
using its main configuration, and default plugins.
If you define a Pod with .spec.schedulerName set to my-scheduler, the kube-scheduler runs
but with a custom configuration; in that custom configuration,
the queueSort, filter and permit extension points are disabled.
If you use this KubeSchedulerConfiguration, and don't run any custom scheduler,
and you then define a Pod with .spec.schedulerName set to nonexistent-scheduler
(or any other scheduler name that doesn't exist in your cluster), no events would be generated for a pod.
Disallow labeling nodes
A cluster administrator should ensure that cluster users cannot label the nodes.
A malicious actor can use nodeSelector to schedule workloads on nodes where those workloads should not be present.
15 - Kubernetes API Server Bypass Risks
Security architecture information relating to the API server and other components
The Kubernetes API server is the main point of entry to a cluster for external parties
(users and services) interacting with it.
As part of this role, the API server has several key built-in security controls, such as
audit logging and admission controllers.
However, there are ways to modify the configuration
or content of the cluster that bypass these controls.
This page describes the ways in which the security controls built into the
Kubernetes API server can be bypassed, so that cluster operators
and security architects can ensure that these bypasses are appropriately restricted.
Static Pods
The kubelet on each node loads and
directly manages any manifests that are stored in a named directory or fetched from
a specific URL as static Pods in
your cluster. The API server doesn't manage these static Pods. An attacker with write
access to this location could modify the configuration of static pods loaded from that
source, or could introduce new static Pods.
Static Pods are restricted from accessing other objects in the Kubernetes API. For example,
you can't configure a static Pod to mount a Secret from the cluster. However, these Pods can
take other security sensitive actions, such as using hostPath mounts from the underlying
node.
By default, the kubelet creates a mirror pod
so that the static Pods are visible in the Kubernetes API. However, if the attacker uses an invalid
namespace name when creating the Pod, it will not be visible in the Kubernetes API and can only
be discovered by tooling that has access to the affected host(s).
If a static Pod fails admission control, the kubelet won't register the Pod with the
API server. However, the Pod still runs on the node. For more information, refer to
kubeadm issue #1541.
If a node uses the static Pod functionality, restrict filesystem access to the static Pod manifest directory
or URL to users who need the access.
Restrict access to kubelet configuration parameters and files to prevent an attacker setting
a static Pod path or URL.
Regularly audit and centrally report all access to directories or web storage locations that host
static Pod manifests and kubelet configuration files.
The kubelet API
The kubelet provides an HTTP API that is typically exposed on TCP port 10250 on cluster
worker nodes. The API might also be exposed on control plane nodes depending on the Kubernetes
distribution in use. Direct access to the API allows for disclosure of information about
the pods running on a node, the logs from those pods, and execution of commands in
every container running on the node.
Some of these endpoints support Websocket protocols via HTTP GET requests, which are authorized with the get verb.
This means that get permission on nodes/proxy is not a read-only permission,
and authorizes access to endpoints which can be used to execute commands in any container running on the node.
When Kubernetes cluster users have RBAC access to Node object sub-resources, that access
serves as authorization to interact with the kubelet API. The exact access depends on
which sub-resource access has been granted, as detailed in
kubelet authorization.
Direct access to the kubelet API is not subject to admission control and is not logged
by Kubernetes audit logging. An attacker with direct access to this API may be able to
bypass controls that detect or prevent certain actions.
The kubelet API can be configured to authenticate requests in a number of ways.
By default, the kubelet configuration allows anonymous access. Most Kubernetes providers
change the default to use webhook and certificate authentication. This lets the control plane
ensure that the caller is authorized to access the nodes API resource or sub-resources.
The default anonymous access doesn't make this assertion with the control plane.
Mitigations
Restrict access to sub-resources of the nodes API object using mechanisms such as
RBAC. Only grant this access when required,
such as by monitoring services.
Avoid granting the nodes/proxy catch-all permission, even with just the get verb.
Instead, grant granular permissions.
Restrict access to the kubelet port. Only allow specified and trusted IP address
ranges to access the port.
Ensure that the unauthenticated "read-only" Kubelet port is not enabled on the cluster.
The etcd API
Kubernetes clusters use etcd as a datastore. The etcd service listens on TCP port 2379.
The only clients that need access are the Kubernetes API server and any backup tooling
that you use. Direct access to this API allows for disclosure or modification of any
data held in the cluster.
Access to the etcd API is typically managed by client certificate authentication.
Any certificate issued by a certificate authority that etcd trusts allows full access
to the data stored inside etcd.
Direct access to etcd is not subject to Kubernetes admission control and is not logged
by Kubernetes audit logging. An attacker who has read access to the API server's
etcd client certificate private key (or can create a new trusted client certificate) can gain
cluster admin rights by accessing cluster secrets or modifying access rules. Even without
elevating their Kubernetes RBAC privileges, an attacker who can modify etcd can retrieve any API object
or create new workloads inside the cluster.
Many Kubernetes providers configure
etcd to use mutual TLS (both client and server verify each other's certificate for authentication).
There is no widely accepted implementation of authorization for the etcd API, although
the feature exists. Since there is no authorization model, any certificate
with client access to etcd can be used to gain full access to etcd. Typically, etcd client certificates
that are only used for health checking can also grant full read and write access.
Mitigations
Ensure that the certificate authority trusted by etcd is used only for the purposes of
authentication to that service.
Control access to the private key for the etcd server certificate, and to the API server's
client certificate and key.
Consider restricting access to the etcd port at a network level, to only allow access
from specified and trusted IP address ranges.
Container runtime socket
On each node in a Kubernetes cluster, access to interact with containers is controlled
by the container runtime (or runtimes, if you have configured more than one). Typically,
the container runtime exposes a Unix socket that the kubelet can access. An attacker with
access to this socket can launch new containers or interact with running containers.
At the cluster level, the impact of this access depends on whether the containers that
run on the compromised node have access to Secrets or other confidential
data that an attacker could use to escalate privileges to other worker nodes or to
control plane components.
Mitigations
Ensure that you tightly control filesystem access to container runtime sockets.
When possible, restrict this access to the root user.
Isolate the kubelet from other components running on the node, using
mechanisms such as Linux kernel namespaces.
Ensure that you restrict or forbid the use of hostPath mounts
that include the container runtime socket, either directly or by mounting a parent
directory. Also hostPath mounts must be set as read-only to mitigate risks
of attackers bypassing directory restrictions.
Restrict user access to nodes, and especially restrict superuser access to nodes.
16 - Linux kernel security constraints for Pods and containers
Overview of Linux kernel security modules and constraints that you can use to harden your Pods and containers.
This page describes some of the security features that are built into the Linux
kernel that you can use in your Kubernetes workloads. To learn how to apply
these features to your Pods and containers, refer to
Configure a SecurityContext for a Pod or Container.
You should already be familiar with Linux and with the basics of Kubernetes
workloads.
Run workloads without root privileges
When you deploy a workload in Kubernetes, use the Pod specification to restrict
that workload from running as the root user on the node. You can use the Pod
securityContext to define the specific Linux user and group for the processes in
the Pod, and explicitly restrict containers from running as root users. Setting
these values in the Pod manifest takes precedence over similar values in the
container image, which is especially useful if you're running images that you
don't own.
Caution:
Ensure that the user or group that you assign to the workload has the permissions
required for the application to function correctly. Changing the user or group
to one that doesn't have the correct permissions could lead to file access
issues or failed operations.
Configuring the kernel security features on this page provides fine-grained
control over the actions that processes in your cluster can take, but managing
these configurations can be challenging at scale. Running containers as
non-root, or in user namespaces if you need root privileges, helps to reduce the
chance that you'll need to enforce your configured kernel security capabilities.
Security features in the Linux kernel
Kubernetes lets you configure and use Linux kernel features to improve isolation
and harden your containerized workloads. Common features include the following:
Secure computing mode (seccomp): Filter which system calls a process can
make
AppArmor: Restrict the access privileges of individual programs
Security Enhanced Linux (SELinux): Assign security labels to objects for
more manageable security policy enforcement
To configure settings for one of these features, the operating system that you
choose for your nodes must enable the feature in the kernel. For example,
Ubuntu 7.10 and later enable AppArmor by default. To learn whether your OS
enables a specific feature, consult the OS documentation.
You use the securityContext field in your Pod specification to define the
constraints that apply to those processes. The securityContext field also
supports other security settings, such as specific Linux capabilities or file
access permissions using UIDs and GIDs. To learn more, refer to
Configure a SecurityContext for a Pod or Container.
seccomp
Some of your workloads might need privileges to perform specific actions as the
root user on your node's host machine. Linux uses capabilities to divide the
available privileges into categories, so that processes can get the privileges
required to perform specific actions without being granted all privileges. Each
capability has a set of system calls (syscalls) that a process can make. seccomp
lets you restrict these individual syscalls. It can be used to sandbox the privileges of a process, restricting the calls it
is able to make from userspace into the kernel.
In Kubernetes, you use a container runtime on each node to run your
containers. Example runtimes include CRI-O, Docker, or containerd. Each runtime
allows only a subset of Linux capabilities by default. You can further limit the
allowed syscalls individually by using a seccomp profile. Container runtimes
usually include a default seccomp profile. Kubernetes lets you automatically
apply seccomp profiles loaded onto a node to your Pods and containers.
Note:
Kubernetes also has the allowPrivilegeEscalation setting for Pods and
containers. When set to false, this prevents processes from gaining new
capabilities and restricts unprivileged users from changing the applied seccomp
profile to a more permissive profile.
To learn more about seccomp, see
Seccomp BPF
in the Linux kernel documentation.
Considerations for seccomp
seccomp is a low-level security configuration that you should only configure
yourself if you require fine-grained control over Linux syscalls. Using
seccomp, especially at scale, has the following risks:
Configurations might break during application updates
Attackers can still use allowed syscalls to exploit vulnerabilities
Profile management for individual applications becomes challenging at scale
Recommendation: Use the default seccomp profile that's bundled with your
container runtime. If you need a more isolated environment, consider using a
sandbox, such as gVisor. Sandboxes solve the preceding risks with custom
seccomp profiles, but require more compute resources on your nodes and might
have compatibility issues with GPUs and other specialized hardware.
AppArmor and SELinux: policy-based mandatory access control
You can use Linux policy-based mandatory access control (MAC) mechanisms, such
as AppArmor and SELinux, to harden your Kubernetes workloads.
AppArmor
AppArmor is a Linux kernel security module that
supplements the standard Linux user and group based permissions to confine
programs to a limited set of resources. AppArmor can be configured for any
application to reduce its potential attack surface and provide greater in-depth
defense. It is configured through profiles tuned to allow the access needed by a
specific program or container, such as Linux capabilities, network access, and
file permissions. Each profile can be run in either enforcing mode, which blocks
access to disallowed resources, or complain mode, which only reports violations.
AppArmor can help you to run a more secure deployment by restricting what
containers are allowed to do, and/or provide better auditing through system
logs. The container runtime that you use might ship with a default AppArmor
profile, or you can use a custom profile.
SELinux is a Linux kernel security module that lets you restrict the access
that a specific subject, such as a process, has to the files on your system.
You define security policies that apply to subjects that have specific SELinux
labels. When a process that has an SELinux label attempts to access a file, the
SELinux server checks whether that process' security policy allows the access
and makes an authorization decision.
In Kubernetes, you can set an SELinux label in the securityContext field of
your manifest. The specified labels are assigned to those processes. If you
have configured security policies that affect those labels, the host OS kernel
enforces these policies.
The operating system on your Linux nodes usually includes one of either
AppArmor or SELinux. Both mechanisms provide similar types of protection, but
have differences such as the following:
Configuration: AppArmor uses profiles to define access to resources.
SELinux uses policies that apply to specific labels.
Policy application: In AppArmor, you define resources using file paths.
SELinux uses the index node (inode) of a resource to identify the resource.
Summary of features
The following table describes the use cases and scope of each security control.
You can use all of these controls together to build a more hardened system.
Summary of Linux kernel security features
Security feature
Description
How to use
Example
seccomp
Restrict individual kernel calls in the userspace. Reduces the
likelihood that a vulnerability that uses a restricted syscall would
compromise the system.
Specify a loaded seccomp profile in the Pod or container specification
to apply its constraints to the processes in the Pod.
Reject the unshare syscall, which was used in
CVE-2022-0185.
AppArmor
Restrict program access to specific resources. Reduces the attack
surface of the program. Improves audit logging.
Specify a loaded AppArmor profile in the container specification.
Restrict a read-only program from writing to any file path
in the system.
SELinux
Restrict access to resources such as files, applications, ports, and
processes using labels and security policies.
Specify access restrictions for specific labels. Tag processes with
those labels to enforce the access restrictions related to the label.
Restrict a container from accessing files outside its own filesystem.
Note:
Mechanisms like AppArmor and SELinux can provide protection that extends beyond
the container. For example, you can use SELinux to help mitigate
CVE-2019-5736.
Considerations for managing custom configurations
seccomp, AppArmor, and SELinux usually have a default configuration that offers
basic protections. You can also create custom profiles and policies that meet
the requirements of your workloads. Managing and distributing these custom
configurations at scale might be challenging, especially if you use all three
features together. To help you to manage these configurations at scale, use a
tool like the
Kubernetes Security Profiles Operator.
Kernel-level security features and privileged containers
Kubernetes lets you specify that some trusted containers can run in
privileged mode. Any container in a Pod can run in privileged mode to use
operating system administrative capabilities that would otherwise be
inaccessible. This is available for both Windows and Linux.
Privileged containers explicitly override some of the Linux kernel constraints
that you might use in your workloads, as follows:
seccomp: Privileged containers run as the Unconfined seccomp profile,
overriding any seccomp profile that you specified in your manifest.
AppArmor: Privileged containers ignore any applied AppArmor profiles.
SELinux: Privileged containers run as the unconfined_t domain.
Privileged containers
Any container in a Pod can enable Privileged mode if you set the
privileged: true field in the
securityContext
field for the container. Privileged containers override or undo many other hardening settings such as the applied seccomp profile, AppArmor profile, or
SELinux constraints. Privileged containers are given all Linux capabilities,
including capabilities that they don't require. For example, a root user in a
privileged container might be able to use the CAP_SYS_ADMIN and
CAP_NET_ADMIN capabilities on the node, bypassing the runtime seccomp
configuration and other restrictions.
In most cases, you should avoid using privileged containers, and instead grant
the specific capabilities required by your container using the capabilities
field in the securityContext field. Only use privileged mode if you have a
capability that you can't grant with the securityContext. This is useful for
containers that want to use operating system administrative capabilities such
as manipulating the network stack or accessing hardware devices.
In Kubernetes version 1.26 and later, you can also run Windows containers in a
similarly privileged mode by setting the windowsOptions.hostProcess flag on
the security context of the Pod spec. For details and instructions, see
Create a Windows HostProcess Pod.
Recommendations and best practices
Before configuring kernel-level security capabilities, you should consider
implementing network-level isolation. For more information, read the
Security Checklist.
Unless necessary, run Linux workloads as non-root by setting specific user and
group IDs in your Pod manifest and by specifying runAsNonRoot: true.
Additionally, you can run workloads in user namespaces by setting
hostUsers: false in your Pod manifest. This lets you run containers as root
users in the user namespace, but as non-root users in the host namespace on the
node. This is still in early stages of development and might not have the level
of support that you need. For instructions, refer to
Use a User Namespace With a Pod.
Baseline checklist for ensuring security in Kubernetes clusters.
This checklist aims at providing a basic list of guidance with links to more
comprehensive documentation on each topic. It does not claim to be exhaustive
and is meant to evolve.
On how to read and use this document:
The order of topics does not reflect an order of priority.
Some checklist items are detailed in the paragraph below the list of each section.
Caution:
Checklists are not sufficient for attaining a good security posture on their
own. A good security posture requires constant attention and improvement, but a
checklist can be the first step on the never-ending journey towards security
preparedness. Some of the recommendations in this checklist may be too
restrictive or too lax for your specific security needs. Since Kubernetes
security is not "one size fits all", each category of checklist items should be
evaluated on its merits.
Authentication & Authorization
system:masters group is not used for user or component authentication after bootstrapping.
The kube-controller-manager is running with --use-service-account-credentials
enabled.
The root certificate is protected (either an offline CA, or a managed
online CA with effective access controls).
Intermediate and leaf certificates have an expiry date no more than 3
years in the future.
A process exists for periodic access review, and reviews occur no more
than 24 months apart.
After bootstrapping, neither users nor components should authenticate to the
Kubernetes API as system:masters. Similarly, running all of
kube-controller-manager as system:masters should be avoided. In fact,
system:masters should only be used as a break-glass mechanism, as opposed to
an admin user.
Network security
CNI plugins in use support network policies.
Ingress and egress network policies are applied to all workloads in the
cluster.
Default network policies within each namespace, selecting all pods, denying
everything, are in place.
If appropriate, a service mesh is used to encrypt all communications inside of the cluster.
The Kubernetes API, kubelet API and etcd are not exposed publicly on Internet.
Access from the workloads to the cloud metadata API is filtered.
Use of LoadBalancer and ExternalIPs is restricted.
A number of Container Network Interface (CNI) plugins
plugins provide the functionality to
restrict network resources that pods may communicate with. This is most commonly done
through Network Policies
which provide a namespaced resource to define rules. Default network policies
that block all egress and ingress, in each namespace, selecting all pods, can be
useful to adopt an allow list approach to ensure that no workloads are missed.
Not all CNI plugins provide encryption in transit. If the chosen plugin lacks this
feature, an alternative solution could be to use a service mesh to provide that
functionality.
The etcd datastore of the control plane should have controls to limit access and
not be publicly exposed on the Internet. Furthermore, mutual TLS (mTLS) should
be used to communicate securely with it. The certificate authority for this
should be unique to etcd.
External Internet access to the Kubernetes API server should be restricted to
not expose the API publicly. Be careful, as many managed Kubernetes distributions
are publicly exposing the API server by default. You can then use a bastion host
to access the server.
The kubelet API access
should be restricted and not exposed publicly, the default authentication and
authorization settings, when no configuration file specified with the --config
flag, are overly permissive.
If a cloud provider is used for hosting Kubernetes, the access from pods to the cloud
metadata API 169.254.169.254 should also be restricted or blocked if not needed
because it may leak information.
RBAC rights to create, update, patch, delete workloads is only granted if necessary.
Appropriate Pod Security Standards policy is applied for all namespaces and enforced.
Memory limit is set for the workloads with a limit equal or inferior to the request.
CPU limit might be set on sensitive workloads.
For nodes that support it, Seccomp is enabled with appropriate syscalls
profile for programs.
For nodes that support it, AppArmor or SELinux is enabled with appropriate
profile for programs.
RBAC authorization is crucial but
cannot be granular enough to have authorization on the Pods' resources
(or on any resource that manages Pods). The only granularity is the API verbs
on the resource itself, for example, create on Pods. Without
additional admission, the authorization to create these resources allows direct
unrestricted access to the schedulable nodes of a cluster.
The Pod Security Standards
define three different policies, privileged, baseline and restricted that limit
how fields can be set in the PodSpec regarding security.
These standards can be enforced at the namespace level with the new
Pod Security admission,
enabled by default, or by third-party admission webhook. Please note that,
contrary to the removed PodSecurityPolicy admission it replaces,
Pod Security
admission can be easily combined with admission webhooks and external services.
Pod Security admission restricted policy, the most restrictive policy of the
Pod Security Standards set,
can operate in several modes,
warn, audit or enforce to gradually apply the most appropriate
security context
according to security best practices. Nevertheless, pods'
security context
should be separately investigated to limit the privileges and access pods may
have on top of the predefined security standards, for specific use cases.
Memory and CPU limits
should be set in order to restrict the memory and CPU resources a pod can
consume on a node, and therefore prevent potential DoS attacks from malicious or
breached workloads. Such policy can be enforced by an admission controller.
Please note that CPU limits will throttle usage and thus can have unintended
effects on auto-scaling features or efficiency i.e. running the process in best
effort with the CPU resource available.
Caution:
Memory limit superior to request can expose the whole node to OOM issues.
Enabling Seccomp
Seccomp stands for secure computing mode and has been a feature of the Linux kernel since version 2.6.12.
It can be used to sandbox the privileges of a process, restricting the calls it is able to make
from userspace into the kernel. Kubernetes lets you automatically apply seccomp profiles loaded onto
a node to your Pods and containers.
Seccomp can improve the security of your workloads by reducing the Linux kernel syscall attack
surface available inside containers. The seccomp filter mode leverages BPF to create an allow or
deny list of specific syscalls, named profiles.
Since Kubernetes 1.27, you can enable the use of RuntimeDefault as the default seccomp profile
for all workloads. A security tutorial is available on this
topic. In addition, the
Kubernetes Security Profiles Operator
is a project that facilitates the management and use of seccomp in clusters.
Note:
Seccomp is only available on Linux nodes.
Enabling AppArmor or SELinux
AppArmor
AppArmor is a Linux kernel security module that can
provide an easy way to implement Mandatory Access Control (MAC) and better
auditing through system logs. A default AppArmor profile is enforced on nodes that support it, or a custom profile can be configured.
Like seccomp, AppArmor is also configured
through profiles, where each profile is either running in enforcing mode, which
blocks access to disallowed resources or complain mode, which only reports
violations. AppArmor profiles are enforced on a per-container basis, with an
annotation, allowing for processes to gain just the right privileges.
SELinux is also a
Linux kernel security module that can provide a mechanism for supporting access
control security policies, including Mandatory Access Controls (MAC). SELinux
labels can be assigned to containers or pods
via their securityContext section.
Audit logs, if enabled, are protected from general access.
Pod placement
Pod placement is done in accordance with the tiers of sensitivity of the
application.
Sensitive applications are running isolated on nodes or with specific
sandboxed runtimes.
Pods that are on different tiers of sensitivity, for example, an application pod
and the Kubernetes API server, should be deployed onto separate nodes. The
purpose of node isolation is to prevent an application container breakout to
directly providing access to applications with higher level of sensitivity to easily
pivot within the cluster. This separation should be enforced to prevent pods
accidentally being deployed onto the same node. This could be enforced with the
following features:
Key-value pairs, as part of the pod specification, that specify which nodes to
deploy onto. These can be enforced at the namespace and cluster level with the
PodNodeSelector
admission controller.
An admission controller that allows administrators to restrict permitted
tolerations within a
namespace. Pods within a namespace may only utilize the tolerations specified on
the namespace object annotation keys that provide a set of default and allowed
tolerations.
RuntimeClass is a feature for selecting the container runtime configuration.
The container runtime configuration is used to run a Pod's containers and can
provide more or less isolation from the host at the cost of performance
overhead.
Secrets
ConfigMaps are not used to hold confidential data.
Encryption at rest is configured for the Secret API.
If appropriate, a mechanism to inject secrets stored in third-party storage
is deployed and available.
Service account tokens are not mounted in pods that don't require them.
Secrets required for pods should be stored within Kubernetes Secrets as opposed
to alternatives such as ConfigMap. Secret resources stored within etcd should
be encrypted at rest.
Pods needing secrets should have these automatically mounted through volumes,
preferably stored in memory like with the emptyDir.medium option.
Mechanism can be used to also inject secrets from third-party storages as
volume, like the Secrets Store CSI Driver.
This should be done preferentially as compared to providing the pods service
account RBAC access to secrets. This would allow adding secrets into the pod as
environment variables or files. Please note that the environment variable method
might be more prone to leakage due to crash dumps in logs and the
non-confidential nature of environment variable in Linux, as opposed to the
permission mechanism on files.
Service account tokens should not be mounted into pods that do not require them. This can be configured by setting
automountServiceAccountToken
to false either within the service account to apply throughout the namespace
or specifically for a pod. For Kubernetes v1.22 and above, use
Bound Service Accounts
for time-bound service account credentials.
Images
Minimize unnecessary content in container images.
Container images are configured to be run as unprivileged user.
References to container images are made by sha256 digests (rather than
tags) or the provenance of the image is validated by verifying the image's
digital signature at deploy time via admission control.
Container images are regularly scanned during creation and in deployment, and
known vulnerable software is patched.
Container image should contain the bare minimum to run the program they
package. Preferably, only the program and its dependencies, building the image
from the minimal possible base. In particular, image used in production should not
contain shells or debugging utilities, as an
ephemeral debug container
can be used for troubleshooting.
Build images to directly start with an unprivileged user by using the
USER instruction in Dockerfile.
The Security Context
allows a container image to be started with a specific user and group with
runAsUser and runAsGroup, even if not specified in the image manifest.
However, the file permissions in the image layers might make it impossible to just
start the process with a new unprivileged user without image modification.
Avoid using image tags to reference an image, especially the latest tag, the
image behind a tag can be easily modified in a registry. Prefer using the
complete sha256 digest which is unique to the image manifest. This policy can be
enforced via an ImagePolicyWebhook.
Image signatures can also be automatically verified with an admission controller
at deploy time to validate their authenticity and integrity.
Scanning a container image can prevent critical vulnerabilities from being
deployed to the cluster alongside the container image. Image scanning should be
completed before deploying a container image to a cluster and is usually done
as part of the deployment process in a CI/CD pipeline. The purpose of an image
scan is to obtain information about possible vulnerabilities and their
prevention in the container image, such as a
Common Vulnerability Scoring System (CVSS)
score. If the result of the image scans is combined with the pipeline
compliance rules, only properly patched container images will end up in
Production.
Admission controllers
An appropriate selection of admission controllers is enabled.
A pod security policy is enforced by the Pod Security Admission or/and a
webhook admission controller.
The admission chain plugins and webhooks are securely configured.
Admission controllers can help improve the security of the cluster. However,
they can present risks themselves as they extend the API server and
should be properly secured.
The following lists present a number of admission controllers that could be
considered to enhance the security posture of your cluster and application. It
includes controllers that may be referenced in other parts of this document.
This first group of admission controllers includes plugins
enabled by default,
consider to leave them enabled unless you know what you are doing:
Allows the use of custom controllers through webhooks, these controllers do
not mutate requests that it reviews.
The second group includes plugins that are not enabled by default but are in general
availability state and are recommended to improve your security posture:
Restricts kubelet's permissions to only modify the pods API resources they own
or the node API resource that represent themselves. It also prevents kubelet
from using the node-restriction.kubernetes.io/ annotation, which can be used
by an attacker with access to the kubelet's credentials to influence pod
placement to the controlled node.
The third group includes plugins that are not enabled by default but could be
considered for certain use cases:
Baseline guidelines around ensuring application security on Kubernetes, aimed at application developers
This checklist aims to provide basic guidelines on securing applications
running in Kubernetes from a developer's perspective.
This list is not meant to be exhaustive and is intended to evolve over time.
On how to read and use this document:
The order of topics does not reflect an order of priority.
Some checklist items are detailed in the paragraph below the list of each section.
This checklist assumes that a developer is a Kubernetes cluster user who
interacts with namespaced scope objects.
Caution:
Checklists are not sufficient for attaining a good security posture on their own.
A good security posture requires constant attention and improvement, but a checklist
can be the first step on the never-ending journey towards security preparedness.
Some recommendations in this checklist may be too restrictive or too lax for
your specific security needs. Since Kubernetes security is not "one size fits all",
each category of checklist items should be evaluated on its merits.
Base security hardening
The following checklist provides base security hardening recommendations that
would apply to most applications deploying to Kubernetes.
Application configured with appropriate QoS class
through resource request and limits.
Memory limit is set for the workloads with a limit equal to or greater than the request.
CPU limit might be set on sensitive workloads.
Service account
Avoid using the default ServiceAccount. Instead, create ServiceAccounts for
each workload or microservice.
automountServiceAccountToken should be set to false unless the pod
specifically requires access to the Kubernetes API to operate.
Pod-level securityContext recommendations
Set runAsNonRoot: true.
Configure the container to execute as a less privileged user
(for example, using runAsUser and runAsGroup), and configure appropriate
permissions on files or directories inside the container image.
Optionally add a supplementary group with fsGroup to access persistent volumes.
The application deploys into a namespace that enforces an appropriate
Pod security standard.
If you cannot control this enforcement for the cluster(s) where the application is
deployed, take this into account either through documentation or additional defense in depth.
Container-level securityContext recommendations
Disable privilege escalations using allowPrivilegeEscalation: false.
Configure the root filesystem to be read-only with readOnlyRootFilesystem: true.
Drop all capabilities from the containers and add back only specific ones
that are needed for operation of the container.
Role Based Access Control (RBAC)
Permissions such as create, patch, update and delete
should be only granted if necessary.
Avoid creating RBAC permissions to create or update roles which can lead to
privilege escalation.
Review bindings for the system:unauthenticated group and remove them where
possible, as this gives access to anyone who can contact the API server at a network level.
For sensitive workloads, consider providing a recommended ValidatingAdmissionPolicy
that further restricts the permitted write actions.
Image security
Using an image scanning tool to scan an image before deploying containers in the Kubernetes cluster.
Use container signing to validate the container image signature before deploying to the Kubernetes cluster.
Network policies
Configure NetworkPolicies
to only allow expected ingress and egress traffic from the pods.
Make sure that your cluster provides and enforces NetworkPolicy.
If you are writing an application that users will deploy to different clusters,
consider whether you can assume that NetworkPolicy is available and enforced.
Advanced security hardening
This section of this guide covers some advanced security hardening points
which might be valuable based on different Kubernetes environment setup.
Configure appropriate runtime classes for containers.
Note: This section links to third party projects that provide functionality required by Kubernetes. The Kubernetes project authors aren't responsible for these projects, which are listed alphabetically. To add a project to this list, read the content guide before submitting a change. More information.
Some containers may require a different isolation level from what is provided by
the default runtime of the cluster. runtimeClassName can be used in a podspec
to define a different runtime class.
For sensitive workloads consider using kernel emulation tools like
gVisor, or virtualized isolation using a mechanism
such as kata-containers.