This is the multi-page printable view of this section. Click here to print.
Administer a Cluster
- 1: Administration with kubeadm
- 1.1: Adding Linux worker nodes
- 1.2: Adding Windows worker nodes
- 1.3: Upgrading kubeadm clusters
- 1.4: Upgrading Linux nodes
- 1.5: Upgrading Windows nodes
- 1.6: Configuring a cgroup driver
- 1.7: Certificate Management with kubeadm
- 1.8: Reconfiguring a kubeadm cluster
- 1.9: Changing The Kubernetes Package Repository
- 2: Overprovision Node Capacity For A Cluster
- 3: Migrating from dockershim
- 3.1: Changing the Container Runtime on a Node from Docker Engine to containerd
- 3.2: Find Out What Container Runtime is Used on a Node
- 3.3: Troubleshooting CNI plugin-related errors
- 3.4: Check whether dockershim removal affects you
- 3.5: Migrating telemetry and security agents from dockershim
- 4: Generate Certificates Manually
- 5: Manage Memory, CPU, and API Resources
- 5.1: Configure Default Memory Requests and Limits for a Namespace
- 5.2: Configure Default CPU Requests and Limits for a Namespace
- 5.3: Configure Minimum and Maximum Memory Constraints for a Namespace
- 5.4: Configure Minimum and Maximum CPU Constraints for a Namespace
- 5.5: Configure Memory and CPU Quotas for a Namespace
- 5.6: Configure a Pod Quota for a Namespace
- 6: Install a Network Policy Provider
- 6.1: Use Antrea for NetworkPolicy
- 6.2: Use Calico for NetworkPolicy
- 6.3: Use Cilium for NetworkPolicy
- 6.4: Use Kube-router for NetworkPolicy
- 6.5: Romana for NetworkPolicy
- 6.6: Weave Net for NetworkPolicy
- 7: Access Clusters Using the Kubernetes API
- 8: Enable Or Disable Feature Gates
- 9: Advertise Extended Resources for a Node
- 10: Autoscale the DNS Service in a Cluster
- 11: Change the Access Mode of a PersistentVolume to ReadWriteOncePod
- 12: Change the default StorageClass
- 13: Switching from Polling to CRI Event-based Updates to Container Status
- 14: Change the Reclaim Policy of a PersistentVolume
- 15: Cloud Controller Manager Administration
- 16: Configure a kubelet image credential provider
- 17: Configure Quotas for API Objects
- 18: Control CPU Management Policies on the Node
- 19: Control Memory Management Policies on a Node
- 20: Control Topology Management Policies on a node
- 21: Customizing DNS Service
- 22: Debugging DNS Resolution
- 23: Declare Network Policy
- 24: Developing Cloud Controller Manager
- 25: Enable Or Disable A Kubernetes API
- 26: Encrypting Confidential Data at Rest
- 27: Decrypt Confidential Data that is Already Encrypted at Rest
- 28: Guaranteed Scheduling For Critical Add-On Pods
- 29: IP Masquerade Agent User Guide
- 30: Limit Storage Consumption
- 31: Migrate Replicated Control Plane To Use Cloud Controller Manager
- 32: Operating etcd clusters for Kubernetes
- 33: Reserve Compute Resources for System Daemons
- 34: Running Kubernetes Node Components as a Non-root User
- 35: Safely Drain a Node
- 36: Securing a Cluster
- 37: Harden Dynamic Resource Allocation in Your Cluster
- 38: Set Kubelet Parameters Via A Configuration File
- 39: Share a Cluster with Namespaces
- 40: Upgrade A Cluster
- 41: Use Cascading Deletion in a Cluster
- 42: Using a KMS provider for data encryption
- 43: Using CoreDNS for Service Discovery
- 44: Using NodeLocal DNSCache in Kubernetes Clusters
- 45: Using sysctls in a Kubernetes Cluster
- 46: Verify Signed Kubernetes Artifacts
1 - Administration with kubeadm
If you don't yet have a cluster, visit
bootstrapping clusters with kubeadm.
The tasks in this section are aimed at people administering an existing cluster:
1.1 - Adding Linux worker nodes
This page explains how to add Linux worker nodes to a kubeadm cluster.
Before you begin
- Each joining worker node has installed the required components from Installing kubeadm, such as, kubeadm, the kubelet and a container runtime.
- A running kubeadm cluster created by
kubeadm initand following the steps in the document Creating a cluster with kubeadm. - You need superuser access to the node.
Adding Linux worker nodes
To add new Linux worker nodes to your cluster do the following for each machine:
- Connect to the machine by using SSH or another method.
- Run the command that was output by
kubeadm init. For example:
sudo kubeadm join --token <token> <control-plane-host>:<control-plane-port> --discovery-token-ca-cert-hash sha256:<hash>
Additional information for kubeadm join
Note:
To specify an IPv6 tuple for<control-plane-host>:<control-plane-port>, IPv6 address must be enclosed in square brackets, for example: [2001:db8::101]:2073.If you do not have the token, you can get it by running the following command on the control plane node:
# Run this on a control plane node
sudo kubeadm token list
The output is similar to this:
TOKEN                    TTL  EXPIRES              USAGES           DESCRIPTION            EXTRA GROUPS
8ewj1p.9r9hcjoqgajrj4gi  23h  2018-06-12T02:51:28Z authentication,  The default bootstrap  system:
                                                   signing          token generated by     bootstrappers:
                                                                    'kubeadm init'.        kubeadm:
                                                                                           default-node-token
By default, node join tokens expire after 24 hours. If you are joining a node to the cluster after the current token has expired, you can create a new token by running the following command on the control plane node:
# Run this on a control plane node
sudo kubeadm token create
The output is similar to this:
5didvk.d09sbcov8ph2amjw
To print a kubeadm join command while also generating a new token you can use:
sudo kubeadm token create --print-join-command
If you don't have the value of --discovery-token-ca-cert-hash, you can get it by running the
following commands on the control plane node:
# Run this on a control plane node
sudo cat /etc/kubernetes/pki/ca.crt | openssl x509 -pubkey  | openssl rsa -pubin -outform der 2>/dev/null | \
   openssl dgst -sha256 -hex | sed 's/^.* //'
The output is similar to:
8cb2de97839780a412b93877f8507ad6c94f73add17d5d7058e91741c9d5ec78
The output of the kubeadm join command should look something like:
[preflight] Running pre-flight checks

... (log output of join workflow) ...

Node join complete:
* Certificate signing request sent to control-plane and response
  received.
* Kubelet informed of new secure connection details.

Run 'kubectl get nodes' on control-plane to see this machine join.
A few seconds later, you should notice this node in the output from kubectl get nodes.
(for example, run kubectl on a control plane node).
Note:
As the cluster nodes are usually initialized sequentially, the CoreDNS Pods are likely to all run on the first control plane node. To provide higher availability, please rebalance the CoreDNS Pods withkubectl -n kube-system rollout restart deployment coredns after at least one new node is joined.What's next
- See how to add Windows worker nodes.
1.2 - Adding Windows worker nodes
Kubernetes v1.18 [beta]This page explains how to add Windows worker nodes to a kubeadm cluster.
Before you begin
- A running Windows Server 2022 (or higher) instance with administrative access.
- A running kubeadm cluster created by
kubeadm initand following the steps in the document Creating a cluster with kubeadm.
Adding Windows worker nodes
Note:
To facilitate the addition of Windows worker nodes to a cluster, PowerShell scripts from the repository https://sigs.k8s.io/sig-windows-tools are used.Do the following for each machine:
- Open a PowerShell session on the machine.
- Make sure you are Administrator or a privileged user.
Then proceed with the steps outlined below.
Install containerd
To install containerd, first run the following command:
curl.exe -LO https://raw.githubusercontent.com/kubernetes-sigs/sig-windows-tools/master/hostprocess/Install-Containerd.ps1
Then run the following command, but first replace CONTAINERD_VERSION with a recent release
from the containerd repository.
The version must not have a v prefix. For example, use 1.7.22 instead of v1.7.22:
.\Install-Containerd.ps1 -ContainerDVersion CONTAINERD_VERSION
- Adjust any other parameters for
Install-Containerd.ps1such asnetAdapterNameas you need them. - Set
skipHypervisorSupportCheckif your machine does not support Hyper-V and cannot host Hyper-V isolated containers. - If you change the
Install-Containerd.ps1optional parametersCNIBinPathand/orCNIConfigPathyou will need to configure the installed Windows CNI plugin with matching values.
Install kubeadm and kubelet
Run the following commands to install kubeadm and the kubelet:
curl.exe -LO https://raw.githubusercontent.com/kubernetes-sigs/sig-windows-tools/master/hostprocess/PrepareNode.ps1
.\PrepareNode.ps1 -KubernetesVersion v1.36.0
- Adjust the parameter
KubernetesVersionofPrepareNode.ps1if needed.
Run kubeadm join
Run the command that was output by kubeadm init. For example:
kubeadm join --token <token> <control-plane-host>:<control-plane-port> --discovery-token-ca-cert-hash sha256:<hash>
Additional information about kubeadm join
Note:
To specify an IPv6 tuple for<control-plane-host>:<control-plane-port>, IPv6 address must be enclosed in square brackets, for example: [2001:db8::101]:2073.If you do not have the token, you can get it by running the following command on the control plane node:
# Run this on a control plane node
sudo kubeadm token list
The output is similar to this:
TOKEN                    TTL  EXPIRES              USAGES           DESCRIPTION            EXTRA GROUPS
8ewj1p.9r9hcjoqgajrj4gi  23h  2018-06-12T02:51:28Z authentication,  The default bootstrap  system:
                                                   signing          token generated by     bootstrappers:
                                                                    'kubeadm init'.        kubeadm:
                                                                                           default-node-token
By default, node join tokens expire after 24 hours. If you are joining a node to the cluster after the current token has expired, you can create a new token by running the following command on the control plane node:
# Run this on a control plane node
sudo kubeadm token create
The output is similar to this:
5didvk.d09sbcov8ph2amjw
If you don't have the value of --discovery-token-ca-cert-hash, you can get it by running the
following commands on the control plane node:
sudo cat /etc/kubernetes/pki/ca.crt | openssl x509 -pubkey  | openssl rsa -pubin -outform der 2>/dev/null | \
   openssl dgst -sha256 -hex | sed 's/^.* //'
The output is similar to:
8cb2de97839780a412b93877f8507ad6c94f73add17d5d7058e91741c9d5ec78
The output of the kubeadm join command should look something like:
[preflight] Running pre-flight checks

... (log output of join workflow) ...

Node join complete:
* Certificate signing request sent to control-plane and response
  received.
* Kubelet informed of new secure connection details.

Run 'kubectl get nodes' on control-plane to see this machine join.
A few seconds later, you should notice this node in the output from kubectl get nodes.
(for example, run kubectl on a control plane node).
Network configuration
CNI setup on clusters mixed with Linux and Windows nodes requires more steps than just
running kubectl apply on a manifest file. Additionally, the CNI plugin running on control
plane nodes must be prepared to support the CNI plugin running on Windows worker nodes.
Only a few CNI plugins currently support Windows. Below you can find individual setup instructions for them:
Install kubectl for Windows (optional)
See Install and Set Up kubectl on Windows.
What's next
- See how to add Linux worker nodes.
1.3 - Upgrading kubeadm clusters
This page explains how to upgrade a Kubernetes cluster created with kubeadm from version
1.35.x to version 1.36.x, and from version
1.36.x to 1.36.y (where y > x). Skipping MINOR versions
when upgrading is unsupported. For more details, please visit Version Skew Policy.
To see information about upgrading clusters created using older versions of kubeadm, please refer to following pages instead:
- Upgrading a kubeadm cluster from 1.34 to 1.35
- Upgrading a kubeadm cluster from 1.33 to 1.34
- Upgrading a kubeadm cluster from 1.32 to 1.33
- Upgrading a kubeadm cluster from 1.31 to 1.32
The Kubernetes project recommends upgrading to the latest patch releases promptly, and to ensure that you are running a supported minor release of Kubernetes. Following this recommendation helps you to stay secure.
The upgrade workflow at high level is the following:
- Upgrade a primary control plane node.
- Upgrade additional control plane nodes.
- Upgrade worker nodes.
Before you begin
- Make sure you read the release notes carefully.
- The cluster should use a static control plane and etcd pods or external etcd.
- Make sure to back up any important components, such as app-level state stored in a database.
kubeadm upgradedoes not touch your workloads, only components internal to Kubernetes, but backups are always a best practice. - Swap must be disabled.
Additional information
- The instructions below outline when to drain each node during the upgrade process. If you are performing a minor version upgrade for any kubelet, you must first drain the node (or nodes) that you are upgrading. In the case of control plane nodes, they could be running CoreDNS Pods or other critical workloads. For more information see Draining nodes.
- The Kubernetes project recommends that you match your kubelet and kubeadm versions. You can instead use a version of kubelet that is older than kubeadm, provided it is within the range of supported versions. For more details, please visit kubeadm's skew against the kubelet.
- All containers are restarted after upgrade, because the container spec hash value is changed.
- To verify that the kubelet service has successfully restarted after the kubelet has been upgraded,
you can execute
systemctl status kubeletor view the service logs withjournalctl -xeu kubelet. kubeadm upgradesupports--configwith aUpgradeConfigurationAPI type which can be used to configure the upgrade process.kubeadm upgradedoes not support reconfiguration of an existing cluster. Follow the steps in Reconfiguring a kubeadm cluster instead.
Considerations when upgrading etcd
Because the kube-apiserver static pod is running at all times (even if you
have drained the node), when you perform a kubeadm upgrade which includes an
etcd upgrade, in-flight requests to the server will stall while the new etcd
static pod is restarting. As a workaround, it is possible to actively stop the
kube-apiserver process a few seconds before starting the kubeadm upgrade apply command. This permits to complete in-flight requests and close existing
connections, and minimizes the consequence of the etcd downtime. This can be
done as follows on control plane nodes:
killall -s SIGTERM kube-apiserver # trigger a graceful kube-apiserver shutdown
sleep 20 # wait a little bit to permit completing in-flight requests
kubeadm upgrade ... # execute a kubeadm upgrade command
Changing the package repository
If you're using the community-owned package repositories (pkgs.k8s.io), you need to
enable the package repository for the desired Kubernetes minor release. This is explained in
Changing the Kubernetes package repository
document.
apt.kubernetes.io and yum.kubernetes.io) have been
deprecated and frozen starting from September 13, 2023.
Using the new package repositories hosted at pkgs.k8s.io
is strongly recommended and required in order to install Kubernetes versions released after September 13, 2023.
The deprecated legacy repositories, and their contents, might be removed at any time in the future and without
a further notice period. The new package repositories provide downloads for Kubernetes versions starting with v1.24.0.Determine which version to upgrade to
Find the latest patch release for Kubernetes 1.36 using the OS package manager:
# Find the latest 1.36 version in the list.
# It should look like 1.36.x-*, where x is the latest patch.
sudo apt update
sudo apt-cache madison kubeadm
For systems with DNF:
# Find the latest 1.36 version in the list.
# It should look like 1.36.x-*, where x is the latest patch.
sudo yum list --showduplicates kubeadm --disableexcludes=kubernetes
For systems with DNF5:
# Find the latest 1.36 version in the list.
# It should look like 1.36.x-*, where x is the latest patch.
sudo yum list --showduplicates kubeadm --setopt=disable_excludes=kubernetes
If you don't see the version you expect to upgrade to, verify if the Kubernetes package repositories are used.
Upgrading control plane nodes
The upgrade procedure on control plane nodes should be executed one node at a time.
Pick a control plane node that you wish to upgrade first. It must have the /etc/kubernetes/admin.conf file.
Call "kubeadm upgrade"
For the first control plane node
Upgrade kubeadm:
# replace x in 1.36.x-* with the latest patch version
sudo apt-mark unhold kubeadm && \
sudo apt-get update && sudo apt-get install -y kubeadm='1.36.x-*' && \
sudo apt-mark hold kubeadm
For systems with DNF:
# replace x in 1.36.x-* with the latest patch version
sudo yum install -y kubeadm-'1.36.x-*' --disableexcludes=kubernetes
For systems with DNF5:
# replace x in 1.36.x-* with the latest patch version
sudo yum install -y kubeadm-'1.36.x-*' --setopt=disable_excludes=kubernetes
Verify that the download works and has the expected version:
kubeadm versionVerify the upgrade plan:
sudo kubeadm upgrade planThis command checks that your cluster can be upgraded, and fetches the versions you can upgrade to. It also shows a table with the component config version states.
Note:
kubeadm upgradealso automatically renews the certificates that it manages on this node. To opt-out of certificate renewal the flag--certificate-renewal=falsecan be used. For more information see the certificate management guide.Choose a version to upgrade to, and run the appropriate command. For example:
# replace x with the patch version you picked for this upgrade
sudo kubeadm upgrade apply v1.36.x
Once the command finishes you should see:
[upgrade/successful] SUCCESS! Your cluster was upgraded to "v1.36.x". Enjoy!

[upgrade/kubelet] Now that your control plane is upgraded, please proceed with upgrading your kubelets if you haven't already done so.
Note:
For versions earlier than v1.28, kubeadm defaulted to a mode that upgrades the addons (including CoreDNS and kube-proxy) immediately duringkubeadm upgrade apply, regardless of whether there are other control plane instances that have not been upgraded. This may cause compatibility problems. Since v1.28, kubeadm defaults to a mode that checks whether all the control plane instances have been upgraded before starting to upgrade the addons. You must perform control plane instances upgrade sequentially or at least ensure that the last control plane instance upgrade is not started until all the other control plane instances have been upgraded completely, and the addons upgrade will be performed after the last control plane instance is upgraded.Manually upgrade your CNI provider plugin.
Your Container Network Interface (CNI) provider may have its own upgrade instructions to follow. Check the addons page to find your CNI provider and see whether additional upgrade steps are required.
This step is not required on additional control plane nodes if the CNI provider runs as a DaemonSet.
For the other control plane nodes
Same as the first control plane node but use:
sudo kubeadm upgrade node
instead of:
sudo kubeadm upgrade apply
Also calling kubeadm upgrade plan and upgrading the CNI provider plugin is no longer needed.
Drain the node
Prepare the node for maintenance by marking it unschedulable and evicting the workloads:
# replace <node-to-drain> with the name of your node you are draining
kubectl drain <node-to-drain> --ignore-daemonsets
Upgrade kubelet and kubectl
Note:
On Linux nodes, the kubelet defaults to supporting only cgroups v2.
For Kubernetes 1.36 the FailCgroupV1 kubelet configuration option is set to true by default.
To learn more, refer to the Kubernetes cgroup v1 deprecation documentation.
Upgrade the kubelet and kubectl:
# replace x in 1.36.x-* with the latest patch version
sudo apt-mark unhold kubelet kubectl && \
sudo apt-get update && sudo apt-get install -y kubelet='1.36.x-*' kubectl='1.36.x-*' && \
sudo apt-mark hold kubelet kubectl
For systems with DNF:
# replace x in 1.36.x-* with the latest patch version
sudo yum install -y kubelet-'1.36.x-*' kubectl-'1.36.x-*' --disableexcludes=kubernetes
For systems with DNF5:
# replace x in 1.36.x-* with the latest patch version
sudo yum install -y kubelet-'1.36.x-*' kubectl-'1.36.x-*' --setopt=disable_excludes=kubernetes
Restart the kubelet:
sudo systemctl daemon-reload
sudo systemctl restart kubelet
Uncordon the node
Bring the node back online by marking it schedulable:
# replace <node-to-uncordon> with the name of your node
kubectl uncordon <node-to-uncordon>
Upgrade worker nodes
The upgrade procedure on worker nodes should be executed one node at a time or few nodes at a time, without compromising the minimum required capacity for running your workloads.
The following pages show how to upgrade Linux and Windows worker nodes:
Verify the status of the cluster
After the kubelet is upgraded on all nodes verify that all nodes are available again by running the following command from anywhere kubectl can access the cluster:
kubectl get nodes
The STATUS column should show Ready for all your nodes, and the version number should be updated.
Recovering from a failure state
If kubeadm upgrade fails and does not roll back, for example because of an unexpected shutdown during execution, you can run kubeadm upgrade again.
This command is idempotent and eventually makes sure that the actual state is the desired state you declare.
To recover from a bad state, you can also run sudo kubeadm upgrade apply --force without changing the version that your cluster is running.
During upgrade kubeadm writes the following backup folders under /etc/kubernetes/tmp:
kubeadm-backup-etcd-<date>-<time>kubeadm-backup-manifests-<date>-<time>
kubeadm-backup-etcd contains a backup of the local etcd member data for this control plane Node.
In case of an etcd upgrade failure and if the automatic rollback does not work, the contents of this folder
can be manually restored in /var/lib/etcd. In case external etcd is used this backup folder will be empty.
kubeadm-backup-manifests contains a backup of the static Pod manifest files for this control plane Node.
In case of a upgrade failure and if the automatic rollback does not work, the contents of this folder can be
manually restored in /etc/kubernetes/manifests. If for some reason there is no difference between a pre-upgrade
and post-upgrade manifest file for a certain component, a backup file for it will not be written.
Note:
After the cluster upgrade using kubeadm, the backup directory/etc/kubernetes/tmp will remain and
these backup files will need to be cleared manually.How it works
kubeadm upgrade apply does the following:
- Checks that your cluster is in an upgradeable state:
- The API server is reachable
- All nodes are in the
Readystate - The control plane is healthy
- Enforces the version skew policies.
- Makes sure the control plane images are available or available to pull to the machine.
- Generates replacements and/or uses user supplied overwrites if component configs require version upgrades.
- Upgrades the control plane components or rollbacks if any of them fails to come up.
- Applies the new
CoreDNSandkube-proxymanifests and makes sure that all necessary RBAC rules are created. - Creates new certificate and key files of the API server and backs up old files if they're about to expire in 180 days.
kubeadm upgrade node does the following on additional control plane nodes:
- Fetches the kubeadm
ClusterConfigurationfrom the cluster. - Optionally backups the kube-apiserver certificate.
- Upgrades the static Pod manifests for the control plane components.
- Upgrades the kubelet configuration for this node.
kubeadm upgrade node does the following on worker nodes:
- Fetches the kubeadm
ClusterConfigurationfrom the cluster. - Upgrades the kubelet configuration for this node.
1.4 - Upgrading Linux nodes
This page explains how to upgrade a Linux Worker Nodes created with kubeadm.
Before you begin
You need to have shell access to all the nodes, and the kubectl command-line tool must be configured to communicate with your cluster. It is recommended to run this tutorial on a cluster with at least two nodes that are not acting as control plane hosts.
To check the version, enter kubectl version.
- Familiarize yourself with the process for upgrading the rest of your kubeadm cluster. You will want to upgrade the control plane nodes before upgrading your Linux Worker nodes.
Changing the package repository
If you're using the community-owned package repositories (pkgs.k8s.io), you need to
enable the package repository for the desired Kubernetes minor release. This is explained in
Changing the Kubernetes package repository
document.
apt.kubernetes.io and yum.kubernetes.io) have been
deprecated and frozen starting from September 13, 2023.
Using the new package repositories hosted at pkgs.k8s.io
is strongly recommended and required in order to install Kubernetes versions released after September 13, 2023.
The deprecated legacy repositories, and their contents, might be removed at any time in the future and without
a further notice period. The new package repositories provide downloads for Kubernetes versions starting with v1.24.0.Upgrading worker nodes
Upgrade kubeadm
Upgrade kubeadm:
# replace x in 1.36.x-* with the latest patch version
sudo apt-mark unhold kubeadm && \
sudo apt-get update && sudo apt-get install -y kubeadm='1.36.x-*' && \
sudo apt-mark hold kubeadm
For systems with DNF:
# replace x in 1.36.x-* with the latest patch version
sudo yum install -y kubeadm-'1.36.x-*' --disableexcludes=kubernetes
For systems with DNF5:
# replace x in 1.36.x-* with the latest patch version
sudo yum install -y kubeadm-'1.36.x-*' --setopt=disable_excludes=kubernetes
Call "kubeadm upgrade"
For worker nodes this upgrades the local kubelet configuration:
sudo kubeadm upgrade node
Drain the node
Prepare the node for maintenance by marking it unschedulable and evicting the workloads:
# execute this command on a control plane node
# replace <node-to-drain> with the name of your node you are draining
kubectl drain <node-to-drain> --ignore-daemonsets
Upgrade kubelet and kubectl
Upgrade the kubelet and kubectl:
# replace x in 1.36.x-* with the latest patch version
sudo apt-mark unhold kubelet kubectl && \
sudo apt-get update && sudo apt-get install -y kubelet='1.36.x-*' kubectl='1.36.x-*' && \
sudo apt-mark hold kubelet kubectl
For systems with DNF:
# replace x in 1.36.x-* with the latest patch version
sudo yum install -y kubelet-'1.36.x-*' kubectl-'1.36.x-*' --disableexcludes=kubernetes
For systems with DNF5:
# replace x in 1.36.x-* with the latest patch version
sudo yum install -y kubelet-'1.36.x-*' kubectl-'1.36.x-*' --setopt=disable_excludes=kubernetes
Restart the kubelet:
sudo systemctl daemon-reload
sudo systemctl restart kubelet
Uncordon the node
Bring the node back online by marking it schedulable:
# execute this command on a control plane node
# replace <node-to-uncordon> with the name of your node
kubectl uncordon <node-to-uncordon>
What's next
- See how to Upgrade Windows nodes.
1.5 - Upgrading Windows nodes
Kubernetes v1.18 [beta]This page explains how to upgrade a Windows node created with kubeadm.
Before you begin
You need to have shell access to all the nodes, and the kubectl command-line tool must be configured to communicate with your cluster. It is recommended to run this tutorial on a cluster with at least two nodes that are not acting as control plane hosts.
Your Kubernetes server must be at or later than version 1.17.To check the version, enter kubectl version.
- Familiarize yourself with the process for upgrading the rest of your kubeadm cluster. You will want to upgrade the control plane nodes before upgrading your Windows nodes.
Upgrading worker nodes
Upgrade kubeadm
From the Windows node, upgrade kubeadm:
# replace 1.36.0 with your desired version
curl.exe -Lo <path-to-kubeadm.exe>  "https://dl.k8s.io/v1.36.0/bin/windows/amd64/kubeadm.exe"
Drain the node
From a machine with access to the Kubernetes API, prepare the node for maintenance by marking it unschedulable and evicting the workloads:
# replace <node-to-drain> with the name of your node you are draining
kubectl drain <node-to-drain> --ignore-daemonsets
You should see output similar to this:
node/ip-172-31-85-18 cordoned
node/ip-172-31-85-18 drained
Upgrade the kubelet configuration
From the Windows node, call the following command to sync new kubelet configuration:
kubeadm upgrade node
Upgrade kubelet and kube-proxy
From the Windows node, upgrade and restart the kubelet:
stop-service kubelet
curl.exe -Lo <path-to-kubelet.exe> "https://dl.k8s.io/v1.36.0/bin/windows/amd64/kubelet.exe"
restart-service kubelet
From the Windows node, upgrade and restart the kube-proxy.
stop-service kube-proxy
curl.exe -Lo <path-to-kube-proxy.exe> "https://dl.k8s.io/v1.36.0/bin/windows/amd64/kube-proxy.exe"
restart-service kube-proxy
Note:
If you are running kube-proxy in a HostProcess container within a Pod, and not as a Windows Service, you can upgrade kube-proxy by applying a newer version of your kube-proxy manifests.Uncordon the node
From a machine with access to the Kubernetes API, bring the node back online by marking it schedulable:
# replace <node-to-drain> with the name of your node
kubectl uncordon <node-to-drain>
What's next
- See how to Upgrade Linux nodes.
1.6 - Configuring a cgroup driver
This page explains how to configure the kubelet's cgroup driver to match the container runtime cgroup driver for kubeadm clusters.
Before you begin
You should be familiar with the Kubernetes container runtime requirements.
Configuring the container runtime cgroup driver
The Container runtimes page
explains that the systemd driver is recommended for kubeadm based setups instead
of the kubelet's default cgroupfs driver,
because kubeadm manages the kubelet as a
systemd service.
The page also provides details on how to set up a number of different container runtimes with the
systemd driver by default.
Configuring the kubelet cgroup driver
kubeadm allows you to pass a KubeletConfiguration structure during kubeadm init.
This KubeletConfiguration can include the cgroupDriver field which controls the cgroup
driver of the kubelet.
Note:
In v1.22 and later, if the user does not set the cgroupDriver field under KubeletConfiguration,
kubeadm defaults it to systemd.
In Kubernetes v1.28, you can enable automatic detection of the cgroup driver as an alpha feature. See systemd cgroup driver for more details.
A minimal example of configuring the field explicitly:
# kubeadm-config.yaml
kind: ClusterConfiguration
apiVersion: kubeadm.k8s.io/v1beta4
kubernetesVersion: v1.21.0
---
kind: KubeletConfiguration
apiVersion: kubelet.config.k8s.io/v1beta1
cgroupDriver: systemd
Such a configuration file can then be passed to the kubeadm command:
kubeadm init --config kubeadm-config.yaml
Note:
Kubeadm uses the same KubeletConfiguration for all nodes in the cluster.
The KubeletConfiguration is stored in a ConfigMap
object under the kube-system namespace.
Executing the sub commands init, join and upgrade would result in kubeadm
writing the KubeletConfiguration as a file under /var/lib/kubelet/config.yaml
and passing it to the local node kubelet.
On each node, kubeadm detects the CRI socket and stores its details into the /var/lib/kubelet/instance-config.yaml file.
When executing the init, join, or upgrade subcommands,
kubeadm patches the containerRuntimeEndpoint value from this instance configuration into /var/lib/kubelet/config.yaml.
Using the cgroupfs driver
To use cgroupfs and to prevent kubeadm upgrade from modifying the
KubeletConfiguration cgroup driver on existing setups, you must be explicit
about its value. This applies to a case where you do not wish future versions
of kubeadm to apply the systemd driver by default.
See the below section on "Modify the kubelet ConfigMap" for details on how to be explicit about the value.
If you wish to configure a container runtime to use the cgroupfs driver,
you must refer to the documentation of the container runtime of your choice.
Migrating to the systemd driver
To change the cgroup driver of an existing kubeadm cluster from cgroupfs to systemd in-place,
a similar procedure to a kubelet upgrade is required. This must include both
steps outlined below.
Note:
Alternatively, it is possible to replace the old nodes in the cluster with new ones that use thesystemd driver. This requires executing only the first step below
before joining the new nodes and ensuring the workloads can safely move to the new
nodes before deleting the old nodes.Modify the kubelet ConfigMap
Call
kubectl edit cm kubelet-config -n kube-system.Either modify the existing
cgroupDrivervalue or add a new field that looks like this:cgroupDriver: systemdThis field must be present under the
kubelet:section of the ConfigMap.
Update the cgroup driver on all nodes
For each node in the cluster:
- Drain the node using
kubectl drain <node-name> --ignore-daemonsets - Stop the kubelet using
systemctl stop kubelet - Stop the container runtime
- Modify the container runtime cgroup driver to
systemd - Set
cgroupDriver: systemdin/var/lib/kubelet/config.yaml - Start the container runtime
- Start the kubelet using
systemctl start kubelet - Uncordon the node using
kubectl uncordon <node-name>
Execute these steps on nodes one at a time to ensure workloads have sufficient time to schedule on different nodes.
Once the process is complete ensure that all nodes and workloads are healthy.
1.7 - Certificate Management with kubeadm
Kubernetes v1.15 [stable]Client certificates generated by kubeadm expire after 1 year. This page explains how to manage certificate renewals with kubeadm. It also covers other tasks related to kubeadm certificate management.
The Kubernetes project recommends upgrading to the latest patch releases promptly, and to ensure that you are running a supported minor release of Kubernetes. Following this recommendation helps you to stay secure.
Before you begin
You should be familiar with PKI certificates and requirements in Kubernetes.
You should be familiar with how to pass a configuration file to the kubeadm commands.
This guide covers the usage of the openssl command (used for manual certificate signing,
if you choose that approach), but you can use your preferred tools.
Some of the steps here use sudo for administrator access. You can use any equivalent tool.
Using custom certificates
By default, kubeadm generates all the certificates needed for a cluster to run. You can override this behavior by providing your own certificates.
To do so, you must place them in whatever directory is specified by the
--cert-dir flag or the certificatesDir field of kubeadm's ClusterConfiguration.
By default this is /etc/kubernetes/pki.
If a given certificate and private key pair exists before running kubeadm init,
kubeadm does not overwrite them. This means you can, for example, copy an existing
CA into /etc/kubernetes/pki/ca.crt and /etc/kubernetes/pki/ca.key,
and kubeadm will use this CA for signing the rest of the certificates.
Choosing an encryption algorithm
kubeadm allows you to choose an encryption algorithm that is used for creating
public and private keys. That can be done by using the encryptionAlgorithm field of the
kubeadm configuration:
apiVersion: kubeadm.k8s.io/v1beta4
kind: ClusterConfiguration
encryptionAlgorithm: <ALGORITHM>
<ALGORITHM> can be one of RSA-2048 (default), RSA-3072, RSA-4096 or ECDSA-P256.
Choosing certificate validity period
kubeadm allows you to choose the validity period of CA and leaf certificates.
That can be done by using the certificateValidityPeriod and caCertificateValidityPeriod
fields of the kubeadm configuration:
apiVersion: kubeadm.k8s.io/v1beta4
kind: ClusterConfiguration
certificateValidityPeriod: 8760h # Default: 365 days × 24 hours = 1 year
caCertificateValidityPeriod: 87600h # Default: 365 days × 24 hours * 10 = 10 years
The values of the fields follow the accepted format for
Go's time.Duration values, with the longest supported
unit being h (hours).
External CA mode
It is also possible to provide only the ca.crt file and not the
ca.key file (this is only available for the root CA file, not other cert pairs).
If all other certificates and kubeconfig files are in place, kubeadm recognizes
this condition and activates the "External CA" mode. kubeadm will proceed without the
CA key on disk.
Instead, run the controller-manager standalone with --controllers=csrsigner and
point to the CA certificate and key.
There are various ways to prepare the component credentials when using external CA mode.
Manual preparation of component credentials
PKI certificates and requirements includes information on how to prepare all the required by kubeadm component credentials manually.
This guide covers the usage of the openssl command (used for manual certificate signing,
if you choose that approach), but you can use your preferred tools.
Preparation of credentials by signing CSRs generated by kubeadm
kubeadm can generate CSR files that you can sign manually with tools like
openssl and your external CA. These CSR files will include all the specification for credentials
that components deployed by kubeadm require.
Automated preparation of component credentials by using kubeadm phases
Alternatively, it is possible to use kubeadm phase commands to automate this process.
- Go to a host that you want to prepare as a kubeadm control plane node with external CA.
- Copy the external CA files
ca.crtandca.keythat you have into/etc/kubernetes/pkion the node. - Prepare a temporary kubeadm configuration file
called
config.yamlthat can be used withkubeadm init. Make sure that this file includes any relevant cluster wide or host-specific information that could be included in certificates, such as,ClusterConfiguration.controlPlaneEndpoint,ClusterConfiguration.certSANsandInitConfiguration.APIEndpoint. - On the same host execute the commands
kubeadm init phase kubeconfig all --config config.yamlandkubeadm init phase certs all --config config.yaml. This will generate all required kubeconfig files and certificates under/etc/kubernetes/and itspkisub directory. - Inspect the generated files. Delete
/etc/kubernetes/pki/ca.key, delete or move to a safe location the file/etc/kubernetes/super-admin.conf. - On nodes where
kubeadm joinwill be called also delete/etc/kubernetes/kubelet.conf. This file is only required on the first node wherekubeadm initwill be called. - Note that some files such
pki/sa.*,pki/front-proxy-ca.*andpki/etc/ca.*are shared between control plane nodes, You can generate them once and distribute them manually to nodes wherekubeadm joinwill be called, or you can use the--upload-certsfunctionality ofkubeadm initand--certificate-keyofkubeadm jointo automate this distribution.
Once the credentials are prepared on all nodes, call kubeadm init and kubeadm join for these nodes to
join the cluster. kubeadm will use the existing kubeconfig and certificate files under /etc/kubernetes/
and its pki sub directory.
Certificate expiry and management
Note:
kubeadm cannot manage certificates signed by an external CA.You can use the check-expiration subcommand to check when certificates expire:
kubeadm certs check-expiration
The output is similar to this:
CERTIFICATE                EXPIRES                  RESIDUAL TIME   CERTIFICATE AUTHORITY   EXTERNALLY MANAGED
admin.conf                 Dec 30, 2020 23:36 UTC   364d                                    no
apiserver                  Dec 30, 2020 23:36 UTC   364d            ca                      no
apiserver-etcd-client      Dec 30, 2020 23:36 UTC   364d            etcd-ca                 no
apiserver-kubelet-client   Dec 30, 2020 23:36 UTC   364d            ca                      no
controller-manager.conf    Dec 30, 2020 23:36 UTC   364d                                    no
etcd-healthcheck-client    Dec 30, 2020 23:36 UTC   364d            etcd-ca                 no
etcd-peer                  Dec 30, 2020 23:36 UTC   364d            etcd-ca                 no
etcd-server                Dec 30, 2020 23:36 UTC   364d            etcd-ca                 no
front-proxy-client         Dec 30, 2020 23:36 UTC   364d            front-proxy-ca          no
scheduler.conf             Dec 30, 2020 23:36 UTC   364d                                    no

CERTIFICATE AUTHORITY   EXPIRES                  RESIDUAL TIME   EXTERNALLY MANAGED
ca                      Dec 28, 2029 23:36 UTC   9y              no
etcd-ca                 Dec 28, 2029 23:36 UTC   9y              no
front-proxy-ca          Dec 28, 2029 23:36 UTC   9y              no
The command shows expiration/residual time for the client certificates in the
/etc/kubernetes/pki folder and for the client certificate embedded in the kubeconfig files used
by kubeadm (admin.conf, controller-manager.conf and scheduler.conf).
Additionally, kubeadm informs the user if the certificate is externally managed; in this case, the user should take care of managing certificate renewal manually/using other tools.
The kubelet.conf configuration file is not included in the list above because kubeadm
configures kubelet
for automatic certificate renewal
with rotatable certificates under /var/lib/kubelet/pki.
To repair an expired kubelet client certificate see
Kubelet client certificate rotation fails.
Note:
On nodes created with kubeadm init from versions prior to kubeadm version 1.17, there is a
bug where you manually have to modify the
contents of kubelet.conf. After kubeadm init finishes, you should update kubelet.conf to
point to the rotated kubelet client certificates, by replacing client-certificate-data and
client-key-data with:
client-certificate: /var/lib/kubelet/pki/kubelet-client-current.pem
client-key: /var/lib/kubelet/pki/kubelet-client-current.pem
Automatic certificate renewal
kubeadm renews all the certificates during control plane upgrade.
This feature is designed for addressing the simplest use cases; if you don't have specific requirements on certificate renewal and perform Kubernetes version upgrades regularly (less than 1 year in between each upgrade), kubeadm will take care of keeping your cluster up to date and reasonably secure.
If you have more complex requirements for certificate renewal, you can opt out from the default
behavior by passing --certificate-renewal=false to kubeadm upgrade apply or to kubeadm upgrade node.
Manual certificate renewal
You can renew your certificates manually at any time with the kubeadm certs renew command,
with the appropriate command line options. If you are running cluster with a replicated control
plane, this command needs to be executed on all the control-plane nodes.
This command performs the renewal using CA (or front-proxy-CA) certificate and key stored in /etc/kubernetes/pki.
kubeadm certs renew uses the existing certificates as the authoritative source for attributes
(Common Name, Organization, subject alternative name) and does not rely on the kubeadm-config
ConfigMap.
Even so, the Kubernetes project recommends keeping the served certificate and the associated
values in that ConfigMap synchronized, to avoid any risk of confusion.
After running the command you should restart the control plane Pods. This is required since
dynamic certificate reload is currently not supported for all components and certificates.
Static Pods are managed by the local kubelet
and not by the API Server, thus kubectl cannot be used to delete and restart them.
To restart a static Pod you can temporarily remove its manifest file from /etc/kubernetes/manifests/
and wait for 20 seconds (see the fileCheckFrequency value in KubeletConfiguration struct).
The kubelet will terminate the Pod if it's no longer in the manifest directory.
You can then move the file back and after another fileCheckFrequency period, the kubelet will recreate
the Pod and the certificate renewal for the component can complete.
kubeadm certs renew can renew any specific certificate or, with the subcommand all, it can renew all of them:
# If you are running cluster with a replicated control plane, this command
# needs to be executed on all the control-plane nodes.
kubeadm certs renew all
Copying the administrator certificate (optional)
Clusters built with kubeadm often copy the admin.conf certificate into
$HOME/.kube/config, as instructed in Creating a cluster with kubeadm.
On such a system, to update the contents of $HOME/.kube/config
after renewing the admin.conf, you could run the following commands:
sudo cp -i /etc/kubernetes/admin.conf $HOME/.kube/config
sudo chown $(id -u):$(id -g) $HOME/.kube/config
Renew certificates with the Kubernetes certificates API
This section provides more details about how to execute manual certificate renewal using the Kubernetes certificates API.
Caution:
These are advanced topics for users who need to integrate their organization's certificate infrastructure into a kubeadm-built cluster. If the default kubeadm configuration satisfies your needs, you should let kubeadm manage certificates instead.Set up a signer
The Kubernetes Certificate Authority does not work out of the box. You can configure an external signer such as cert-manager, or you can use the built-in signer.
The built-in signer is part of kube-controller-manager.
To activate the built-in signer, you must pass the --cluster-signing-cert-file and
--cluster-signing-key-file flags.
If you're creating a new cluster, you can use a kubeadm configuration file:
apiVersion: kubeadm.k8s.io/v1beta4
kind: ClusterConfiguration
controllerManager:
  extraArgs:
  - name: "cluster-signing-cert-file"
    value: "/etc/kubernetes/pki/ca.crt"
  - name: "cluster-signing-key-file"
    value: "/etc/kubernetes/pki/ca.key"
Create certificate signing requests (CSR)
See Create CertificateSigningRequest for creating CSRs with the Kubernetes API.
Renew certificates with external CA
This section provide more details about how to execute manual certificate renewal using an external CA.
To better integrate with external CAs, kubeadm can also produce certificate signing requests (CSRs). A CSR represents a request to a CA for a signed certificate for a client. In kubeadm terms, any certificate that would normally be signed by an on-disk CA can be produced as a CSR instead. A CA, however, cannot be produced as a CSR.
Renewal by using certificate signing requests (CSR)
Renewal of ceritficates is possible by generating new CSRs and signing them with the external CA. For more details about working with CSRs generated by kubeadm see the section Signing certificate signing requests (CSR) generated by kubeadm.
Certificate authority (CA) rotation
Kubeadm does not support rotation or replacement of CA certificates out of the box.
For more information about manual rotation or replacement of CA, see manual rotation of CA certificates.
Enabling signed kubelet serving certificates
By default the kubelet serving certificate deployed by kubeadm is self-signed. This means a connection from external services like the metrics-server to a kubelet cannot be secured with TLS.
To configure the kubelets in a new kubeadm cluster to obtain properly signed serving
certificates you must pass the following minimal configuration to kubeadm init:
apiVersion: kubeadm.k8s.io/v1beta4
kind: ClusterConfiguration
---
apiVersion: kubelet.config.k8s.io/v1beta1
kind: KubeletConfiguration
serverTLSBootstrap: true
If you have already created the cluster you must adapt it by doing the following:
- Find and edit the
kubelet-configConfigMap in thekube-systemnamespace. In that ConfigMap, thekubeletkey has a KubeletConfiguration document as its value. Edit the KubeletConfiguration document to setserverTLSBootstrap: true. - On each node, add the
serverTLSBootstrap: truefield in/var/lib/kubelet/config.yamland restart the kubelet withsystemctl restart kubelet
The field serverTLSBootstrap: true will enable the bootstrap of kubelet serving
certificates by requesting them from the certificates.k8s.io API. One known limitation
is that the CSRs (Certificate Signing Requests) for these certificates cannot be automatically
approved by the default signer in the kube-controller-manager -
kubernetes.io/kubelet-serving.
This will require action from the user or a third party controller.
These CSRs can be viewed using:
kubectl get csr
NAME        AGE     SIGNERNAME                        REQUESTOR                      CONDITION
csr-9wvgt   112s    kubernetes.io/kubelet-serving     system:node:worker-1           Pending
csr-lz97v   1m58s   kubernetes.io/kubelet-serving     system:node:control-plane-1    Pending
To approve them you can do the following:
kubectl certificate approve <CSR-name>
By default, these serving certificate will expire after one year. Kubeadm sets the
KubeletConfiguration field rotateCertificates to true, which means that close
to expiration a new set of CSRs for the serving certificates will be created and must
be approved to complete the rotation. To understand more see
Certificate Rotation.
If you are looking for a solution for automatic approval of these CSRs it is recommended that you contact your cloud provider and ask if they have a CSR signer that verifies the node identity with an out of band mechanism.
Third party custom controllers can be used:
Such a controller is not a secure mechanism unless it not only verifies the CommonName in the CSR but also verifies the requested IPs and domain names. This would prevent a malicious actor that has access to a kubelet client certificate to create CSRs requesting serving certificates for any IP or domain name.
Generating kubeconfig files for additional users
During cluster creation, kubeadm init signs the certificate in the super-admin.conf
to have Subject: O = system:masters, CN = kubernetes-super-admin.
system:masters
is a break-glass, super user group that bypasses the authorization layer (for example,
RBAC). The file admin.conf is also created
by kubeadm on control plane nodes and it contains a certificate with
Subject: O = kubeadm:cluster-admins, CN = kubernetes-admin. kubeadm:cluster-admins
is a group logically belonging to kubeadm. If your cluster uses RBAC
(the kubeadm default), the kubeadm:cluster-admins group is bound to the
cluster-admin ClusterRole.
Warning:
Avoid sharing thesuper-admin.conf or admin.conf files. Instead, create least
privileged access even for people who work as administrators and use that least
privilege alternative for anything other than break-glass (emergency) access.You can use the kubeadm kubeconfig user
command to generate kubeconfig files for additional users.
The command accepts a mixture of command line flags and
kubeadm configuration options.
The generated kubeconfig will be written to stdout and can be piped to a file using
kubeadm kubeconfig user ... > somefile.conf.
Example configuration file that can be used with --config:
# example.yaml
apiVersion: kubeadm.k8s.io/v1beta4
kind: ClusterConfiguration
# Will be used as the target "cluster" in the kubeconfig
clusterName: "kubernetes"
# Will be used as the "server" (IP or DNS name) of this cluster in the kubeconfig
controlPlaneEndpoint: "some-dns-address:6443"
# The cluster CA key and certificate will be loaded from this local directory
certificatesDir: "/etc/kubernetes/pki"
Make sure that these settings match the desired target cluster settings. To see the settings of an existing cluster use:
kubectl get cm kubeadm-config -n kube-system -o=jsonpath="{.data.ClusterConfiguration}"
The following example will generate a kubeconfig file with credentials valid for 24 hours
for a new user johndoe that is part of the appdevs group:
kubeadm kubeconfig user --config example.yaml --org appdevs --client-name johndoe --validity-period 24h
The following example will generate a kubeconfig file with administrator credentials valid for 1 week:
kubeadm kubeconfig user --config example.yaml --client-name admin --validity-period 168h
Signing certificate signing requests (CSR) generated by kubeadm
You can create certificate signing requests with kubeadm certs generate-csr.
Calling this command will generate .csr / .key file pairs for regular
certificates. For certificates embedded in kubeconfig files, the command will
generate a .csr / .conf pair where the key is already embedded in the .conf file.
A CSR file contains all relevant information for a CA to sign a certificate. kubeadm uses a well defined specification for all its certificates and CSRs.
The default certificate directory is /etc/kubernetes/pki, while the default
directory for kubeconfig files is /etc/kubernetes. These defaults can be
overridden with the flags --cert-dir and --kubeconfig-dir, respectively.
To pass custom options to kubeadm certs generate-csr use the --config flag,
which accepts a kubeadm configuration
file, similarly to commands such as kubeadm init. Any specification such
as extra SANs and custom IP addresses must be stored in the same configuration
file and used for all relevant kubeadm commands by passing it as --config.
Note:
This guide uses the default Kubernetes directory /etc/kubernetes, which requires
a super user. If you are following this guide and are using directories that you can
write to (typically, this means running kubeadm with --cert-dir and --kubeconfig-dir)
then you can omit the sudo command.
You must then copy the files that you produced over to within the /etc/kubernetes
directory so that kubeadm init or kubeadm join will find them.
Preparing CA and service account files
On the primary control plane node, where kubeadm init will be executed, call the following
commands:
sudo kubeadm init phase certs ca
sudo kubeadm init phase certs etcd-ca
sudo kubeadm init phase certs front-proxy-ca
sudo kubeadm init phase certs sa
This will populate the folders /etc/kubernetes/pki and /etc/kubernetes/pki/etcd
with all self-signed CA files (certificates and keys) and service account (public and
private keys) that kubeadm needs for a control plane node.
Note:
If you are using an external CA, you must generate the same files out of band and manually
copy them to the primary control plane node in /etc/kubernetes.
Once all CSRs are signed, you can delete the root CA key (ca.key) as noted in the
External CA mode section.
For secondary control plane nodes (kubeadm join --control-plane) there is no need to call
the above commands. Depending on how you setup the
High Availability
cluster, you either have to manually copy the same files from the primary
control plane node, or use the automated --upload-certs functionality of kubeadm init.
Generate CSRs
The kubeadm certs generate-csr command generates CSRs for all known certificates
managed by kubeadm. Once the command is done you must manually delete .csr, .conf
or .key files that you don't need.
Considerations for kubelet.conf
This section applies to both control plane and worker nodes.
If you have deleted the ca.key file from control plane nodes
(External CA mode), the active kube-controller-manager in
this cluster will not be able to sign kubelet client certificates. If no external
method for signing these certificates exists in your setup (such as an
external signer), you could manually sign the kubelet.conf.csr
as explained in this guide.
Note that this also means that the automatic
kubelet client certificate rotation
will be disabled. If so, close to certificate expiration, you must generate
a new kubelet.conf.csr, sign the certificate, embed it in kubelet.conf
and restart the kubelet.
If this does not apply to your setup, you can skip processing the kubelet.conf.csr
on secondary control plane and on workers nodes (all nodes that call kubeadm join ...).
That is because the active kube-controller-manager will be responsible
for signing new kubelet client certificates.
Note:
You must process thekubelet.conf.csr file on the primary control plane node
(the host where you originally ran kubeadm init). This is because kubeadm
considers that as the node that bootstraps the cluster, and a pre-populated
kubelet.conf is needed.Control plane nodes
Execute the following command on primary (kubeadm init) and secondary
(kubeadm join --control-plane) control plane nodes to generate all CSR files:
sudo kubeadm certs generate-csr
If external etcd is to be used, follow the
External etcd with kubeadm
guide to understand what CSR files are needed on the kubeadm and etcd nodes. Other
.csr and .key files under /etc/kubernetes/pki/etcd can be removed.
Based on the explanation in
Considerations for kubelet.conf keep or delete
the kubelet.conf and kubelet.conf.csr files.
Worker nodes
Based on the explanation in Considerations for kubelet.conf, optionally call:
sudo kubeadm certs generate-csr
and keep only the kubelet.conf and kubelet.conf.csr files. Alternatively skip
the steps for worker nodes entirely.
Signing CSRs for all certificates
Note:
If you are using external CA and already have CA serial number files (.srl) for
openssl, you can copy such files to a kubeadm node where CSRs will be processed.
The .srl files to copy are /etc/kubernetes/pki/ca.srl,
/etc/kubernetes/pki/front-proxy-ca.srl and /etc/kubernetes/pki/etcd/ca.srl.
The files can be then moved to a new node where CSR files will be processed.
If a .srl file is missing for a CA on a node, the script below will generate a new SRL file
with a random starting serial number.
To read more about .srl files see the
openssl
documentation for the --CAserial flag.
Repeat this step for all nodes that have CSR files.
Write the following script in the /etc/kubernetes directory, navigate to the directory
and execute the script. The script will generate certificates for all CSR files that are
present in the /etc/kubernetes tree.
#!/bin/bash

# Set certificate expiration time in days
DAYS=365

# Process all CSR files except those for front-proxy and etcd
find ./ -name "*.csr" | grep -v "pki/etcd" | grep -v "front-proxy" | while read -r FILE;
do
    echo "* Processing ${FILE} ..."
    FILE=${FILE%.*} # Trim the extension
    if [ -f "./pki/ca.srl" ]; then
        SERIAL_FLAG="-CAserial ./pki/ca.srl"
    else
        SERIAL_FLAG="-CAcreateserial"
    fi
    openssl x509 -req -days "${DAYS}" -CA ./pki/ca.crt -CAkey ./pki/ca.key ${SERIAL_FLAG} \
        -in "${FILE}.csr" -out "${FILE}.crt"
    sleep 2
done

# Process all etcd CSRs
find ./pki/etcd -name "*.csr" | while read -r FILE;
do
    echo "* Processing ${FILE} ..."
    FILE=${FILE%.*} # Trim the extension
    if [ -f "./pki/etcd/ca.srl" ]; then
        SERIAL_FLAG=-CAserial ./pki/etcd/ca.srl
    else
        SERIAL_FLAG=-CAcreateserial
    fi
    openssl x509 -req -days "${DAYS}" -CA ./pki/etcd/ca.crt -CAkey ./pki/etcd/ca.key ${SERIAL_FLAG} \
        -in "${FILE}.csr" -out "${FILE}.crt"
done

# Process front-proxy CSRs
echo "* Processing ./pki/front-proxy-client.csr ..."
openssl x509 -req -days "${DAYS}" -CA ./pki/front-proxy-ca.crt -CAkey ./pki/front-proxy-ca.key -CAcreateserial \
    -in ./pki/front-proxy-client.csr -out ./pki/front-proxy-client.crt
Embedding certificates in kubeconfig files
Repeat this step for all nodes that have CSR files.
Write the following script in the /etc/kubernetes directory, navigate to the directory
and execute the script. The script will take the .crt files that were signed for
kubeconfig files from CSRs in the previous step and will embed them in the kubeconfig files.
#!/bin/bash

CLUSTER=kubernetes
find ./ -name "*.conf" | while read -r FILE;
do
    echo "* Processing ${FILE} ..."
    KUBECONFIG="${FILE}" kubectl config set-cluster "${CLUSTER}" --certificate-authority ./pki/ca.crt --embed-certs
    USER=$(KUBECONFIG="${FILE}" kubectl config view -o jsonpath='{.users[0].name}')
    KUBECONFIG="${FILE}" kubectl config set-credentials "${USER}" --client-certificate "${FILE}.crt" --embed-certs
done
Performing cleanup
Perform this step on all nodes that have CSR files.
Write the following script in the /etc/kubernetes directory, navigate to the directory
and execute the script.
#!/bin/bash

# Cleanup CSR files
rm -f ./*.csr ./pki/*.csr ./pki/etcd/*.csr # Clean all CSR files

# Cleanup CRT files that were already embedded in kubeconfig files
rm -f ./*.crt
Optionally, move .srl files to the next node to be processed.
Optionally, if using external CA remove the /etc/kubernetes/pki/ca.key file,
as explained in the External CA node section.
kubeadm node initialization
Once CSR files have been signed and required certificates are in place on the hosts
you want to use as nodes, you can use the commands kubeadm init and kubeadm join
to create a Kubernetes cluster from these nodes. During init and join, kubeadm
uses existing certificates, encryption keys and kubeconfig files that it finds in the
/etc/kubernetes tree on the host's local filesystem.
1.8 - Reconfiguring a kubeadm cluster
kubeadm does not support automated ways of reconfiguring components that were deployed on managed nodes. One way of automating this would be by using a custom operator.
To modify the components configuration you must manually edit associated cluster objects and files on disk.
This guide shows the correct sequence of steps that need to be performed to achieve kubeadm cluster reconfiguration.
Before you begin
- You need a cluster that was deployed using kubeadm
- Have administrator credentials (
/etc/kubernetes/admin.conf) and network connectivity to a running kube-apiserver in the cluster from a host that has kubectl installed - Have a text editor installed on all hosts
Reconfiguring the cluster
kubeadm writes a set of cluster wide component configuration options in
ConfigMaps and other objects. These objects must be manually edited. The command kubectl edit
can be used for that.
The kubectl edit command will open a text editor where you can edit and save the object directly.
You can use the environment variables KUBECONFIG and KUBE_EDITOR to specify the location of
the kubectl consumed kubeconfig file and preferred text editor.
For example:
KUBECONFIG=/etc/kubernetes/admin.conf KUBE_EDITOR=nano kubectl edit <parameters>
Note:
Upon saving any changes to these cluster objects, components running on nodes may not be automatically updated. The steps below instruct you on how to perform that manually.Warning:
Component configuration in ConfigMaps is stored as unstructured data (YAML string). This means that validation will not be performed upon updating the contents of a ConfigMap. You have to be careful to follow the documented API format for a particular component configuration and avoid introducing typos and YAML indentation mistakes.Applying cluster configuration changes
Updating the ClusterConfiguration
During cluster creation and upgrade, kubeadm writes its
ClusterConfiguration
in a ConfigMap called kubeadm-config in the kube-system namespace.
To change a particular option in the ClusterConfiguration you can edit the ConfigMap with this command:
kubectl edit cm -n kube-system kubeadm-config
The configuration is located under the data.ClusterConfiguration key.
Note:
TheClusterConfiguration includes a variety of options that affect the configuration of individual
components such as kube-apiserver, kube-scheduler, kube-controller-manager, CoreDNS, etcd and kube-proxy.
Changes to the configuration must be reflected on node components manually.Reflecting ClusterConfiguration changes on control plane nodes
kubeadm manages the control plane components as static Pod manifests located in
the directory /etc/kubernetes/manifests.
Any changes to the ClusterConfiguration under the apiServer, controllerManager, scheduler or etcd
keys must be reflected in the associated files in the manifests directory on a control plane node.
Such changes may include:
extraArgs- requires updating the list of flags passed to a component containerextraVolumes- requires updating the volume mounts for a component container*SANs- requires writing new certificates with updated Subject Alternative Names
Before proceeding with these changes, make sure you have backed up the directory /etc/kubernetes/.
To write new certificates you can use:
kubeadm init phase certs <component-name> --config <config-file>
To write new manifest files in /etc/kubernetes/manifests you can use:
# For Kubernetes control plane components
kubeadm init phase control-plane <component-name> --config <config-file>
# For local etcd
kubeadm init phase etcd local --config <config-file>
The <config-file> contents must match the updated ClusterConfiguration.
The <component-name> value must be a name of a Kubernetes control plane component (apiserver, controller-manager or scheduler).
Note:
Updating a file in/etc/kubernetes/manifests will tell the kubelet to restart the static Pod for the corresponding component.
Try doing these changes one node at a time to leave the cluster without downtime.Applying kubelet configuration changes
Updating the KubeletConfiguration
During cluster creation and upgrade, kubeadm writes its
KubeletConfiguration
in a ConfigMap called kubelet-config in the kube-system namespace.
You can edit the ConfigMap with this command:
kubectl edit cm -n kube-system kubelet-config
The configuration is located under the data.kubelet key.
Reflecting the kubelet changes
To reflect the change on kubeadm nodes you must do the following:
- Log in to a kubeadm node
- Run
kubeadm upgrade node phase kubelet-configto download the latestkubelet-configConfigMap contents into the local file/var/lib/kubelet/config.yaml - Edit the file
/var/lib/kubelet/kubeadm-flags.envto apply additional configuration with flags - Restart the kubelet service with
systemctl restart kubelet
Note:
Do these changes one node at a time to allow workloads to be rescheduled properly.Note:
Duringkubeadm upgrade, kubeadm downloads the KubeletConfiguration from the
kubelet-config ConfigMap and overwrite the contents of /var/lib/kubelet/config.yaml.
This means that node local configuration must be applied either by flags in
/var/lib/kubelet/kubeadm-flags.env or by manually updating the contents of
/var/lib/kubelet/config.yaml after kubeadm upgrade, and then restarting the kubelet.Applying kube-proxy configuration changes
Updating the KubeProxyConfiguration
During cluster creation and upgrade, kubeadm writes its
KubeProxyConfiguration
in a ConfigMap in the kube-system namespace called kube-proxy.
This ConfigMap is used by the kube-proxy DaemonSet in the kube-system namespace.
To change a particular option in the KubeProxyConfiguration, you can edit the ConfigMap with this command:
kubectl edit cm -n kube-system kube-proxy
The configuration is located under the data.config.conf key.
Reflecting the kube-proxy changes
Once the kube-proxy ConfigMap is updated, you can restart all kube-proxy Pods:
Delete the Pods with:
kubectl delete po -n kube-system -l k8s-app=kube-proxy
New Pods that use the updated ConfigMap will be created.
Note:
Because kubeadm deploys kube-proxy as a DaemonSet, node specific configuration is unsupported.Applying CoreDNS configuration changes
Updating the CoreDNS Deployment and Service
kubeadm deploys CoreDNS as a Deployment called coredns and with a Service kube-dns,
both in the kube-system namespace.
To update any of the CoreDNS settings, you can edit the Deployment and Service objects:
kubectl edit deployment -n kube-system coredns
kubectl edit service -n kube-system kube-dns
Reflecting the CoreDNS changes
Once the CoreDNS changes are applied you can restart the CoreDNS deployment:
kubectl rollout restart deployment -n kube-system coredns
Note:
kubeadm does not allow CoreDNS configuration during cluster creation and upgrade. This means that if you executekubeadm upgrade apply, your changes to the CoreDNS
objects will be lost and must be reapplied.Persisting the reconfiguration
During the execution of kubeadm upgrade on a managed node, kubeadm might overwrite configuration
that was applied after the cluster was created (reconfiguration).
Persisting Node object reconfiguration
kubeadm writes Labels, Taints, CRI socket and other information on the Node object for a particular Kubernetes node. To change any of the contents of this Node object you can use:
kubectl edit no <node-name>
During kubeadm upgrade the contents of such a Node might get overwritten.
If you would like to persist your modifications to the Node object after upgrade,
you can prepare a kubectl patch
and apply it to the Node object:
kubectl patch no <node-name> --patch-file <patch-file>
Persisting control plane component reconfiguration
The main source of control plane configuration is the ClusterConfiguration
object stored in the cluster. To extend the static Pod manifests configuration,
patches can be used.
These patch files must remain as files on the control plane nodes to ensure that
they can be used by the kubeadm upgrade ... --patches <directory>.
If reconfiguration is done to the ClusterConfiguration and static Pod manifests on disk,
the set of node specific patches must be updated accordingly.
Persisting kubelet reconfiguration
Any changes to the KubeletConfiguration stored in /var/lib/kubelet/config.yaml will be overwritten on
kubeadm upgrade by downloading the contents of the cluster wide kubelet-config ConfigMap.
To persist kubelet node specific configuration either the file /var/lib/kubelet/config.yaml
has to be updated manually post-upgrade or the file /var/lib/kubelet/kubeadm-flags.env can include flags.
The kubelet flags override the associated KubeletConfiguration options, but note that
some of the flags are deprecated.
A kubelet restart will be required after changing /var/lib/kubelet/config.yaml or
/var/lib/kubelet/kubeadm-flags.env.
What's next
1.9 - Changing The Kubernetes Package Repository
This page explains how to enable a package repository for the desired
Kubernetes minor release upon upgrading a cluster. This is only needed
for users of the community-owned package repositories hosted at pkgs.k8s.io.
Unlike the legacy package repositories, the community-owned package
repositories are structured in a way that there's a dedicated package
repository for each Kubernetes minor version.
Note:
This guide only covers a part of the Kubernetes upgrade process. Please see the upgrade guide for more information about upgrading Kubernetes clusters.Note:
This step is only needed upon upgrading a cluster to another minor release. If you're upgrading to another patch release within the same minor release (e.g. v1.36.5 to v1.36.7), you don't need to follow this guide. However, if you're still using the legacy package repositories, you'll need to migrate to the new community-owned package repositories before upgrading (see the next section for more details on how to do this).Before you begin
This document assumes that you're already using the community-owned
package repositories (pkgs.k8s.io). If that's not the case, it's strongly
recommended to migrate to the community-owned package repositories as described
in the official announcement.
apt.kubernetes.io and yum.kubernetes.io) have been
deprecated and frozen starting from September 13, 2023.
Using the new package repositories hosted at pkgs.k8s.io
is strongly recommended and required in order to install Kubernetes versions released after September 13, 2023.
The deprecated legacy repositories, and their contents, might be removed at any time in the future and without
a further notice period. The new package repositories provide downloads for Kubernetes versions starting with v1.24.0.Verifying if the Kubernetes package repositories are used
If you're unsure whether you're using the community-owned package repositories or the legacy package repositories, take the following steps to verify:
Print the contents of the file that defines the Kubernetes apt repository:
# On your system, this configuration file could have a different name
pager /etc/apt/sources.list.d/kubernetes.list
If you see a line similar to:
deb [signed-by=/etc/apt/keyrings/kubernetes-apt-keyring.gpg] https://pkgs.k8s.io/core:/stable:/v1.35/deb/ /
You're using the Kubernetes package repositories and this guide applies to you. Otherwise, it's strongly recommended to migrate to the Kubernetes package repositories as described in the official announcement.
Print the contents of the file that defines the Kubernetes yum repository:
# On your system, this configuration file could have a different name
cat /etc/yum.repos.d/kubernetes.repo
If you see a baseurl similar to the baseurl in the output below:
[kubernetes]
name=Kubernetes
baseurl=https://pkgs.k8s.io/core:/stable:/v1.35/rpm/
enabled=1
gpgcheck=1
gpgkey=https://pkgs.k8s.io/core:/stable:/v1.35/rpm/repodata/repomd.xml.key
exclude=kubelet kubeadm kubectl
You're using the Kubernetes package repositories and this guide applies to you. Otherwise, it's strongly recommended to migrate to the Kubernetes package repositories as described in the official announcement.
Print the contents of the file that defines the Kubernetes zypper repository:
# On your system, this configuration file could have a different name
cat /etc/zypp/repos.d/kubernetes.repo
If you see a baseurl similar to the baseurl in the output below:
[kubernetes]
name=Kubernetes
baseurl=https://pkgs.k8s.io/core:/stable:/v1.35/rpm/
enabled=1
gpgcheck=1
gpgkey=https://pkgs.k8s.io/core:/stable:/v1.35/rpm/repodata/repomd.xml.key
exclude=kubelet kubeadm kubectl
You're using the Kubernetes package repositories and this guide applies to you. Otherwise, it's strongly recommended to migrate to the Kubernetes package repositories as described in the official announcement.
Note:
The URL used for the Kubernetes package repositories is not limited to pkgs.k8s.io,
it can also be one of:
pkgs.k8s.iopkgs.kubernetes.iopackages.kubernetes.io
Switching to another Kubernetes package repository
This step should be done upon upgrading from one to another Kubernetes minor release in order to get access to the packages of the desired Kubernetes minor version.
Open the file that defines the Kubernetes
aptrepository using a text editor of your choice:nano /etc/apt/sources.list.d/kubernetes.listYou should see a single line with the URL that contains your current Kubernetes minor version. For example, if you're using v1.35, you should see this:
deb [signed-by=/etc/apt/keyrings/kubernetes-apt-keyring.gpg] https://pkgs.k8s.io/core:/stable:/v1.35/deb/ /Change the version in the URL to the next available minor release, for example:
deb [signed-by=/etc/apt/keyrings/kubernetes-apt-keyring.gpg] https://pkgs.k8s.io/core:/stable:/v1.36/deb/ /Save the file and exit your text editor. Continue following the relevant upgrade instructions.
Open the file that defines the Kubernetes
yumrepository using a text editor of your choice:nano /etc/yum.repos.d/kubernetes.repoYou should see a file with two URLs that contain your current Kubernetes minor version. For example, if you're using v1.35, you should see this:
[kubernetes]
name=Kubernetes
baseurl=https://pkgs.k8s.io/core:/stable:/v1.35/rpm/
enabled=1
gpgcheck=1
gpgkey=https://pkgs.k8s.io/core:/stable:/v1.35/rpm/repodata/repomd.xml.key
exclude=kubelet kubeadm kubectl cri-tools kubernetes-cni
Change the version in these URLs to the next available minor release, for example:
[kubernetes]
name=Kubernetes
baseurl=https://pkgs.k8s.io/core:/stable:/v1.36/rpm/
enabled=1
gpgcheck=1
gpgkey=https://pkgs.k8s.io/core:/stable:/v1.36/rpm/repodata/repomd.xml.key
exclude=kubelet kubeadm kubectl cri-tools kubernetes-cni
Save the file and exit your text editor. Continue following the relevant upgrade instructions.
What's next
- See how to Upgrade Linux nodes.
- See how to Upgrade Windows nodes.
2 - Overprovision Node Capacity For A Cluster
This page guides you through configuring Node overprovisioning in your Kubernetes cluster. Node overprovisioning is a strategy that proactively reserves a portion of your cluster's compute resources. This reservation helps reduce the time required to schedule new pods during scaling events, enhancing your cluster's responsiveness to sudden spikes in traffic or workload demands.
By maintaining some unused capacity, you ensure that resources are immediately available when new pods are created, preventing them from entering a pending state while the cluster scales up.
Before you begin
- You need to have a Kubernetes cluster, and the kubectl command-line tool must be configured to communicate with your cluster.
- You should already have a basic understanding of Deployments, Pod priority, and PriorityClasses.
- Your cluster must be set up with an autoscaler that manages nodes based on demand.
Create a PriorityClass
Begin by defining a PriorityClass for the placeholder Pods. First, create a PriorityClass with a negative priority value, that you will shortly assign to the placeholder pods. Later, you will set up a Deployment that uses this PriorityClass
apiVersion: scheduling.k8s.io/v1
kind: PriorityClass
metadata:
  name: placeholder # these Pods represent placeholder capacity
value: -1000
globalDefault: false
description: "Negative priority for placeholder pods to enable overprovisioning."
Then create the PriorityClass:
kubectl apply -f https://k8s.io/examples/priorityclass/low-priority-class.yaml
You will next define a Deployment that uses the negative-priority PriorityClass and runs a minimal container. When you add this to your cluster, Kubernetes runs those placeholder pods to reserve capacity. Any time there is a capacity shortage, the control plane will pick one these placeholder pods as the first candidate to preempt.
Run Pods that request node capacity
Review the sample manifest:
apiVersion: apps/v1
kind: Deployment
metadata:
  name: capacity-reservation
  # You should decide what namespace to deploy this into
spec:
  replicas: 1
  selector:
    matchLabels:
      app.kubernetes.io/name: capacity-placeholder
  template:
    metadata:
      labels:
        app.kubernetes.io/name: capacity-placeholder
      annotations:
        kubernetes.io/description: "Capacity reservation"
    spec:
      priorityClassName: placeholder
      affinity: # Try to place these overhead Pods on different nodes
                # if possible
        podAntiAffinity:
          preferredDuringSchedulingIgnoredDuringExecution:
          - weight: 100
            podAffinityTerm:
              labelSelector:
                matchLabels:
                  app.kubernetes.io/name: capacity-placeholder
              topologyKey: topology.kubernetes.io/hostname
      containers:
      - name: pause
        image: registry.k8s.io/pause:3.6
        resources:
          requests:
            cpu: "50m"
            memory: "512Mi"
          limits:
            memory: "512Mi"
Pick a namespace for the placeholder pods
You should select, or create, a namespace that the placeholder Pods will go into.
Create the placeholder deployment
Create a Deployment based on that manifest:
# Change the namespace name "example"
kubectl --namespace example apply -f https://k8s.io/examples/deployments/deployment-with-capacity-reservation.yaml
Adjust placeholder resource requests
Configure the resource requests and limits for the placeholder pods to define the amount of overprovisioned resources you want to maintain. This reservation ensures that a specific amount of CPU and memory is kept available for new pods.
To edit the Deployment, modify the resources section in the Deployment manifest file
to set appropriate requests and limits. You can download that file locally and then edit it
with whichever text editor you prefer.
You can also edit the Deployment using kubectl:
kubectl edit deployment capacity-reservation
For example, to reserve a total of a 0.5 CPU and 1GiB of memory across 5 placeholder pods, define the resource requests and limits for a single placeholder pod as follows:
  resources:
    requests:
      cpu: "100m"
      memory: "200Mi"
    limits:
      cpu: "100m"
Set the desired replica count
Calculate the total reserved resources
For example, with 5 replicas each reserving 0.1 CPU and 200MiB of memory:
Total CPU reserved: 5 × 0.1 = 0.5 (in the Pod specification, you'll write the quantity 500m)
Total memory reserved: 5 × 200MiB = 1GiB (in the Pod specification, you'll write 1 Gi)
To scale the Deployment, adjust the number of replicas based on your cluster's size and expected workload:
kubectl scale deployment capacity-reservation --replicas=5
Verify the scaling:
kubectl get deployment capacity-reservation
The output should reflect the updated number of replicas:
NAME                   READY   UP-TO-DATE   AVAILABLE   AGE
capacity-reservation   5/5     5            5           2m
Note:
Some autoscalers, notably Karpenter, treat preferred affinity rules as hard rules when considering node scaling. If you use Karpenter or another node autoscaler that uses the same heuristic, the replica count you set here also sets a minimum node count for your cluster.What's next
- Learn more about PriorityClasses and how they affect pod scheduling.
- Explore node autoscaling to dynamically adjust your cluster's size based on workload demands.
- Understand Pod preemption, a key mechanism for Kubernetes to handle resource contention. The same page covers eviction, which is less relevant to the placeholder Pod approach, but is also a mechanism for Kubernetes to react when resources are contended.
3 - Migrating from dockershim
This section presents information you need to know when migrating from dockershim to other container runtimes.
Since the announcement of dockershim deprecation in Kubernetes 1.20, there were questions on how this will affect various workloads and Kubernetes installations. Our Dockershim Removal FAQ is there to help you to understand the problem better.
Dockershim was removed from Kubernetes with the release of v1.24. If you use Docker Engine via dockershim as your container runtime and wish to upgrade to v1.24, it is recommended that you either migrate to another runtime or find an alternative means to obtain Docker Engine support. Check out the container runtimes section to know your options.
The version of Kubernetes with dockershim (1.23) is out of support and the v1.24 will run out of support soon. Make sure to report issues you encountered with the migration so the issues can be fixed in a timely manner and your cluster would be ready for dockershim removal. After v1.24 running out of support, you will need to contact your Kubernetes provider for support or upgrade multiple versions at a time if there are critical issues affecting your cluster.
Your cluster might have more than one kind of node, although this is not a common configuration.
These tasks will help you to migrate:
What's next
- Check out container runtimes to understand your options for an alternative.
- If you find a defect or other technical concern relating to migrating away from dockershim, you can report an issue to the Kubernetes project.
3.1 - Changing the Container Runtime on a Node from Docker Engine to containerd
This task outlines the steps needed to update your container runtime to containerd from Docker. It is applicable for cluster operators running Kubernetes 1.23 or earlier. This also covers an example scenario for migrating from dockershim to containerd. Alternative container runtimes can be picked from this page.
Before you begin
Install containerd. For more information see containerd's installation documentation and for specific prerequisite follow the containerd guide.
Drain the node
kubectl drain <node-to-drain> --ignore-daemonsets
Replace <node-to-drain> with the name of your node you are draining.
Stop the Docker daemon
systemctl stop kubelet
systemctl disable docker.service --now
Install Containerd
Follow the guide for detailed steps to install containerd.
Install the
containerd.iopackage from the official Docker repositories. Instructions for setting up the Docker repository for your respective Linux distribution and installing thecontainerd.iopackage can be found at Getting started with containerd.Configure containerd:
sudo mkdir -p /etc/containerd
containerd config default | sudo tee /etc/containerd/config.toml
Restart containerd:
sudo systemctl restart containerd
Start a Powershell session, set $Version to the desired version (ex: $Version="1.4.3"), and
then run the following commands:
Download containerd:
curl.exe -L https://github.com/containerd/containerd/releases/download/v$Version/containerd-$Version-windows-amd64.tar.gz -o containerd-windows-amd64.tar.gz
tar.exe xvf .\containerd-windows-amd64.tar.gz
Extract and configure:
Copy-Item -Path ".\bin\" -Destination "$Env:ProgramFiles\containerd" -Recurse -Force
cd $Env:ProgramFiles\containerd\
.\containerd.exe config default | Out-File config.toml -Encoding ascii

# Review the configuration. Depending on setup you may want to adjust:
# - the sandbox_image (Kubernetes pause image)
# - cni bin_dir and conf_dir locations
Get-Content config.toml

# (Optional - but highly recommended) Exclude containerd from Windows Defender Scans
Add-MpPreference -ExclusionProcess "$Env:ProgramFiles\containerd\containerd.exe"
Start containerd:
.\containerd.exe --register-service
Start-Service containerd
Configure the kubelet to use containerd as its container runtime
Edit the file /var/lib/kubelet/kubeadm-flags.env and add the containerd runtime to the flags;
--container-runtime-endpoint=unix:///run/containerd/containerd.sock.
Users using kubeadm should be aware that the kubeadm tool stores the host's CRI socket in the
/var/lib/kubelet/instance-config.yaml file on each node. You can create this /var/lib/kubelet/instance-config.yaml file on the node.
The /var/lib/kubelet/instance-config.yaml file allows setting the containerRuntimeEndpoint parameter.
You can set this parameter's value to the path of your chosen CRI socket (for example unix:///run/containerd/containerd.sock).
Restart the kubelet
systemctl start kubelet
Verify that the node is healthy
Run kubectl get nodes -o wide and containerd appears as the runtime for the node we just changed.
Remove Docker Engine
If the node appears healthy, remove Docker.
sudo yum remove docker-ce docker-ce-cli
sudo apt-get purge docker-ce docker-ce-cli
sudo dnf remove docker-ce docker-ce-cli
sudo apt-get purge docker-ce docker-ce-cli
The preceding commands don't remove images, containers, volumes, or customized configuration files on your host. To delete them, follow Docker's instructions to Uninstall Docker Engine.
Caution:
Docker's instructions for uninstalling Docker Engine create a risk of deleting containerd. Be careful when executing commands.Uncordon the node
kubectl uncordon <node-to-uncordon>
Replace <node-to-uncordon> with the name of your node you previously drained.
3.2 - Find Out What Container Runtime is Used on a Node
This page outlines steps to find out what container runtime the nodes in your cluster use.
Depending on the way you run your cluster, the container runtime for the nodes may
have been pre-configured or you need to configure it. If you're using a managed
Kubernetes service, there might be vendor-specific ways to check what container runtime is
configured for the nodes. The method described on this page should work whenever
the execution of kubectl is allowed.
Before you begin
Install and configure kubectl. See Install Tools section for details.
Find out the container runtime used on a Node
Use kubectl to fetch and show node information:
kubectl get nodes -o wide
The output is similar to the following. The column CONTAINER-RUNTIME outputs
the runtime and its version.
For Docker Engine, the output is similar to this:
NAME         STATUS   VERSION    CONTAINER-RUNTIME
node-1       Ready    v1.16.15   docker://19.3.1
node-2       Ready    v1.16.15   docker://19.3.1
node-3       Ready    v1.16.15   docker://19.3.1
If your runtime shows as Docker Engine, you still might not be affected by the removal of dockershim in Kubernetes v1.24. Check the runtime endpoint to see if you use dockershim. If you don't use dockershim, you aren't affected.
For containerd, the output is similar to this:
NAME         STATUS   VERSION   CONTAINER-RUNTIME
node-1       Ready    v1.19.6   containerd://1.4.1
node-2       Ready    v1.19.6   containerd://1.4.1
node-3       Ready    v1.19.6   containerd://1.4.1
Find out more information about container runtimes on Container Runtimes page.
Find out what container runtime endpoint you use
The container runtime talks to the kubelet over a Unix socket using the CRI protocol, which is based on the gRPC framework. The kubelet acts as a client, and the runtime acts as the server. In some cases, you might find it useful to know which socket your nodes use. For example, with the removal of dockershim in Kubernetes v1.24 and later, you might want to know whether you use Docker Engine with dockershim.
Note:
If you currently use Docker Engine in your nodes withcri-dockerd, you aren't
affected by the dockershim removal.You can check which socket you use by checking the kubelet configuration on your nodes.
Read the starting commands for the kubelet process:
tr \\0 ' ' < /proc/"$(pgrep kubelet)"/cmdlineIf you don't have
trorpgrep, check the command line for the kubelet process manually.In the output, look for the
--container-runtimeflag and the--container-runtime-endpointflag.- If your nodes use Kubernetes v1.23 and earlier and these flags aren't
present or if the
--container-runtimeflag is notremote, you use the dockershim socket with Docker Engine. The--container-runtimecommand line argument is not available in Kubernetes v1.27 and later. - If the
--container-runtime-endpointflag is present, check the socket name to find out which runtime you use. For example,unix:///run/containerd/containerd.sockis the containerd endpoint.
- If your nodes use Kubernetes v1.23 and earlier and these flags aren't
present or if the
If you want to change the Container Runtime on a Node from Docker Engine to containerd,
you can find out more information on migrating from Docker Engine to containerd,
or, if you want to continue using Docker Engine in Kubernetes v1.24 and later, migrate to a
CRI-compatible adapter like cri-dockerd.
3.3 - Troubleshooting CNI plugin-related errors
To avoid CNI plugin-related errors, verify that you are using or upgrading to a container runtime that has been tested to work correctly with your version of Kubernetes.
About the "Incompatible CNI versions" and "Failed to destroy network for sandbox" errors
Service issues exist for pod CNI network setup and tear down in containerd v1.6.0-v1.6.3 when the CNI plugins have not been upgraded and/or the CNI config version is not declared in the CNI config files. The containerd team reports, "these issues are resolved in containerd v1.6.4."
With containerd v1.6.0-v1.6.3, if you do not upgrade the CNI plugins and/or declare the CNI config version, you might encounter the following "Incompatible CNI versions" or "Failed to destroy network for sandbox" error conditions.
Incompatible CNI versions error
If the version of your CNI plugin does not correctly match the plugin version in the config because the config version is later than the plugin version, the containerd log will likely show an error message on startup of a pod similar to:
incompatible CNI versions; config is \"1.0.0\", plugin supports [\"0.1.0\" \"0.2.0\" \"0.3.0\" \"0.3.1\" \"0.4.0\"]"
To fix this issue, update your CNI plugins and CNI config files.
Failed to destroy network for sandbox error
If the version of the plugin is missing in the CNI plugin config, the pod may run. However, stopping the pod generates an error similar to:
ERROR[2022-04-26T00:43:24.518165483Z] StopPodSandbox for "b" failed
error="failed to destroy network for sandbox \"bbc85f891eaf060c5a879e27bba9b6b06450210161dfdecfbb2732959fb6500a\": invalid version \"\": the version is empty"
This error leaves the pod in the not-ready state with a network namespace still attached. To recover from this problem, edit the CNI config file to add the missing version information. The next attempt to stop the pod should be successful.
Updating your CNI plugins and CNI config files
If you're using containerd v1.6.0-v1.6.3 and encountered "Incompatible CNI versions" or "Failed to destroy network for sandbox" errors, consider updating your CNI plugins and editing the CNI config files.
Here's an overview of the typical steps for each node:
After stopping your container runtime and kubelet services, perform the following upgrade operations:
- If you're running CNI plugins, upgrade them to the latest version.
- If you're using non-CNI plugins, replace them with CNI plugins. Use the latest version of the plugins.
- Update the plugin configuration file to specify or match a version of the CNI specification that the plugin supports, as shown in the following "An example containerd configuration file" section.
- For
containerd, ensure that you have installed the latest version (v1.0.0 or later) of the CNI loopback plugin. - Upgrade node components (for example, the kubelet) to Kubernetes v1.24
- Upgrade to or install the most current version of the container runtime.
Bring the node back into your cluster by restarting your container runtime and kubelet. Uncordon the node (
kubectl uncordon <nodename>).
An example containerd configuration file
The following example shows a configuration for containerd runtime v1.6.x,
which supports a recent version of the CNI specification (v1.0.0).
Please see the documentation from your plugin and networking provider for further instructions on configuring your system.
On Kubernetes, containerd runtime adds a loopback interface, lo, to pods as a
default behavior. The containerd runtime configures the loopback interface via a
CNI plugin, loopback. The loopback plugin is distributed as part of the
containerd release packages that have the cni designation. containerd
v1.6.0 and later includes a CNI v1.0.0-compatible loopback plugin as well as
other default CNI plugins. The configuration for the loopback plugin is done
internally by containerd, and is set to use CNI v1.0.0. This also means that the
version of the loopback plugin must be v1.0.0 or later when this newer version
containerd is started.
The following bash command generates an example CNI config. Here, the 1.0.0
value for the config version is assigned to the cniVersion field for use when
containerd invokes the CNI bridge plugin.
cat << EOF | tee /etc/cni/net.d/10-containerd-net.conflist
{
 "cniVersion": "1.0.0",
 "name": "containerd-net",
 "plugins": [
   {
     "type": "bridge",
     "bridge": "cni0",
     "isGateway": true,
     "ipMasq": true,
     "promiscMode": true,
     "ipam": {
       "type": "host-local",
       "ranges": [
         [{
           "subnet": "10.88.0.0/16"
         }],
         [{
           "subnet": "2001:db8:4860::/64"
         }]
       ],
       "routes": [
         { "dst": "0.0.0.0/0" },
         { "dst": "::/0" }
       ]
     }
   },
   {
     "type": "portmap",
     "capabilities": {"portMappings": true},
     "externalSetMarkChain": "KUBE-MARK-MASQ"
   }
 ]
}
EOF
Update the IP address ranges in the preceding example with ones that are based on your use case and network addressing plan.
3.4 - Check whether dockershim removal affects you
The dockershim component of Kubernetes allows the use of Docker as a Kubernetes's
container runtime.
Kubernetes' built-in dockershim component was removed in release v1.24.
This page explains how your cluster could be using Docker as a container runtime,
provides details on the role that dockershim plays when in use, and shows steps
you can take to check whether any workloads could be affected by dockershim removal.
Finding if your app has a dependencies on Docker
If you are using Docker for building your application containers, you can still run these containers on any container runtime. This use of Docker does not count as a dependency on Docker as a container runtime.
When alternative container runtime is used, executing Docker commands may either not work or yield unexpected output. This is how you can find whether you have a dependency on Docker:
- Make sure no privileged Pods execute Docker commands (like
docker ps), restart the Docker service (commands such assystemctl restart docker.service), or modify Docker-specific files such as/etc/docker/daemon.json. - Check for any private registries or image mirror settings in the Docker
configuration file (like
/etc/docker/daemon.json). Those typically need to be reconfigured for another container runtime. - Check that scripts and apps running on nodes outside of your Kubernetes
infrastructure do not execute Docker commands. It might be:
- SSH to nodes to troubleshoot;
- Node startup scripts;
- Monitoring and security agents installed on nodes directly.
- Third-party tools that perform above mentioned privileged operations. See Migrating telemetry and security agents from dockershim for more information.
- Make sure there are no indirect dependencies on dockershim behavior. This is an edge case and unlikely to affect your application. Some tooling may be configured to react to Docker-specific behaviors, for example, raise alert on specific metrics or search for a specific log message as part of troubleshooting instructions. If you have such tooling configured, test the behavior on a test cluster before migration.
Dependency on Docker explained
A container runtime is software that can execute the containers that make up a Kubernetes pod. Kubernetes is responsible for orchestration and scheduling of Pods; on each node, the kubelet uses the container runtime interface as an abstraction so that you can use any compatible container runtime.
In its earliest releases, Kubernetes offered compatibility with one container runtime: Docker.
Later in the Kubernetes project's history, cluster operators wanted to adopt additional container runtimes.
The CRI was designed to allow this kind of flexibility - and the kubelet began supporting CRI. However,
because Docker existed before the CRI specification was invented, the Kubernetes project created an
adapter component, dockershim. The dockershim adapter allows the kubelet to interact with Docker as
if Docker were a CRI compatible runtime.
You can read about it in Kubernetes Containerd integration goes GA blog post.
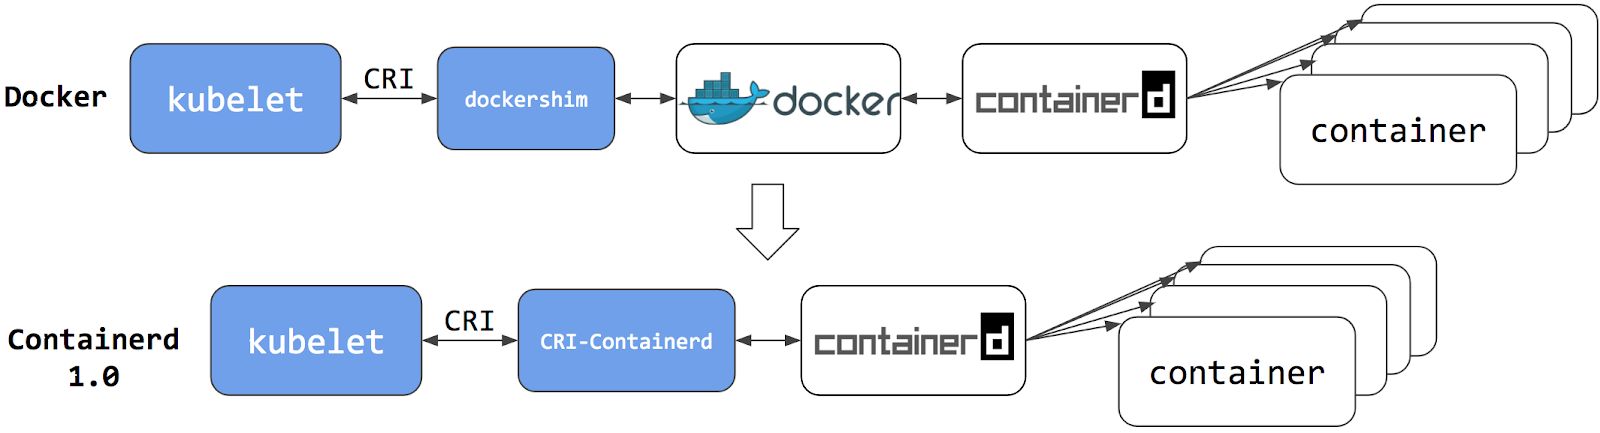
Switching to Containerd as a container runtime eliminates the middleman. All the same containers can be run by container runtimes like Containerd as before. But now, since containers schedule directly with the container runtime, they are not visible to Docker. So any Docker tooling or fancy UI you might have used before to check on these containers is no longer available.
You cannot get container information using docker ps or docker inspect
commands. As you cannot list containers, you cannot get logs, stop containers,
or execute something inside a container using docker exec.
Note:
If you're running workloads via Kubernetes, the best way to stop a container is through the Kubernetes API rather than directly through the container runtime (this advice applies for all container runtimes, not only Docker).You can still pull images or build them using docker build command. But images
built or pulled by Docker would not be visible to container runtime and
Kubernetes. They needed to be pushed to some registry to allow them to be used
by Kubernetes.
Known issues
Some filesystem metrics are missing and the metrics format is different
The Kubelet /metrics/cadvisor endpoint provides Prometheus metrics,
as documented in Metrics for Kubernetes system components.
If you install a metrics collector that depends on that endpoint, you might see the following issues:
- The metrics format on the Docker node is
k8s_<container-name>_<pod-name>_<namespace>_<pod-uid>_<restart-count>but the format on other runtime is different. For example, on containerd node it is<container-id>. - Some filesystem metrics are missing, as follows:
container_fs_inodes_free
container_fs_inodes_total
container_fs_io_current
container_fs_io_time_seconds_total
container_fs_io_time_weighted_seconds_total
container_fs_limit_bytes
container_fs_read_seconds_total
container_fs_reads_merged_total
container_fs_sector_reads_total
container_fs_sector_writes_total
container_fs_usage_bytes
container_fs_write_seconds_total
container_fs_writes_merged_total
Workaround
You can mitigate this issue by using cAdvisor as a standalone daemonset.
- Find the latest cAdvisor release
with the name pattern
vX.Y.Z-containerd-cri(for example,v0.42.0-containerd-cri). - Follow the steps in cAdvisor Kubernetes Daemonset to create the daemonset.
- Point the installed metrics collector to use the cAdvisor
/metricsendpoint which provides the full set of Prometheus container metrics.
Alternatives:
- Use alternative third party metrics collection solution.
- Collect metrics from the Kubelet summary API that is served at
/stats/summary.
What's next
- Read Migrating from dockershim to understand your next steps
- Read the dockershim deprecation FAQ article for more information.
3.5 - Migrating telemetry and security agents from dockershim
Kubernetes' support for direct integration with Docker Engine is deprecated and has been removed. Most apps do not have a direct dependency on runtime hosting containers. However, there are still a lot of telemetry and monitoring agents that have a dependency on Docker to collect containers metadata, logs, and metrics. This document aggregates information on how to detect these dependencies as well as links on how to migrate these agents to use generic tools or alternative runtimes.
Telemetry and security agents
Within a Kubernetes cluster there are a few different ways to run telemetry or security agents. Some agents have a direct dependency on Docker Engine when they run as DaemonSets or directly on nodes.
Why do some telemetry agents communicate with Docker Engine?
Historically, Kubernetes was written to work specifically with Docker Engine. Kubernetes took care of networking and scheduling, relying on Docker Engine for launching and running containers (within Pods) on a node. Some information that is relevant to telemetry, such as a pod name, is only available from Kubernetes components. Other data, such as container metrics, is not the responsibility of the container runtime. Early telemetry agents needed to query the container runtime and Kubernetes to report an accurate picture. Over time, Kubernetes gained the ability to support multiple runtimes, and now supports any runtime that is compatible with the container runtime interface.
Some telemetry agents rely specifically on Docker Engine tooling. For example, an agent
might run a command such as
docker ps
or docker top to list
containers and processes or docker logs
to receive streamed logs. If nodes in your existing cluster use
Docker Engine, and you switch to a different container runtime,
these commands will not work any longer.
Identify DaemonSets that depend on Docker Engine
If a pod wants to make calls to the dockerd running on the node, the pod must either:
- mount the filesystem containing the Docker daemon's privileged socket, as a volume; or
- mount the specific path of the Docker daemon's privileged socket directly, also as a volume.
For example: on COS images, Docker exposes its Unix domain socket at
/var/run/docker.sock This means that the pod spec will include a
hostPath volume mount of /var/run/docker.sock.
Here's a sample shell script to find Pods that have a mount directly mapping the
Docker socket. This script outputs the namespace and name of the pod. You can
remove the grep '/var/run/docker.sock' to review other mounts.
kubectl get pods --all-namespaces \
-o=jsonpath='{range .items[*]}{"\n"}{.metadata.namespace}{":\t"}{.metadata.name}{":\t"}{range .spec.volumes[*]}{.hostPath.path}{", "}{end}{end}' \
| sort \
| grep '/var/run/docker.sock'
Note:
There are alternative ways for a pod to access Docker on the host. For instance, the parent directory/var/run may be mounted instead of the full path (like in this
example).
The script above only detects the most common uses.Detecting Docker dependency from node agents
If your cluster nodes are customized and install additional security and telemetry agents on the node, check with the agent vendor to verify whether it has any dependency on Docker.
Telemetry and security agent vendors
This section is intended to aggregate information about various telemetry and security agents that may have a dependency on container runtimes.
We keep the work in progress version of migration instructions for various telemetry and security agent vendors in Google doc. Please contact the vendor to get up to date instructions for migrating from dockershim.
Migration from dockershim
Aqua
No changes are needed: everything should work seamlessly on the runtime switch.
Datadog
How to migrate: Docker deprecation in Kubernetes The pod that accesses Docker Engine may have a name containing any of:
datadog-agentdatadogdd-agent
Dynatrace
How to migrate: Migrating from Docker-only to generic container metrics in Dynatrace
Containerd support announcement: Get automated full-stack visibility into containerd-based Kubernetes environments
CRI-O support announcement: Get automated full-stack visibility into your CRI-O Kubernetes containers (Beta)
The pod accessing Docker may have name containing:
dynatrace-oneagent
Falco
How to migrate:
Migrate Falco from dockershim Falco supports any CRI-compatible runtime (containerd is used in the default configuration); the documentation explains all details. The pod accessing Docker may have name containing:
falco
Prisma Cloud Compute
Check documentation for Prisma Cloud, under the "Install Prisma Cloud on a CRI (non-Docker) cluster" section. The pod accessing Docker may be named like:
twistlock-defender-ds
SignalFx (Splunk)
The SignalFx Smart Agent (deprecated) uses several different monitors for Kubernetes including
kubernetes-cluster, kubelet-stats/kubelet-metrics, and docker-container-stats.
The kubelet-stats monitor was previously deprecated by the vendor, in favor of kubelet-metrics.
The docker-container-stats monitor is the one affected by dockershim removal.
Do not use the docker-container-stats with container runtimes other than Docker Engine.
How to migrate from dockershim-dependent agent:
- Remove
docker-container-statsfrom the list of configured monitors. Note, keeping this monitor enabled with non-dockershim runtime will result in incorrect metrics being reported when docker is installed on node and no metrics when docker is not installed. - Enable and configure
kubelet-metricsmonitor.
Note:
The set of collected metrics will change. Review your alerting rules and dashboards.The Pod accessing Docker may be named something like:
signalfx-agent
Yahoo Kubectl Flame
Flame does not support container runtimes other than Docker. See https://github.com/yahoo/kubectl-flame/issues/51
4 - Generate Certificates Manually
When using client certificate authentication, you can generate certificates
manually through easyrsa, openssl or cfssl.
easyrsa
easyrsa can manually generate certificates for your cluster.
Download, unpack, and initialize the patched version of
easyrsa3.curl -LO https://dl.k8s.io/easy-rsa/easy-rsa.tar.gz tar xzf easy-rsa.tar.gz cd easy-rsa-master/easyrsa3 ./easyrsa init-pkiGenerate a new certificate authority (CA).
--batchsets automatic mode;--req-cnspecifies the Common Name (CN) for the CA's new root certificate../easyrsa --batch "--req-cn=${MASTER_IP}@`date +%s`" build-ca nopassGenerate server certificate and key.
The argument
--subject-alt-namesets the possible IPs and DNS names the API server will be accessed with. TheMASTER_CLUSTER_IPis usually the first IP from the service CIDR that is specified as the--service-cluster-ip-rangeargument for both the API server and the controller manager component. The argument--daysis used to set the number of days after which the certificate expires. The sample below also assumes that you are usingcluster.localas the default DNS domain name../easyrsa --subject-alt-name="IP:${MASTER_IP},"\ "IP:${MASTER_CLUSTER_IP},"\ "DNS:kubernetes,"\ "DNS:kubernetes.default,"\ "DNS:kubernetes.default.svc,"\ "DNS:kubernetes.default.svc.cluster,"\ "DNS:kubernetes.default.svc.cluster.local" \ --days=10000 \ build-server-full server nopassCopy
pki/ca.crt,pki/issued/server.crt, andpki/private/server.keyto your directory.Fill in and add the following parameters into the API server start parameters:
--client-ca-file=/yourdirectory/ca.crt
--tls-cert-file=/yourdirectory/server.crt
--tls-private-key-file=/yourdirectory/server.key
openssl
openssl can manually generate certificates for your cluster.
Generate a ca.key with 2048bit:
openssl genrsa -out ca.key 2048According to the ca.key generate a ca.crt (use
-daysto set the certificate effective time):openssl req -x509 -new -noenc -key ca.key -subj "/CN=${MASTER_IP}" -days 10000 -out ca.crtGenerate a server.key with 2048bit:
openssl genrsa -out server.key 2048Create a config file for generating a Certificate Signing Request (CSR).
Be sure to substitute the values marked with angle brackets (e.g.
<MASTER_IP>) with real values before saving this to a file (e.g.csr.conf). Note that the value forMASTER_CLUSTER_IPis the service cluster IP for the API server as described in previous subsection. The sample below also assumes that you are usingcluster.localas the default DNS domain name.[ req ] default_bits = 2048 prompt = no default_md = sha256 req_extensions = req_ext distinguished_name = dn [ dn ] C = <country> ST = <state> L = <city> O = <organization> OU = <organization unit> CN = <MASTER_IP> [ req_ext ] subjectAltName = @alt_names [ alt_names ] DNS.1 = kubernetes DNS.2 = kubernetes.default DNS.3 = kubernetes.default.svc DNS.4 = kubernetes.default.svc.cluster DNS.5 = kubernetes.default.svc.cluster.local IP.1 = <MASTER_IP> IP.2 = <MASTER_CLUSTER_IP> [ v3_ext ] authorityKeyIdentifier=keyid,issuer:always basicConstraints=CA:FALSE keyUsage=keyEncipherment,dataEncipherment extendedKeyUsage=serverAuth,clientAuth subjectAltName=@alt_namesGenerate the certificate signing request based on the config file:
openssl req -new -key server.key -out server.csr -config csr.confGenerate the server certificate using the ca.key, ca.crt and server.csr:
openssl x509 -req -in server.csr -CA ca.crt -CAkey ca.key \
    -CAcreateserial -out server.crt -days 10000 \
    -extensions v3_ext -extfile csr.conf -sha256
View the certificate signing request:
openssl req -noout -text -in ./server.csrView the certificate:
openssl x509 -noout -text -in ./server.crtFill in and add the following parameters into the API server start parameters:
--client-ca-file=/yourdirectory/ca.crt
--tls-cert-file=/yourdirectory/server.crt
--tls-private-key-file=/yourdirectory/server.key
cfssl
cfssl is another tool for certificate generation.
Download, unpack and prepare the command line tools as shown below.
Note that you may need to adapt the sample commands based on the hardware architecture and cfssl version you are using.
curl -L https://github.com/cloudflare/cfssl/releases/download/v1.5.0/cfssl_1.5.0_linux_amd64 -o cfssl
chmod +x cfssl
curl -L https://github.com/cloudflare/cfssl/releases/download/v1.5.0/cfssljson_1.5.0_linux_amd64 -o cfssljson
chmod +x cfssljson
curl -L https://github.com/cloudflare/cfssl/releases/download/v1.5.0/cfssl-certinfo_1.5.0_linux_amd64 -o cfssl-certinfo
chmod +x cfssl-certinfo
Create a directory to hold the artifacts and initialize cfssl:
mkdir cert
cd cert
../cfssl print-defaults config > config.json
../cfssl print-defaults csr > csr.json
Create a JSON config file for generating the CA file, for example,
ca-config.json:{ "signing": { "default": { "expiry": "8760h" }, "profiles": { "kubernetes": { "usages": [ "signing", "key encipherment", "server auth", "client auth" ], "expiry": "8760h" } } } }Create a JSON config file for CA certificate signing request (CSR), for example,
ca-csr.json. Be sure to replace the values marked with angle brackets with real values you want to use.{ "CN": "kubernetes", "key": { "algo": "rsa", "size": 2048 }, "names":[{ "C": "<country>", "ST": "<state>", "L": "<city>", "O": "<organization>", "OU": "<organization unit>" }] }Generate CA key (
ca-key.pem) and certificate (ca.pem):../cfssl gencert -initca ca-csr.json | ../cfssljson -bare caCreate a JSON config file for generating keys and certificates for the API server, for example,
server-csr.json. Be sure to replace the values in angle brackets with real values you want to use. The<MASTER_CLUSTER_IP>is the service cluster IP for the API server as described in previous subsection. The sample below also assumes that you are usingcluster.localas the default DNS domain name.{ "CN": "kubernetes", "hosts": [ "127.0.0.1", "<MASTER_IP>", "<MASTER_CLUSTER_IP>", "kubernetes", "kubernetes.default", "kubernetes.default.svc", "kubernetes.default.svc.cluster", "kubernetes.default.svc.cluster.local" ], "key": { "algo": "rsa", "size": 2048 }, "names": [{ "C": "<country>", "ST": "<state>", "L": "<city>", "O": "<organization>", "OU": "<organization unit>" }] }Generate the key and certificate for the API server, which are by default saved into file
server-key.pemandserver.pemrespectively:../cfssl gencert -ca=ca.pem -ca-key=ca-key.pem \ --config=ca-config.json -profile=kubernetes \ server-csr.json | ../cfssljson -bare server
Distributing Self-Signed CA Certificate
A client node may refuse to recognize a self-signed CA certificate as valid. For a non-production deployment, or for a deployment that runs behind a company firewall, you can distribute a self-signed CA certificate to all clients and refresh the local list for valid certificates.
On each client, perform the following operations:
sudo cp ca.crt /usr/local/share/ca-certificates/kubernetes.crt
sudo update-ca-certificates
Updating certificates in /etc/ssl/certs...
1 added, 0 removed; done.
Running hooks in /etc/ca-certificates/update.d....
done.
Certificates API
You can use the certificates.k8s.io API to provision
x509 certificates to use for authentication as documented
in the Managing TLS in a cluster
task page.
5 - Manage Memory, CPU, and API Resources
5.1 - Configure Default Memory Requests and Limits for a Namespace
This page shows how to configure default memory requests and limits for a namespace.
A Kubernetes cluster can be divided into namespaces. Once you have a namespace that has a default memory limit, and you then try to create a Pod with a container that does not specify its own memory limit, then the control plane assigns the default memory limit to that container.
Kubernetes assigns a default memory request under certain conditions that are explained later in this topic.
Before you begin
You need to have a Kubernetes cluster, and the kubectl command-line tool must be configured to communicate with your cluster. It is recommended to run this tutorial on a cluster with at least two nodes that are not acting as control plane hosts. If you do not already have a cluster, you can create one by using minikube or you can use one of these Kubernetes playgrounds:
You must have access to create namespaces in your cluster.
Each node in your cluster must have at least 2 GiB of memory.
Create a namespace
Create a namespace so that the resources you create in this exercise are isolated from the rest of your cluster.
kubectl create namespace default-mem-example
Create a LimitRange and a Pod
Here's a manifest for an example LimitRange. The manifest specifies a default memory request and a default memory limit.
apiVersion: v1
kind: LimitRange
metadata:
  name: mem-limit-range
spec:
  limits:
  - default:
      memory: 512Mi
    defaultRequest:
      memory: 256Mi
    type: Container
Create the LimitRange in the default-mem-example namespace:
kubectl apply -f https://k8s.io/examples/admin/resource/memory-defaults.yaml --namespace=default-mem-example
Now if you create a Pod in the default-mem-example namespace, and any container within that Pod does not specify its own values for memory request and memory limit, then the control plane applies default values: a memory request of 256MiB and a memory limit of 512MiB.
Here's an example manifest for a Pod that has one container. The container does not specify a memory request and limit.
apiVersion: v1
kind: Pod
metadata:
  name: default-mem-demo
spec:
  containers:
  - name: default-mem-demo-ctr
    image: nginx
Create the Pod.
kubectl apply -f https://k8s.io/examples/admin/resource/memory-defaults-pod.yaml --namespace=default-mem-example
View detailed information about the Pod:
kubectl get pod default-mem-demo --output=yaml --namespace=default-mem-example
The output shows that the Pod's container has a memory request of 256 MiB and a memory limit of 512 MiB. These are the default values specified by the LimitRange.
containers:
- image: nginx
  imagePullPolicy: Always
  name: default-mem-demo-ctr
  resources:
    limits:
      memory: 512Mi
    requests:
      memory: 256Mi
Delete your Pod:
kubectl delete pod default-mem-demo --namespace=default-mem-example
What if you specify a container's limit, but not its request?
Here's a manifest for a Pod that has one container. The container specifies a memory limit, but not a request:
apiVersion: v1
kind: Pod
metadata:
  name: default-mem-demo-2
spec:
  containers:
  - name: default-mem-demo-2-ctr
    image: nginx
    resources:
      limits:
        memory: "1Gi"
Create the Pod:
kubectl apply -f https://k8s.io/examples/admin/resource/memory-defaults-pod-2.yaml --namespace=default-mem-example
View detailed information about the Pod:
kubectl get pod default-mem-demo-2 --output=yaml --namespace=default-mem-example
The output shows that the container's memory request is set to match its memory limit. Notice that the container was not assigned the default memory request value of 256Mi.
resources:
  limits:
    memory: 1Gi
  requests:
    memory: 1Gi
What if you specify a container's request, but not its limit?
Here's a manifest for a Pod that has one container. The container specifies a memory request, but not a limit:
apiVersion: v1
kind: Pod
metadata:
  name: default-mem-demo-3
spec:
  containers:
  - name: default-mem-demo-3-ctr
    image: nginx
    resources:
      requests:
        memory: "128Mi"
Create the Pod:
kubectl apply -f https://k8s.io/examples/admin/resource/memory-defaults-pod-3.yaml --namespace=default-mem-example
View the Pod's specification:
kubectl get pod default-mem-demo-3 --output=yaml --namespace=default-mem-example
The output shows that the container's memory request is set to the value specified in the container's manifest. The container is limited to use no more than 512MiB of memory, which matches the default memory limit for the namespace.
resources:
  limits:
    memory: 512Mi
  requests:
    memory: 128Mi
Note:
ALimitRange does not check the consistency of the default values it applies. This means that a default value for the limit that is set by LimitRange may be less than the request value specified for the container in the spec that a client submits to the API server. If that happens, the final Pod will not be scheduleable.
See Constraints on resource limits and requests for more details.Motivation for default memory limits and requests
If your namespace has a memory resource quota configured, it is helpful to have a default value in place for memory limit. Here are three of the restrictions that a resource quota imposes on a namespace:
- For every Pod that runs in the namespace, the Pod and each of its containers must have a memory limit. (If you specify a memory limit for every container in a Pod, Kubernetes can infer the Pod-level memory limit by adding up the limits for its containers).
- Memory limits apply a resource reservation on the node where the Pod in question is scheduled. The total amount of memory reserved for all Pods in the namespace must not exceed a specified limit.
- The total amount of memory actually used by all Pods in the namespace must also not exceed a specified limit.
When you add a LimitRange:
If any Pod in that namespace that includes a container does not specify its own memory limit, the control plane applies the default memory limit to that container, and the Pod can be allowed to run in a namespace that is restricted by a memory ResourceQuota.
Clean up
Delete your namespace:
kubectl delete namespace default-mem-example
What's next
For cluster administrators
Configure Minimum and Maximum Memory Constraints for a Namespace
Configure Minimum and Maximum CPU Constraints for a Namespace
For app developers
5.2 - Configure Default CPU Requests and Limits for a Namespace
This page shows how to configure default CPU requests and limits for a namespace.
A Kubernetes cluster can be divided into namespaces. If you create a Pod within a namespace that has a default CPU limit, and any container in that Pod does not specify its own CPU limit, then the control plane assigns the default CPU limit to that container.
Kubernetes assigns a default CPU request, but only under certain conditions that are explained later in this page.
Before you begin
You need to have a Kubernetes cluster, and the kubectl command-line tool must be configured to communicate with your cluster. It is recommended to run this tutorial on a cluster with at least two nodes that are not acting as control plane hosts. If you do not already have a cluster, you can create one by using minikube or you can use one of these Kubernetes playgrounds:
You must have access to create namespaces in your cluster.
If you're not already familiar with what Kubernetes means by 1.0 CPU, read meaning of CPU.
Create a namespace
Create a namespace so that the resources you create in this exercise are isolated from the rest of your cluster.
kubectl create namespace default-cpu-example
Create a LimitRange and a Pod
Here's a manifest for an example LimitRange. The manifest specifies a default CPU request and a default CPU limit.
apiVersion: v1
kind: LimitRange
metadata:
  name: cpu-limit-range
spec:
  limits:
  - default:
      cpu: 1
    defaultRequest:
      cpu: 0.5
    type: Container
Create the LimitRange in the default-cpu-example namespace:
kubectl apply -f https://k8s.io/examples/admin/resource/cpu-defaults.yaml --namespace=default-cpu-example
Now if you create a Pod in the default-cpu-example namespace, and any container in that Pod does not specify its own values for CPU request and CPU limit, then the control plane applies default values: a CPU request of 0.5 and a default CPU limit of 1.
Here's a manifest for a Pod that has one container. The container does not specify a CPU request and limit.
apiVersion: v1
kind: Pod
metadata:
  name: default-cpu-demo
spec:
  containers:
  - name: default-cpu-demo-ctr
    image: nginx
Create the Pod.
kubectl apply -f https://k8s.io/examples/admin/resource/cpu-defaults-pod.yaml --namespace=default-cpu-example
View the Pod's specification:
kubectl get pod default-cpu-demo --output=yaml --namespace=default-cpu-example
The output shows that the Pod's only container has a CPU request of 500m cpu
(which you can read as “500 millicpu”), and a CPU limit of 1 cpu.
These are the default values specified by the LimitRange.
containers:
- image: nginx
  imagePullPolicy: Always
  name: default-cpu-demo-ctr
  resources:
    limits:
      cpu: "1"
    requests:
      cpu: 500m
What if you specify a container's limit, but not its request?
Here's a manifest for a Pod that has one container. The container specifies a CPU limit, but not a request:
apiVersion: v1
kind: Pod
metadata:
  name: default-cpu-demo-2
spec:
  containers:
  - name: default-cpu-demo-2-ctr
    image: nginx
    resources:
      limits:
        cpu: "1"
Create the Pod:
kubectl apply -f https://k8s.io/examples/admin/resource/cpu-defaults-pod-2.yaml --namespace=default-cpu-example
View the specification of the Pod that you created:
kubectl get pod default-cpu-demo-2 --output=yaml --namespace=default-cpu-example
The output shows that the container's CPU request is set to match its CPU limit.
Notice that the container was not assigned the default CPU request value of 0.5 cpu:
resources:
  limits:
    cpu: "1"
  requests:
    cpu: "1"
What if you specify a container's request, but not its limit?
Here's an example manifest for a Pod that has one container. The container specifies a CPU request, but not a limit:
apiVersion: v1
kind: Pod
metadata:
  name: default-cpu-demo-3
spec:
  containers:
  - name: default-cpu-demo-3-ctr
    image: nginx
    resources:
      requests:
        cpu: "0.75"
Create the Pod:
kubectl apply -f https://k8s.io/examples/admin/resource/cpu-defaults-pod-3.yaml --namespace=default-cpu-example
View the specification of the Pod that you created:
kubectl get pod default-cpu-demo-3 --output=yaml --namespace=default-cpu-example
The output shows that the container's CPU request is set to the value you specified at
the time you created the Pod (in other words: it matches the manifest).
However, the same container's CPU limit is set to 1 cpu, which is the default CPU limit
for that namespace.
resources:
  limits:
    cpu: "1"
  requests:
    cpu: 750m
Motivation for default CPU limits and requests
If your namespace has a CPU resource quota configured, it is helpful to have a default value in place for CPU limit. Here are two of the restrictions that a CPU resource quota imposes on a namespace:
- For every Pod that runs in the namespace, each of its containers must have a CPU limit.
- CPU limits apply a resource reservation on the node where the Pod in question is scheduled. The total amount of CPU that is reserved for use by all Pods in the namespace must not exceed a specified limit.
When you add a LimitRange:
If any Pod in that namespace that includes a container does not specify its own CPU limit, the control plane applies the default CPU limit to that container, and the Pod can be allowed to run in a namespace that is restricted by a CPU ResourceQuota.
Clean up
Delete your namespace:
kubectl delete namespace default-cpu-example
What's next
For cluster administrators
Configure Default Memory Requests and Limits for a Namespace
Configure Minimum and Maximum Memory Constraints for a Namespace
Configure Minimum and Maximum CPU Constraints for a Namespace
For app developers
5.3 - Configure Minimum and Maximum Memory Constraints for a Namespace
This page shows how to set minimum and maximum values for memory used by containers running in a namespace. You specify minimum and maximum memory values in a LimitRange object. If a Pod does not meet the constraints imposed by the LimitRange, it cannot be created in the namespace.
Before you begin
You need to have a Kubernetes cluster, and the kubectl command-line tool must be configured to communicate with your cluster. It is recommended to run this tutorial on a cluster with at least two nodes that are not acting as control plane hosts. If you do not already have a cluster, you can create one by using minikube or you can use one of these Kubernetes playgrounds:
You must have access to create namespaces in your cluster.
Each node in your cluster must have at least 1 GiB of memory available for Pods.
Create a namespace
Create a namespace so that the resources you create in this exercise are isolated from the rest of your cluster.
kubectl create namespace constraints-mem-example
Create a LimitRange and a Pod
Here's an example manifest for a LimitRange:
apiVersion: v1
kind: LimitRange
metadata:
  name: mem-min-max-demo-lr
spec:
  limits:
  - max:
      memory: 1Gi
    min:
      memory: 500Mi
    type: Container
Create the LimitRange:
kubectl apply -f https://k8s.io/examples/admin/resource/memory-constraints.yaml --namespace=constraints-mem-example
View detailed information about the LimitRange:
kubectl get limitrange mem-min-max-demo-lr --namespace=constraints-mem-example --output=yaml
The output shows the minimum and maximum memory constraints as expected. But notice that even though you didn't specify default values in the configuration file for the LimitRange, they were created automatically.
  limits:
  - default:
      memory: 1Gi
    defaultRequest:
      memory: 1Gi
    max:
      memory: 1Gi
    min:
      memory: 500Mi
    type: Container
Now whenever you define a Pod within the constraints-mem-example namespace, Kubernetes performs these steps:
If any container in that Pod does not specify its own memory request and limit, the control plane assigns the default memory request and limit to that container.
Verify that every container in that Pod requests at least 500 MiB of memory.
Verify that every container in that Pod requests no more than 1024 MiB (1 GiB) of memory.
Here's a manifest for a Pod that has one container. Within the Pod spec, the sole container specifies a memory request of 600 MiB and a memory limit of 800 MiB. These satisfy the minimum and maximum memory constraints imposed by the LimitRange.
apiVersion: v1
kind: Pod
metadata:
  name: constraints-mem-demo
spec:
  containers:
  - name: constraints-mem-demo-ctr
    image: nginx
    resources:
      limits:
        memory: "800Mi"
      requests:
        memory: "600Mi"
Create the Pod:
kubectl apply -f https://k8s.io/examples/admin/resource/memory-constraints-pod.yaml --namespace=constraints-mem-example
Verify that the Pod is running and that its container is healthy:
kubectl get pod constraints-mem-demo --namespace=constraints-mem-example
View detailed information about the Pod:
kubectl get pod constraints-mem-demo --output=yaml --namespace=constraints-mem-example
The output shows that the container within that Pod has a memory request of 600 MiB and a memory limit of 800 MiB. These satisfy the constraints imposed by the LimitRange for this namespace:
resources:
  limits:
     memory: 800Mi
  requests:
    memory: 600Mi
Delete your Pod:
kubectl delete pod constraints-mem-demo --namespace=constraints-mem-example
Attempt to create a Pod that exceeds the maximum memory constraint
Here's a manifest for a Pod that has one container. The container specifies a memory request of 800 MiB and a memory limit of 1.5 GiB.
apiVersion: v1
kind: Pod
metadata:
  name: constraints-mem-demo-2
spec:
  containers:
  - name: constraints-mem-demo-2-ctr
    image: nginx
    resources:
      limits:
        memory: "1.5Gi"
      requests:
        memory: "800Mi"
Attempt to create the Pod:
kubectl apply -f https://k8s.io/examples/admin/resource/memory-constraints-pod-2.yaml --namespace=constraints-mem-example
The output shows that the Pod does not get created, because it defines a container that requests more memory than is allowed:
Error from server (Forbidden): error when creating "examples/admin/resource/memory-constraints-pod-2.yaml":
pods "constraints-mem-demo-2" is forbidden: maximum memory usage per Container is 1Gi, but limit is 1536Mi.
Attempt to create a Pod that does not meet the minimum memory request
Here's a manifest for a Pod that has one container. That container specifies a memory request of 100 MiB and a memory limit of 800 MiB.
apiVersion: v1
kind: Pod
metadata:
  name: constraints-mem-demo-3
spec:
  containers:
  - name: constraints-mem-demo-3-ctr
    image: nginx
    resources:
      limits:
        memory: "800Mi"
      requests:
        memory: "100Mi"
Attempt to create the Pod:
kubectl apply -f https://k8s.io/examples/admin/resource/memory-constraints-pod-3.yaml --namespace=constraints-mem-example
The output shows that the Pod does not get created, because it defines a container that requests less memory than the enforced minimum:
Error from server (Forbidden): error when creating "examples/admin/resource/memory-constraints-pod-3.yaml":
pods "constraints-mem-demo-3" is forbidden: minimum memory usage per Container is 500Mi, but request is 100Mi.
Create a Pod that does not specify any memory request or limit
Here's a manifest for a Pod that has one container. The container does not specify a memory request, and it does not specify a memory limit.
apiVersion: v1
kind: Pod
metadata:
  name: constraints-mem-demo-4
spec:
  containers:
  - name: constraints-mem-demo-4-ctr
    image: nginx
Create the Pod:
kubectl apply -f https://k8s.io/examples/admin/resource/memory-constraints-pod-4.yaml --namespace=constraints-mem-example
View detailed information about the Pod:
kubectl get pod constraints-mem-demo-4 --namespace=constraints-mem-example --output=yaml
The output shows that the Pod's only container has a memory request of 1 GiB and a memory limit of 1 GiB. How did that container get those values?
resources:
  limits:
    memory: 1Gi
  requests:
    memory: 1Gi
Because your Pod did not define any memory request and limit for that container, the cluster applied a default memory request and limit from the LimitRange.
This means that the definition of that Pod shows those values. You can check it using
kubectl describe:
# Look for the "Requests:" section of the output
kubectl describe pod constraints-mem-demo-4 --namespace=constraints-mem-example
At this point, your Pod might be running or it might not be running. Recall that a prerequisite for this task is that your Nodes have at least 1 GiB of memory. If each of your Nodes has only 1 GiB of memory, then there is not enough allocatable memory on any Node to accommodate a memory request of 1 GiB. If you happen to be using Nodes with 2 GiB of memory, then you probably have enough space to accommodate the 1 GiB request.
Delete your Pod:
kubectl delete pod constraints-mem-demo-4 --namespace=constraints-mem-example
Enforcement of minimum and maximum memory constraints
The maximum and minimum memory constraints imposed on a namespace by a LimitRange are enforced only when a Pod is created or updated. If you change the LimitRange, it does not affect Pods that were created previously.
Note:
When using in-place Pod resize, the memory constraints are also enforced. If a resize would cause the Pod's memory values to violate the LimitRange constraints (either exceeding the maximum or falling below the minimum), the resize will be rejected and the Pod's resources remain at their previous values.Motivation for minimum and maximum memory constraints
As a cluster administrator, you might want to impose restrictions on the amount of memory that Pods can use. For example:
Each Node in a cluster has 2 GiB of memory. You do not want to accept any Pod that requests more than 2 GiB of memory, because no Node in the cluster can support the request.
A cluster is shared by your production and development departments. You want to allow production workloads to consume up to 8 GiB of memory, but you want development workloads to be limited to 512 MiB. You create separate namespaces for production and development, and you apply memory constraints to each namespace.
Clean up
Delete your namespace:
kubectl delete namespace constraints-mem-example
What's next
For cluster administrators
Configure Default Memory Requests and Limits for a Namespace
Configure Minimum and Maximum CPU Constraints for a Namespace
For app developers
5.4 - Configure Minimum and Maximum CPU Constraints for a Namespace
This page shows how to set minimum and maximum values for the CPU resources used by containers and Pods in a namespace. You specify minimum and maximum CPU values in a LimitRange object. If a Pod does not meet the constraints imposed by the LimitRange, it cannot be created in the namespace.
Before you begin
You need to have a Kubernetes cluster, and the kubectl command-line tool must be configured to communicate with your cluster. It is recommended to run this tutorial on a cluster with at least two nodes that are not acting as control plane hosts. If you do not already have a cluster, you can create one by using minikube or you can use one of these Kubernetes playgrounds:
You must have access to create namespaces in your cluster.
Each node in your cluster must have at least 1.0 CPU available for Pods. See meaning of CPU to learn what Kubernetes means by “1 CPU”.
Create a namespace
Create a namespace so that the resources you create in this exercise are isolated from the rest of your cluster.
kubectl create namespace constraints-cpu-example
Create a LimitRange and a Pod
Here's a manifest for an example LimitRange:
apiVersion: v1
kind: LimitRange
metadata:
  name: cpu-min-max-demo-lr
spec:
  limits:
  - max:
      cpu: "800m"
    min:
      cpu: "200m"
    type: Container
Create the LimitRange:
kubectl apply -f https://k8s.io/examples/admin/resource/cpu-constraints.yaml --namespace=constraints-cpu-example
View detailed information about the LimitRange:
kubectl get limitrange cpu-min-max-demo-lr --output=yaml --namespace=constraints-cpu-example
The output shows the minimum and maximum CPU constraints as expected. But notice that even though you didn't specify default values in the configuration file for the LimitRange, they were created automatically.
limits:
- default:
    cpu: 800m
  defaultRequest:
    cpu: 800m
  max:
    cpu: 800m
  min:
    cpu: 200m
  type: Container
Now whenever you create a Pod in the constraints-cpu-example namespace (or some other client of the Kubernetes API creates an equivalent Pod), Kubernetes performs these steps:
If any container in that Pod does not specify its own CPU request and limit, the control plane assigns the default CPU request and limit to that container.
Verify that every container in that Pod specifies a CPU request that is greater than or equal to 200 millicpu.
Verify that every container in that Pod specifies a CPU limit that is less than or equal to 800 millicpu.
Note:
When creating aLimitRange object, you can specify limits on huge-pages
or GPUs as well. However, when both default and defaultRequest are specified
on these resources, the two values must be the same.Here's a manifest for a Pod that has one container. The container manifest specifies a CPU request of 500 millicpu and a CPU limit of 800 millicpu. These satisfy the minimum and maximum CPU constraints imposed by the LimitRange for this namespace.
apiVersion: v1
kind: Pod
metadata:
  name: constraints-cpu-demo
spec:
  containers:
  - name: constraints-cpu-demo-ctr
    image: nginx
    resources:
      limits:
        cpu: "800m"
      requests:
        cpu: "500m"
Create the Pod:
kubectl apply -f https://k8s.io/examples/admin/resource/cpu-constraints-pod.yaml --namespace=constraints-cpu-example
Verify that the Pod is running and that its container is healthy:
kubectl get pod constraints-cpu-demo --namespace=constraints-cpu-example
View detailed information about the Pod:
kubectl get pod constraints-cpu-demo --output=yaml --namespace=constraints-cpu-example
The output shows that the Pod's only container has a CPU request of 500 millicpu and CPU limit of 800 millicpu. These satisfy the constraints imposed by the LimitRange.
resources:
  limits:
    cpu: 800m
  requests:
    cpu: 500m
Delete the Pod
kubectl delete pod constraints-cpu-demo --namespace=constraints-cpu-example
Attempt to create a Pod that exceeds the maximum CPU constraint
Here's a manifest for a Pod that has one container. The container specifies a CPU request of 500 millicpu and a cpu limit of 1.5 cpu.
apiVersion: v1
kind: Pod
metadata:
  name: constraints-cpu-demo-2
spec:
  containers:
  - name: constraints-cpu-demo-2-ctr
    image: nginx
    resources:
      limits:
        cpu: "1.5"
      requests:
        cpu: "500m"
Attempt to create the Pod:
kubectl apply -f https://k8s.io/examples/admin/resource/cpu-constraints-pod-2.yaml --namespace=constraints-cpu-example
The output shows that the Pod does not get created, because it defines an unacceptable container. That container is not acceptable because it specifies a CPU limit that is too large:
Error from server (Forbidden): error when creating "examples/admin/resource/cpu-constraints-pod-2.yaml":
pods "constraints-cpu-demo-2" is forbidden: maximum cpu usage per Container is 800m, but limit is 1500m.
Attempt to create a Pod that does not meet the minimum CPU request
Here's a manifest for a Pod that has one container. The container specifies a CPU request of 100 millicpu and a CPU limit of 800 millicpu.
apiVersion: v1
kind: Pod
metadata:
  name: constraints-cpu-demo-3
spec:
  containers:
  - name: constraints-cpu-demo-3-ctr
    image: nginx
    resources:
      limits:
        cpu: "800m"
      requests:
        cpu: "100m"
Attempt to create the Pod:
kubectl apply -f https://k8s.io/examples/admin/resource/cpu-constraints-pod-3.yaml --namespace=constraints-cpu-example
The output shows that the Pod does not get created, because it defines an unacceptable container. That container is not acceptable because it specifies a CPU request that is lower than the enforced minimum:
Error from server (Forbidden): error when creating "examples/admin/resource/cpu-constraints-pod-3.yaml":
pods "constraints-cpu-demo-3" is forbidden: minimum cpu usage per Container is 200m, but request is 100m.
Create a Pod that does not specify any CPU request or limit
Here's a manifest for a Pod that has one container. The container does not specify a CPU request, nor does it specify a CPU limit.
apiVersion: v1
kind: Pod
metadata:
  name: constraints-cpu-demo-4
spec:
  containers:
  - name: constraints-cpu-demo-4-ctr
    image: vish/stress
Create the Pod:
kubectl apply -f https://k8s.io/examples/admin/resource/cpu-constraints-pod-4.yaml --namespace=constraints-cpu-example
View detailed information about the Pod:
kubectl get pod constraints-cpu-demo-4 --namespace=constraints-cpu-example --output=yaml
The output shows that the Pod's single container has a CPU request of 800 millicpu and a CPU limit of 800 millicpu. How did that container get those values?
resources:
  limits:
    cpu: 800m
  requests:
    cpu: 800m
Because that container did not specify its own CPU request and limit, the control plane applied the default CPU request and limit from the LimitRange for this namespace.
At this point, your Pod may or may not be running. Recall that a prerequisite for this task is that your Nodes must have at least 1 CPU available for use. If each of your Nodes has only 1 CPU, then there might not be enough allocatable CPU on any Node to accommodate a request of 800 millicpu. If you happen to be using Nodes with 2 CPU, then you probably have enough CPU to accommodate the 800 millicpu request.
Delete your Pod:
kubectl delete pod constraints-cpu-demo-4 --namespace=constraints-cpu-example
Enforcement of minimum and maximum CPU constraints
The maximum and minimum CPU constraints imposed on a namespace by a LimitRange are enforced only when a Pod is created or updated. If you change the LimitRange, it does not affect Pods that were created previously.
Note:
When using in-place Pod resize, the CPU constraints are also enforced. If a resize would cause the Pod's CPU values to violate the LimitRange constraints (either exceeding the maximum or falling below the minimum), the resize will be rejected and the Pod's resources remain at their previous values.Motivation for minimum and maximum CPU constraints
As a cluster administrator, you might want to impose restrictions on the CPU resources that Pods can use. For example:
Each Node in a cluster has 2 CPU. You do not want to accept any Pod that requests more than 2 CPU, because no Node in the cluster can support the request.
A cluster is shared by your production and development departments. You want to allow production workloads to consume up to 3 CPU, but you want development workloads to be limited to 1 CPU. You create separate namespaces for production and development, and you apply CPU constraints to each namespace.
Clean up
Delete your namespace:
kubectl delete namespace constraints-cpu-example
What's next
For cluster administrators
Configure Default Memory Requests and Limits for a Namespace
Configure Minimum and Maximum Memory Constraints for a Namespace
For app developers
5.5 - Configure Memory and CPU Quotas for a Namespace
This page shows how to set quotas for the total amount memory and CPU that can be used by all Pods running in a namespace. You specify quotas in a ResourceQuota object.
Before you begin
You need to have a Kubernetes cluster, and the kubectl command-line tool must be configured to communicate with your cluster. It is recommended to run this tutorial on a cluster with at least two nodes that are not acting as control plane hosts. If you do not already have a cluster, you can create one by using minikube or you can use one of these Kubernetes playgrounds:
You must have access to create namespaces in your cluster.
Each node in your cluster must have at least 1 GiB of memory.
Create a namespace
Create a namespace so that the resources you create in this exercise are isolated from the rest of your cluster.
kubectl create namespace quota-mem-cpu-example
Create a ResourceQuota
Here is a manifest for an example ResourceQuota:
apiVersion: v1
kind: ResourceQuota
metadata:
  name: mem-cpu-demo
spec:
  hard:
    requests.cpu: "1"
    requests.memory: 1Gi
    limits.cpu: "2"
    limits.memory: 2Gi
Create the ResourceQuota:
kubectl apply -f https://k8s.io/examples/admin/resource/quota-mem-cpu.yaml --namespace=quota-mem-cpu-example
View detailed information about the ResourceQuota:
kubectl get resourcequota mem-cpu-demo --namespace=quota-mem-cpu-example --output=yaml
The ResourceQuota places these requirements on the quota-mem-cpu-example namespace:
- For every Pod in the namespace, each container must have a memory request, memory limit, cpu request, and cpu limit.
- The memory request total for all Pods in that namespace must not exceed 1 GiB.
- The memory limit total for all Pods in that namespace must not exceed 2 GiB.
- The CPU request total for all Pods in that namespace must not exceed 1 cpu.
- The CPU limit total for all Pods in that namespace must not exceed 2 cpu.
See meaning of CPU to learn what Kubernetes means by “1 CPU”.
Create a Pod
Here is a manifest for an example Pod:
apiVersion: v1
kind: Pod
metadata:
  name: quota-mem-cpu-demo
spec:
  containers:
  - name: quota-mem-cpu-demo-ctr
    image: nginx
    resources:
      limits:
        memory: "800Mi"
        cpu: "800m"
      requests:
        memory: "600Mi"
        cpu: "400m"
Create the Pod:
kubectl apply -f https://k8s.io/examples/admin/resource/quota-mem-cpu-pod.yaml --namespace=quota-mem-cpu-example
Verify that the Pod is running and that its (only) container is healthy:
kubectl get pod quota-mem-cpu-demo --namespace=quota-mem-cpu-example
Once again, view detailed information about the ResourceQuota:
kubectl get resourcequota mem-cpu-demo --namespace=quota-mem-cpu-example --output=yaml
The output shows the quota along with how much of the quota has been used. You can see that the memory and CPU requests and limits for your Pod do not exceed the quota.
status:
  hard:
    limits.cpu: "2"
    limits.memory: 2Gi
    requests.cpu: "1"
    requests.memory: 1Gi
  used:
    limits.cpu: 800m
    limits.memory: 800Mi
    requests.cpu: 400m
    requests.memory: 600Mi
If you have the jq tool, you can also query (using JSONPath)
for just the used values, and pretty-print that that of the output. For example:
kubectl get resourcequota mem-cpu-demo --namespace=quota-mem-cpu-example -o jsonpath='{ .status.used }' | jq .
Attempt to create a second Pod
Here is a manifest for a second Pod:
apiVersion: v1
kind: Pod
metadata:
  name: quota-mem-cpu-demo-2
spec:
  containers:
  - name: quota-mem-cpu-demo-2-ctr
    image: redis
    resources:
      limits:
        memory: "1Gi"
        cpu: "800m"
      requests:
        memory: "700Mi"
        cpu: "400m"
In the manifest, you can see that the Pod has a memory request of 700 MiB. Notice that the sum of the used memory request and this new memory request exceeds the memory request quota: 600 MiB + 700 MiB > 1 GiB.
Attempt to create the Pod:
kubectl apply -f https://k8s.io/examples/admin/resource/quota-mem-cpu-pod-2.yaml --namespace=quota-mem-cpu-example
The second Pod does not get created. The output shows that creating the second Pod would cause the memory request total to exceed the memory request quota.
Error from server (Forbidden): error when creating "examples/admin/resource/quota-mem-cpu-pod-2.yaml":
pods "quota-mem-cpu-demo-2" is forbidden: exceeded quota: mem-cpu-demo,
requested: requests.memory=700Mi,used: requests.memory=600Mi, limited: requests.memory=1Gi
Discussion
As you have seen in this exercise, you can use a ResourceQuota to restrict the memory request total for all Pods running in a namespace. You can also restrict the totals for memory limit, cpu request, and cpu limit.
Instead of managing total resource use within a namespace, you might want to restrict individual Pods, or the containers in those Pods. To achieve that kind of limiting, use a LimitRange.
Note:
When using in-place Pod resize, ResourceQuota enforcement applies to the resized values. If a resize would cause the namespace to exceed its quota limits, the resize is rejected and the Pod's resources remain unchanged.Clean up
Delete your namespace:
kubectl delete namespace quota-mem-cpu-example
What's next
For cluster administrators
Configure Default Memory Requests and Limits for a Namespace
Configure Minimum and Maximum Memory Constraints for a Namespace
Configure Minimum and Maximum CPU Constraints for a Namespace
For app developers
5.6 - Configure a Pod Quota for a Namespace
This page shows how to set a quota for the total number of Pods that can run in a Namespace. You specify quotas in a ResourceQuota object.
Before you begin
You need to have a Kubernetes cluster, and the kubectl command-line tool must be configured to communicate with your cluster. It is recommended to run this tutorial on a cluster with at least two nodes that are not acting as control plane hosts. If you do not already have a cluster, you can create one by using minikube or you can use one of these Kubernetes playgrounds:
You must have access to create namespaces in your cluster.
Create a namespace
Create a namespace so that the resources you create in this exercise are isolated from the rest of your cluster.
kubectl create namespace quota-pod-example
Create a ResourceQuota
Here is an example manifest for a ResourceQuota:
apiVersion: v1
kind: ResourceQuota
metadata:
  name: pod-demo
spec:
  hard:
    pods: "2"
Create the ResourceQuota:
kubectl apply -f https://k8s.io/examples/admin/resource/quota-pod.yaml --namespace=quota-pod-example
View detailed information about the ResourceQuota:
kubectl get resourcequota pod-demo --namespace=quota-pod-example --output=yaml
The output shows that the namespace has a quota of two Pods, and that currently there are no Pods; that is, none of the quota is used.
spec:
  hard:
    pods: "2"
status:
  hard:
    pods: "2"
  used:
    pods: "0"
Here is an example manifest for a Deployment:
apiVersion: apps/v1
kind: Deployment
metadata:
  name: pod-quota-demo
spec:
  selector:
    matchLabels:
      purpose: quota-demo
  replicas: 3
  template:
    metadata:
      labels:
        purpose: quota-demo
    spec:
      containers:
      - name: pod-quota-demo
        image: nginx
In that manifest, replicas: 3 tells Kubernetes to attempt to create three new Pods, all
running the same application.
Create the Deployment:
kubectl apply -f https://k8s.io/examples/admin/resource/quota-pod-deployment.yaml --namespace=quota-pod-example
View detailed information about the Deployment:
kubectl get deployment pod-quota-demo --namespace=quota-pod-example --output=yaml
The output shows that even though the Deployment specifies three replicas, only two Pods were created because of the quota you defined earlier:
spec:
  ...
  replicas: 3
...
status:
  availableReplicas: 2
...
lastUpdateTime: 2021-04-02T20:57:05Z
    message: 'unable to create pods: pods "pod-quota-demo-1650323038-" is forbidden:
      exceeded quota: pod-demo, requested: pods=1, used: pods=2, limited: pods=2'
Choice of resource
In this task you have defined a ResourceQuota that limited the total number of Pods, but you could also limit the total number of other kinds of object. For example, you might decide to limit how many CronJobs that can live in a single namespace.
Clean up
Delete your namespace:
kubectl delete namespace quota-pod-example
What's next
For cluster administrators
Configure Default Memory Requests and Limits for a Namespace
Configure Minimum and Maximum Memory Constraints for a Namespace
Configure Minimum and Maximum CPU Constraints for a Namespace
For app developers
6 - Install a Network Policy Provider
6.1 - Use Antrea for NetworkPolicy
This page shows how to install and use Antrea CNI plugin on Kubernetes. For background on Project Antrea, read the Introduction to Antrea.
Before you begin
You need to have a Kubernetes cluster. Follow the kubeadm getting started guide to bootstrap one.
Deploying Antrea with kubeadm
Follow Getting Started guide to deploy Antrea for kubeadm.
What's next
Once your cluster is running, you can follow the Declare Network Policy to try out Kubernetes NetworkPolicy.
6.2 - Use Calico for NetworkPolicy
This page shows a couple of quick ways to create a Calico cluster on Kubernetes.
Before you begin
Decide whether you want to deploy a cloud or local cluster.
Creating a Calico cluster with Google Kubernetes Engine (GKE)
Prerequisite: gcloud.
To launch a GKE cluster with Calico, include the
--enable-network-policyflag.Syntax
gcloud container clusters create [CLUSTER_NAME] --enable-network-policyExample
gcloud container clusters create my-calico-cluster --enable-network-policyTo verify the deployment, use the following command.
kubectl get pods --namespace=kube-systemThe Calico pods begin with
calico. Check to make sure each one has a status ofRunning.
Creating a local Calico cluster with kubeadm
To get a local single-host Calico cluster in fifteen minutes using kubeadm, refer to the Calico Quickstart.
What's next
Once your cluster is running, you can follow the Declare Network Policy to try out Kubernetes NetworkPolicy.
6.3 - Use Cilium for NetworkPolicy
This page shows how to use Cilium for NetworkPolicy.
For background on Cilium, read the Introduction to Cilium.
Before you begin
You need to have a Kubernetes cluster, and the kubectl command-line tool must be configured to communicate with your cluster. It is recommended to run this tutorial on a cluster with at least two nodes that are not acting as control plane hosts. If you do not already have a cluster, you can create one by using minikube or you can use one of these Kubernetes playgrounds:
To check the version, enter kubectl version.
Deploying Cilium on Minikube for Basic Testing
To get familiar with Cilium easily you can follow the Cilium Kubernetes Getting Started Guide to perform a basic DaemonSet installation of Cilium in minikube.
To start minikube, which requires version v1.5.2 or higher, run it with the following arguments:
minikube version
minikube version: v1.5.2
minikube start --network-plugin=cni
For minikube you can install Cilium using its CLI tool. To do so, first download the latest version of the CLI with the following command:
curl -LO https://github.com/cilium/cilium-cli/releases/latest/download/cilium-linux-amd64.tar.gz
Then extract the downloaded file to your /usr/local/bin directory with the following command:
sudo tar xzvfC cilium-linux-amd64.tar.gz /usr/local/bin
rm cilium-linux-amd64.tar.gz
After running the above commands, you can now install Cilium with the following command:
cilium install
Cilium will then automatically detect the cluster configuration and create and install the appropriate components for a successful installation. The components are:
- Certificate Authority (CA) in Secret
cilium-caand certificates for Hubble (Cilium's observability layer). - Service accounts.
- Cluster roles.
- ConfigMap.
- Agent DaemonSet and an Operator Deployment.
After the installation, you can view the overall status of the Cilium deployment with the cilium status command.
See the expected output of the status command
here.
The remainder of the Getting Started Guide explains how to enforce both L3/L4 (i.e., IP address + port) security policies, as well as L7 (e.g., HTTP) security policies using an example application.
Deploying Cilium for Production Use
For detailed instructions around deploying Cilium for production, see: Cilium Kubernetes Installation Guide This documentation includes detailed requirements, instructions and example production DaemonSet files.
Understanding Cilium components
Deploying a cluster with Cilium adds Pods to the kube-system namespace. To see
this list of Pods run:
kubectl get pods --namespace=kube-system -l k8s-app=cilium
You'll see a list of Pods similar to this:
NAME           READY   STATUS    RESTARTS   AGE
cilium-kkdhz   1/1     Running   0          3m23s
...
A cilium Pod runs on each node in your cluster and enforces network policy
on the traffic to/from Pods on that node using Linux BPF.
What's next
Once your cluster is running, you can follow the Declare Network Policy to try out Kubernetes NetworkPolicy with Cilium. Have fun, and if you have questions, contact us using the Cilium Slack Channel.
6.4 - Use Kube-router for NetworkPolicy
This page shows how to use Kube-router for NetworkPolicy.
Before you begin
You need to have a Kubernetes cluster running. If you do not already have a cluster, you can create one by using any of the cluster installers like Kops, Bootkube, Kubeadm etc.
Installing Kube-router addon
The Kube-router Addon comes with a Network Policy Controller that watches Kubernetes API server for any NetworkPolicy and pods updated and configures iptables rules and ipsets to allow or block traffic as directed by the policies. Please follow the trying Kube-router with cluster installers guide to install Kube-router addon.
What's next
Once you have installed the Kube-router addon, you can follow the Declare Network Policy to try out Kubernetes NetworkPolicy.
6.5 - Romana for NetworkPolicy
This page shows how to use Romana for NetworkPolicy.
Before you begin
Complete steps 1, 2, and 3 of the kubeadm getting started guide.
Installing Romana with kubeadm
Follow the containerized installation guide for kubeadm.
Applying network policies
To apply network policies use one of the following:
- Romana network policies.
- The NetworkPolicy API.
What's next
Once you have installed Romana, you can follow the Declare Network Policy to try out Kubernetes NetworkPolicy.
6.6 - Weave Net for NetworkPolicy
This page shows how to use Weave Net for NetworkPolicy.
Before you begin
You need to have a Kubernetes cluster. Follow the kubeadm getting started guide to bootstrap one.
Install the Weave Net addon
Follow the Integrating Kubernetes via the Addon guide.
The Weave Net addon for Kubernetes comes with a
Network Policy Controller
that automatically monitors Kubernetes for any NetworkPolicy annotations on all
namespaces and configures iptables rules to allow or block traffic as directed by the policies.
Test the installation
Verify that the weave works.
Enter the following command:
kubectl get pods -n kube-system -o wide
The output is similar to this:
NAME                                    READY     STATUS    RESTARTS   AGE       IP              NODE
weave-net-1t1qg                         2/2       Running   0          9d        192.168.2.10    worknode3
weave-net-231d7                         2/2       Running   1          7d        10.2.0.17       worknodegpu
weave-net-7nmwt                         2/2       Running   3          9d        192.168.2.131   masternode
weave-net-pmw8w                         2/2       Running   0          9d        192.168.2.216   worknode2
Each Node has a weave Pod, and all Pods are Running and 2/2 READY. (2/2 means that each Pod has weave and weave-npc.)
What's next
Once you have installed the Weave Net addon, you can follow the Declare Network Policy to try out Kubernetes NetworkPolicy. If you have any question, contact us at #weave-community on Slack or Weave User Group.
7 - Access Clusters Using the Kubernetes API
This page shows how to access clusters using the Kubernetes API.
Before you begin
You need to have a Kubernetes cluster, and the kubectl command-line tool must be configured to communicate with your cluster. It is recommended to run this tutorial on a cluster with at least two nodes that are not acting as control plane hosts. If you do not already have a cluster, you can create one by using minikube or you can use one of these Kubernetes playgrounds:
To check the version, enter kubectl version.
Accessing the Kubernetes API
Accessing for the first time with kubectl
When accessing the Kubernetes API for the first time, use the
Kubernetes command-line tool, kubectl.
To access a cluster, you need to know the location of the cluster and have credentials to access it. Typically, this is automatically set-up when you work through a Getting started guide, or someone else set up the cluster and provided you with credentials and a location.
Check the location and credentials that kubectl knows about with this command:
kubectl config view
Many of the examples provide an introduction to using kubectl. Complete documentation is found in the kubectl manual.
Directly accessing the REST API
kubectl handles locating and authenticating to the API server. If you want to directly access the REST API with an http client like
curl or wget, or a browser, there are multiple ways you can locate and authenticate against the API server:
- Run kubectl in proxy mode (recommended). This method is recommended, since it uses the stored API server location and verifies the identity of the API server using a self-signed certificate. No man-in-the-middle (MITM) attack is possible using this method.
- Alternatively, you can provide the location and credentials directly to the http client. This works with client code that is confused by proxies. To protect against man in the middle attacks, you'll need to import a root cert into your browser.
Using the Go or Python client libraries provides accessing kubectl in proxy mode.
Using kubectl proxy
The following command runs kubectl in a mode where it acts as a reverse proxy. It handles locating the API server and authenticating.
Run it like this:
kubectl proxy --port=8080 &
See kubectl proxy for more details.
Then you can explore the API with curl, wget, or a browser, like so:
curl http://localhost:8080/api/
The output is similar to this:
{
  "versions": [
    "v1"
  ],
  "serverAddressByClientCIDRs": [
    {
      "clientCIDR": "0.0.0.0/0",
      "serverAddress": "10.0.1.149:443"
    }
  ]
}
Without kubectl proxy
It is possible to avoid using kubectl proxy by passing an authentication token directly to the API server, like this:
Using grep/cut approach:
# Check all possible clusters, as your .KUBECONFIG may have multiple contexts:
kubectl config view -o jsonpath='{"Cluster name\tServer\n"}{range .clusters[*]}{.name}{"\t"}{.cluster.server}{"\n"}{end}'

# Select name of cluster you want to interact with from above output:
export CLUSTER_NAME="some_server_name"

# Point to the API server referring the cluster name
APISERVER=$(kubectl config view -o jsonpath="{.clusters[?(@.name==\"$CLUSTER_NAME\")].cluster.server}")

# Create a secret to hold a token for the default service account
kubectl apply -f - <<EOF
apiVersion: v1
kind: Secret
metadata:
  name: default-token
  annotations:
    kubernetes.io/service-account.name: default
type: kubernetes.io/service-account-token
EOF

# Wait for the token controller to populate the secret with a token:
while ! kubectl describe secret default-token | grep -E '^token' >/dev/null; do
  echo "waiting for token..." >&2
  sleep 1
done

# Get the token value
TOKEN=$(kubectl get secret default-token -o jsonpath='{.data.token}' | base64 --decode)

# Explore the API with TOKEN
curl -X GET $APISERVER/api --header "Authorization: Bearer $TOKEN" --insecure
The output is similar to this:
{
  "kind": "APIVersions",
  "versions": [
    "v1"
  ],
  "serverAddressByClientCIDRs": [
    {
      "clientCIDR": "0.0.0.0/0",
      "serverAddress": "10.0.1.149:443"
    }
  ]
}
The above example uses the --insecure flag. This leaves it subject to MITM
attacks. When kubectl accesses the cluster it uses a stored root certificate
and client certificates to access the server. (These are installed in the
~/.kube directory). Since cluster certificates are typically self-signed, it
may take special configuration to get your http client to use root
certificate.
On some clusters, the API server does not require authentication; it may serve on localhost, or be protected by a firewall. There is not a standard for this. Controlling Access to the Kubernetes API describes how you can configure this as a cluster administrator.
Programmatic access to the API
Kubernetes officially supports client libraries for Go, Python, Java, dotnet, JavaScript, and Haskell. There are other client libraries that are provided and maintained by their authors, not the Kubernetes team. See client libraries for accessing the API from other languages and how they authenticate.
Go client
- To get the library, run the following command:
go get k8s.io/client-go@kubernetes-<kubernetes-version-number>See https://github.com/kubernetes/client-go/releases to see which versions are supported. - Write an application atop of the client-go clients.
Note:
client-go defines its own API objects, so if needed, import API definitions from client-go rather than
from the main repository. For example, import "k8s.io/client-go/kubernetes" is correct.The Go client can use the same kubeconfig file as the kubectl CLI does to locate and authenticate to the API server. See this example:
package main

import (
  "context"
  "fmt"
  "k8s.io/apimachinery/pkg/apis/meta/v1"
  "k8s.io/client-go/kubernetes"
  "k8s.io/client-go/tools/clientcmd"
)

func main() {
  // uses the current context in kubeconfig
  // path-to-kubeconfig -- for example, /root/.kube/config
  config, _ := clientcmd.BuildConfigFromFlags("", "<path-to-kubeconfig>")
  // creates the clientset
  clientset, _ := kubernetes.NewForConfig(config)
  // access the API to list pods
  pods, _ := clientset.CoreV1().Pods("").List(context.TODO(), v1.ListOptions{})
  fmt.Printf("There are %d pods in the cluster\n", len(pods.Items))
}
If the application is deployed as a Pod in the cluster, see Accessing the API from within a Pod.
Python client
To use Python client, run the following command:
pip install kubernetes. See Python Client Library page
for more installation options.
The Python client can use the same kubeconfig file as the kubectl CLI does to locate and authenticate to the API server. See this example:
from kubernetes import client, config

config.load_kube_config()

v1=client.CoreV1Api()
print("Listing pods with their IPs:")
ret = v1.list_pod_for_all_namespaces(watch=False)
for i in ret.items:
    print("%s\t%s\t%s" % (i.status.pod_ip, i.metadata.namespace, i.metadata.name))
Java client
To install the Java Client, run:
# Clone java library
git clone --recursive https://github.com/kubernetes-client/java

# Installing project artifacts, POM etc:
cd java
mvn install
See https://github.com/kubernetes-client/java/releases to see which versions are supported.
The Java client can use the same kubeconfig file as the kubectl CLI does to locate and authenticate to the API server. See this example:
package io.kubernetes.client.examples;

import io.kubernetes.client.ApiClient;
import io.kubernetes.client.ApiException;
import io.kubernetes.client.Configuration;
import io.kubernetes.client.apis.CoreV1Api;
import io.kubernetes.client.models.V1Pod;
import io.kubernetes.client.models.V1PodList;
import io.kubernetes.client.util.ClientBuilder;
import io.kubernetes.client.util.KubeConfig;
import java.io.FileReader;
import java.io.IOException;

/**
 * A simple example of how to use the Java API from an application outside a kubernetes cluster
 *
 * <p>Easiest way to run this: mvn exec:java
 * -Dexec.mainClass="io.kubernetes.client.examples.KubeConfigFileClientExample"
 *
 */
public class KubeConfigFileClientExample {
  public static void main(String[] args) throws IOException, ApiException {

    // file path to your KubeConfig
    String kubeConfigPath = "~/.kube/config";

    // loading the out-of-cluster config, a kubeconfig from file-system
    ApiClient client =
        ClientBuilder.kubeconfig(KubeConfig.loadKubeConfig(new FileReader(kubeConfigPath))).build();

    // set the global default api-client to the in-cluster one from above
    Configuration.setDefaultApiClient(client);

    // the CoreV1Api loads default api-client from global configuration.
    CoreV1Api api = new CoreV1Api();

    // invokes the CoreV1Api client
    V1PodList list = api.listPodForAllNamespaces(null, null, null, null, null, null, null, null, null);
    System.out.println("Listing all pods: ");
    for (V1Pod item : list.getItems()) {
      System.out.println(item.getMetadata().getName());
    }
  }
}
dotnet client
To use dotnet client,
run the following command: dotnet add package KubernetesClient --version 1.6.1.
See dotnet Client Library page
for more installation options. See
https://github.com/kubernetes-client/csharp/releases
to see which versions are supported.
The dotnet client can use the same kubeconfig file as the kubectl CLI does to locate and authenticate to the API server. See this example:
using System;
using k8s;

namespace simple
{
    internal class PodList
    {
        private static void Main(string[] args)
        {
            var config = KubernetesClientConfiguration.BuildDefaultConfig();
            IKubernetes client = new Kubernetes(config);
            Console.WriteLine("Starting Request!");

            var list = client.ListNamespacedPod("default");
            foreach (var item in list.Items)
            {
                Console.WriteLine(item.Metadata.Name);
            }
            if (list.Items.Count == 0)
            {
                Console.WriteLine("Empty!");
            }
        }
    }
}
JavaScript client
To install JavaScript client,
run the following command: npm install @kubernetes/client-node. See
https://github.com/kubernetes-client/javascript/releases
to see which versions are supported.
The JavaScript client can use the same kubeconfig file as the kubectl CLI does to locate and authenticate to the API server. See this example:
const k8s = require('@kubernetes/client-node');

const kc = new k8s.KubeConfig();
kc.loadFromDefault();

const k8sApi = kc.makeApiClient(k8s.CoreV1Api);

k8sApi.listNamespacedPod({ namespace: 'default' }).then((res) => {
    console.log(res);
});
Haskell client
See https://github.com/kubernetes-client/haskell/releases to see which versions are supported.
The Haskell client can use the same kubeconfig file as the kubectl CLI does to locate and authenticate to the API server. See this example:
exampleWithKubeConfig :: IO ()
exampleWithKubeConfig = do
    oidcCache <- atomically $ newTVar $ Map.fromList []
    (mgr, kcfg) <- mkKubeClientConfig oidcCache $ KubeConfigFile "/path/to/kubeconfig"
    dispatchMime
            mgr
            kcfg
            (CoreV1.listPodForAllNamespaces (Accept MimeJSON))
        >>= print
What's next
8 - Enable Or Disable Feature Gates
This page shows how to enable or disable feature gates to control specific Kubernetes features in your cluster. Enabling feature gates allows you to test and use Alpha or Beta features before they become generally available.
Note:
For some stable (GA) gates, you can also disable them, usually for one minor release after GA; however if you do that, your cluster may not be conformant as Kubernetes.Before you begin
You need to have a Kubernetes cluster, and the kubectl command-line tool must be configured to communicate with your cluster. It is recommended to run this tutorial on a cluster with at least two nodes that are not acting as control plane hosts. If you do not already have a cluster, you can create one by using minikube or you can use one of these Kubernetes playgrounds:
You also need:
- Administrative access to your cluster
- Knowledge of which feature gate you want to enable (see the Feature Gates reference)
Note:
GA (stable) features are always enabled by default. You typically configure gates for Alpha or Beta features.Understand feature gate maturity
Before enabling a feature gate, check the Feature Gates reference for the feature's maturity level:
- Alpha: Disabled by default, may be buggy. Use only in test clusters.
- Beta: Usually enabled by default, well-tested.
- GA: Always enabled by default; can sometimes be disabled for one release after GA.
Identify which components need the feature gate
Different feature gates affect different Kubernetes components:
- Some features require enabling the gate on multiple components (e.g., API server and controller manager)
- Other features only need the gate on a single component (e.g., only kubelet)
The Feature Gates reference typically indicates which components are affected by each gate. All Kubernetes components share the same feature gate definitions, so all gates appear in help output, but only relevant gates affect each component's behavior.
Configuration
During cluster initialization
Create a configuration file to enable feature gates across relevant components:
apiVersion: kubeadm.k8s.io/v1beta4
kind: ClusterConfiguration
apiServer:
  extraArgs:
    feature-gates: "FeatureName=true"
controllerManager:
  extraArgs:
    feature-gates: "FeatureName=true"
scheduler:
  extraArgs:
    feature-gates: "FeatureName=true"
---
apiVersion: kubelet.config.k8s.io/v1beta1
kind: KubeletConfiguration
featureGates:
  FeatureName: true
Initialize the cluster:
kubeadm init --config kubeadm-config.yaml
On an existing cluster
For kubeadm clusters, feature gate configuration can be set in several locations including manifest files, configuration files, and kubeadm configuration.
Edit control plane component manifests in /etc/kubernetes/manifests/:
For kube-apiserver, kube-controller-manager, or kube-scheduler, add the flag to the command:
spec:
  containers:
  - command:
    - kube-apiserver
    - --feature-gates=FeatureName=true
    # ... other flags
Save the file. The pod restarts automatically.
For kubelet, edit
/var/lib/kubelet/config.yaml:apiVersion: kubelet.config.k8s.io/v1beta1 kind: KubeletConfiguration featureGates: FeatureName: trueRestart kubelet:
sudo systemctl restart kubeletFor kube-proxy, edit the ConfigMap:
kubectl -n kube-system edit configmap kube-proxyAdd feature gates to the configuration:
featureGates:
  FeatureName: true
Restart the DaemonSet:
kubectl -n kube-system rollout restart daemonset kube-proxy
Configure multiple feature gates
Use comma-separated lists for command-line flags:
--feature-gates=FeatureA=true,FeatureB=false,FeatureC=true
For components that support configuration files (kubelet, kube-proxy):
featureGates:
  FeatureA: true
  FeatureB: false
  FeatureC: true
Note:
In kubeadm clusters, control plane components (kube-apiserver, kube-controller-manager, and kube-scheduler) are typically configured via command-line flags in their static pod manifests located at/etc/kubernetes/manifests/. While these components support
configuration files via the --config flag, kubeadm primarily uses command-line flags.Verify feature gate configuration
After configuring, verify the feature gates are active. The following methods apply to kubeadm clusters where control plane components run as static pods.
Check control plane component manifests
View the feature gates configured in the static pod manifest:
kubectl -n kube-system get pod kube-apiserver-<node-name> -o yaml | grep feature-gates
Check kubelet configuration
Use the kubelet's configz endpoint:
kubectl proxy --port=8001 &
curl -sSL "http://localhost:8001/api/v1/nodes/<node-name>/proxy/configz" | grep featureGates -A 5
Or check the configuration file directly on the node:
cat /var/lib/kubelet/config.yaml | grep -A 10 featureGates
Check via metrics endpoint
Feature gate status is exposed in Prometheus-style metrics by Kubernetes components (available in Kubernetes 1.26+). Query the metrics endpoint to verify which feature gates are enabled:
kubectl get --raw /metrics | grep kubernetes_feature_enabled
To check a specific feature gate:
kubectl get --raw /metrics | grep kubernetes_feature_enabled | grep FeatureName
The metric shows 1 for enabled gates and 0 for disabled gates.
Note:
In kubeadm clusters, verify all relevant locations where feature gates might be configured, as the configuration is distributed across multiple files and locations.Check via /flagz endpoint
If you have access to a component's debugging endpoints, and the ComponentFlagz
feature gate is enabled for that component, you can inspect the command-line flags
that were used to start the component by visiting the /flagz endpoint. Feature
gates configured using command-line flags appear in this output.
The /flagz endpoint is part of Kubernetes z-pages, which provide human-readable
runtime debugging information for core components.
For more information, see the z-pages documentation.
Understanding component-specific requirements
Some examples of component-specific feature gates:
- API server-focused: Features like
StructuredAuthenticationConfigurationprimarily affect kube-apiserver - Kubelet-focused: Features like
GracefulNodeShutdownprimarily affect kubelet - Multiple components: Some features require coordination between components
Caution:
When a feature requires multiple components, you must enable the gate on all relevant components. Enabling it on only some components may result in unexpected behavior or errors.Always test feature gates in non-production environments first. Alpha features may be removed without notice.
What's next
- Read the Feature Gates reference
- Learn about Feature Stages
- Review kubeadm configuration
9 - Advertise Extended Resources for a Node
This page shows how to specify extended resources for a Node. Extended resources allow cluster administrators to advertise node-level resources that would otherwise be unknown to Kubernetes.
Before you begin
You need to have a Kubernetes cluster, and the kubectl command-line tool must be configured to communicate with your cluster. It is recommended to run this tutorial on a cluster with at least two nodes that are not acting as control plane hosts. If you do not already have a cluster, you can create one by using minikube or you can use one of these Kubernetes playgrounds:
To check the version, enter kubectl version.
Get the names of your Nodes
kubectl get nodes
Choose one of your Nodes to use for this exercise.
Advertise a new extended resource on one of your Nodes
To advertise a new extended resource on a Node, send an HTTP PATCH request to the Kubernetes API server. For example, suppose one of your Nodes has four dongles attached. Here's an example of a PATCH request that advertises four dongle resources for your Node.
PATCH /api/v1/nodes/<your-node-name>/status HTTP/1.1
Accept: application/json
Content-Type: application/json-patch+json
Host: k8s-master:8080

[
  {
    "op": "add",
    "path": "/status/capacity/example.com~1dongle",
    "value": "4"
  }
]
Note that Kubernetes does not need to know what a dongle is or what a dongle is for. The preceding PATCH request tells Kubernetes that your Node has four things that you call dongles.
Start a proxy, so that you can easily send requests to the Kubernetes API server:
kubectl proxy
In another command window, send the HTTP PATCH request.
Replace <your-node-name> with the name of your Node:
curl --header "Content-Type: application/json-patch+json" \
  --request PATCH \
  --data '[{"op": "add", "path": "/status/capacity/example.com~1dongle", "value": "4"}]' \
  http://localhost:8001/api/v1/nodes/<your-node-name>/status
Note:
In the preceding request,~1 is the encoding for the character / in
the patch path. The operation path value in JSON-Patch is interpreted as a
JSON-Pointer. For more details, see
IETF RFC 6901, section 3.The output shows that the Node has a capacity of 4 dongles:
"capacity": {
  "cpu": "2",
  "memory": "2049008Ki",
  "example.com/dongle": "4",
Describe your Node:
kubectl describe node <your-node-name>
Once again, the output shows the dongle resource:
Capacity:
  cpu: 2
  memory: 2049008Ki
  example.com/dongle: 4
Now, application developers can create Pods that request a certain number of dongles. See Assign Extended Resources to a Container.
Discussion
Extended resources are similar to memory and CPU resources. For example, just as a Node has a certain amount of memory and CPU to be shared by all components running on the Node, it can have a certain number of dongles to be shared by all components running on the Node. And just as application developers can create Pods that request a certain amount of memory and CPU, they can create Pods that request a certain number of dongles.
Extended resources are opaque to Kubernetes; Kubernetes does not know anything about what they are. Kubernetes knows only that a Node has a certain number of them. Extended resources must be advertised in integer amounts. For example, a Node can advertise four dongles, but not 4.5 dongles.
Storage example
Suppose a Node has 800 GiB of a special kind of disk storage. You could create a name for the special storage, say example.com/special-storage. Then you could advertise it in chunks of a certain size, say 100 GiB. In that case, your Node would advertise that it has eight resources of type example.com/special-storage.
Capacity:
 ...
 example.com/special-storage: 8
If you want to allow arbitrary requests for special storage, you could advertise special storage in chunks of size 1 byte. In that case, you would advertise 800Gi resources of type example.com/special-storage.
Capacity:
 ...
 example.com/special-storage:  800Gi
Then a Container could request any number of bytes of special storage, up to 800Gi.
Clean up
Here is a PATCH request that removes the dongle advertisement from a Node.
PATCH /api/v1/nodes/<your-node-name>/status HTTP/1.1
Accept: application/json
Content-Type: application/json-patch+json
Host: k8s-master:8080

[
  {
    "op": "remove",
    "path": "/status/capacity/example.com~1dongle",
  }
]
Start a proxy, so that you can easily send requests to the Kubernetes API server:
kubectl proxy
In another command window, send the HTTP PATCH request.
Replace <your-node-name> with the name of your Node:
curl --header "Content-Type: application/json-patch+json" \
  --request PATCH \
  --data '[{"op": "remove", "path": "/status/capacity/example.com~1dongle"}]' \
  http://localhost:8001/api/v1/nodes/<your-node-name>/status
Verify that the dongle advertisement has been removed:
kubectl describe node <your-node-name> | grep dongle
(you should not see any output)
What's next
For application developers
For cluster administrators
10 - Autoscale the DNS Service in a Cluster
This page shows how to enable and configure autoscaling of the DNS service in your Kubernetes cluster.
Before you begin
You need to have a Kubernetes cluster, and the kubectl command-line tool must be configured to communicate with your cluster. It is recommended to run this tutorial on a cluster with at least two nodes that are not acting as control plane hosts. If you do not already have a cluster, you can create one by using minikube or you can use one of these Kubernetes playgrounds:
To check the version, enter
kubectl version.This guide assumes your nodes use the AMD64 or Intel 64 CPU architecture.
Make sure Kubernetes DNS is enabled.
Determine whether DNS horizontal autoscaling is already enabled
List the Deployments in your cluster in the kube-system namespace:
kubectl get deployment --namespace=kube-system
The output is similar to this:
NAME                   READY   UP-TO-DATE   AVAILABLE   AGE
...
kube-dns-autoscaler    1/1     1            1           ...
...
If you see "kube-dns-autoscaler" in the output, DNS horizontal autoscaling is already enabled, and you can skip to Tuning autoscaling parameters.
Get the name of your DNS Deployment
List the DNS deployments in your cluster in the kube-system namespace:
kubectl get deployment -l k8s-app=kube-dns --namespace=kube-system
The output is similar to this:
NAME      READY   UP-TO-DATE   AVAILABLE   AGE
...
coredns   2/2     2            2           ...
...
If you don't see a Deployment for DNS services, you can also look for it by name:
kubectl get deployment --namespace=kube-system
and look for a deployment named coredns or kube-dns.
Your scale target is
Deployment/<your-deployment-name>
where <your-deployment-name> is the name of your DNS Deployment. For example, if
the name of your Deployment for DNS is coredns, your scale target is Deployment/coredns.
Note:
CoreDNS is the default DNS service for Kubernetes. CoreDNS sets the labelk8s-app=kube-dns so that it can work in clusters that originally used
kube-dns.Enable DNS horizontal autoscaling
In this section, you create a new Deployment. The Pods in the Deployment run a
container based on the cluster-proportional-autoscaler-amd64 image.
Create a file named dns-horizontal-autoscaler.yaml with this content:
kind: ServiceAccount
apiVersion: v1
metadata:
  name: kube-dns-autoscaler
  namespace: kube-system
---
kind: ClusterRole
apiVersion: rbac.authorization.k8s.io/v1
metadata:
  name: system:kube-dns-autoscaler
rules:
  - apiGroups: [""]
    resources: ["nodes"]
    verbs: ["list", "watch"]
  - apiGroups: [""]
    resources: ["replicationcontrollers/scale"]
    verbs: ["get", "update"]
  - apiGroups: ["apps"]
    resources: ["deployments/scale", "replicasets/scale"]
    verbs: ["get", "update"]
# Remove the configmaps rule once below issue is fixed:
# kubernetes-incubator/cluster-proportional-autoscaler#16
  - apiGroups: [""]
    resources: ["configmaps"]
    verbs: ["get", "create"]
---
kind: ClusterRoleBinding
apiVersion: rbac.authorization.k8s.io/v1
metadata:
  name: system:kube-dns-autoscaler
subjects:
  - kind: ServiceAccount
    name: kube-dns-autoscaler
    namespace: kube-system
roleRef:
  kind: ClusterRole
  name: system:kube-dns-autoscaler
  apiGroup: rbac.authorization.k8s.io

---
apiVersion: apps/v1
kind: Deployment
metadata:
  name: kube-dns-autoscaler
  namespace: kube-system
  labels:
    k8s-app: kube-dns-autoscaler
    kubernetes.io/cluster-service: "true"
spec:
  selector:
    matchLabels:
      k8s-app: kube-dns-autoscaler
  template:
    metadata:
      labels:
        k8s-app: kube-dns-autoscaler
    spec:
      priorityClassName: system-cluster-critical
      securityContext:
        seccompProfile:
          type: RuntimeDefault
        supplementalGroups: [ 65534 ]
        fsGroup: 65534
      nodeSelector:
        kubernetes.io/os: linux
      containers:
      - name: autoscaler
        image: registry.k8s.io/cpa/cluster-proportional-autoscaler:1.8.4
        resources:
            requests:
                cpu: "20m"
                memory: "10Mi"
        command:
          - /cluster-proportional-autoscaler
          - --namespace=kube-system
          - --configmap=kube-dns-autoscaler
          # Should keep target in sync with cluster/addons/dns/kube-dns.yaml.base
          - --target=<SCALE_TARGET>
          # When cluster is using large nodes(with more cores), "coresPerReplica" should dominate.
          # If using small nodes, "nodesPerReplica" should dominate.
          - --default-params={"linear":{"coresPerReplica":256,"nodesPerReplica":16,"preventSinglePointFailure":true,"includeUnschedulableNodes":true}}
          - --logtostderr=true
          - --v=2
      tolerations:
      - key: "CriticalAddonsOnly"
        operator: "Exists"
      serviceAccountName: kube-dns-autoscaler
In the file, replace <SCALE_TARGET> with your scale target.
Go to the directory that contains your configuration file, and enter this command to create the Deployment:
kubectl apply -f dns-horizontal-autoscaler.yaml
The output of a successful command is:
deployment.apps/kube-dns-autoscaler created
DNS horizontal autoscaling is now enabled.
Tune DNS autoscaling parameters
Verify that the kube-dns-autoscaler ConfigMap exists:
kubectl get configmap --namespace=kube-system
The output is similar to this:
NAME                  DATA      AGE
...
kube-dns-autoscaler   1         ...
...
Modify the data in the ConfigMap:
kubectl edit configmap kube-dns-autoscaler --namespace=kube-system
Look for this line:
linear: '{"coresPerReplica":256,"min":1,"nodesPerReplica":16}'
Modify the fields according to your needs. The "min" field indicates the minimal number of DNS backends. The actual number of backends is calculated using this equation:
replicas = max( ceil( cores × 1/coresPerReplica ) , ceil( nodes × 1/nodesPerReplica ) )
Note that the values of both coresPerReplica and nodesPerReplica are
floats.
The idea is that when a cluster is using nodes that have many cores,
coresPerReplica dominates. When a cluster is using nodes that have fewer
cores, nodesPerReplica dominates.
There are other supported scaling patterns. For details, see cluster-proportional-autoscaler.
Disable DNS horizontal autoscaling
There are a few options for tuning DNS horizontal autoscaling. Which option to use depends on different conditions.
Option 1: Scale down the kube-dns-autoscaler deployment to 0 replicas
This option works for all situations. Enter this command:
kubectl scale deployment --replicas=0 kube-dns-autoscaler --namespace=kube-system
The output is:
deployment.apps/kube-dns-autoscaler scaled
Verify that the replica count is zero:
kubectl get rs --namespace=kube-system
The output displays 0 in the DESIRED and CURRENT columns:
NAME                                  DESIRED   CURRENT   READY   AGE
...
kube-dns-autoscaler-6b59789fc8        0         0         0       ...
...
Option 2: Delete the kube-dns-autoscaler deployment
This option works if kube-dns-autoscaler is under your own control, which means no one will re-create it:
kubectl delete deployment kube-dns-autoscaler --namespace=kube-system
The output is:
deployment.apps "kube-dns-autoscaler" deleted
Option 3: Delete the kube-dns-autoscaler manifest file from the master node
This option works if kube-dns-autoscaler is under control of the (deprecated) Addon Manager, and you have write access to the master node.
Sign in to the master node and delete the corresponding manifest file. The common path for this kube-dns-autoscaler is:
/etc/kubernetes/addons/dns-horizontal-autoscaler/dns-horizontal-autoscaler.yaml
After the manifest file is deleted, the Addon Manager will delete the kube-dns-autoscaler Deployment.
Understanding how DNS horizontal autoscaling works
The cluster-proportional-autoscaler application is deployed separately from the DNS service.
An autoscaler Pod runs a client that polls the Kubernetes API server for the number of nodes and cores in the cluster.
A desired replica count is calculated and applied to the DNS backends based on the current schedulable nodes and cores and the given scaling parameters.
The scaling parameters and data points are provided via a ConfigMap to the autoscaler, and it refreshes its parameters table every poll interval to be up to date with the latest desired scaling parameters.
Changes to the scaling parameters are allowed without rebuilding or restarting the autoscaler Pod.
The autoscaler provides a controller interface to support two control patterns: linear and ladder.
What's next
- Read about Guaranteed Scheduling For Critical Add-On Pods.
- Learn more about the implementation of cluster-proportional-autoscaler.
11 - Change the Access Mode of a PersistentVolume to ReadWriteOncePod
This page shows how to change the access mode on an existing PersistentVolume to
use ReadWriteOncePod.
Before you begin
You need to have a Kubernetes cluster, and the kubectl command-line tool must be configured to communicate with your cluster. It is recommended to run this tutorial on a cluster with at least two nodes that are not acting as control plane hosts. If you do not already have a cluster, you can create one by using minikube or you can use one of these Kubernetes playgrounds:
Your Kubernetes server must be at or later than version v1.22.To check the version, enter kubectl version.
Note:
TheReadWriteOncePod access mode graduated to stable in the Kubernetes v1.29
release. If you are running a version of Kubernetes older than v1.29, you might
need to enable a feature gate. Check the documentation for your version of
Kubernetes.Note:
The ReadWriteOncePod access mode is only supported for
CSI volumes.
To use this volume access mode you will need to update the following
CSI sidecars
to these versions or greater:
Why should I use ReadWriteOncePod?
Prior to Kubernetes v1.22, the ReadWriteOnce access mode was commonly used to
restrict PersistentVolume access for workloads that required single-writer
access to storage. However, this access mode had a limitation: it restricted
volume access to a single node, allowing multiple pods on the same node to
read from and write to the same volume simultaneously. This could pose a risk
for applications that demand strict single-writer access for data safety.
If ensuring single-writer access is critical for your workloads, consider
migrating your volumes to ReadWriteOncePod.
Migrating existing PersistentVolumes
If you have existing PersistentVolumes, they can be migrated to use
ReadWriteOncePod. Only migrations from ReadWriteOnce to ReadWriteOncePod
are supported.
In this example, there is already a ReadWriteOnce "cat-pictures-pvc"
PersistentVolumeClaim that is bound to a "cat-pictures-pv" PersistentVolume,
and a "cat-pictures-writer" Deployment that uses this PersistentVolumeClaim.
Note:
If your storage plugin supports Dynamic provisioning, the "cat-pictures-pv" will be created for you, but its name may differ. To get your PersistentVolume's name run:
kubectl get pvc cat-pictures-pvc -o jsonpath='{.spec.volumeName}'
And you can view the PVC before you make changes. Either view the manifest
locally, or run kubectl get pvc <name-of-pvc> -o yaml. The output is similar
to:
# cat-pictures-pvc.yaml
kind: PersistentVolumeClaim
apiVersion: v1
metadata:
  name: cat-pictures-pvc
spec:
  accessModes:
  - ReadWriteOnce
  resources:
    requests:
      storage: 1Gi
Here's an example Deployment that relies on that PersistentVolumeClaim:
# cat-pictures-writer-deployment.yaml
apiVersion: apps/v1
kind: Deployment
metadata:
  name: cat-pictures-writer
spec:
  replicas: 3
  selector:
    matchLabels:
      app: cat-pictures-writer
  template:
    metadata:
      labels:
        app: cat-pictures-writer
    spec:
      containers:
      - name: nginx
        image: nginx:1.14.2
        ports:
        - containerPort: 80
        volumeMounts:
        - name: cat-pictures
          mountPath: /mnt
      volumes:
      - name: cat-pictures
        persistentVolumeClaim:
          claimName: cat-pictures-pvc
          readOnly: false
As a first step, you need to edit your PersistentVolume's
spec.persistentVolumeReclaimPolicy and set it to Retain. This ensures your
PersistentVolume will not be deleted when you delete the corresponding
PersistentVolumeClaim:
kubectl patch pv cat-pictures-pv -p '{"spec":{"persistentVolumeReclaimPolicy":"Retain"}}'
Next you need to stop any workloads that are using the PersistentVolumeClaim bound to the PersistentVolume you want to migrate, and then delete the PersistentVolumeClaim. Avoid making any other changes to the PersistentVolumeClaim, such as volume resizes, until after the migration is complete.
Once that is done, you need to clear your PersistentVolume's spec.claimRef.uid
to ensure PersistentVolumeClaims can bind to it upon recreation:
kubectl scale --replicas=0 deployment cat-pictures-writer
kubectl delete pvc cat-pictures-pvc
kubectl patch pv cat-pictures-pv -p '{"spec":{"claimRef":{"uid":""}}}'
After that, replace the PersistentVolume's list of valid access modes to be
(only) ReadWriteOncePod:
kubectl patch pv cat-pictures-pv -p '{"spec":{"accessModes":["ReadWriteOncePod"]}}'
Note:
TheReadWriteOncePod access mode cannot be combined with other access modes.
Make sure ReadWriteOncePod is the only access mode on the PersistentVolume
when updating, otherwise the request will fail.Next you need to modify your PersistentVolumeClaim to set ReadWriteOncePod as
the only access mode. You should also set the PersistentVolumeClaim's
spec.volumeName to the name of your PersistentVolume to ensure it binds to
this specific PersistentVolume.
Once this is done, you can recreate your PersistentVolumeClaim and start up your workloads:
# IMPORTANT: Make sure to edit your PVC in cat-pictures-pvc.yaml before applying. You need to:
# - Set ReadWriteOncePod as the only access mode
# - Set spec.volumeName to "cat-pictures-pv"

kubectl apply -f cat-pictures-pvc.yaml
kubectl apply -f cat-pictures-writer-deployment.yaml
Lastly you may edit your PersistentVolume's spec.persistentVolumeReclaimPolicy
and set to it back to Delete if you previously changed it.
kubectl patch pv cat-pictures-pv -p '{"spec":{"persistentVolumeReclaimPolicy":"Delete"}}'
What's next
- Learn more about PersistentVolumes.
- Learn more about PersistentVolumeClaims.
- Learn more about Configuring a Pod to Use a PersistentVolume for Storage
12 - Change the default StorageClass
This page shows how to change the default Storage Class that is used to provision volumes for PersistentVolumeClaims that have no special requirements.
Before you begin
You need to have a Kubernetes cluster, and the kubectl command-line tool must be configured to communicate with your cluster. It is recommended to run this tutorial on a cluster with at least two nodes that are not acting as control plane hosts. If you do not already have a cluster, you can create one by using minikube or you can use one of these Kubernetes playgrounds:
To check the version, enter kubectl version.
Why change the default storage class?
Depending on the installation method, your Kubernetes cluster may be deployed with an existing StorageClass that is marked as default. This default StorageClass is then used to dynamically provision storage for PersistentVolumeClaims that do not require any specific storage class. See PersistentVolumeClaim documentation for details.
The pre-installed default StorageClass may not fit well with your expected workload; for example, it might provision storage that is too expensive. If this is the case, you can either change the default StorageClass or disable it completely to avoid dynamic provisioning of storage.
Deleting the default StorageClass may not work, as it may be re-created automatically by the addon manager running in your cluster. Please consult the docs for your installation for details about addon manager and how to disable individual addons.
Changing the default StorageClass
List the StorageClasses in your cluster:
kubectl get storageclassThe output is similar to this:
NAME                 PROVISIONER               AGE
standard (default)   kubernetes.io/gce-pd      1d
gold                 kubernetes.io/gce-pd      1d
The default StorageClass is marked by
(default).Mark the default StorageClass as non-default:
The default StorageClass has an annotation
storageclass.kubernetes.io/is-default-classset totrue. Any other value or absence of the annotation is interpreted asfalse.To mark a StorageClass as non-default, you need to change its value to
false:kubectl patch storageclass standard -p '{"metadata": {"annotations":{"storageclass.kubernetes.io/is-default-class":"false"}}}'where
standardis the name of your chosen StorageClass.Mark a StorageClass as default:
Similar to the previous step, you need to add/set the annotation
storageclass.kubernetes.io/is-default-class=true.kubectl patch storageclass gold -p '{"metadata": {"annotations":{"storageclass.kubernetes.io/is-default-class":"true"}}}'Please note you can have multiple
StorageClassmarked as default. If more than oneStorageClassis marked as default, aPersistentVolumeClaimwithout an explicitly definedstorageClassNamewill be created using the most recently created defaultStorageClass. When aPersistentVolumeClaimis created with a specifiedvolumeName, it remains in a pending state if the static volume'sstorageClassNamedoes not match theStorageClasson thePersistentVolumeClaim.Verify that your chosen StorageClass is default:
kubectl get storageclassThe output is similar to this:
NAME             PROVISIONER               AGE
standard         kubernetes.io/gce-pd      1d
gold (default)   kubernetes.io/gce-pd      1d
What's next
- Learn more about PersistentVolumes.
13 - Switching from Polling to CRI Event-based Updates to Container Status
Kubernetes v1.26 [alpha](disabled by default)This page shows how to migrate nodes to use event based updates for container status. The event-based implementation reduces node resource consumption by the kubelet, compared to the legacy approach that relies on polling. You may know this feature as evented Pod lifecycle event generator (PLEG). That's the name used internally within the Kubernetes project for a key implementation detail.
The polling based approach is referred to as generic PLEG.
Before you begin
- You need to run a version of Kubernetes that provides this feature. Kubernetes v1.27 includes beta support for event-based container status updates. The feature is beta but is disabled by default because it requires support from the container runtime.
- Your Kubernetes server must be at or later than version 1.26.
To check the version, enter
If you are running a different version of Kubernetes, check the documentation for that release.kubectl version. - The container runtime in use must support container lifecycle events. The kubelet automatically switches back to the legacy generic PLEG mechanism if the container runtime does not announce support for container lifecycle events, even if you have this feature gate enabled.
Why switch to Evented PLEG?
- The Generic PLEG incurs non-negligible overhead due to frequent polling of container statuses.
- This overhead is exacerbated by Kubelet's parallelized polling of container states, thus limiting its scalability and causing poor performance and reliability problems.
- The goal of Evented PLEG is to reduce unnecessary work during inactivity by replacing periodic polling.
Switching to Evented PLEG
Start the Kubelet with the feature gate
EventedPLEGenabled. You can manage the kubelet feature gates editing the kubelet config file and restarting the kubelet service. You need to do this on each node where you are using this feature.Make sure the node is drained before proceeding.
Start the container runtime with the container event generation enabled.
Your Kubernetes server must be at or later than version 1.26.Version 1.7+
Version 1.26+
Check if the CRI-O is already configured to emit CRI events by verifying the configuration,
crio config | grep enable_pod_eventsIf it is enabled, the output should be similar to the following:
enable_pod_events = trueTo enable it, start the CRI-O daemon with the flag
--enable-pod-events=trueor use a dropin config with the following lines:[crio.runtime] enable_pod_events: trueTo check the version, enter
kubectl version.Verify that the kubelet is using event-based container stage change monitoring. To check, look for the term
EventedPLEGin the kubelet logs.The output should be similar to this:
I0314 11:10:13.909915 1105457 feature_gate.go:249] feature gates: &{map[EventedPLEG:true]}If you have set
--vto 4 and above, you might see more entries that indicate that the kubelet is using event-based container state monitoring.I0314 11:12:42.009542 1110177 evented.go:238] "Evented PLEG: Generated pod status from the received event" podUID=3b2c6172-b112-447a-ba96-94e7022912dc I0314 11:12:44.623326 1110177 evented.go:238] "Evented PLEG: Generated pod status from the received event" podUID=b3fba5ea-a8c5-4b76-8f43-481e17e8ec40 I0314 11:12:44.714564 1110177 evented.go:238] "Evented PLEG: Generated pod status from the received event" podUID=b3fba5ea-a8c5-4b76-8f43-481e17e8ec40
What's next
- Learn more about the design in the Kubernetes Enhancement Proposal (KEP): Kubelet Evented PLEG for Better Performance.
14 - Change the Reclaim Policy of a PersistentVolume
This page shows how to change the reclaim policy of a Kubernetes PersistentVolume.
Before you begin
You need to have a Kubernetes cluster, and the kubectl command-line tool must be configured to communicate with your cluster. It is recommended to run this tutorial on a cluster with at least two nodes that are not acting as control plane hosts. If you do not already have a cluster, you can create one by using minikube or you can use one of these Kubernetes playgrounds:
To check the version, enter kubectl version.
Why change reclaim policy of a PersistentVolume
PersistentVolumes can have various reclaim policies, including "Retain", "Recycle", and "Delete". For dynamically provisioned PersistentVolumes, the default reclaim policy is "Delete". This means that a dynamically provisioned volume is automatically deleted when a user deletes the corresponding PersistentVolumeClaim. This automatic behavior might be inappropriate if the volume contains precious data. In that case, it is more appropriate to use the "Retain" policy. With the "Retain" policy, if a user deletes a PersistentVolumeClaim, the corresponding PersistentVolume will not be deleted. Instead, it is moved to the Released phase, where all of its data can be manually recovered.
Changing the reclaim policy of a PersistentVolume
List the PersistentVolumes in your cluster:
kubectl get pvThe output is similar to this:
NAME                                       CAPACITY   ACCESSMODES   RECLAIMPOLICY   STATUS    CLAIM             STORAGECLASS     REASON    AGE
pvc-b6efd8da-b7b5-11e6-9d58-0ed433a7dd94   4Gi        RWO           Delete          Bound     default/claim1    manual                     10s
pvc-b95650f8-b7b5-11e6-9d58-0ed433a7dd94   4Gi        RWO           Delete          Bound     default/claim2    manual                     6s
pvc-bb3ca71d-b7b5-11e6-9d58-0ed433a7dd94   4Gi        RWO           Delete          Bound     default/claim3    manual                     3s
This list also includes the name of the claims that are bound to each volume for easier identification of dynamically provisioned volumes.
Choose one of your PersistentVolumes and change its reclaim policy:
kubectl patch pv <your-pv-name> -p '{"spec":{"persistentVolumeReclaimPolicy":"Retain"}}'where
<your-pv-name>is the name of your chosen PersistentVolume.Note:
On Windows, you must double quote any JSONPath template that contains spaces (not single quote as shown above for bash). This in turn means that you must use a single quote or escaped double quote around any literals in the template. For example:
kubectl patch pv <your-pv-name> -p "{\"spec\":{\"persistentVolumeReclaimPolicy\":\"Retain\"}}"Verify that your chosen PersistentVolume has the right policy:
kubectl get pvThe output is similar to this:
NAME                                       CAPACITY   ACCESSMODES   RECLAIMPOLICY   STATUS    CLAIM             STORAGECLASS     REASON    AGE
pvc-b6efd8da-b7b5-11e6-9d58-0ed433a7dd94   4Gi        RWO           Delete          Bound     default/claim1    manual                     40s
pvc-b95650f8-b7b5-11e6-9d58-0ed433a7dd94   4Gi        RWO           Delete          Bound     default/claim2    manual                     36s
pvc-bb3ca71d-b7b5-11e6-9d58-0ed433a7dd94   4Gi        RWO           Retain          Bound     default/claim3    manual                     33s
In the preceding output, you can see that the volume bound to claim
default/claim3has reclaim policyRetain. It will not be automatically deleted when a user deletes claimdefault/claim3.
What's next
- Learn more about PersistentVolumes.
- Learn more about PersistentVolumeClaims.
References
- PersistentVolume
- Pay attention to the
.spec.persistentVolumeReclaimPolicyfield of PersistentVolume.
- Pay attention to the
- PersistentVolumeClaim
15 - Cloud Controller Manager Administration
Kubernetes v1.11 [beta]Since cloud providers develop and release at a different pace compared to the
Kubernetes project, abstracting the provider-specific code to the
cloud-controller-manager
binary allows cloud vendors to evolve independently from the core Kubernetes code.
The cloud-controller-manager can be linked to any cloud provider that satisfies
cloudprovider.Interface.
For backwards compatibility, the
cloud-controller-manager
provided in the core Kubernetes project uses the same cloud libraries as kube-controller-manager.
Cloud providers already supported in Kubernetes core are expected to use the in-tree
cloud-controller-manager to transition out of Kubernetes core.
Administration
Requirements
Every cloud has their own set of requirements for running their own cloud provider
integration, it should not be too different from the requirements when running
kube-controller-manager. As a general rule of thumb you'll need:
- cloud authentication/authorization: your cloud may require a token or IAM rules to allow access to their APIs
- kubernetes authentication/authorization: cloud-controller-manager may need RBAC rules set to speak to the kubernetes apiserver
- high availability: like kube-controller-manager, you may want a high available setup for cloud controller manager using leader election (on by default).
Running cloud-controller-manager
Successfully running cloud-controller-manager requires some changes to your cluster configuration.
kubeletandkube-controller-managermust be set according to the user's usage of external CCM. If the user has an external CCM (not the internal cloud controller loops in the Kubernetes Controller Manager), then--cloud-provider=externalmust be specified. Otherwise, it should not be specified.
Keep in mind that setting up your cluster to use cloud controller manager will change your cluster behaviour in a few ways:
- Components that specify
--cloud-provider=externalwill add a taintnode.cloudprovider.kubernetes.io/uninitializedwith an effectNoScheduleduring initialization. This marks the node as needing a second initialization from an external controller before it can be scheduled work. Note that in the event that cloud controller manager is not available, new nodes in the cluster will be left unschedulable. The taint is important since the scheduler may require cloud specific information about nodes such as their region or type (high cpu, gpu, high memory, spot instance, etc). - cloud information about nodes in the cluster will no longer be retrieved using local metadata, but instead all API calls to retrieve node information will go through cloud controller manager. This may mean you can restrict access to your cloud API on the kubelets for better security. For larger clusters you may want to consider if cloud controller manager will hit rate limits since it is now responsible for almost all API calls to your cloud from within the cluster.
The cloud controller manager can implement:
- Node controller - responsible for updating kubernetes nodes using cloud APIs and deleting kubernetes nodes that were deleted on your cloud.
- Service controller - responsible for loadbalancers on your cloud against services of type LoadBalancer.
- Route controller - responsible for setting up network routes on your cloud
- any other features you would like to implement if you are running an out-of-tree provider.
Examples
If you are using a cloud that is currently supported in Kubernetes core and would like to adopt cloud controller manager, see the cloud controller manager in kubernetes core.
For cloud controller managers not in Kubernetes core, you can find the respective projects in repositories maintained by cloud vendors or by SIGs.
For providers already in Kubernetes core, you can run the in-tree cloud controller manager as a DaemonSet in your cluster, use the following as a guideline:
# This is an example of how to set up cloud-controller-manager as a Daemonset in your cluster.
# It assumes that your masters can run pods and has the role node-role.kubernetes.io/master
# Note that this Daemonset will not work straight out of the box for your cloud, this is
# meant to be a guideline.

---
apiVersion: v1
kind: ServiceAccount
metadata:
  name: cloud-controller-manager
  namespace: kube-system
---
apiVersion: rbac.authorization.k8s.io/v1
kind: ClusterRoleBinding
metadata:
  name: system:cloud-controller-manager
roleRef:
  apiGroup: rbac.authorization.k8s.io
  kind: ClusterRole
  name: cluster-admin
subjects:
- kind: ServiceAccount
  name: cloud-controller-manager
  namespace: kube-system
---
apiVersion: apps/v1
kind: DaemonSet
metadata:
  labels:
    k8s-app: cloud-controller-manager
  name: cloud-controller-manager
  namespace: kube-system
spec:
  selector:
    matchLabels:
      k8s-app: cloud-controller-manager
  template:
    metadata:
      labels:
        k8s-app: cloud-controller-manager
    spec:
      serviceAccountName: cloud-controller-manager
      containers:
      - name: cloud-controller-manager
        # for in-tree providers we use registry.k8s.io/cloud-controller-manager
        # this can be replaced with any other image for out-of-tree providers
        image: registry.k8s.io/cloud-controller-manager:v1.8.0
        command:
        - /usr/local/bin/cloud-controller-manager
        - --cloud-provider=[YOUR_CLOUD_PROVIDER]  # Add your own cloud provider here!
        - --leader-elect=true
        - --use-service-account-credentials
        # these flags will vary for every cloud provider
        - --allocate-node-cidrs=true
        - --configure-cloud-routes=true
        - --cluster-cidr=172.17.0.0/16
      tolerations:
      # this is required so CCM can bootstrap itself
      - key: node.cloudprovider.kubernetes.io/uninitialized
        value: "true"
        effect: NoSchedule
      # these tolerations are to have the daemonset runnable on control plane nodes
      # remove them if your control plane nodes should not run pods
      - key: node-role.kubernetes.io/control-plane
        operator: Exists
        effect: NoSchedule
      - key: node-role.kubernetes.io/master
        operator: Exists
        effect: NoSchedule
      # this is to restrict CCM to only run on master nodes
      # the node selector may vary depending on your cluster setup
      nodeSelector:
        node-role.kubernetes.io/master: ""
Limitations
Running cloud controller manager comes with a few possible limitations. Although these limitations are being addressed in upcoming releases, it's important that you are aware of these limitations for production workloads.
Support for Volumes
Cloud controller manager does not implement any of the volume controllers found
in kube-controller-manager as the volume integrations also require coordination
with kubelets. As we evolve CSI (container storage interface) and add stronger
support for flex volume plugins, necessary support will be added to cloud
controller manager so that clouds can fully integrate with volumes. Learn more
about out-of-tree CSI volume plugins here.
Scalability
The cloud-controller-manager queries your cloud provider's APIs to retrieve information for all nodes. For very large clusters, consider possible bottlenecks such as resource requirements and API rate limiting.
Chicken and Egg
The goal of the cloud controller manager project is to decouple development of cloud features from the core Kubernetes project. Unfortunately, many aspects of the Kubernetes project has assumptions that cloud provider features are tightly integrated into the project. As a result, adopting this new architecture can create several situations where a request is being made for information from a cloud provider, but the cloud controller manager may not be able to return that information without the original request being complete.
A good example of this is the TLS bootstrapping feature in the Kubelet. TLS bootstrapping assumes that the Kubelet has the ability to ask the cloud provider (or a local metadata service) for all its address types (private, public, etc) but cloud controller manager cannot set a node's address types without being initialized in the first place which requires that the kubelet has TLS certificates to communicate with the apiserver.
As this initiative evolves, changes will be made to address these issues in upcoming releases.
What's next
To build and develop your own cloud controller manager, read Developing Cloud Controller Manager.
16 - Configure a kubelet image credential provider
Kubernetes v1.26 [stable]Starting from Kubernetes v1.20, the kubelet can dynamically retrieve credentials for a container image registry using exec plugins. The kubelet and the exec plugin communicate through stdio (stdin, stdout, and stderr) using Kubernetes versioned APIs. These plugins allow the kubelet to request credentials for a container registry dynamically as opposed to storing static credentials on disk. For example, the plugin may talk to a local metadata server to retrieve short-lived credentials for an image that is being pulled by the kubelet.
You may be interested in using this capability if any of the below are true:
- API calls to a cloud provider service are required to retrieve authentication information for a registry.
- Credentials have short expiration times and requesting new credentials frequently is required.
- Storing registry credentials on disk or in imagePullSecrets is not acceptable.
This guide demonstrates how to configure the kubelet's image credential provider plugin mechanism.
Service Account Token for Image Pulls
Kubernetes v1.34 [beta](enabled by default)Starting from Kubernetes v1.33, the kubelet can be configured to send a service account token bound to the pod for which the image pull is being performed to the credential provider plugin.
This allows the plugin to exchange the token for credentials to access the image registry.
To enable this feature,
the KubeletServiceAccountTokenForCredentialProviders feature gate
must be enabled on the kubelet,
and the tokenAttributes field must be set
in the CredentialProviderConfig file for the plugin.
The tokenAttributes field contains information
about the service account token that will be passed to the plugin,
including the intended audience for the token
and whether the plugin requires the pod to have a service account.
Using service account token credentials can enable the following use-cases:
- Avoid needing a kubelet/node-based identity to pull images from a registry.
- Allow workloads to pull images based on their own runtime identity without long-lived/persisted secrets.
Before you begin
- You need a Kubernetes cluster with nodes that support kubelet credential provider plugins. This support is available in Kubernetes 1.36; Kubernetes v1.24 and v1.25 included this as a beta feature, enabled by default.
- If you are configuring a credential provider plugin
that requires the service account token,
you need a Kubernetes cluster with nodes running Kubernetes v1.33 or later
and the
KubeletServiceAccountTokenForCredentialProvidersfeature gate enabled on the kubelet. - A working implementation of a credential provider exec plugin. You can build your own plugin or use one provided by cloud providers.
To check the version, enter kubectl version.
Installing Plugins on Nodes
A credential provider plugin is an executable binary that will be run by the kubelet. Ensure that the plugin binary exists on every node in your cluster and stored in a known directory. The directory will be required later when configuring kubelet flags.
Configuring the Kubelet
In order to use this feature, the kubelet expects two flags to be set:
--image-credential-provider-config- the path to the credential provider plugin config file.--image-credential-provider-bin-dir- the path to the directory where credential provider plugin binaries are located.
Configure a kubelet credential provider
The configuration file passed into --image-credential-provider-config is read by the kubelet to determine which exec plugins
should be invoked for which container images. Here's an example configuration file you may end up using if you are using the
ECR-based plugin:
apiVersion: kubelet.config.k8s.io/v1
kind: CredentialProviderConfig
# providers is a list of credential provider helper plugins that will be enabled by the kubelet.
# Multiple providers may match against a single image, in which case credentials
# from all providers will be returned to the kubelet. If multiple providers are called
# for a single image, the results are combined. If providers return overlapping
# auth keys, the value from the provider earlier in this list is used.
providers:
  # name is the required name of the credential provider. It must match the name of the
  # provider executable as seen by the kubelet. The executable must be in the kubelet's
  # bin directory (set by the --image-credential-provider-bin-dir flag).
  - name: ecr-credential-provider
    # matchImages is a required list of strings used to match against images in order to
    # determine if this provider should be invoked. If one of the strings matches the
    # requested image from the kubelet, the plugin will be invoked and given a chance
    # to provide credentials. Images are expected to contain the registry domain
    # and URL path.
    #
    # Each entry in matchImages is a pattern which can optionally contain a port and a path.
    # Globs can be used in the domain, but not in the port or the path. Globs are supported
    # as subdomains like '*.k8s.io' or 'k8s.*.io', and top-level-domains such as 'k8s.*'.
    # Matching partial subdomains like 'app*.k8s.io' is also supported. Each glob can only match
    # a single subdomain segment, so `*.io` does **not** match `*.k8s.io`.
    #
    # A match exists between an image and a matchImage when all of the below are true:
    # - Both contain the same number of domain parts and each part matches.
    # - The URL path of an matchImages must be a prefix of the target image URL path.
    # - If the matchImages contains a port, then the port must match in the image as well.
    #
    # Example values of matchImages:
    # - 123456789.dkr.ecr.us-east-1.amazonaws.com
    # - *.azurecr.io
    # - gcr.io
    # - *.*.registry.io
    # - registry.io:8080/path
    matchImages:
      - "*.dkr.ecr.*.amazonaws.com"
      - "*.dkr.ecr.*.amazonaws.com.cn"
      - "*.dkr.ecr-fips.*.amazonaws.com"
      - "*.dkr.ecr.us-iso-east-1.c2s.ic.gov"
      - "*.dkr.ecr.us-isob-east-1.sc2s.sgov.gov"
    # defaultCacheDuration is the default duration the plugin will cache credentials in-memory
    # if a cache duration is not provided in the plugin response. This field is required.
    defaultCacheDuration: "12h"
    # Required input version of the exec CredentialProviderRequest. The returned CredentialProviderResponse
    # MUST use the same encoding version as the input. Current supported values are:
    # - credentialprovider.kubelet.k8s.io/v1
    apiVersion: credentialprovider.kubelet.k8s.io/v1
    # Arguments to pass to the command when executing it.
    # +optional
    # args:
    #   - --example-argument
    # Env defines additional environment variables to expose to the process. These
    # are unioned with the host's environment, as well as variables client-go uses
    # to pass argument to the plugin.
    # +optional
    env:
      - name: AWS_PROFILE
        value: example_profile

    # tokenAttributes is the configuration for the service account token that will be passed to the plugin.
    # The credential provider opts in to using service account tokens for image pull by setting this field.
    # if this field is set without the `KubeletServiceAccountTokenForCredentialProviders` feature gate enabled,
    # kubelet will fail to start with invalid configuration error.
    # +optional
    tokenAttributes:
      # serviceAccountTokenAudience is the intended audience for the projected service account token.
      # +required
      serviceAccountTokenAudience: "<audience for the token>"
      # cacheType indicates the type of cache key use for caching the credentials returned by the plugin
      # when the service account token is used.
      # The most conservative option is to set this to "Token", which means the kubelet will cache
      # returned credentials on a per-token basis. This should be set if the returned credential's
      # lifetime is limited to the service account token's lifetime.
      # If the plugin's credential retrieval logic depends only on the service account and not on
      # pod-specific claims, then the plugin can set this to "ServiceAccount". In this case, the
      # kubelet will cache returned credentials on a per-serviceaccount basis. Use this when the
      # returned credential is valid for all pods using the same service account.
      # +required
      cacheType: "<Token or ServiceAccount>"
      # requireServiceAccount indicates whether the plugin requires the pod to have a service account.
      # If set to true, kubelet will only invoke the plugin if the pod has a service account.
      # If set to false, kubelet will invoke the plugin even if the pod does not have a service account
      # and will not include a token in the CredentialProviderRequest. This is useful for plugins
      # that are used to pull images for pods without service accounts (e.g., static pods).
      # +required
      requireServiceAccount: true
      # requiredServiceAccountAnnotationKeys is the list of annotation keys that the plugin is interested in
      # and that are required to be present in the service account.
      # The keys defined in this list will be extracted from the corresponding service account and passed
      # to the plugin as part of the CredentialProviderRequest. If any of the keys defined in this list
      # are not present in the service account, kubelet will not invoke the plugin and will return an error.
      # This field is optional and may be empty. Plugins may use this field to extract additional information
      # required to fetch credentials or allow workloads to opt in to using service account tokens for image pull.
      # If non-empty, requireServiceAccount must be set to true.
      # The keys defined in this list must be unique and not overlap with the keys defined in the
      # optionalServiceAccountAnnotationKeys list.
      # +optional
      requiredServiceAccountAnnotationKeys:
      - "example.com/required-annotation-key-1"
      - "example.com/required-annotation-key-2"
      # optionalServiceAccountAnnotationKeys is the list of annotation keys that the plugin is interested in
      # and that are optional to be present in the service account.
      # The keys defined in this list will be extracted from the corresponding service account and passed
      # to the plugin as part of the CredentialProviderRequest. The plugin is responsible for validating the
      # existence of annotations and their values. This field is optional and may be empty.
      # Plugins may use this field to extract additional information required to fetch credentials.
      # The keys defined in this list must be unique and not overlap with the keys defined in the
      # requiredServiceAccountAnnotationKeys list.
      # +optional
      optionalServiceAccountAnnotationKeys:
      - "example.com/optional-annotation-key-1"
      - "example.com/optional-annotation-key-2"
The providers field is a list of enabled plugins used by the kubelet. Each entry has a few required fields:
name: the name of the plugin which MUST match the name of the executable binary that exists in the directory passed into--image-credential-provider-bin-dir.matchImages: a list of strings used to match against images in order to determine if this provider should be invoked. More on this below.defaultCacheDuration: the default duration the kubelet will cache credentials in-memory if a cache duration was not specified by the plugin.apiVersion: the API version that the kubelet and the exec plugin will use when communicating.
Each credential provider can also be given optional args and environment variables as well. Consult the plugin implementors to determine what set of arguments and environment variables are required for a given plugin.
If you are using the KubeletServiceAccountTokenForCredentialProviders feature gate and configuring the plugin to use the service account token by setting the tokenAttributes field, the following fields are required:
serviceAccountTokenAudience: the intended audience for the projected service account token. This cannot be the empty string. When theServiceAccountNodeAudienceRestrictionfeature gate is enabled, the kubelet must be authorized to request tokens for this audience; otherwise the credential provider will not be invoked. You must grant thesystem:nodesgroup permission to use therequest-serviceaccounts-token-audienceverb on this audience via RBAC. For details and examples, see Service account token audience restriction.cacheType: the type of cache key used for caching the credentials returned by the plugin when the service account token is used. The most conservative option is to set this toToken, which means the kubelet will cache returned credentials on a per-token basis. This should be set if the returned credential's lifetime is limited to the service account token's lifetime. If the plugin's credential retrieval logic depends only on the service account and not on pod-specific claims, then the plugin can set this toServiceAccount. In this case, the kubelet will cache returned credentials on a per-service account basis. Use this when the returned credential is valid for all pods using the same service account.requireServiceAccount: whether the plugin requires the pod to have a service account.- If set to
true, kubelet will only invoke the plugin if the pod has a service account. - If set to
false, kubelet will invoke the plugin even if the pod does not have a service account and will not include a token in theCredentialProviderRequest.
- If set to
This is useful for plugins that are used to pull images for pods without service accounts (e.g., static pods).
Configure image matching
The matchImages field for each credential provider is used by the kubelet to determine whether a plugin should be invoked
for a given image that a Pod is using. Each entry in matchImages is an image pattern which can optionally contain a port and a path.
Globs can be used in the domain, but not in the port or the path. Globs are supported as subdomains like *.k8s.io or k8s.*.io,
and top-level domains such as k8s.*. Matching partial subdomains like app*.k8s.io is also supported. Each glob can only match
a single subdomain segment, so *.io does NOT match *.k8s.io.
A match exists between an image name and a matchImage entry when all of the below are true:
- Both contain the same number of domain parts and each part matches.
- The URL path of match image must be a prefix of the target image URL path.
- If the matchImages contains a port, then the port must match in the image as well.
Some example values of matchImages patterns are:
123456789.dkr.ecr.us-east-1.amazonaws.com*.azurecr.iogcr.io*.*.registry.iofoo.registry.io:8080/path
What's next
- Read the details about
CredentialProviderConfigin the kubelet configuration API (v1) reference. - Read the kubelet credential provider API reference (v1).
17 - Configure Quotas for API Objects
This page shows how to configure quotas for API objects, including PersistentVolumeClaims and Services. A quota restricts the number of objects, of a particular type, that can be created in a namespace. You specify quotas in a ResourceQuota object.
Before you begin
You need to have a Kubernetes cluster, and the kubectl command-line tool must be configured to communicate with your cluster. It is recommended to run this tutorial on a cluster with at least two nodes that are not acting as control plane hosts. If you do not already have a cluster, you can create one by using minikube or you can use one of these Kubernetes playgrounds:
To check the version, enter kubectl version.
Create a namespace
Create a namespace so that the resources you create in this exercise are isolated from the rest of your cluster.
kubectl create namespace quota-object-example
Create a ResourceQuota
Here is the configuration file for a ResourceQuota object:
apiVersion: v1
kind: ResourceQuota
metadata:
  name: object-quota-demo
spec:
  hard:
    persistentvolumeclaims: "1"
    services.loadbalancers: "2"
    services.nodeports: "0"
Create the ResourceQuota:
kubectl apply -f https://k8s.io/examples/admin/resource/quota-objects.yaml --namespace=quota-object-example
View detailed information about the ResourceQuota:
kubectl get resourcequota object-quota-demo --namespace=quota-object-example --output=yaml
The output shows that in the quota-object-example namespace, there can be at most one PersistentVolumeClaim, at most two Services of type LoadBalancer, and no Services of type NodePort.
status:
  hard:
    persistentvolumeclaims: "1"
    services.loadbalancers: "2"
    services.nodeports: "0"
  used:
    persistentvolumeclaims: "0"
    services.loadbalancers: "0"
    services.nodeports: "0"
Create a PersistentVolumeClaim
Here is the configuration file for a PersistentVolumeClaim object:
apiVersion: v1
kind: PersistentVolumeClaim
metadata:
  name: pvc-quota-demo
spec:
  storageClassName: manual
  accessModes:
    - ReadWriteOnce
  resources:
    requests:
      storage: 3Gi
Create the PersistentVolumeClaim:
kubectl apply -f https://k8s.io/examples/admin/resource/quota-objects-pvc.yaml --namespace=quota-object-example
Verify that the PersistentVolumeClaim was created:
kubectl get persistentvolumeclaims --namespace=quota-object-example
The output shows that the PersistentVolumeClaim exists and has status Pending:
NAME             STATUS
pvc-quota-demo   Pending
Attempt to create a second PersistentVolumeClaim
Here is the configuration file for a second PersistentVolumeClaim:
apiVersion: v1
kind: PersistentVolumeClaim
metadata:
  name: pvc-quota-demo-2
spec:
  storageClassName: manual
  accessModes:
    - ReadWriteOnce
  resources:
    requests:
      storage: 4Gi
Attempt to create the second PersistentVolumeClaim:
kubectl apply -f https://k8s.io/examples/admin/resource/quota-objects-pvc-2.yaml --namespace=quota-object-example
The output shows that the second PersistentVolumeClaim was not created, because it would have exceeded the quota for the namespace.
persistentvolumeclaims "pvc-quota-demo-2" is forbidden:
exceeded quota: object-quota-demo, requested: persistentvolumeclaims=1,
used: persistentvolumeclaims=1, limited: persistentvolumeclaims=1
Notes
These are the strings used to identify API resources that can be constrained by quotas:
| String | API Object |
|---|---|
| "pods" | Pod |
| "services" | Service |
| "replicationcontrollers" | ReplicationController |
| "resourcequotas" | ResourceQuota |
| "secrets" | Secret |
| "configmaps" | ConfigMap |
| "persistentvolumeclaims" | PersistentVolumeClaim |
| "services.nodeports" | Service of type NodePort |
| "services.loadbalancers" | Service of type LoadBalancer |
Clean up
Delete your namespace:
kubectl delete namespace quota-object-example
What's next
For cluster administrators
Configure Default Memory Requests and Limits for a Namespace
Configure Minimum and Maximum Memory Constraints for a Namespace
Configure Minimum and Maximum CPU Constraints for a Namespace
For app developers
18 - Control CPU Management Policies on the Node
Kubernetes v1.26 [stable]Kubernetes keeps many aspects of how pods execute on nodes abstracted from the user. This is by design. However, some workloads require stronger guarantees in terms of latency and/or performance in order to operate acceptably. The kubelet provides methods to enable more complex workload placement policies while keeping the abstraction free from explicit placement directives.
For detailed information on resource management, please refer to the Resource Management for Pods and Containers documentation.
For detailed information on how the kubelet implements resource management, please refer to the Node ResourceManagers documentation.
Before you begin
You need to have a Kubernetes cluster, and the kubectl command-line tool must be configured to communicate with your cluster. It is recommended to run this tutorial on a cluster with at least two nodes that are not acting as control plane hosts. If you do not already have a cluster, you can create one by using minikube or you can use one of these Kubernetes playgrounds:
Your Kubernetes server must be at or later than version v1.26.To check the version, enter kubectl version.
If you are running an older version of Kubernetes, please look at the documentation for the version you are actually running.
Configuring CPU management policies
By default, the kubelet uses CFS quota to enforce pod CPU limits. When the node runs many CPU-bound pods, the workload can move to different CPU cores depending on whether the pod is throttled and which CPU cores are available at scheduling time. Many workloads are not sensitive to this migration and thus work fine without any intervention.
However, in workloads where CPU cache affinity and scheduling latency significantly affect workload performance, the kubelet allows alternative CPU management policies to determine some placement preferences on the node.
Windows Support
Kubernetes v1.32 [alpha](disabled by default)CPU Manager support can be enabled on Windows by using the WindowsCPUAndMemoryAffinity feature gate
and it requires support in the container runtime.
Once the feature gate is enabled, follow the steps below to configure the CPU manager policy.
Configuration
The CPU Manager policy is set with the --cpu-manager-policy kubelet
flag or the cpuManagerPolicy field in KubeletConfiguration.
There are two supported policies:
none: the default policy.static: allows pods with certain resource characteristics to be granted increased CPU affinity and exclusivity on the node.
The CPU manager periodically writes resource updates through the CRI in
order to reconcile in-memory CPU assignments with cgroupfs. The reconcile
frequency is set through a new Kubelet configuration value
--cpu-manager-reconcile-period. If not specified, it defaults to the same
duration as --node-status-update-frequency.
The behavior of the static policy can be fine-tuned using the --cpu-manager-policy-options flag.
The flag takes a comma-separated list of key=value policy options.
If you disable the CPUManagerPolicyOptions
feature gate
then you cannot fine-tune CPU manager policies. In that case, the CPU manager
operates only using its default settings.
In addition to the top-level CPUManagerPolicyOptions feature gate, the policy options are split
into two groups: alpha quality (hidden by default) and beta quality (visible by default).
The groups are guarded respectively by the CPUManagerPolicyAlphaOptions
and CPUManagerPolicyBetaOptions feature gates. Diverging from the Kubernetes standard, these
feature gates guard groups of options, because it would have been too cumbersome to add a feature
gate for each individual option.
Changing the CPU Manager Policy
Since the CPU manager policy can only be applied when kubelet spawns new pods, simply changing from "none" to "static" won't apply to existing pods. So in order to properly change the CPU manager policy on a node, perform the following steps:
- Drain the node.
- Stop kubelet.
- Remove the old CPU manager state file. The path to this file is
/var/lib/kubelet/cpu_manager_stateby default. This clears the state maintained by the CPUManager so that the cpu-sets set up by the new policy won’t conflict with it. - Edit the kubelet configuration to change the CPU manager policy to the desired value.
- Start kubelet.
Repeat this process for every node that needs its CPU manager policy changed. Skipping this process will result in kubelet crashlooping with the following error:
could not restore state from checkpoint: configured policy "static" differs from state checkpoint policy "none", please drain this node and delete the CPU manager checkpoint file "/var/lib/kubelet/cpu_manager_state" before restarting Kubelet
Note:
if the set of online CPUs changes on the node, the node must be drained and CPU manager manually reset by deleting the state filecpu_manager_state in the kubelet root directory.none policy configuration
This policy has no extra configuration items.
static policy configuration
This policy manages a shared pool of CPUs that initially contains all CPUs in the
node. The amount of exclusively allocatable CPUs is equal to the total
number of CPUs in the node minus any CPU reservations by the kubelet --kube-reserved or
--system-reserved options. From 1.17, the CPU reservation list can be specified
explicitly by kubelet --reserved-cpus option. The explicit CPU list specified by
--reserved-cpus takes precedence over the CPU reservation specified by
--kube-reserved and --system-reserved. CPUs reserved by these options are taken, in
integer quantity, from the initial shared pool in ascending order by physical
core ID. This shared pool is the set of CPUs on which any containers in
BestEffort and Burstable pods run. Containers in Guaranteed pods with fractional
CPU requests also run on CPUs in the shared pool. Only containers that are
both part of a Guaranteed pod and have integer CPU requests are assigned
exclusive CPUs.
Note:
The kubelet requires a CPU reservation greater than zero be made using either--kube-reserved and/or --system-reserved or --reserved-cpus when
the static policy is enabled. This is because zero CPU reservation would allow the shared
pool to become empty.Static policy options
You can toggle groups of options on and off based upon their maturity level using the following feature gates:
CPUManagerPolicyBetaOptionsdefault enabled. Disable to hide beta-level options.CPUManagerPolicyAlphaOptionsdefault disabled. Enable to show alpha-level options. You will still have to enable each option using theCPUManagerPolicyOptionskubelet option.
The following policy options exist for the static CPUManager policy:
full-pcpus-only(GA, visible by default) (1.33 or higher)distribute-cpus-across-numa(beta, visible by default) (1.33 or higher)align-by-socket(alpha, hidden by default) (1.25 or higher)distribute-cpus-across-cores(alpha, hidden by default) (1.31 or higher)strict-cpu-reservation(GA, visible by default) (1.35 or higher)prefer-align-cpus-by-uncorecache(GA, visible by default) (1.36 or higher)
The full-pcpus-only option can be enabled by adding full-pcpus-only=true to
the CPUManager policy options.
Likewise, the distribute-cpus-across-numa option can be enabled by adding
distribute-cpus-across-numa=true to the CPUManager policy options.
When both are set, they are "additive" in the sense that CPUs will be
distributed across NUMA nodes in chunks of full-pcpus rather than individual
cores.
The align-by-socket policy option can be enabled by adding align-by-socket=true
to the CPUManager policy options. It is also additive to the full-pcpus-only
and distribute-cpus-across-numa policy options.
The distribute-cpus-across-cores option can be enabled by adding
distribute-cpus-across-cores=true to the CPUManager policy options.
It cannot be used with full-pcpus-only or distribute-cpus-across-numa policy
options together at this moment.
The strict-cpu-reservation option can be enabled by adding strict-cpu-reservation=true to
the CPUManager policy options followed by removing the /var/lib/kubelet/cpu_manager_state file and restart kubelet.
The prefer-align-cpus-by-uncorecache option can be enabled by adding the
prefer-align-cpus-by-uncorecache to the CPUManager policy options. If
incompatible options are used, the kubelet will fail to start with the error
explained in the logs.
For mode detail about the behavior of the individual options you can configure, please refer to the Node ResourceManagers documentation.
What's next
- Read about Pod-level resource managers.
19 - Control Memory Management Policies on a Node
Kubernetes v1.32 [stable](enabled by default)The Kubernetes Memory Manager enables the feature of guaranteed memory (and hugepages)
allocation for pods in the Guaranteed QoS class.
The Memory Manager employs a hint generation protocol to yield the most suitable NUMA affinity for a pod. The Memory Manager feeds the central manager (Topology Manager) with these affinity hints. Based on both the hints and Topology Manager policy, the pod is rejected or admitted to the node.
Moreover, the Memory Manager ensures that the memory which a pod requests is allocated from a minimum number of NUMA nodes.
For background about memory resources for Pods, read Assign Memory Resources to Containers and Pods.
Before you begin
You need to have a Kubernetes cluster, and the kubectl command-line tool must be configured to communicate with your cluster. It is recommended to run this tutorial on a cluster with at least two nodes that are not acting as control plane hosts. If you do not already have a cluster, you can create one by using minikube or you can use one of these Kubernetes playgrounds:
Your Kubernetes server must be at or later than version v1.32.
To check the version, enter kubectl version.
Resource alignment prerequisites
To align memory resources with other requested resources in a Pod spec:
- the CPU Manager should be enabled and proper CPU Manager policy should be configured on a Node. See control CPU Management Policies;
- the Topology Manager should be enabled and proper Topology Manager policy should be configured on a Node. See control Topology Management Policies.
Windows support
Kubernetes v1.32 [alpha](disabled by default)Windows support can be enabled via the WindowsCPUAndMemoryAffinity feature gate
and it requires support in the container runtime.
Only the None and BestEffort policies are supported on Windows.
How does the Memory Manager operate?
For Linux nodes, the Memory Manager offers the guaranteed memory (and hugepages) allocation
for Pods in Guaranteed QoS class.
To immediately put the Memory Manager into operation follow the guidelines in the section
Memory Manager configuration, and subsequently,
prepare and deploy a Guaranteed Pod as illustrated in the section
Placing a Pod in the Guaranteed QoS class.
The Memory Manager is a hint provider, and it provides topology hints for
the Topology Manager which then aligns the requested resources according to these topology hints.
On Linux, it also enforces cgroups (specifically, cpuset.mems) for Pods.
The complete flow diagram concerning pod admission and deployment process is illustrated
below:

During this process, the Memory Manager updates its internal counters stored in [Node Map and Memory Maps][2] to manage guaranteed memory allocation.
The memory manager activates during kubelet startup if a node administrator configures
reservedMemory for the kubelet (section Reserved memory configuration).
In this case, the kubelet updates its node map to reflect this reservation.
When the Static policy is configured, you must configure reserved memory for the node
(for example, with the reservedMemory configuration field in the kubelet configuration).
An important topic in the context of Memory Manager operation is the management of NUMA groups. Each time pod's memory request is in excess of single NUMA node capacity, the Memory Manager attempts to create a group that comprises several NUMA nodes and that features extended memory capacity.
Memory Manager configuration
Other Managers should already be configured (see resource alignment prerequisites.
Set the memoryManagerPolicy configuration field within the kubelet configuration, to the name of your chosen policy.
Optionally, some amount of memory can be reserved for system or kubelet processes to increase node stability (section Reserved memory configuration).
Policies
Kubernetes' memory manager provides three policies. You can select a policy via the memoryManagerPolicy configuration field
in the kubelet configuration; the values available in Kubernetes 1.36 are:
None(default)Static(Linux only)BestEffort(Windows only)
None policy
This is the default policy and does not affect the memory allocation in any way. It acts the same as if the Memory Manager is not present at all.
The None policy returns default topology hint. This special hint denotes that Hint Provider
(Memory Manager in this case) has no preference for NUMA affinity with any resource.
Static policy
Kubernetes v1.32 [stable](enabled by default)This policy is only supported on Linux.
In the case of the Guaranteed pod, the Static Memory Manager policy returns topology hints
relating to the set of NUMA nodes where the memory can be guaranteed,
and reserves the memory through updating the internal [NodeMap][2] object.
In the case of the BestEffort or Burstable pod, the Static Memory Manager policy sends back
the default topology hint as there is no request for the guaranteed memory,
and does not reserve the memory in the internal [NodeMap][2] object.
This policy is only supported on Linux.
BestEffort policy
Kubernetes v1.32 [alpha](disabled by default)This policy is only supported on Windows.
On Windows, NUMA node assignment works differently than Linux. There is no mechanism to ensure that Memory access only comes from a specific NUMA node. Instead the Windows operating system scheduler selects the most optimal NUMA node based on the CPU(s) assignments. It is possible that Windows might use other NUMA nodes if the Windows scheduler deems them optimal.
The policy does track the amount of memory available and requested through the internal node map.
The memory manager makes a best effort at ensuring that enough memory is available on a NUMA node before making
a resource assignment.
This means that in most cases memory assignment should function as specified.
Reserved memory configuration
As an administrator, you can configure the total amount of reserved memory for a node. This pre-configured value is subsequently utilized to calculate the real amount of node allocatable memory available to pods.
The Kubernetes scheduler incorporates allocatable memory information to optimise pod scheduling. . The node allocatable mechanism is commonly used by node administrators to reserve K8s node system resources for the kubelet or operating system processes to help assure node stability.
The relevant kubelet settings include kubeReserved, systemReserved and reservedMemory.
The reservedMemory setting allows you to split the total reserved memory and assign it
across many NUMA nodes.
You specify a comma-separated list of memory reservations, of different memory types, per NUMA node. You can also specify reservations that span multiple NUMA nodes, using a semicolon as separator.
The Memory Manager will not use this reserved memory for running container workloads.
For example, if you have a NUMA node "NUMA0" with 10GiB of memory available, and
you configure reservedMemory to reserve 1Gi (of memory) for NUMA0,
the Memory Manager assumes that only 9GiB is available for pods.
You can omit this parameter, however, you should be aware that the quantity of reserved memory from all NUMA nodes should be equal to the quantity of node allocatable memory.
If at least one node allocatable parameter is non-zero, you will need to specify
reservedMemory for at least one NUMA node.
In fact, the evictionHard threshold value is equal to 100Mi by default, so
if you use the Static policy, specifying reservedMemory is obligatory.
Memory manager reserved memory syntax
Here are some examples of how to set the reservedMemory configuration for the kubelet.
  # Example 1
  reservedMemory:
  - numaNode: 0 # NUMA node index
    limits:
      memory: "1Gi" # byte quantity
  - numaNode: 1
    limits:
      memory: "2Gi" # byte quantity
  # Example 2
  reservedMemory:
  - numaNode: 0
    limits:
      "memory": "512Gi"
  - numaNode: 1
    limits:
      "memory": "512Gi"
      "hugepages-1Gi": "2Gi" # only relevant on Linux
Constraints on NUMA memory reservation
When you specify values for reservedMemory, this must be compatible with the kubeReserved
and systemReserved values that are in effect, along with any memory.available setting
you make as part of evictionHard.
If you do not follow the formula above, the Memory Manager will show an error on startup.
In other words, the example 1 (above) illustrates that for the conventional memory (type=memory),
Kubernetes reserves 3GiB in total; that is:
Some examples of kubelet configuration settings relevant to the node allocatable configuration:
  kubeReserved: { cpu: "500m", memory: "50Mi" } # half a CPU, 50MiB of memory
  systemReserved: { cpu: "500m", memory: "256Mi" } # half a CPU, 256MiB of memory
Note:
The default hard eviction threshold is 100MiB, and not zero.
Remember to increase the quantity of memory that you reserve by setting reservedMemory
by that hard eviction threshold. Otherwise, the kubelet will not start Memory Manager and
display an error.
Here is an example of a correct configuration that uses reservedMemory:
  # this snippet relies on the default value of evictionHard
  memoryManagerPolicy: Static
  kubeReserved: { cpu: "4", memory: "4Gi" }
  systemReserved: { cpu: "1", memory: "1Gi" }
  reservedMemory:
  - numaNode: 0
    limits:
      memory: "3Gi"
  - numaNode: 1
    limits:
      memory: "2148Mi" # 3GiB minus 100MiB
Configurations to avoid
Avoid the following configurations:
- duplicates: the same NUMA node or memory type, but with a different value;
- setting a zero limit for any of memory types;
- NUMA node IDs that do not exist in the machine hardware;
- memory type names different than
memoryorhugepages-<size>(hugepages of particular<size>should also exist).
Placing a Pod in the Guaranteed QoS class
If the selected policy is anything other than None, the Memory Manager identifies pods
that are in the Guaranteed QoS class.
The Memory Manager provides specific topology hints to the Topology Manager for each Guaranteed pod.
For pods in a QoS class other than Guaranteed, the Memory Manager provides default topology hints
to the Topology Manager.
The following excerpts from pod manifests assign a pod to the Guaranteed QoS class.
A Pod with integer CPU(s) runs in the Guaranteed QoS class, when requests are equal to limits:
spec:
  containers:
  - name: nginx
    image: nginx
    resources:
      limits:
        memory: "200Mi"
        cpu: "2"
        example.com/device: "1"
      requests:
        memory: "200Mi"
        cpu: "2"
        example.com/device: "1"
Also, a pod sharing CPU(s) runs in the Guaranteed QoS class, when requests are equal to limits.
spec:
  containers:
  - name: nginx
    image: nginx
    resources:
      limits:
        memory: "200Mi"
        cpu: "300m"
        example.com/device: "1"
      requests:
        memory: "200Mi"
        cpu: "300m"
        example.com/device: "1"
Notice that both CPU and memory requests must be specified for a Pod to lend it to Guaranteed QoS class.
What's next
- Read Troubleshooting Topology Management
- Read the KEP (Kubernetes enhancement proposal) for memory manager
- Read about Pod-level resource managers.
20 - Control Topology Management Policies on a node
Kubernetes v1.27 [stable]An increasing number of systems leverage a combination of CPUs and hardware accelerators to support latency-critical execution and high-throughput parallel computation. These include workloads in fields such as telecommunications, scientific computing, machine learning, financial services and data analytics. Such hybrid systems comprise a high performance environment.
In order to extract the best performance, optimizations related to CPU isolation, memory and device locality are required. However, in Kubernetes, these optimizations are handled by a disjoint set of components.
Topology Manager is a kubelet component that aims to coordinate the set of components that are responsible for these optimizations.
Before you begin
You need to have a Kubernetes cluster, and the kubectl command-line tool must be configured to communicate with your cluster. It is recommended to run this tutorial on a cluster with at least two nodes that are not acting as control plane hosts. If you do not already have a cluster, you can create one by using minikube or you can use one of these Kubernetes playgrounds:
Your Kubernetes server must be at or later than version v1.18.To check the version, enter kubectl version.
How topology manager works
Prior to the introduction of Topology Manager, the CPU and Device Manager in Kubernetes make resource allocation decisions independently of each other. This can result in undesirable allocations on multiple-socketed systems, and performance/latency sensitive applications will suffer due to these undesirable allocations. Undesirable in this case meaning, for example, CPUs and devices being allocated from different NUMA Nodes, thus incurring additional latency.
The Topology Manager is a kubelet component, which acts as a source of truth so that other kubelet components can make topology aligned resource allocation choices.
The Topology Manager provides an interface for components, called Hint Providers, to send and receive topology information. The Topology Manager has a set of node level policies which are explained below.
The Topology Manager receives topology information from the Hint Providers as a bitmask denoting NUMA Nodes available and a preferred allocation indication. The Topology Manager policies perform a set of operations on the hints provided and converge on the hint determined by the policy to give the optimal result. If an undesirable hint is stored, the preferred field for the hint will be set to false. In the current policies preferred is the narrowest preferred mask. The selected hint is stored as part of the Topology Manager. Depending on the policy configured, the pod can be accepted or rejected from the node based on the selected hint. The hint is then stored in the Topology Manager for use by the Hint Providers when making the resource allocation decisions.
The flow can be seen in the following diagram.
Windows Support
Kubernetes v1.32 [alpha](disabled by default)The Topology Manager support can be enabled on Windows by using the WindowsCPUAndMemoryAffinity feature gate and
it requires support in the container runtime.
Topology manager scopes and policies
The Topology Manager currently:
- aligns Pods of all QoS classes.
- aligns the requested resources that Hint Provider provides topology hints for.
If these conditions are met, the Topology Manager will align the requested resources.
In order to customize how this alignment is carried out, the Topology Manager provides two
distinct options: scope and policy.
The scope defines the granularity at which you would like resource alignment to be performed,
for example, at the pod or container level. And the policy defines the actual policy used to
carry out the alignment, for example, best-effort, restricted, and single-numa-node.
Details on the various scopes and policies available today can be found below.
Note:
To align CPU resources with other requested resources in a Pod spec, the CPU Manager should be enabled and proper CPU Manager policy should be configured on a Node. See Control CPU Management Policies on the Node.Note:
To align memory (and hugepages) resources with other requested resources in a Pod spec, the Memory Manager should be enabled and proper Memory Manager policy should be configured on a Node. Refer to Memory Manager documentation.Topology manager scopes
The Topology Manager can deal with the alignment of resources in a couple of distinct scopes:
container(default)pod
Either option can be selected at a time of the kubelet startup, by setting the
topologyManagerScope in the
kubelet configuration file.
container scope
The container scope is used by default. You can also explicitly set the
topologyManagerScope to container in the
kubelet configuration file.
Within this scope, the Topology Manager performs a number of sequential resource alignments, i.e., for each container (in a pod) a separate alignment is computed. In other words, there is no notion of grouping the containers to a specific set of NUMA nodes, for this particular scope. In effect, the Topology Manager performs an arbitrary alignment of individual containers to NUMA nodes.
The notion of grouping the containers was endorsed and implemented on purpose in the following
scope, for example the pod scope.
pod scope
To select the pod scope, set topologyManagerScope in the
kubelet configuration file to pod.
This scope allows for grouping all containers in a pod to a common set of NUMA nodes. That is, the Topology Manager treats a pod as a whole and attempts to allocate the entire pod (all containers) to either a single NUMA node or a common set of NUMA nodes. The following examples illustrate the alignments produced by the Topology Manager on different occasions:
- all containers can be and are allocated to a single NUMA node;
- all containers can be and are allocated to a shared set of NUMA nodes.
The total amount of particular resource demanded for the entire pod is calculated according to effective requests/limits formula, and thus, this total value is equal to the maximum of:
- the sum of all app container requests,
- the maximum of init container requests,
for a resource.
Using the pod scope in tandem with single-numa-node Topology Manager policy is specifically
valuable for workloads that are latency sensitive or for high-throughput applications that perform
IPC. By combining both options, you are able to place all containers in a pod onto a single NUMA
node; hence, the inter-NUMA communication overhead can be eliminated for that pod.
In the case of single-numa-node policy, a pod is accepted only if a suitable set of NUMA nodes
is present among possible allocations. Reconsider the example above:
- a set containing only a single NUMA node - it leads to pod being admitted,
- whereas a set containing more NUMA nodes - it results in pod rejection (because instead of one NUMA node, two or more NUMA nodes are required to satisfy the allocation).
To recap, the Topology Manager first computes a set of NUMA nodes and then tests it against the Topology Manager policy, which either leads to the rejection or admission of the pod.
Topology manager policies
The Topology Manager supports four allocation policies. You can set a policy via a kubelet flag,
--topology-manager-policy. There are four supported policies:
none(default)best-effortrestrictedsingle-numa-node
Note:
If the Topology Manager is configured with the pod scope, the container, which is considered by the policy, is reflecting requirements of the entire pod, and thus each container from the pod will result with the same topology alignment decision.none policy
This is the default policy and does not perform any topology alignment.
best-effort policy
For each container in a Pod, the kubelet, with best-effort topology management policy, calls
each Hint Provider to discover their resource availability. Using this information, the Topology
Manager stores the preferred NUMA Node affinity for that container. If the affinity is not
preferred, the Topology Manager will store this and admit the pod to the node anyway.
The Hint Providers can then use this information when making the resource allocation decision.
restricted policy
For each container in a Pod, the kubelet, with restricted topology management policy, calls each
Hint Provider to discover their resource availability. Using this information, the Topology
Manager stores the preferred NUMA Node affinity for that container. If the affinity is not
preferred, the Topology Manager will reject this pod from the node. This will result in a pod entering a
Terminated state with a pod admission failure.
Once the pod is in a Terminated state, the Kubernetes scheduler will not attempt to
reschedule the pod. It is recommended to use a ReplicaSet or Deployment to trigger a redeployment of
the pod. An external control loop could be also implemented to trigger a redeployment of pods that
have the Topology Affinity error.
If the pod is admitted, the Hint Providers can then use this information when making the resource allocation decision.
single-numa-node policy
For each container in a Pod, the kubelet, with single-numa-node topology management policy,
calls each Hint Provider to discover their resource availability. Using this information, the
Topology Manager determines if a single NUMA Node affinity is possible. If it is, Topology
Manager will store this and the Hint Providers can then use this information when making the
resource allocation decision. If, however, this is not possible then the Topology Manager will
reject the pod from the node. This will result in a pod in a Terminated state with a pod
admission failure.
Once the pod is in a Terminated state, the Kubernetes scheduler will not attempt to
reschedule the pod. It is recommended to use a Deployment with replicas to trigger a redeployment of
the Pod. An external control loop could be also implemented to trigger a redeployment of pods
that have the Topology Affinity error.
Topology manager policy options
Support for the Topology Manager policy options requires TopologyManagerPolicyOptions
feature gate to be enabled
(it is enabled by default).
You can toggle groups of options on and off based upon their maturity level using the following feature gates:
TopologyManagerPolicyBetaOptionsdefault enabled. Enable to show beta-level options.TopologyManagerPolicyAlphaOptionsdefault disabled. Enable to show alpha-level options.
You will still have to enable each option using the TopologyManagerPolicyOptions kubelet option.
prefer-closest-numa-nodes
The prefer-closest-numa-nodes option is GA since Kubernetes 1.32. In Kubernetes 1.36
this policy option is visible by default provided that the TopologyManagerPolicyOptions
feature gate is enabled.
The Topology Manager is not aware by default of NUMA distances, and does not take them into account when making Pod admission decisions. This limitation surfaces in multi-socket, as well as single-socket multi NUMA systems, and can cause significant performance degradation in latency-critical execution and high-throughput applications if the Topology Manager decides to align resources on non-adjacent NUMA nodes.
If you specify the prefer-closest-numa-nodes policy option, the best-effort and restricted
policies favor sets of NUMA nodes with shorter distance between them when making admission decisions.
You can enable this option by adding prefer-closest-numa-nodes=true to the Topology Manager policy options.
By default (without this option), the Topology Manager aligns resources on either a single NUMA node or, in the case where more than one NUMA node is required, using the minimum number of NUMA nodes.
max-allowable-numa-nodes
The max-allowable-numa-nodes option is GA since Kubernetes 1.35. In Kubernetes 1.36,
this policy option is visible by default provided that the TopologyManagerPolicyOptions
feature gate is enabled.
The time to admit a pod is tied to the number of NUMA nodes on the physical machine. By default, Kubernetes does not run a kubelet with the Topology Manager enabled, on any (Kubernetes) node where more than 8 NUMA nodes are detected.
Note:
If you select themax-allowable-numa-nodes policy option, nodes with more than 8 NUMA nodes can
be allowed to run with the Topology Manager enabled. The Kubernetes project only has limited data on the impact
of using the Topology Manager on (Kubernetes) nodes with more than 8 NUMA nodes. Because of that
lack of data, using this policy option with Kubernetes 1.36 is not recommended and is
at your own risk.You can enable this option by adding max-allowable-numa-nodes=<integer> to the Topology Manager policy options, where the integer value must be greater than 8. The default is 8, which preserves the existing limit.
Setting a value of max-allowable-numa-nodes does not (in and of itself) affect the
latency of pod admission, but binding a Pod to a (Kubernetes) node with many NUMA does have an impact.
Future, potential improvements to Kubernetes may improve Pod admission performance and the high
latency that happens as the number of NUMA nodes increases.
Pod interactions with topology manager policies
Consider the containers in the following Pod manifest:
spec:
  containers:
  - name: nginx
    image: nginx
This pod runs in the BestEffort QoS class because no resource requests or limits are specified.
spec:
  containers:
  - name: nginx
    image: nginx
    resources:
      limits:
        memory: "200Mi"
      requests:
        memory: "100Mi"
This pod runs in the Burstable QoS class because requests are less than limits.
If the selected policy is anything other than none, the Topology Manager would consider these Pod
specifications. The Topology Manager would consult the Hint Providers to get topology hints.
In the case of the static, the CPU Manager policy would return default topology hint, because
these Pods do not explicitly request CPU resources.
spec:
  containers:
  - name: nginx
    image: nginx
    resources:
      limits:
        memory: "200Mi"
        cpu: "2"
        example.com/device: "1"
      requests:
        memory: "200Mi"
        cpu: "2"
        example.com/device: "1"
This pod with integer CPU request runs in the Guaranteed QoS class because requests are equal
to limits.
spec:
  containers:
  - name: nginx
    image: nginx
    resources:
      limits:
        memory: "200Mi"
        cpu: "300m"
        example.com/device: "1"
      requests:
        memory: "200Mi"
        cpu: "300m"
        example.com/device: "1"
This pod with sharing CPU request runs in the Guaranteed QoS class because requests are equal
to limits.
spec:
  containers:
  - name: nginx
    image: nginx
    resources:
      limits:
        example.com/deviceA: "1"
        example.com/deviceB: "1"
      requests:
        example.com/deviceA: "1"
        example.com/deviceB: "1"
This pod runs in the BestEffort QoS class because there are no CPU and memory requests.
The Topology Manager would consider the above pods. The Topology Manager would consult the Hint Providers, which are CPU and Device Manager to get topology hints for the pods.
In the case of the Guaranteed pod with integer CPU request, the static CPU Manager policy
would return topology hints relating to the exclusive CPU and the Device Manager would send back
hints for the requested device.
In the case of the Guaranteed pod with sharing CPU request, the static CPU Manager policy
would return default topology hint as there is no exclusive CPU request and the Device Manager
would send back hints for the requested device.
In the above two cases of the Guaranteed pod, the none CPU Manager policy would return default
topology hint.
In the case of the BestEffort pod, the static CPU Manager policy would send back the default
topology hint as there is no CPU request and the Device Manager would send back the hints for each
of the requested devices.
Using this information the Topology Manager calculates the optimal hint for the pod and stores this information, which will be used by the Hint Providers when they are making their resource assignments.
Known limitations
The maximum number of NUMA nodes that Topology Manager allows is 8. With more than 8 NUMA nodes, there will be a state explosion when trying to enumerate the possible NUMA affinities and generating their hints. See
max-allowable-numa-nodes(beta) for more options.The scheduler is not topology-aware, so it is possible to be scheduled on a node and then fail on the node due to the Topology Manager.
What's next
- Read about Pod-level resource managers.
21 - Customizing DNS Service
This page explains how to configure your DNS Pod(s) and customize the DNS resolution process in your cluster.
Before you begin
You need to have a Kubernetes cluster, and the kubectl command-line tool must be configured to communicate with your cluster. It is recommended to run this tutorial on a cluster with at least two nodes that are not acting as control plane hosts. If you do not already have a cluster, you can create one by using minikube or you can use one of these Kubernetes playgrounds:
Your cluster must be running the CoreDNS add-on.
Your Kubernetes server must be at or later than version v1.12.
To check the version, enter kubectl version.
Introduction
DNS is a built-in Kubernetes service launched automatically using the addon manager cluster add-on.
Note:
The CoreDNS Service is namedkube-dns in the metadata.name field.The intent is to ensure greater interoperability with workloads that relied on the legacy
kube-dns Service name to resolve addresses internal to the cluster.
Using a Service named kube-dns abstracts away the implementation detail of
which DNS provider is running behind that common name.If you are running CoreDNS as a Deployment, it will typically be exposed as
a Kubernetes Service with a static IP address.
The kubelet passes DNS resolver information to each container with the
--cluster-dns=<dns-service-ip> flag.
DNS names also need domains. You configure the local domain in the kubelet
with the flag --cluster-domain=<default-local-domain>.
The DNS server supports forward lookups (A and AAAA records), port lookups (SRV records), reverse IP address lookups (PTR records), and more. For more information, see DNS for Services and Pods.
If a Pod's dnsPolicy is set to default, it inherits the name resolution
configuration from the node that the Pod runs on. The Pod's DNS resolution
should behave the same as the node.
But see Known issues.
If you don't want this, or if you want a different DNS config for pods, you can
use the kubelet's --resolv-conf flag. Set this flag to "" to prevent Pods from
inheriting DNS. Set it to a valid file path to specify a file other than
/etc/resolv.conf for DNS inheritance.
CoreDNS
CoreDNS is a general-purpose authoritative DNS server that can serve as cluster DNS, complying with the DNS specifications.
CoreDNS ConfigMap options
CoreDNS is a DNS server that is modular and pluggable, with plugins adding new functionalities. The CoreDNS server can be configured by maintaining a Corefile, which is the CoreDNS configuration file. As a cluster administrator, you can modify the ConfigMap for the CoreDNS Corefile to change how DNS service discovery behaves for that cluster.
In Kubernetes, CoreDNS is installed with the following default Corefile configuration:
apiVersion: v1
kind: ConfigMap
metadata:
name: coredns
namespace: kube-system
data:
Corefile: |
.:53 {
errors
health {
lameduck 5s
}
ready
kubernetes cluster.local in-addr.arpa ip6.arpa {
pods insecure
fallthrough in-addr.arpa ip6.arpa
ttl 30
}
prometheus :9153
forward . /etc/resolv.conf
cache 30
loop
reload
loadbalance
}
The Corefile configuration includes the following plugins of CoreDNS:
- errors: Errors are logged to stdout.
- health: Health of CoreDNS is reported to
http://localhost:8080/health. In this extended syntaxlameduckwill make the process unhealthy then wait for 5 seconds before the process is shut down. - ready: An HTTP endpoint on port 8181 will return 200 OK, when all plugins that are able to signal readiness have done so.
- kubernetes: CoreDNS will reply to DNS queries
based on IP of the Services and Pods. You can find more details
about this plugin on the CoreDNS website.
ttlallows you to set a custom TTL for responses. The default is 5 seconds. The minimum TTL allowed is 0 seconds, and the maximum is capped at 3600 seconds. Setting TTL to 0 will prevent records from being cached.- The
pods insecureoption is provided for backward compatibility withkube-dns. - You can use the
pods verifiedoption, which returns an A record only if there exists a pod in the same namespace with a matching IP. - The
pods disabledoption can be used if you don't use pod records.
- prometheus: Metrics of CoreDNS are available at
http://localhost:9153/metricsin the Prometheus format (also known as OpenMetrics). - forward: Any queries that are not within the Kubernetes cluster domain are forwarded to predefined resolvers (/etc/resolv.conf).
- cache: This enables a frontend cache.
- loop: Detects simple forwarding loops and halts the CoreDNS process if a loop is found.
- reload: Allows automatic reload of a changed Corefile. After you edit the ConfigMap configuration, allow two minutes for your changes to take effect.
- loadbalance: This is a round-robin DNS loadbalancer that randomizes the order of A, AAAA, and MX records in the answer.
You can modify the default CoreDNS behavior by modifying the ConfigMap.
Configuration of Stub-domain and upstream nameserver using CoreDNS
CoreDNS has the ability to configure stub-domains and upstream nameservers using the forward plugin.
Example
If a cluster operator has a Consul domain server located at "10.150.0.1", and all Consul names have the suffix ".consul.local". To configure it in CoreDNS, the cluster administrator creates the following stanza in the CoreDNS ConfigMap.
consul.local:53 {
errors
cache 30
forward . 10.150.0.1
}
To explicitly force all non-cluster DNS lookups to go through a specific nameserver at 172.16.0.1,
point the forward to the nameserver instead of /etc/resolv.conf
forward . 172.16.0.1
The final ConfigMap along with the default Corefile configuration looks like:
apiVersion: v1
kind: ConfigMap
metadata:
name: coredns
namespace: kube-system
data:
Corefile: |
.:53 {
errors
health
kubernetes cluster.local in-addr.arpa ip6.arpa {
pods insecure
fallthrough in-addr.arpa ip6.arpa
}
prometheus :9153
forward . 172.16.0.1
cache 30
loop
reload
loadbalance
}
consul.local:53 {
errors
cache 30
forward . 10.150.0.1
}
Note:
CoreDNS does not support FQDNs for stub-domains and nameservers (eg: "ns.foo.com"). During translation, all FQDN nameservers will be omitted from the CoreDNS config.What's next
22 - Debugging DNS Resolution
This page provides hints on diagnosing DNS problems.
Before you begin
You need to have a Kubernetes cluster, and the kubectl command-line tool must be configured to communicate with your cluster. It is recommended to run this tutorial on a cluster with at least two nodes that are not acting as control plane hosts. If you do not already have a cluster, you can create one by using minikube or you can use one of these Kubernetes playgrounds:
Your cluster must be configured to use the CoreDNS addon or its precursor, kube-dns.
Your Kubernetes server must be at or later than version v1.6.
To check the version, enter kubectl version.
Create a simple Pod to use as a test environment
apiVersion: v1
kind: Pod
metadata:
name: dnsutils
namespace: default
spec:
containers:
- name: dnsutils
image: registry.k8s.io/e2e-test-images/agnhost:2.39
imagePullPolicy: IfNotPresent
restartPolicy: Always
Note:
This example creates a pod in thedefault namespace. DNS name resolution for
services depends on the namespace of the pod. For more information, review
DNS for Services and Pods.Use that manifest to create a Pod:
kubectl apply -f https://k8s.io/examples/admin/dns/dnsutils.yaml
pod/dnsutils created
…and verify its status:
kubectl get pods dnsutils
NAME READY STATUS RESTARTS AGE
dnsutils 1/1 Running 0 <some-time>
Once that Pod is running, you can exec nslookup in that environment.
If you see something like the following, DNS is working correctly.
kubectl exec -i -t dnsutils -- nslookup kubernetes.default
Server: 10.0.0.10
Address 1: 10.0.0.10
Name: kubernetes.default
Address 1: 10.0.0.1
If the nslookup command fails, check the following:
Check the local DNS configuration first
Take a look inside the resolv.conf file. (See Customizing DNS Service and Known issues below for more information)
kubectl exec -ti dnsutils -- cat /etc/resolv.conf
Verify that the search path and name server are set up like the following (note that search path may vary for different cloud providers):
search default.svc.cluster.local svc.cluster.local cluster.local google.internal c.gce_project_id.internal
nameserver 10.0.0.10
options ndots:5
Errors such as the following indicate a problem with the CoreDNS (or kube-dns) add-on or with associated Services:
kubectl exec -i -t dnsutils -- nslookup kubernetes.default
Server: 10.0.0.10
Address 1: 10.0.0.10
nslookup: can't resolve 'kubernetes.default'
or
kubectl exec -i -t dnsutils -- nslookup kubernetes.default
Server: 10.0.0.10
Address 1: 10.0.0.10 kube-dns.kube-system.svc.cluster.local
nslookup: can't resolve 'kubernetes.default'
Check if the DNS pod is running
Use the kubectl get pods command to verify that the DNS pod is running.
kubectl get pods --namespace=kube-system -l k8s-app=kube-dns
NAME READY STATUS RESTARTS AGE
...
coredns-7b96bf9f76-5hsxb 1/1 Running 0 1h
coredns-7b96bf9f76-mvmmt 1/1 Running 0 1h
...
Note:
The value for labelk8s-app is kube-dns for both CoreDNS and kube-dns deployments.If you see that no CoreDNS Pod is running or that the Pod has failed/completed, the DNS add-on may not be deployed by default in your current environment and you will have to deploy it manually.
Check for errors in the DNS pod
Use the kubectl logs command to see logs for the DNS containers.
For CoreDNS:
kubectl logs --namespace=kube-system -l k8s-app=kube-dns
Here is an example of a healthy CoreDNS log:
.:53
2018/08/15 14:37:17 [INFO] CoreDNS-1.2.2
2018/08/15 14:37:17 [INFO] linux/amd64, go1.10.3, 2e322f6
CoreDNS-1.2.2
linux/amd64, go1.10.3, 2e322f6
2018/08/15 14:37:17 [INFO] plugin/reload: Running configuration MD5 = 24e6c59e83ce706f07bcc82c31b1ea1c
See if there are any suspicious or unexpected messages in the logs.
Is DNS service up?
Verify that the DNS service is up by using the kubectl get service command.
kubectl get svc --namespace=kube-system
NAME TYPE CLUSTER-IP EXTERNAL-IP PORT(S) AGE
...
kube-dns ClusterIP 10.0.0.10 <none> 53/UDP,53/TCP 1h
...
Note:
The service name iskube-dns for both CoreDNS and kube-dns deployments.If you have created the Service or in the case it should be created by default but it does not appear, see debugging Services for more information.
Are DNS endpoints exposed?
You can verify that DNS endpoints are exposed by using the kubectl get endpointslice
command.
kubectl get endpointslice -l kubernetes.io/service-name=kube-dns --namespace=kube-system
NAME ADDRESSTYPE PORTS ENDPOINTS AGE
kube-dns-zxoja IPv4 53 10.180.3.17,10.180.3.17 1h
If you do not see the endpoints, see the endpoints section in the debugging Services documentation.
Are DNS queries being received/processed?
You can verify if queries are being received by CoreDNS by adding the log plugin to the CoreDNS configuration (aka Corefile).
The CoreDNS Corefile is held in a ConfigMap named coredns. To edit it, use the command:
kubectl -n kube-system edit configmap coredns
Then add log in the Corefile section per the example below:
apiVersion: v1
kind: ConfigMap
metadata:
name: coredns
namespace: kube-system
data:
Corefile: |
.:53 {
log
errors
health
kubernetes cluster.local in-addr.arpa ip6.arpa {
pods insecure
upstream
fallthrough in-addr.arpa ip6.arpa
}
prometheus :9153
forward . /etc/resolv.conf
cache 30
loop
reload
loadbalance
}
After saving the changes, it may take up to minute or two for Kubernetes to propagate these changes to the CoreDNS pods.
Next, make some queries and view the logs per the sections above in this document. If CoreDNS pods are receiving the queries, you should see them in the logs.
Here is an example of a query in the log:
.:53
2018/08/15 14:37:15 [INFO] CoreDNS-1.2.0
2018/08/15 14:37:15 [INFO] linux/amd64, go1.10.3, 2e322f6
CoreDNS-1.2.0
linux/amd64, go1.10.3, 2e322f6
2018/09/07 15:29:04 [INFO] plugin/reload: Running configuration MD5 = 162475cdf272d8aa601e6fe67a6ad42f
2018/09/07 15:29:04 [INFO] Reloading complete
172.17.0.18:41675 - [07/Sep/2018:15:29:11 +0000] 59925 "A IN kubernetes.default.svc.cluster.local. udp 54 false 512" NOERROR qr,aa,rd,ra 106 0.000066649s
Does CoreDNS have sufficient permissions?
CoreDNS must be able to list service and endpointslice related resources to properly resolve service names.
Sample error message:
2022-03-18T07:12:15.699431183Z [INFO] 10.96.144.227:52299 - 3686 "A IN serverproxy.contoso.net.cluster.local. udp 52 false 512" SERVFAIL qr,aa,rd 145 0.000091221s
First, get the current ClusterRole of system:coredns:
kubectl describe clusterrole system:coredns -n kube-system
Expected output:
PolicyRule:
Resources Non-Resource URLs Resource Names Verbs
--------- ----------------- -------------- -----
endpoints [] [] [list watch]
namespaces [] [] [list watch]
pods [] [] [list watch]
services [] [] [list watch]
endpointslices.discovery.k8s.io [] [] [list watch]
If any permissions are missing, edit the ClusterRole to add them:
kubectl edit clusterrole system:coredns -n kube-system
Example insertion of EndpointSlices permissions:
...
- apiGroups:
- discovery.k8s.io
resources:
- endpointslices
verbs:
- list
- watch
...
Are you in the right namespace for the service?
DNS queries that don't specify a namespace are limited to the pod's namespace.
If the namespace of the pod and service differ, the DNS query must include the namespace of the service.
This query is limited to the pod's namespace:
kubectl exec -i -t dnsutils -- nslookup <service-name>
This query specifies the namespace:
kubectl exec -i -t dnsutils -- nslookup <service-name>.<namespace>
To learn more about name resolution, see DNS for Services and Pods.
Known issues
Some Linux distributions (e.g. Ubuntu) use a local DNS resolver by default (systemd-resolved).
Systemd-resolved moves and replaces /etc/resolv.conf with a stub file that can cause a fatal forwarding
loop when resolving names in upstream servers. This can be fixed manually by using kubelet's --resolv-conf flag
to point to the correct resolv.conf (With systemd-resolved, this is /run/systemd/resolve/resolv.conf).
kubeadm automatically detects systemd-resolved, and adjusts the kubelet flags accordingly.
Kubernetes installs do not configure the nodes' resolv.conf files to use the
cluster DNS by default, because that process is inherently distribution-specific.
This should probably be implemented eventually.
Linux's libc (a.k.a. glibc) has a limit for the DNS nameserver records to 3 by
default and Kubernetes needs to consume 1 nameserver record. This means that
if a local installation already uses 3 nameservers, some of those entries will
be lost. To work around this limit, the node can run dnsmasq, which will
provide more nameserver entries. You can also use kubelet's --resolv-conf
flag.
If you are using Alpine version 3.17 or earlier as your base image, DNS may not work properly due to a design issue with Alpine. Until musl version 1.24 didn't include TCP fallback to the DNS stub resolver meaning any DNS call above 512 bytes would fail. Please upgrade your images to Alpine version 3.18 or above.
What's next
23 - Declare Network Policy
This document helps you get started using the Kubernetes NetworkPolicy API to declare network policies that govern how pods communicate with each other.
Before you begin
You need to have a Kubernetes cluster, and the kubectl command-line tool must be configured to communicate with your cluster. It is recommended to run this tutorial on a cluster with at least two nodes that are not acting as control plane hosts. If you do not already have a cluster, you can create one by using minikube or you can use one of these Kubernetes playgrounds:
Your Kubernetes server must be at or later than version v1.8.To check the version, enter kubectl version.
Make sure you've configured a network provider with network policy support. There are a number of network providers that support NetworkPolicy, including:
Create an nginx deployment and expose it via a service
To see how Kubernetes network policy works, start off by creating an nginx Deployment.
kubectl create deployment nginx --image=nginx
deployment.apps/nginx created
Expose the Deployment through a Service called nginx.
kubectl expose deployment nginx --port=80
service/nginx exposed
The above commands create a Deployment with an nginx Pod and expose the Deployment through a Service named nginx. The nginx Pod and Deployment are found in the default namespace.
kubectl get svc,pod
NAME CLUSTER-IP EXTERNAL-IP PORT(S) AGE
service/kubernetes 10.100.0.1 <none> 443/TCP 46m
service/nginx 10.100.0.16 <none> 80/TCP 33s
NAME READY STATUS RESTARTS AGE
pod/nginx-701339712-e0qfq 1/1 Running 0 35s
Test the service by accessing it from another Pod
You should be able to access the new nginx service from other Pods. To access the nginx Service from another Pod in the default namespace, start a busybox container:
kubectl run busybox --rm -ti --image=busybox -- /bin/sh
In your shell, run the following command:
wget --spider --timeout=1 nginx
Connecting to nginx (10.100.0.16:80)
remote file exists
Limit access to the nginx service
To limit the access to the nginx service so that only Pods with the label access: true can query it, create a NetworkPolicy object as follows:
apiVersion: networking.k8s.io/v1
kind: NetworkPolicy
metadata:
name: access-nginx
spec:
podSelector:
matchLabels:
app: nginx
ingress:
- from:
- podSelector:
matchLabels:
access: "true"
The name of a NetworkPolicy object must be a valid DNS subdomain name.
Note:
NetworkPolicy includes apodSelector which selects the grouping of Pods to which the policy applies. You can see this policy selects Pods with the label app=nginx. The label was automatically added to the Pod in the nginx Deployment. An empty podSelector selects all pods in the namespace.Assign the policy to the service
Use kubectl to create a NetworkPolicy from the above nginx-policy.yaml file:
kubectl apply -f https://k8s.io/examples/service/networking/nginx-policy.yaml
networkpolicy.networking.k8s.io/access-nginx created
Test access to the service when access label is not defined
When you attempt to access the nginx Service from a Pod without the correct labels, the request times out:
kubectl run busybox --rm -ti --image=busybox -- /bin/sh
In your shell, run the command:
wget --spider --timeout=1 nginx
Connecting to nginx (10.100.0.16:80)
wget: download timed out
Define access label and test again
You can create a Pod with the correct labels to see that the request is allowed:
kubectl run busybox --rm -ti --labels="access=true" --image=busybox -- /bin/sh
In your shell, run the command:
wget --spider --timeout=1 nginx
Connecting to nginx (10.100.0.16:80)
remote file exists
24 - Developing Cloud Controller Manager
Kubernetes v1.11 [beta]The cloud-controller-manager is a Kubernetes control plane component that embeds cloud-specific control logic. The cloud controller manager lets you link your cluster into your cloud provider's API, and separates out the components that interact with that cloud platform from components that only interact with your cluster.
By decoupling the interoperability logic between Kubernetes and the underlying cloud infrastructure, the cloud-controller-manager component enables cloud providers to release features at a different pace compared to the main Kubernetes project.
Background
Since cloud providers develop and release at a different pace compared to the Kubernetes project, abstracting the provider-specific code to the cloud-controller-manager binary allows cloud vendors to evolve independently from the core Kubernetes code.
The Kubernetes project provides skeleton cloud-controller-manager code with Go interfaces to allow you (or your cloud provider) to plug in your own implementations. This means that a cloud provider can implement a cloud-controller-manager by importing packages from Kubernetes core; each cloudprovider will register their own code by calling cloudprovider.RegisterCloudProvider to update a global variable of available cloud providers.
Developing
Out of tree
To build an out-of-tree cloud-controller-manager for your cloud:
- Create a go package with an implementation that satisfies cloudprovider.Interface.
- Use
main.goin cloud-controller-manager from Kubernetes core as a template for yourmain.go. As mentioned above, the only difference should be the cloud package that will be imported. - Import your cloud package in
main.go, ensure your package has aninitblock to runcloudprovider.RegisterCloudProvider.
Many cloud providers publish their controller manager code as open source. If you are creating a new cloud-controller-manager from scratch, you could take an existing out-of-tree cloud controller manager as your starting point.
In tree
For in-tree cloud providers, you can run the in-tree cloud controller manager as a DaemonSet in your cluster. See Cloud Controller Manager Administration for more details.
25 - Enable Or Disable A Kubernetes API
This page shows how to enable or disable an API version from your cluster's control plane.
Specific API versions can be turned on or off by passing --runtime-config=api/<version> as a
command line argument to the API server. The values for this argument are a comma-separated
list of API versions. Later values override earlier values.
The runtime-config command line argument also supports 2 special keys:
api/all, representing all known APIsapi/legacy, representing only legacy APIs. Legacy APIs are any APIs that have been explicitly deprecated.
For example, to turn off all API versions except v1, pass --runtime-config=api/all=false,api/v1=true
to the kube-apiserver.
What's next
Read the full documentation
for the kube-apiserver component.
26 - Encrypting Confidential Data at Rest
All of the APIs in Kubernetes that let you write persistent API resource data support at-rest encryption. For example, you can enable at-rest encryption for Secrets. This at-rest encryption is additional to any system-level encryption for the etcd cluster or for the filesystem(s) on hosts where you are running the kube-apiserver.
This page shows how to enable and configure encryption of API data at rest.
Note:
This task covers encryption for resource data stored using the Kubernetes API. For example, you can encrypt Secret objects, including the key-value data they contain.
If you want to encrypt data in filesystems that are mounted into containers, you instead need to either:
- use a storage integration that provides encrypted volumes
- encrypt the data within your own application
Before you begin
You need to have a Kubernetes cluster, and the kubectl command-line tool must be configured to communicate with your cluster. It is recommended to run this tutorial on a cluster with at least two nodes that are not acting as control plane hosts. If you do not already have a cluster, you can create one by using minikube or you can use one of these Kubernetes playgrounds:
This task assumes that you are running the Kubernetes API server as a static pod on each control plane node.
Your cluster's control plane must use etcd v3.x (major version 3, any minor version).
To encrypt a custom resource, your cluster must be running Kubernetes v1.26 or newer.
To use a wildcard to match resources, your cluster must be running Kubernetes v1.27 or newer.
To check the version, enter kubectl version.
Determine whether encryption at rest is already enabled
By default, the API server stores plain-text representations of resources into etcd, with no at-rest encryption.
The kube-apiserver process accepts an argument --encryption-provider-config
that specifies a path to a configuration file. The contents of that file, if you specify one,
control how Kubernetes API data is encrypted in etcd.
If you are running the kube-apiserver without the --encryption-provider-config command line
argument, you do not have encryption at rest enabled. If you are running the kube-apiserver
with the --encryption-provider-config command line argument, and the file that it references
specifies the identity provider as the first encryption provider in the list, then you
do not have at-rest encryption enabled
(the default identity provider does not provide any confidentiality protection.)
If you are running the kube-apiserver
with the --encryption-provider-config command line argument, and the file that it references
specifies a provider other than identity as the first encryption provider in the list, then
you already have at-rest encryption enabled. However, that check does not tell you whether
a previous migration to encrypted storage has succeeded. If you are not sure, see
ensure all relevant data are encrypted.
Understanding the encryption at rest configuration
---
#
# CAUTION: this is an example configuration.
# Do not use this for your own cluster!
#
apiVersion: apiserver.config.k8s.io/v1
kind: EncryptionConfiguration
resources:
- resources:
- secrets
- configmaps
- pandas.awesome.bears.example # a custom resource API
providers:
# This configuration does not provide data confidentiality. The first
# configured provider is specifying the "identity" mechanism, which
# stores resources as plain text.
#
- identity: {} # plain text, in other words NO encryption
- aesgcm:
keys:
- name: key1
secret: c2VjcmV0IGlzIHNlY3VyZQ==
- name: key2
secret: dGhpcyBpcyBwYXNzd29yZA==
- aescbc:
keys:
- name: key1
secret: c2VjcmV0IGlzIHNlY3VyZQ==
- name: key2
secret: dGhpcyBpcyBwYXNzd29yZA==
- secretbox:
keys:
- name: key1
secret: YWJjZGVmZ2hpamtsbW5vcHFyc3R1dnd4eXoxMjM0NTY=
- resources:
- events
providers:
- identity: {} # do not encrypt Events even though *.* is specified below
- resources:
- '*.apps' # wildcard match requires Kubernetes 1.27 or later
providers:
- aescbc:
keys:
- name: key2
secret: c2VjcmV0IGlzIHNlY3VyZSwgb3IgaXMgaXQ/Cg==
- resources:
- '*.*' # wildcard match requires Kubernetes 1.27 or later
providers:
- aescbc:
keys:
- name: key3
secret: c2VjcmV0IGlzIHNlY3VyZSwgSSB0aGluaw==Each resources array item is a separate config and contains a complete configuration. The
resources.resources field is an array of Kubernetes resource names (resource or resource.group)
that should be encrypted like Secrets, ConfigMaps, or other resources.
If custom resources are added to EncryptionConfiguration and the cluster version is 1.26 or newer,
any newly created custom resources mentioned in the EncryptionConfiguration will be encrypted.
Any custom resources that existed in etcd prior to that version and configuration will be unencrypted
until they are next written to storage. This is the same behavior as built-in resources.
See the Ensure all secrets are encrypted section.
The providers array is an ordered list of the possible encryption providers to use for the APIs that you listed.
Each provider supports multiple keys - the keys are tried in order for decryption, and if the provider
is the first provider, the first key is used for encryption.
Only one provider type may be specified per entry (identity or aescbc may be provided,
but not both in the same item).
The first provider in the list is used to encrypt resources written into the storage. When reading
resources from storage, each provider that matches the stored data attempts in order to decrypt the
data. If no provider can read the stored data due to a mismatch in format or secret key, an error
is returned which prevents clients from accessing that resource.
EncryptionConfiguration supports the use of wildcards to specify the resources that should be encrypted.
Use '*.<group>' to encrypt all resources within a group (for eg '*.apps' in above example) or '*.*'
to encrypt all resources. '*.' can be used to encrypt all resource in the core group. '*.*' will
encrypt all resources, even custom resources that are added after API server start.
Note:
Use of wildcards that overlap within the same resource list or across multiple entries are not allowed since part of the configuration would be ineffective. Theresources list's processing order and precedence
are determined by the order it's listed in the configuration.If you have a wildcard covering resources and want to opt out of at-rest encryption for a particular kind
of resource, you achieve that by adding a separate resources array item with the name of the resource that
you want to exempt, followed by a providers array item where you specify the identity provider. You add
this item to the list so that it appears earlier than the configuration where you do specify encryption
(a provider that is not identity).
For example, if '*.*' is enabled and you want to opt out of encryption for Events and ConfigMaps, add a
new earlier item to the resources, followed by the providers array item with identity as the
provider. The more specific entry must come before the wildcard entry.
The new item would look similar to:
...
- resources:
- configmaps. # specifically from the core API group,
# because of trailing "."
- events
providers:
- identity: {}
# and then other entries in resources
Ensure that the exemption is listed before the wildcard '*.*' item in the resources array
to give it precedence.
For more detailed information about the EncryptionConfiguration struct, please refer to the
encryption configuration API.
Caution:
If any resource is not readable via the encryption configuration (because keys were changed), and you cannot restore a working configuration, your only recourse is to delete that entry from the underlying etcd directly.
Any calls to the Kubernetes API that attempt to read that resource will fail until it is deleted or a valid decryption key is provided.
Available providers
Before you configure encryption-at-rest for data in your cluster's Kubernetes API, you need to select which provider(s) you will use.
The following table describes each available provider.
| Name | Encryption | Strength | Speed | Key length |
|---|---|---|---|---|
| identity | None | N/A | N/A | N/A |
| Resources written as-is without encryption. When set as the first provider, the resource will be decrypted as new values are written. Existing encrypted resources are not automatically overwritten with the plaintext data. The identity provider is the default if you do not specify otherwise. | ||||
| aescbc | AES-CBC with PKCS#7 padding | Weak | Fast | 16, 24, or 32-byte |
| Not recommended due to CBC's vulnerability to padding oracle attacks. Key material accessible from control plane host. | ||||
| aesgcm | AES-GCM with random nonce | Must be rotated every 200,000 writes | Fastest | 16, 24, or 32-byte |
| Not recommended for use except when an automated key rotation scheme is implemented. Key material accessible from control plane host. | ||||
| kms v1 (deprecated since Kubernetes v1.28) | Uses envelope encryption scheme with DEK per resource. | Strongest | Slow (compared to kms version 2) | 32-bytes |
| Data is encrypted by data encryption keys (DEKs) using AES-GCM;
DEKs are encrypted by key encryption keys (KEKs) according to
configuration in Key Management Service (KMS).
Simple key rotation, with a new DEK generated for each encryption, and
KEK rotation controlled by the user. Read how to configure the KMS V1 provider. | ||||
| kms v2 | Uses envelope encryption scheme with DEK per API server. | Strongest | Fast | 32-bytes |
| Data is encrypted by data encryption keys (DEKs) using AES-GCM; DEKs
are encrypted by key encryption keys (KEKs) according to configuration
in Key Management Service (KMS).
Kubernetes generates a new DEK per encryption from a secret seed.
The seed is rotated whenever the KEK is rotated. A good choice if using a third party tool for key management. Available as stable from Kubernetes v1.29. Read how to configure the KMS V2 provider. | ||||
| secretbox | XSalsa20 and Poly1305 | Strong | Faster | 32-byte |
| Uses relatively new encryption technologies that may not be considered acceptable in environments that require high levels of review. Key material accessible from control plane host. | ||||
The identity provider is the default if you do not specify otherwise. The identity provider does not
encrypt stored data and provides no additional confidentiality protection.
Key storage
Local key storage
Encrypting secret data with a locally managed key protects against an etcd compromise, but it fails to protect against a host compromise. Since the encryption keys are stored on the host in the EncryptionConfiguration YAML file, a skilled attacker can access that file and extract the encryption keys.
Managed (KMS) key storage
The KMS provider uses envelope encryption: Kubernetes encrypts resources using a data key, and then encrypts that data key using the managed encryption service. Kubernetes generates a unique data key for each resource. The API server stores an encrypted version of the data key in etcd alongside the ciphertext; when reading the resource, the API server calls the managed encryption service and provides both the ciphertext and the (encrypted) data key. Within the managed encryption service, the provider use a key encryption key to decipher the data key, deciphers the data key, and finally recovers the plain text. Communication between the control plane and the KMS requires in-transit protection, such as TLS.
Using envelope encryption creates dependence on the key encryption key, which is not stored in Kubernetes. In the KMS case, an attacker who intends to get unauthorised access to the plaintext values would need to compromise etcd and the third-party KMS provider.
Protection for encryption keys
You should take appropriate measures to protect the confidential information that allows decryption, whether that is a local encryption key, or an authentication token that allows the API server to call KMS.
Even when you rely on a provider to manage the use and lifecycle of the main encryption key (or keys), you are still responsible for making sure that access controls and other security measures for the managed encryption service are appropriate for your security needs.
Encrypt your data
Generate the encryption key
The following steps assume that you are not using KMS, and therefore the steps also assume that you need to generate an encryption key. If you already have an encryption key, skip to Write an encryption configuration file.
Caution:
Storing the raw encryption key in the EncryptionConfig only moderately improves your security posture, compared to no encryption.
For additional secrecy, consider using the kms provider as this relies on keys held outside your
Kubernetes cluster. Implementations of kms can work with hardware security modules or with
encryption services managed by your cloud provider.
To learn about setting up encryption at rest using KMS, see Using a KMS provider for data encryption. The KMS provider plugin that you use may also come with additional specific documentation.
Start by generating a new encryption key, and then encode it using base64:
Generate a 32-byte random key and base64 encode it. You can use this command:
head -c 32 /dev/urandom | base64
You can use /dev/hwrng instead of /dev/urandom if you want to
use your PC's built-in hardware entropy source. Not all Linux
devices provide a hardware random generator.
Generate a 32-byte random key and base64 encode it. You can use this command:
head -c 32 /dev/urandom | base64
Generate a 32-byte random key and base64 encode it. You can use this command:
# Do not run this in a session where you have set a random number
# generator seed.
[Convert]::ToBase64String((1..32|%{[byte](Get-Random -Max 256)}))
Note:
Keep the encryption key confidential, including while you generate it and ideally even after you are no longer actively using it.Replicate the encryption key
Using a secure mechanism for file transfer, make a copy of that encryption key available to every other control plane host.
At a minimum, use encryption in transit - for example, secure shell (SSH). For more security, use asymmetric encryption between hosts, or change the approach you are using so that you're relying on KMS encryption.
Write an encryption configuration file
Caution:
The encryption configuration file may contain keys that can decrypt content in etcd. If the configuration file contains any key material, you must properly restrict permissions on all your control plane hosts so only the user who runs the kube-apiserver can read this configuration.Create a new encryption configuration file. The contents should be similar to:
---
apiVersion: apiserver.config.k8s.io/v1
kind: EncryptionConfiguration
resources:
- resources:
- secrets
- configmaps
- pandas.awesome.bears.example
providers:
- aescbc:
keys:
- name: key1
# See the following text for more details about the secret value
secret: <BASE 64 ENCODED SECRET>
- identity: {} # this fallback allows reading unencrypted secrets;
# for example, during initial migration
To create a new encryption key (that does not use KMS), see Generate the encryption key.
Use the new encryption configuration file
You will need to mount the new encryption config file to the kube-apiserver static pod. Here is an example on how to do that:
Save the new encryption config file to
/etc/kubernetes/enc/enc.yamlon the control-plane node.Edit the manifest for the
kube-apiserverstatic pod:/etc/kubernetes/manifests/kube-apiserver.yamlso that it is similar to:--- # # This is a fragment of a manifest for a static Pod. # Check whether this is correct for your cluster and for your API server. # apiVersion: v1 kind: Pod metadata: annotations: kubeadm.kubernetes.io/kube-apiserver.advertise-address.endpoint: 10.20.30.40:443 creationTimestamp: null labels: app.kubernetes.io/component: kube-apiserver tier: control-plane name: kube-apiserver namespace: kube-system spec: containers: - command: - kube-apiserver ... - --encryption-provider-config=/etc/kubernetes/enc/enc.yaml # add this line volumeMounts: ... - name: enc # add this line mountPath: /etc/kubernetes/enc # add this line readOnly: true # add this line ... volumes: ... - name: enc # add this line hostPath: # add this line path: /etc/kubernetes/enc # add this line type: DirectoryOrCreate # add this line ...Restart your API server.
Caution:
Your config file contains keys that can decrypt the contents in etcd, so you must properly restrict permissions on your control-plane nodes so only the user who runs thekube-apiserver can read it.You now have encryption in place for one control plane host. A typical Kubernetes cluster has multiple control plane hosts, so there is more to do.
Reconfigure other control plane hosts
If you have multiple API servers in your cluster, you should deploy the changes in turn to each API server.
Caution:
For cluster configurations with two or more control plane nodes, the encryption configuration should be identical across each control plane node.
If there is a difference in the encryption provider configuration between control plane nodes, this difference may mean that the kube-apiserver can't decrypt data.
When you are planning to update the encryption configuration of your cluster, plan this so that the API servers in your control plane can always decrypt the stored data (even part way through rolling out the change).
Make sure that you use the same encryption configuration on each control plane host.
Verify that newly written data is encrypted
Data is encrypted when written to etcd. After restarting your kube-apiserver, any newly
created or updated Secret (or other resource kinds configured in EncryptionConfiguration)
should be encrypted when stored.
To check this, you can use the etcdctl command line
program to retrieve the contents of your secret data.
This example shows how to check this for encrypting the Secret API.
Create a new Secret called
secret1in thedefaultnamespace:kubectl create secret generic secret1 -n default --from-literal=mykey=mydataUsing the
etcdctlcommand line tool, read that Secret out of etcd:ETCDCTL_API=3 etcdctl get /registry/secrets/default/secret1 [...] | hexdump -Cwhere
[...]must be the additional arguments for connecting to the etcd server.For example:
ETCDCTL_API=3 etcdctl \ --cacert=/etc/kubernetes/pki/etcd/ca.crt \ --cert=/etc/kubernetes/pki/etcd/server.crt \ --key=/etc/kubernetes/pki/etcd/server.key \ get /registry/secrets/default/secret1 | hexdump -CThe output is similar to this (abbreviated):
00000000 2f 72 65 67 69 73 74 72 79 2f 73 65 63 72 65 74 |/registry/secret| 00000010 73 2f 64 65 66 61 75 6c 74 2f 73 65 63 72 65 74 |s/default/secret| 00000020 31 0a 6b 38 73 3a 65 6e 63 3a 61 65 73 63 62 63 |1.k8s:enc:aescbc| 00000030 3a 76 31 3a 6b 65 79 31 3a c7 6c e7 d3 09 bc 06 |:v1:key1:.l.....| 00000040 25 51 91 e4 e0 6c e5 b1 4d 7a 8b 3d b9 c2 7c 6e |%Q...l..Mz.=..|n| 00000050 b4 79 df 05 28 ae 0d 8e 5f 35 13 2c c0 18 99 3e |.y..(..._5.,...>| [...] 00000110 23 3a 0d fc 28 ca 48 2d 6b 2d 46 cc 72 0b 70 4c |#:..(.H-k-F.r.pL| 00000120 a5 fc 35 43 12 4e 60 ef bf 6f fe cf df 0b ad 1f |..5C.N`..o......| 00000130 82 c4 88 53 02 da 3e 66 ff 0a |...S..>f..| 0000013aVerify the stored Secret is prefixed with
k8s:enc:aescbc:v1:which indicates theaescbcprovider has encrypted the resulting data. Confirm that the key name shown inetcdmatches the key name specified in theEncryptionConfigurationmentioned above. In this example, you can see that the encryption key namedkey1is used inetcdand inEncryptionConfiguration.Verify the Secret is correctly decrypted when retrieved via the API:
kubectl get secret secret1 -n default -o yamlThe output should contain
mykey: bXlkYXRh, with contents ofmydataencoded using base64; read decoding a Secret to learn how to completely decode the Secret.
Ensure all relevant data are encrypted
It's often not enough to make sure that new objects get encrypted: you also want that encryption to apply to the objects that are already stored.
For this example, you have configured your cluster so that Secrets are encrypted on write. Performing a replace operation for each Secret will encrypt that content at rest, where the objects are unchanged.
You can make this change across all Secrets in your cluster:
# Run this as an administrator that can read and write all Secrets
kubectl get secrets --all-namespaces -o json | kubectl replace -f -
The command above reads all Secrets and then updates them with the same data, in order to apply server side encryption.
Note:
If an error occurs due to a conflicting write, retry the command. It is safe to run that command more than once.
For larger clusters, you may wish to subdivide the Secrets by namespace, or script an update.
Prevent plain text retrieval
If you want to make sure that the only access to a particular API kind is done using encryption, you can remove the API server's ability to read that API's backing data as plaintext.
Warning:
Making this change prevents the API server from retrieving resources that are marked as encrypted at rest, but are actually stored in the clear.
When you have configured encryption at rest for an API (for example: the API kind
Secret, representing secrets resources in the core API group), you must ensure
that all those resources in this cluster really are encrypted at rest. Check this before
you carry on with the next steps.
Once all Secrets in your cluster are encrypted, you can remove the identity
part of the encryption configuration. For example:
---
apiVersion: apiserver.config.k8s.io/v1
kind: EncryptionConfiguration
resources:
- resources:
- secrets
providers:
- aescbc:
keys:
- name: key1
secret: <BASE 64 ENCODED SECRET>
- identity: {} # REMOVE THIS LINE…and then restart each API server in turn. This change prevents the API server from accessing a plain-text Secret, even by accident.
Rotate a decryption key
Changing an encryption key for Kubernetes without incurring downtime requires a multi-step operation,
especially in the presence of a highly-available deployment where multiple kube-apiserver processes
are running.
- Generate a new key and add it as the second key entry for the current provider on all control plane nodes.
- Restart all
kube-apiserverprocesses, to ensure each server can decrypt any data that are encrypted with the new key. - Make a secure backup of the new encryption key. If you lose all copies of this key you would need to delete all the resources were encrypted under the lost key, and workloads may not operate as expected during the time that at-rest encryption is broken.
- Make the new key the first entry in the
keysarray so that it is used for encryption-at-rest for new writes - Restart all
kube-apiserverprocesses to ensure each control plane host now encrypts using the new key - As a privileged user, run
kubectl get secrets --all-namespaces -o json | kubectl replace -f -to encrypt all existing Secrets with the new key - After you have updated all existing Secrets to use the new key and have made a secure backup of the new key, remove the old decryption key from the configuration.
Decrypt all data
This example shows how to stop encrypting the Secret API at rest. If you are encrypting other API kinds, adjust the steps to match.
To disable encryption at rest, place the identity provider as the first
entry in your encryption configuration file:
---
apiVersion: apiserver.config.k8s.io/v1
kind: EncryptionConfiguration
resources:
- resources:
- secrets
# list any other resources here that you previously were
# encrypting at rest
providers:
- identity: {} # add this line
- aescbc:
keys:
- name: key1
secret: <BASE 64 ENCODED SECRET> # keep this in place
# make sure it comes after "identity"
Then run the following command to force decryption of all Secrets:
kubectl get secrets --all-namespaces -o json | kubectl replace -f -
Once you have replaced all existing encrypted resources with backing data that
don't use encryption, you can remove the encryption settings from the
kube-apiserver.
Configure automatic reloading
You can configure automatic reloading of encryption provider configuration.
That setting determines whether the
API server should
load the file you specify for --encryption-provider-config only once at
startup, or automatically whenever you change that file. Enabling this option
allows you to change the keys for encryption at rest without restarting the
API server.
To allow automatic reloading, configure the API server to run with:
--encryption-provider-config-automatic-reload=true.
When enabled, file changes are polled every minute to observe the modifications.
The apiserver_encryption_config_controller_automatic_reload_last_timestamp_seconds
metric identifies when the new config becomes effective. This allows
encryption keys to be rotated without restarting the API server.
What's next
- Read about decrypting data that are already stored at rest
- Learn more about the EncryptionConfiguration configuration API (v1).
27 - Decrypt Confidential Data that is Already Encrypted at Rest
All of the APIs in Kubernetes that let you write persistent API resource data support at-rest encryption. For example, you can enable at-rest encryption for Secrets. This at-rest encryption is additional to any system-level encryption for the etcd cluster or for the filesystem(s) on hosts where you are running the kube-apiserver.
This page shows how to switch from encryption of API data at rest, so that API data are stored unencrypted. You might want to do this to improve performance; usually, though, if it was a good idea to encrypt some data, it's also a good idea to leave them encrypted.
Note:
This task covers encryption for resource data stored using the Kubernetes API. For example, you can encrypt Secret objects, including the key-value data they contain.
If you wanted to manage encryption for data in filesystems that are mounted into containers, you instead need to either:
- use a storage integration that provides encrypted volumes
- encrypt the data within your own application
Before you begin
You need to have a Kubernetes cluster, and the kubectl command-line tool must be configured to communicate with your cluster. It is recommended to run this tutorial on a cluster with at least two nodes that are not acting as control plane hosts. If you do not already have a cluster, you can create one by using minikube or you can use one of these Kubernetes playgrounds:
This task assumes that you are running the Kubernetes API server as a static pod on each control plane node.
Your cluster's control plane must use etcd v3.x (major version 3, any minor version).
To encrypt a custom resource, your cluster must be running Kubernetes v1.26 or newer.
You should have some API data that are already encrypted.
To check the version, enter kubectl version.
Determine whether encryption at rest is already enabled
By default, the API server uses an identity provider that stores plain-text representations
of resources.
The default identity provider does not provide any confidentiality protection.
The kube-apiserver process accepts an argument --encryption-provider-config
that specifies a path to a configuration file. The contents of that file, if you specify one,
control how Kubernetes API data is encrypted in etcd.
If it is not specified, you do not have encryption at rest enabled.
The format of that configuration file is YAML, representing a configuration API kind named
EncryptionConfiguration.
You can see an example configuration
in Encryption at rest configuration.
If --encryption-provider-config is set, check which resources (such as secrets) are
configured for encryption, and what provider is used.
Make sure that the preferred provider for that resource type is not identity; you
only set identity (no encryption) as default when you want to disable encryption at
rest.
Verify that the first-listed provider for a resource is something other than identity,
which means that any new information written to resources of that type will be encrypted as
configured. If you do see identity as the first-listed provider for any resource, this
means that those resources are being written out to etcd without encryption.
Decrypt all data
This example shows how to stop encrypting the Secret API at rest. If you are encrypting other API kinds, adjust the steps to match.
Locate the encryption configuration file
First, find the API server configuration files. On each control plane node, static Pod manifest
for the kube-apiserver specifies a command line argument, --encryption-provider-config.
You are likely to find that this file is mounted into the static Pod using a
hostPath volume mount. Once you locate the volume
you can find the file on the node filesystem and inspect it.
Configure the API server to decrypt objects
To disable encryption at rest, place the identity provider as the first
entry in your encryption configuration file.
For example, if your existing EncryptionConfiguration file reads:
---
apiVersion: apiserver.config.k8s.io/v1
kind: EncryptionConfiguration
resources:
- resources:
- secrets
providers:
- aescbc:
keys:
# Do not use this (invalid) example key for encryption
- name: example
secret: 2KfZgdiq2K0g2YrYpyDYs9mF2LPZhQ==
then change it to:
---
apiVersion: apiserver.config.k8s.io/v1
kind: EncryptionConfiguration
resources:
- resources:
- secrets
providers:
- identity: {} # add this line
- aescbc:
keys:
- name: example
secret: 2KfZgdiq2K0g2YrYpyDYs9mF2LPZhQ==
and restart the kube-apiserver Pod on this node.
Reconfigure other control plane hosts
If you have multiple API servers in your cluster, you should deploy the changes in turn to each API server.
Make sure that you use the same encryption configuration on each control plane host.
Force decryption
Then run the following command to force decryption of all Secrets:
# If you are decrypting a different kind of object, change "secrets" to match.
kubectl get secrets --all-namespaces -o json | kubectl replace -f -
Once you have replaced all existing encrypted resources with backing data that
don't use encryption, you can remove the encryption settings from the
kube-apiserver.
The command line options to remove are:
--encryption-provider-config--encryption-provider-config-automatic-reload
Restart the kube-apiserver Pod again to apply the new configuration.
Reconfigure other control plane hosts
If you have multiple API servers in your cluster, you should again deploy the changes in turn to each API server.
Make sure that you use the same encryption configuration on each control plane host.
What's next
- Learn more about the EncryptionConfiguration configuration API (v1).
28 - Guaranteed Scheduling For Critical Add-On Pods
Kubernetes core components such as the API server, scheduler, and controller-manager run on a control plane node. However, add-ons must run on a regular cluster node. Some of these add-ons are critical to a fully functional cluster, such as metrics-server, DNS, and UI. A cluster may stop working properly if a critical add-on is evicted (either manually or as a side effect of another operation like upgrade) and becomes pending (for example when the cluster is highly utilized and either there are other pending pods that schedule into the space vacated by the evicted critical add-on pod or the amount of resources available on the node changed for some other reason).
Note that marking a pod as critical is not meant to prevent evictions entirely; it only prevents the pod from becoming permanently unavailable. A static pod marked as critical can't be evicted. However, non-static pods marked as critical are always rescheduled.
Marking pod as critical
To mark a Pod as critical, set priorityClassName for that Pod to system-cluster-critical or system-node-critical. system-node-critical is the highest available priority, even higher than system-cluster-critical.
29 - IP Masquerade Agent User Guide
This page shows how to configure and enable the ip-masq-agent.
Before you begin
You need to have a Kubernetes cluster, and the kubectl command-line tool must be configured to communicate with your cluster. It is recommended to run this tutorial on a cluster with at least two nodes that are not acting as control plane hosts. If you do not already have a cluster, you can create one by using minikube or you can use one of these Kubernetes playgrounds:
To check the version, enter kubectl version.
IP Masquerade Agent User Guide
The ip-masq-agent configures iptables rules to hide a pod's IP address behind the cluster
node's IP address. This is typically done when sending traffic to destinations outside the
cluster's pod CIDR range.
Key Terms
- NAT (Network Address Translation): Is a method of remapping one IP address to another by modifying either the source and/or destination address information in the IP header. Typically performed by a device doing IP routing.
- Masquerading: A form of NAT that is typically used to perform a many to one address translation, where multiple source IP addresses are masked behind a single address, which is typically the device doing the IP routing. In Kubernetes this is the Node's IP address.
- CIDR (Classless Inter-Domain Routing): Based on the variable-length subnet masking, allows specifying arbitrary-length prefixes. CIDR introduced a new method of representation for IP addresses, now commonly known as CIDR notation, in which an address or routing prefix is written with a suffix indicating the number of bits of the prefix, such as 192.168.2.0/24.
- Link Local: A link-local address is a network address that is valid only for communications within the network segment or the broadcast domain that the host is connected to. Link-local addresses for IPv4 are defined in the address block 169.254.0.0/16 in CIDR notation.
The ip-masq-agent configures iptables rules to handle masquerading node/pod IP addresses when
sending traffic to destinations outside the cluster node's IP and the Cluster IP range. This
essentially hides pod IP addresses behind the cluster node's IP address. In some environments,
traffic to "external" addresses must come from a known machine address. For example, in Google
Cloud, any traffic to the internet must come from a VM's IP. When containers are used, as in
Google Kubernetes Engine, the Pod IP will be rejected for egress. To avoid this, we must hide
the Pod IP behind the VM's own IP address - generally known as "masquerade". By default, the
agent is configured to treat the three private IP ranges specified by
RFC 1918 as non-masquerade
CIDR.
These ranges are 10.0.0.0/8, 172.16.0.0/12, and 192.168.0.0/16.
The agent will also treat link-local (169.254.0.0/16) as a non-masquerade CIDR by default.
The agent is configured to reload its configuration from the location
/etc/config/ip-masq-agent every 60 seconds, which is also configurable.
The agent configuration file must be written in YAML or JSON syntax, and may contain three optional keys:
nonMasqueradeCIDRs: A list of strings in CIDR notation that specify the non-masquerade ranges.masqLinkLocal: A Boolean (true/false) which indicates whether to masquerade traffic to the link local prefix169.254.0.0/16. False by default.resyncInterval: A time interval at which the agent attempts to reload config from disk. For example: '30s', where 's' means seconds, 'ms' means milliseconds.
Traffic to 10.0.0.0/8, 172.16.0.0/12 and 192.168.0.0/16 ranges will NOT be masqueraded. Any other traffic (assumed to be internet) will be masqueraded. An example of a local destination from a pod could be its Node's IP address as well as another node's address or one of the IP addresses in Cluster's IP range. Any other traffic will be masqueraded by default. The below entries show the default set of rules that are applied by the ip-masq-agent:
iptables -t nat -L IP-MASQ-AGENT
target prot opt source destination
RETURN all -- anywhere 169.254.0.0/16 /* ip-masq-agent: cluster-local traffic should not be subject to MASQUERADE */ ADDRTYPE match dst-type !LOCAL
RETURN all -- anywhere 10.0.0.0/8 /* ip-masq-agent: cluster-local traffic should not be subject to MASQUERADE */ ADDRTYPE match dst-type !LOCAL
RETURN all -- anywhere 172.16.0.0/12 /* ip-masq-agent: cluster-local traffic should not be subject to MASQUERADE */ ADDRTYPE match dst-type !LOCAL
RETURN all -- anywhere 192.168.0.0/16 /* ip-masq-agent: cluster-local traffic should not be subject to MASQUERADE */ ADDRTYPE match dst-type !LOCAL
MASQUERADE all -- anywhere anywhere /* ip-masq-agent: outbound traffic should be subject to MASQUERADE (this match must come after cluster-local CIDR matches) */ ADDRTYPE match dst-type !LOCAL
By default, in GCE/Google Kubernetes Engine, if network policy is enabled or
you are using a cluster CIDR not in the 10.0.0.0/8 range, the ip-masq-agent
will run in your cluster. If you are running in another environment,
you can add the ip-masq-agent DaemonSet
to your cluster.
Create an ip-masq-agent
To create an ip-masq-agent, run the following kubectl command:
kubectl apply -f https://raw.githubusercontent.com/kubernetes-sigs/ip-masq-agent/master/ip-masq-agent.yaml
You must also apply the appropriate node label to any nodes in your cluster that you want the agent to run on.
kubectl label nodes my-node node.kubernetes.io/masq-agent-ds-ready=true
More information can be found in the ip-masq-agent documentation here.
In most cases, the default set of rules should be sufficient; however, if this is not the case for your cluster, you can create and apply a ConfigMap to customize the IP ranges that are affected. For example, to allow only 10.0.0.0/8 to be considered by the ip-masq-agent, you can create the following ConfigMap in a file called "config".
Note:
It is important that the file is called config since, by default, that will be used as the key
for lookup by the ip-masq-agent:
nonMasqueradeCIDRs:
- 10.0.0.0/8
resyncInterval: 60s
Run the following command to add the configmap to your cluster:
kubectl create configmap ip-masq-agent --from-file=config --namespace=kube-system
This will update a file located at /etc/config/ip-masq-agent which is periodically checked
every resyncInterval and applied to the cluster node.
After the resync interval has expired, you should see the iptables rules reflect your changes:
iptables -t nat -L IP-MASQ-AGENT
Chain IP-MASQ-AGENT (1 references)
target prot opt source destination
RETURN all -- anywhere 169.254.0.0/16 /* ip-masq-agent: cluster-local traffic should not be subject to MASQUERADE */ ADDRTYPE match dst-type !LOCAL
RETURN all -- anywhere 10.0.0.0/8 /* ip-masq-agent: cluster-local
MASQUERADE all -- anywhere anywhere /* ip-masq-agent: outbound traffic should be subject to MASQUERADE (this match must come after cluster-local CIDR matches) */ ADDRTYPE match dst-type !LOCAL
By default, the link local range (169.254.0.0/16) is also handled by the ip-masq agent, which
sets up the appropriate iptables rules. To have the ip-masq-agent ignore link local, you can
set masqLinkLocal to true in the ConfigMap.
nonMasqueradeCIDRs:
- 10.0.0.0/8
resyncInterval: 60s
masqLinkLocal: true
30 - Limit Storage Consumption
This example demonstrates how to limit the amount of storage consumed in a namespace.
The following resources are used in the demonstration: ResourceQuota, LimitRange, and PersistentVolumeClaim.
Before you begin
You need to have a Kubernetes cluster, and the kubectl command-line tool must be configured to communicate with your cluster. It is recommended to run this tutorial on a cluster with at least two nodes that are not acting as control plane hosts. If you do not already have a cluster, you can create one by using minikube or you can use one of these Kubernetes playgrounds:
To check the version, enter
kubectl version.
Scenario: Limiting Storage Consumption
The cluster-admin is operating a cluster on behalf of a user population and the admin wants to control how much storage a single namespace can consume in order to control cost.
The admin would like to limit:
- The number of persistent volume claims in a namespace
- The amount of storage each claim can request
- The amount of cumulative storage the namespace can have
LimitRange to limit requests for storage
Adding a LimitRange to a namespace enforces storage request sizes to a minimum and maximum. Storage is requested
via PersistentVolumeClaim. The admission controller that enforces limit ranges will reject any PVC that is above or below
the values set by the admin.
In this example, a PVC requesting 10Gi of storage would be rejected because it exceeds the 2Gi max.
apiVersion: v1
kind: LimitRange
metadata:
name: storagelimits
spec:
limits:
- type: PersistentVolumeClaim
max:
storage: 2Gi
min:
storage: 1Gi
Minimum storage requests are used when the underlying storage provider requires certain minimums. For example, AWS EBS volumes have a 1Gi minimum requirement.
ResourceQuota to limit PVC count and cumulative storage capacity
Admins can limit the number of PVCs in a namespace as well as the cumulative capacity of those PVCs. New PVCs that exceed either maximum value will be rejected.
In this example, a 6th PVC in the namespace would be rejected because it exceeds the maximum count of 5. Alternatively, a 5Gi maximum quota when combined with the 2Gi max limit above, cannot have 3 PVCs where each has 2Gi. That would be 6Gi requested for a namespace capped at 5Gi.
apiVersion: v1
kind: ResourceQuota
metadata:
name: storagequota
spec:
hard:
persistentvolumeclaims: "5"
requests.storage: "5Gi"
Summary
A limit range can put a ceiling on how much storage is requested while a resource quota can effectively cap the storage consumed by a namespace through claim counts and cumulative storage capacity. The allows a cluster-admin to plan their cluster's storage budget without risk of any one project going over their allotment.
31 - Migrate Replicated Control Plane To Use Cloud Controller Manager
The cloud-controller-manager is a Kubernetes control plane component that embeds cloud-specific control logic. The cloud controller manager lets you link your cluster into your cloud provider's API, and separates out the components that interact with that cloud platform from components that only interact with your cluster.
By decoupling the interoperability logic between Kubernetes and the underlying cloud infrastructure, the cloud-controller-manager component enables cloud providers to release features at a different pace compared to the main Kubernetes project.
Background
As part of the cloud provider extraction effort,
all cloud specific controllers must be moved out of the kube-controller-manager.
All existing clusters that run cloud controllers in the kube-controller-manager
must migrate to instead run the controllers in a cloud provider specific
cloud-controller-manager.
Leader Migration provides a mechanism in which HA clusters can safely migrate "cloud
specific" controllers between the kube-controller-manager and the
cloud-controller-manager via a shared resource lock between the two components
while upgrading the replicated control plane. For a single-node control plane, or if
unavailability of controller managers can be tolerated during the upgrade, Leader
Migration is not needed and this guide can be ignored.
Leader Migration can be enabled by setting --enable-leader-migration on
kube-controller-manager or cloud-controller-manager. Leader Migration only
applies during the upgrade and can be safely disabled or left enabled after the
upgrade is complete.
This guide walks you through the manual process of upgrading the control plane from
kube-controller-manager with built-in cloud provider to running both
kube-controller-manager and cloud-controller-manager. If you use a tool to deploy
and manage the cluster, please refer to the documentation of the tool and the cloud
provider for specific instructions of the migration.
Before you begin
It is assumed that the control plane is running Kubernetes version N and to be
upgraded to version N + 1. Although it is possible to migrate within the same
version, ideally the migration should be performed as part of an upgrade so that
changes of configuration can be aligned to each release. The exact versions of N and
N + 1 depend on each cloud provider. For example, if a cloud provider builds a
cloud-controller-manager to work with Kubernetes 1.24, then N can be 1.23 and N + 1
can be 1.24.
The control plane nodes should run kube-controller-manager with Leader Election
enabled, which is the default. As of version N, an in-tree cloud provider must be set
with --cloud-provider flag and cloud-controller-manager should not yet be
deployed.
The out-of-tree cloud provider must have built a cloud-controller-manager with
Leader Migration implementation. If the cloud provider imports
k8s.io/cloud-provider and k8s.io/controller-manager of version v0.21.0 or later,
Leader Migration will be available. However, for version before v0.22.0, Leader
Migration is alpha and requires feature gate ControllerManagerLeaderMigration to be
enabled in cloud-controller-manager.
This guide assumes that kubelet of each control plane node starts
kube-controller-manager and cloud-controller-manager as static pods defined by
their manifests. If the components run in a different setting, please adjust the
steps accordingly.
For authorization, this guide assumes that the cluster uses RBAC. If another
authorization mode grants permissions to kube-controller-manager and
cloud-controller-manager components, please grant the needed access in a way that
matches the mode.
Grant access to Migration Lease
The default permissions of the controller manager allow only accesses to their main Lease. In order for the migration to work, accesses to another Lease are required.
You can grant kube-controller-manager full access to the leases API by modifying
the system::leader-locking-kube-controller-manager role. This task guide assumes
that the name of the migration lease is cloud-provider-extraction-migration.
kubectl patch -n kube-system role 'system::leader-locking-kube-controller-manager' -p '{"rules": [ {"apiGroups":[ "coordination.k8s.io"], "resources": ["leases"], "resourceNames": ["cloud-provider-extraction-migration"], "verbs": ["create", "list", "get", "update"] } ]}' --type=merge
Do the same to the system::leader-locking-cloud-controller-manager role.
kubectl patch -n kube-system role 'system::leader-locking-cloud-controller-manager' -p '{"rules": [ {"apiGroups":[ "coordination.k8s.io"], "resources": ["leases"], "resourceNames": ["cloud-provider-extraction-migration"], "verbs": ["create", "list", "get", "update"] } ]}' --type=merge
Initial Leader Migration configuration
Leader Migration optionally takes a configuration file representing the state of
controller-to-manager assignment. At this moment, with in-tree cloud provider,
kube-controller-manager runs route, service, and cloud-node-lifecycle. The
following example configuration shows the assignment.
Leader Migration can be enabled without a configuration. Please see Default Configuration for details.
kind: LeaderMigrationConfiguration
apiVersion: controllermanager.config.k8s.io/v1
leaderName: cloud-provider-extraction-migration
resourceLock: leases
controllerLeaders:
- name: route
component: kube-controller-manager
- name: service
component: kube-controller-manager
- name: cloud-node-lifecycle
component: kube-controller-manager
Alternatively, because the controllers can run under either controller managers,
setting component to * for both sides makes the configuration file consistent
between both parties of the migration.
# wildcard version
kind: LeaderMigrationConfiguration
apiVersion: controllermanager.config.k8s.io/v1
leaderName: cloud-provider-extraction-migration
resourceLock: leases
controllerLeaders:
- name: route
component: *
- name: service
component: *
- name: cloud-node-lifecycle
component: *
On each control plane node, save the content to /etc/leadermigration.conf, and
update the manifest of kube-controller-manager so that the file is mounted inside
the container at the same location. Also, update the same manifest to add the
following arguments:
--enable-leader-migrationto enable Leader Migration on the controller manager--leader-migration-config=/etc/leadermigration.confto set configuration file
Restart kube-controller-manager on each node. At this moment,
kube-controller-manager has leader migration enabled and is ready for the
migration.
Deploy Cloud Controller Manager
In version N + 1, the desired state of controller-to-manager assignment can be
represented by a new configuration file, shown as follows. Please note component
field of each controllerLeaders changing from kube-controller-manager to
cloud-controller-manager. Alternatively, use the wildcard version mentioned above,
which has the same effect.
kind: LeaderMigrationConfiguration
apiVersion: controllermanager.config.k8s.io/v1
leaderName: cloud-provider-extraction-migration
resourceLock: leases
controllerLeaders:
- name: route
component: cloud-controller-manager
- name: service
component: cloud-controller-manager
- name: cloud-node-lifecycle
component: cloud-controller-manager
When creating control plane nodes of version N + 1, the content should be deployed to
/etc/leadermigration.conf. The manifest of cloud-controller-manager should be
updated to mount the configuration file in the same manner as
kube-controller-manager of version N. Similarly, add --enable-leader-migration
and --leader-migration-config=/etc/leadermigration.conf to the arguments of
cloud-controller-manager.
Create a new control plane node of version N + 1 with the updated
cloud-controller-manager manifest, and with the --cloud-provider flag set to
external for kube-controller-manager. kube-controller-manager of version N + 1
MUST NOT have Leader Migration enabled because, with an external cloud provider, it
does not run the migrated controllers anymore, and thus it is not involved in the
migration.
Please refer to Cloud Controller Manager Administration
for more detail on how to deploy cloud-controller-manager.
Upgrade Control Plane
The control plane now contains nodes of both version N and N + 1. The nodes of
version N run kube-controller-manager only, and these of version N + 1 run both
kube-controller-manager and cloud-controller-manager. The migrated controllers,
as specified in the configuration, are running under either kube-controller-manager
of version N or cloud-controller-manager of version N + 1 depending on which
controller manager holds the migration lease. No controller will ever be running
under both controller managers at any time.
In a rolling manner, create a new control plane node of version N + 1 and bring down
one of version N until the control plane contains only nodes of version N + 1.
If a rollback from version N + 1 to N is required, add nodes of version N with Leader
Migration enabled for kube-controller-manager back to the control plane, replacing
one of version N + 1 each time until there are only nodes of version N.
(Optional) Disable Leader Migration
Now that the control plane has been upgraded to run both kube-controller-manager
and cloud-controller-manager of version N + 1, Leader Migration has finished its
job and can be safely disabled to save one Lease resource. It is safe to re-enable
Leader Migration for the rollback in the future.
In a rolling manager, update manifest of cloud-controller-manager to unset both
--enable-leader-migration and --leader-migration-config= flag, also remove the
mount of /etc/leadermigration.conf, and finally remove /etc/leadermigration.conf.
To re-enable Leader Migration, recreate the configuration file and add its mount and
the flags that enable Leader Migration back to cloud-controller-manager.
Default Configuration
Starting Kubernetes 1.22, Leader Migration provides a default configuration suitable
for the default controller-to-manager assignment.
The default configuration can be enabled by setting --enable-leader-migration but
without --leader-migration-config=.
For kube-controller-manager and cloud-controller-manager, if there are no flags
that enable any in-tree cloud provider or change ownership of controllers, the
default configuration can be used to avoid manual creation of the configuration file.
Special case: migrating the Node IPAM controller
If your cloud provider provides an implementation of Node IPAM controller, you should
switch to the implementation in cloud-controller-manager. Disable Node IPAM
controller in kube-controller-manager of version N + 1 by adding
--controllers=*,-nodeipam to its flags. Then add nodeipam to the list of migrated
controllers.
# wildcard version, with nodeipam
kind: LeaderMigrationConfiguration
apiVersion: controllermanager.config.k8s.io/v1
leaderName: cloud-provider-extraction-migration
resourceLock: leases
controllerLeaders:
- name: route
component: *
- name: service
component: *
- name: cloud-node-lifecycle
component: *
- name: nodeipam
- component: *
What's next
- Read the Controller Manager Leader Migration enhancement proposal.
32 - Operating etcd clusters for Kubernetes
etcd is a consistent and highly-available key value store used as Kubernetes' backing store for all cluster data.
If your Kubernetes cluster uses etcd as its backing store, make sure you have a back up plan for the data.
You can find in-depth information about etcd in the official documentation.
Before you begin
Before you follow steps in this page to deploy, manage, back up or restore etcd, you need to understand the typical expectations for operating an etcd cluster. Refer to the etcd documentation for more context.
Key details include:
The minimum recommended etcd versions to run in production are
3.4.29+and3.5.11+.etcd is a leader-based distributed system. Ensure that the leader periodically send heartbeats on time to all followers to keep the cluster stable.
You should run etcd as a cluster with an odd number of members.
Aim to ensure that no resource starvation occurs.
Performance and stability of the cluster is sensitive to network and disk I/O. Any resource starvation can lead to heartbeat timeout, causing instability of the cluster. An unstable etcd indicates that no leader is elected. Under such circumstances, a cluster cannot make any changes to its current state, which implies no new pods can be scheduled.
Resource requirements for etcd
Operating etcd with limited resources is suitable only for testing purposes. For deploying in production, advanced hardware configuration is required. Before deploying etcd in production, see resource requirement reference.
Keeping etcd clusters stable is critical to the stability of Kubernetes clusters. Therefore, run etcd clusters on dedicated machines or isolated environments for guaranteed resource requirements.
Tools
Depending on which specific outcome you're working on, you will need the etcdctl tool or the
etcdutl tool (you may need both).
Understanding etcdctl and etcdutl
etcdctl and etcdutl are command-line tools used to interact with etcd clusters, but they serve different purposes:
etcdctl: This is the primary command-line client for interacting with etcd over a network. It is used for day-to-day operations such as managing keys and values, administering the cluster, checking health, and more.etcdutl: This is an administration utility designed to operate directly on etcd data files, including migrating data between etcd versions, defragmenting the database, restoring snapshots, and validating data consistency. For network operations,etcdctlshould be used.
For more information on etcdutl, you can refer to the etcd recovery documentation.
Starting etcd clusters
This section covers starting a single-node and multi-node etcd cluster.
This guide assumes that etcd is already installed.
Single-node etcd cluster
Use a single-node etcd cluster only for testing purposes.
Run the following:
etcd --listen-client-urls=http://$PRIVATE_IP:2379 \ --advertise-client-urls=http://$PRIVATE_IP:2379Start the Kubernetes API server with the flag
--etcd-servers=$PRIVATE_IP:2379.Make sure
PRIVATE_IPis set to your etcd client IP.
Multi-node etcd cluster
For durability and high availability, run etcd as a multi-node cluster in production and back it up periodically. A five-member cluster is recommended in production. For more information, see FAQ documentation.
As you're using Kubernetes, you have the option to run etcd as a container inside
one or more Pods. The kubeadm tool sets up etcd
static pods by default, or
you can deploy a
separate cluster
and instruct kubeadm to use that etcd cluster as the control plane's backing store.
You configure an etcd cluster either by static member information or by dynamic discovery. For more information on clustering, see etcd clustering documentation.
For an example, consider a five-member etcd cluster running with the following
client URLs: http://$IP1:2379, http://$IP2:2379, http://$IP3:2379,
http://$IP4:2379, and http://$IP5:2379. To start a Kubernetes API server:
Run the following:
etcd --listen-client-urls=http://$IP1:2379,http://$IP2:2379,http://$IP3:2379,http://$IP4:2379,http://$IP5:2379 --advertise-client-urls=http://$IP1:2379,http://$IP2:2379,http://$IP3:2379,http://$IP4:2379,http://$IP5:2379Start the Kubernetes API servers with the flag
--etcd-servers=$IP1:2379,$IP2:2379,$IP3:2379,$IP4:2379,$IP5:2379.Make sure the
IP<n>variables are set to your client IP addresses.
Multi-node etcd cluster with load balancer
To run a load balancing etcd cluster:
- Set up an etcd cluster.
- Configure a load balancer in front of the etcd cluster.
For example, let the address of the load balancer be
$LB. - Start Kubernetes API Servers with the flag
--etcd-servers=$LB:2379.
Securing etcd clusters
Access to etcd is equivalent to root permission in the cluster so ideally only the API server should have access to it. Considering the sensitivity of the data, it is recommended to grant permission to only those nodes that require access to etcd clusters.
To secure etcd, either set up firewall rules or use the security features
provided by etcd. etcd security features depend on x509 Public Key
Infrastructure (PKI). To begin, establish secure communication channels by
generating a key and certificate pair. For example, use key pairs peer.key
and peer.cert for securing communication between etcd members, and
client.key and client.cert for securing communication between etcd and its
clients. See the example scripts
provided by the etcd project to generate key pairs and CA files for client
authentication.
Securing communication
To configure etcd with secure peer communication, specify flags
--peer-key-file=peer.key and --peer-cert-file=peer.cert, and use HTTPS as
the URL schema.
Similarly, to configure etcd with secure client communication, specify flags
--key=k8sclient.key and --cert=k8sclient.cert, and use HTTPS as
the URL schema. Here is an example on a client command that uses secure
communication:
ETCDCTL_API=3 etcdctl --endpoints 10.2.0.9:2379 \
--cert=/etc/kubernetes/pki/etcd/server.crt \
--key=/etc/kubernetes/pki/etcd/server.key \
--cacert=/etc/kubernetes/pki/etcd/ca.crt \
member list
Limiting access of etcd clusters
After configuring secure communication, restrict the access of the etcd cluster to only the Kubernetes API servers using TLS authentication.
For example, consider key pairs k8sclient.key and k8sclient.cert that are
trusted by the CA etcd.ca. When etcd is configured with --client-cert-auth
along with TLS, it verifies the certificates from clients by using system CAs
or the CA passed in by --trusted-ca-file flag. Specifying flags
--client-cert-auth=true and --trusted-ca-file=etcd.ca will restrict the
access to clients with the certificate k8sclient.cert.
Once etcd is configured correctly, only clients with valid certificates can
access it. To give Kubernetes API servers the access, configure them with the
flags --etcd-certfile=k8sclient.cert, --etcd-keyfile=k8sclient.key and
--etcd-cafile=ca.cert.
Note:
etcd authentication is not planned for Kubernetes.Replacing a failed etcd member
etcd cluster achieves high availability by tolerating minor member failures. However, to improve the overall health of the cluster, replace failed members immediately. When multiple members fail, replace them one by one. Replacing a failed member involves two steps: removing the failed member and adding a new member.
Though etcd keeps unique member IDs internally, it is recommended to use a
unique name for each member to avoid human errors. For example, consider a
three-member etcd cluster. Let the URLs be, member1=http://10.0.0.1,
member2=http://10.0.0.2, and member3=http://10.0.0.3. When member1 fails,
replace it with member4=http://10.0.0.4.
Get the member ID of the failed
member1:etcdctl --endpoints=http://10.0.0.2,http://10.0.0.3 member listThe following message is displayed:
8211f1d0f64f3269, started, member1, http://10.0.0.1:2380, http://10.0.0.1:2379 91bc3c398fb3c146, started, member2, http://10.0.0.2:2380, http://10.0.0.2:2379 fd422379fda50e48, started, member3, http://10.0.0.3:2380, http://10.0.0.3:2379Do either of the following:
- If each Kubernetes API server is configured to communicate with all etcd
members, remove the failed member from the
--etcd-serversflag, then restart each Kubernetes API server. - If each Kubernetes API server communicates with a single etcd member, then stop the Kubernetes API server that communicates with the failed etcd.
- If each Kubernetes API server is configured to communicate with all etcd
members, remove the failed member from the
Stop the etcd server on the broken node. It is possible that other clients besides the Kubernetes API server are causing traffic to etcd and it is desirable to stop all traffic to prevent writes to the data directory.
Remove the failed member:
etcdctl member remove 8211f1d0f64f3269The following message is displayed:
Removed member 8211f1d0f64f3269 from clusterAdd the new member:
etcdctl member add member4 --peer-urls=http://10.0.0.4:2380The following message is displayed:
Member 2be1eb8f84b7f63e added to cluster ef37ad9dc622a7c4Start the newly added member on a machine with the IP
10.0.0.4:export ETCD_NAME="member4" export ETCD_INITIAL_CLUSTER="member2=http://10.0.0.2:2380,member3=http://10.0.0.3:2380,member4=http://10.0.0.4:2380" export ETCD_INITIAL_CLUSTER_STATE=existing etcd [flags]Do either of the following:
- If each Kubernetes API server is configured to communicate with all etcd
members, add the newly added member to the
--etcd-serversflag, then restart each Kubernetes API server. - If each Kubernetes API server communicates with a single etcd member, start the Kubernetes API server that was stopped in step 2. Then configure Kubernetes API server clients to again route requests to the Kubernetes API server that was stopped. This can often be done by configuring a load balancer.
- If each Kubernetes API server is configured to communicate with all etcd
members, add the newly added member to the
For more information on cluster reconfiguration, see etcd reconfiguration documentation.
Backing up an etcd cluster
All Kubernetes objects are stored in etcd. Periodically backing up the etcd cluster data is important to recover Kubernetes clusters under disaster scenarios, such as losing all control plane nodes. The snapshot file contains all the Kubernetes state and critical information. In order to keep the sensitive Kubernetes data safe, encrypt the snapshot files.
Backing up an etcd cluster can be accomplished in two ways: etcd built-in snapshot and volume snapshot.
Built-in snapshot
etcd supports built-in snapshot. A snapshot may either be created from a live
member with the etcdctl snapshot save command or by copying the
member/snap/db file from an etcd
data directory
that is not currently used by an etcd process. Creating the snapshot will
not affect the performance of the member.
Below is an example for creating a snapshot of the keyspace served by
$ENDPOINT to the file snapshot.db:
ETCDCTL_API=3 etcdctl --endpoints $ENDPOINT snapshot save snapshot.db
Verify the snapshot:
The below example depicts the usage of the etcdutl tool for verifying a snapshot:
etcdutl --write-out=table snapshot status snapshot.db
This should generate an output resembling the example provided below:
+----------+----------+------------+------------+
| HASH | REVISION | TOTAL KEYS | TOTAL SIZE |
+----------+----------+------------+------------+
| fe01cf57 | 10 | 7 | 2.1 MB |
+----------+----------+------------+------------+
Note:
The usage ofetcdctl snapshot status has been deprecated since etcd v3.5.x and is slated for removal from etcd v3.6.
It is recommended to utilize etcdutl instead.The below example depicts the usage of the etcdctl tool for verifying a snapshot:
export ETCDCTL_API=3
etcdctl --write-out=table snapshot status snapshot.db
This should generate an output resembling the example provided below:
Deprecated: Use `etcdutl snapshot status` instead.
+----------+----------+------------+------------+
| HASH | REVISION | TOTAL KEYS | TOTAL SIZE |
+----------+----------+------------+------------+
| fe01cf57 | 10 | 7 | 2.1 MB |
+----------+----------+------------+------------+
Volume snapshot
If etcd is running on a storage volume that supports backup, such as Amazon Elastic Block Store, back up etcd data by creating a snapshot of the storage volume.
Snapshot using etcdctl options
We can also create the snapshot using various options given by etcdctl. For example:
ETCDCTL_API=3 etcdctl -h
will list various options available from etcdctl. For example, you can create a snapshot by specifying the endpoint, certificates and key as shown below:
ETCDCTL_API=3 etcdctl --endpoints=https://127.0.0.1:2379 \
--cacert=<trusted-ca-file> --cert=<cert-file> --key=<key-file> \
snapshot save <backup-file-location>
where trusted-ca-file, cert-file and key-file can be obtained from the description of the etcd Pod.
Scaling out etcd clusters
Scaling out etcd clusters increases availability by trading off performance. Scaling does not increase cluster performance nor capability. A general rule is not to scale out or in etcd clusters. Do not configure any auto scaling groups for etcd clusters. It is strongly recommended to always run a static five-member etcd cluster for production Kubernetes clusters at any officially supported scale.
A reasonable scaling is to upgrade a three-member cluster to a five-member one, when more reliability is desired. See etcd reconfiguration documentation for information on how to add members into an existing cluster.
Restoring an etcd cluster
Caution:
If any API servers are running in your cluster, you should not attempt to restore instances of etcd. Instead, follow these steps to restore etcd:
- stop all API server instances
- restore state in all etcd instances
- restart all API server instances
The Kubernetes project also recommends restarting Kubernetes components (kube-scheduler,
kube-controller-manager, kubelet) to ensure that they don't rely on some
stale data. In practice the restore takes a bit of time. During the
restoration, critical components will lose leader lock and restart themselves.
etcd supports restoring from snapshots that are taken from an etcd process of the major.minor version. Restoring a version from a different patch version of etcd is also supported. A restore operation is employed to recover the data of a failed cluster.
Before starting the restore operation, a snapshot file must be present. It can either be a snapshot file from a previous backup operation, or from a remaining data directory.
When restoring the cluster using etcdutl,
use the --data-dir option to specify to which folder the cluster should be restored:
etcdutl --data-dir <data-dir-location> snapshot restore snapshot.db
where <data-dir-location> is a directory that will be created during the restore process.
Note:
The usage ofetcdctl for restoring has been deprecated since etcd v3.5.x and is slated for removal from etcd v3.6.
It is recommended to utilize etcdutl instead.The below example depicts the usage of the etcdctl tool for the restore operation:
export ETCDCTL_API=3
etcdctl --data-dir <data-dir-location> snapshot restore snapshot.db
If <data-dir-location> is the same folder as before, delete it and stop the etcd process before restoring the cluster.
Otherwise, change etcd configuration and restart the etcd process after restoration to have it use the new data directory:
first change /etc/kubernetes/manifests/etcd.yaml's volumes.hostPath.path for name: etcd-data to <data-dir-location>,
then execute kubectl -n kube-system delete pod <name-of-etcd-pod> or systemctl restart kubelet.service (or both).
For more information and examples on restoring a cluster from a snapshot file, see etcd disaster recovery documentation.
If the access URLs of the restored cluster are changed from the previous
cluster, the Kubernetes API server must be reconfigured accordingly. In this
case, restart Kubernetes API servers with the flag
--etcd-servers=$NEW_ETCD_CLUSTER instead of the flag
--etcd-servers=$OLD_ETCD_CLUSTER. Replace $NEW_ETCD_CLUSTER and
$OLD_ETCD_CLUSTER with the respective IP addresses. If a load balancer is
used in front of an etcd cluster, you might need to update the load balancer
instead.
If the majority of etcd members have permanently failed, the etcd cluster is considered failed. In this scenario, Kubernetes cannot make any changes to its current state. Although the scheduled pods might continue to run, no new pods can be scheduled. In such cases, recover the etcd cluster and potentially reconfigure Kubernetes API servers to fix the issue.
Upgrading etcd clusters
Caution:
Before you start an upgrade, back up your etcd cluster first.For details on etcd upgrade, refer to the etcd upgrades documentation.
Maintaining etcd clusters
For more details on etcd maintenance, please refer to the etcd maintenance documentation.
Cluster defragmentation
Defragmentation is an expensive operation, so it should be executed as infrequently as possible. On the other hand, it's also necessary to make sure any etcd member will not exceed the storage quota. The Kubernetes project recommends that when you perform defragmentation, you use a tool such as etcd-defrag.
You can also run the defragmentation tool as a Kubernetes CronJob, to make sure that
defragmentation happens regularly. See etcd-defrag-cronjob.yaml
for details.
33 - Reserve Compute Resources for System Daemons
Kubernetes nodes can be scheduled to Capacity. Pods can consume all the
available capacity on a node by default. This is an issue because nodes
typically run quite a few system daemons that power the OS and Kubernetes
itself. Unless resources are set aside for these system daemons, pods and system
daemons compete for resources and lead to resource starvation issues on the
node.
The kubelet exposes a feature named 'Node Allocatable' that helps to reserve
compute resources for system daemons. Kubernetes recommends cluster
administrators to configure 'Node Allocatable' based on their workload density
on each node.
Before you begin
You need to have a Kubernetes cluster, and the kubectl command-line tool must be configured to communicate with your cluster. It is recommended to run this tutorial on a cluster with at least two nodes that are not acting as control plane hosts. If you do not already have a cluster, you can create one by using minikube or you can use one of these Kubernetes playgrounds:
You can configure below kubelet configuration settings using the kubelet configuration file.
Node Allocatable

'Allocatable' on a Kubernetes node is defined as the amount of compute resources that are available for pods. The scheduler does not over-subscribe 'Allocatable'. 'CPU', 'memory' and 'ephemeral-storage' are supported as of now.
Node Allocatable is exposed as part of v1.Node object in the API and as part
of kubectl describe node in the CLI.
Resources can be reserved for two categories of system daemons in the kubelet.
Enabling QoS and Pod level cgroups
To properly enforce node allocatable constraints on the node, you must
enable the new cgroup hierarchy via the cgroupsPerQOS setting. This setting is
enabled by default. When enabled, the kubelet will parent all end-user pods
under a cgroup hierarchy managed by the kubelet.
Configuring a cgroup driver
The kubelet supports manipulation of the cgroup hierarchy on
the host using a cgroup driver. The driver is configured via the cgroupDriver setting.
The supported values are the following:
cgroupfsis the default driver that performs direct manipulation of the cgroup filesystem on the host in order to manage cgroup sandboxes.systemdis an alternative driver that manages cgroup sandboxes using transient slices for resources that are supported by that init system.
Depending on the configuration of the associated container runtime,
operators may have to choose a particular cgroup driver to ensure
proper system behavior. For example, if operators use the systemd
cgroup driver provided by the containerd runtime, the kubelet must
be configured to use the systemd cgroup driver.
Kube Reserved
- KubeletConfiguration Setting:
kubeReserved: {}. Example value{cpu: 100m, memory: 100Mi, ephemeral-storage: 1Gi, pid=1000} - KubeletConfiguration Setting:
kubeReservedCgroup: ""
kubeReserved is meant to capture resource reservation for kubernetes system
daemons like the kubelet, container runtime, etc.
It is not meant to reserve resources for system daemons that are run as pods.
kubeReserved is typically a function of pod density on the nodes.
In addition to cpu, memory, and ephemeral-storage, pid may be
specified to reserve the specified number of process IDs for
kubernetes system daemons.
To optionally enforce kubeReserved on kubernetes system daemons, specify the parent
control group for kube daemons as the value for kubeReservedCgroup setting,
and add kube-reserved to enforceNodeAllocatable.
It is recommended that the kubernetes system daemons are placed under a top
level control group (runtime.slice on systemd machines for example). Each
system daemon should ideally run within its own child control group. Refer to
the design proposal
for more details on recommended control group hierarchy.
Note that Kubelet does not create kubeReservedCgroup if it doesn't
exist. The kubelet will fail to start if an invalid cgroup is specified. With systemd
cgroup driver, you should follow a specific pattern for the name of the cgroup you
define: the name should be the value you set for kubeReservedCgroup,
with .slice appended.
System Reserved
- KubeletConfiguration Setting:
systemReserved: {}. Example value{cpu: 100m, memory: 100Mi, ephemeral-storage: 1Gi, pid=1000} - KubeletConfiguration Setting:
systemReservedCgroup: ""
systemReserved is meant to capture resource reservation for OS system daemons
like sshd, udev, etc. systemReserved should reserve memory for the
kernel too since kernel memory is not accounted to pods in Kubernetes at this time.
Reserving resources for user login sessions is also recommended (user.slice in
systemd world).
In addition to cpu, memory, and ephemeral-storage, pid may be
specified to reserve the specified number of process IDs for OS system
daemons.
To optionally enforce systemReserved on system daemons, specify the parent
control group for OS system daemons as the value for systemReservedCgroup setting,
and add system-reserved to enforceNodeAllocatable.
It is recommended that the OS system daemons are placed under a top level
control group (system.slice on systemd machines for example).
Note that kubelet does not create systemReservedCgroup if it doesn't
exist. kubelet will fail if an invalid cgroup is specified. With systemd
cgroup driver, you should follow a specific pattern for the name of the cgroup you
define: the name should be the value you set for systemReservedCgroup,
with .slice appended.
Explicitly Reserved CPU List
Kubernetes v1.17 [stable]KubeletConfiguration Setting: reservedSystemCPUs:. Example value 0-3
reservedSystemCPUs is meant to define an explicit CPU set for OS system daemons and
kubernetes system daemons. reservedSystemCPUs is for systems that do not intend to
define separate top level cgroups for OS system daemons and kubernetes system daemons
with regard to cpuset resource.
If the Kubelet does not have kubeReservedCgroup and systemReservedCgroup,
the explicit cpuset provided by reservedSystemCPUs will take precedence over the CPUs
defined by kubeReservedCgroup and systemReservedCgroup options.
This option is specifically designed for Telco/NFV use cases where uncontrolled interrupts/timers may impact the workload performance. you can use this option to define the explicit cpuset for the system/kubernetes daemons as well as the interrupts/timers, so the rest CPUs on the system can be used exclusively for workloads, with less impact from uncontrolled interrupts/timers. To move the system daemon, kubernetes daemons and interrupts/timers to the explicit cpuset defined by this option, other mechanism outside Kubernetes should be used. For example: in Centos, you can do this using the tuned toolset.
Eviction Thresholds
KubeletConfiguration Setting: evictionHard: {memory.available: "100Mi", nodefs.available: "10%", nodefs.inodesFree: "5%", imagefs.available: "15%"}. Example value: {memory.available: "<500Mi"}
Memory pressure at the node level leads to System OOMs which affects the entire
node and all pods running on it. Nodes can go offline temporarily until memory
has been reclaimed. To avoid (or reduce the probability of) system OOMs kubelet
provides out of resource
management. Evictions are
supported for memory and ephemeral-storage only. By reserving some memory via
evictionHard setting, the kubelet attempts to evict pods whenever memory
availability on the node drops below the reserved value. Hypothetically, if
system daemons did not exist on a node, pods cannot use more than capacity - eviction-hard. For this reason, resources reserved for evictions are not
available for pods.
Enforcing Node Allocatable
KubeletConfiguration setting: enforceNodeAllocatable: [pods]. Example value: [pods,system-reserved,kube-reserved]
The scheduler treats 'Allocatable' as the available capacity for pods.
kubelet enforce 'Allocatable' across pods by default. Enforcement is performed
by evicting pods whenever the overall usage across all pods exceeds
'Allocatable'. More details on eviction policy can be found
on the node pressure eviction
page. This enforcement is controlled by
specifying pods value to the KubeletConfiguration setting enforceNodeAllocatable.
Optionally, kubelet can be made to enforce kubeReserved and
systemReserved by specifying kube-reserved & system-reserved values in
the same setting. Additionally, only compressible resources may be enforced by
specifying kube-reserved-compressible and system-reserved-compressible.
Note that to enforce kubeReserved or systemReserved,
kubeReservedCgroup or systemReservedCgroup needs to be specified
respectively.
General Guidelines
System daemons are expected to be treated similar to
Guaranteed pods.
System daemons can burst within their bounding control groups and this behavior needs
to be managed as part of kubernetes deployments. For example, kubelet should
have its own control group and share kubeReserved resources with the
container runtime. However, Kubelet cannot burst and use up all available Node
resources if kubeReserved is enforced.
Be extra careful while enforcing systemReserved reservation since it can lead
to critical system services being CPU starved, OOM killed, or unable
to fork on the node. The
recommendation is to enforce systemReserved only if a user has profiled their
nodes exhaustively to come up with precise estimates and is confident in their
ability to recover if any process in that group is oom-killed.
Enforcing only compressible resources for kubeReserved and systemReserved
is less likely to cause disruption while ensuring that the resource is
allocated appropriately when there is contention.
- To begin with enforce 'Allocatable' on
pods. - Once adequate monitoring and alerting is in place to track kube and system
daemons, attempt to enforce compressible resources on
kubeReservedandsystemReserved. - Attempt to enforce non-compressible
kubeReservedresources based on usage heuristics. - If absolutely necessary, enforce non-compressible
systemReservedresources over time.
The resource requirements of kube system daemons may grow over time as more and
more features are added. Over time, kubernetes project will attempt to bring
down utilization of node system daemons, but that is not a priority as of now.
So expect a drop in Allocatable capacity in future releases.
Example Scenario
Here is an example to illustrate Node Allocatable computation:
- Node has
32Giofmemory,16 CPUsand100GiofStorage kubeReservedis set to{cpu: 1000m, memory: 2Gi, ephemeral-storage: 1Gi}systemReservedis set to{cpu: 500m, memory: 1Gi, ephemeral-storage: 1Gi}evictionHardis set to{memory.available: "<500Mi", nodefs.available: "<10%"}
Under this scenario, 'Allocatable' will be 14.5 CPUs, 28.5Gi of memory and
88Gi of local storage.
Scheduler ensures that the total memory requests across all pods on this node does
not exceed 28.5Gi and storage doesn't exceed 88Gi.
Kubelet evicts pods whenever the overall memory usage across pods exceeds 28.5Gi,
or if overall disk usage exceeds 88Gi. If all processes on the node consume as
much CPU as they can, pods together cannot consume more than 14.5 CPUs.
If kubeReserved and/or systemReserved is not enforced and system daemons
exceed their reservation, kubelet evicts pods whenever the overall node memory
usage is higher than 31.5Gi or storage is greater than 90Gi.
34 - Running Kubernetes Node Components as a Non-root User
Kubernetes v1.22 [alpha]This document describes how to run Kubernetes Node components such as kubelet, CRI, OCI, and CNI without root privileges, by using a user namespace.
This technique is also known as rootless mode.
Note:
This document describes how to run Kubernetes Node components (and hence pods) as a non-root user.
If you are just looking for how to run a pod as a non-root user, see SecurityContext.
Before you begin
Your Kubernetes server must be at or later than version 1.22.
To check the version, enter kubectl version.
- Enable Cgroup v2
- Enable systemd with user session
- Configure several sysctl values, depending on host Linux distribution
- Ensure that your unprivileged user is listed in
/etc/subuidand/etc/subgid - Enable the
KubeletInUserNamespacefeature gate
Running Kubernetes inside Rootless Docker/Podman
kind
kind supports running Kubernetes inside Rootless Docker or Rootless Podman.
See Running kind with Rootless Docker.
minikube
minikube also supports running Kubernetes inside Rootless Docker or Rootless Podman.
See the Minikube documentation:
Running Kubernetes inside Unprivileged Containers
sysbox
Sysbox is an open-source container runtime (similar to "runc") that supports running system-level workloads such as Docker and Kubernetes inside unprivileged containers isolated with the Linux user namespace.
See Sysbox Quick Start Guide: Kubernetes-in-Docker for more info.
Sysbox supports running Kubernetes inside unprivileged containers without
requiring Cgroup v2 and without the KubeletInUserNamespace feature gate. It
does this by exposing specially crafted /proc and /sys filesystems inside
the container plus several other advanced OS virtualization techniques.
Running Rootless Kubernetes directly on a host
K3s
K3s experimentally supports rootless mode.
See Running K3s with Rootless mode for the usage.
Usernetes
Usernetes is a reference distribution of Kubernetes that can be installed under $HOME directory without the root privilege.
Usernetes supports both containerd and CRI-O as CRI runtimes. Usernetes supports multi-node clusters using Flannel (VXLAN).
See the Usernetes repo for the usage.
Manually deploy a node that runs the kubelet in a user namespace
This section provides hints for running Kubernetes in a user namespace manually.
Note:
This section is intended to be read by developers of Kubernetes distributions, not by end users.Creating a user namespace
The first step is to create a user namespace.
If you are trying to run Kubernetes in a user-namespaced container such as Rootless Docker/Podman or LXC/LXD, you are all set, and you can go to the next subsection.
Otherwise you have to create a user namespace by yourself, by calling unshare(2) with CLONE_NEWUSER.
A user namespace can be also unshared by using command line tools such as:
After unsharing the user namespace, you will also have to unshare other namespaces such as mount namespace.
You do not need to call chroot() nor pivot_root() after unsharing the mount namespace,
however, you have to mount writable filesystems on several directories in the namespace.
At least, the following directories need to be writable in the namespace (not outside the namespace):
/etc/run/var/logs/var/lib/kubelet/var/lib/cni/var/lib/containerd(for containerd)/var/lib/containers(for CRI-O)
Creating a delegated cgroup tree
In addition to the user namespace, you also need to have a writable cgroup tree with cgroup v2.
Note:
Kubernetes support for running Node components in user namespaces requires cgroup v2. Cgroup v1 is not supported.If you are trying to run Kubernetes in Rootless Docker/Podman or LXC/LXD on a systemd-based host, you are all set.
Otherwise you have to create a systemd unit with Delegate=yes property to delegate a cgroup tree with writable permission.
On your node, systemd must already be configured to allow delegation; for more details, see cgroup v2 in the Rootless Containers documentation.
Configuring network
The network namespace of the Node components has to have a non-loopback interface, which can be for example configured with slirp4netns, VPNKit, or lxc-user-nic(1).
The network namespaces of the Pods can be configured with regular CNI plugins. For multi-node networking, Flannel (VXLAN, 8472/UDP) is known to work.
Ports such as the kubelet port (10250/TCP) and NodePort service ports have to be exposed from the Node network namespace to
the host with an external port forwarder, such as RootlessKit, slirp4netns, or
socat(1).
You can use the port forwarder from K3s.
See Running K3s in Rootless Mode
for more details.
The implementation can be found in the pkg/rootlessports package of k3s.
Configuring CRI
The kubelet relies on a container runtime. You should deploy a container runtime such as containerd or CRI-O and ensure that it is running within the user namespace before the kubelet starts.
Running CRI plugin of containerd in a user namespace is supported since containerd 1.4.
Running containerd within a user namespace requires the following configurations.
version = 2
[plugins."io.containerd.grpc.v1.cri"]
# Disable AppArmor
disable_apparmor = true
# Ignore an error during setting oom_score_adj
restrict_oom_score_adj = true
# Disable hugetlb cgroup v2 controller (because systemd does not support delegating hugetlb controller)
disable_hugetlb_controller = true
[plugins."io.containerd.grpc.v1.cri".containerd]
# Using non-fuse overlayfs is also possible for kernel >= 5.11, but requires SELinux to be disabled
snapshotter = "fuse-overlayfs"
[plugins."io.containerd.grpc.v1.cri".containerd.runtimes.runc.options]
# We use cgroupfs that is delegated by systemd, so we do not use SystemdCgroup driver
# (unless you run another systemd in the namespace)
SystemdCgroup = false
The default path of the configuration file is /etc/containerd/config.toml.
The path can be specified with containerd -c /path/to/containerd/config.toml.
Running CRI-O in a user namespace is supported since CRI-O 1.22.
CRI-O requires an environment variable _CRIO_ROOTLESS=1 to be set.
The following configurations are also recommended:
[crio]
storage_driver = "overlay"
# Using non-fuse overlayfs is also possible for kernel >= 5.11, but requires SELinux to be disabled
storage_option = ["overlay.mount_program=/usr/local/bin/fuse-overlayfs"]
[crio.runtime]
# We use cgroupfs that is delegated by systemd, so we do not use "systemd" driver
# (unless you run another systemd in the namespace)
cgroup_manager = "cgroupfs"
The default path of the configuration file is /etc/crio/crio.conf.
The path can be specified with crio --config /path/to/crio/crio.conf.
Configuring kubelet
Running kubelet in a user namespace requires the following configuration:
apiVersion: kubelet.config.k8s.io/v1beta1
kind: KubeletConfiguration
featureGates:
KubeletInUserNamespace: true
# We use cgroupfs that is delegated by systemd, so we do not use "systemd" driver
# (unless you run another systemd in the namespace)
cgroupDriver: "cgroupfs"
When the KubeletInUserNamespace feature gate is enabled, the kubelet ignores errors
that may happen during setting the following sysctl values on the node.
vm.overcommit_memoryvm.panic_on_oomkernel.panickernel.panic_on_oopskernel.keys.root_maxkeyskernel.keys.root_maxbytes.
Within a user namespace, the kubelet also ignores any error raised from trying to open /dev/kmsg.
This feature gate also allows kube-proxy to ignore an error during setting RLIMIT_NOFILE.
The KubeletInUserNamespace feature gate was introduced in Kubernetes v1.22 with "alpha" status.
Running kubelet in a user namespace without using this feature gate is also possible by mounting a specially crafted proc filesystem (as done by Sysbox), but not officially supported.
Configuring kube-proxy
Running kube-proxy in a user namespace requires the following configuration:
apiVersion: kubeproxy.config.k8s.io/v1alpha1
kind: KubeProxyConfiguration
mode: "iptables" # or "userspace"
conntrack:
# Skip setting sysctl value "net.netfilter.nf_conntrack_max"
maxPerCore: 0
# Skip setting "net.netfilter.nf_conntrack_tcp_timeout_established"
tcpEstablishedTimeout: 0s
# Skip setting "net.netfilter.nf_conntrack_tcp_timeout_close"
tcpCloseWaitTimeout: 0s
Caveats
Most of "non-local" volume drivers such as
nfsandiscsido not work. Local volumes likelocal,hostPath,emptyDir,configMap,secret, anddownwardAPIare known to work.Some CNI plugins may not work. Flannel (VXLAN) is known to work.
For more on this, see the Caveats and Future work page on the rootlesscontaine.rs website.
See Also
35 - Safely Drain a Node
This page shows how to safely drain a node, optionally respecting the PodDisruptionBudget you have defined.
Before you begin
This task assumes that you have met the following prerequisites:
- You do not require your applications to be highly available during the node drain, or
- You have read about the PodDisruptionBudget concept, and have configured PodDisruptionBudgets for applications that need them.
(Optional) Configure a disruption budget
To ensure that your workloads remain available during maintenance, you can configure a PodDisruptionBudget.
If availability is important for any applications that run or could run on the node(s) that you are draining, configure a PodDisruptionBudgets first and then continue following this guide.
It is recommended to set AlwaysAllow Unhealthy Pod Eviction Policy
to your PodDisruptionBudgets to support eviction of misbehaving applications during a node drain.
The default behavior is to wait for the application pods to become healthy
before the drain can proceed.
Use kubectl drain to remove a node from service
You can use kubectl drain to safely evict all of your pods from a
node before you perform maintenance on the node (e.g. kernel upgrade,
hardware maintenance, etc.). Safe evictions allow the pod's containers
to gracefully terminate
and will respect the PodDisruptionBudgets you have specified.
Note:
By defaultkubectl drain ignores certain system pods on the node
that cannot be killed; see
the kubectl drain
documentation for more details.When kubectl drain returns successfully, that indicates that all of
the pods (except the ones excluded as described in the previous paragraph)
have been safely evicted (respecting the desired graceful termination period,
and respecting the PodDisruptionBudget you have defined). It is then safe to
bring down the node by powering down its physical machine or, if running on a
cloud platform, deleting its virtual machine.
Note:
If any new Pods tolerate the node.kubernetes.io/unschedulable taint, then those Pods
might be scheduled to the node you have drained. Avoid tolerating that taint other than
for DaemonSets.
If you or another API user directly set the nodeName
field for a Pod (bypassing the scheduler), then the Pod is bound to the specified node
and will run there, even though you have drained that node and marked it unschedulable.
First, identify the name of the node you wish to drain. You can list all of the nodes in your cluster with
kubectl get nodes
Next, tell Kubernetes to drain the node:
kubectl drain --ignore-daemonsets <node name>
If there are pods managed by a DaemonSet, you will need to specify
--ignore-daemonsets with kubectl to successfully drain the node. The kubectl drain subcommand on its own does not actually drain
a node of its DaemonSet pods:
the DaemonSet controller (part of the control plane) immediately replaces missing Pods with
new equivalent Pods. The DaemonSet controller also creates Pods that ignore unschedulable
taints, which allows the new Pods to launch onto a node that you are draining.
Once it returns (without giving an error), you can power down the node (or equivalently, if on a cloud platform, delete the virtual machine backing the node). If you leave the node in the cluster during the maintenance operation, you need to run
kubectl uncordon <node name>
afterwards to tell Kubernetes that it can resume scheduling new pods onto the node.
Draining multiple nodes in parallel
The kubectl drain command should only be issued to a single node at a
time. However, you can run multiple kubectl drain commands for
different nodes in parallel, in different terminals or in the
background. Multiple drain commands running concurrently will still
respect the PodDisruptionBudget you specify.
For example, if you have a StatefulSet with three replicas and have
set a PodDisruptionBudget for that set specifying minAvailable: 2,
kubectl drain only evicts a pod from the StatefulSet if all three
replicas pods are healthy;
if then you issue multiple drain commands in parallel,
Kubernetes respects the PodDisruptionBudget and ensures that
only 1 (calculated as replicas - minAvailable) Pod is unavailable
at any given time. Any drains that would cause the number of healthy
replicas to fall below the specified budget are blocked.
The Eviction API
If you prefer not to use kubectl drain (such as to avoid calling to an external command, or to get finer control over the pod eviction process), you can also programmatically cause evictions using the eviction API.
For more information, see API-initiated eviction.
What's next
- Follow steps to protect your application by configuring a Pod Disruption Budget.
36 - Securing a Cluster
This document covers topics related to protecting a cluster from accidental or malicious access and provides recommendations on overall security.
Before you begin
You need to have a Kubernetes cluster, and the kubectl command-line tool must be configured to communicate with your cluster. It is recommended to run this tutorial on a cluster with at least two nodes that are not acting as control plane hosts. If you do not already have a cluster, you can create one by using minikube or you can use one of these Kubernetes playgrounds:
To check the version, enter
kubectl version.
Controlling access to the Kubernetes API
As Kubernetes is entirely API-driven, controlling and limiting who can access the cluster and what actions they are allowed to perform is the first line of defense.
Use Transport Layer Security (TLS) for all API traffic
Kubernetes expects that all API communication in the cluster is encrypted by default with TLS, and the majority of installation methods will allow the necessary certificates to be created and distributed to the cluster components. Note that some components and installation methods may enable local ports over HTTP and administrators should familiarize themselves with the settings of each component to identify potentially unsecured traffic.
API Authentication
Choose an authentication mechanism for the API servers to use that matches the common access patterns when you install a cluster. For instance, small, single-user clusters may wish to use a simple certificate or static Bearer token approach. Larger clusters may wish to integrate an existing OIDC or LDAP server that allow users to be subdivided into groups.
All API clients must be authenticated, even those that are part of the infrastructure like nodes, proxies, the scheduler, and volume plugins. These clients are typically service accounts or use x509 client certificates, and they are created automatically at cluster startup or are setup as part of the cluster installation.
Consult the authentication reference document for more information.
API Authorization
Once authenticated, every API call is also expected to pass an authorization check. Kubernetes ships an integrated Role-Based Access Control (RBAC) component that matches an incoming user or group to a set of permissions bundled into roles. These permissions combine verbs (get, create, delete) with resources (pods, services, nodes) and can be namespace-scoped or cluster-scoped. A set of out-of-the-box roles are provided that offer reasonable default separation of responsibility depending on what actions a client might want to perform. It is recommended that you use the Node and RBAC authorizers together, in combination with the NodeRestriction admission plugin.
As with authentication, simple and broad roles may be appropriate for smaller clusters, but as more users interact with the cluster, it may become necessary to separate teams into separate namespaces with more limited roles.
With authorization, it is important to understand how updates on one object may cause actions in other places. For instance, a user may not be able to create pods directly, but allowing them to create a deployment, which creates pods on their behalf, will let them create those pods indirectly. Likewise, deleting a node from the API will result in the pods scheduled to that node being terminated and recreated on other nodes. The out-of-the box roles represent a balance between flexibility and common use cases, but more limited roles should be carefully reviewed to prevent accidental escalation. You can make roles specific to your use case if the out-of-box ones don't meet your needs.
Consult the authorization reference section for more information.
If your cluster uses Dynamic Resource Allocation (DRA),
review DRA synthetic subresource authorization (resourceclaims/binding and
resourceclaims/driver) and grant only the minimum required verbs to each
component. For details, see
Hardening Guide - Dynamic Resource Allocation
and
Harden Dynamic Resource Allocation in Your Cluster.
Controlling access to the Kubelet
Kubelets expose HTTPS endpoints which grant powerful control over the node and containers. By default Kubelets allow unauthenticated access to this API.
Production clusters should enable Kubelet authentication and authorization.
Consult the Kubelet authentication/authorization reference for more information.
Controlling the capabilities of a workload or user at runtime
Authorization in Kubernetes is intentionally high level, focused on coarse actions on resources. More powerful controls exist as policies to limit by use case how those objects act on the cluster, themselves, and other resources.
Limiting resource usage on a cluster
Resource quota limits the number or capacity of resources granted to a namespace. This is most often used to limit the amount of CPU, memory, or persistent disk a namespace can allocate, but can also control how many pods, services, or volumes exist in each namespace.
Limit ranges restrict the maximum or minimum size of some of the resources above, to prevent users from requesting unreasonably high or low values for commonly reserved resources like memory, or to provide default limits when none are specified.
Controlling what privileges containers run with
A pod definition contains a security context that allows it to request access to run as a specific Linux user on a node (like root), access to run privileged or access the host network, and other controls that would otherwise allow it to run unfettered on a hosting node.
You can configure Pod security admission to enforce use of a particular Pod Security Standard in a namespace, or to detect breaches.
Generally, most application workloads need limited access to host resources so they can successfully run as a root process (uid 0) without access to host information. However, considering the privileges associated with the root user, you should write application containers to run as a non-root user. Similarly, administrators who wish to prevent client applications from escaping their containers should apply the Baseline or Restricted Pod Security Standard.
Preventing containers from loading unwanted kernel modules
The Linux kernel automatically loads kernel modules from disk if needed in certain circumstances, such as when a piece of hardware is attached or a filesystem is mounted. Of particular relevance to Kubernetes, even unprivileged processes can cause certain network-protocol-related kernel modules to be loaded, just by creating a socket of the appropriate type. This may allow an attacker to exploit a security hole in a kernel module that the administrator assumed was not in use.
To prevent specific modules from being automatically loaded, you can uninstall them from
the node, or add rules to block them. On most Linux distributions, you can do that by
creating a file such as /etc/modprobe.d/kubernetes-blacklist.conf with contents like:
# DCCP is unlikely to be needed, has had multiple serious
# vulnerabilities, and is not well-maintained.
blacklist dccp
# SCTP is not used in most Kubernetes clusters, and has also had
# vulnerabilities in the past.
blacklist sctp
To block module loading more generically, you can use a Linux Security Module (such as
SELinux) to completely deny the module_request permission to containers, preventing the
kernel from loading modules for containers under any circumstances. (Pods would still be
able to use modules that had been loaded manually, or modules that were loaded by the
kernel on behalf of some more-privileged process.)
Restricting network access
The network policies for a namespace allows application authors to restrict which pods in other namespaces may access pods and ports within their namespaces. Many of the supported Kubernetes networking providers now respect network policy.
Quota and limit ranges can also be used to control whether users may request node ports or load-balanced services, which on many clusters can control whether those users applications are visible outside of the cluster.
Additional protections may be available that control network rules on a per-plugin or per- environment basis, such as per-node firewalls, physically separating cluster nodes to prevent cross talk, or advanced networking policy.
Restricting cloud metadata API access
Cloud platforms (AWS, Azure, GCE, etc.) often expose metadata services locally to instances. By default these APIs are accessible by pods running on an instance and can contain cloud credentials for that node, or provisioning data such as kubelet credentials. These credentials can be used to escalate within the cluster or to other cloud services under the same account.
When running Kubernetes on a cloud platform, limit permissions given to instance credentials, use network policies to restrict pod access to the metadata API, and avoid using provisioning data to deliver secrets.
Controlling which nodes pods may access
By default, there are no restrictions on which nodes may run a pod. Kubernetes offers a rich set of policies for controlling placement of pods onto nodes and the taint-based pod placement and eviction that are available to end users. For many clusters use of these policies to separate workloads can be a convention that authors adopt or enforce via tooling.
As an administrator, a beta admission plugin PodNodeSelector can be used to force pods
within a namespace to default or require a specific node selector, and if end users cannot
alter namespaces, this can strongly limit the placement of all of the pods in a specific workload.
Protecting cluster components from compromise
This section describes some common patterns for protecting clusters from compromise.
Restrict access to etcd
Write access to the etcd backend for the API is equivalent to gaining root on the entire cluster, and read access can be used to escalate fairly quickly. Administrators should always use strong credentials from the API servers to their etcd server, such as mutual auth via TLS client certificates, and it is often recommended to isolate the etcd servers behind a firewall that only the API servers may access.
Caution:
Allowing other components within the cluster to access the master etcd instance with read or write access to the full keyspace is equivalent to granting cluster-admin access. Using separate etcd instances for non-master components or using etcd ACLs to restrict read and write access to a subset of the keyspace is strongly recommended.Enable audit logging
The audit logger is a beta feature that records actions taken by the API for later analysis in the event of a compromise. It is recommended to enable audit logging and archive the audit file on a secure server.
Restrict access to alpha or beta features
Alpha and beta Kubernetes features are in active development and may have limitations or bugs that result in security vulnerabilities. Always assess the value an alpha or beta feature may provide against the possible risk to your security posture. When in doubt, disable features you do not use.
Rotate infrastructure credentials frequently
The shorter the lifetime of a secret or credential the harder it is for an attacker to make use of that credential. Set short lifetimes on certificates and automate their rotation. Use an authentication provider that can control how long issued tokens are available and use short lifetimes where possible. If you use service-account tokens in external integrations, plan to rotate those tokens frequently. For example, once the bootstrap phase is complete, a bootstrap token used for setting up nodes should be revoked or its authorization removed.
Review third party integrations before enabling them
Many third party integrations to Kubernetes may alter the security profile of your cluster. When enabling an integration, always review the permissions that an extension requests before granting it access. For example, many security integrations may request access to view all secrets on your cluster which is effectively making that component a cluster admin. When in doubt, restrict the integration to functioning in a single namespace if possible.
Components that create pods may also be unexpectedly powerful if they can do so inside namespaces
like the kube-system namespace, because those pods can gain access to service account secrets
or run with elevated permissions if those service accounts are granted access to permissive
PodSecurityPolicies.
If you use Pod Security admission and allow any component to create Pods within a namespace that permits privileged Pods, those Pods may be able to escape their containers and use this widened access to elevate their privileges.
You should not allow untrusted components to create Pods in any system namespace (those with
names that start with kube-) nor in any namespace where that access grant allows the possibility
of privilege escalation.
Encrypt secrets at rest
In general, the etcd database will contain any information accessible via the Kubernetes API and may grant an attacker significant visibility into the state of your cluster. Always encrypt your backups using a well reviewed backup and encryption solution, and consider using full disk encryption where possible.
Kubernetes supports optional encryption at rest for information in the Kubernetes API.
This lets you ensure that when Kubernetes stores data for objects (for example, Secret or
ConfigMap objects), the API server writes an encrypted representation of the object.
That encryption means that even someone who has access to etcd backup data is unable
to view the content of those objects.
In Kubernetes 1.36 you can also encrypt custom resources;
encryption-at-rest for extension APIs defined in CustomResourceDefinitions was added to
Kubernetes as part of the v1.26 release.
Receiving alerts for security updates and reporting vulnerabilities
Join the kubernetes-announce group for emails about security announcements. See the security reporting page for more on how to report vulnerabilities.
What's next
- Security Checklist for additional information on Kubernetes security guidance.
- Seccomp Node Reference
37 - Harden Dynamic Resource Allocation in Your Cluster
This page shows cluster administrators how to harden authorization for
Dynamic Resource Allocation (DRA), with a focus on least-privilege access for
ResourceClaim status updates.
Before you begin
You need to have a Kubernetes cluster, and the kubectl command-line tool must be configured to communicate with your cluster. It is recommended to run this tutorial on a cluster with at least two nodes that are not acting as control plane hosts. If you do not already have a cluster, you can create one by using minikube or you can use one of these Kubernetes playgrounds:
To check the version, enter
kubectl version.- Dynamic Resource Allocation is configured in your cluster.
- You can edit RBAC resources and restart or roll out DRA components.
Identify DRA components that write status
Document which identities (usually ServiceAccounts) update ResourceClaim status in your cluster. Typical writers are:
- kube-scheduler or a custom allocation controller
- node-local DRA drivers
- multi-node DRA status controllers
Grant least-privilege permissions for synthetic subresources
Starting in Kubernetes v1.36, DRA status updates require synthetic subresource
permissions in addition to resourceclaims/status.
Grant scheduler and allocation-controller permissions
Apply a role that allows binding-related updates:
apiVersion: rbac.authorization.k8s.io/v1
kind: ClusterRole
metadata:
name: dra-binding-updater
rules:
- apiGroups: ["resource.k8s.io"]
resources: ["resourceclaims/status"]
verbs: ["get", "patch", "update"]
- apiGroups: ["resource.k8s.io"]
resources: ["resourceclaims/binding"]
verbs: ["patch", "update"]
Grant node-local driver permissions
Use node-aware verbs for node-local drivers:
apiVersion: rbac.authorization.k8s.io/v1
kind: ClusterRole
metadata:
name: dra-node-driver-status-updater
rules:
- apiGroups: ["resource.k8s.io"]
resources: ["resourceclaims/status"]
verbs: ["get", "patch", "update"]
- apiGroups: ["resource.k8s.io"]
resources: ["resourceclaims/driver"]
verbs: ["associated-node:patch", "associated-node:update"]
resourceNames: ["dra.example.com"]
Grant multi-node controller permissions only when needed
Use arbitrary-node:* only for components that must update from any node:
apiVersion: rbac.authorization.k8s.io/v1
kind: ClusterRole
metadata:
name: dra-multinode-status-updater
rules:
- apiGroups: ["resource.k8s.io"]
resources: ["resourceclaims/status"]
verbs: ["get", "patch", "update"]
- apiGroups: ["resource.k8s.io"]
resources: ["resourceclaims/driver"]
verbs: ["arbitrary-node:patch", "arbitrary-node:update"]
resourceNames: ["dra.example.com"]
Bind roles to explicit identities
Create ClusterRoleBinding objects for each component identity, and avoid
sharing a broad role across unrelated DRA components.
Restrict resourceclaims/driver rules with resourceNames where possible so
an identity can only write status for the specific DRA driver it operates.
Validate and monitor
- Verify each identity has only the required verbs and subresources.
- Confirm DRA status updates work after rollout.
- Watch API server audit events for denied
resourceclaims/bindingandresourceclaims/driverrequests.
What's next
38 - Set Kubelet Parameters Via A Configuration File
Before you begin
Some steps in this page use the jq tool. If you don't have jq, you can
install it via your operating system's software sources, or fetch it from
https://jqlang.github.io/jq/.
Some steps also involve installing curl, which can be installed via your
operating system's software sources.
A subset of the kubelet's configuration parameters may be set via an on-disk config file, as a substitute for command-line flags.
Providing parameters via a config file is the recommended approach because it simplifies node deployment and configuration management.
Create the config file
The subset of the kubelet's configuration that can be configured via a file
is defined by the
KubeletConfiguration
struct.
The configuration file must be a JSON or YAML representation of the parameters in this struct. Make sure the kubelet has read permissions on the file.
Here is an example of what this file might look like:
apiVersion: kubelet.config.k8s.io/v1beta1
kind: KubeletConfiguration
address: "192.168.0.8"
port: 20250
serializeImagePulls: false
evictionHard:
memory.available: "100Mi"
nodefs.available: "10%"
nodefs.inodesFree: "5%"
imagefs.available: "15%"
imagefs.inodesFree: "5%"
In this example, the kubelet is configured with the following settings:
address: The kubelet will serve on IP address192.168.0.8.port: The kubelet will serve on port20250.serializeImagePulls: Image pulls will be done in parallel.evictionHard: The kubelet will evict Pods under one of the following conditions:- When the node's available memory drops below 100MiB.
- When the node's main filesystem's available space is less than 10%.
- When the image filesystem's available space is less than 15%.
- When more than 95% of the node's main filesystem's inodes are in use.
Note:
In the example, by changing the default value of only one parameter for evictionHard, the default values of other parameters will not be inherited and will be set to zero. In order to provide custom values, you should provide all the threshold values respectively. Alternatively, you can set the MergeDefaultEvictionSettings to true in the kubelet configuration file, if any parameter is changed then the other parameters will inherit their default values instead of 0.The imagefs is an optional filesystem that container runtimes use to store container
images and container writable layers.
Start a kubelet process configured via the config file
Note:
If you use kubeadm to initialize your cluster, use the kubelet-config while creating your cluster withkubeadm init.
See configuring kubelet using kubeadm for details.Start the kubelet with the --config flag set to the path of the kubelet's config file.
The kubelet will then load its config from this file.
Note that command line flags which target the same value as a config file will override that value. This helps ensure backwards compatibility with the command-line API.
Note that relative file paths in the kubelet config file are resolved relative to the location of the kubelet config file, whereas relative paths in command line flags are resolved relative to the kubelet's current working directory.
Note that some default values differ between command-line flags and the kubelet config file.
If --config is provided and the values are not specified via the command line, the
defaults for the KubeletConfiguration version apply.
In the above example, this version is kubelet.config.k8s.io/v1beta1.
Drop-in directory for kubelet configuration files
You can specify a drop-in configuration directory for the kubelet. By default, the kubelet does not look
for drop-in configuration files anywhere - you must specify a path.
For example: --config-dir=/etc/kubernetes/kubelet.conf.d
For Kubernetes v1.28 to v1.29, you can only specify --config-dir if you also set
the environment variable KUBELET_CONFIG_DROPIN_DIR_ALPHA for the kubelet process (the value
of that variable does not matter).
Note:
The suffix of a valid kubelet drop-in configuration file must be.conf. For instance: 99-kubelet-address.confThe kubelet processes files in its config drop-in directory by sorting the entire file name alphanumerically.
For instance, 00-kubelet.conf is processed first, and then overridden with a file named 01-kubelet.conf.
These files may contain partial configurations but should not be invalid and must include type metadata, specifically apiVersion and kind.
Validation is only performed on the final resulting configuration structure stored internally in the kubelet.
This offers flexibility in managing and merging kubelet configurations from different sources while preventing undesirable configurations.
However, it is important to note that behavior varies based on the data type of the configuration fields.
Different data types in the kubelet configuration structure merge differently. See the reference document for more information.
Kubelet configuration merging order
On startup, the kubelet merges configuration from:
- Feature gates specified over the command line (lowest precedence).
- The kubelet configuration.
- Drop-in configuration files, according to sort order.
- Command line arguments excluding feature gates (highest precedence).
Note:
The config drop-in dir mechanism for the kubelet is similar but different from how thekubeadm tool allows you to patch configuration.
The kubeadm tool uses a specific patching strategy
for its configuration, whereas the only patch strategy for kubelet configuration drop-in files is replace.
The kubelet determines the order of merges based on sorting the suffixes alphanumerically,
and replaces every field present in a higher priority file.Viewing the kubelet configuration
Since the configuration could now be spread over multiple files with this feature, if someone wants to inspect the final actuated configuration, they can follow these steps to inspect the kubelet configuration:
Start a proxy server using
kubectl proxyin your terminal.kubectl proxyWhich gives output like:
Starting to serve on 127.0.0.1:8001Open another terminal window and use
curlto fetch the kubelet configuration. Replace<node-name>with the actual name of your node:curl -X GET http://127.0.0.1:8001/api/v1/nodes/<node-name>/proxy/configz | jq .{ "kubeletconfig": { "enableServer": true, "staticPodPath": "/var/run/kubernetes/static-pods", "syncFrequency": "1m0s", "fileCheckFrequency": "20s", "httpCheckFrequency": "20s", "address": "192.168.1.16", "port": 10250, "readOnlyPort": 10255, "tlsCertFile": "/var/lib/kubelet/pki/kubelet.crt", "tlsPrivateKeyFile": "/var/lib/kubelet/pki/kubelet.key", "rotateCertificates": true, "authentication": { "x509": { "clientCAFile": "/var/run/kubernetes/client-ca.crt" }, "webhook": { "enabled": true, "cacheTTL": "2m0s" }, "anonymous": { "enabled": true } }, "authorization": { "mode": "AlwaysAllow", "webhook": { "cacheAuthorizedTTL": "5m0s", "cacheUnauthorizedTTL": "30s" } }, "registryPullQPS": 5, "registryBurst": 10, "eventRecordQPS": 50, "eventBurst": 100, "enableDebuggingHandlers": true, "healthzPort": 10248, "healthzBindAddress": "127.0.0.1", "oomScoreAdj": -999, "clusterDomain": "cluster.local", "clusterDNS": [ "10.0.0.10" ], "streamingConnectionIdleTimeout": "4h0m0s", "nodeStatusUpdateFrequency": "10s", "nodeStatusReportFrequency": "5m0s", "nodeLeaseDurationSeconds": 40, "imageMinimumGCAge": "2m0s", "imageMaximumGCAge": "0s", "imageGCHighThresholdPercent": 85, "imageGCLowThresholdPercent": 80, "volumeStatsAggPeriod": "1m0s", "cgroupsPerQOS": true, "cgroupDriver": "systemd", "cpuManagerPolicy": "none", "cpuManagerReconcilePeriod": "10s", "memoryManagerPolicy": "None", "topologyManagerPolicy": "none", "topologyManagerScope": "container", "runtimeRequestTimeout": "2m0s", "hairpinMode": "promiscuous-bridge", "maxPods": 110, "podPidsLimit": -1, "resolvConf": "/run/systemd/resolve/resolv.conf", "cpuCFSQuota": true, "cpuCFSQuotaPeriod": "100ms", "nodeStatusMaxImages": 50, "maxOpenFiles": 1000000, "contentType": "application/vnd.kubernetes.protobuf", "kubeAPIQPS": 50, "kubeAPIBurst": 100, "serializeImagePulls": true, "evictionHard": { "imagefs.available": "15%", "memory.available": "100Mi", "nodefs.available": "10%", "nodefs.inodesFree": "5%", "imagefs.inodesFree": "5%" }, "evictionPressureTransitionPeriod": "1m0s", "mergeDefaultEvictionSettings": false, "enableControllerAttachDetach": true, "makeIPTablesUtilChains": true, "iptablesMasqueradeBit": 14, "iptablesDropBit": 15, "featureGates": { "AllAlpha": false }, "failSwapOn": false, "memorySwap": {}, "containerLogMaxSize": "10Mi", "containerLogMaxFiles": 5, "configMapAndSecretChangeDetectionStrategy": "Watch", "enforceNodeAllocatable": [ "pods" ], "volumePluginDir": "/usr/libexec/kubernetes/kubelet-plugins/volume/exec/", "logging": { "format": "text", "flushFrequency": "5s", "verbosity": 3, "options": { "json": { "infoBufferSize": "0" } } }, "enableSystemLogHandler": true, "enableSystemLogQuery": false, "shutdownGracePeriod": "0s", "shutdownGracePeriodCriticalPods": "0s", "enableProfilingHandler": true, "enableDebugFlagsHandler": true, "seccompDefault": false, "memoryThrottlingFactor": 0.9, "registerNode": true, "localStorageCapacityIsolation": true, "containerRuntimeEndpoint": "unix:///var/run/crio/crio.sock" } }
What's next
- Learn more about kubelet configuration by checking the
KubeletConfigurationreference. - Learn more about kubelet configuration merging in the reference document.
39 - Share a Cluster with Namespaces
This page shows how to view, work in, and delete namespaces. The page also shows how to use Kubernetes namespaces to subdivide your cluster.
Before you begin
- Have an existing Kubernetes cluster.
- You have a basic understanding of Kubernetes Pods, Services, and Deployments.
Viewing namespaces
List the current namespaces in a cluster using:
kubectl get namespaces
NAME STATUS AGE
default Active 11d
kube-node-lease Active 11d
kube-public Active 11d
kube-system Active 11d
Kubernetes starts with four initial namespaces:
defaultThe default namespace for objects with no other namespacekube-node-leaseThis namespace holds Lease objects associated with each node. Node leases allow the kubelet to send heartbeats so that the control plane can detect node failure.kube-publicThis namespace is created automatically and is readable by all users (including those not authenticated). This namespace is mostly reserved for cluster usage, in case that some resources should be visible and readable publicly throughout the whole cluster. The public aspect of this namespace is only a convention, not a requirement.kube-systemThe namespace for objects created by the Kubernetes system
You can also get the summary of a specific namespace using:
kubectl get namespaces <name>
Or you can get detailed information with:
kubectl describe namespaces <name>
Name: default
Labels: <none>
Annotations: <none>
Status: Active
No resource quota.
Resource Limits
Type Resource Min Max Default
---- -------- --- --- ---
Container cpu - - 100m
Note that these details show both resource quota (if present) as well as resource limit ranges.
Resource quota tracks aggregate usage of resources in the Namespace and allows cluster operators to define Hard resource usage limits that a Namespace may consume.
A limit range defines min/max constraints on the amount of resources a single entity can consume in a Namespace.
See Admission control: Limit Range
A namespace can be in one of two phases:
Activethe namespace is in useTerminatingthe namespace is being deleted, and can not be used for new objects
For more details, see Namespace in the API reference.
Creating a new namespace
Note:
Avoid creating namespace with prefixkube-, since it is reserved for Kubernetes system namespaces.Create a new YAML file called my-namespace.yaml with the contents:
apiVersion: v1
kind: Namespace
metadata:
name: <insert-namespace-name-here>
Then run:
kubectl create -f ./my-namespace.yaml
Alternatively, you can create namespace using below command:
kubectl create namespace <insert-namespace-name-here>
The name of your namespace must be a valid DNS label.
There's an optional field finalizers, which allows observables to purge resources whenever the
namespace is deleted. Keep in mind that if you specify a nonexistent finalizer, the namespace will
be created but will get stuck in the Terminating state if the user tries to delete it.
More information on finalizers can be found in the namespace
design doc.
Deleting a namespace
Delete a namespace with
kubectl delete namespaces <insert-some-namespace-name>
Warning:
This deletes everything under the namespace!This delete is asynchronous, so for a time you will see the namespace in the Terminating state.
Subdividing your cluster using Kubernetes namespaces
By default, a Kubernetes cluster will instantiate a default namespace when provisioning the cluster to hold the default set of Pods, Services, and Deployments used by the cluster.
Assuming you have a fresh cluster, you can introspect the available namespaces by doing the following:
kubectl get namespaces
NAME STATUS AGE
default Active 13m
Create new namespaces
For this exercise, we will create two additional Kubernetes namespaces to hold our content.
In a scenario where an organization is using a shared Kubernetes cluster for development and production use cases:
The development team would like to maintain a space in the cluster where they can get a view on the list of Pods, Services, and Deployments they use to build and run their application. In this space, Kubernetes resources come and go, and the restrictions on who can or cannot modify resources are relaxed to enable agile development.
The operations team would like to maintain a space in the cluster where they can enforce strict procedures on who can or cannot manipulate the set of Pods, Services, and Deployments that run the production site.
One pattern this organization could follow is to partition the Kubernetes cluster into two
namespaces: development and production. Let's create two new namespaces to hold our work.
Create the development namespace using kubectl:
kubectl create -f https://k8s.io/examples/admin/namespace-dev.json
And then let's create the production namespace using kubectl:
kubectl create -f https://k8s.io/examples/admin/namespace-prod.json
To be sure things are right, list all of the namespaces in our cluster.
kubectl get namespaces --show-labels
NAME STATUS AGE LABELS
default Active 32m <none>
development Active 29s name=development
production Active 23s name=production
Create pods in each namespace
A Kubernetes namespace provides the scope for Pods, Services, and Deployments in the cluster.
Users interacting with one namespace do not see the content in another namespace.
To demonstrate this, let's spin up a simple Deployment and Pods in the development namespace.
kubectl create deployment snowflake \
--image=registry.k8s.io/serve_hostname \
-n=development --replicas=2
We have created a deployment whose replica size is 2 that is running the pod called snowflake
with a basic container that serves the hostname.
kubectl get deployment -n=development
NAME READY UP-TO-DATE AVAILABLE AGE
snowflake 2/2 2 2 2m
kubectl get pods -l app=snowflake -n=development
NAME READY STATUS RESTARTS AGE
snowflake-3968820950-9dgr8 1/1 Running 0 2m
snowflake-3968820950-vgc4n 1/1 Running 0 2m
And this is great, developers are able to do what they want, and they do not have to worry about
affecting content in the production namespace.
Let's switch to the production namespace and show how resources in one namespace are hidden from
the other. The production namespace should be empty, and the following commands should return nothing.
kubectl get deployment -n=production
kubectl get pods -n=production
Production likes to run cattle, so let's create some cattle pods.
kubectl create deployment cattle --image=registry.k8s.io/serve_hostname -n=production
kubectl scale deployment cattle --replicas=5 -n=production
kubectl get deployment -n=production
NAME READY UP-TO-DATE AVAILABLE AGE
cattle 5/5 5 5 10s
kubectl get pods -l app=cattle -n=production
NAME READY STATUS RESTARTS AGE
cattle-2263376956-41xy6 1/1 Running 0 34s
cattle-2263376956-kw466 1/1 Running 0 34s
cattle-2263376956-n4v97 1/1 Running 0 34s
cattle-2263376956-p5p3i 1/1 Running 0 34s
cattle-2263376956-sxpth 1/1 Running 0 34s
At this point, it should be clear that the resources users create in one namespace are hidden from the other namespace.
As the policy support in Kubernetes evolves, we will extend this scenario to show how you can provide different authorization rules for each namespace.
Understanding the motivation for using namespaces
A single cluster should be able to satisfy the needs of multiple users or groups of users (henceforth in this document a user community).
Kubernetes namespaces help different projects, teams, or customers to share a Kubernetes cluster.
It does this by providing the following:
- A scope for names.
- A mechanism to attach authorization and policy to a subsection of the cluster.
Use of multiple namespaces is optional.
Each user community wants to be able to work in isolation from other communities. Each user community has its own:
- resources (pods, services, replication controllers, etc.)
- policies (who can or cannot perform actions in their community)
- constraints (this community is allowed this much quota, etc.)
A cluster operator may create a Namespace for each unique user community.
The Namespace provides a unique scope for:
- named resources (to avoid basic naming collisions)
- delegated management authority to trusted users
- ability to limit community resource consumption
Use cases include:
- As a cluster operator, I want to support multiple user communities on a single cluster.
- As a cluster operator, I want to delegate authority to partitions of the cluster to trusted users in those communities.
- As a cluster operator, I want to limit the amount of resources each community can consume in order to limit the impact to other communities using the cluster.
- As a cluster user, I want to interact with resources that are pertinent to my user community in isolation of what other user communities are doing on the cluster.
Understanding namespaces and DNS
When you create a Service, it creates a corresponding
DNS entry.
This entry is of the form <service-name>.<namespace-name>.svc.cluster.local, which means
that if a container uses <service-name> it will resolve to the service which
is local to a namespace. This is useful for using the same configuration across
multiple namespaces such as Development, Staging and Production. If you want to reach
across namespaces, you need to use the fully qualified domain name (FQDN).
What's next
- Learn more about setting the namespace preference.
- Learn more about setting the namespace for a request
- See namespaces design.
40 - Upgrade A Cluster
This page provides an overview of the steps you should follow to upgrade a Kubernetes cluster.
The Kubernetes project recommends upgrading to the latest patch releases promptly, and to ensure that you are running a supported minor release of Kubernetes. Following this recommendation helps you to stay secure.
The way that you upgrade a cluster depends on how you initially deployed it and on any subsequent changes.
At a high level, the steps you perform are:
- Upgrade the control plane
- Upgrade the nodes in your cluster
- Upgrade clients such as kubectl
- Adjust manifests and other resources based on the API changes that accompany the new Kubernetes version
Before you begin
You must have an existing cluster. This page is about upgrading from Kubernetes 1.35 to Kubernetes 1.36. If your cluster is not currently running Kubernetes 1.35 then please check the documentation for the version of Kubernetes that you plan to upgrade to.
Note:
On Linux nodes, the kubelet defaults to supporting only cgroups v2.
For Kubernetes 1.36 the FailCgroupV1 kubelet configuration option is set to true by default.
To learn more, refer to the Kubernetes cgroup v1 deprecation documentation.
Upgrade approaches
kubeadm
If your cluster was deployed using the kubeadm tool, refer to
Upgrading kubeadm clusters
for detailed information on how to upgrade the cluster.
Once you have upgraded the cluster, remember to
install the latest version of kubectl.
Manual deployments
Caution:
These steps do not account for third-party extensions such as network and storage plugins.You should manually update the control plane following this sequence:
- etcd (all instances)
- kube-apiserver (all control plane hosts)
- kube-controller-manager
- kube-scheduler
- cloud controller manager, if you use one
At this point you should
install the latest version of kubectl.
For each node in your cluster, drain that node and then either replace it with a new node that uses the 1.36 kubelet, or upgrade the kubelet on that node and bring the node back into service.
Caution:
Draining nodes before upgrading kubelet ensures that pods are re-admitted and containers are re-created, which may be necessary to resolve some security issues or other important bugs.Other deployments
Refer to the documentation for your cluster deployment tool to learn the recommended set up steps for maintenance.
Post-upgrade tasks
Switch your cluster's storage API version
The objects that are serialized into etcd for a cluster's internal representation of the Kubernetes resources active in the cluster are written using a particular version of the API.
When the supported API changes, these objects may need to be rewritten in the newer API. Failure to do this will eventually result in resources that are no longer decodable or usable by the Kubernetes API server.
For each affected object, fetch it using the latest supported API and then write it back also using the latest supported API.
Update manifests
Upgrading to a new Kubernetes version can provide new APIs.
You can use kubectl convert command to convert manifests between different API versions.
For example:
kubectl convert -f pod.yaml --output-version v1
The kubectl tool replaces the contents of pod.yaml with a manifest that sets kind to
Pod (unchanged), but with a revised apiVersion.
Device Plugins
If your cluster is running device plugins and the node needs to be upgraded to a Kubernetes release with a newer device plugin API version, device plugins must be upgraded to support both version before the node is upgraded in order to guarantee that device allocations continue to complete successfully during the upgrade.
Refer to API compatibility and Kubelet Device Manager API Versions for more details.
41 - Use Cascading Deletion in a Cluster
This page shows you how to specify the type of cascading deletion to use in your cluster during garbage collection.
Before you begin
You need to have a Kubernetes cluster, and the kubectl command-line tool must be configured to communicate with your cluster. It is recommended to run this tutorial on a cluster with at least two nodes that are not acting as control plane hosts. If you do not already have a cluster, you can create one by using minikube or you can use one of these Kubernetes playgrounds:
You also need to create a sample Deployment to experiment with the different types of cascading deletion. You will need to recreate the Deployment for each type.
Check owner references on your pods
Check that the ownerReferences field is present on your pods:
kubectl get pods -l app=nginx --output=yaml
The output has an ownerReferences field similar to this:
apiVersion: v1
...
ownerReferences:
- apiVersion: apps/v1
blockOwnerDeletion: true
controller: true
kind: ReplicaSet
name: nginx-deployment-6b474476c4
uid: 4fdcd81c-bd5d-41f7-97af-3a3b759af9a7
...
Use foreground cascading deletion
By default, Kubernetes uses background cascading deletion
to delete dependents of an object. You can switch to foreground cascading deletion
using either kubectl or the Kubernetes API, depending on the Kubernetes
version your cluster runs.
To check the version, enter kubectl version.
You can delete objects using foreground cascading deletion using kubectl or the
Kubernetes API.
Using kubectl
Run the following command:
kubectl delete deployment nginx-deployment --cascade=foreground
Using the Kubernetes API
Start a local proxy session:
kubectl proxy --port=8080Use
curlto trigger deletion:curl -X DELETE localhost:8080/apis/apps/v1/namespaces/default/deployments/nginx-deployment \ -d '{"kind":"DeleteOptions","apiVersion":"v1","propagationPolicy":"Foreground"}' \ -H "Content-Type: application/json"The output contains a
foregroundDeletionfinalizer like this:"kind": "Deployment", "apiVersion": "apps/v1", "metadata": { "name": "nginx-deployment", "namespace": "default", "uid": "d1ce1b02-cae8-4288-8a53-30e84d8fa505", "resourceVersion": "1363097", "creationTimestamp": "2021-07-08T20:24:37Z", "deletionTimestamp": "2021-07-08T20:27:39Z", "finalizers": [ "foregroundDeletion" ] ...
Use background cascading deletion
- Create a sample Deployment.
- Use either
kubectlor the Kubernetes API to delete the Deployment, depending on the Kubernetes version your cluster runs.To check the version, enter
kubectl version.
You can delete objects using background cascading deletion using kubectl
or the Kubernetes API.
Kubernetes uses background cascading deletion by default, and does so
even if you run the following commands without the --cascade flag or the
propagationPolicy argument.
Using kubectl
Run the following command:
kubectl delete deployment nginx-deployment --cascade=background
Using the Kubernetes API
Start a local proxy session:
kubectl proxy --port=8080Use
curlto trigger deletion:curl -X DELETE localhost:8080/apis/apps/v1/namespaces/default/deployments/nginx-deployment \ -d '{"kind":"DeleteOptions","apiVersion":"v1","propagationPolicy":"Background"}' \ -H "Content-Type: application/json"The output is similar to this:
"kind": "Status", "apiVersion": "v1", ... "status": "Success", "details": { "name": "nginx-deployment", "group": "apps", "kind": "deployments", "uid": "cc9eefb9-2d49-4445-b1c1-d261c9396456" }
Delete owner objects and orphan dependents
By default, when you tell Kubernetes to delete an object, the
controller also deletes
dependent objects. You can make Kubernetes orphan these dependents using
kubectl or the Kubernetes API, depending on the Kubernetes version your
cluster runs.
To check the version, enter kubectl version.
Using kubectl
Run the following command:
kubectl delete deployment nginx-deployment --cascade=orphan
Using the Kubernetes API
Start a local proxy session:
kubectl proxy --port=8080Use
curlto trigger deletion:curl -X DELETE localhost:8080/apis/apps/v1/namespaces/default/deployments/nginx-deployment \ -d '{"kind":"DeleteOptions","apiVersion":"v1","propagationPolicy":"Orphan"}' \ -H "Content-Type: application/json"The output contains
orphanin thefinalizersfield, similar to this:"kind": "Deployment", "apiVersion": "apps/v1", "namespace": "default", "uid": "6f577034-42a0-479d-be21-78018c466f1f", "creationTimestamp": "2021-07-09T16:46:37Z", "deletionTimestamp": "2021-07-09T16:47:08Z", "deletionGracePeriodSeconds": 0, "finalizers": [ "orphan" ], ...
You can check that the Pods managed by the Deployment are still running:
kubectl get pods -l app=nginx
What's next
- Learn about owners and dependents in Kubernetes.
- Learn about Kubernetes finalizers.
- Learn about garbage collection.
42 - Using a KMS provider for data encryption
This page shows how to configure a Key Management Service (KMS) provider and plugin to enable secret data encryption. In Kubernetes 1.36 there are two versions of KMS at-rest encryption. You should use KMS v2 if feasible because KMS v1 is deprecated (since Kubernetes v1.28) and disabled by default (since Kubernetes v1.29). KMS v2 offers significantly better performance characteristics than KMS v1.
Caution:
This documentation is for the generally available implementation of KMS v2 (and for the deprecated version 1 implementation). If you are using any control plane components older than Kubernetes v1.29, please check the equivalent page in the documentation for the version of Kubernetes that your cluster is running. Earlier releases of Kubernetes had different behavior that may be relevant for information security.Before you begin
You need to have a Kubernetes cluster, and the kubectl command-line tool must be configured to communicate with your cluster. It is recommended to run this tutorial on a cluster with at least two nodes that are not acting as control plane hosts. If you do not already have a cluster, you can create one by using minikube or you can use one of these Kubernetes playgrounds:
The version of Kubernetes that you need depends on which KMS API version you have selected. Kubernetes recommends using KMS v2.
- If you selected KMS API v1 to support clusters prior to version v1.27 or if you have a legacy KMS plugin that only supports KMS v1, any supported Kubernetes version will work. This API is deprecated as of Kubernetes v1.28. Kubernetes does not recommend the use of this API.
To check the version, enter kubectl version.
KMS v1
Kubernetes v1.28 [deprecated]Kubernetes version 1.10.0 or later is required
For version 1.29 and later, the v1 implementation of KMS is disabled by default. To enable the feature, set
--feature-gates=KMSv1=trueto configure a KMS v1 provider.Your cluster must use etcd v3 or later
KMS v2
Kubernetes v1.29 [stable]- Your cluster must use etcd v3 or later
KMS encryption and per-object encryption keys
The KMS encryption provider uses an envelope encryption scheme to encrypt data in etcd. The data is encrypted using a data encryption key (DEK). The DEKs are encrypted with a key encryption key (KEK) that is stored and managed in a remote KMS.
If you use the (deprecated) v1 implementation of KMS, a new DEK is generated for each encryption.
With KMS v2, a new DEK is generated per encryption: the API server uses a key derivation function to generate single use data encryption keys from a secret seed combined with some random data. The seed is rotated whenever the KEK is rotated (see the Understanding key_id and Key Rotation section below for more details).
The KMS provider uses gRPC to communicate with a specific KMS plugin over a UNIX domain socket. The KMS plugin, which is implemented as a gRPC server and deployed on the same host(s) as the Kubernetes control plane, is responsible for all communication with the remote KMS.
Configuring the KMS provider
To configure a KMS provider on the API server, include a provider of type kms in the
providers array in the encryption configuration file and set the following properties:
KMS v1
apiVersion: API Version for KMS provider. Leave this value empty or set it tov1.name: Display name of the KMS plugin. Cannot be changed once set.endpoint: Listen address of the gRPC server (KMS plugin). The endpoint is a UNIX domain socket.cachesize: Number of data encryption keys (DEKs) to be cached in the clear. When cached, DEKs can be used without another call to the KMS; whereas DEKs that are not cached require a call to the KMS to unwrap.timeout: How long shouldkube-apiserverwait for kms-plugin to respond before returning an error (default is 3 seconds).
KMS v2
apiVersion: API Version for KMS provider. Set this tov2.name: Display name of the KMS plugin. Cannot be changed once set.endpoint: Listen address of the gRPC server (KMS plugin). The endpoint is a UNIX domain socket.timeout: How long shouldkube-apiserverwait for kms-plugin to respond before returning an error (default is 3 seconds).
KMS v2 does not support the cachesize property. All data encryption keys (DEKs) will be cached in
the clear once the server has unwrapped them via a call to the KMS. Once cached, DEKs can be used
to perform decryption indefinitely without making a call to the KMS.
See Understanding the encryption at rest configuration.
Implementing a KMS plugin
To implement a KMS plugin, you can develop a new plugin gRPC server or enable a KMS plugin already provided by your cloud provider. You then integrate the plugin with the remote KMS and deploy it on the Kubernetes control plane.
Enabling the KMS supported by your cloud provider
Refer to your cloud provider for instructions on enabling the cloud provider-specific KMS plugin.
Developing a KMS plugin gRPC server
You can develop a KMS plugin gRPC server using a stub file available for Go. For other languages, you use a proto file to create a stub file that you can use to develop the gRPC server code.
KMS v1
Using Go: Use the functions and data structures in the stub file: api.pb.go to develop the gRPC server code
Using languages other than Go: Use the protoc compiler with the proto file: api.proto to generate a stub file for the specific language
KMS v2
Using Go: A high level library is provided to make the process easier. Low level implementations can use the functions and data structures in the stub file: api.pb.go to develop the gRPC server code
Using languages other than Go: Use the protoc compiler with the proto file: api.proto to generate a stub file for the specific language
Then use the functions and data structures in the stub file to develop the server code.
Notes
KMS v1
kms plugin version:
v1beta1In response to procedure call Version, a compatible KMS plugin should return
v1beta1asVersionResponse.version.message version:
v1beta1All messages from KMS provider have the version field set to
v1beta1.protocol: UNIX domain socket (
unix)The plugin is implemented as a gRPC server that listens at UNIX domain socket. The plugin deployment should create a file on the file system to run the gRPC unix domain socket connection. The API server (gRPC client) is configured with the KMS provider (gRPC server) unix domain socket endpoint in order to communicate with it. An abstract Linux socket may be used by starting the endpoint with
/@, i.e.unix:///@foo. Care must be taken when using this type of socket as they do not have concept of ACL (unlike traditional file based sockets). However, they are subject to Linux networking namespace, so will only be accessible to containers within the same pod unless host networking is used.
KMS v2
KMS plugin version:
v2In response to the
Statusremote procedure call, a compatible KMS plugin should return its KMS compatibility version asStatusResponse.version. That status response should also include "ok" asStatusResponse.healthzand akey_id(remote KMS KEK ID) asStatusResponse.key_id. The Kubernetes project recommends you make your plugin compatible with the stablev2KMS API. Kubernetes 1.36 also supports thev2beta1API for KMS; future Kubernetes releases are likely to continue supporting that beta version.The API server polls the
Statusprocedure call approximately every minute when everything is healthy, and every 10 seconds when the plugin is not healthy. Plugins must take care to optimize this call as it will be under constant load.Encryption
The
EncryptRequestprocedure call provides the plaintext and a UID for logging purposes. The response must include the ciphertext, thekey_idfor the KEK used, and, optionally, any metadata that the KMS plugin needs to aid in futureDecryptRequestcalls (via theannotationsfield). The plugin must guarantee that any distinct plaintext results in a distinct response(ciphertext, key_id, annotations).If the plugin returns a non-empty
annotationsmap, all map keys must be fully qualified domain names such asexample.com. An example use case ofannotationis{"kms.example.io/remote-kms-auditid":"<audit ID used by the remote KMS>"}The API server does not perform the
EncryptRequestprocedure call at a high rate. Plugin implementations should still aim to keep each request's latency at under 100 milliseconds.Decryption
The
DecryptRequestprocedure call provides the(ciphertext, key_id, annotations)fromEncryptRequestand a UID for logging purposes. As expected, it is the inverse of theEncryptRequestcall. Plugins must verify that thekey_idis one that they understand - they must not attempt to decrypt data unless they are sure that it was encrypted by them at an earlier time.The API server may perform thousands of
DecryptRequestprocedure calls on startup to fill its watch cache. Thus plugin implementations must perform these calls as quickly as possible, and should aim to keep each request's latency at under 10 milliseconds.Understanding
key_idand Key RotationThe
key_idis the public, non-secret name of the remote KMS KEK that is currently in use. It may be logged during regular operation of the API server, and thus must not contain any private data. Plugin implementations are encouraged to use a hash to avoid leaking any data. The KMS v2 metrics take care to hash this value before exposing it via the/metricsendpoint.The API server considers the
key_idreturned from theStatusprocedure call to be authoritative. Thus, a change to this value signals to the API server that the remote KEK has changed, and data encrypted with the old KEK should be marked stale when a no-op write is performed (as described below). If anEncryptRequestprocedure call returns akey_idthat is different fromStatus, the response is thrown away and the plugin is considered unhealthy. Thus implementations must guarantee that thekey_idreturned fromStatuswill be the same as the one returned byEncryptRequest. Furthermore, plugins must ensure that thekey_idis stable and does not flip-flop between values (i.e. during a remote KEK rotation).Plugins must not re-use
key_ids, even in situations where a previously used remote KEK has been reinstated. For example, if a plugin was usingkey_id=A, switched tokey_id=B, and then went back tokey_id=A- instead of reportingkey_id=Athe plugin should report some derivative value such askey_id=A_001or use a new value such askey_id=C.Since the API server polls
Statusabout every minute,key_idrotation is not immediate. Furthermore, the API server will coast on the last valid state for about three minutes. Thus if a user wants to take a passive approach to storage migration (i.e. by waiting), they must schedule a migration to occur at3 + N + Mminutes after the remote KEK has been rotated (Nis how long it takes the plugin to observe thekey_idchange andMis the desired buffer to allow config changes to be processed - a minimumMof five minutes is recommend). Note that no API server restart is required to perform KEK rotation.Caution:
Because you don't control the number of writes performed with the DEK, the Kubernetes project recommends rotating the KEK at least every 90 days.protocol: UNIX domain socket (
unix)The plugin is implemented as a gRPC server that listens at UNIX domain socket. The plugin deployment should create a file on the file system to run the gRPC unix domain socket connection. The API server (gRPC client) is configured with the KMS provider (gRPC server) unix domain socket endpoint in order to communicate with it. An abstract Linux socket may be used by starting the endpoint with
/@, i.e.unix:///@foo. Care must be taken when using this type of socket as they do not have concept of ACL (unlike traditional file based sockets). However, they are subject to Linux networking namespace, so will only be accessible to containers within the same pod unless host networking is used.
Integrating a KMS plugin with the remote KMS
The KMS plugin can communicate with the remote KMS using any protocol supported by the KMS.
All configuration data, including authentication credentials the KMS plugin uses to communicate with the remote KMS,
are stored and managed by the KMS plugin independently.
The KMS plugin can encode the ciphertext with additional metadata that may be required before sending it to the KMS
for decryption (KMS v2 makes this process easier by providing a dedicated annotations field).
Deploying the KMS plugin
Ensure that the KMS plugin runs on the same host(s) as the Kubernetes API server(s).
Encrypting your data with the KMS provider
To encrypt the data:
Create a new
EncryptionConfigurationfile using the appropriate properties for thekmsprovider to encrypt resources like Secrets and ConfigMaps. If you want to encrypt an extension API that is defined in a CustomResourceDefinition, your cluster must be running Kubernetes v1.26 or newer.Set the
--encryption-provider-configflag on the kube-apiserver to point to the location of the configuration file.--encryption-provider-config-automatic-reloadboolean argument determines if the file set by--encryption-provider-configshould be automatically reloaded if the disk contents change.Restart your API server.
KMS v1
apiVersion: apiserver.config.k8s.io/v1
kind: EncryptionConfiguration
resources:
- resources:
- secrets
- configmaps
- pandas.awesome.bears.example
providers:
- kms:
name: myKmsPluginFoo
endpoint: unix:///tmp/socketfile-foo.sock
cachesize: 100
timeout: 3s
- kms:
name: myKmsPluginBar
endpoint: unix:///tmp/socketfile-bar.sock
cachesize: 100
timeout: 3s
KMS v2
apiVersion: apiserver.config.k8s.io/v1
kind: EncryptionConfiguration
resources:
- resources:
- secrets
- configmaps
- pandas.awesome.bears.example
providers:
- kms:
apiVersion: v2
name: myKmsPluginFoo
endpoint: unix:///tmp/socketfile-foo.sock
timeout: 3s
- kms:
apiVersion: v2
name: myKmsPluginBar
endpoint: unix:///tmp/socketfile-bar.sock
timeout: 3s
Setting --encryption-provider-config-automatic-reload to true collapses all health checks to a single health check endpoint. Individual health checks are only available when KMS v1 providers are in use and the encryption config is not auto-reloaded.
The following table summarizes the health check endpoints for each KMS version:
| KMS configurations | Without Automatic Reload | With Automatic Reload |
|---|---|---|
| KMS v1 only | Individual Healthchecks | Single Healthcheck |
| KMS v2 only | Single Healthcheck | Single Healthcheck |
| Both KMS v1 and v2 | Individual Healthchecks | Single Healthcheck |
| No KMS | None | Single Healthcheck |
Single Healthcheck means that the only health check endpoint is /healthz/kms-providers.
Individual Healthchecks means that each KMS plugin has an associated health check endpoint based on its location in the encryption config: /healthz/kms-provider-0, /healthz/kms-provider-1 etc.
These healthcheck endpoint paths are hard coded and generated/controlled by the server. The indices for individual healthchecks corresponds to the order in which the KMS encryption config is processed.
Until the steps defined in Ensuring all secrets are encrypted are performed, the providers list should end with the identity: {} provider to allow unencrypted data to be read. Once all resources are encrypted, the identity provider should be removed to prevent the API server from honoring unencrypted data.
For details about the EncryptionConfiguration format, please check the
API server encryption API reference.
Verifying that the data is encrypted
When encryption at rest is correctly configured, resources are encrypted on write.
After restarting your kube-apiserver, any newly created or updated Secret or other resource types
configured in EncryptionConfiguration should be encrypted when stored. To verify,
you can use the etcdctl command line program to retrieve the contents of your secret data.
Create a new secret called
secret1in thedefaultnamespace:kubectl create secret generic secret1 -n default --from-literal=mykey=mydataUsing the
etcdctlcommand line, read that secret out of etcd:ETCDCTL_API=3 etcdctl get /kubernetes.io/secrets/default/secret1 [...] | hexdump -Cwhere
[...]contains the additional arguments for connecting to the etcd server.Verify the stored secret is prefixed with
k8s:enc:kms:v1:for KMS v1 or prefixed withk8s:enc:kms:v2:for KMS v2, which indicates that thekmsprovider has encrypted the resulting data.Verify that the secret is correctly decrypted when retrieved via the API:
kubectl describe secret secret1 -n defaultThe Secret should contain
mykey: mydata
Ensuring all secrets are encrypted
When encryption at rest is correctly configured, resources are encrypted on write. Thus we can perform an in-place no-op update to ensure that data is encrypted.
The following command reads all secrets and then updates them to apply server side encryption. If an error occurs due to a conflicting write, retry the command. For larger clusters, you may wish to subdivide the secrets by namespace or script an update.
kubectl get secrets --all-namespaces -o json | kubectl replace -f -
Switching from a local encryption provider to the KMS provider
To switch from a local encryption provider to the kms provider and re-encrypt all of the secrets:
Add the
kmsprovider as the first entry in the configuration file as shown in the following example.apiVersion: apiserver.config.k8s.io/v1 kind: EncryptionConfiguration resources: - resources: - secrets providers: - kms: apiVersion: v2 name : myKmsPlugin endpoint: unix:///tmp/socketfile.sock - aescbc: keys: - name: key1 secret: <BASE 64 ENCODED SECRET>Restart all
kube-apiserverprocesses.Run the following command to force all secrets to be re-encrypted using the
kmsprovider.kubectl get secrets --all-namespaces -o json | kubectl replace -f -
What's next
If you no longer want to use encryption for data persisted in the Kubernetes API, read decrypt data that are already stored at rest.
43 - Using CoreDNS for Service Discovery
This page describes the CoreDNS upgrade process and how to install CoreDNS instead of kube-dns.
Before you begin
You need to have a Kubernetes cluster, and the kubectl command-line tool must be configured to communicate with your cluster. It is recommended to run this tutorial on a cluster with at least two nodes that are not acting as control plane hosts. If you do not already have a cluster, you can create one by using minikube or you can use one of these Kubernetes playgrounds:
Your Kubernetes server must be at or later than version v1.9.To check the version, enter kubectl version.
About CoreDNS
CoreDNS is a flexible, extensible DNS server that can serve as the Kubernetes cluster DNS. Like Kubernetes, the CoreDNS project is hosted by the CNCF.
You can use CoreDNS instead of kube-dns in your cluster by replacing kube-dns in an existing deployment, or by using tools like kubeadm that will deploy and upgrade the cluster for you.
Installing CoreDNS
For manual deployment or replacement of kube-dns, see the documentation at the CoreDNS website.
Migrating to CoreDNS
Upgrading an existing cluster with kubeadm
In Kubernetes version 1.21, kubeadm removed its support for kube-dns as a DNS application.
For kubeadm v1.36, the only supported cluster DNS application
is CoreDNS.
You can move to CoreDNS when you use kubeadm to upgrade a cluster that is
using kube-dns. In this case, kubeadm generates the CoreDNS configuration
("Corefile") based upon the kube-dns ConfigMap, preserving configurations for
stub domains, and upstream name server.
Upgrading CoreDNS
You can check the version of CoreDNS that kubeadm installs for each version of Kubernetes in the page CoreDNS version in Kubernetes.
CoreDNS can be upgraded manually in case you want to only upgrade CoreDNS or use your own custom image. There is a helpful guideline and walkthrough available to ensure a smooth upgrade. Make sure the existing CoreDNS configuration ("Corefile") is retained when upgrading your cluster.
If you are upgrading your cluster using the kubeadm tool, kubeadm
can take care of retaining the existing CoreDNS configuration automatically.
Tuning CoreDNS
When resource utilisation is a concern, it may be useful to tune the configuration of CoreDNS. For more details, check out the documentation on scaling CoreDNS.
What's next
You can configure CoreDNS to support many more use cases than
kube-dns does by modifying the CoreDNS configuration ("Corefile").
For more information, see the documentation
for the kubernetes CoreDNS plugin, or read the
Custom DNS Entries for Kubernetes.
in the CoreDNS blog.
44 - Using NodeLocal DNSCache in Kubernetes Clusters
Kubernetes v1.18 [stable]This page provides an overview of NodeLocal DNSCache feature in Kubernetes.
Before you begin
You need to have a Kubernetes cluster, and the kubectl command-line tool must be configured to communicate with your cluster. It is recommended to run this tutorial on a cluster with at least two nodes that are not acting as control plane hosts. If you do not already have a cluster, you can create one by using minikube or you can use one of these Kubernetes playgrounds:
To check the version, enter kubectl version.
Introduction
NodeLocal DNSCache improves Cluster DNS performance by running a DNS caching agent
on cluster nodes as a DaemonSet. In today's architecture, Pods in 'ClusterFirst' DNS mode
reach out to a kube-dns serviceIP for DNS queries. This is translated to a
kube-dns/CoreDNS endpoint via iptables rules added by kube-proxy.
With this new architecture, Pods will reach out to the DNS caching agent
running on the same node, thereby avoiding iptables DNAT rules and connection tracking.
The local caching agent will query kube-dns service for cache misses of cluster
hostnames ("cluster.local" suffix by default).
Motivation
With the current DNS architecture, it is possible that Pods with the highest DNS QPS have to reach out to a different node, if there is no local kube-dns/CoreDNS instance. Having a local cache will help improve the latency in such scenarios.
Skipping iptables DNAT and connection tracking will help reduce conntrack races and avoid UDP DNS entries filling up conntrack table.
Connections from the local caching agent to kube-dns service can be upgraded to TCP. TCP conntrack entries will be removed on connection close in contrast with UDP entries that have to timeout (default
nf_conntrack_udp_timeoutis 30 seconds)Upgrading DNS queries from UDP to TCP would reduce tail latency attributed to dropped UDP packets and DNS timeouts usually up to 30s (3 retries + 10s timeout). Since the nodelocal cache listens for UDP DNS queries, applications don't need to be changed.
Metrics & visibility into DNS requests at a node level.
Negative caching can be re-enabled, thereby reducing the number of queries for the kube-dns service.
Architecture Diagram
This is the path followed by DNS Queries after NodeLocal DNSCache is enabled:

Nodelocal DNSCache flow
This image shows how NodeLocal DNSCache handles DNS queries.
Configuration
Note:
The local listen IP address for NodeLocal DNSCache can be any address that can be guaranteed to not collide with any existing IP in your cluster. It's recommended to use an address with a local scope, for example, from the 'link-local' range '169.254.0.0/16' for IPv4 or from the 'Unique Local Address' range in IPv6 'fd00::/8'.This feature can be enabled using the following steps:
Prepare a manifest similar to the sample
nodelocaldns.yamland save it asnodelocaldns.yaml.If using IPv6, the CoreDNS configuration file needs to enclose all the IPv6 addresses into square brackets if used in 'IP:Port' format. If you are using the sample manifest from the previous point, this will require you to modify the configuration line L70 like this: "
health [__PILLAR__LOCAL__DNS__]:8080"Substitute the variables in the manifest with the right values:
kubedns=`kubectl get svc kube-dns -n kube-system -o jsonpath={.spec.clusterIP}` domain=<cluster-domain> localdns=<node-local-address><cluster-domain>is "cluster.local" by default.<node-local-address>is the local listen IP address chosen for NodeLocal DNSCache.If kube-proxy is running in IPTABLES mode:
sed -i "s/__PILLAR__LOCAL__DNS__/$localdns/g; s/__PILLAR__DNS__DOMAIN__/$domain/g; s/__PILLAR__DNS__SERVER__/$kubedns/g" nodelocaldns.yaml__PILLAR__CLUSTER__DNS__and__PILLAR__UPSTREAM__SERVERS__will be populated by thenode-local-dnspods. In this mode, thenode-local-dnspods listen on both the kube-dns service IP as well as<node-local-address>, so pods can look up DNS records using either IP address.If kube-proxy is running in IPVS mode:
sed -i "s/__PILLAR__LOCAL__DNS__/$localdns/g; s/__PILLAR__DNS__DOMAIN__/$domain/g; s/,__PILLAR__DNS__SERVER__//g; s/__PILLAR__CLUSTER__DNS__/$kubedns/g" nodelocaldns.yamlIn this mode, the
node-local-dnspods listen only on<node-local-address>. Thenode-local-dnsinterface cannot bind the kube-dns cluster IP since the interface used for IPVS loadbalancing already uses this address.__PILLAR__UPSTREAM__SERVERS__will be populated by the node-local-dns pods.
Run
kubectl create -f nodelocaldns.yamlIf using kube-proxy in IPVS mode,
--cluster-dnsflag to kubelet needs to be modified to use<node-local-address>that NodeLocal DNSCache is listening on. Otherwise, there is no need to modify the value of the--cluster-dnsflag, since NodeLocal DNSCache listens on both the kube-dns service IP as well as<node-local-address>.
Once enabled, the node-local-dns Pods will run in the kube-system namespace
on each of the cluster nodes. This Pod runs CoreDNS
in cache mode, so all CoreDNS metrics exposed by the different plugins will
be available on a per-node basis.
You can disable this feature by removing the DaemonSet, using kubectl delete -f <manifest>.
You should also revert any changes you made to the kubelet configuration.
StubDomains and Upstream server Configuration
StubDomains and upstream servers specified in the kube-dns ConfigMap in the kube-system namespace
are automatically picked up by node-local-dns pods. The ConfigMap contents need to follow the format
shown in the example.
The node-local-dns ConfigMap can also be modified directly with the stubDomain configuration
in the Corefile format. Some cloud providers might not allow modifying node-local-dns ConfigMap directly.
In those cases, the kube-dns ConfigMap can be updated.
Setting memory limits
The node-local-dns Pods use memory for storing cache entries and processing queries.
Since they do not watch Kubernetes objects, the cluster size or the number of Services / EndpointSlices do not directly affect memory usage. Memory usage is influenced by the DNS query pattern.
From CoreDNS docs,
The default cache size is 10000 entries, which uses about 30 MB when completely filled.
This would be the memory usage for each server block (if the cache gets completely filled). Memory usage can be reduced by specifying smaller cache sizes.
The number of concurrent queries is linked to the memory demand, because each extra
goroutine used for handling a query requires an amount of memory. You can set an upper limit
using the max_concurrent option in the forward plugin.
If a node-local-dns Pod attempts to use more memory than is available (because of total system
resources, or because of a configured
resource limit), the operating system
may shut down that pod's container.
If this happens, the container that is terminated (“OOMKilled”) does not clean up the custom
packet filtering rules that it previously added during startup.
The node-local-dns container should get restarted (since managed as part of a DaemonSet), but this
will lead to a brief DNS downtime each time that the container fails: the packet filtering rules direct
DNS queries to a local Pod that is unhealthy.
You can determine a suitable memory limit by running node-local-dns pods without a limit and measuring the peak usage. You can also set up and use a VerticalPodAutoscaler in recommender mode, and then check its recommendations.
45 - Using sysctls in a Kubernetes Cluster
Kubernetes v1.21 [stable]This document describes how to configure and use kernel parameters within a Kubernetes cluster using the sysctl interface.
Note:
Starting from Kubernetes version 1.23, the kubelet supports the use of either/ or .
as separators for sysctl names.
Starting from Kubernetes version 1.25, setting Sysctls for a Pod supports setting sysctls with slashes.
For example, you can represent the same sysctl name as kernel.shm_rmid_forced using a
period as the separator, or as kernel/shm_rmid_forced using a slash as a separator.
For more sysctl parameter conversion method details, please refer to
the page sysctl.d(5) from
the Linux man-pages project.Before you begin
Note:
sysctl is a Linux-specific command-line tool used to configure various kernel parameters
and it is not available on non-Linux operating systems.You need to have a Kubernetes cluster, and the kubectl command-line tool must be configured to communicate with your cluster. It is recommended to run this tutorial on a cluster with at least two nodes that are not acting as control plane hosts. If you do not already have a cluster, you can create one by using minikube or you can use one of these Kubernetes playgrounds:
For some steps, you also need to be able to reconfigure the command line options for the kubelets running on your cluster.
Listing all Sysctl Parameters
In Linux, the sysctl interface allows an administrator to modify kernel
parameters at runtime. Parameters are available via the /proc/sys/ virtual
process file system. The parameters cover various subsystems such as:
- kernel (common prefix:
kernel.) - networking (common prefix:
net.) - virtual memory (common prefix:
vm.) - MDADM (common prefix:
dev.) - More subsystems are described in Kernel docs.
To get a list of all parameters, you can run
sudo sysctl -a
Safe and Unsafe Sysctls
Kubernetes classes sysctls as either safe or unsafe. In addition to proper namespacing, a safe sysctl must be properly isolated between pods on the same node. This means that setting a safe sysctl for one pod
- must not have any influence on any other pod on the node
- must not allow to harm the node's health
- must not allow to gain CPU or memory resources outside of the resource limits of a pod.
By far, most of the namespaced sysctls are not necessarily considered safe. The following sysctls are supported in the safe set:
kernel.shm_rmid_forced;net.ipv4.ip_local_port_range;net.ipv4.tcp_syncookies;net.ipv4.ping_group_range(since Kubernetes 1.18);net.ipv4.ip_unprivileged_port_start(since Kubernetes 1.22);net.ipv4.ip_local_reserved_ports(since Kubernetes 1.27, needs kernel 3.16+);net.ipv4.tcp_keepalive_time(since Kubernetes 1.29, needs kernel 4.5+);net.ipv4.tcp_fin_timeout(since Kubernetes 1.29, needs kernel 4.6+);net.ipv4.tcp_keepalive_intvl(since Kubernetes 1.29, needs kernel 4.5+);net.ipv4.tcp_keepalive_probes(since Kubernetes 1.29, needs kernel 4.5+).net.ipv4.tcp_rmem(since Kubernetes 1.32, needs kernel 4.15+).net.ipv4.tcp_wmem(since Kubernetes 1.32, needs kernel 4.15+).
Note:
There are some exceptions to the set of safe sysctls:
- The
net.*sysctls are not allowed with host networking enabled. - The
net.ipv4.tcp_syncookiessysctl is not namespaced on Linux kernel version 4.5 or lower.
This list will be extended in future Kubernetes versions when the kubelet supports better isolation mechanisms.
Enabling Unsafe Sysctls
All safe sysctls are enabled by default.
All unsafe sysctls are disabled by default and must be allowed manually by the cluster admin on a per-node basis. Pods with disabled unsafe sysctls will be scheduled, but will fail to launch.
With the warning above in mind, the cluster admin can allow certain unsafe sysctls for very special situations such as high-performance or real-time application tuning. Unsafe sysctls are enabled on a node-by-node basis with a flag of the kubelet; for example:
kubelet --allowed-unsafe-sysctls \
'kernel.msg*,net.core.somaxconn' ...
For Minikube, this can be done via the extra-config flag:
minikube start --extra-config="kubelet.allowed-unsafe-sysctls=kernel.msg*,net.core.somaxconn"...
Only namespaced sysctls can be enabled this way.
Setting Sysctls for a Pod
A number of sysctls are namespaced in today's Linux kernels. This means that they can be set independently for each pod on a node. Only namespaced sysctls are configurable via the pod securityContext within Kubernetes.
The following sysctls are known to be namespaced. This list could change in future versions of the Linux kernel.
kernel.shm*,kernel.msg*,kernel.sem,fs.mqueue.*,- Those
net.*that can be set in container networking namespace. However, there are exceptions (e.g.,net.netfilter.nf_conntrack_maxandnet.netfilter.nf_conntrack_expect_maxcan be set in container networking namespace but are unnamespaced before Linux 5.12.2).
Sysctls with no namespace are called node-level sysctls. If you need to set them, you must manually configure them on each node's operating system, or by using a DaemonSet with privileged containers.
Use the pod securityContext to configure namespaced sysctls. The securityContext applies to all containers in the same pod.
This example uses the pod securityContext to set a safe sysctl
kernel.shm_rmid_forced and two unsafe sysctls net.core.somaxconn and
kernel.msgmax. There is no distinction between safe and unsafe sysctls in
the specification.
Warning:
Only modify sysctl parameters after you understand their effects, to avoid destabilizing your operating system.apiVersion: v1
kind: Pod
metadata:
name: sysctl-example
spec:
securityContext:
sysctls:
- name: kernel.shm_rmid_forced
value: "0"
- name: net.core.somaxconn
value: "1024"
- name: kernel.msgmax
value: "65536"
...
Warning:
Due to their nature of being unsafe, the use of unsafe sysctls is at-your-own-risk and can lead to severe problems like wrong behavior of containers, resource shortage or complete breakage of a node.It is good practice to consider nodes with special sysctl settings as tainted within a cluster, and only schedule pods onto them which need those sysctl settings. It is suggested to use the Kubernetes taints and toleration feature to implement this.
A pod with the unsafe sysctls will fail to launch on any node which has not enabled those two unsafe sysctls explicitly. As with node-level sysctls it is recommended to use taints and toleration feature or taints on nodes to schedule those pods onto the right nodes.
46 - Verify Signed Kubernetes Artifacts
Kubernetes v1.26 [beta]Before you begin
You will need to have the following tools installed:
cosign(install guide)curl(often provided by your operating system)jq(download jq)
Verifying binary signatures
The Kubernetes release process signs all binary artifacts (tarballs, SPDX files, standalone binaries) by using cosign's keyless signing. To verify a particular binary, retrieve it together with its signature and certificate:
URL=https://dl.k8s.io/release/v1.36.0/bin/linux/amd64
BINARY=kubectl
FILES=(
"$BINARY"
"$BINARY.sig"
"$BINARY.cert"
)
for FILE in "${FILES[@]}"; do
curl -sSfL --retry 3 --retry-delay 3 "$URL/$FILE" -o "$FILE"
done
Then verify the blob by using cosign verify-blob:
cosign verify-blob "$BINARY" \
--signature "$BINARY".sig \
--certificate "$BINARY".cert \
--certificate-identity krel-staging@k8s-releng-prod.iam.gserviceaccount.com \
--certificate-oidc-issuer https://accounts.google.com
Note:
Cosign 2.0 requires the --certificate-identity and --certificate-oidc-issuer options.
To learn more about keyless signing, please refer to Keyless Signatures.
Previous versions of Cosign required that you set COSIGN_EXPERIMENTAL=1.
For additional information, please refer to the sigstore Blog
Verifying image signatures
For a complete list of images that are signed please refer to Releases.
Pick one image from this list and verify its signature using
the cosign verify command:
cosign verify registry.k8s.io/kube-apiserver-amd64:v1.36.0 \
--certificate-identity krel-trust@k8s-releng-prod.iam.gserviceaccount.com \
--certificate-oidc-issuer https://accounts.google.com \
| jq .
Verifying images for all control plane components
To verify all signed control plane images for the latest stable version (v1.36.0), please run the following commands:
curl -Ls "https://sbom.k8s.io/$(curl -Ls https://dl.k8s.io/release/stable.txt)/release" \
| grep "SPDXID: SPDXRef-Package-registry.k8s.io" \
| grep -v sha256 | cut -d- -f3- | sed 's/-/\//' | sed 's/-v1/:v1/' \
| sort > images.txt
input=images.txt
while IFS= read -r image
do
cosign verify "$image" \
--certificate-identity krel-trust@k8s-releng-prod.iam.gserviceaccount.com \
--certificate-oidc-issuer https://accounts.google.com \
| jq .
done < "$input"
Once you have verified an image, you can specify the image by its digest in your Pod manifests as per this example:
registry-url/image-name@sha256:45b23dee08af5e43a7fea6c4cf9c25ccf269ee113168c19722f87876677c5cb2
For more information, please refer to the Image Pull Policy section.
Verifying Image Signatures with Admission Controller
For non-control plane images (for example conformance image), signatures can also be verified at deploy time using sigstore policy-controller admission controller.
Here are some helpful resources to get started with policy-controller:
Verify the Software Bill Of Materials
You can verify the Kubernetes Software Bill of Materials (SBOM) by using the sigstore certificate and signature, or the corresponding SHA files:
# Retrieve the latest available Kubernetes release version
VERSION=$(curl -Ls https://dl.k8s.io/release/stable.txt)
# Verify the SHA512 sum
curl -Ls "https://sbom.k8s.io/$VERSION/release" -o "$VERSION.spdx"
echo "$(curl -Ls "https://sbom.k8s.io/$VERSION/release.sha512") $VERSION.spdx" | sha512sum --check
# Verify the SHA256 sum
echo "$(curl -Ls "https://sbom.k8s.io/$VERSION/release.sha256") $VERSION.spdx" | sha256sum --check
# Retrieve sigstore signature and certificate
curl -Ls "https://sbom.k8s.io/$VERSION/release.sig" -o "$VERSION.spdx.sig"
curl -Ls "https://sbom.k8s.io/$VERSION/release.cert" -o "$VERSION.spdx.cert"
# Verify the sigstore signature
cosign verify-blob \
--certificate "$VERSION.spdx.cert" \
--signature "$VERSION.spdx.sig" \
--certificate-identity krel-staging@k8s-releng-prod.iam.gserviceaccount.com \
--certificate-oidc-issuer https://accounts.google.com \
"$VERSION.spdx"