This is the multi-page printable view of this section. Click here to print.
Extend Kubernetes
- 1: Configure the Aggregation Layer
- 2: Use Custom Resources
- 2.1: Extend the Kubernetes API with CustomResourceDefinitions
- 2.2: Versions in CustomResourceDefinitions
- 3: Set up an Extension API Server
- 4: Configure Multiple Schedulers
- 5: Use an HTTP Proxy to Access the Kubernetes API
- 6: Use a SOCKS5 Proxy to Access the Kubernetes API
- 7: Set up Konnectivity service
1 - Configure the Aggregation Layer
Configuring the aggregation layer allows the Kubernetes apiserver to be extended with additional APIs, which are not part of the core Kubernetes APIs.
Before you begin
You need to have a Kubernetes cluster, and the kubectl command-line tool must be configured to communicate with your cluster. It is recommended to run this tutorial on a cluster with at least two nodes that are not acting as control plane hosts. If you do not already have a cluster, you can create one by using minikube or you can use one of these Kubernetes playgrounds:
To check the version, enter kubectl version.
Note:
There are a few setup requirements for getting the aggregation layer working in your environment to support mutual TLS auth between the proxy and extension apiservers. Kubernetes and the kube-apiserver have multiple CAs, so make sure that the proxy is signed by the aggregation layer CA and not by something else, like the Kubernetes general CA.Caution:
Reusing the same CA for different client types can negatively impact the cluster's ability to function. For more information, see CA Reusage and Conflicts.Authentication Flow
Unlike Custom Resource Definitions (CRDs), the Aggregation API involves another server - your Extension apiserver - in addition to the standard Kubernetes apiserver. The Kubernetes apiserver will need to communicate with your extension apiserver, and your extension apiserver will need to communicate with the Kubernetes apiserver. In order for this communication to be secured, the Kubernetes apiserver uses x509 certificates to authenticate itself to the extension apiserver.
This section describes how the authentication and authorization flows work, and how to configure them.
The high-level flow is as follows:
- Kubernetes apiserver: authenticate the requesting user and authorize their rights to the requested API path.
- Kubernetes apiserver: proxy the request to the extension apiserver
- Extension apiserver: authenticate the request from the Kubernetes apiserver
- Extension apiserver: authorize the request from the original user
- Extension apiserver: execute
The rest of this section describes these steps in detail.
The flow can be seen in the following diagram.
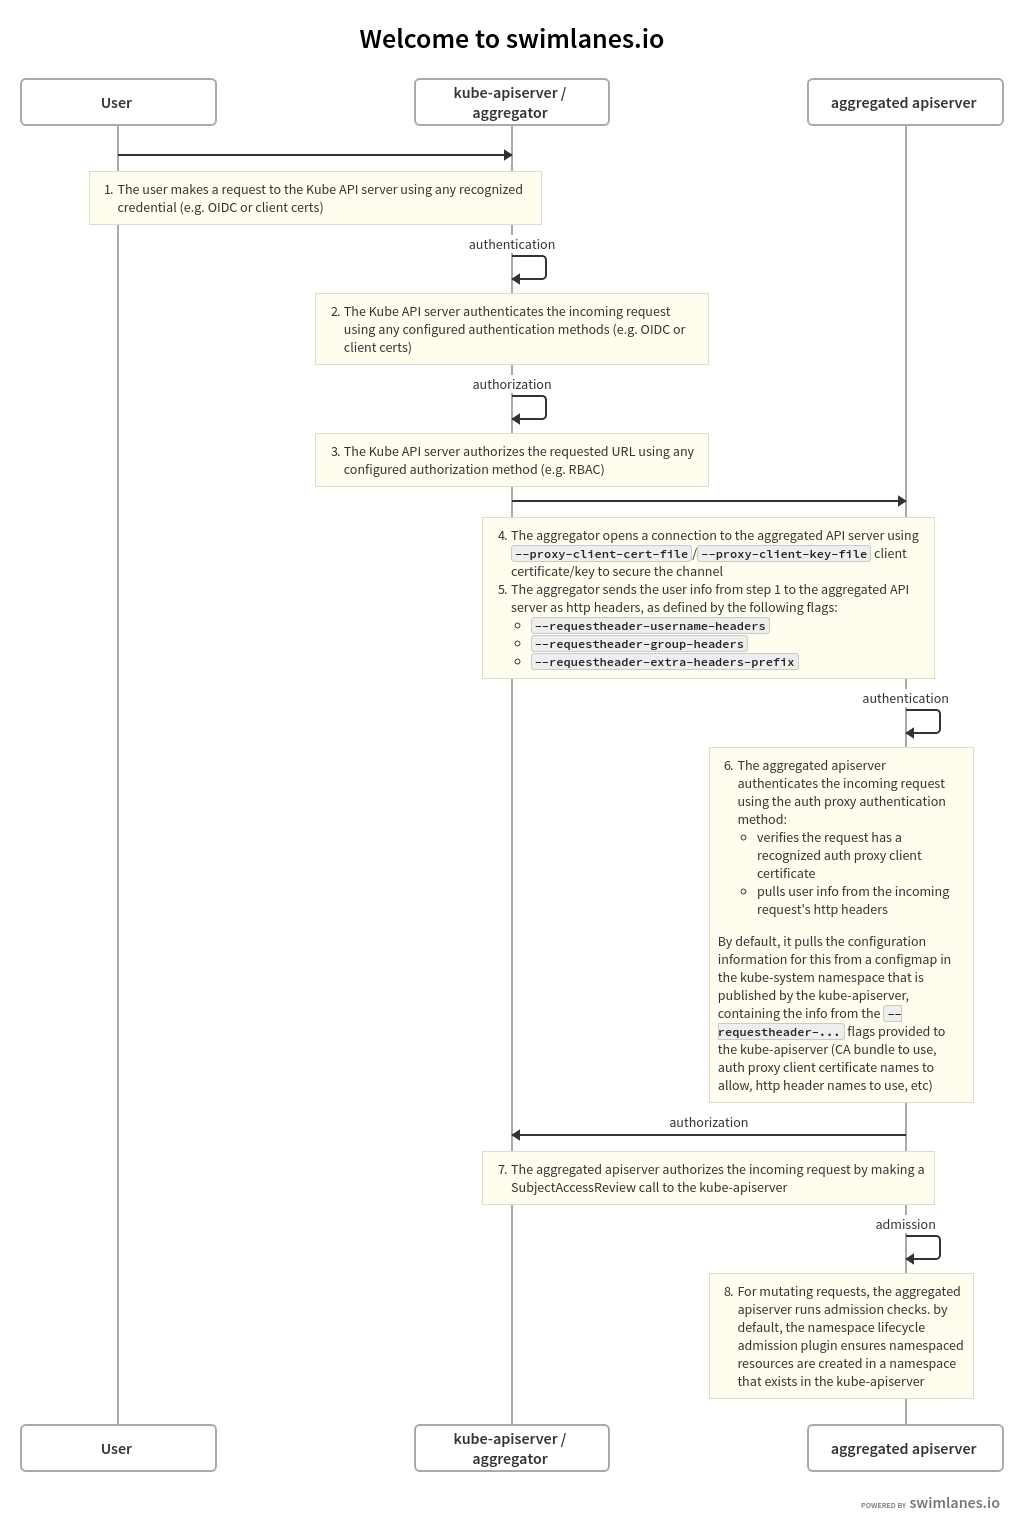
The source for the above swimlanes can be found in the source of this document.
Kubernetes Apiserver Authentication and Authorization
A request to an API path that is served by an extension apiserver begins the same way as all API requests: communication to the Kubernetes apiserver. This path already has been registered with the Kubernetes apiserver by the extension apiserver.
The user communicates with the Kubernetes apiserver, requesting access to the path. The Kubernetes apiserver uses standard authentication and authorization configured with the Kubernetes apiserver to authenticate the user and authorize access to the specific path.
For an overview of authenticating to a Kubernetes cluster, see "Authenticating to a Cluster". For an overview of authorization of access to Kubernetes cluster resources, see "Authorization Overview".
Everything to this point has been standard Kubernetes API requests, authentication and authorization.
The Kubernetes apiserver now is prepared to send the request to the extension apiserver.
Kubernetes Apiserver Proxies the Request
The Kubernetes apiserver now will send, or proxy, the request to the extension apiserver that registered to handle the request. In order to do so, it needs to know several things:
- How should the Kubernetes apiserver authenticate to the extension apiserver, informing the extension apiserver that the request, which comes over the network, is coming from a valid Kubernetes apiserver?
- How should the Kubernetes apiserver inform the extension apiserver of the username and group for which the original request was authenticated?
In order to provide for these two, you must configure the Kubernetes apiserver using several flags.
Kubernetes Apiserver Client Authentication
The Kubernetes apiserver connects to the extension apiserver over TLS, authenticating itself using a client certificate. You must provide the following to the Kubernetes apiserver upon startup, using the provided flags:
- private key file via
--proxy-client-key-file - signed client certificate file via
--proxy-client-cert-file - certificate of the CA that signed the client certificate file via
--requestheader-client-ca-file - valid Common Name values (CNs) in the signed client certificate via
--requestheader-allowed-names
The Kubernetes apiserver will use the files indicated by --proxy-client-*-file
to authenticate to the extension apiserver. In order for the request to be considered
valid by a compliant extension apiserver, the following conditions must be met:
- The connection must be made using a client certificate that is signed by
the CA whose certificate is in
--requestheader-client-ca-file. - The connection must be made using a client certificate whose CN is one of
those listed in
--requestheader-allowed-names.
Note:
You can set this option to blank as--requestheader-allowed-names="".
This will indicate to an extension apiserver that any CN is acceptable.When started with these options, the Kubernetes apiserver will:
- Use them to authenticate to the extension apiserver.
- Create a configmap in the
kube-systemnamespace calledextension-apiserver-authentication, in which it will place the CA certificate and the allowed CNs. These in turn can be retrieved by extension apiservers to validate requests.
Note that the same client certificate is used by the Kubernetes apiserver to authenticate against all extension apiservers. It does not create a client certificate per extension apiserver, but rather a single one to authenticate as the Kubernetes apiserver. This same one is reused for all extension apiserver requests.
Original Request Username and Group
When the Kubernetes apiserver proxies the request to the extension apiserver, it informs the extension apiserver of the username and group with which the original request successfully authenticated. It provides these in http headers of its proxied request. You must inform the Kubernetes apiserver of the names of the headers to be used.
- the header in which to store the username via
--requestheader-username-headers - the header in which to store the group via
--requestheader-group-headers - the prefix to append to all extra headers via
--requestheader-extra-headers-prefix
These header names are also placed in the extension-apiserver-authentication configmap,
so they can be retrieved and used by extension apiservers.
Extension Apiserver Authenticates the Request
The extension apiserver, upon receiving a proxied request from the Kubernetes apiserver, must validate that the request actually did come from a valid authenticating proxy, which role the Kubernetes apiserver is fulfilling. The extension apiserver validates it via:
- Retrieve the following from the configmap in
kube-system, as described above:- Client CA certificate
- List of allowed names (CNs)
- Header names for username, group and extra info
- Check that the TLS connection was authenticated using a client certificate which:
- Was signed by the CA whose certificate matches the retrieved CA certificate.
- Has a CN in the list of allowed CNs, unless the list is blank, in which case all CNs are allowed.
- Extract the username and group from the appropriate headers
If the above passes, then the request is a valid proxied request from a legitimate authenticating proxy, in this case the Kubernetes apiserver.
Note that it is the responsibility of the extension apiserver implementation to provide
the above. Many do it by default, leveraging the k8s.io/apiserver/ package.
Others may provide options to override it using command-line options.
In order to have permission to retrieve the configmap, an extension apiserver
requires the appropriate role. There is a default role named extension-apiserver-authentication-reader
in the kube-system namespace which can be assigned.
Extension Apiserver Authorizes the Request
The extension apiserver now can validate that the user/group retrieved from the headers are authorized to execute the given request. It does so by sending a standard SubjectAccessReview request to the Kubernetes apiserver.
In order for the extension apiserver to be authorized itself to submit the
SubjectAccessReview request to the Kubernetes apiserver, it needs the correct permissions.
Kubernetes includes a default ClusterRole named system:auth-delegator that
has the appropriate permissions. It can be granted to the extension apiserver's service account.
Extension Apiserver Executes
If the SubjectAccessReview passes, the extension apiserver executes the request.
Enable Kubernetes Apiserver flags
Enable the aggregation layer via the following kube-apiserver flags.
They may have already been taken care of by your provider.
--requestheader-client-ca-file=<path to aggregator CA cert>
--requestheader-allowed-names=front-proxy-client
--requestheader-extra-headers-prefix=X-Remote-Extra-
--requestheader-group-headers=X-Remote-Group
--requestheader-username-headers=X-Remote-User
--proxy-client-cert-file=<path to aggregator proxy cert>
--proxy-client-key-file=<path to aggregator proxy key>
CA Reusage and Conflicts
The Kubernetes apiserver has two client CA options:
--client-ca-file--requestheader-client-ca-file
Each of these functions independently and can conflict with each other, if not used correctly.
--client-ca-file: When a request arrives to the Kubernetes apiserver, if this option is enabled, the Kubernetes apiserver checks the certificate of the request. If it is signed by one of the CA certificates in the file referenced by--client-ca-file, then the request is treated as a legitimate request, and the user is the value of the common nameCN=, while the group is the organizationO=. See the documentation on TLS authentication.--requestheader-client-ca-file: When a request arrives to the Kubernetes apiserver, if this option is enabled, the Kubernetes apiserver checks the certificate of the request. If it is signed by one of the CA certificates in the file reference by--requestheader-client-ca-file, then the request is treated as a potentially legitimate request. The Kubernetes apiserver then checks if the common nameCN=is one of the names in the list provided by--requestheader-allowed-names. If the name is allowed, the request is approved; if it is not, the request is not.
If both --client-ca-file and --requestheader-client-ca-file are provided,
then the request first checks the --requestheader-client-ca-file CA and then the
--client-ca-file. Normally, different CAs, either root CAs or intermediate CAs,
are used for each of these options; regular client requests match against --client-ca-file,
while aggregation requests match against --requestheader-client-ca-file. However,
if both use the same CA, then client requests that normally would pass via --client-ca-file
will fail, because the CA will match the CA in --requestheader-client-ca-file,
but the common name CN= will not match one of the acceptable common names in
--requestheader-allowed-names. This can cause your kubelets and other control plane components,
as well as end-users, to be unable to authenticate to the Kubernetes apiserver.
For this reason, use different CA certs for the --client-ca-file
option - to authorize control plane components and end-users - and the --requestheader-client-ca-file option - to authorize aggregation apiserver requests.
Warning:
Do not reuse a CA that is used in a different context unless you understand the risks and the mechanisms to protect the CA's usage.If you are not running kube-proxy on a host running the API server,
then you must make sure that the system is enabled with the following
kube-apiserver flag:
--enable-aggregator-routing=true
Register APIService objects
You can dynamically configure what client requests are proxied to extension apiserver. The following is an example registration:
apiVersion: apiregistration.k8s.io/v1
kind: APIService
metadata:
  name: <name of the registration object>
spec:
  group: <API group name this extension apiserver hosts>
  version: <API version this extension apiserver hosts>
  groupPriorityMinimum: <priority this APIService for this group, see API documentation>
  versionPriority: <prioritizes ordering of this version within a group, see API documentation>
  service:
    namespace: <namespace of the extension apiserver service>
    name: <name of the extension apiserver service>
  caBundle: <pem encoded ca cert that signs the server cert used by the webhook>
The name of an APIService object must be a valid path segment name.
Contacting the extension apiserver
Once the Kubernetes apiserver has determined a request should be sent to an extension apiserver, it needs to know how to contact it.
The service stanza is a reference to the service for an extension apiserver.
The service namespace and name are required. The port is optional and defaults to 443.
Here is an example of an extension apiserver that is configured to be called on port "1234",
and to verify the TLS connection against the ServerName
my-service-name.my-service-namespace.svc using a custom CA bundle.
apiVersion: apiregistration.k8s.io/v1
kind: APIService
...
spec:
  ...
  service:
    namespace: my-service-namespace
    name: my-service-name
    port: 1234
  caBundle: "Ci0tLS0tQk...<base64-encoded PEM bundle>...tLS0K"
...
What's next
- Set up an extension api-server to work with the aggregation layer.
- For a high level overview, see Extending the Kubernetes API with the aggregation layer.
- Learn how to Extend the Kubernetes API Using Custom Resource Definitions.
2 - Use Custom Resources
2.1 - Extend the Kubernetes API with CustomResourceDefinitions
This page shows how to install a custom resource into the Kubernetes API by creating a CustomResourceDefinition.
Before you begin
You need to have a Kubernetes cluster, and the kubectl command-line tool must be configured to communicate with your cluster. It is recommended to run this tutorial on a cluster with at least two nodes that are not acting as control plane hosts. If you do not already have a cluster, you can create one by using minikube or you can use one of these Kubernetes playgrounds:
Your Kubernetes server must be at or later than version 1.16.To check the version, enter kubectl version.
Create a CustomResourceDefinition
When you create a new CustomResourceDefinition (CRD), the Kubernetes API Server
creates a new RESTful resource path for each version you specify. The custom
resource created from a CRD object can be either namespaced or cluster-scoped,
as specified in the CRD's spec.scope field. As with existing built-in
objects, deleting a namespace deletes all custom objects in that namespace.
CustomResourceDefinitions themselves are non-namespaced and are available to
all namespaces.
For example, if you save the following CustomResourceDefinition to resourcedefinition.yaml:
apiVersion: apiextensions.k8s.io/v1
kind: CustomResourceDefinition
metadata:
  # name must match the spec fields below, and be in the form: <plural>.<group>
  name: crontabs.stable.example.com
spec:
  # group name to use for REST API: /apis/<group>/<version>
  group: stable.example.com
  # list of versions supported by this CustomResourceDefinition
  versions:
    - name: v1
      # Each version can be enabled/disabled by Served flag.
      served: true
      # One and only one version must be marked as the storage version.
      storage: true
      schema:
        openAPIV3Schema:
          type: object
          properties:
            spec:
              type: object
              properties:
                cronSpec:
                  type: string
                image:
                  type: string
                replicas:
                  type: integer
  # either Namespaced or Cluster
  scope: Namespaced
  names:
    # plural name to be used in the URL: /apis/<group>/<version>/<plural>
    plural: crontabs
    # singular name to be used as an alias on the CLI and for display
    singular: crontab
    # kind is normally the CamelCased singular type. Your resource manifests use this.
    kind: CronTab
    # shortNames allow shorter string to match your resource on the CLI
    shortNames:
    - ct
and create it:
kubectl apply -f resourcedefinition.yaml
Then a new namespaced RESTful API endpoint is created at:
/apis/stable.example.com/v1/namespaces/*/crontabs/...
This endpoint URL can then be used to create and manage custom objects.
The kind of these objects will be CronTab from the spec of the
CustomResourceDefinition object you created above.
It might take a few seconds for the endpoint to be created.
You can watch the Established condition of your CustomResourceDefinition
to be true or watch the discovery information of the API server for your
resource to show up.
Create custom objects
After the CustomResourceDefinition object has been created, you can create
custom objects. Custom objects can contain custom fields. These fields can
contain arbitrary JSON.
In the following example, the cronSpec and image custom fields are set in a
custom object of kind CronTab. The kind CronTab comes from the spec of the
CustomResourceDefinition object you created above.
If you save the following YAML to my-crontab.yaml:
apiVersion: "stable.example.com/v1"
kind: CronTab
metadata:
  name: my-new-cron-object
spec:
  cronSpec: "* * * * */5"
  image: my-awesome-cron-image
and create it:
kubectl apply -f my-crontab.yaml
You can then manage your CronTab objects using kubectl. For example:
kubectl get crontab
Should print a list like this:
NAME                 AGE
my-new-cron-object   6s
Resource names are not case-sensitive when using kubectl, and you can use either the singular or plural forms defined in the CRD, as well as any short names.
You can also view the raw YAML data:
kubectl get ct -o yaml
You should see that it contains the custom cronSpec and image fields
from the YAML you used to create it:
apiVersion: v1
items:
- apiVersion: stable.example.com/v1
  kind: CronTab
  metadata:
    annotations:
      kubectl.kubernetes.io/last-applied-configuration: |
        {"apiVersion":"stable.example.com/v1","kind":"CronTab","metadata":{"annotations":{},"name":"my-new-cron-object","namespace":"default"},"spec":{"cronSpec":"* * * * */5","image":"my-awesome-cron-image"}}
    creationTimestamp: "2021-06-20T07:35:27Z"
    generation: 1
    name: my-new-cron-object
    namespace: default
    resourceVersion: "1326"
    uid: 9aab1d66-628e-41bb-a422-57b8b3b1f5a9
  spec:
    cronSpec: '* * * * */5'
    image: my-awesome-cron-image
kind: List
metadata:
  resourceVersion: ""
  selfLink: ""
Delete a CustomResourceDefinition
When you delete a CustomResourceDefinition, the server will uninstall the RESTful API endpoint and delete all custom objects stored in it.
kubectl delete -f resourcedefinition.yaml
kubectl get crontabs
Error from server (NotFound): Unable to list {"stable.example.com" "v1" "crontabs"}: the server could not
find the requested resource (get crontabs.stable.example.com)
If you later recreate the same CustomResourceDefinition, it will start out empty.
Specifying a structural schema
CustomResources store structured data in custom fields (alongside the built-in
fields apiVersion, kind and metadata, which the API server validates
implicitly). With OpenAPI v3.0 validation a schema can be
specified, which is validated during creation and updates, compare below for
details and limits of such a schema.
With apiextensions.k8s.io/v1 the definition of a structural schema is
mandatory for CustomResourceDefinitions. In the beta version of
CustomResourceDefinition, the structural schema was optional.
A structural schema is an OpenAPI v3.0 validation schema which:
- specifies a non-empty type (via
typein OpenAPI) for the root, for each specified field of an object node (viapropertiesoradditionalPropertiesin OpenAPI) and for each item in an array node (viaitemsin OpenAPI), with the exception of:- a node with
x-kubernetes-int-or-string: true - a node with
x-kubernetes-preserve-unknown-fields: true
- a node with
- for each field in an object and each item in an array which is specified within any of
allOf,anyOf,oneOfornot, the schema also specifies the field/item outside of those logical junctors (compare example 1 and 2). - does not set
description,type,default,additionalProperties,nullablewithin anallOf,anyOf,oneOfornot, with the exception of the two pattern forx-kubernetes-int-or-string: true(see below). - if
metadatais specified, then only restrictions onmetadata.nameandmetadata.generateNameare allowed.
Non-structural example 1:
allOf:
- properties:
    foo:
      # ...
conflicts with rule 2. The following would be correct:
properties:
  foo:
    # ...
allOf:
- properties:
    foo:
      # ...
Non-structural example 2:
allOf:
- items:
    properties:
      foo:
        # ...
conflicts with rule 2. The following would be correct:
items:
  properties:
    foo:
      # ...
allOf:
- items:
    properties:
      foo:
        # ...
Non-structural example 3:
properties:
  foo:
    pattern: "abc"
  metadata:
    type: object
    properties:
      name:
        type: string
        pattern: "^a"
      finalizers:
        type: array
        items:
          type: string
          pattern: "my-finalizer"
anyOf:
- properties:
    bar:
      type: integer
      minimum: 42
  required: ["bar"]
  description: "foo bar object"
is not a structural schema because of the following violations:
- the type at the root is missing (rule 1).
- the type of
foois missing (rule 1). barinside ofanyOfis not specified outside (rule 2).bar'stypeis withinanyOf(rule 3).- the description is set within
anyOf(rule 3). metadata.finalizersmight not be restricted (rule 4).
In contrast, the following, corresponding schema is structural:
type: object
description: "foo bar object"
properties:
  foo:
    type: string
    pattern: "abc"
  bar:
    type: integer
  metadata:
    type: object
    properties:
      name:
        type: string
        pattern: "^a"
anyOf:
- properties:
    bar:
      minimum: 42
  required: ["bar"]
Violations of the structural schema rules are reported in the NonStructural condition in the
CustomResourceDefinition.
Field pruning
CustomResourceDefinitions store validated resource data in the cluster's persistence store, etcd. As with native Kubernetes resources such as ConfigMap, if you specify a field that the API server does not recognize, the unknown field is pruned (removed) before being persisted.
CRDs converted from apiextensions.k8s.io/v1beta1 to apiextensions.k8s.io/v1 might lack
structural schemas, and spec.preserveUnknownFields might be true.
For legacy CustomResourceDefinition objects created as
apiextensions.k8s.io/v1beta1 with spec.preserveUnknownFields set to
true, the following is also true:
- Pruning is not enabled.
- You can store arbitrary data.
For compatibility with apiextensions.k8s.io/v1, update your custom
resource definitions to:
- Use a structural OpenAPI schema.
- Set
spec.preserveUnknownFieldstofalse.
If you save the following YAML to my-crontab.yaml:
apiVersion: "stable.example.com/v1"
kind: CronTab
metadata:
  name: my-new-cron-object
spec:
  cronSpec: "* * * * */5"
  image: my-awesome-cron-image
  someRandomField: 42
and create it:
kubectl create --validate=false -f my-crontab.yaml -o yaml
Your output is similar to:
apiVersion: stable.example.com/v1
kind: CronTab
metadata:
  creationTimestamp: 2017-05-31T12:56:35Z
  generation: 1
  name: my-new-cron-object
  namespace: default
  resourceVersion: "285"
  uid: 9423255b-4600-11e7-af6a-28d2447dc82b
spec:
  cronSpec: '* * * * */5'
  image: my-awesome-cron-image
Notice that the field someRandomField was pruned.
This example turned off client-side validation to demonstrate the API server's behavior, by adding
the --validate=false command line option.
Because the OpenAPI validation schemas are also published
to clients, kubectl also checks for unknown fields and rejects those objects well before they
would be sent to the API server.
Controlling pruning
By default, all unspecified fields for a custom resource, across all versions, are pruned. It is possible though to
opt-out of that for specific sub-trees of fields by adding x-kubernetes-preserve-unknown-fields: true in the
structural OpenAPI v3 validation schema.
For example:
type: object
properties:
  json:
    x-kubernetes-preserve-unknown-fields: true
The field json can store any JSON value, without anything being pruned.
You can also partially specify the permitted JSON; for example:
type: object
properties:
  json:
    x-kubernetes-preserve-unknown-fields: true
    type: object
    description: this is arbitrary JSON
With this, only object type values are allowed.
Pruning is enabled again for each specified property (or additionalProperties):
type: object
properties:
  json:
    x-kubernetes-preserve-unknown-fields: true
    type: object
    properties:
      spec:
        type: object
        properties:
          foo:
            type: string
          bar:
            type: string
With this, the value:
json:
  spec:
    foo: abc
    bar: def
    something: x
  status:
    something: x
is pruned to:
json:
  spec:
    foo: abc
    bar: def
  status:
    something: x
This means that the something field in the specified spec object is pruned, but everything outside is not.
IntOrString
Nodes in a schema with x-kubernetes-int-or-string: true are excluded from rule 1, such that the
following is structural:
type: object
properties:
  foo:
    x-kubernetes-int-or-string: true
Also those nodes are partially excluded from rule 3 in the sense that the following two patterns are allowed (exactly those, without variations in order to additional fields):
x-kubernetes-int-or-string: true
anyOf:
  - type: integer
  - type: string
...
and
x-kubernetes-int-or-string: true
allOf:
  - anyOf:
      - type: integer
      - type: string
  - # ... zero or more
...
With one of those specification, both an integer and a string validate.
In Validation Schema Publishing,
x-kubernetes-int-or-string: true is unfolded to one of the two patterns shown above.
RawExtension
RawExtensions (as in runtime.RawExtension)
holds complete Kubernetes objects, i.e. with apiVersion and kind fields.
It is possible to specify those embedded objects (both completely without constraints or partially specified)
by setting x-kubernetes-embedded-resource: true. For example:
type: object
properties:
  foo:
    x-kubernetes-embedded-resource: true
    x-kubernetes-preserve-unknown-fields: true
Here, the field foo holds a complete object, e.g.:
foo:
  apiVersion: v1
  kind: Pod
  spec:
    # ...
Because x-kubernetes-preserve-unknown-fields: true is specified alongside, nothing is pruned.
The use of x-kubernetes-preserve-unknown-fields: true is optional though.
With x-kubernetes-embedded-resource: true, the apiVersion, kind and metadata are implicitly specified and validated.
Serving multiple versions of a CRD
See Custom resource definition versioning for more information about serving multiple versions of your CustomResourceDefinition and migrating your objects from one version to another.
Advanced topics
Finalizers
Finalizers allow controllers to implement asynchronous pre-delete hooks. Custom objects support finalizers similar to built-in objects.
You can add a finalizer to a custom object like this:
apiVersion: "stable.example.com/v1"
kind: CronTab
metadata:
  finalizers:
  - stable.example.com/finalizer
Identifiers of custom finalizers consist of a domain name, a forward slash and the name of the finalizer. Any controller can add a finalizer to any object's list of finalizers.
The first delete request on an object with finalizers sets a value for the
metadata.deletionTimestamp field but does not delete it. Once this value is set,
entries in the finalizers list can only be removed. While any finalizers remain it is also
impossible to force the deletion of an object.
When the metadata.deletionTimestamp field is set, controllers watching the object execute any
finalizers they handle and remove the finalizer from the list after they are done. It is the
responsibility of each controller to remove its finalizer from the list.
The value of metadata.deletionGracePeriodSeconds controls the interval between polling updates.
Once the list of finalizers is empty, meaning all finalizers have been executed, the resource is deleted by Kubernetes.
Validation
Custom resources are validated via OpenAPI v3.0 schemas, by x-kubernetes-validations when the Validation Rules feature is enabled, and you can add additional validation using admission webhooks.
Additionally, the following restrictions are applied to the schema:
These fields cannot be set:
definitions,dependencies,deprecated,discriminator,id,patternProperties,readOnly,writeOnly,xml,$ref.
The field
uniqueItemscannot be set totrue.The field
additionalPropertiescannot be set tofalse.The field
additionalPropertiesis mutually exclusive withproperties.
The x-kubernetes-validations extension can be used to validate custom resources using
Common Expression Language (CEL) expressions when the
Validation rules feature is enabled and the CustomResourceDefinition schema is a
structural schema.
Refer to the structural schemas section for other restrictions and CustomResourceDefinition features.
The schema is defined in the CustomResourceDefinition. In the following example, the CustomResourceDefinition applies the following validations on the custom object:
spec.cronSpecmust be a string and must be of the form described by the regular expression.spec.replicasmust be an integer and must have a minimum value of 1 and a maximum value of 10.
Save the CustomResourceDefinition to resourcedefinition.yaml:
apiVersion: apiextensions.k8s.io/v1
kind: CustomResourceDefinition
metadata:
  name: crontabs.stable.example.com
spec:
  group: stable.example.com
  versions:
    - name: v1
      served: true
      storage: true
      schema:
        # openAPIV3Schema is the schema for validating custom objects.
        openAPIV3Schema:
          type: object
          properties:
            spec:
              type: object
              properties:
                cronSpec:
                  type: string
                  pattern: '^(\d+|\*)(/\d+)?(\s+(\d+|\*)(/\d+)?){4}$'
                image:
                  type: string
                replicas:
                  type: integer
                  minimum: 1
                  maximum: 10
  scope: Namespaced
  names:
    plural: crontabs
    singular: crontab
    kind: CronTab
    shortNames:
    - ct
and create it:
kubectl apply -f resourcedefinition.yaml
A request to create a custom object of kind CronTab is rejected if there are invalid values in its fields. In the following example, the custom object contains fields with invalid values:
spec.cronSpecdoes not match the regular expression.spec.replicasis greater than 10.
If you save the following YAML to my-crontab.yaml:
apiVersion: "stable.example.com/v1"
kind: CronTab
metadata:
  name: my-new-cron-object
spec:
  cronSpec: "* * * *"
  image: my-awesome-cron-image
  replicas: 15
and attempt to create it:
kubectl apply -f my-crontab.yaml
then you get an error:
The CronTab "my-new-cron-object" is invalid: []: Invalid value: map[string]interface {}{"apiVersion":"stable.example.com/v1", "kind":"CronTab", "metadata":map[string]interface {}{"name":"my-new-cron-object", "namespace":"default", "deletionTimestamp":interface {}(nil), "deletionGracePeriodSeconds":(*int64)(nil), "creationTimestamp":"2017-09-05T05:20:07Z", "uid":"e14d79e7-91f9-11e7-a598-f0761cb232d1", "clusterName":""}, "spec":map[string]interface {}{"cronSpec":"* * * *", "image":"my-awesome-cron-image", "replicas":15}}:
validation failure list:
spec.cronSpec in body should match '^(\d+|\*)(/\d+)?(\s+(\d+|\*)(/\d+)?){4}$'
spec.replicas in body should be less than or equal to 10
If the fields contain valid values, the object creation request is accepted.
Save the following YAML to my-crontab.yaml:
apiVersion: "stable.example.com/v1"
kind: CronTab
metadata:
  name: my-new-cron-object
spec:
  cronSpec: "* * * * */5"
  image: my-awesome-cron-image
  replicas: 5
And create it:
kubectl apply -f my-crontab.yaml
crontab "my-new-cron-object" created
Validation ratcheting
Kubernetes v1.33 [stable](enabled by default)If you are using a version of Kubernetes older than v1.30, you need to explicitly
enable the CRDValidationRatcheting
feature gate to
use this behavior, which then applies to all CustomResourceDefinitions in your
cluster.
Provided you enabled the feature gate, Kubernetes implements validation ratcheting for CustomResourceDefinitions. The API server is willing to accept updates to resources that are not valid after the update, provided that each part of the resource that failed to validate was not changed by the update operation. In other words, any invalid part of the resource that remains invalid must have already been wrong. You cannot use this mechanism to update a valid resource so that it becomes invalid.
This feature allows authors of CRDs to confidently add new validations to the OpenAPIV3 schema under certain conditions. Users can update to the new schema safely without bumping the version of the object or breaking workflows.
While most validations placed in the OpenAPIV3 schema of a CRD support ratcheting, there are a few exceptions. The following OpenAPIV3 schema validations are not supported by ratcheting under the implementation in Kubernetes 1.36 and if violated will continue to throw an error as normally:
Quantors
allOfoneOfanyOfnot- any validations in a descendent of one of these fields
x-kubernetes-validationsFor Kubernetes 1.28, CRD validation rules are ignored by ratcheting. Starting with Alpha 2 in Kubernetes 1.29,x-kubernetes-validationsare ratcheted only if they do not refer tooldSelf.Transition Rules are never ratcheted: only errors raised by rules that do not use
oldSelfwill be automatically ratcheted if their values are unchanged.To write custom ratcheting logic for CEL expressions, check out optionalOldSelf.
x-kubernetes-list-typeErrors arising from changing the list type of a subschema will not be ratcheted. For example addingsetonto a list with duplicates will always result in an error.x-kubernetes-list-map-keysErrors arising from changing the map keys of a list schema will not be ratcheted.requiredErrors arising from changing the list of required fields will not be ratcheted.propertiesAdding/removing/modifying the names of properties is not ratcheted, but changes to validations in each properties' schemas and subschemas may be ratcheted if the name of the property stays the same.additionalPropertiesTo remove a previously specifiedadditionalPropertiesvalidation will not be ratcheted.metadataErrors that come from Kubernetes' built-in validation of an object'smetadataare not ratcheted (such as object name, or characters in a label value). If you specify your own additional rules for the metadata of a custom resource, that additional validation will be ratcheted.
Validation rules
Kubernetes v1.29 [stable]Validation rules use the Common Expression Language (CEL)
to validate custom resource values. Validation rules are included in
CustomResourceDefinition schemas using the x-kubernetes-validations extension.
The Rule is scoped to the location of the x-kubernetes-validations extension in the schema.
And self variable in the CEL expression is bound to the scoped value.
All validation rules are scoped to the current object: no cross-object or stateful validation rules are supported.
For example:
  # ...
  openAPIV3Schema:
    type: object
    properties:
      spec:
        type: object
        x-kubernetes-validations:
          - rule: "self.minReplicas <= self.replicas"
            message: "replicas should be greater than or equal to minReplicas."
          - rule: "self.replicas <= self.maxReplicas"
            message: "replicas should be smaller than or equal to maxReplicas."
        properties:
          # ...
          minReplicas:
            type: integer
          replicas:
            type: integer
          maxReplicas:
            type: integer
        required:
          - minReplicas
          - replicas
          - maxReplicas
will reject a request to create this custom resource:
apiVersion: "stable.example.com/v1"
kind: CronTab
metadata:
  name: my-new-cron-object
spec:
  minReplicas: 0
  replicas: 20
  maxReplicas: 10
with the response:
The CronTab "my-new-cron-object" is invalid:
* spec: Invalid value: map[string]interface {}{"maxReplicas":10, "minReplicas":0, "replicas":20}: replicas should be smaller than or equal to maxReplicas.
x-kubernetes-validations could have multiple rules.
The rule under x-kubernetes-validations represents the expression which will be evaluated by CEL.
The message represents the message displayed when validation fails. If message is unset, the
above response would be:
The CronTab "my-new-cron-object" is invalid:
* spec: Invalid value: map[string]interface {}{"maxReplicas":10, "minReplicas":0, "replicas":20}: failed rule: self.replicas <= self.maxReplicas
Note:
You can quickly test CEL expressions in CEL Playground.Validation rules are compiled when CRDs are created/updated. The request of CRDs create/update will fail if compilation of validation rules fail. Compilation process includes type checking as well.
The compilation failure:
no_matching_overload: this function has no overload for the types of the arguments.For example, a rule like
self == trueagainst a field of integer type will get error:Invalid value: apiextensions.ValidationRule{Rule:"self == true", Message:""}: compilation failed: ERROR: \<input>:1:6: found no matching overload for '_==_' applied to '(int, bool)'no_such_field: does not contain the desired field.For example, a rule like
self.nonExistingField > 0against a non-existing field will return the following error:Invalid value: apiextensions.ValidationRule{Rule:"self.nonExistingField > 0", Message:""}: compilation failed: ERROR: \<input>:1:5: undefined field 'nonExistingField'invalid argument: invalid argument to macros.For example, a rule like
has(self)will return error:Invalid value: apiextensions.ValidationRule{Rule:"has(self)", Message:""}: compilation failed: ERROR: <input>:1:4: invalid argument to has() macro
Validation Rules Examples:
| Rule | Purpose |
|---|---|
self.minReplicas <= self.replicas && self.replicas <= self.maxReplicas | Validate that the three fields defining replicas are ordered appropriately |
'Available' in self.stateCounts | Validate that an entry with the 'Available' key exists in a map |
(size(self.list1) == 0) != (size(self.list2) == 0) | Validate that one of two lists is non-empty, but not both |
!('MY_KEY' in self.map1) || self['MY_KEY'].matches('^[a-zA-Z]*$') | Validate the value of a map for a specific key, if it is in the map |
self.envars.filter(e, e.name == 'MY_ENV').all(e, e.value.matches('^[a-zA-Z]*$') | Validate the 'value' field of a listMap entry where key field 'name' is 'MY_ENV' |
has(self.expired) && self.created + self.ttl < self.expired | Validate that 'expired' date is after a 'create' date plus a 'ttl' duration |
self.health.startsWith('ok') | Validate a 'health' string field has the prefix 'ok' |
self.widgets.exists(w, w.key == 'x' && w.foo < 10) | Validate that the 'foo' property of a listMap item with a key 'x' is less than 10 |
type(self) == string ? self == '100%' : self == 1000 | Validate an int-or-string field for both the int and string cases |
self.metadata.name.startsWith(self.prefix) | Validate that an object's name has the prefix of another field value |
self.set1.all(e, !(e in self.set2)) | Validate that two listSets are disjoint |
size(self.names) == size(self.details) && self.names.all(n, n in self.details) | Validate the 'details' map is keyed by the items in the 'names' listSet |
size(self.clusters.filter(c, c.name == self.primary)) == 1 | Validate that the 'primary' property has one and only one occurrence in the 'clusters' listMap |
Xref: Supported evaluation on CEL
If the Rule is scoped to the root of a resource, it may make field selection into any fields declared in the OpenAPIv3 schema of the CRD as well as
apiVersion,kind,metadata.nameandmetadata.generateName. This includes selection of fields in both thespecandstatusin the same expression:# ... openAPIV3Schema: type: object x-kubernetes-validations: - rule: "self.status.availableReplicas >= self.spec.minReplicas" properties: spec: type: object properties: minReplicas: type: integer # ... status: type: object properties: availableReplicas: type: integerIf the Rule is scoped to an object with properties, the accessible properties of the object are field selectable via
self.fieldand field presence can be checked viahas(self.field). Null valued fields are treated as absent fields in CEL expressions.# ... openAPIV3Schema: type: object properties: spec: type: object x-kubernetes-validations: - rule: "has(self.foo)" properties: # ... foo: type: integerIf the Rule is scoped to an object with additionalProperties (i.e. a map) the value of the map are accessible via
self[mapKey], map containment can be checked viamapKey in selfand all entries of the map are accessible via CEL macros and functions such asself.all(...).# ... openAPIV3Schema: type: object properties: spec: type: object x-kubernetes-validations: - rule: "self['xyz'].foo > 0" additionalProperties: # ... type: object properties: foo: type: integerIf the Rule is scoped to an array, the elements of the array are accessible via
self[i]and also by macros and functions.# ... openAPIV3Schema: type: object properties: # ... foo: type: array x-kubernetes-validations: - rule: "size(self) == 1" items: type: stringIf the Rule is scoped to a scalar,
selfis bound to the scalar value.# ... openAPIV3Schema: type: object properties: spec: type: object properties: # ... foo: type: integer x-kubernetes-validations: - rule: "self > 0"
Examples:
| type of the field rule scoped to | Rule example |
|---|---|
| root object | self.status.actual <= self.spec.maxDesired |
| map of objects | self.components['Widget'].priority < 10 |
| list of integers | self.values.all(value, value >= 0 && value < 100) |
| string | self.startsWith('kube') |
The apiVersion, kind, metadata.name and metadata.generateName are always accessible from
the root of the object and from any x-kubernetes-embedded-resource annotated objects. No other
metadata properties are accessible.
Unknown data preserved in custom resources via x-kubernetes-preserve-unknown-fields is not
accessible in CEL expressions. This includes:
Unknown field values that are preserved by object schemas with
x-kubernetes-preserve-unknown-fields.Object properties where the property schema is of an "unknown type". An "unknown type" is recursively defined as:
- A schema with no type and x-kubernetes-preserve-unknown-fields set to true
- An array where the items schema is of an "unknown type"
- An object where the additionalProperties schema is of an "unknown type"
Only property names of the form [a-zA-Z_.-/][a-zA-Z0-9_.-/]* are accessible.
Accessible property names are escaped according to the following rules when accessed in the expression:
| escape sequence | property name equivalent |
|---|---|
__underscores__ | __ |
__dot__ | . |
__dash__ | - |
__slash__ | / |
__{keyword}__ | CEL RESERVED keyword |
Note: CEL RESERVED keyword needs to match the exact property name to be escaped (e.g. int in the word sprint would not be escaped).
Examples on escaping:
| property name | rule with escaped property name |
|---|---|
| namespace | self.__namespace__ > 0 |
| x-prop | self.x__dash__prop > 0 |
| redact__d | self.redact__underscores__d > 0 |
| string | self.startsWith('kube') |
Equality on arrays with x-kubernetes-list-type of set or map ignores element order,
i.e., [1, 2] == [2, 1]. Concatenation on arrays with x-kubernetes-list-type use the semantics of
the list type:
set:X + Yperforms a union where the array positions of all elements inXare preserved and non-intersecting elements inYare appended, retaining their partial order.map:X + Yperforms a merge where the array positions of all keys inXare preserved but the values are overwritten by values inYwhen the key sets ofXandYintersect. Elements inYwith non-intersecting keys are appended, retaining their partial order.
Here is the declarations type mapping between OpenAPIv3 and CEL type:
| OpenAPIv3 type | CEL type |
|---|---|
| 'object' with Properties | object / "message type" |
| 'object' with AdditionalProperties | map |
| 'object' with x-kubernetes-embedded-type | object / "message type", 'apiVersion', 'kind', 'metadata.name' and 'metadata.generateName' are implicitly included in schema |
| 'object' with x-kubernetes-preserve-unknown-fields | object / "message type", unknown fields are NOT accessible in CEL expression |
| x-kubernetes-int-or-string | dynamic object that is either an int or a string, type(value) can be used to check the type |
| 'array | list |
| 'array' with x-kubernetes-list-type=map | list with map based Equality & unique key guarantees |
| 'array' with x-kubernetes-list-type=set | list with set based Equality & unique entry guarantees |
| 'boolean' | boolean |
| 'number' (all formats) | double |
| 'integer' (all formats) | int (64) |
| 'null' | null_type |
| 'string' | string |
| 'string' with format=byte (base64 encoded) | bytes |
| 'string' with format=date | timestamp (google.protobuf.Timestamp) |
| 'string' with format=datetime | timestamp (google.protobuf.Timestamp) |
| 'string' with format=duration | duration (google.protobuf.Duration) |
xref: CEL types, OpenAPI types, Kubernetes Structural Schemas.
The messageExpression field
Similar to the message field, which defines the string reported for a validation rule failure,
messageExpression allows you to use a CEL expression to construct the message string.
This allows you to insert more descriptive information into the validation failure message.
messageExpression must evaluate a string and may use the same variables that are available to the rule
field. For example:
x-kubernetes-validations:
- rule: "self.x <= self.maxLimit"
  messageExpression: '"x exceeded max limit of " + string(self.maxLimit)'
Keep in mind that CEL string concatenation (+ operator) does not auto-cast to string. If
you have a non-string scalar, use the string(<value>) function to cast the scalar to a string
like shown in the above example.
messageExpression must evaluate to a string, and this is checked while the CRD is being written. Note that it is possible
to set message and messageExpression on the same rule, and if both are present, messageExpression
will be used. However, if messageExpression evaluates to an error, the string defined in message
will be used instead, and the messageExpression error will be logged. This fallback will also occur if
the CEL expression defined in messageExpression generates an empty string, or a string containing line
breaks.
If one of the above conditions are met and no message has been set, then the default validation failure
message will be used instead.
messageExpression is a CEL expression, so the restrictions listed in Resource use by validation functions apply. If evaluation halts due to resource constraints
during messageExpression execution, then no further validation rules will be executed.
Setting messageExpression is optional.
The message field
If you want to set a static message, you can supply message rather than messageExpression.
The value of message is used as an opaque error string if validation fails.
Setting message is optional.
The reason field
You can add a machine-readable validation failure reason within a validation, to be returned
whenever a request fails this validation rule.
For example:
x-kubernetes-validations:
- rule: "self.x <= self.maxLimit"
  reason: "FieldValueInvalid"
The HTTP status code returned to the caller will match the reason of the first failed validation rule. The currently supported reasons are: "FieldValueInvalid", "FieldValueForbidden", "FieldValueRequired", "FieldValueDuplicate". If not set or unknown reasons, default to use "FieldValueInvalid".
Setting reason is optional.
The fieldPath field
You can specify the field path returned when the validation fails.
For example:
x-kubernetes-validations:
- rule: "self.foo.test.x <= self.maxLimit"
  fieldPath: ".foo.test.x"
In the example above, the validation checks the value of field x should be less than the value of maxLimit.
If no fieldPath specified, when validation fails, the fieldPath would be default to wherever self scoped.
With fieldPath specified, the returned error will have fieldPath properly refer to the location of field x.
The fieldPath value must be a relative JSON path that is scoped to the location of this x-kubernetes-validations extension in the schema.
Additionally, it should refer to an existing field within the schema.
For example when validation checks if a specific attribute foo under a map testMap, you could set
fieldPath to ".testMap.foo" or .testMap['foo']'.
If the validation requires checking for unique attributes in two lists, the fieldPath can be set to either of the lists.
For example, it can be set to .testList1 or .testList2.
It supports child operation to refer to an existing field currently.
Refer to JSONPath support in Kubernetes for more info.
The fieldPath field does not support indexing arrays numerically.
Setting fieldPath is optional.
The optionalOldSelf field
Kubernetes v1.33 [stable](enabled by default)If your cluster does not have CRD validation ratcheting enabled, the CustomResourceDefinition API doesn't include this field, and trying to set it may result in an error.
The optionalOldSelf field is a boolean field that alters the behavior of Transition Rules described
below. Normally, a transition rule will not evaluate if oldSelf cannot be determined:
during object creation or when a new value is introduced in an update.
If optionalOldSelf is set to true, then transition rules will always be
evaluated and the type of oldSelf be changed to a CEL Optional type.
optionalOldSelf is useful in cases where schema authors would like a more
control tool than provided by the default equality based behavior of
to introduce newer, usually stricter constraints on new values, while still
allowing old values to be "grandfathered" or ratcheted using the older validation.
Example Usage:
| CEL | Description |
|---|---|
self.foo == "foo" || (oldSelf.hasValue() && oldSelf.value().foo != "foo") | Ratcheted rule. Once a value is set to "foo", it must stay foo. But if it existed before the "foo" constraint was introduced, it may use any value |
[oldSelf.orValue(""), self].all(x, ["OldCase1", "OldCase2"].exists(case, x == case)) || ["NewCase1", "NewCase2"].exists(case, self == case) || ["NewCase"].has(self) | "Ratcheted validation for removed enum cases if oldSelf used them" |
oldSelf.optMap(o, o.size()).orValue(0) < 4 || self.size() >= 4 | Ratcheted validation of newly increased minimum map or list size |
Validation functions
Functions available include:
- CEL standard functions, defined in the list of standard definitions
- CEL standard macros
- CEL extended string function library
- Kubernetes CEL extension library
Transition rules
A rule that contains an expression referencing the identifier oldSelf is implicitly considered a
transition rule. Transition rules allow schema authors to prevent certain transitions between two
otherwise valid states. For example:
type: string
enum: ["low", "medium", "high"]
x-kubernetes-validations:
- rule: "!(self == 'high' && oldSelf == 'low') && !(self == 'low' && oldSelf == 'high')"
  message: cannot transition directly between 'low' and 'high'
Unlike other rules, transition rules apply only to operations meeting the following criteria:
The operation updates an existing object. Transition rules never apply to create operations.
Both an old and a new value exist. It remains possible to check if a value has been added or removed by placing a transition rule on the parent node. Transition rules are never applied to custom resource creation. When placed on an optional field, a transition rule will not apply to update operations that set or unset the field.
The path to the schema node being validated by a transition rule must resolve to a node that is comparable between the old object and the new object. For example, list items and their descendants (
spec.foo[10].bar) can't necessarily be correlated between an existing object and a later update to the same object.
Errors will be generated on CRD writes if a schema node contains a transition rule that can never be applied, e.g. "oldSelf cannot be used on the uncorrelatable portion of the schema within path".
Transition rules are only allowed on correlatable portions of a schema.
A portion of the schema is correlatable if all array parent schemas are of type x-kubernetes-list-type=map;
any setor atomicarray parent schemas make it impossible to unambiguously correlate a self with oldSelf.
Here are some examples for transition rules:
| Use Case | Rule |
|---|---|
| Immutability | self.foo == oldSelf.foo |
| Prevent modification/removal once assigned | oldSelf != 'bar' || self == 'bar' or !has(oldSelf.field) || has(self.field) |
| Append-only set | self.all(element, element in oldSelf) |
| If previous value was X, new value can only be A or B, not Y or Z | oldSelf != 'X' || self in ['A', 'B'] |
| Monotonic (non-decreasing) counters | self >= oldSelf |
Resource use by validation functions
When you create or update a CustomResourceDefinition that uses validation rules, the API server checks the likely impact of running those validation rules. If a rule is estimated to be prohibitively expensive to execute, the API server rejects the create or update operation, and returns an error message. A similar system is used at runtime that observes the actions the interpreter takes. If the interpreter executes too many instructions, execution of the rule will be halted, and an error will result. Each CustomResourceDefinition is also allowed a certain amount of resources to finish executing all of its validation rules. If the sum total of its rules are estimated at creation time to go over that limit, then a validation error will also occur.
You are unlikely to encounter issues with the resource budget for validation if you only
specify rules that always take the same amount of time regardless of how large their input is.
For example, a rule that asserts that self.foo == 1 does not by itself have any
risk of rejection on validation resource budget groups.
But if foo is a string and you define a validation rule self.foo.contains("someString"), that rule takes
longer to execute depending on how long foo is.
Another example would be if foo were an array, and you specified a validation rule self.foo.all(x, x > 5).
The cost system always assumes the worst-case scenario if a limit on the length of foo is not
given, and this will happen for anything that can be iterated over (lists, maps, etc.).
Because of this, it is considered best practice to put a limit via maxItems, maxProperties, and
maxLength for anything that will be processed in a validation rule in order to prevent validation
errors during cost estimation. For example, given this schema with one rule:
openAPIV3Schema:
  type: object
  properties:
    foo:
      type: array
      items:
        type: string
      x-kubernetes-validations:
        - rule: "self.all(x, x.contains('a string'))"
then the API server rejects this rule on validation budget grounds with error:
spec.validation.openAPIV3Schema.properties[spec].properties[foo].x-kubernetes-validations[0].rule: Forbidden:
CEL rule exceeded budget by more than 100x (try simplifying the rule, or adding maxItems, maxProperties, and
maxLength where arrays, maps, and strings are used)
The rejection happens because self.all implies calling contains() on every string in foo,
which in turn will check the given string to see if it contains 'a string'. Without limits, this
is a very expensive rule.
If you do not specify any validation limit, the estimated cost of this rule will exceed the per-rule cost limit. But if you add limits in the appropriate places, the rule will be allowed:
openAPIV3Schema:
  type: object
  properties:
    foo:
      type: array
      maxItems: 25
      items:
        type: string
        maxLength: 10
      x-kubernetes-validations:
        - rule: "self.all(x, x.contains('a string'))"
The cost estimation system takes into account how many times the rule will be executed in addition to the estimated cost of the rule itself. For instance, the following rule will have the same estimated cost as the previous example (despite the rule now being defined on the individual array items):
openAPIV3Schema:
  type: object
  properties:
    foo:
      type: array
      maxItems: 25
      items:
        type: string
        x-kubernetes-validations:
          - rule: "self.contains('a string'))"
        maxLength: 10
If a list inside of a list has a validation rule that uses self.all, that is significantly more expensive
than a non-nested list with the same rule. A rule that would have been allowed on a non-nested list might need
lower limits set on both nested lists in order to be allowed. For example, even without having limits set,
the following rule is allowed:
openAPIV3Schema:
  type: object
  properties:
    foo:
      type: array
      items:
        type: integer
    x-kubernetes-validations:
      - rule: "self.all(x, x == 5)"
But the same rule on the following schema (with a nested array added) produces a validation error:
openAPIV3Schema:
  type: object
  properties:
    foo:
      type: array
      items:
        type: array
        items:
          type: integer
        x-kubernetes-validations:
          - rule: "self.all(x, x == 5)"
This is because each item of foo is itself an array, and each subarray in turn calls self.all.
Avoid nested lists and maps if possible where validation rules are used.
Defaulting
Note:
To use defaulting, your CustomResourceDefinition must use API versionapiextensions.k8s.io/v1.Defaulting allows to specify default values in the OpenAPI v3 validation schema:
apiVersion: apiextensions.k8s.io/v1
kind: CustomResourceDefinition
metadata:
  name: crontabs.stable.example.com
spec:
  group: stable.example.com
  versions:
    - name: v1
      served: true
      storage: true
      schema:
        # openAPIV3Schema is the schema for validating custom objects.
        openAPIV3Schema:
          type: object
          properties:
            spec:
              type: object
              properties:
                cronSpec:
                  type: string
                  pattern: '^(\d+|\*)(/\d+)?(\s+(\d+|\*)(/\d+)?){4}$'
                  default: "5 0 * * *"
                image:
                  type: string
                replicas:
                  type: integer
                  minimum: 1
                  maximum: 10
                  default: 1
  scope: Namespaced
  names:
    plural: crontabs
    singular: crontab
    kind: CronTab
    shortNames:
    - ct
With this both cronSpec and replicas are defaulted:
apiVersion: "stable.example.com/v1"
kind: CronTab
metadata:
  name: my-new-cron-object
spec:
  image: my-awesome-cron-image
leads to
apiVersion: "stable.example.com/v1"
kind: CronTab
metadata:
  name: my-new-cron-object
spec:
  cronSpec: "5 0 * * *"
  image: my-awesome-cron-image
  replicas: 1
Defaulting happens on the object
- in the request to the API server using the request version defaults,
- when reading from etcd using the storage version defaults,
- after mutating admission plugins with non-empty patches using the admission webhook object version defaults.
Defaults applied when reading data from etcd are not automatically written back to etcd. An update request via the API is required to persist those defaults back into etcd.
Default values for non-leaf fields must be pruned (with the exception of defaults for metadata fields) and must
validate against a provided schema. For example in the above example, a default of {"replicas": "foo", "badger": 1}
for the spec field would be invalid, because badger is an unknown field, and replicas is not a string.
Default values for metadata fields of x-kubernetes-embedded-resources: true nodes (or parts of
a default value covering metadata) are not pruned during CustomResourceDefinition creation, but
through the pruning step during handling of requests.
Defaulting and Nullable
Null values for fields that either don't specify the nullable flag, or give it a
false value, will be pruned before defaulting happens. If a default is present, it will be
applied. When nullable is true, null values will be conserved and won't be defaulted.
For example, given the OpenAPI schema below:
type: object
properties:
  spec:
    type: object
    properties:
      foo:
        type: string
        nullable: false
        default: "default"
      bar:
        type: string
        nullable: true
      baz:
        type: string
creating an object with null values for foo and bar and baz
spec:
  foo: null
  bar: null
  baz: null
leads to
spec:
  foo: "default"
  bar: null
with foo pruned and defaulted because the field is non-nullable, bar maintaining the null
value due to nullable: true, and baz pruned because the field is non-nullable and has no
default.
Publish Validation Schema in OpenAPI
CustomResourceDefinition OpenAPI v3 validation schemas which are structural and enable pruning are published as OpenAPI v3 and OpenAPI v2 from Kubernetes API server. It is recommended to use the OpenAPI v3 document as it is a lossless representation of the CustomResourceDefinition OpenAPI v3 validation schema while OpenAPI v2 represents a lossy conversion.
The kubectl command-line tool consumes the published schema to perform
client-side validation (kubectl create and kubectl apply), schema explanation (kubectl explain)
on custom resources. The published schema can be consumed for other purposes as well, like client generation or documentation.
Compatibility with OpenAPI V2
For compatibility with OpenAPI V2, the OpenAPI v3 validation schema performs a lossy conversion
to the OpenAPI v2 schema. The schema show up in definitions and paths fields in the
OpenAPI v2 spec.
The following modifications are applied during the conversion to keep backwards compatibility with kubectl in previous 1.13 version. These modifications prevent kubectl from being over-strict and rejecting valid OpenAPI schemas that it doesn't understand. The conversion won't modify the validation schema defined in CRD, and therefore won't affect validation in the API server.
The following fields are removed as they aren't supported by OpenAPI v2.
- The fields
allOf,anyOf,oneOfandnotare removed
- The fields
If
nullable: trueis set, we droptype,nullable,itemsandpropertiesbecause OpenAPI v2 is not able to express nullable. To avoid kubectl to reject good objects, this is necessary.
Additional printer columns
The kubectl tool relies on server-side output formatting. Your cluster's API server decides which
columns are shown by the kubectl get command. You can customize these columns for a
CustomResourceDefinition. The following example adds the Spec, Replicas, and Age
columns.
Save the CustomResourceDefinition to resourcedefinition.yaml:
apiVersion: apiextensions.k8s.io/v1
kind: CustomResourceDefinition
metadata:
  name: crontabs.stable.example.com
spec:
  group: stable.example.com
  scope: Namespaced
  names:
    plural: crontabs
    singular: crontab
    kind: CronTab
    shortNames:
    - ct
  versions:
  - name: v1
    served: true
    storage: true
    schema:
      openAPIV3Schema:
        type: object
        properties:
          spec:
            type: object
            properties:
              cronSpec:
                type: string
              image:
                type: string
              replicas:
                type: integer
    additionalPrinterColumns:
    - name: Spec
      type: string
      description: The cron spec defining the interval a CronJob is run
      jsonPath: .spec.cronSpec
    - name: Replicas
      type: integer
      description: The number of jobs launched by the CronJob
      jsonPath: .spec.replicas
    - name: Age
      type: date
      jsonPath: .metadata.creationTimestamp
Create the CustomResourceDefinition:
kubectl apply -f resourcedefinition.yaml
Create an instance using the my-crontab.yaml from the previous section.
Invoke the server-side printing:
kubectl get crontab my-new-cron-object
Notice the NAME, SPEC, REPLICAS, and AGE columns in the output:
NAME                 SPEC        REPLICAS   AGE
my-new-cron-object   * * * * *   1          7s
Note:
TheNAME column is implicit and does not need to be defined in the CustomResourceDefinition.Priority
Each column includes a priority field. Currently, the priority
differentiates between columns shown in standard view or wide view (using the -o wide flag).
- Columns with priority
0are shown in standard view. - Columns with priority greater than
0are shown only in wide view.
Type
A column's type field can be any of the following (compare
OpenAPI v3 data types):
integer– non-floating-point numbersnumber– floating point numbersstring– stringsboolean–trueorfalsedate– rendered differentially as time since this timestamp.
If the value inside a CustomResource does not match the type specified for the column, the value is omitted. Use CustomResource validation to ensure that the value types are correct.
Format
A column's format field can be any of the following:
int32int64floatdoublebytedatedate-timepassword
The column's format controls the style used when kubectl prints the value.
Field selectors
Field Selectors let clients select custom resources based on the value of one or more resource fields.
All custom resources support the metadata.name and metadata.namespace field
selectors.
Fields declared in a CustomResourceDefinition
may also be used with field selectors when included in the spec.versions[*].selectableFields field of the
CustomResourceDefinition.
Selectable fields for custom resources
Kubernetes v1.32 [stable](enabled by default)The spec.versions[*].selectableFields field of a CustomResourceDefinition may be used to
declare which other fields in a custom resource may be used in field selectors
with the feature of CustomResourceFieldSelectors
feature gate (This feature gate is enabled by default since Kubernetes v1.31).
The following example adds the .spec.color and .spec.size fields as
selectable fields.
Save the CustomResourceDefinition to shirt-resource-definition.yaml:
apiVersion: apiextensions.k8s.io/v1
kind: CustomResourceDefinition
metadata:
  name: shirts.stable.example.com
spec:
  group: stable.example.com
  scope: Namespaced
  names:
    plural: shirts
    singular: shirt
    kind: Shirt
  versions:
  - name: v1
    served: true
    storage: true
    schema:
      openAPIV3Schema:
        type: object
        properties:
          spec:
            type: object
            properties:
              color:
                type: string
              size:
                type: string
    selectableFields:
    - jsonPath: .spec.color
    - jsonPath: .spec.size
    additionalPrinterColumns:
    - jsonPath: .spec.color
      name: Color
      type: string
    - jsonPath: .spec.size
      name: Size
      type: string
Create the CustomResourceDefinition:
kubectl apply -f https://k8s.io/examples/customresourcedefinition/shirt-resource-definition.yaml
Define some Shirts by editing shirt-resources.yaml; for example:
---
apiVersion: stable.example.com/v1
kind: Shirt
metadata:
  name: example1
spec:
  color: blue
  size: S
---
apiVersion: stable.example.com/v1
kind: Shirt
metadata:
  name: example2
spec:
  color: blue
  size: M
---
apiVersion: stable.example.com/v1
kind: Shirt
metadata:
  name: example3
spec:
  color: green
  size: M
Create the custom resources:
kubectl apply -f https://k8s.io/examples/customresourcedefinition/shirt-resources.yaml
Get all the resources:
kubectl get shirts.stable.example.com
The output is:
NAME       COLOR  SIZE
example1   blue   S
example2   blue   M
example3   green  M
Fetch blue shirts (retrieve Shirts with a color of blue):
kubectl get shirts.stable.example.com --field-selector spec.color=blue
Should output:
NAME       COLOR  SIZE
example1   blue   S
example2   blue   M
Get only resources with a color of green and a size of M:
kubectl get shirts.stable.example.com --field-selector spec.color=green,spec.size=M
Should output:
NAME       COLOR   SIZE
example3   green   M
Subresources
Custom resources support /status and /scale subresources.
The status and scale subresources can be optionally enabled by defining them in the CustomResourceDefinition.
Status subresource
When the status subresource is enabled, the /status subresource for the custom resource is exposed.
The status and the spec stanzas are represented by the
.statusand.specJSONPaths respectively inside of a custom resource.PUTrequests to the/statussubresource take a custom resource object and ignore changes to anything except the status stanza.PUTrequests to the/statussubresource only validate the status stanza of the custom resource.PUT/POST/PATCHrequests to the custom resource ignore changes to the status stanza.The
.metadata.generationvalue is incremented for all changes, except for changes to.metadataor.status.Only the following constructs are allowed at the root of the CRD OpenAPI validation schema:
descriptionexampleexclusiveMaximumexclusiveMinimumexternalDocsformatitemsmaximummaxItemsmaxLengthminimumminItemsminLengthmultipleOfpatternpropertiesrequiredtitletypeuniqueItems
Scale subresource
When the scale subresource is enabled, the /scale subresource for the custom resource is exposed.
The autoscaling/v1.Scale object is sent as the payload for /scale.
To enable the scale subresource, the following fields are defined in the CustomResourceDefinition.
specReplicasPathdefines the JSONPath inside of a custom resource that corresponds toscale.spec.replicas.- It is a required value.
- Only JSONPaths under
.specand with the dot notation are allowed. - If there is no value under the
specReplicasPathin the custom resource, the/scalesubresource will return an error on GET.
statusReplicasPathdefines the JSONPath inside of a custom resource that corresponds toscale.status.replicas.- It is a required value.
- Only JSONPaths under
.statusand with the dot notation are allowed. - If there is no value under the
statusReplicasPathin the custom resource, the status replica value in the/scalesubresource will default to 0.
labelSelectorPathdefines the JSONPath inside of a custom resource that corresponds toScale.Status.Selector.- It is an optional value.
- It must be set to work with HPA and VPA.
- Only JSONPaths under
.statusor.specand with the dot notation are allowed. - If there is no value under the
labelSelectorPathin the custom resource, the status selector value in the/scalesubresource will default to the empty string. - The field pointed by this JSON path must be a string field (not a complex selector struct) which contains a serialized label selector in string form.
In the following example, both status and scale subresources are enabled.
Save the CustomResourceDefinition to resourcedefinition.yaml:
apiVersion: apiextensions.k8s.io/v1
kind: CustomResourceDefinition
metadata:
  name: crontabs.stable.example.com
spec:
  group: stable.example.com
  versions:
    - name: v1
      served: true
      storage: true
      schema:
        openAPIV3Schema:
          type: object
          properties:
            spec:
              type: object
              properties:
                cronSpec:
                  type: string
                image:
                  type: string
                replicas:
                  type: integer
            status:
              type: object
              properties:
                replicas:
                  type: integer
                labelSelector:
                  type: string
      # subresources describes the subresources for custom resources.
      subresources:
        # status enables the status subresource.
        status: {}
        # scale enables the scale subresource.
        scale:
          # specReplicasPath defines the JSONPath inside of a custom resource that corresponds to Scale.Spec.Replicas.
          specReplicasPath: .spec.replicas
          # statusReplicasPath defines the JSONPath inside of a custom resource that corresponds to Scale.Status.Replicas.
          statusReplicasPath: .status.replicas
          # labelSelectorPath defines the JSONPath inside of a custom resource that corresponds to Scale.Status.Selector.
          labelSelectorPath: .status.labelSelector
  scope: Namespaced
  names:
    plural: crontabs
    singular: crontab
    kind: CronTab
    shortNames:
    - ct
And create it:
kubectl apply -f resourcedefinition.yaml
After the CustomResourceDefinition object has been created, you can create custom objects.
If you save the following YAML to my-crontab.yaml:
apiVersion: "stable.example.com/v1"
kind: CronTab
metadata:
  name: my-new-cron-object
spec:
  cronSpec: "* * * * */5"
  image: my-awesome-cron-image
  replicas: 3
and create it:
kubectl apply -f my-crontab.yaml
Then new namespaced RESTful API endpoints are created at:
/apis/stable.example.com/v1/namespaces/*/crontabs/status
and
/apis/stable.example.com/v1/namespaces/*/crontabs/scale
A custom resource can be scaled using the kubectl scale command.
For example, the following command sets .spec.replicas of the
custom resource created above to 5:
kubectl scale --replicas=5 crontabs/my-new-cron-object
crontabs "my-new-cron-object" scaled

kubectl get crontabs my-new-cron-object -o jsonpath='{.spec.replicas}'
5
You can use a PodDisruptionBudget to protect custom resources that have the scale subresource enabled.
Categories
Categories is a list of grouped resources the custom resource belongs to (eg. all).
You can use kubectl get <category-name> to list the resources belonging to the category.
The following example adds all in the list of categories in the CustomResourceDefinition
and illustrates how to output the custom resource using kubectl get all.
Save the following CustomResourceDefinition to resourcedefinition.yaml:
apiVersion: apiextensions.k8s.io/v1
kind: CustomResourceDefinition
metadata:
  name: crontabs.stable.example.com
spec:
  group: stable.example.com
  versions:
    - name: v1
      served: true
      storage: true
      schema:
        openAPIV3Schema:
          type: object
          properties:
            spec:
              type: object
              properties:
                cronSpec:
                  type: string
                image:
                  type: string
                replicas:
                  type: integer
  scope: Namespaced
  names:
    plural: crontabs
    singular: crontab
    kind: CronTab
    shortNames:
    - ct
    # categories is a list of grouped resources the custom resource belongs to.
    categories:
    - all
and create it:
kubectl apply -f resourcedefinition.yaml
After the CustomResourceDefinition object has been created, you can create custom objects.
Save the following YAML to my-crontab.yaml:
apiVersion: "stable.example.com/v1"
kind: CronTab
metadata:
  name: my-new-cron-object
spec:
  cronSpec: "* * * * */5"
  image: my-awesome-cron-image
and create it:
kubectl apply -f my-crontab.yaml
You can specify the category when using kubectl get:
kubectl get all
and it will include the custom resources of kind CronTab:
NAME                          AGE
crontabs/my-new-cron-object   3s
What's next
Read about custom resources.
Serve multiple versions of a CustomResourceDefinition.
2.2 - Versions in CustomResourceDefinitions
This page explains how to add versioning information to CustomResourceDefinitions, to indicate the stability level of your CustomResourceDefinitions or advance your API to a new version with conversion between API representations. It also describes how to upgrade an object from one version to another.
Before you begin
You need to have a Kubernetes cluster, and the kubectl command-line tool must be configured to communicate with your cluster. It is recommended to run this tutorial on a cluster with at least two nodes that are not acting as control plane hosts. If you do not already have a cluster, you can create one by using minikube or you can use one of these Kubernetes playgrounds:
You should have an initial understanding of custom resources.
Your Kubernetes server must be at or later than version v1.16.To check the version, enter kubectl version.
Overview
The CustomResourceDefinition API provides a workflow for introducing and upgrading to new versions of a CustomResourceDefinition.
When a CustomResourceDefinition is created, the first version is set in the
CustomResourceDefinition spec.versions list to an appropriate stability level
and a version number. For example v1beta1 would indicate that the first
version is not yet stable. All custom resource objects will initially be stored
at this version.
Once the CustomResourceDefinition is created, clients may begin using the
v1beta1 API.
Later it might be necessary to add new version such as v1.
Adding a new version:
- Pick a conversion strategy. Since custom resource objects need the ability to
be served at both versions, that means they will sometimes be served in a
different version than the one stored. To make this possible, the custom resource objects must sometimes be converted between the
version they are stored at and the version they are served at. If the
conversion involves schema changes and requires custom logic, a conversion
webhook should be used. If there are no schema changes, the default
Noneconversion strategy may be used and only theapiVersionfield will be modified when serving different versions. - If using conversion webhooks, create and deploy the conversion webhook. See the Webhook conversion for more details.
- Update the CustomResourceDefinition to include the new version in the
spec.versionslist withserved:true. Also, setspec.conversionfield to the selected conversion strategy. If using a conversion webhook, configurespec.conversion.webhookClientConfigfield to call the webhook.
Once the new version is added, clients may incrementally migrate to the new version. It is perfectly safe for some clients to use the old version while others use the new version.
Migrate stored objects to the new version:
- See the upgrade existing objects to a new stored version section.
It is safe for clients to use both the old and new version before, during and after upgrading the objects to a new stored version.
Removing an old version:
- Ensure all clients are fully migrated to the new version. The kube-apiserver logs can be reviewed to help identify any clients that are still accessing via the old version.
- Set
servedtofalsefor the old version in thespec.versionslist. If any clients are still unexpectedly using the old version they may begin reporting errors attempting to access the custom resource objects at the old version. If this occurs, switch back to usingserved:trueon the old version, migrate the remaining clients to the new version and repeat this step. - Ensure the upgrade of existing objects to the new stored version step has been completed.
- Verify that the
storageis set totruefor the new version in thespec.versionslist in the CustomResourceDefinition. - Verify that the old version is no longer listed in the CustomResourceDefinition
status.storedVersions.
- Verify that the
- Remove the old version from the CustomResourceDefinition
spec.versionslist. - Drop conversion support for the old version in conversion webhooks.
Specify multiple versions
The CustomResourceDefinition API versions field can be used to support multiple versions of custom resources that you
have developed. Versions can have different schemas, and conversion webhooks can convert custom resources between versions.
Webhook conversions should follow the Kubernetes API conventions wherever applicable.
Specifically, See the API change documentation for a set of useful gotchas and suggestions.
Note:
Inapiextensions.k8s.io/v1beta1, there was a version field instead of versions. The
version field is deprecated and optional, but if it is not empty, it must
match the first item in the versions field.This example shows a CustomResourceDefinition with two versions. For the first example, the assumption is all versions share the same schema with no conversion between them. The comments in the YAML provide more context.
apiVersion: apiextensions.k8s.io/v1
kind: CustomResourceDefinition
metadata:
  # name must match the spec fields below, and be in the form: <plural>.<group>
  name: crontabs.example.com
spec:
  # group name to use for REST API: /apis/<group>/<version>
  group: example.com
  # list of versions supported by this CustomResourceDefinition
  versions:
  - name: v1beta1
    # Each version can be enabled/disabled by Served flag.
    served: true
    # One and only one version must be marked as the storage version.
    storage: true
    # A schema is required
    schema:
      openAPIV3Schema:
        type: object
        properties:
          host:
            type: string
          port:
            type: string
  - name: v1
    served: true
    storage: false
    schema:
      openAPIV3Schema:
        type: object
        properties:
          host:
            type: string
          port:
            type: string
  # The conversion section is introduced in Kubernetes 1.13+ with a default value of
  # None conversion (strategy sub-field set to None).
  conversion:
    # None conversion assumes the same schema for all versions and only sets the apiVersion
    # field of custom resources to the proper value
    strategy: None
  # either Namespaced or Cluster
  scope: Namespaced
  names:
    # plural name to be used in the URL: /apis/<group>/<version>/<plural>
    plural: crontabs
    # singular name to be used as an alias on the CLI and for display
    singular: crontab
    # kind is normally the CamelCased singular type. Your resource manifests use this.
    kind: CronTab
    # shortNames allow shorter string to match your resource on the CLI
    shortNames:
    - ct
# Deprecated in v1.16 in favor of apiextensions.k8s.io/v1
apiVersion: apiextensions.k8s.io/v1beta1
kind: CustomResourceDefinition
metadata:
  # name must match the spec fields below, and be in the form: <plural>.<group>
  name: crontabs.example.com
spec:
  # group name to use for REST API: /apis/<group>/<version>
  group: example.com
  # list of versions supported by this CustomResourceDefinition
  versions:
  - name: v1beta1
    # Each version can be enabled/disabled by Served flag.
    served: true
    # One and only one version must be marked as the storage version.
    storage: true
  - name: v1
    served: true
    storage: false
  validation:
    openAPIV3Schema:
      type: object
      properties:
        host:
          type: string
        port:
          type: string
  # The conversion section is introduced in Kubernetes 1.13+ with a default value of
  # None conversion (strategy sub-field set to None).
  conversion:
    # None conversion assumes the same schema for all versions and only sets the apiVersion
    # field of custom resources to the proper value
    strategy: None
  # either Namespaced or Cluster
  scope: Namespaced
  names:
    # plural name to be used in the URL: /apis/<group>/<version>/<plural>
    plural: crontabs
    # singular name to be used as an alias on the CLI and for display
    singular: crontab
    # kind is normally the PascalCased singular type. Your resource manifests use this.
    kind: CronTab
    # shortNames allow shorter string to match your resource on the CLI
    shortNames:
    - ct
You can save the CustomResourceDefinition in a YAML file, then use
kubectl apply to create it.
kubectl apply -f my-versioned-crontab.yaml
After creation, the API server starts to serve each enabled version at an HTTP
REST endpoint. In the above example, the API versions are available at
/apis/example.com/v1beta1 and /apis/example.com/v1.
Version priority
Regardless of the order in which versions are defined in a CustomResourceDefinition, the version with the highest priority is used by kubectl as the default version to access objects. The priority is determined by parsing the name field to determine the version number, the stability (GA, Beta, or Alpha), and the sequence within that stability level.
The algorithm used for sorting the versions is designed to sort versions in the
same way that the Kubernetes project sorts Kubernetes versions. Versions start with a
v followed by a number, an optional beta or alpha designation, and
optional additional numeric versioning information. Broadly, a version string might look
like v2 or v2beta1. Versions are sorted using the following algorithm:
- Entries that follow Kubernetes version patterns are sorted before those that do not.
- For entries that follow Kubernetes version patterns, the numeric portions of the version string is sorted largest to smallest.
- If the strings
betaoralphafollow the first numeric portion, they sorted in that order, after the equivalent string without thebetaoralphasuffix (which is presumed to be the GA version). - If another number follows the
beta, oralpha, those numbers are also sorted from largest to smallest. - Strings that don't fit the above format are sorted alphabetically and the
numeric portions are not treated specially. Notice that in the example below,
foo1is sorted abovefoo10. This is different from the sorting of the numeric portion of entries that do follow the Kubernetes version patterns.
This might make sense if you look at the following sorted version list:
- v10
- v2
- v1
- v11beta2
- v10beta3
- v3beta1
- v12alpha1
- v11alpha2
- foo1
- foo10
For the example in Specify multiple versions, the
version sort order is v1, followed by v1beta1. This causes the kubectl
command to use v1 as the default version unless the provided object specifies
the version.
Version deprecation
Kubernetes v1.19 [stable]Starting in v1.19, a CustomResourceDefinition can indicate a particular version of the resource it defines is deprecated. When API requests to a deprecated version of that resource are made, a warning message is returned in the API response as a header. The warning message for each deprecated version of the resource can be customized if desired.
A customized warning message should indicate the deprecated API group, version, and kind, and should indicate what API group, version, and kind should be used instead, if applicable.
apiVersion: apiextensions.k8s.io/v1
kind: CustomResourceDefinition
metadata:
  name: crontabs.example.com
spec:
  group: example.com
  names:
    plural: crontabs
    singular: crontab
    kind: CronTab
  scope: Namespaced
  versions:
  - name: v1alpha1
    served: true
    storage: false
    # This indicates the v1alpha1 version of the custom resource is deprecated.
    # API requests to this version receive a warning header in the server response.
    deprecated: true
    # This overrides the default warning returned to API clients making v1alpha1 API requests.
    deprecationWarning: "example.com/v1alpha1 CronTab is deprecated; see http://example.com/v1alpha1-v1 for instructions to migrate to example.com/v1 CronTab"

    schema: ...
  - name: v1beta1
    served: true
    # This indicates the v1beta1 version of the custom resource is deprecated.
    # API requests to this version receive a warning header in the server response.
    # A default warning message is returned for this version.
    deprecated: true
    schema: ...
  - name: v1
    served: true
    storage: true
    schema: ...
# Deprecated in v1.16 in favor of apiextensions.k8s.io/v1
apiVersion: apiextensions.k8s.io/v1beta1
kind: CustomResourceDefinition
metadata:
  name: crontabs.example.com
spec:
  group: example.com
  names:
    plural: crontabs
    singular: crontab
    kind: CronTab
  scope: Namespaced
  validation: ...
  versions:
  - name: v1alpha1
    served: true
    storage: false
    # This indicates the v1alpha1 version of the custom resource is deprecated.
    # API requests to this version receive a warning header in the server response.
    deprecated: true
    # This overrides the default warning returned to API clients making v1alpha1 API requests.
    deprecationWarning: "example.com/v1alpha1 CronTab is deprecated; see http://example.com/v1alpha1-v1 for instructions to migrate to example.com/v1 CronTab"
  - name: v1beta1
    served: true
    # This indicates the v1beta1 version of the custom resource is deprecated.
    # API requests to this version receive a warning header in the server response.
    # A default warning message is returned for this version.
    deprecated: true
  - name: v1
    served: true
    storage: true
Version removal
An older API version cannot be dropped from a CustomResourceDefinition manifest until existing stored data has been migrated to the newer API version for all clusters that served the older version of the custom resource, and the old version is removed from the status.storedVersions of the CustomResourceDefinition.
apiVersion: apiextensions.k8s.io/v1
kind: CustomResourceDefinition
metadata:
  name: crontabs.example.com
spec:
  group: example.com
  names:
    plural: crontabs
    singular: crontab
    kind: CronTab
  scope: Namespaced
  versions:
  - name: v1beta1
    # This indicates the v1beta1 version of the custom resource is no longer served.
    # API requests to this version receive a not found error in the server response.
    served: false
    schema: ...
  - name: v1
    served: true
    # The new served version should be set as the storage version
    storage: true
    schema: ...
Webhook conversion
Kubernetes v1.16 [stable]Note:
Webhook conversion is available as beta since 1.15, and as alpha since Kubernetes 1.13. TheCustomResourceWebhookConversion feature must be enabled, which is the case automatically for many clusters for beta features. Please refer to the feature gate documentation for more information.The above example has a None conversion between versions which only sets the apiVersion field
on conversion and does not change the rest of the object. The API server also supports webhook
conversions that call an external service in case a conversion is required. For example when:
- custom resource is requested in a different version than stored version.
- Watch is created in one version but the changed object is stored in another version.
- custom resource PUT request is in a different version than storage version.
To cover all of these cases and to optimize conversion by the API server, the conversion requests may contain multiple objects in order to minimize the external calls. The webhook should perform these conversions independently.
Write a conversion webhook server
Please refer to the implementation of the custom resource conversion webhook
server
that is validated in a Kubernetes e2e test. The webhook handles the
ConversionReview requests sent by the API servers, and sends back conversion
results wrapped in ConversionResponse. Note that the request
contains a list of custom resources that need to be converted independently without
changing the order of objects.
The example server is organized in a way to be reused for other conversions.
Most of the common code are located in the
framework file
that leaves only
one function
to be implemented for different conversions.
Note:
The example conversion webhook server leaves theClientAuth field
empty,
which defaults to NoClientCert. This means that the webhook server does not
authenticate the identity of the clients, supposedly API servers. If you need
mutual TLS or other ways to authenticate the clients, see
how to authenticate API servers.Permissible mutations
A conversion webhook must not mutate anything inside of metadata of the converted object
other than labels and annotations.
Attempted changes to name, UID and namespace are rejected and fail the request
which caused the conversion. All other changes are ignored.
Deploy the conversion webhook service
Documentation for deploying the conversion webhook is the same as for the
admission webhook example service.
The assumption for next sections is that the conversion webhook server is deployed to a service
named example-conversion-webhook-server in default namespace and serving traffic on path /crdconvert.
Note:
When the webhook server is deployed into the Kubernetes cluster as a service, it has to be exposed via a service on port 443 (The server itself can have an arbitrary port but the service object should map it to port 443). The communication between the API server and the webhook service may fail if a different port is used for the service.Configure CustomResourceDefinition to use conversion webhooks
The None conversion example can be extended to use the conversion webhook by modifying conversion
section of the spec:
apiVersion: apiextensions.k8s.io/v1
kind: CustomResourceDefinition
metadata:
  # name must match the spec fields below, and be in the form: <plural>.<group>
  name: crontabs.example.com
spec:
  # group name to use for REST API: /apis/<group>/<version>
  group: example.com
  # list of versions supported by this CustomResourceDefinition
  versions:
  - name: v1beta1
    # Each version can be enabled/disabled by Served flag.
    served: true
    # One and only one version must be marked as the storage version.
    storage: true
    # Each version can define its own schema when there is no top-level
    # schema is defined.
    schema:
      openAPIV3Schema:
        type: object
        properties:
          hostPort:
            type: string
  - name: v1
    served: true
    storage: false
    schema:
      openAPIV3Schema:
        type: object
        properties:
          host:
            type: string
          port:
            type: string
  conversion:
    # the Webhook strategy instructs the API server to call an external webhook for any conversion between custom resources.
    strategy: Webhook
    # webhook is required when strategy is `Webhook` and it configures the webhook endpoint to be called by API server.
    webhook:
      # conversionReviewVersions indicates what ConversionReview versions are understood/preferred by the webhook.
      # The first version in the list understood by the API server is sent to the webhook.
      # The webhook must respond with a ConversionReview object in the same version it received.
      conversionReviewVersions: ["v1","v1beta1"]
      clientConfig:
        service:
          namespace: default
          name: example-conversion-webhook-server
          path: /crdconvert
        caBundle: "Ci0tLS0tQk...<base64-encoded PEM bundle>...tLS0K"
  # either Namespaced or Cluster
  scope: Namespaced
  names:
    # plural name to be used in the URL: /apis/<group>/<version>/<plural>
    plural: crontabs
    # singular name to be used as an alias on the CLI and for display
    singular: crontab
    # kind is normally the CamelCased singular type. Your resource manifests use this.
    kind: CronTab
    # shortNames allow shorter string to match your resource on the CLI
    shortNames:
    - ct
# Deprecated in v1.16 in favor of apiextensions.k8s.io/v1
apiVersion: apiextensions.k8s.io/v1beta1
kind: CustomResourceDefinition
metadata:
  # name must match the spec fields below, and be in the form: <plural>.<group>
  name: crontabs.example.com
spec:
  # group name to use for REST API: /apis/<group>/<version>
  group: example.com
  # prunes object fields that are not specified in OpenAPI schemas below.
  preserveUnknownFields: false
  # list of versions supported by this CustomResourceDefinition
  versions:
  - name: v1beta1
    # Each version can be enabled/disabled by Served flag.
    served: true
    # One and only one version must be marked as the storage version.
    storage: true
    # Each version can define its own schema when there is no top-level
    # schema is defined.
    schema:
      openAPIV3Schema:
        type: object
        properties:
          hostPort:
            type: string
  - name: v1
    served: true
    storage: false
    schema:
      openAPIV3Schema:
        type: object
        properties:
          host:
            type: string
          port:
            type: string
  conversion:
    # the Webhook strategy instructs the API server to call an external webhook for any conversion between custom resources.
    strategy: Webhook
    # webhookClientConfig is required when strategy is `Webhook` and it configures the webhook endpoint to be called by API server.
    webhookClientConfig:
      service:
        namespace: default
        name: example-conversion-webhook-server
        path: /crdconvert
      caBundle: "Ci0tLS0tQk...<base64-encoded PEM bundle>...tLS0K"
  # either Namespaced or Cluster
  scope: Namespaced
  names:
    # plural name to be used in the URL: /apis/<group>/<version>/<plural>
    plural: crontabs
    # singular name to be used as an alias on the CLI and for display
    singular: crontab
    # kind is normally the CamelCased singular type. Your resource manifests use this.
    kind: CronTab
    # shortNames allow shorter string to match your resource on the CLI
    shortNames:
    - ct
You can save the CustomResourceDefinition in a YAML file, then use
kubectl apply to apply it.
kubectl apply -f my-versioned-crontab-with-conversion.yaml
Make sure the conversion service is up and running before applying new changes.
Contacting the webhook
Once the API server has determined a request should be sent to a conversion webhook,
it needs to know how to contact the webhook. This is specified in the webhookClientConfig
stanza of the webhook configuration.
Conversion webhooks can either be called via a URL or a service reference, and can optionally include a custom CA bundle to use to verify the TLS connection.
URL
url gives the location of the webhook, in standard URL form
(scheme://host:port/path).
The host should not refer to a service running in the cluster; use
a service reference by specifying the service field instead.
The host might be resolved via external DNS in some apiservers
(i.e., kube-apiserver cannot resolve in-cluster DNS as that would
be a layering violation). host may also be an IP address.
Please note that using localhost or 127.0.0.1 as a host is
risky unless you take great care to run this webhook on all hosts
which run an apiserver which might need to make calls to this
webhook. Such installations are likely to be non-portable or not readily run in a new cluster.
The scheme must be "https"; the URL must begin with "https://".
Attempting to use a user or basic auth (for example "user:password@") is not allowed. Fragments ("#...") and query parameters ("?...") are also not allowed.
Here is an example of a conversion webhook configured to call a URL (and expects the TLS certificate to be verified using system trust roots, so does not specify a caBundle):
apiVersion: apiextensions.k8s.io/v1
kind: CustomResourceDefinition
...
spec:
  ...
  conversion:
    strategy: Webhook
    webhook:
      clientConfig:
        url: "https://my-webhook.example.com:9443/my-webhook-path"
...
# Deprecated in v1.16 in favor of apiextensions.k8s.io/v1
apiVersion: apiextensions.k8s.io/v1beta1
kind: CustomResourceDefinition
...
spec:
  ...
  conversion:
    strategy: Webhook
    webhookClientConfig:
      url: "https://my-webhook.example.com:9443/my-webhook-path"
...
Service Reference
The service stanza inside webhookClientConfig is a reference to the service for a conversion webhook.
If the webhook is running within the cluster, then you should use service instead of url.
The service namespace and name are required. The port is optional and defaults to 443.
The path is optional and defaults to "/".
Here is an example of a webhook that is configured to call a service on port "1234"
at the subpath "/my-path", and to verify the TLS connection against the ServerName
my-service-name.my-service-namespace.svc using a custom CA bundle.
apiVersion: apiextensions.k8s.io/v1
kind: CustomResourceDefinition
...
spec:
  ...
  conversion:
    strategy: Webhook
    webhook:
      clientConfig:
        service:
          namespace: my-service-namespace
          name: my-service-name
          path: /my-path
          port: 1234
        caBundle: "Ci0tLS0tQk...<base64-encoded PEM bundle>...tLS0K"
...
# Deprecated in v1.16 in favor of apiextensions.k8s.io/v1
apiVersion: apiextensions.k8s.io/v1beta1
kind: CustomResourceDefinition
...
spec:
  ...
  conversion:
    strategy: Webhook
    webhookClientConfig:
      service:
        namespace: my-service-namespace
        name: my-service-name
        path: /my-path
        port: 1234
      caBundle: "Ci0tLS0tQk...<base64-encoded PEM bundle>...tLS0K"
...
Webhook request and response
Request
Webhooks are sent a POST request, with Content-Type: application/json,
with a ConversionReview API object in the apiextensions.k8s.io API group
serialized to JSON as the body.
Webhooks can specify what versions of ConversionReview objects they accept
with the conversionReviewVersions field in their CustomResourceDefinition:
apiVersion: apiextensions.k8s.io/v1
kind: CustomResourceDefinition
...
spec:
  ...
  conversion:
    strategy: Webhook
    webhook:
      conversionReviewVersions: ["v1", "v1beta1"]
      ...
conversionReviewVersions is a required field when creating
apiextensions.k8s.io/v1 custom resource definitions.
Webhooks are required to support at least one ConversionReview
version understood by the current and previous API server.
# Deprecated in v1.16 in favor of apiextensions.k8s.io/v1
apiVersion: apiextensions.k8s.io/v1beta1
kind: CustomResourceDefinition
...
spec:
  ...
  conversion:
    strategy: Webhook
    conversionReviewVersions: ["v1", "v1beta1"]
    ...
If no conversionReviewVersions are specified, the default when creating
apiextensions.k8s.io/v1beta1 custom resource definitions is v1beta1.
API servers send the first ConversionReview version in the conversionReviewVersions list they support.
If none of the versions in the list are supported by the API server, the custom resource definition will not be allowed to be created.
If an API server encounters a conversion webhook configuration that was previously created and does not support any of the ConversionReview
versions the API server knows how to send, attempts to call to the webhook will fail.
This example shows the data contained in an ConversionReview object
for a request to convert CronTab objects to example.com/v1:
{
  "apiVersion": "apiextensions.k8s.io/v1",
  "kind": "ConversionReview",
  "request": {
    # Random uid uniquely identifying this conversion call
    "uid": "705ab4f5-6393-11e8-b7cc-42010a800002",

    # The API group and version the objects should be converted to
    "desiredAPIVersion": "example.com/v1",

    # The list of objects to convert.
    # May contain one or more objects, in one or more versions.
    "objects": [
      {
        "kind": "CronTab",
        "apiVersion": "example.com/v1beta1",
        "metadata": {
          "creationTimestamp": "2019-09-04T14:03:02Z",
          "name": "local-crontab",
          "namespace": "default",
          "resourceVersion": "143",
          "uid": "3415a7fc-162b-4300-b5da-fd6083580d66"
        },
        "hostPort": "localhost:1234"
      },
      {
        "kind": "CronTab",
        "apiVersion": "example.com/v1beta1",
        "metadata": {
          "creationTimestamp": "2019-09-03T13:02:01Z",
          "name": "remote-crontab",
          "resourceVersion": "12893",
          "uid": "359a83ec-b575-460d-b553-d859cedde8a0"
        },
        "hostPort": "example.com:2345"
      }
    ]
  }
}
{
  # Deprecated in v1.16 in favor of apiextensions.k8s.io/v1
  "apiVersion": "apiextensions.k8s.io/v1beta1",
  "kind": "ConversionReview",
  "request": {
    # Random uid uniquely identifying this conversion call
    "uid": "705ab4f5-6393-11e8-b7cc-42010a800002",

    # The API group and version the objects should be converted to
    "desiredAPIVersion": "example.com/v1",

    # The list of objects to convert.
    # May contain one or more objects, in one or more versions.
    "objects": [
      {
        "kind": "CronTab",
        "apiVersion": "example.com/v1beta1",
        "metadata": {
          "creationTimestamp": "2019-09-04T14:03:02Z",
          "name": "local-crontab",
          "namespace": "default",
          "resourceVersion": "143",
          "uid": "3415a7fc-162b-4300-b5da-fd6083580d66"
        },
        "hostPort": "localhost:1234"
      },
      {
        "kind": "CronTab",
        "apiVersion": "example.com/v1beta1",
        "metadata": {
          "creationTimestamp": "2019-09-03T13:02:01Z",
          "name": "remote-crontab",
          "resourceVersion": "12893",
          "uid": "359a83ec-b575-460d-b553-d859cedde8a0"
        },
        "hostPort": "example.com:2345"
      }
    ]
  }
}
Response
Webhooks respond with a 200 HTTP status code, Content-Type: application/json,
and a body containing a ConversionReview object (in the same version they were sent),
with the response stanza populated, serialized to JSON.
If conversion succeeds, a webhook should return a response stanza containing the following fields:
uid, copied from therequest.uidsent to the webhookresult, set to{"status":"Success"}convertedObjects, containing all of the objects fromrequest.objects, converted torequest.desiredAPIVersion
Example of a minimal successful response from a webhook:
{
  "apiVersion": "apiextensions.k8s.io/v1",
  "kind": "ConversionReview",
  "response": {
    # must match <request.uid>
    "uid": "705ab4f5-6393-11e8-b7cc-42010a800002",
    "result": {
      "status": "Success"
    },
    # Objects must match the order of request.objects, and have apiVersion set to <request.desiredAPIVersion>.
    # kind, metadata.uid, metadata.name, and metadata.namespace fields must not be changed by the webhook.
    # metadata.labels and metadata.annotations fields may be changed by the webhook.
    # All other changes to metadata fields by the webhook are ignored.
    "convertedObjects": [
      {
        "kind": "CronTab",
        "apiVersion": "example.com/v1",
        "metadata": {
          "creationTimestamp": "2019-09-04T14:03:02Z",
          "name": "local-crontab",
          "namespace": "default",
          "resourceVersion": "143",
          "uid": "3415a7fc-162b-4300-b5da-fd6083580d66"
        },
        "host": "localhost",
        "port": "1234"
      },
      {
        "kind": "CronTab",
        "apiVersion": "example.com/v1",
        "metadata": {
          "creationTimestamp": "2019-09-03T13:02:01Z",
          "name": "remote-crontab",
          "resourceVersion": "12893",
          "uid": "359a83ec-b575-460d-b553-d859cedde8a0"
        },
        "host": "example.com",
        "port": "2345"
      }
    ]
  }
}
{
  # Deprecated in v1.16 in favor of apiextensions.k8s.io/v1
  "apiVersion": "apiextensions.k8s.io/v1beta1",
  "kind": "ConversionReview",
  "response": {
    # must match <request.uid>
    "uid": "705ab4f5-6393-11e8-b7cc-42010a800002",
    "result": {
      "status": "Failed"
    },
    # Objects must match the order of request.objects, and have apiVersion set to <request.desiredAPIVersion>.
    # kind, metadata.uid, metadata.name, and metadata.namespace fields must not be changed by the webhook.
    # metadata.labels and metadata.annotations fields may be changed by the webhook.
    # All other changes to metadata fields by the webhook are ignored.
    "convertedObjects": [
      {
        "kind": "CronTab",
        "apiVersion": "example.com/v1",
        "metadata": {
          "creationTimestamp": "2019-09-04T14:03:02Z",
          "name": "local-crontab",
          "namespace": "default",
          "resourceVersion": "143",
          "uid": "3415a7fc-162b-4300-b5da-fd6083580d66"
        },
        "host": "localhost",
        "port": "1234"
      },
      {
        "kind": "CronTab",
        "apiVersion": "example.com/v1",
        "metadata": {
          "creationTimestamp": "2019-09-03T13:02:01Z",
          "name": "remote-crontab",
          "resourceVersion": "12893",
          "uid": "359a83ec-b575-460d-b553-d859cedde8a0"
        },
        "host": "example.com",
        "port": "2345"
      }
    ]
  }
}
If conversion fails, a webhook should return a response stanza containing the following fields:
uid, copied from therequest.uidsent to the webhookresult, set to{"status":"Failed"}
Warning:
Failing conversion can disrupt read and write access to the custom resources, including the ability to update or delete the resources. Conversion failures should be avoided whenever possible, and should not be used to enforce validation constraints (use validation schemas or webhook admission instead).Example of a response from a webhook indicating a conversion request failed, with an optional message:
{
  "apiVersion": "apiextensions.k8s.io/v1",
  "kind": "ConversionReview",
  "response": {
    "uid": "<value from request.uid>",
    "result": {
      "status": "Failed",
      "message": "hostPort could not be parsed into a separate host and port"
    }
  }
}
{
  # Deprecated in v1.16 in favor of apiextensions.k8s.io/v1
  "apiVersion": "apiextensions.k8s.io/v1beta1",
  "kind": "ConversionReview",
  "response": {
    "uid": "<value from request.uid>",
    "result": {
      "status": "Failed",
      "message": "hostPort could not be parsed into a separate host and port"
    }
  }
}
Writing, reading, and updating versioned CustomResourceDefinition objects
When an object is written, it is stored at the version designated as the storage version at the time of the write. If the storage version changes, existing objects are never converted automatically. However, newly-created or updated objects are written at the new storage version. It is possible for an object to have been written at a version that is no longer served.
When you read an object, you specify the version as part of the path. You can request an object at any version that is currently served. If you specify a version that is different from the object's stored version, Kubernetes returns the object to you at the version you requested, but the stored object is not changed on disk.
What happens to the object that is being returned while serving the read
request depends on what is specified in the CRD's spec.conversion:
- if the default
strategyvalueNoneis specified, the only modifications to the object are changing theapiVersionstring and perhaps pruning unknown fields (depending on the configuration). Note that this is unlikely to lead to good results if the schemas differ between the storage and requested version. In particular, you should not use this strategy if the same data is represented in different fields between versions. - if webhook conversion is specified, then this mechanism controls the conversion.
If you update an existing object, it is rewritten at the version that is currently the storage version. This is the only way that objects can change from one version to another.
To illustrate this, consider the following hypothetical series of events:
- The storage version is
v1beta1. You create an object. It is stored at versionv1beta1 - You add version
v1to your CustomResourceDefinition and designate it as the storage version. Here the schemas forv1andv1beta1are identical, which is typically the case when promoting an API to stable in the Kubernetes ecosystem. - You read your object at version
v1beta1, then you read the object again at versionv1. Both returned objects are identical except for the apiVersion field. - You create a new object. It is stored at version
v1. You now have two objects, one of which is atv1beta1, and the other of which is atv1. - You update the first object. It is now stored at version
v1since that is the current storage version.
Previous storage versions
The API server records each version which has ever been marked as the storage
version in the status field storedVersions. Objects may have been stored
at any version that has ever been designated as a storage version. No objects
can exist in storage at a version that has never been a storage version.
Upgrade existing objects to a new stored version
When deprecating versions and dropping support, select a storage upgrade procedure.
Option 1: Use the Storage Version Migrator
- Run the storage Version migrator
- Remove the old version from the CustomResourceDefinition
status.storedVersionsfield.
Option 2: Manually upgrade the existing objects to a new stored version
The following is an example procedure to upgrade from v1beta1 to v1.
- Set
v1as the storage in the CustomResourceDefinition file and apply it using kubectl. ThestoredVersionsis nowv1beta1, v1. - Write an upgrade procedure to list all existing objects and write them with
the same content. This forces the backend to write objects in the current
storage version, which is
v1. - Remove
v1beta1from the CustomResourceDefinitionstatus.storedVersionsfield.
Note:
Here is an example of how to patch the status subresource for a CRD object using kubectl:
kubectl patch customresourcedefinitions <CRD_Name> --subresource='status' --type='merge' -p '{"status":{"storedVersions":["v1"]}}'
3 - Set up an Extension API Server
Setting up an extension API server to work with the aggregation layer allows the Kubernetes apiserver to be extended with additional APIs, which are not part of the core Kubernetes APIs.
Before you begin
You need to have a Kubernetes cluster, and the kubectl command-line tool must be configured to communicate with your cluster. It is recommended to run this tutorial on a cluster with at least two nodes that are not acting as control plane hosts. If you do not already have a cluster, you can create one by using minikube or you can use one of these Kubernetes playgrounds:
To check the version, enter kubectl version.
- You must configure the aggregation layer and enable the apiserver flags.
Set up an extension api-server to work with the aggregation layer
The following steps describe how to set up an extension-apiserver at a high level. These steps apply regardless if you're using YAML configs or using APIs. An attempt is made to specifically identify any differences between the two. For a concrete example of how they can be implemented using YAML configs, you can look at the sample-apiserver in the Kubernetes repo.
Alternatively, you can use an existing 3rd party solution, such as apiserver-builder, which should generate a skeleton and automate all of the following steps for you.
- Make sure the APIService API is enabled (check
--runtime-config). It should be on by default, unless it's been deliberately turned off in your cluster. - You may need to make an RBAC rule allowing you to add APIService objects, or get your cluster administrator to make one. (Since API extensions affect the entire cluster, it is not recommended to do testing/development/debug of an API extension in a live cluster.)
- Create the Kubernetes namespace you want to run your extension api-service in.
- Create/get a CA cert to be used to sign the server cert the extension api-server uses for HTTPS.
- Create a server cert/key for the api-server to use for HTTPS. This cert should be signed by the above CA. It should also have a CN of the Kube DNS name. This is derived from the Kubernetes service and be of the form
<service name>.<service name namespace>.svc - Create a Kubernetes secret with the server cert/key in your namespace.
- Create a Kubernetes deployment for the extension api-server and make sure you are loading the secret as a volume. It should contain a reference to a working image of your extension api-server. The deployment should also be in your namespace.
- Make sure that your extension-apiserver loads those certs from that volume and that they are used in the HTTPS handshake.
- Create a Kubernetes service account in your namespace.
- Create a Kubernetes cluster role for the operations you want to allow on your resources.
- Create a Kubernetes cluster role binding from the service account in your namespace to the cluster role you created.
- Create a Kubernetes cluster role binding from the service account in your namespace to the
system:auth-delegatorcluster role to delegate auth decisions to the Kubernetes core API server. - Create a Kubernetes role binding from the service account in your namespace to the
extension-apiserver-authentication-readerrole. This allows your extension api-server to access theextension-apiserver-authenticationconfigmap. - Create a Kubernetes apiservice. The CA cert above should be base64 encoded, stripped of new lines and used as the spec.caBundle in the apiservice. This should not be namespaced. If using the kube-aggregator API, only pass in the PEM encoded CA bundle because the base 64 encoding is done for you.
- Use kubectl to get your resource. When run, kubectl should return "No resources found.". This message indicates that everything worked but you currently have no objects of that resource type created.
What's next
- Walk through the steps to configure the API aggregation layer and enable the apiserver flags.
- For a high level overview, see Extending the Kubernetes API with the aggregation layer.
- Learn how to Extend the Kubernetes API using Custom Resource Definitions.
4 - Configure Multiple Schedulers
Kubernetes ships with a default scheduler that is described here. If the default scheduler does not suit your needs you can implement your own scheduler. Moreover, you can even run multiple schedulers simultaneously alongside the default scheduler and instruct Kubernetes what scheduler to use for each of your pods. Let's learn how to run multiple schedulers in Kubernetes with an example.
A detailed description of how to implement a scheduler is outside the scope of this document. Please refer to the kube-scheduler implementation in pkg/scheduler in the Kubernetes source directory for a canonical example.
Before you begin
You need to have a Kubernetes cluster, and the kubectl command-line tool must be configured to communicate with your cluster. It is recommended to run this tutorial on a cluster with at least two nodes that are not acting as control plane hosts. If you do not already have a cluster, you can create one by using minikube or you can use one of these Kubernetes playgrounds:
To check the version, enter kubectl version.
Package the scheduler
Package your scheduler binary into a container image. For the purposes of this example, you can use the default scheduler (kube-scheduler) as your second scheduler. Clone the Kubernetes source code from GitHub and build the source.
git clone https://github.com/kubernetes/kubernetes.git
cd kubernetes
make
Create a container image containing the kube-scheduler binary. Here is the Dockerfile
to build the image:
FROM busybox
ADD ./_output/local/bin/linux/amd64/kube-scheduler /usr/local/bin/kube-scheduler
Save the file as Dockerfile, build the image and push it to a registry. This example
pushes the image to
Google Container Registry (GCR).
For more details, please read the GCR
documentation. Alternatively
you can also use the docker hub. For more details
refer to the docker hub documentation.
docker build -t gcr.io/my-gcp-project/my-kube-scheduler:1.0 .     # The image name and the repository
gcloud docker -- push gcr.io/my-gcp-project/my-kube-scheduler:1.0 # used in here is just an example
Define a Kubernetes Deployment for the scheduler
Now that you have your scheduler in a container image, create a pod
configuration for it and run it in your Kubernetes cluster. But instead of creating a pod
directly in the cluster, you can use a Deployment
for this example. A Deployment manages a
Replica Set which in turn manages the pods,
thereby making the scheduler resilient to failures. Here is the deployment
config. Save it as my-scheduler.yaml:
apiVersion: v1
kind: ServiceAccount
metadata:
  name: my-scheduler
  namespace: kube-system
---
apiVersion: rbac.authorization.k8s.io/v1
kind: ClusterRoleBinding
metadata:
  name: my-scheduler-as-kube-scheduler
subjects:
- kind: ServiceAccount
  name: my-scheduler
  namespace: kube-system
roleRef:
  kind: ClusterRole
  name: system:kube-scheduler
  apiGroup: rbac.authorization.k8s.io
---
apiVersion: rbac.authorization.k8s.io/v1
kind: ClusterRoleBinding
metadata:
  name: my-scheduler-as-volume-scheduler
subjects:
- kind: ServiceAccount
  name: my-scheduler
  namespace: kube-system
roleRef:
  kind: ClusterRole
  name: system:volume-scheduler
  apiGroup: rbac.authorization.k8s.io
---
apiVersion: rbac.authorization.k8s.io/v1
kind: RoleBinding
metadata:
  name: my-scheduler-extension-apiserver-authentication-reader
  namespace: kube-system
roleRef:
  kind: Role
  name: extension-apiserver-authentication-reader
  apiGroup: rbac.authorization.k8s.io
subjects:
- kind: ServiceAccount
  name: my-scheduler
  namespace: kube-system
---
apiVersion: v1
kind: ConfigMap
metadata:
  name: my-scheduler-config
  namespace: kube-system
data:
  my-scheduler-config.yaml: |
    apiVersion: kubescheduler.config.k8s.io/v1
    kind: KubeSchedulerConfiguration
    profiles:
      - schedulerName: my-scheduler
    leaderElection:
      leaderElect: false
---
apiVersion: apps/v1
kind: Deployment
metadata:
  labels:
    component: scheduler
    tier: control-plane
  name: my-scheduler
  namespace: kube-system
spec:
  selector:
    matchLabels:
      component: scheduler
      tier: control-plane
  replicas: 1
  template:
    metadata:
      labels:
        component: scheduler
        tier: control-plane
        version: second
    spec:
      serviceAccountName: my-scheduler
      containers:
      - command:
        - /usr/local/bin/kube-scheduler
        - --config=/etc/kubernetes/my-scheduler/my-scheduler-config.yaml
        image: gcr.io/my-gcp-project/my-kube-scheduler:1.0
        livenessProbe:
          httpGet:
            path: /healthz
            port: 10259
            scheme: HTTPS
          initialDelaySeconds: 15
        name: kube-second-scheduler
        readinessProbe:
          httpGet:
            path: /healthz
            port: 10259
            scheme: HTTPS
        resources:
          requests:
            cpu: '0.1'
        securityContext:
          privileged: false
        volumeMounts:
          - name: config-volume
            mountPath: /etc/kubernetes/my-scheduler
      hostNetwork: false
      hostPID: false
      volumes:
        - name: config-volume
          configMap:
            name: my-scheduler-config
In the above manifest, you use a KubeSchedulerConfiguration
to customize the behavior of your scheduler implementation. This configuration has been passed to
the kube-scheduler during initialization with the --config option. The my-scheduler-config ConfigMap stores the configuration file. The Pod of themy-scheduler Deployment mounts the my-scheduler-config ConfigMap as a volume.
In the aforementioned Scheduler Configuration, your scheduler implementation is represented via a KubeSchedulerProfile.
Note:
To determine if a scheduler is responsible for scheduling a specific Pod, thespec.schedulerName field in a
PodTemplate or Pod manifest must match the schedulerName field of the KubeSchedulerProfile.
All schedulers running in the cluster must have unique names.Also, note that you create a dedicated service account my-scheduler and bind the ClusterRole
system:kube-scheduler to it so that it can acquire the same privileges as kube-scheduler.
Please see the
kube-scheduler documentation for
detailed description of other command line arguments and
Scheduler Configuration reference for
detailed description of other customizable kube-scheduler configurations.
Run the second scheduler in the cluster
In order to run your scheduler in a Kubernetes cluster, create the deployment specified in the config above in a Kubernetes cluster:
kubectl create -f my-scheduler.yaml
Verify that the scheduler pod is running:
kubectl get pods --namespace=kube-system
NAME                                           READY     STATUS    RESTARTS   AGE
....
my-scheduler-lnf4s-4744f                       1/1       Running   0          2m
...
You should see a "Running" my-scheduler pod, in addition to the default kube-scheduler pod in this list.
Enable leader election
To run multiple-scheduler with leader election enabled, you must do the following:
Update the following fields for the KubeSchedulerConfiguration in the my-scheduler-config ConfigMap in your YAML file:
leaderElection.leaderElecttotrueleaderElection.resourceNamespaceto<lock-object-namespace>leaderElection.resourceNameto<lock-object-name>
Note:
The control plane creates the lock objects for you, but the namespace must already exist. You can use thekube-system namespace.If RBAC is enabled on your cluster, you must update the system:kube-scheduler cluster role.
Add your scheduler name to the resourceNames of the rule applied for endpoints and leases resources, as in the following example:
kubectl edit clusterrole system:kube-scheduler
apiVersion: rbac.authorization.k8s.io/v1
kind: ClusterRole
metadata:
  annotations:
    rbac.authorization.kubernetes.io/autoupdate: "true"
  labels:
    kubernetes.io/bootstrapping: rbac-defaults
  name: system:kube-scheduler
rules:
  - apiGroups:
      - coordination.k8s.io
    resources:
      - leases
    verbs:
      - create
  - apiGroups:
      - coordination.k8s.io
    resourceNames:
      - kube-scheduler
      - my-scheduler
    resources:
      - leases
    verbs:
      - get
      - update
  - apiGroups:
      - ""
    resourceNames:
      - kube-scheduler
      - my-scheduler
    resources:
      - endpoints
    verbs:
      - delete
      - get
      - patch
      - update
Specify schedulers for pods
Now that your second scheduler is running, create some pods, and direct them to be scheduled by either the default scheduler or the one you deployed. In order to schedule a given pod using a specific scheduler, specify the name of the scheduler in that pod spec. Let's look at three examples.
Pod spec without any scheduler name
apiVersion: v1
kind: Pod
metadata:
  name: no-annotation
  labels:
    name: multischeduler-example
spec:
  containers:
  - name: pod-with-no-annotation-container
    image: registry.k8s.io/pause:3.8
When no scheduler name is supplied, the pod is automatically scheduled using the default-scheduler.
Save this file as
pod1.yamland submit it to the Kubernetes cluster.kubectl create -f pod1.yamlPod spec with
default-schedulerapiVersion: v1 kind: Pod metadata: name: annotation-default-scheduler labels: name: multischeduler-example spec: schedulerName: default-scheduler containers: - name: pod-with-default-annotation-container image: registry.k8s.io/pause:3.8A scheduler is specified by supplying the scheduler name as a value to
spec.schedulerName. In this case, we supply the name of the default scheduler which isdefault-scheduler.Save this file as
pod2.yamland submit it to the Kubernetes cluster.kubectl create -f pod2.yamlPod spec with
my-schedulerapiVersion: v1 kind: Pod metadata: name: annotation-second-scheduler labels: name: multischeduler-example spec: schedulerName: my-scheduler containers: - name: pod-with-second-annotation-container image: registry.k8s.io/pause:3.8In this case, we specify that this pod should be scheduled using the scheduler that we deployed -
my-scheduler. Note that the value ofspec.schedulerNameshould match the name supplied for the scheduler in theschedulerNamefield of the mappingKubeSchedulerProfile.Save this file as
pod3.yamland submit it to the Kubernetes cluster.kubectl create -f pod3.yamlVerify that all three pods are running.
kubectl get pods
Verifying that the pods were scheduled using the desired schedulers
In order to make it easier to work through these examples, we did not verify that the
pods were actually scheduled using the desired schedulers. We can verify that by
changing the order of pod and deployment config submissions above. If we submit all the
pod configs to a Kubernetes cluster before submitting the scheduler deployment config,
we see that the pod annotation-second-scheduler remains in "Pending" state forever
while the other two pods get scheduled. Once we submit the scheduler deployment config
and our new scheduler starts running, the annotation-second-scheduler pod gets
scheduled as well.
Alternatively, you can look at the "Scheduled" entries in the event logs to verify that the pods were scheduled by the desired schedulers.
kubectl get events
You can also use a custom scheduler configuration or a custom container image for the cluster's main scheduler by modifying its static pod manifest on the relevant control plane nodes.
5 - Use an HTTP Proxy to Access the Kubernetes API
This page shows how to use an HTTP proxy to access the Kubernetes API.
Before you begin
You need to have a Kubernetes cluster, and the kubectl command-line tool must be configured to communicate with your cluster. It is recommended to run this tutorial on a cluster with at least two nodes that are not acting as control plane hosts. If you do not already have a cluster, you can create one by using minikube or you can use one of these Kubernetes playgrounds:
To check the version, enter kubectl version.
If you do not already have an application running in your cluster, start a Hello world application by entering this command:
kubectl create deployment hello-app --image=gcr.io/google-samples/hello-app:2.0 --port=8080
Using kubectl to start a proxy server
This command starts a proxy to the Kubernetes API server:
kubectl proxy --port=8080
Exploring the Kubernetes API
When the proxy server is running, you can explore the API using curl, wget,
or a browser.
Get the API versions:
curl http://localhost:8080/api/
The output should look similar to this:
{
  "kind": "APIVersions",
  "versions": [
    "v1"
  ],
  "serverAddressByClientCIDRs": [
    {
      "clientCIDR": "0.0.0.0/0",
      "serverAddress": "10.0.2.15:8443"
    }
  ]
}
Get a list of pods:
curl http://localhost:8080/api/v1/namespaces/default/pods
The output should look similar to this:
{
  "kind": "PodList",
  "apiVersion": "v1",
  "metadata": {
    "resourceVersion": "33074"
  },
  "items": [
    {
      "metadata": {
        "name": "kubernetes-bootcamp-2321272333-ix8pt",
        "generateName": "kubernetes-bootcamp-2321272333-",
        "namespace": "default",
        "uid": "ba21457c-6b1d-11e6-85f7-1ef9f1dab92b",
        "resourceVersion": "33003",
        "creationTimestamp": "2016-08-25T23:43:30Z",
        "labels": {
          "pod-template-hash": "2321272333",
          "run": "kubernetes-bootcamp"
        },
        ...
}
What's next
Learn more about kubectl proxy.
6 - Use a SOCKS5 Proxy to Access the Kubernetes API
Kubernetes v1.24 [stable]This page shows how to use a SOCKS5 proxy to access the API of a remote Kubernetes cluster. This is useful when the cluster you want to access does not expose its API directly on the public internet.
Before you begin
You need to have a Kubernetes cluster, and the kubectl command-line tool must be configured to communicate with your cluster. It is recommended to run this tutorial on a cluster with at least two nodes that are not acting as control plane hosts. If you do not already have a cluster, you can create one by using minikube or you can use one of these Kubernetes playgrounds:
Your Kubernetes server must be at or later than version v1.24.To check the version, enter kubectl version.
You need SSH client software (the ssh tool), and an SSH service running on the remote server.
You must be able to log in to the SSH service on the remote server.
Task context
Note:
This example tunnels traffic using SSH, with the SSH client and server acting as a SOCKS proxy. You can instead use any other kind of SOCKS5 proxies.Figure 1 represents what you're going to achieve in this task.
- You have a client computer, referred to as local in the steps ahead, from where you're going to create requests to talk to the Kubernetes API.
- The Kubernetes server/API is hosted on a remote server.
- You will use SSH client and server software to create a secure SOCKS5 tunnel between the local and the remote server. The HTTPS traffic between the client and the Kubernetes API will flow over the SOCKS5 tunnel, which is itself tunnelled over SSH.
graph LR; subgraph local[Local client machine] client([client])-. localFigure 1. SOCKS5 tutorial components
traffic .-> local_ssh[Local SSH
SOCKS5 proxy]; end local_ssh[SSH
SOCKS5
proxy]-- SSH Tunnel -->sshd subgraph remote[Remote server] sshd[SSH
server]-- local traffic -->service1; end client([client])-. proxied HTTPs traffic
going through the proxy .->service1[Kubernetes API]; classDef plain fill:#ddd,stroke:#fff,stroke-width:4px,color:#000; classDef k8s fill:#326ce5,stroke:#fff,stroke-width:4px,color:#fff; classDef cluster fill:#fff,stroke:#bbb,stroke-width:2px,color:#326ce5; class ingress,service1,service2,pod1,pod2,pod3,pod4 k8s; class client plain; class cluster cluster;
Using ssh to create a SOCKS5 proxy
The following command starts a SOCKS5 proxy between your client machine and the remote SOCKS server:
# The SSH tunnel continues running in the foreground after you run this
ssh -D 1080 -q -N username@kubernetes-remote-server.example
The SOCKS5 proxy lets you connect to your cluster's API server based on the following configuration:
-D 1080: opens a SOCKS proxy on local port :1080.-q: quiet mode. Causes most warning and diagnostic messages to be suppressed.-N: Do not execute a remote command. Useful for just forwarding ports.username@kubernetes-remote-server.example: the remote SSH server behind which the Kubernetes cluster is running (eg: a bastion host).
Client configuration
To access the Kubernetes API server through the proxy you must instruct kubectl to send queries through
the SOCKS proxy we created earlier. Do this by either setting the appropriate environment variable,
or via the proxy-url attribute in the kubeconfig file. Using an environment variable:
export HTTPS_PROXY=socks5://localhost:1080
To always use this setting on a specific kubectl context, specify the proxy-url attribute in the relevant
cluster entry within the ~/.kube/config file. For example:
apiVersion: v1
clusters:
- cluster:
    certificate-authority-data: LRMEMMW2 # shortened for readability
    server: https://<API_SERVER_IP_ADDRESS>:6443  # the "Kubernetes API" server, in other words the IP address of kubernetes-remote-server.example
    proxy-url: socks5://localhost:1080   # the "SSH SOCKS5 proxy" in the diagram above
  name: default
contexts:
- context:
    cluster: default
    user: default
  name: default
current-context: default
kind: Config
preferences: {}
users:
- name: default
  user:
    client-certificate-data: LS0tLS1CR== # shortened for readability
    client-key-data: LS0tLS1CRUdJT=      # shortened for readability
Once you have created the tunnel via the ssh command mentioned earlier, and defined either the environment variable or
the proxy-url attribute, you can interact with your cluster through that proxy. For example:
kubectl get pods
NAMESPACE     NAME                                     READY   STATUS      RESTARTS   AGE
kube-system   coredns-85cb69466-klwq8                  1/1     Running     0          5m46s
Note:
- Before
kubectl1.24, mostkubectlcommands worked when using a socks proxy, exceptkubectl exec. kubectlsupports bothHTTPS_PROXYandhttps_proxyenvironment variables. These are used by other programs that support SOCKS, such ascurl. Therefore in some cases it will be better to define the environment variable on the command line:HTTPS_PROXY=socks5://localhost:1080 kubectl get pods- When using
proxy-url, the proxy is used only for the relevantkubectlcontext, whereas the environment variable will affect all contexts. - The k8s API server hostname can be further protected from DNS leakage by using the
socks5hprotocol name instead of the more commonly knownsocks5protocol shown above. In this case,kubectlwill ask the proxy server (such as an ssh bastion) to resolve the k8s API server domain name, instead of resolving it on the system runningkubectl. Note also that withsocks5h, a k8s API server URL likehttps://localhost:6443/apidoes not refer to your local client computer. Instead, it refers tolocalhostas known on the proxy server (eg the ssh bastion).
Clean up
Stop the ssh port-forwarding process by pressing CTRL+C on the terminal where it is running.
Type unset https_proxy in a terminal to stop forwarding http traffic through the proxy.
Further reading
7 - Set up Konnectivity service
The Konnectivity service provides a TCP level proxy for the control plane to cluster communication.
Before you begin
You need to have a Kubernetes cluster, and the kubectl command-line tool must be configured to communicate with your cluster. It is recommended to run this tutorial on a cluster with at least two nodes that are not acting as control plane hosts. If you do not already have a cluster, you can create one by using minikube.
Configure the Konnectivity service
The following steps require an egress configuration, for example:
apiVersion: apiserver.k8s.io/v1beta1
kind: EgressSelectorConfiguration
egressSelections:
# Since we want to control the egress traffic to the cluster, we use the
# "cluster" as the name. Other supported values are "etcd", and "controlplane".
- name: cluster
  connection:
    # This controls the protocol between the API Server and the Konnectivity
    # server. Supported values are "GRPC" and "HTTPConnect". There is no
    # end user visible difference between the two modes. You need to set the
    # Konnectivity server to work in the same mode.
    proxyProtocol: GRPC
    transport:
      # This controls what transport the API Server uses to communicate with the
      # Konnectivity server. UDS is recommended if the Konnectivity server
      # locates on the same machine as the API Server. You need to configure the
      # Konnectivity server to listen on the same UDS socket.
      # The other supported transport is "tcp". You will need to set up TLS
      # config to secure the TCP transport.
      uds:
        udsName: /etc/kubernetes/konnectivity-server/konnectivity-server.socket
You need to configure the API Server to use the Konnectivity service and direct the network traffic to the cluster nodes:
- Make sure that Service Account Token Volume Projection feature enabled in your cluster. It is enabled by default since Kubernetes v1.20.
- Create an egress configuration file such as
admin/konnectivity/egress-selector-configuration.yaml. - Set the
--egress-selector-config-fileflag of the API Server to the path of your API Server egress configuration file. - If you use UDS connection, add volumes config to the kube-apiserver:
spec:
  containers:
    volumeMounts:
    - name: konnectivity-uds
      mountPath: /etc/kubernetes/konnectivity-server
      readOnly: false
  volumes:
  - name: konnectivity-uds
    hostPath:
      path: /etc/kubernetes/konnectivity-server
      type: DirectoryOrCreate
Generate or obtain a certificate and kubeconfig for konnectivity-server.
For example, you can use the OpenSSL command line tool to issue a X.509 certificate,
using the cluster CA certificate /etc/kubernetes/pki/ca.crt from a control-plane host.
openssl req -subj "/CN=system:konnectivity-server" -new -newkey rsa:2048 -noenc -out konnectivity.csr -keyout konnectivity.key
openssl x509 -req -in konnectivity.csr -CA /etc/kubernetes/pki/ca.crt -CAkey /etc/kubernetes/pki/ca.key -CAcreateserial -out konnectivity.crt -days 375 -sha256
SERVER=$(kubectl config view -o jsonpath='{.clusters..server}')
kubectl --kubeconfig /etc/kubernetes/konnectivity-server.conf config set-credentials system:konnectivity-server --client-certificate konnectivity.crt --client-key konnectivity.key --embed-certs=true
kubectl --kubeconfig /etc/kubernetes/konnectivity-server.conf config set-cluster kubernetes --server "$SERVER" --certificate-authority /etc/kubernetes/pki/ca.crt --embed-certs=true
kubectl --kubeconfig /etc/kubernetes/konnectivity-server.conf config set-context system:konnectivity-server@kubernetes --cluster kubernetes --user system:konnectivity-server
kubectl --kubeconfig /etc/kubernetes/konnectivity-server.conf config use-context system:konnectivity-server@kubernetes
rm -f konnectivity.crt konnectivity.key konnectivity.csr
Next, you need to deploy the Konnectivity server and agents. kubernetes-sigs/apiserver-network-proxy is a reference implementation.
Deploy the Konnectivity server on your control plane node. The provided
konnectivity-server.yaml manifest assumes
that the Kubernetes components are deployed as a static Pod in your cluster. If not, you can deploy the Konnectivity
server as a DaemonSet.
apiVersion: v1
kind: Pod
metadata:
  name: konnectivity-server
  namespace: kube-system
spec:
  priorityClassName: system-cluster-critical
  hostNetwork: true
  containers:
  - name: konnectivity-server-container
    image: registry.k8s.io/kas-network-proxy/proxy-server:v0.0.37
    command: ["/proxy-server"]
    args: [
            "--logtostderr=true",
            # This needs to be consistent with the value set in egressSelectorConfiguration.
            "--uds-name=/etc/kubernetes/konnectivity-server/konnectivity-server.socket",
            "--delete-existing-uds-file",
            # The following two lines assume the Konnectivity server is
            # deployed on the same machine as the apiserver, and the certs and
            # key of the API Server are at the specified location.
            "--cluster-cert=/etc/kubernetes/pki/apiserver.crt",
            "--cluster-key=/etc/kubernetes/pki/apiserver.key",
            # This needs to be consistent with the value set in egressSelectorConfiguration.
            "--mode=grpc",
            "--server-port=0",
            "--agent-port=8132",
            "--admin-port=8133",
            "--health-port=8134",
            "--agent-namespace=kube-system",
            "--agent-service-account=konnectivity-agent",
            "--kubeconfig=/etc/kubernetes/konnectivity-server.conf",
            "--authentication-audience=system:konnectivity-server"
            ]
    livenessProbe:
      httpGet:
        scheme: HTTP
        host: 127.0.0.1
        port: 8134
        path: /healthz
      initialDelaySeconds: 30
      timeoutSeconds: 60
    ports:
    - name: agentport
      containerPort: 8132
      hostPort: 8132
    - name: adminport
      containerPort: 8133
      hostPort: 8133
    - name: healthport
      containerPort: 8134
      hostPort: 8134
    volumeMounts:
    - name: k8s-certs
      mountPath: /etc/kubernetes/pki
      readOnly: true
    - name: kubeconfig
      mountPath: /etc/kubernetes/konnectivity-server.conf
      readOnly: true
    - name: konnectivity-uds
      mountPath: /etc/kubernetes/konnectivity-server
      readOnly: false
  volumes:
  - name: k8s-certs
    hostPath:
      path: /etc/kubernetes/pki
  - name: kubeconfig
    hostPath:
      path: /etc/kubernetes/konnectivity-server.conf
      type: FileOrCreate
  - name: konnectivity-uds
    hostPath:
      path: /etc/kubernetes/konnectivity-server
      type: DirectoryOrCreate
Then deploy the Konnectivity agents in your cluster:
apiVersion: apps/v1
# Alternatively, you can deploy the agents as Deployments. It is not necessary
# to have an agent on each node.
kind: DaemonSet
metadata:
  labels:
    addonmanager.kubernetes.io/mode: Reconcile
    k8s-app: konnectivity-agent
  namespace: kube-system
  name: konnectivity-agent
spec:
  selector:
    matchLabels:
      k8s-app: konnectivity-agent
  template:
    metadata:
      labels:
        k8s-app: konnectivity-agent
    spec:
      priorityClassName: system-cluster-critical
      tolerations:
        - key: "CriticalAddonsOnly"
          operator: "Exists"
      containers:
        - image: us.gcr.io/k8s-artifacts-prod/kas-network-proxy/proxy-agent:v0.0.37
          name: konnectivity-agent
          command: ["/proxy-agent"]
          args: [
                  "--logtostderr=true",
                  "--ca-cert=/var/run/secrets/kubernetes.io/serviceaccount/ca.crt",
                  # Since the konnectivity server runs with hostNetwork=true,
                  # this is the IP address of the master machine.
                  "--proxy-server-host=35.225.206.7",
                  "--proxy-server-port=8132",
                  "--admin-server-port=8133",
                  "--health-server-port=8134",
                  "--service-account-token-path=/var/run/secrets/tokens/konnectivity-agent-token"
                  ]
          volumeMounts:
            - mountPath: /var/run/secrets/tokens
              name: konnectivity-agent-token
          livenessProbe:
            httpGet:
              port: 8134
              path: /healthz
            initialDelaySeconds: 15
            timeoutSeconds: 15
      serviceAccountName: konnectivity-agent
      volumes:
        - name: konnectivity-agent-token
          projected:
            sources:
              - serviceAccountToken:
                  path: konnectivity-agent-token
                  audience: system:konnectivity-server
Last, if RBAC is enabled in your cluster, create the relevant RBAC rules:
apiVersion: rbac.authorization.k8s.io/v1
kind: ClusterRoleBinding
metadata:
  name: system:konnectivity-server
  labels:
    kubernetes.io/cluster-service: "true"
    addonmanager.kubernetes.io/mode: Reconcile
roleRef:
  apiGroup: rbac.authorization.k8s.io
  kind: ClusterRole
  name: system:auth-delegator
subjects:
  - apiGroup: rbac.authorization.k8s.io
    kind: User
    name: system:konnectivity-server
---
apiVersion: v1
kind: ServiceAccount
metadata:
  name: konnectivity-agent
  namespace: kube-system
  labels:
    kubernetes.io/cluster-service: "true"
    addonmanager.kubernetes.io/mode: Reconcile